rear lights FIAT DUCATO 2010 Owner handbook (in English)
[x] Cancel search | Manufacturer: FIAT, Model Year: 2010, Model line: DUCATO, Model: FIAT DUCATO 2010Pages: 286, PDF Size: 12.53 MB
Page 62 of 286
61
KNOWING
YOUR CAR
SAFETY
STARTING
AND
DRIVING
WARNING
LIGHTS AND
MESSAGES
IN AN
EMERGENCY
MAINTENANCE
AND CARE
TECHNICAL
SPECIFICATIONS
INDEX
E System off button.
F Compressor enabling/disabling button.
G Air recirculation control button.
H Fan speed increase/decrease control buttons.
I Temperature increase/decrease control knob.
USING THE CLIMATE CONTROL SYSTEM
The system can be started in different ways, but it is
advisable to start by pressing the AUTO button and
then turning the knob to set the temperature required
on the display. The system will start running
automatically in this way and the set temperature will be
reached as quickly as possible. The system will adjust
the temperature, the quantity and the distribution of the
air introduced into the passenger compartment and, by
managing the recirculation function, the activation of the
compressor. During fully automatic operation, the only
manual intervention required is the possible activation
of the following functions:
❒Òair recirculation, to keep it always on or off;
❒Zto speed up demisting/defrosting of the front
windows, rear window and door mirrors.During fully automatic system operation, you can change
the set temperature, air distribution and fan speed at
any time by using the relevant buttons or knobs: the
system will automatically change its settings to adjust to
the new requirements. During fully automatic operation
(FULL AUTO), the word FULL will disappear if the air
distribution and/or flow rate and/or engagement of the
compressor and/or recirculation settings are changed.
In this way, the functions will switch from automatic to
manual control until the AUTO button is pressed again.
With one or more functions turned on manually, the
adjustment of the intake air temperature continues to
be managed automatically, except with the compressor
switched off: if this is the case, the temperature of the
air introduced into the passenger compartment cannot
be lower than that of the outside air.
CONTROLS
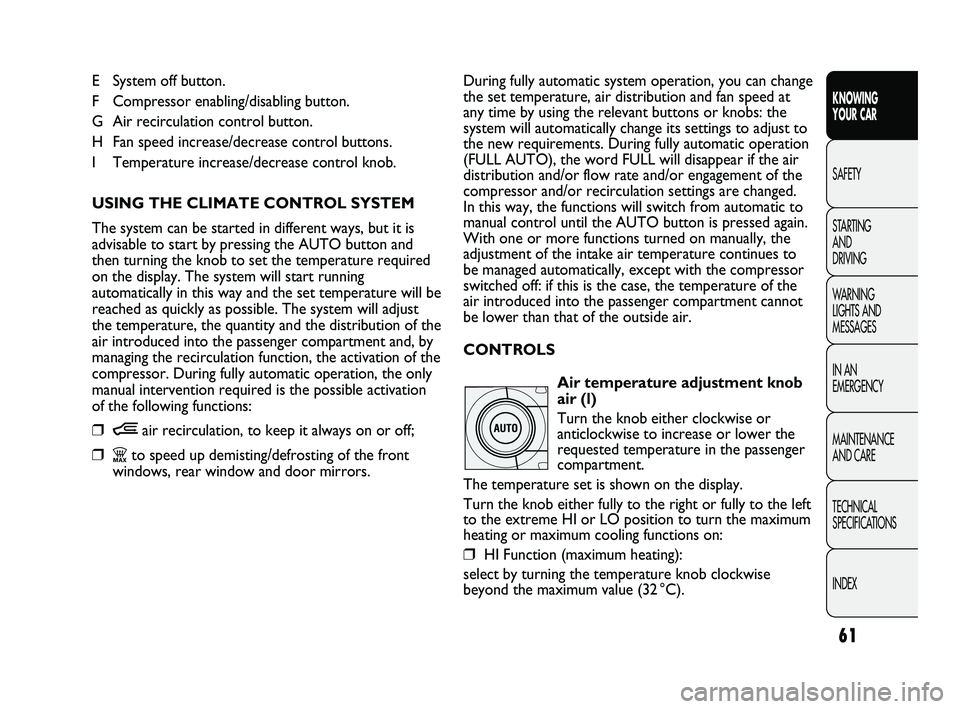
Air temperature adjustment knob
air (l)
Turn the knob either clockwise or
anticlockwise to increase or lower the
requested temperature in the passenger
compartment.
The temperature set is shown on the display.
Turn the knob either fully to the right or fully to the left
to the extreme HI or LO position to turn the maximum
heating or maximum cooling functions on:
❒HI Function (maximum heating):
select by turning the temperature knob clockwise
beyond the maximum value (32 °C).
037-128 DUCATO LUM EN 7ed 6/21/10 2:10 PM Page 61
Page 63 of 286
62
KNOWING
YOUR CAR
SAFETY
STARTING
AND
DRIVING
WARNING
LIGHTS AND
MESSAGES
IN AN
EMERGENCY
MAINTENANCE
AND CARE
TECHNICAL
SPECIFICATIONS
INDEX
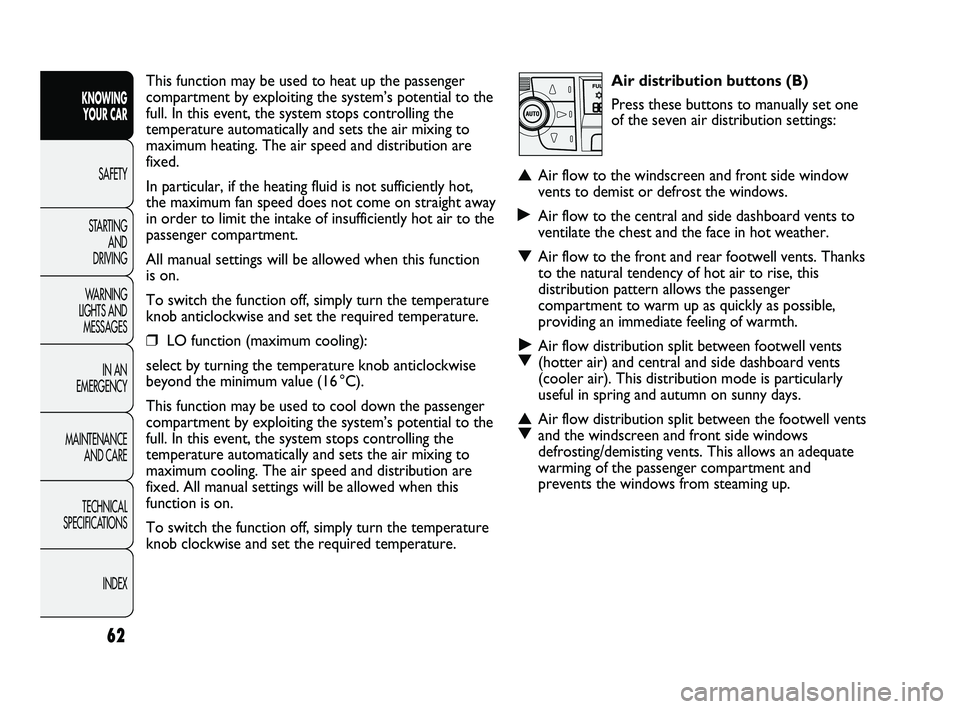
Air distribution buttons (B)
Press these buttons to manually set one
of the seven air distribution settings:
▲Air flow to the windscreen and front side window
vents to demist or defrost the windows.
˙Air flow to the central and side dashboard vents to
ventilate the chest and the face in hot weather.
▼Air flow to the front and rear footwell vents. Thanks
to the natural tendency of hot air to rise, this
distribution pattern allows the passenger
compartment to warm up as quickly as possible,
providing an immediate feeling of warmth.
˙
▼Air flow distribution split between footwell vents
(hotter air) and central and side dashboard vents
(cooler air). This distribution mode is particularly
useful in spring and autumn on sunny days.
▲
▼Air flow distribution split between the footwell vents
and the windscreen and front side windows
defrosting/demisting vents. This allows an adequate
warming of the passenger compartment and
prevents the windows from steaming up.
This function may be used to heat up the passenger
compartment by exploiting the system’s potential to the
full. In this event, the system stops controlling the
temperature automatically and sets the air mixing to
maximum heating. The air speed and distribution are
fixed.
In particular, if the heating fluid is not sufficiently hot,
the maximum fan speed does not come on straight away
in order to limit the intake of insufficiently hot air to the
passenger compartment.
All manual settings will be allowed when this function
is on.
To switch the function off, simply turn the temperature
knob anticlockwise and set the required temperature.
❒LO function (maximum cooling):
select by turning the temperature knob anticlockwise
beyond the minimum value (16 °C).
This function may be used to cool down the passenger
compartment by exploiting the system’s potential to the
full. In this event, the system stops controlling the
temperature automatically and sets the air mixing to
maximum cooling. The air speed and distribution are
fixed. All manual settings will be allowed when this
function is on.
To switch the function off, simply turn the temperature
knob clockwise and set the required temperature.
037-128 DUCATO LUM EN 7ed 6/21/10 2:10 PM Page 62
Page 66 of 286

65
KNOWING
YOUR CAR
SAFETY
STARTING
AND
DRIVING
WARNING
LIGHTS AND
MESSAGES
IN AN
EMERGENCY
MAINTENANCE
AND CARE
TECHNICAL
SPECIFICATIONS
INDEX
IMPORTANT With the compressor off, it is not
possible to introduce air into the passenger
compartment at a temperature lower than that of the
outside air. In certain weather conditions, the windows
could mist up rapidly due to the non-dehumidified air.
The system remembers that the compressor has been
switched off, even after the engine has stopped.
To restore automatic compressor activation control,
press the √button again (in this case, the system will
work only as a heater) or press the AUTO button.
With the compressor switched off, if the outside
temperature is higher than the one set, the system is
not capable of satisfying this request. This is signalled by
the target temperature flashing, after which the word
AUTO goes out.
With the climate control compressor off, the fan speed
can be set to zero manually (no bar shown).
With the compressor enabled and the engine started,
the fan speed may be reduced to the minimum setting
(only one bar shown).
Button for rapid window demisting/
defrosting (D)
When this button is pressed, the climate
control automatically activates all the
functions necessary to speed up the
demising/defrosting of the windscreen
and the side windows:❒turns on the climate control compressor when
weather conditions are suitable;
❒air recirculation switching-off;
❒sets the maximum temperature for the HI air in both
zones;
❒sets the fan speed set according to the engine
coolant temperature to limit the flow of air that is
insufficiently warm to demist the windows;
❒directs the air flow to the windscreen and front side
windows vents;
❒switches on the heated rear window.
IMPORTANT The rapid demisting/defrosting function
for the windows remains on for about 3 minutes from
when the engine coolant reaches the appropriate
temperature for a rapid demisting of the windows.
When this function is active, the LED on the
corresponding button and the one on the heated rear
window button switch on. The message FULL AUTO
goes off on the display.
You can only adjust the fan speed and switch off the
heated rear windscreen manually when this function is
active.
To restore the operating conditions, prior to activation,
simply press button B, air recirculation button G, the
compressor button F or the
AUTO button A.
037-128 DUCATO LUM EN 7ed 6/21/10 2:10 PM Page 65
Page 67 of 286

66
KNOWING
YOUR CAR
SAFETY
STARTING
AND
DRIVING
WARNING
LIGHTS AND
MESSAGES
IN AN
EMERGENCY
MAINTENANCE
AND CARE
TECHNICAL
SPECIFICATIONS
INDEX
IMPORTANT To ensure rapid demisting/defrosting,
if there is an additional heater/air conditioner (under the
front or rear seat on Panorama and Combi versions),
if activated, deactivate it by pressing button F (LED off)
located on the control panel fig. 60.
Switching off the system OFF (E)
The climate control system is switched
off by pressing button E and
the display switches off as a result.
The following climate control conditions will be present
when the system is off:
❒display off;
❒set temperature not shown;
❒air recirculation on, passenger compartment isolated
from the outside (recirculation LED on);
❒air conditioner compressor off;
❒fan off.
Press the AUTO button to switch the climate control
system back on in full automatic mode.
F0N0185mfig. 60
ADDITIONAL HEATER
(for versions/markets where provided)
On some versions, an additional heater is also present
beneath the driver’s seat. The fan for this heater is
operated by means of the button F located on the
control panel fig. 60.
037-128 DUCATO LUM EN 7ed 6/21/10 2:10 PM Page 66
Page 73 of 286

72
KNOWING
YOUR CAR
SAFETY
STARTING
AND
DRIVING
WARNING
LIGHTS AND
MESSAGES
IN AN
EMERGENCY
MAINTENANCE
AND CARE
TECHNICAL
SPECIFICATIONS
INDEX
IMPORTANT Before switching the device on, check
that the fuel level is higher than the reserve level.
Otherwise the device could lock and require the
assistance of a Fiat Dealership.
❒Always turn off the heater when refuelling and near
service stations to avoid the risk of explosion or fire
hazards.
❒Do not park the vehicle on inflammable material
such as paper, grass or dry leaves: fire hazard!
❒The temperature near the heater should not exceed
120 °C (e.g. during stove painting in a body shop).
The electronic control unit components may be
damaged at higher temperatures.
❒Whilst the heater is operating with the engine
switched off, it absorbs energy from the battery; the
engine should therefore be left running for a while to
make sure that the battery is properly recharged.
❒To check the coolant level, follow the instructions in
the “Vehicle maintenance” chapter in the “Engine
coolant system fluid” paragraph. The water in the
heating circuit must contain a minimum percentage
of 10% antifreeze.
❒For maintenance and repairs, only contact Fiat
Dealerships and only use genuine spare parts.
F0N0233mfig. 67
MAINTENANCE
Have the additional heater checked regularly at a Fiat
Dealership (and always at the start of every winter).
This will guarantee safe and economic operation of the
heater as well as a long duration.
ADDITIONAL REAR HEATING
(Panorama and Combi)
(for versions/markets, where provided)
The Panorama and Combi versions have a main heating
system plus an additional one (on request) with the
controls in the roof lining above the second row of
seats, fig. 67.
037-128 DUCATO LUM EN 7ed 6/21/10 2:10 PM Page 72
Page 74 of 286

73
KNOWING
YOUR CAR
SAFETY
STARTING
AND
DRIVING
WARNING
LIGHTS AND
MESSAGES
IN AN
EMERGENCY
MAINTENANCE
AND CARE
TECHNICAL
SPECIFICATIONS
INDEX
Operation must be enabled using the button F-fig. 68 in
the control panel.
❒Turn the knob D to the maximum cold position (ring
nut at blue sector) and air at ambient temperature
will come out of the rear footwell vents (located
under the seats in the 2
nd–3rdrow for Panorama
versions and the grille on the left wheel arch side for
Combi versions);
❒Turn the knob D to the maximum heating position
(ring nut at red sector) and warm air will emerge
(with the engine warmed up), from the rear footwell
outlets (located under the seats in the 2
nd–3rdrow
for Panorama versions and the grille on the left wheel
arch side for Combi versions).
F0N0185mfig. 68
ADDITIONAL REAR CLIMATE CONTROL
(Panorama and Combi)
(for versions/markets, where provided)
The Panorama and Combi versions are equipped with
a main heating/air conditioning system plus an additional
system (available on request) with controls in the roof
lining above the second row of seats, fig. 67.
Button F-fig. 68 in the control panel must be enabled for
operation; the air conditioning only works if the main air
conditioner is on.
❒When the knob D is placed in the fully cold position
(ring nut in blue sector) cold air comes out of the
vents in the ceiling.
❒Turn the knob D to the maximum heating position
(ring nut at red sector) and warm air will emerge
(with the engine warmed up), from the rear footwell
outlets (located under the seats in the 2
nd–3rdrow
for Panorama versions and the grille on the left
wheel arch side for Combi versions).
❒When the knob D is in an intermediate position, air
will be distributed between the vents in the roof and
the rear footwell outlets to alter the temperature.
IMPORTANT If the compressor on the main air
conditioner control is turned on (operation of button
E), even if the additional air conditioner fan is in position
0, the 1
stspeed will automatically be activated to
prevent ice formation, with possible damage to the
component.
037-128 DUCATO LUM EN 7ed 6/21/10 2:10 PM Page 73
Page 80 of 286
79
KNOWING
YOUR CAR
SAFETY
STARTING
AND
DRIVING
WARNING
LIGHTS AND
MESSAGES
IN AN
EMERGENCY
MAINTENANCE
AND CARE
TECHNICAL
SPECIFICATIONS
INDEX
Deactivation fig. 77
Move the lever from position B or turn the ignition key
to OFF. The next time the vehicle is started (ignition
key in ON position), the sensor is not reactivated even
if the lever is still in position B. To activate the sensor,
move the lever to position A or C and then back to
position B or turn the ring nut for adjusting the
sensitivity. Rain sensor activation will be indicated by at
least one wiper “stroke” even if the windscreen is dry.
The rain sensor is capable of recognising the difference
between day and night and making the necessary
adjustments automatically. RAIN SENSOR
(for versions/markets where provided)
The rain sensor is located behind the rear view mirror
in contact with the windscreen and has the purpose of
automatically adjusting the frequency of the windscreen
wiper strokes depending on the intensity of the rain
during intermittent operation.
IMPORTANT Keep the glass in the sensor area clean.
Activation fig. 77
Move the right lever down by one click (position B).
The activation of the sensor is signalled by a “stroke” to
show that the command has been acquired.
Turn the control F to increase the rain sensor
sensitivity.
The increasing of the rain sensor sensitivity is signalled
by a “stroke” to show that the command has been
acquired.
If the windscreen washer is used with the rain sensor
activated, the normal washing cycle is performed, after
which the rain sensor resumes its normal automatic
operation.HEADLIGHT WASHERS
(for versions/markets where provided)
The headlight washers are “retractable”, i.e.: they are
located inside the front bumper and they are activated
when (with dipped beams on) the windscreen washer is
operated.
IMPORTANT Check the correct operation and
cleanliness of the jets at regular intervals.
Streaks of water may cause unnecessary
blade movements.
WARNING
037-128 DUCATO LUM EN 7ed 6/21/10 2:10 PM Page 79
Page 84 of 286

83
KNOWING
YOUR CAR
SAFETY
STARTING
AND
DRIVING
WARNING
LIGHTS AND
MESSAGES
IN AN
EMERGENCY
MAINTENANCE
AND CARE
TECHNICAL
SPECIFICATIONS
INDEX
❒when opening one of the side doors for about
3 minutes;
❒when one of the doors is closed for a period of
about 10 seconds.
The timed delay period ends automatically when the
doors are locked.
LOAD COMPARTMENT REAR COURTESY
LIGHT fig. 81
This is located above the rear door. Press the cover at
the point shown in the figure to turn it on. IMPORTANT Before getting out of the car, make sure
both switches are in the middle position; when the
doors are closed, the lights switch off preventing the
battery from being run down.
In any case, if the switch is left in on position, the
courtesy light switches off automatically 15 minutes
after the engine switching off.
Courtesy light timing
On some versions, to facilitate getting in/out of the
vehicle at night or with poor lighting, 2 different timed
switching on modes are available.
TIMED OPERATION FOR GETTING INTO
THE VEHICLE
The courtesy lights switch on according to the following
modes:
❒for about 10 seconds when unlocking the front
doors;
❒for about 3 minutes when opening one of the side
doors;
❒for about 10 seconds when closing the doors.
The timed period is interrupted when the ignition is
turned to “MAR-ON“.
TIMED OPERATION FOR GETTING OUT OF THE
VEHICLE
After removing the key from the ignition, the courtesy
lights switch on according to the following modes:
❒within 2 minutes from turning the engine off for
about 10 seconds;
F0N0042mfig. 81
037-128 DUCATO LUM EN 7ed 6/21/10 2:10 PM Page 83
Page 87 of 286

86
KNOWING
YOUR CAR
SAFETY
STARTING
AND
DRIVING
WARNING
LIGHTS AND
MESSAGES
IN AN
EMERGENCY
MAINTENANCE
AND CARE
TECHNICAL
SPECIFICATIONS
INDEX
F0N0046mfig. 86
F0N0043mfig. 87
PARKING LIGHTS
These lights can only be turned on with ignition key in
the STOP position or removed, by turning the control
on the left lever first to
Oand then to position 6or
2. The warning light 3on the instrument panel
comes on.
HEATED REAR WINDSCREEN fig. 87
(for versions/markets where provided)
Press button A to turn this function on. It will turn off
automatically after about 20 minutes.
BATTERY DISCONNECTION FUNCTION
(DISCONNECT SWITCH)
(for versions/markets where provided)
The battery disconnection function is enabled with the
ignition key in the BATT position, as illustrated on the
dedicated plate located in the area illustrated in fig. 88.
To turn the ignition key to the BATT position, press the
button A (red) fig. 89. The battery will be disconnected,
by interrupting the earth lead, about 45 seconds after
the key is turned to the BATT position.
This 45 second period is necessary to:
❒allow the driver to get out of the vehicle and lock
the doors using the remote control;
❒guarantee that all the vehicle electrical systems have
been deactivated.
With the battery disconnected, access to the vehicle will
only be possible by unlocking the driver’s door using the
mechanical lock. REAR FOG LAMPS fig. 86
These lights come on, with the dipped headlights on or
with the side lights and fog lights on (for versions/markets
where provided) by pressing the button 4. The warning
light 4in the instrument panel will come on. Press the
button again to turn the lights off, or turn off the dipped
beams and/or the front fog lights (where provided). The
use of rear fog lamps is governed by the Highway Code of
the country you are in. Comply with legal requirements.
037-128 DUCATO LUM EN 7ed 6/21/10 2:10 PM Page 86
Page 94 of 286

93
KNOWING
YOUR CAR
SAFETY
STARTING
AND
DRIVING
WARNING
LIGHTS AND
MESSAGES
IN AN
EMERGENCY
MAINTENANCE
AND CARE
TECHNICAL
SPECIFICATIONS
INDEX
REAR PARTITION fig. 101
The vehicle may be equipped with a solid rear partition
or with a sliding glass partition.
To open/close the sliding glass partition use the knob A.
Certain versions are equipped with a protective grille on
the glass partition inside the load compartment.
F0N0218mfig. 101
CUP HOLDER – CAN HOLDER fig. 102
The cup – can holder is located in the middle of the
dashboard.
F0N0054mfig. 102
037-128 DUCATO LUM EN 7ed 6/21/10 2:10 PM Page 93