headlamp FIAT DUCATO 2012 Owner handbook (in English)
[x] Cancel search | Manufacturer: FIAT, Model Year: 2012, Model line: DUCATO, Model: FIAT DUCATO 2012Pages: 287, PDF Size: 4.5 MB
Page 7 of 287
3
KNOWING
YOUR CAR
SAFETY
STARTING
AND
DRIVING
WARNING
LIGHTS AND
MESSAGES
IN AN
EMERGENCY
MAINTENANCE
AND CARE
TECHNICAL
SPECIFICATIONS
INDEX
KNOWING YOUR CAR
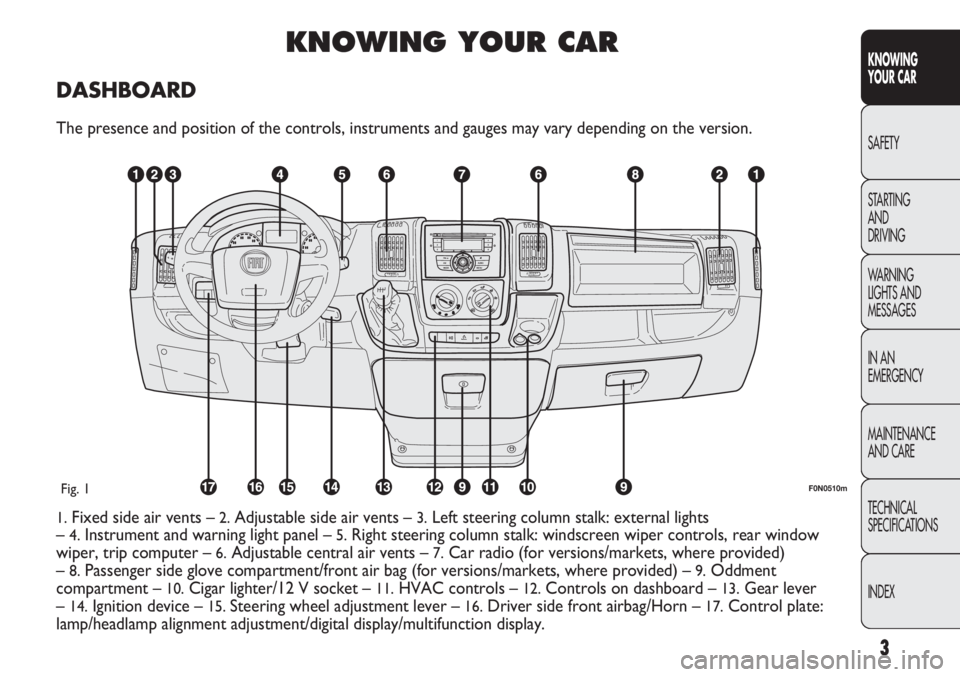
DASHBOARD
The presence and position of the controls, instruments and gauges may vary depending on the version.
1.Fixed side air vents –2.Adjustable side air vents – 3.Left steering column stalk: external lights
–
4.Instrument and warning light panel – 5.Right steering column stalk: windscreen wiper controls, rear window
wiper, trip computer –
6.Adjustable central air vents – 7.Car radio (for versions/markets, where provided)
–
8.Passenger side glove compartment/front air bag (for versions/markets, where provided) – 9.Oddment
compartment –
10.Cigar lighter/12 V socket – 11.HVAC controls – 12.Controls on dashboard – 13.Gear lever
–
14.Ignition device – 15. Steering wheel adjustment lever – 16.Driver side front airbag/Horn – 17.Control plate:
lamp/headlamp alignment adjustment/digital display/multifunction display.
F0N0510mFig. 1
Page 22 of 287
F0N0519mfig. 15F0N0017mfig. 16
NOTE When opening one of the front doors, the
display will turn on and show for a few seconds the
clock and the kilometres or miles covered.
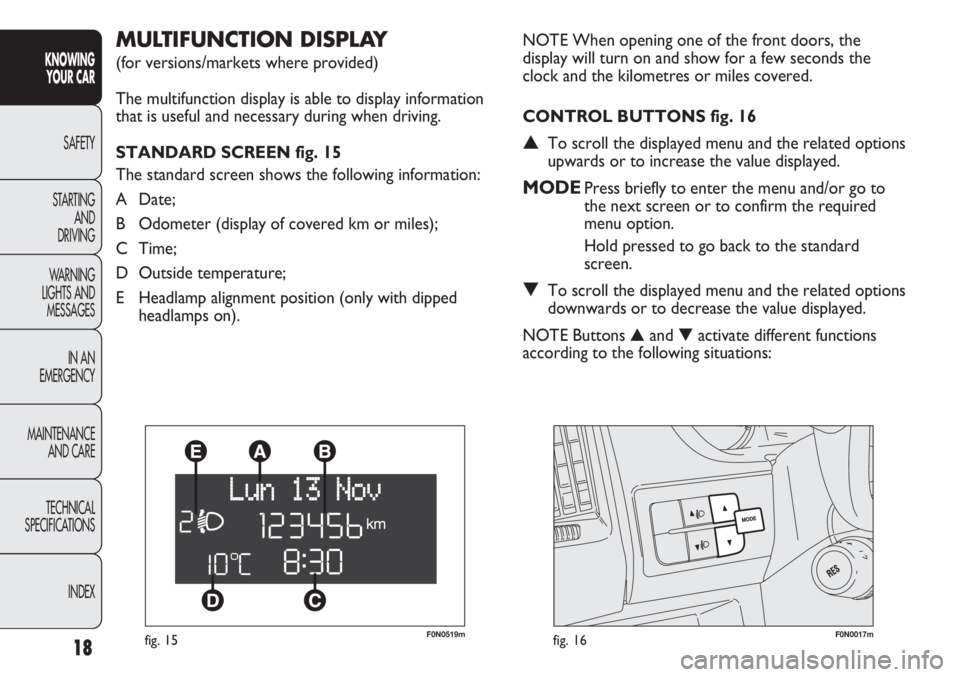
CONTROL BUTTONS fig. 16
▲To scroll the displayed menu and the related options
upwards or to increase the value displayed.
MODEPress briefly to enter the menu and/or go to
the next screen or to confirm the required
menu option.
Hold pressed to go back to the standard
screen.
▼To scroll the displayed menu and the related options
downwards or to decrease the value displayed.
NOTE Buttons ▲and ▼activate different functions
according to the following situations:
MULTIFUNCTION DISPLAY
(for versions/markets where provided)
The multifunction display is able to display information
that is useful and necessary during when driving.
STANDARD SCREEN fig. 15
The standard screen shows the following information:
A Date;
B Odometer (display of covered km or miles);
C Time;
D Outside temperature;
E Headlamp alignment position (only with dipped
headlamps on).
18
KNOWING
YOUR CAR
SAFETY
STARTING
AND
DRIVING
WARNING
LIGHTS AND
MESSAGES
IN AN
EMERGENCY
MAINTENANCE
AND CARE
TECHNICAL
SPECIFICATIONS
INDEX
Page 25 of 287
21
KNOWING
YOUR CAR
SAFETY
STARTING
AND
DRIVING
WARNING
LIGHTS AND
MESSAGES
IN AN
EMERGENCY
MAINTENANCE
AND CARE
TECHNICAL
SPECIFICATIONS
INDEX
Day
YearMonth
Deutsch
Français
English
Español
Italiano
Nederland
Português Example:
fig. 17 Example:
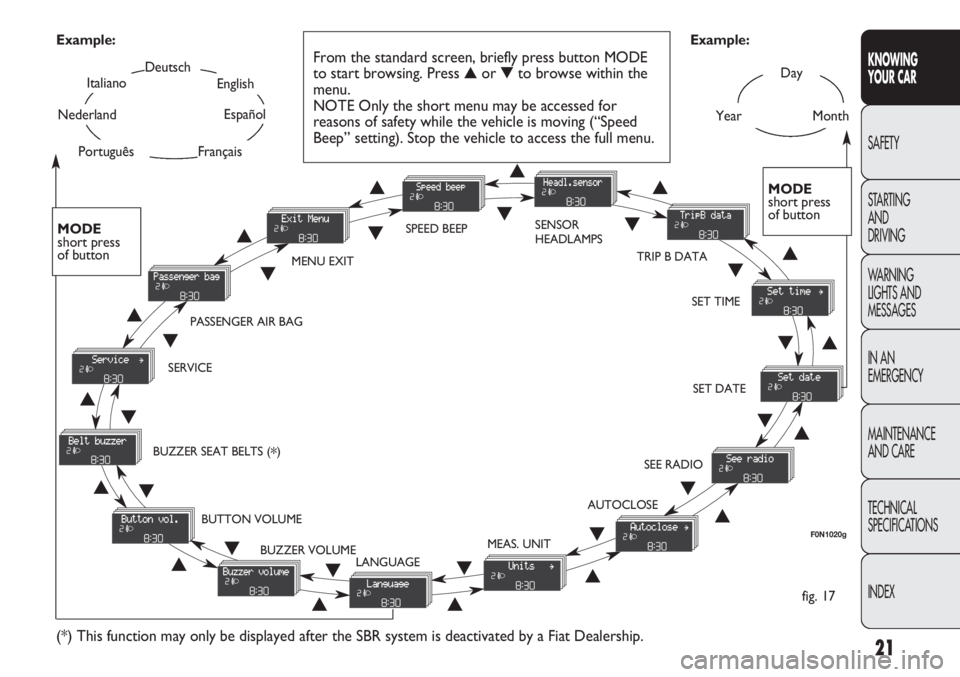
From the standard screen, briefly press button MODE
to start browsing. Press ▲or ▼to browse within the
menu.
NOTE Only the short menu may be accessed for
reasons of safety while the vehicle is moving (“Speed
Beep” setting). Stop the vehicle to access the full menu.
F0N1020g
MODE
short press
of button
▲
▼
MENU EXITSPEED BEEPSENSOR
HEADLAMPS
SET TIME
SET DATE
SEE RADIO
AUTOCLOSE
MEAS. UNIT
LANGUAGE BUZZER VOLUME BUTTON VOLUME BUZZER SEAT BELTS (
*) SERVICEPASSENGER AIR BAG
(*) This function may only be displayed after the SBR system is deactivated by a Fiat Dealership.
TRIP B DATA
MODE
short press
of button
▲
▼▲
▼▲
▼
▲
▼
▲ ▼
▲ ▼ ▲
▼
▲
▼
▲
▼
▲▼
▲▼
▲▼
▲▼▼
▲
Page 72 of 287
68
KNOWING
YOUR CAR
SAFETY
STARTING
AND
DRIVING
WARNING
LIGHTS AND
MESSAGES
IN AN
EMERGENCY
MAINTENANCE
AND CARE
TECHNICAL
SPECIFICATIONS
INDEX
F0N0501mfig. 63F0N0502mfig. 64
EXTERNAL LIGHTS
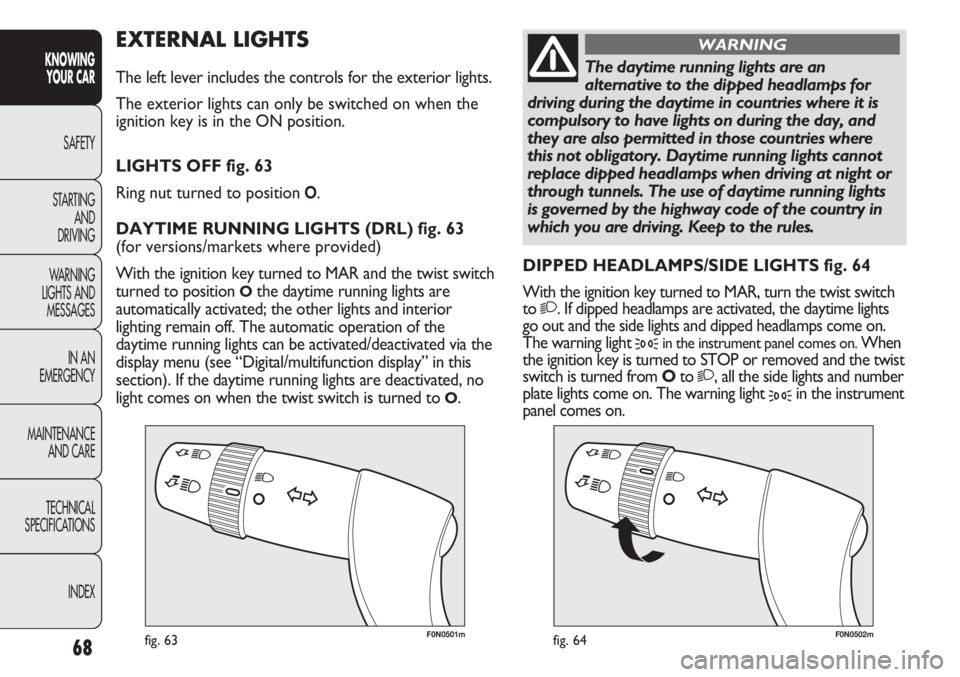
The left lever includes the controls for the exterior lights.
The exterior lights can only be switched on when the
ignition key is in the ON position.
LIGHTS OFF fig. 63
Ring nut turned to position
O.
DAYTIME RUNNING LIGHTS (DRL) fig. 63
(for versions/markets where provided)
With the ignition key turned to MAR and the twist switch
turned to position
Othe daytime running lights are
automatically activated; the other lights and interior
lighting remain off. The automatic operation of the
daytime running lights can be activated/deactivated via the
display menu (see “Digital/multifunction display” in this
section). If the daytime running lights are deactivated, no
light comes on when the twist switch is turned to
O.DIPPED HEADLAMPS/SIDE LIGHTS fig. 64
With the ignition key turned to MAR, turn the twist switch
to
2. If dipped headlamps are activated, the daytime lights
go out and the side lights and dipped headlamps come on.
The warning light
3in the instrument panel comes on. When
the ignition key is turned to STOP or removed and the twist
switch is turned from Oto
2, all the side lights and number
plate lights come on. The warning light
3in the instrument
panel comes on.
The daytime running lights are an
alternative to the dipped headlamps for
driving during the daytime in countries where it is
compulsory to have lights on during the day, and
they are also permitted in those countries where
this not obligatory. Daytime running lights cannot
replace dipped headlamps when driving at night or
through tunnels. The use of daytime running lights
is governed by the highway code of the country in
which you are driving. Keep to the rules.
WARNING
Page 170 of 287
166
KNOWING
YOUR CAR
SAFETY
STARTING
AND
DRIVING
WARNING
LIGHTS AND
MESSAGES
IN AN
EMERGENCY
MAINTENANCE
AND CARE
TECHNICAL
SPECIFICATIONS
INDEX
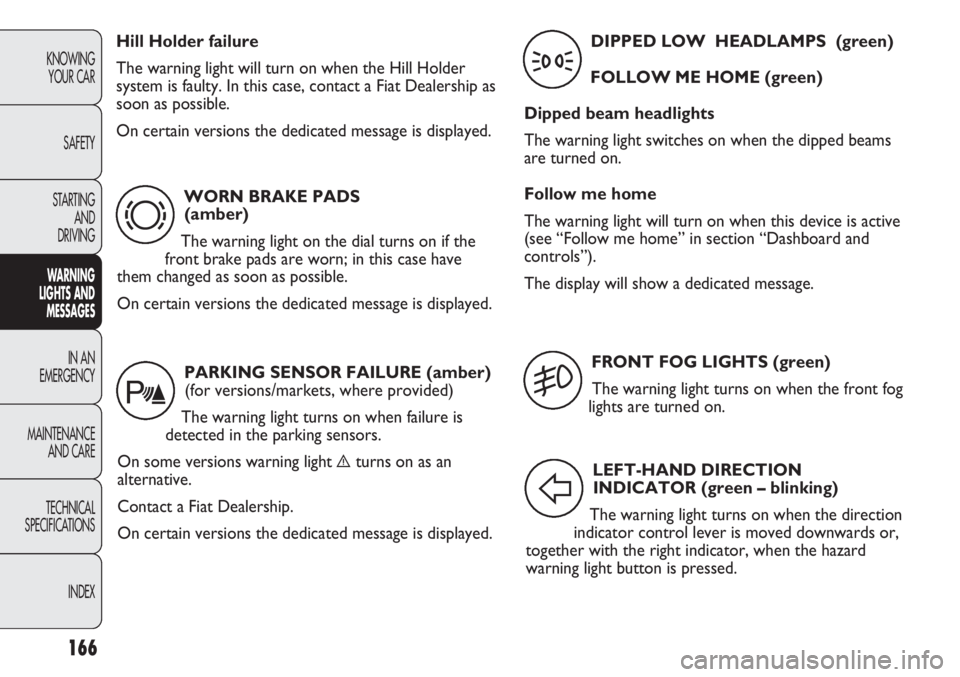
WORN BRAKE PADS
(amber)
The warning light on the dial turns on if the
front brake pads are worn; in this case have
them changed as soon as possible.
On certain versions the dedicated message is displayed.
d
Hill Holder failure
The warning light will turn on when the Hill Holder
system is faulty. In this case, contact a Fiat Dealership as
soon as possible.
On certain versions the dedicated message is displayed.
PARKING SENSOR FAILURE (amber)
(for versions/markets, where provided)
The warning light turns on when failure is
detected in the parking sensors.
On some versions warning light
èturns on as an
alternative.
Contact a Fiat Dealership.
On certain versions the dedicated message is displayed.
t
FRONT FOG LIGHTS (green)
The warning light turns on when the front fog
lights are turned on.
5
LEFT-HAND DIRECTION
INDICATOR (green – blinking)
The warning light turns on when the direction
indicator control lever is moved downwards or,
together with the right indicator, when the hazard
warning light button is pressed.
F
DIPPED LOW HEADLAMPS (green)
FOLLOW ME HOME (green)
Dipped beam headlights
The warning light switches on when the dipped beams
are turned on.
Follow me home
The warning light will turn on when this device is active
(see “Follow me home” in section “Dashboard and
controls”).
The display will show a dedicated message.
3
Page 187 of 287
183
KNOWING
YOUR CAR
SAFETY
STARTING
AND
DRIVING
WARNING
LIGHTS AND
MESSAGES
IN AN
EMERGENCY
MAINTENANCE
AND CARE
TECHNICAL
SPECIFICATIONS
INDEX
H1
H15
H7
W5W
H1
PY21W
W16WF(*)/WY5W(▼)
PY21W
W5W
P21/5W
P21/5W
P21W
P21W
P21W
P21W
C5W
12V10W
12V10WD
D
D
A
–
B
A
B
A
B
B
B
–
–
–
A
C
C55W
15/55W
55W
5W
55W
21W
16W(*)/5W(▼)
21W
5W
5W
5W
21W
21W
21W
21W
5W
10W
10W
(*) XL and recreational versions
(▼) all other versions
(❑) (for versions/markets where provided)
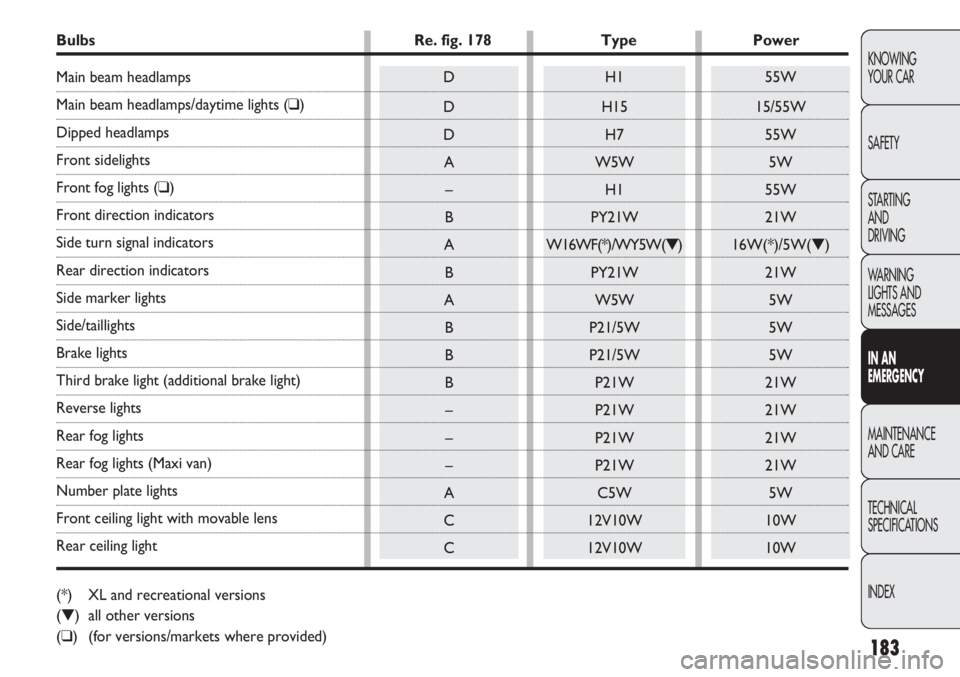
Bulbs Re. fig. 178 Type Power
Main beam headlamps
Main beam headlamps/daytime lights (❑)
Dipped headlamps
Front sidelights
Front fog lights (❑)
Front direction indicators
Side turn signal indicators
Rear direction indicators
Side marker lights
Side/taillights
Brake lights
Third brake light (additional brake light)
Reverse lights
Rear fog lights
Rear fog lights (Maxi van)
Number plate lights
Front ceiling light with movable lens
Rear ceiling light
Page 202 of 287
198
KNOWING
YOUR CAR
SAFETY
STARTING
AND
DRIVING
WARNING
LIGHTS AND
MESSAGES
IN AN
EMERGENCY
MAINTENANCE
AND CARE
TECHNICAL
SPECIFICATIONS
INDEX
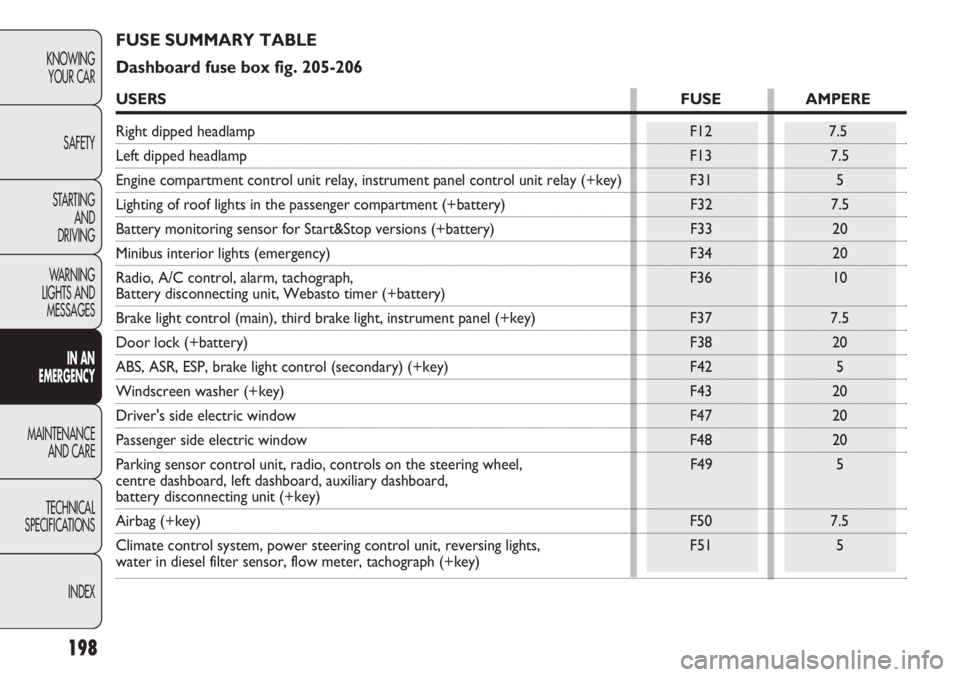
FUSE SUMMARY TABLE
Dashboard fuse box fig. 205-206
USERSFUSE AMPERE
Right dipped headlamp F12 7.5
Left dipped headlamp F13 7.5
Engine compartment control unit relay, instrument panel control unit relay (+key) F31 5
Lighting of roof lights in the passenger compartment (+battery) F32 7.5
Battery monitoring sensor for Start&Stop versions (+battery) F33 20
Minibus interior lights (emergency) F34 20
Radio, A/C control, alarm, tachograph, F36 10
Battery disconnecting unit, Webasto timer (+battery)
Brake light control (main), third brake light, instrument panel (+key) F37 7.5
Door lock (+battery) F38 20
ABS, ASR, ESP, brake light control (secondary) (+key) F42 5
Windscreen washer (+key) F43 20
Driver's side electric window F47 20
Passenger side electric window F48 20
Parking sensor control unit, radio, controls on the steering wheel, F49 5
centre dashboard, left dashboard, auxiliary dashboard,
battery disconnecting unit (+key)
Airbag (+key) F50 7.5
Climate control system, power steering control unit, reversing lights, F51 5
water in diesel filter sensor, flow meter, tachograph (+key)
Page 203 of 287
199
7.5
KNOWING
YOUR CAR
SAFETY
STARTING
AND
DRIVING
WARNING
LIGHTS AND
MESSAGES
IN AN
EMERGENCY
MAINTENANCE
AND CARE
TECHNICAL
SPECIFICATIONS
INDEX
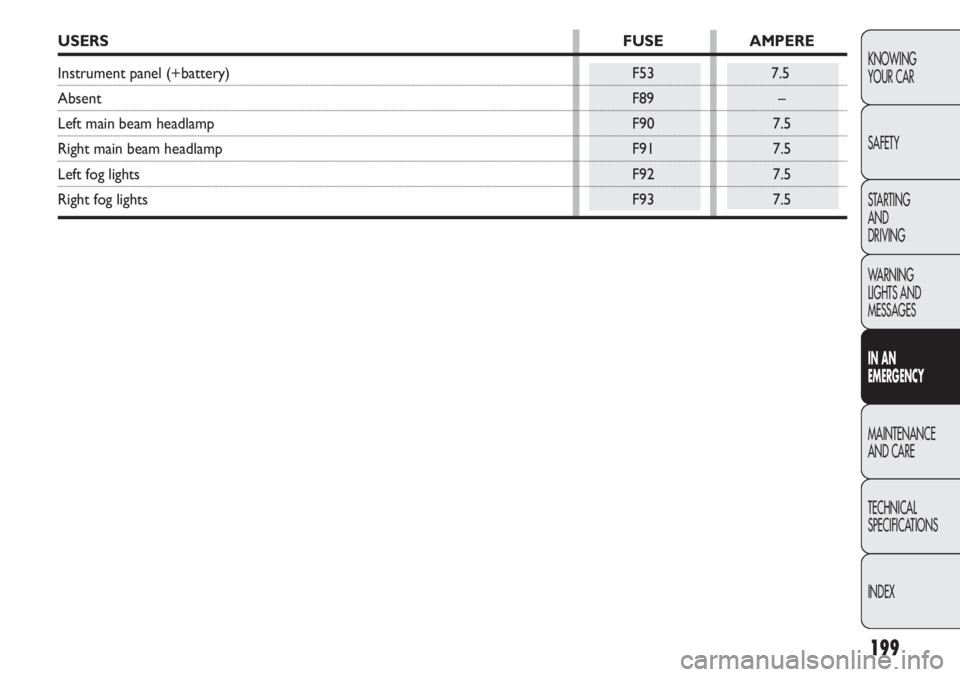
USERSFUSE AMPERE
Instrument panel (+battery) F53 7.5
AbsentF89 –
Left main beam headlamp F90 7.5
Right main beam headlamp F91 7.5
Left fog lightsF92 7.5
Right fog lights F93 7.5
Page 204 of 287
200
KNOWING
YOUR CAR
SAFETY
STARTING
AND
DRIVING
WARNING
LIGHTS AND
MESSAGES
IN AN
EMERGENCY
MAINTENANCE
AND CARE
TECHNICAL
SPECIFICATIONS
INDEX
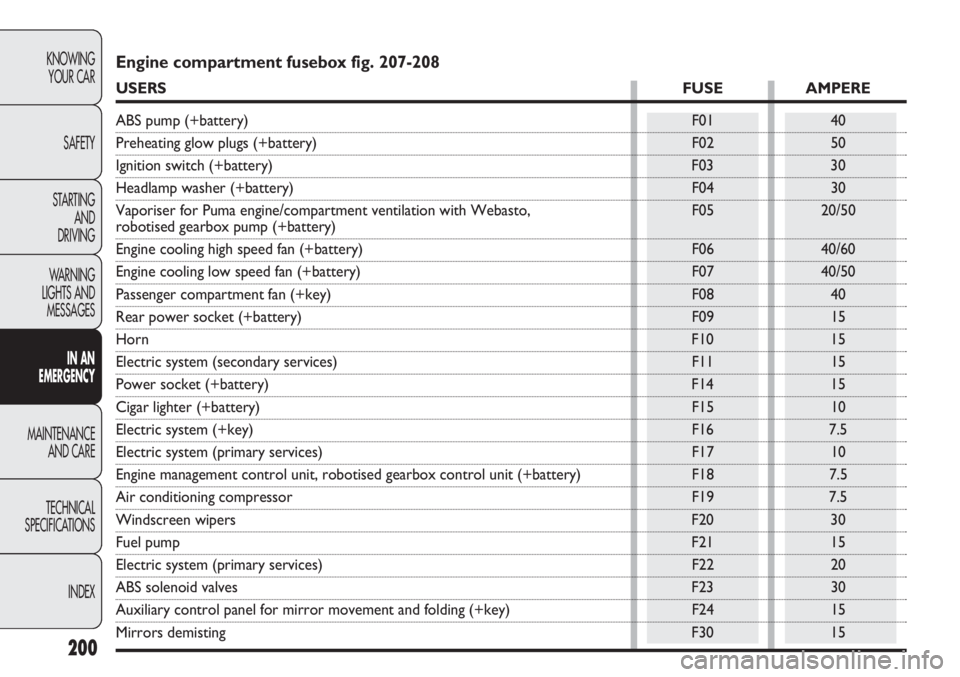
Engine compartment fusebox fig. 207-208
USERSFUSE AMPERE
ABS pump (+battery) F01 40
Preheating glow plugs (+battery) F02 50
Ignition switch (+battery) F03 30
Headlamp washer (+battery) F04 30
Vaporiser for Puma engine/compartment ventilation with Webasto, F05 20/50
robotised gearbox pump (+battery)
Engine cooling high speed fan (+battery) F06 40/60
Engine cooling low speed fan (+battery) F07 40/50
Passenger compartment fan (+key) F08 40
Rear power socket (+battery) F09 15
HornF10 15
Electric system (secondary services) F11 15
Power socket (+battery) F14 15
Cigar lighter (+battery) F15 10
Electric system (+key) F16 7.5
Electric system (primary services) F17 10
Engine management control unit, robotised gearbox control unit (+battery) F18 7.5
Air conditioning compressor F19 7.5
Windscreen wipers F20 30
Fuel pumpF21 15
Electric system (primary services) F22 20
ABS solenoid valves F23 30
Auxiliary control panel for mirror movement and folding (+key) F24 15
Mirrors demisting F30 15
Page 210 of 287
●● ● ● ●
●● ● ● ●
●● ● ● ●
●● ● ● ●
●● ● ● ●
●● ● ● ●
●● ● ● ●
●● ● ● ●
●● ● ● ●
●● ● ● ●
●●
●●
●●●
206
KNOWING
YOUR CAR
SAFETY
STARTING
AND
DRIVING
WARNING
LIGHTS AND
MESSAGES
IN AN
EMERGENCY
MAINTENANCE
AND CARE
TECHNICAL
SPECIFICATIONS
INDEX
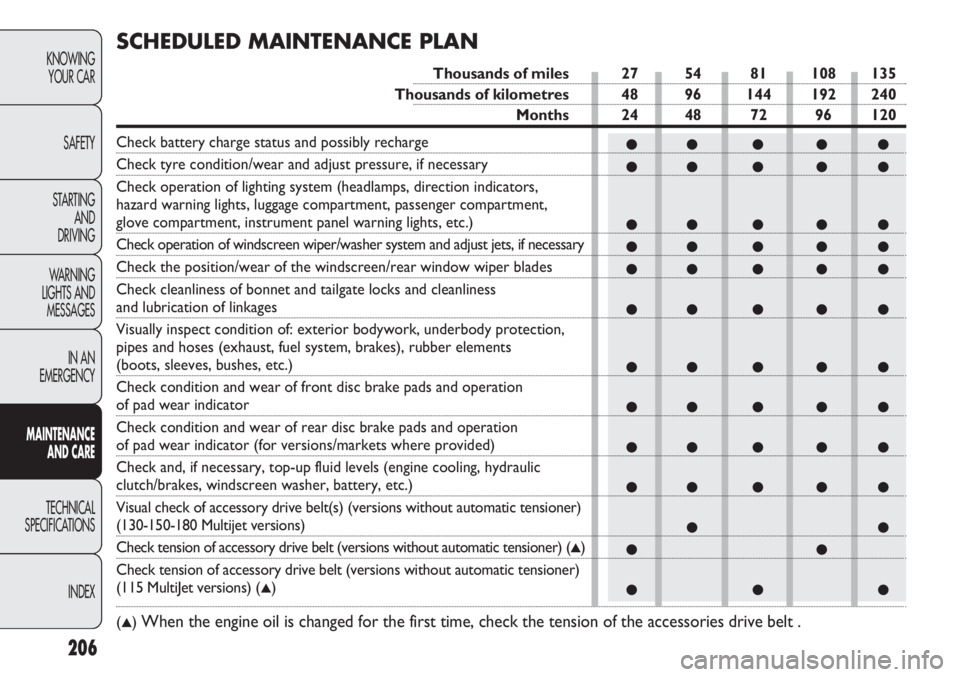
SCHEDULED MAINTENANCE PLAN
Thousands of miles 27 54 81 108 135
Thousands of kilometres 48 96 144 192 240
Months 24 48 72 96 120
Check battery charge status and possibly recharge
Check tyre condition/wear and adjust pressure, if necessary
Check operation of lighting system (headlamps, direction indicators,
hazard warning lights, luggage compartment, passenger compartment,
glove compartment, instrument panel warning lights, etc.)
Check operation of windscreen wiper/washer system and adjust jets, if necessary
Check the position/wear of the windscreen/rear window wiper blades
Check cleanliness of bonnet and tailgate locks and cleanliness
and lubrication of linkages
Visually inspect condition of: exterior bodywork, underbody protection,
pipes and hoses (exhaust, fuel system, brakes), rubber elements
(boots, sleeves, bushes, etc.)
Check condition and wear of front disc brake pads and operation
of pad wear indicator
Check condition and wear of rear disc brake pads and operation
of pad wear indicator (for versions/markets where provided)
Check and, if necessary, top-up fluid levels (engine cooling, hydraulic
clutch/brakes, windscreen washer, battery, etc.)
Visual check of accessory drive belt(s) (versions without automatic tensioner)
(130-150-180 Multijet versions)
Check tension of accessory drive belt (versions without automatic tensioner) (▲)
Check tension of accessory drive belt (versions without automatic tensioner)
(115 MultiJet versions) (▲)
(
▲)When the engine oil is changed for the first time, check the tension of the accessories drive belt .