instrument panel FIAT DUCATO BASE CAMPER 2015 Owner handbook (in English)
[x] Cancel search | Manufacturer: FIAT, Model Year: 2015, Model line: DUCATO BASE CAMPER, Model: FIAT DUCATO BASE CAMPER 2015Pages: 367, PDF Size: 19.73 MB
Page 104 of 367
WARNING
82) If the camera loses its position
due to a load variation, the system
may not work temporarily to allow
the camera to perform an
autocalibration.
83) The system only detects the
preset traffic signs. If the
minimum visibility conditions and
distance from the sign are met
it can detect all traffic signs.
84) The system is a driving
assistance system but it does not
relieve the driver of the
responsibility of driving with due
attention and diligence in
compliance with the laws in force.
85) When the system is active, the
driver is responsible for
controlling the vehicle and
monitoring the system, and must
intervene as appropriate if
necessary.
IMPORTANT
10) If the sensor is blocked, the
system may not work.
11) In the case of low temperatures
or harsh weather conditions, the
system may not work.
12) Rain, snow, splashes and strong
light contrast may influence the
sensor.
13) Do not repair the area of the
windscreen directly surrounding
the sensor.
14) If the vehicle is equipped with a
non-genuine suspension kit, the
system may not work correctly.
15) Always use genuine spare parts
when replacing the bulbs of the
headlights. Other bulbs may
reduce the system performance.
16) Clean the windscreen from
foreign matters such as bird
droppings, insects, snow or ice.
EOBD SYSTEM
The EOBD system (European On
Board Diagnosis) allows continuous
diagnosis of emission-related
components on the vehicle to be
made.
It also alerts the driver, by turning
on the
warning light in the
instrument panel (together with
relevant message in the
multifunction display, for versions/
markets where provided) when
these components are no longer in
peak condition (see “Warning
lights and messages” paragraph).
The aim of the system is to:
❒monitor system efficiency;
❒indicate an increase in emissions due
to vehicle malfunction;
❒indicate the need to replace
components which have
deteriorated.
100
KNOW YOUR VEHICLE
Page 106 of 367
FAULT INDICATIONS
Any parking sensor faults will be
indicated when reverse is engaged
by the warning light
in the
instrument panel or by the icon
on the display and by the
message in the multifunction
display (for versions/markets, where
provided)
OPERATION WITH
TRAILER
Parking sensor operation is
automatically deactivated when the
electric cable plug of the trailer is
inserted into the vehicle tow hook
socket.
The sensors are automatically
reactivated when the trailer's cable
plug is removed.
17)
86)
IMPORTANT If you wish to leave
the tow hook fitted without towing a
trailer, it is advisable to contact a
Fiat Dealership for the relevant
system update operations because
the tow hook could be detected
as an obstacle by the central
sensors.When using special washing
equipment such as high pressure
jets or steam cleaning, clean the
sensors very quickly keeping the jet
more than 10 cm away.
IMPORTANT
INFORMATION
❒Do not apply stickers to the sensors.
❒When parking, take the utmost
care over obstacles that may be
above or under the sensor.
❒Objects close to the vehicle, in
certain circumstances are not
detected and could therefore cause
damage to the vehicle or be
damaged.
The following conditions may
influence the performance of the
parking assistance system:
❒Reduced sensor sensitivity and a
reduction in the parking assistance
system performance could be due to
the presence on the surface of the
sensor of: ice, snow, mud, thick
paint.❒The sensor may detect a non-
existent obstacle (echo noise) due to
mechanical noises, for example
when washing the vehicle, in case of
rain, strong wind, hail.
❒The signals sent by the sensors can
also be altered by the presence of
ultrasonic systems (e.g. pneumatic
brake systems or pneumatic drills)
near the vehicle.
❒The performance of the parking
assistance system may also be
affected by the position of the
sensors. For example by a change in
the ride setting (caused by the wear
of the shock absorbers, suspension),
changing the tyres, overloading the
vehicle and carrying out specific
tuning operations that require the
vehicle to be lowered.
❒Detection of obstacles in the upper
part of the vehicle (particularly in the
case of vans or chassis cabs) may
not be guaranteed because the
system detects obstacles that could
strike the lower part of the vehicle.
102
KNOW YOUR VEHICLE
Page 109 of 367
❒vehicle in motion (e.g. when driving
on roads with a gradient);
❒stopping the engine through the
Start&Stop system for more than
about three minutes.
❒automatic climate control system for
adjusting the thermal comfort level or
to enable MAX-DEF function.
With a gear engaged, the engine
can be automatically restarted only
by fully depressing the clutch pedal.
NoteIf the engine stops and this is
not desired, due for example to the
clutch pedal being released sharply
with a gear engaged, if the Start&Stop
system is active, the engine can be
restarted by fully depressing the clutch
pedal or by placing the gear lever in
neutral.
NoteIf the clutch is not pressed, when
approx. three minutes have elapsed
since the engine was stopped, the
engine can only be restarted using the
key.
SAFETY FUNCTIONS
In engine cut-out conditions
through the Start&Stop system, if
the driver unfastens his/her seat
belt and opens the driver's door or
the passenger door, the engine
can be restarted only by using the
key. The driver is notified of this
condition by a buzzer, through the
warning light flashing in the
instrument panel and, where
provided, by a message in the
display.
"ENERGY SAVING"
FUNCTION
(for versions/markets, where
provided)
If, after the engine has been
automatically restarted, the driver
does not take any action for a
period of about 3 minutes,
the Start&Stop system will
definitively stop the engine to avoid
fuel consumption. The engine
can only be started using the key in
such cases.
NoteIn any case, it is possible to keep
the engine running by deactivating
the Start&Stop system.
IRREGULAR
OPERATION
In the event of malfunction, the
Start&Stop system is deactivated.
The driver is informed about the
fault through the switching on of the
icon together with a message
on the display. In this case, contact
a Fiat Dealership.
VEHICLE INACTIVITY
In the event of vehicle inactivity,
special attention must be paid to
the disconnection of the battery
power supply. Proceed as follows:
detach connector A fig. 134 (by
pressing button B) from sensor C
for monitoring the status of the
battery installed on the negative
battery pole D. This sensor should
never be disconnected from the
pole except if the battery is
replaced.
87) 88)
IMPORTANT After turning the
ignition key to STOP, wait at least 1
minute before disconnecting the
electrical supply to the battery.
105
Page 117 of 367
KNOWING THE INSTRUMENT PANEL
This section of the booklet gives
you all the information you need to
understand, interpret and use
the instrument panel correctly.CONTROL PANEL AND
INSTRUMENTS ...............................114
DISPLAY ........................................120
TRIP COMPUTER ...........................129
WARNING LIGHTS AND
MESSAGES ....................................132
- LOW BRAKE FLUID/HANDBRAKE
ENGAGED .......................................... 132
- EBD FAILURE .................................. 133
- AIRBAG FAILURE ............................. 133
- SEAT BELTS NOT FASTENED .......... 134
- ENGINE COOLANT TEMPERATURE
TOO HIGH .......................................... 135
- LOW BATTERY CHARGE ................. 135
- LOW ENGINE OIL PRESSURE ......... 136
-ENGINE OIL DETERIORATED ........... 136
-INCOMPLETE DOOR/LOAD
COMPARTMENT CLOSURE ............... 137
- POWER STEERING FAILURE ........... 137
-SELF-LEVELLING SUSPENSION
FAILURE ............................................. 137
- INJECTION/EOBD SYSTEM
FAILURE ............................................. 139
- ABS FAILURE ................................... 140
-FUEL RESERVE ................................ 140
- GLOW PLUG HEATING/GLOW
PLUG HEATING FAILURE ................... 141
- WATER IN DIESEL FILTER ................ 141
-VEHICLE PROTECTION SYSTEM
FAILURE - FIAT CODE ........................ 142
- REAR FOG LIGHTS .......................... 142
-GENERIC FAILURE INDICATION ....... 142
-DPF (PARTICULATE FILTER)
CLEANING UNDERWAY ..................... 144
-WORN BRAKE PADS ........................ 145
-DRIVING ADVISOR ........................... 146
- TPMS ............................................... 147
- DIPPED HEADLIGHTS ..................... 148- FOLLOW ME HOME ........................ 148
- LEFT-HAND DIRECTION INDICATOR
............................................................ 148
- RIGHT-HAND DIRECTION
INDICATOR ........................................ 149
-FOG LIGHTS ..................................... 149
- CRUISE CONTROL .......................... 149
-SPEED LIMITER ................................ 149
- AUTOMATIC MAIN BEAM
HEADLIGHTS ..................................... 150
- MAIN BEAM HEADLIGHTS .............. 150
-EXTERIOR LIGHTS FAULT ................ 151
-BRAKE LIGHT FAILURE .................... 151
-MAIN BEAM AUTOMATISM FAULT ... 152
-POSSIBLE ICE ON ROAD ................. 152
-SPEED LIMIT EXCEEDED ................. 152
-SCHEDULED SERVICING ................. 152
-DRIVING ADVISOR SYSTEM
FAILURE ............................................. 153
-TRAFFIC SIGN RECOGNITION
FAILURE ............................................. 153
-LIMITED RANGE ............................... 153
-START&STOP SYSTEM
ACTIVATION/DEACTIVATION .............. 154
-START&STOP FAILURE .................... 154
113
Page 118 of 367
CONTROL PANEL AND INSTRUMENTS.
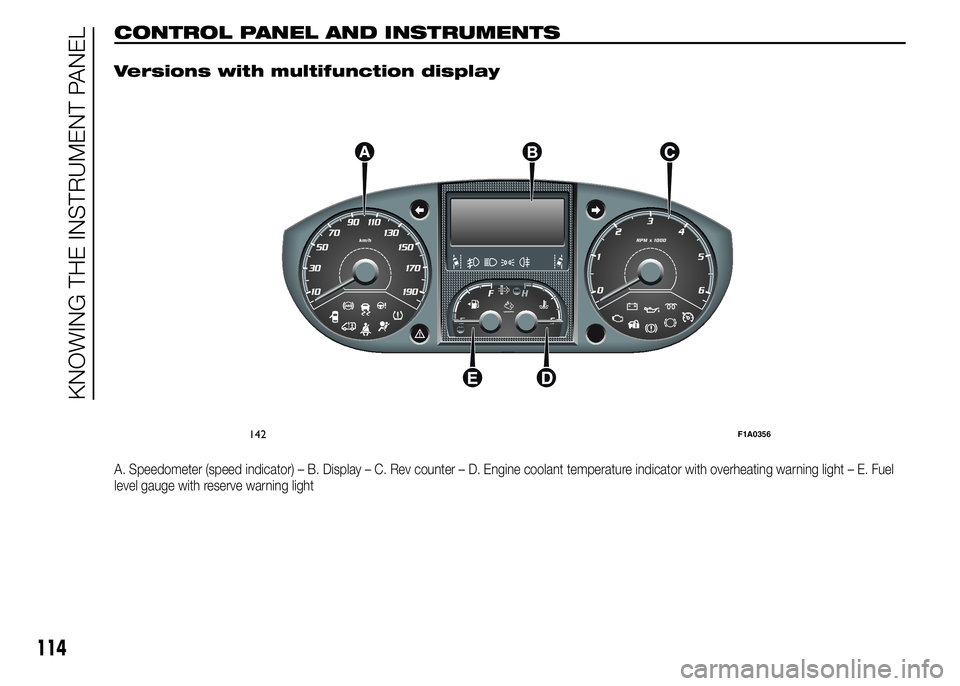
Versions with multifunction display
A. Speedometer (speed indicator) – B. Display – C. Rev counter – D. Engine coolant temperature indicator with overheating warning light – E. Fuel
level gauge with reserve warning light
142F1A0356
114
KNOWING THE INSTRUMENT PANEL
Page 120 of 367
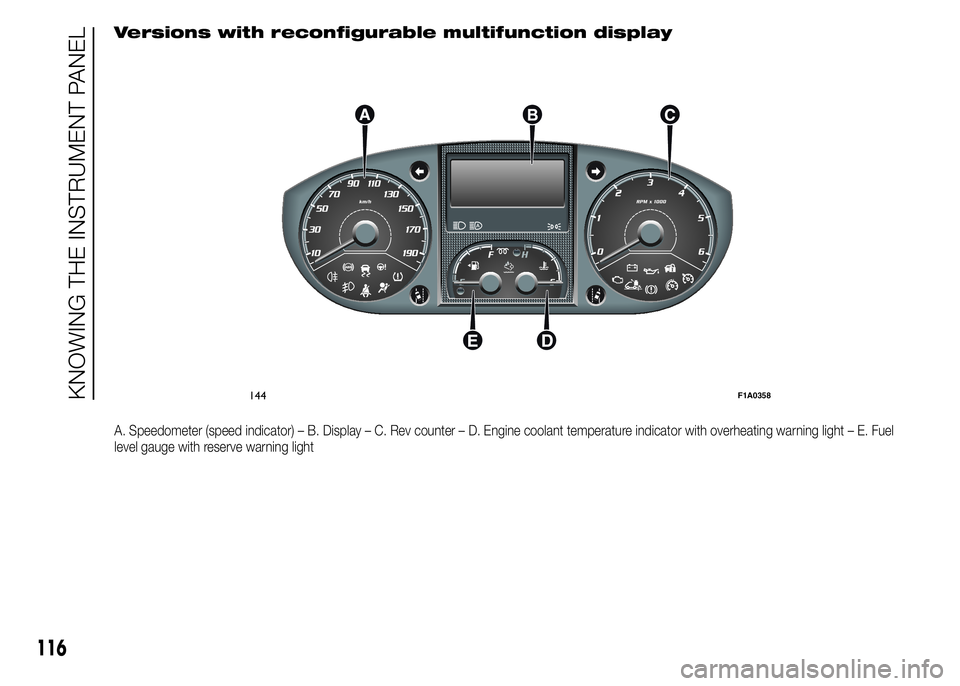
Versions with reconfigurable multifunction display
A. Speedometer (speed indicator) – B. Display – C. Rev counter – D. Engine coolant temperature indicator with overheating warning light – E. Fuel
level gauge with reserve warning light
144F1A0358
116
KNOWING THE INSTRUMENT PANEL
Page 122 of 367
SPEEDOMETER
(speed indicator)
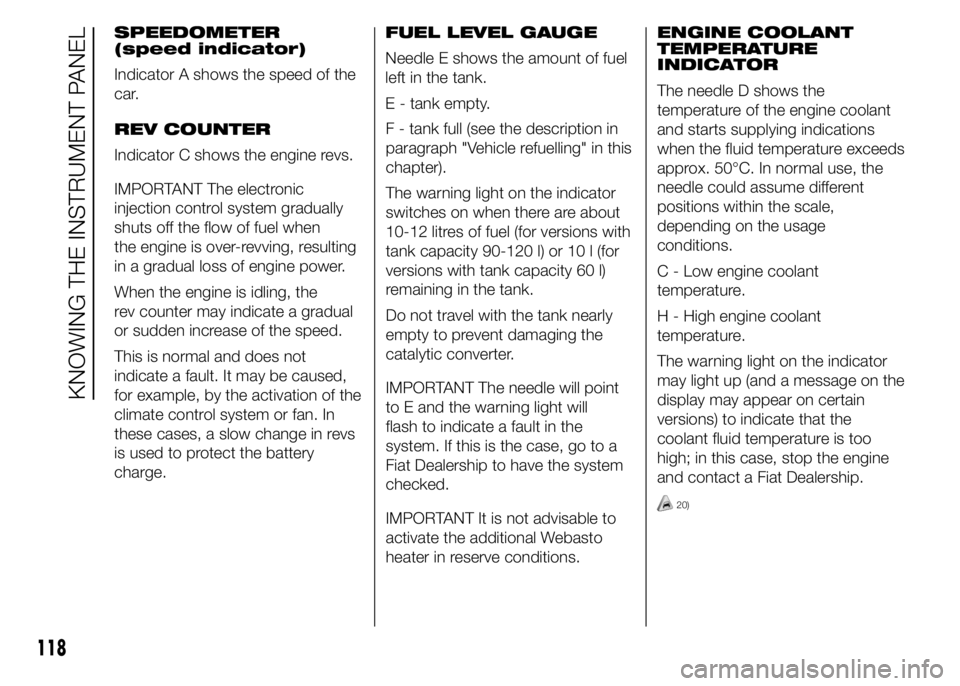
Indicator A shows the speed of the
car.
REV COUNTER
Indicator C shows the engine revs.
IMPORTANT The electronic
injection control system gradually
shuts off the flow of fuel when
the engine is over-revving, resulting
in a gradual loss of engine power.
When the engine is idling, the
rev counter may indicate a gradual
or sudden increase of the speed.
This is normal and does not
indicate a fault. It may be caused,
for example, by the activation of the
climate control system or fan. In
these cases, a slow change in revs
is used to protect the battery
charge.FUEL LEVEL GAUGE
Needle E shows the amount of fuel
left in the tank.
E - tank empty.
F - tank full (see the description in
paragraph "Vehicle refuelling" in this
chapter).
The warning light on the indicator
switches on when there are about
10-12 litres of fuel (for versions with
tank capacity 90-120 l) or 10 l (for
versions with tank capacity 60 l)
remaining in the tank.
Do not travel with the tank nearly
empty to prevent damaging the
catalytic converter.
IMPORTANT The needle will point
to E and the warning light will
flash to indicate a fault in the
system. If this is the case, go to a
Fiat Dealership to have the system
checked.
IMPORTANT It is not advisable to
activate the additional Webasto
heater in reserve conditions.ENGINE COOLANT
TEMPERATURE
INDICATOR
The needle D shows the
temperature of the engine coolant
and starts supplying indications
when the fluid temperature exceeds
approx. 50°C. In normal use, the
needle could assume different
positions within the scale,
depending on the usage
conditions.
C - Low engine coolant
temperature.
H - High engine coolant
temperature.
The warning light on the indicator
may light up (and a message on the
display may appear on certain
versions) to indicate that the
coolant fluid temperature is too
high; in this case, stop the engine
and contact a Fiat Dealership.
20)
118
KNOWING THE INSTRUMENT PANEL
Page 124 of 367
DISPLAY
(for versions/markets, where
provided)
The vehicle may be equipped with
a multifunction display or with a
reconfigurable multifunction display,
able to display information that is
useful and necessary when driving.
MULTIFUNCTION
DISPLAY "STANDARD"
SCREEN
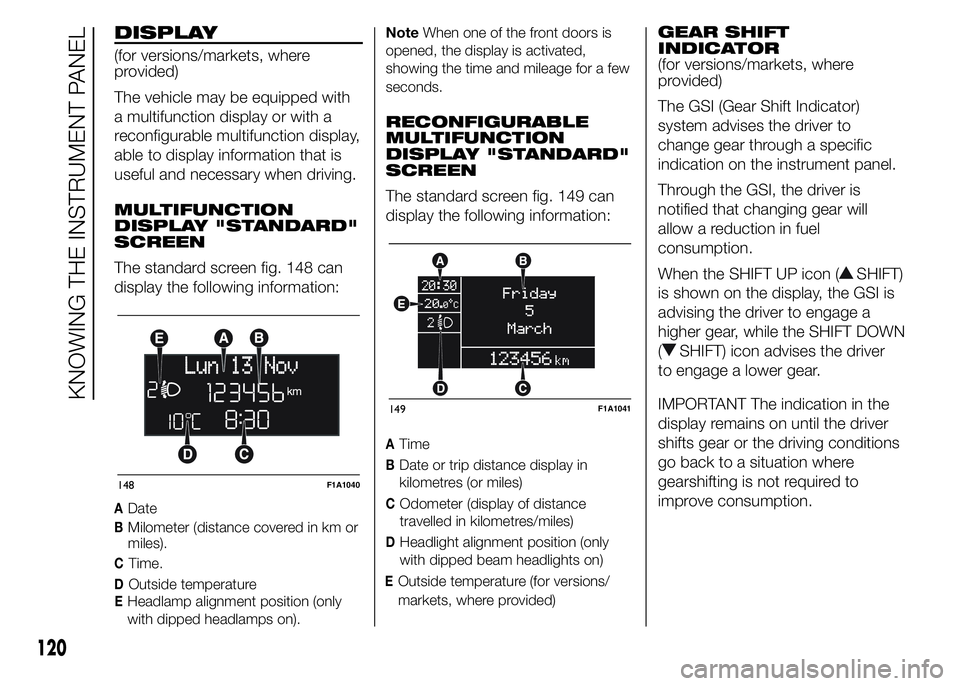
The standard screen fig. 148 can
display the following information:
ADate
BMilometer (distance covered in km or
miles).
CTime.
DOutside temperature
EHeadlamp alignment position (only
with dipped headlamps on).NoteWhen one of the front doors is
opened, the display is activated,
showing the time and mileage for a few
seconds.
RECONFIGURABLE
MULTIFUNCTION
DISPLAY "STANDARD"
SCREEN
The standard screen fig. 149 can
display the following information:
ATime
BDate or trip distance display in
kilometres (or miles)
COdometer (display of distance
travelled in kilometres/miles)
DHeadlight alignment position (only
with dipped beam headlights on)
EOutside temperature (for versions/
markets, where provided)
GEAR SHIFT
INDICATOR
(for versions/markets, where
provided)
The GSI (Gear Shift Indicator)
system advises the driver to
change gear through a specific
indication on the instrument panel.
Through the GSI, the driver is
notified that changing gear will
allow a reduction in fuel
consumption.
When the SHIFT UP icon (
SHIFT)
is shown on the display, the GSI is
advising the driver to engage a
higher gear, while the SHIFT DOWN
(
SHIFT) icon advises the driver
to engage a lower gear.
IMPORTANT The indication in the
display remains on until the driver
shifts gear or the driving conditions
go back to a situation where
gearshifting is not required to
improve consumption.
148F1A1040
149F1A1041
120
KNOWING THE INSTRUMENT PANEL
Page 126 of 367
Operating modes are different
according to the characteristics of
the option selected.
Selecting an option from the main
menu without a submenu:
- briefly press the MODE button to
select the main menu option that
needs to be changed;
- press the
orbuttons
(with a single press) to select the
new setting;
- briefly press the MODE button to
store the new setting and at the
same time go back to the
previously selected menu option.
Selecting an option from the main
menu with a submenu:
- briefly press the MODE button to
display the first submenu option;
- press the
orbuttons
(with a single press) to scroll
through all submenu options;
- briefly press the MODE button to
select the displayed submenu
option and to open the relevant
settings menu;- press the
orbuttons
(with a single press) to choose
the new setting for this submenu
option;
- briefly press the MODE button to
store the setting and return to
the previously selected submenu
option.
Selecting “Date” and “Set Clock”:
- briefly press the MODE button
to select the first value to be
changed (e.g. hours / minutes or
year / month / day);
- press the
orbuttons
(with a single press) to select the
new setting;
- briefly press the MODE button to
store the new setting and go to
the next settings menu option.
If this is the last one, the system
brings you back to the previously
selected menu option.
Press the button MODE for long:
- to exit the set-up menu if you are
in the main menu;- to exit the main menu if you are in
another point of the menu (e.g.:
at submenu option setting level, at
submenu level or at main menu
option setting level);
- to save only the changes stored
by the user (and confirmed by
pressing the MODE button).
The setup menu environment is
timed; when the menu is exited due
to expiry of the time allowed, only
the changes already stored by
the user (confirmed beforehand by
a brief press of the MODE button)
will be saved.
From the standard screen, briefly
press button MODE to start
navigation.
Press the
orbuttons to
navigate within the menu.
NoteOnly the reduced menu can be
accessed while the vehicle is moving
for safety reasons ("Speed Beep"
setting). Stop the vehicle to access the
full menu.
122
KNOWING THE INSTRUMENT PANEL
Page 127 of 367
Lighting
(Passenger compartment light
adjustment)
(only with side lights on)
This function is used to set the
brightness of the instrument panel,
uconnect™system controls (for
versions/markets where provided)
and automatic climate control
system controls (for versions/
markets where provided) to
8 levels.
Proceed as follows to adjust the
light intensity:
❒briefly press the MODE button. The
level set previously flashes on the
display;
❒press button
orto set
the required brightness level;
❒briefly press the MODE button to
return to the menu screen or hold the
button down to return to the
standard screen without storing.
NoteOn versions with reconfigurable
multifunction display adjustment can be
made both with lights off ("daytime"
mode brightness level) and with lights
on ("nighttime" mode brightness level).
Headlight alignment
(Headlight alignment
corrector position
adjustment)
(for versions/markets, where
provided)
This function permits the
adjustment (to 4 levels) of the
headlight alignment corrector
position.
To carry out the adjustment,
proceed as follows:
❒briefly press the MODE button. The
level set previously flashes on the
display;
❒press button
orto adjust
the position;
❒briefly press the MODE button to
return to the menu screen or hold the
button down to return to the
standard screen without storing.
Speed limit (Speed
Beep)
This function makes it possible to
set the vehicle speed limit (km/h or
mph). When this limit is exceeded
the driver is immediately alerted
(see “Warning lights and messages”
section).To set the desired speed limit,
proceed as follows:
- briefly press the MODE button:
the display will show the wording
(Speed Beep);
press button
orto select
speed limit activation (On) or
deactivation (Off);
- if the function has been activated
(On), press the
orbutton
to select the desired speed limit
and then press MODE to confirm.
NoteSetting is possible between
30 and 200 km/h, or 20 and 125 mph,
according to the previously set unit.
See the "Setting the unit of
measurement (Measurement unit)"
paragraph described below. The setting
will increase/decrease by 5 units each
time button
/is pressed.
Hold down the
/button to
automatically increase/decrease the
setting rapidly. Complete the
adjustment with single presses of the
button when you approach the desired
value.
- press the MODE button briefly to
return to the menu screen or hold
the button down to return to the
standard screen without storing.
123