window FIAT FIORINO 2007 Owner handbook (in English)
[x] Cancel search | Manufacturer: FIAT, Model Year: 2007, Model line: FIORINO, Model: FIAT FIORINO 2007Pages: 210, PDF Size: 3.22 MB
Page 5 of 210
4
SAFETY
STARTING
AND DRIVING
WARNING
LIGHTS AND
MESSAGES
IN AN
EMERGENCY
MAINTENANCE
AND CARE
TECHNICAL
SPECIFICATIONS
INDEX
DASHBOARD
AND CONTROLSDASHBOARD........................................................................ 5
INSTRUMENT PANEL......................................................... 6
SYMBOLS ............................................................................... 7
THE FIAT CODE SYSTEM ................................................. 7
THE KEYS .............................................................................. 8
ALARM ................................................................................... 12
IGNITION DEVICE ............................................................. 14
INSTRUMENTS .................................................................... 15
DIGITAL DISPLAY ............................................................... 17
MULTIFUNCTIONAL DISPLAY ...................................... 22
TRIP COMPUTER ................................................................ 31
SEATS ...................................................................................... 33
PARTITIONS.......................................................................... 36
HEAD RESTRAINTS............................................................. 38
STEERING WHEEL .............................................................. 39
REARVIEW MIRRORS......................................................... 39
HEATING AND CLIMATE CONTROL SYSTEM ........ 41
HEATING AND VENTILATION...................................... 43
MANUAL CLIMATE CONTROL SYSTEM .................... 46EXTERNAL LIGHTS ............................................................ 49
WINDOW WASHING....................................................... 51
CEILING LIGHTS.................................................................. 53
CONTROLS........................................................................... 56
INTERIOR FITTINGS........................................................... 58
DOORS .................................................................................. 61
WINDOW WINDERS ....................................................... 66
BOOT ...................................................................................... 67
BONNET................................................................................. 70
ROOF RACK/SKI RACK .................................................... 72
HEADLIGHTS........................................................................ 73
ABS SYSTEM ......................................................................... 74
EOBD SYSTEM ..................................................................... 76
PARKING SENSORS ........................................................... 77
SOUND SYSTEM.................................................................. 79
ELECTRICAL/ELECTRONIC DEVICES
INSTALLATION.................................................................... 80
VEHICLE REFUELLING........................................................ 81
ENVIRONMENTAL PROTECTION................................. 82
DD D
A A
S S
H H
B B
O O
A A
R R
D D
A A
N N
D D
C C
O O
N N
T T
R R
O O
L L
S S
Page 6 of 210
DASHBOARD
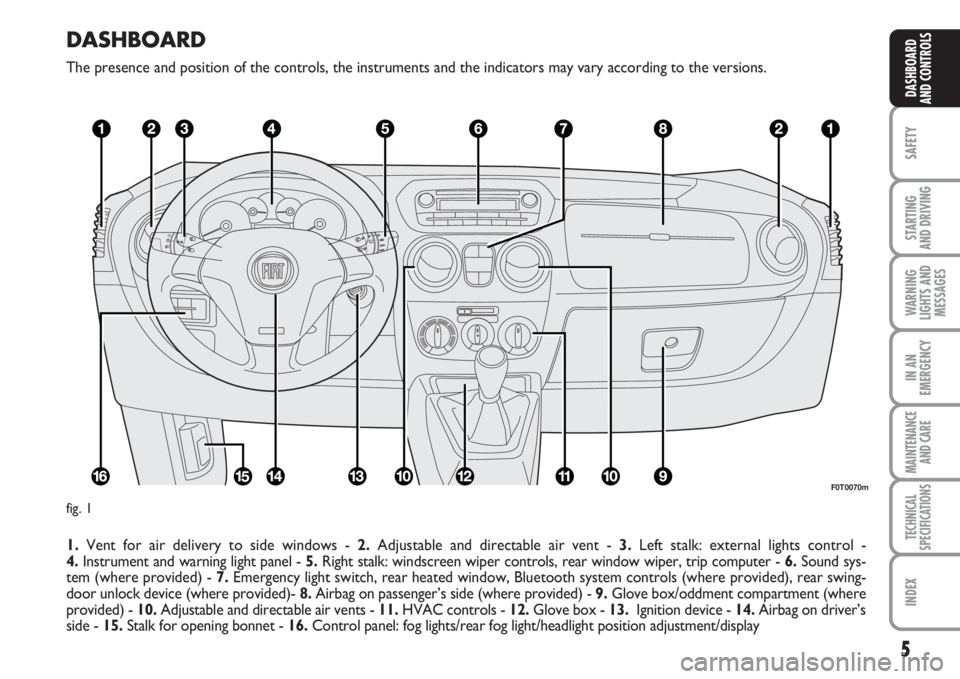
The presence and position of the controls, the instruments and the indicators may vary according to the versions.
1.Vent for air delivery to side windows - 2.Adjustable and directable air vent - 3.Left stalk: external lights control -
4.Instrument and warning light panel - 5.Right stalk: windscreen wiper controls, rear window wiper, trip computer - 6.Sound sys-
tem (where provided) - 7.Emergency light switch, rear heated window, Bluetooth system controls (where provided), rear swing-
door unlock device (where provided)- 8.Airbag on passenger’s side (where provided) - 9.Glove box/oddment compartment (where
provided) - 10.Adjustable and directable air vents - 11.HVAC controls - 12.Glove box - 13.Ignition device - 14.Airbag on driver’s
side - 15.Stalk for opening bonnet - 16.Control panel: fog lights/rear fog light/headlight position adjustment/display
5
SAFETY
STARTING
AND DRIVING
WARNING
LIGHTS AND
MESSAGES
IN AN
EMERGENCY
MAINTENANCE
AND CARE
TECHNICAL
SPECIFICATIONS
INDEX
DASHBOARD
AND CONTROLS
F0T0070m
fig. 1
Page 12 of 210
11
SAFETY
STARTING
AND DRIVING
WARNING
LIGHTS AND
MESSAGES
IN AN
EMERGENCY
MAINTENANCE
AND CARE
TECHNICAL
SPECIFICATIONS
INDEX
DASHBOARD
AND CONTROLS
DEAD LOCK SYSTEM
(where provided)
The dead lock system is a safety device
which prevents door opening from inside
the passenger compartment in case of an
attempted break-in (e.g.: window break-
ing).
It is the best protection possible against
attempted break-ins. We recommend en-
gaging it whenever the vehicle is parked
and left unattended.
Once the dead lock device
has been engaged, doors
cannot be opened from the passen-
ger compartment in any way. For this
reason, make sure there are no per-
sons left inside the vehicle.
WARNING
If the battery of the key with
remote control is down, the
dead lock device can be activated on-
ly by fitting the metal insert of the key
in both front door revolving plugs as
described previously: in this case the
dead lock device will stay engaged on-
ly on the rear doors.
WARNING
Engaging the system
The system is automatically enabled on all
the doors by double-pressing the button
Ápositioned on the key with the remote
control.
The system has been successfully enabled
when the direction indicators flash twice.
The system is not enabled if one or more
than one door is not correctly locked.
This prevents any person from getting in-
to the vehicle from an open door, and
locks him/her inside the passenger com-
partment when the door is closed.
Disengaging the system
The system is disabled automatically on
every door in the following cases:
❒when unlocking the doors;
❒when turning the ignition key to MAR.
Page 43 of 210
42
SAFETY
STARTING
AND DRIVING
WARNING
LIGHTS AND
MESSAGES
IN AN
EMERGENCY
MAINTENANCE
AND CARE
TECHNICAL
SPECIFICATIONS
INDEX
DASHBOARD
AND CONTROLS
fig. 44FF0T0030mfig. 43F0T0031m
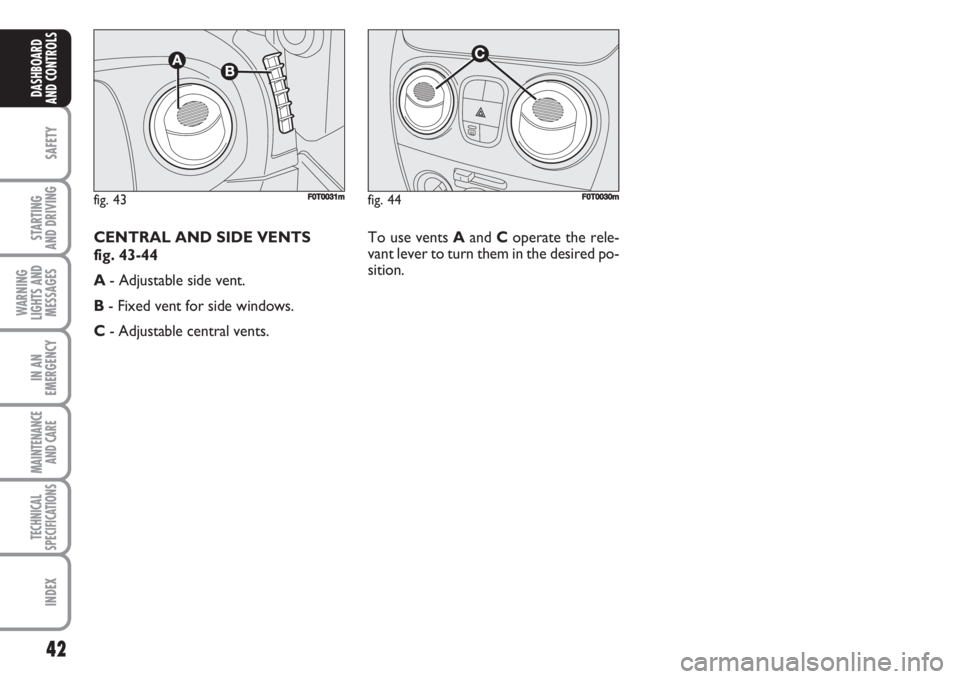
To use vents Aand Coperate the rele-
vant lever to turn them in the desired po-
sition. CENTRAL AND SIDE VENTS
fig. 43-44
A- Adjustable side vent.
B- Fixed vent for side windows.
C- Adjustable central vents.
Page 44 of 210
43
SAFETY
STARTING
AND DRIVING
WARNING
LIGHTS AND
MESSAGES
IN AN
EMERGENCY
MAINTENANCE
AND CARE
TECHNICAL
SPECIFICATIONS
INDEX
DASHBOARD
AND CONTROLS
HEATING AND VENTILATION
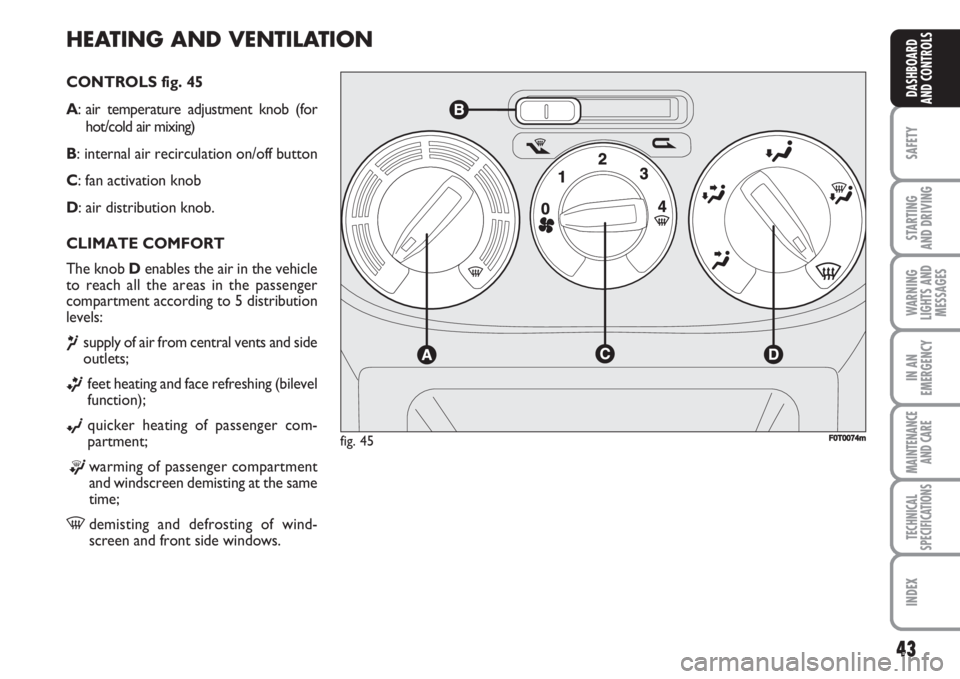
CONTROLS fig. 45
A: air temperature adjustment knob (for
hot/cold air mixing)
B: internal air recirculation on/off button
C: fan activation knob
D: air distribution knob.
CLIMATE COMFORT
The knob Denables the air in the vehicle
to reach all the areas in the passenger
compartment according to 5 distribution
levels:
¶supply of air from central vents and side
outlets;
ßfeet heating and face refreshing (bilevel
function);
©quicker heating of passenger com-
partment;
®warming of passenger compartment
and windscreen demisting at the same
time;
-demisting and defrosting of wind-
screen and front side windows.
fig. 45FF0T0074m
Page 45 of 210
44
SAFETY
STARTING
AND DRIVING
WARNING
LIGHTS AND
MESSAGES
IN AN
EMERGENCY
MAINTENANCE
AND CARE
TECHNICAL
SPECIFICATIONS
INDEX
DASHBOARD
AND CONTROLS
HEATING
Proceed as follows:
❒turn knob Aall the way to the right
(line on -);
❒turn knob Cto the required speed;
❒turn knob Don:
®to warm the feet and demist the
windscreen at the same time;
ßto deliver air to the feet area and re-
lease cooler air from central vents
and outlets on the dashboard;
©to heat the area quickly.
FAST HEATING
Proceed as follows:
❒close all the vents on the dashboard;
❒turn knob Aon
-;
❒turn knob Con 4
-;
❒turn knob Don
©;FAST DEMISTING/
DEFROSTING OF WINDSCREEN
AND FRONT SIDE WINDOWS
(MAX-DEF function)
Proceed as follows:
❒turn knob Aon
-;
❒turn knob Con 4
-;
❒turn knob Don
-;
❒turn cursor Bon
¶.
After demisting/defrosting, operate the
standard controls to restore the required
comfort conditions.Window demisting
In the event of considerable external mois-
ture and/or rain and/or considerable dif-
ferences in temperature inside and out-
side the passenger compartment, perform
the following preventive demisting proce-
dure:
❒turn cursor Bon
Y;
❒turn knob Aon
-;
❒turn knob Con 2;
❒turn knob Don
-having the possi-
bility to reach position
®if the win-
dows are not misty.
Page 46 of 210
45
SAFETY
STARTING
AND DRIVING
WARNING
LIGHTS AND
MESSAGES
IN AN
EMERGENCY
MAINTENANCE
AND CARE
TECHNICAL
SPECIFICATIONS
INDEX
DASHBOARD
AND CONTROLS
REGULATING THE
FAN SPEED
To ventilate the passenger compartment
properly proceed as follows:
❒fully open the central air vents and side
outlets;
❒turn knob Ato the blue section;
❒turn cursor Bon
¶;
❒turn knob Cto the required speed;
❒turn knob Don
¥.ACTIVATION OF INTERNAL
AIR RECIRCULATION
Turn cursor Bto position
v.
It is advisable to activate air recirculation
during vehicle stops in queues or tunnels
to prevent the introduction of polluted air
from the outside.
Do not use the function for a long time,
particularly if there are many passengers
on board, to prevent the windows from
misting up.
IMPORTANT The internal air recircula-
tion system makes it possible to reach the
required “heating” or “cooling” condi-
tions faster. Do not use the air recircula-
tion function on rainy/cold days as it would
considerably increase the possibility of the
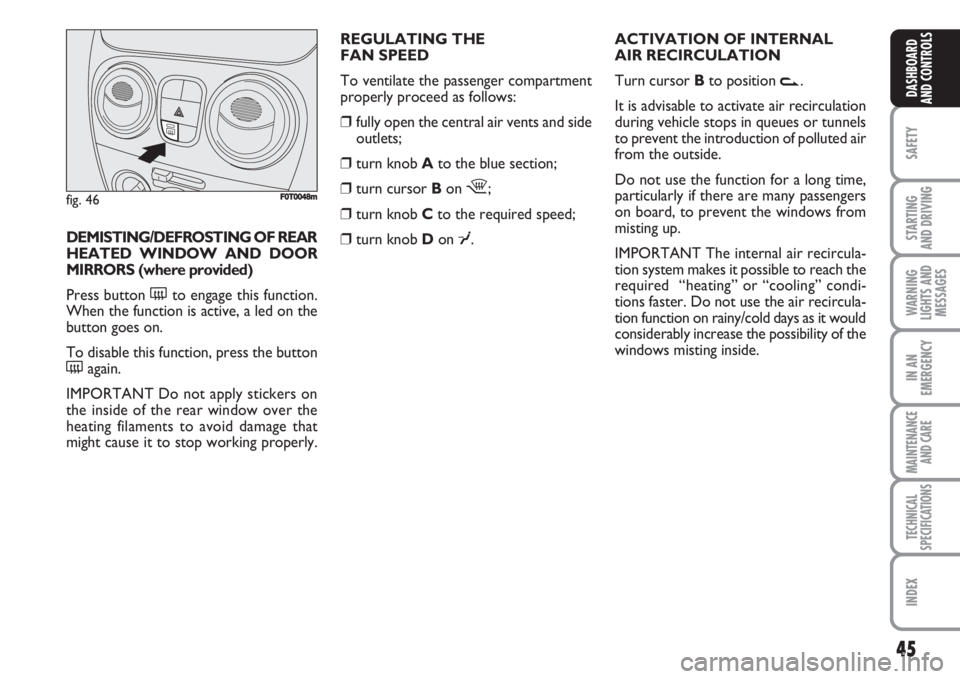
windows misting inside. DEMISTING/DEFROSTING OF REAR
HEATED WINDOW AND DOOR
MIRRORS (where provided)
Press button (to engage this function.
When the function is active, a led on the
button goes on.
To disable this function, press the button
(again.
IMPORTANT Do not apply stickers on
the inside of the rear window over the
heating filaments to avoid damage that
might cause it to stop working properly.
fig. 46F0T0048m
Page 47 of 210
46
SAFETY
STARTING
AND DRIVING
WARNING
LIGHTS AND
MESSAGES
IN AN
EMERGENCY
MAINTENANCE
AND CARE
TECHNICAL
SPECIFICATIONS
INDEX
DASHBOARD
AND CONTROLS
MANUAL CLIMATE CONTROL SYSTEM (where provided)
CLIMATE COMFORT
The knob Denables the air in the vehicle
to reach all the areas in the passenger
compartment according to 5 distribution
levels:
¶supply of air from central vents and side
outlets;
ßfeet heating and face refreshing (bilevel
function);
©quicker heating of passenger com-
partment;
®warming of passenger compartment
and windscreen demisting at the same
time;
-demisting and defrosting of wind-
screen and front side windows.
HEATING
Proceed as follows:
❒turn knob Aall the way to the right
(line on
-);
❒turn knob Cto the required speed;
❒turn knob Don:
®to warm the feet and at the same time
demist the windscreen;
ßto deliver air to the feet area and re-
lease cooler air from central vents
and outlets on the dashboard;
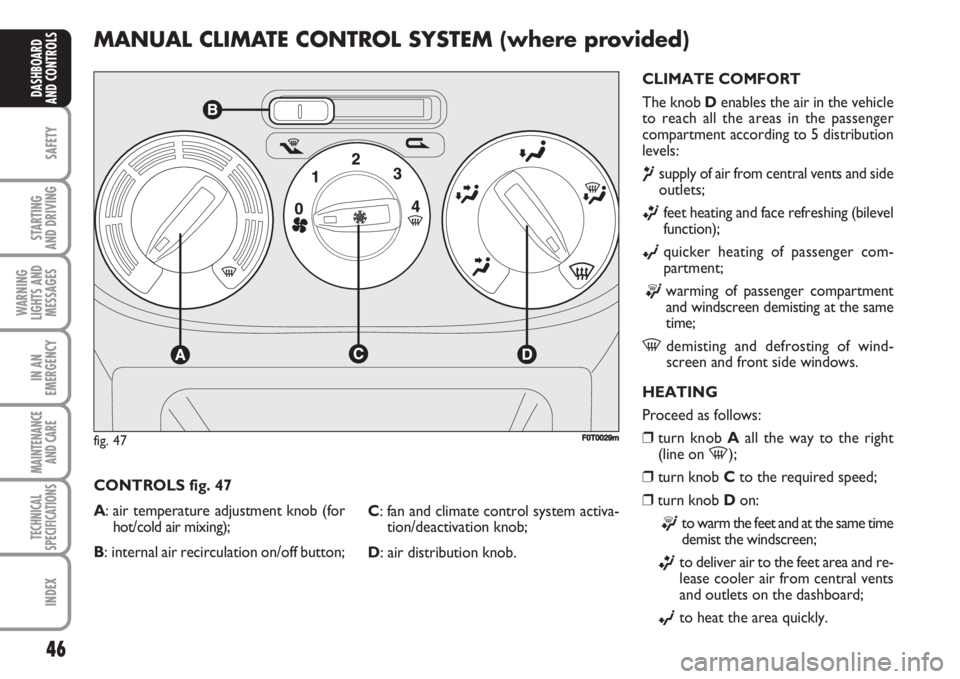
©to heat the area quickly. CONTROLS fig. 47
A: air temperature adjustment knob (for
hot/cold air mixing);
B: internal air recirculation on/off button;C: fan and climate control system activa-
tion/deactivation knob;
D: air distribution knob.
fig. 47FF0T0029m
Page 48 of 210
47
SAFETY
STARTING
AND DRIVING
WARNING
LIGHTS AND
MESSAGES
IN AN
EMERGENCY
MAINTENANCE
AND CARE
TECHNICAL
SPECIFICATIONS
INDEX
DASHBOARD
AND CONTROLS
FAST HEATING
Proceed as follows:
❒close all the vents on the dashboard;
❒turn knob Aon
-;
❒turn knob Con 4
-;
❒turn knob Don
ß.
FAST DEMISTING/
DEFROSTING OF WINDSCREEN
AND FRONT SIDE WINDOWS
(MAX-DEF function)
Proceed as follows:
❒turn knob Aon
-;
❒turn knob Con 4
-;
❒turn knob Don
-;
❒turn cursor Bon
¶.
After demisting/defrosting, operate the
standard controls to restore the required
comfort conditions.
IMPORTANT The climate control system
is very useful for faster demisting because
it dries the air. Regulate the controls as
described above and engage the climate
control by pressing knob C.Window demisting
In the event of considerable external mois-
ture and/or rain and/or considerable dif-
ferences in temperature inside and out-
side the passenger compartment, perform
the following preventive demisting proce-
dure:
❒turn cursor Bon
¶;
❒turn knob Aon
-;
❒turn knob Con 2;
❒turn knob Don
-having the possi-
bility to reach position
®if the win-
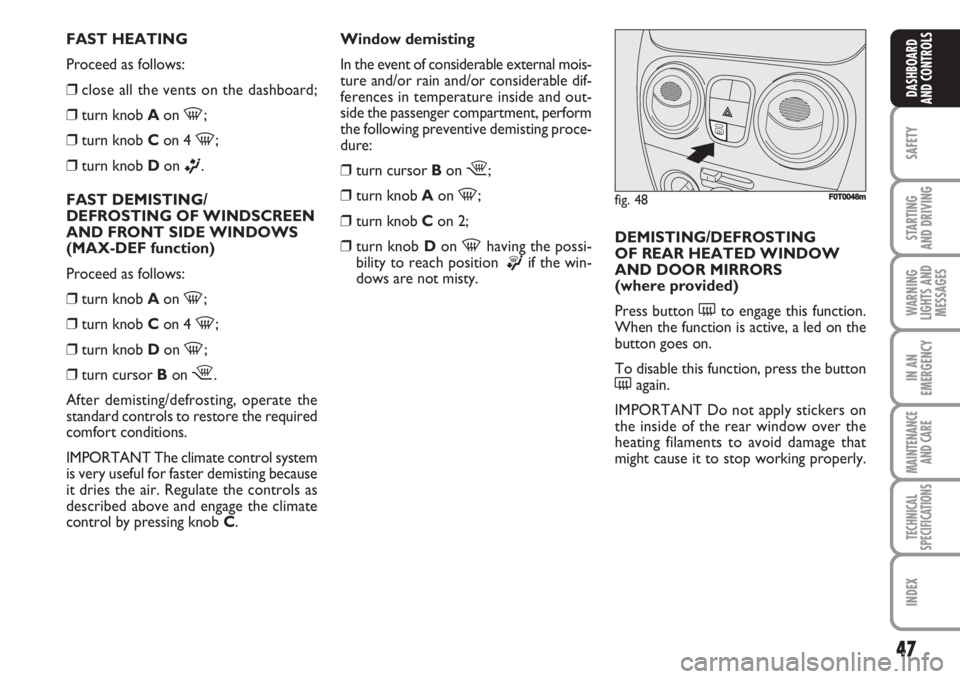
dows are not misty. DEMISTING/DEFROSTING
OF REAR HEATED WINDOW
AND DOOR MIRRORS
(where provided)
Press button (to engage this function.
When the function is active, a led on the
button goes on.
To disable this function, press the button
(again.
IMPORTANT Do not apply stickers on
the inside of the rear window over the
heating filaments to avoid damage that
might cause it to stop working properly.
fig. 48F0T0048m
Page 49 of 210
48
SAFETY
STARTING
AND DRIVING
WARNING
LIGHTS AND
MESSAGES
IN AN
EMERGENCY
MAINTENANCE
AND CARE
TECHNICAL
SPECIFICATIONS
INDEX
DASHBOARD
AND CONTROLS
CLIMATE CONTROL (cooling)
Proceed as follows:
❒turn knob Ato the blue section;
❒turn knob Con 4
-;
❒turn cursor Bon
v;
❒turn knob Don
©;
❒turn knob C.
Regulating cooling
Proceed as follows:
❒turn cursor Bon
¶;
❒turn knob Ato the right to increase the
temperature;
❒turn knob Cto the left to reduce the
fan speed.
SERVICING THE SYSTEM
Let the climate control system run for at
least 10 minutes every month during the
winter. Have the system inspected at a Fi-
at Dealership before the summer. REGULATING THE FAN SPEED
To ventilate the passenger compartment
properly proceed as follows:
❒fully open the central air vents and side
outlets;
❒turn knob Ato the blue section;
❒turn cursor Bon
¶;
❒turn knob Cto the required speed;
❒turn knob Don
©.ACTIVATION OF
INTERNAL AIR
RECIRCULATION
Turn cursor Bto position
v.
It is advisable to activate air recirculation
during vehicle stops in queues or tunnels
to prevent the introduction of polluted air
from the outside.
Do not use the function for a long time,
particularly if there are many passengers
on board, to prevent the windows from
misting up.
IMPORTANT The internal air recircula-
tion system makes it possible to reach the
required “heating” or “cooling” condi-
tions faster. Do not use the air recircula-
tion function on rainy/cold days as it would
considerably increase the possibility of the
windows misting inside.