technical data FIAT FIORINO 2017 Owner handbook (in English)
[x] Cancel search | Manufacturer: FIAT, Model Year: 2017, Model line: FIORINO, Model: FIAT FIORINO 2017Pages: 272, PDF Size: 5.87 MB
Page 16 of 272
DEAD LOCK
(for versions/markets, where provided)
This security device prevents the opening of the
doors from inside the passenger compartment
if there has been a break-in attempt (e.g. a window
has been broken).
Dead lock therefore offers the best possible
protection against break-in attempts. We
recommend engaging it whenever the vehicle is
parked and left unattended.
WARNING
Once the dead lock system is engaged it
is impossible to open the doors from
inside the vehicle. Before engaging the system
please therefore check that there is no one left
on board.
WARNING
If the remote control battery is flat , the
system can be engaged by inser ting
the metal key in the door lock as described
previously: in this case, the device only remains
active for the rear doors.Switching the device on
The system is automatically enabled on all the doors
by pressing button
twice on the key with remote
control.
The direction indicators flash twice to let you know
that the device is active.
If one or more of the doors is not perfectly shut, the
dead lock device will not be activated, thus
preventing a person getting into the car through the
open door and, on shutting, it, remaining stuck
inside the passenger compartment.
Switching the device off
The system is disabled automatically on every door
when:
by unlocking the doors;
by turning the ignition key to the ON position.
12
KNOWING YOUR
VEHICLE
SAFETY
STARTING AND
DRIVING
WARNING LIGHTS
AND MESSAGES
IN AN EMERGENCY
SERVICING AND
CARE
TECHNICAL DATA
INDEX
Page 17 of 272
ALARM
(for versions/markets, where provided)
The alarm, in addition to all the previously described
remote control functions, is controlled by the
receiver located under the dashboard near the fuse
box.
ALARM TRIPPING
The alarm trips in the following cases:
unauthorised opening of a door, the bonnet, the
tailgate or a sliding side door (if present)
(perimeter protection)
unauthorized operation of the starting device (key
turned on using a key that is not enabled)
cutting of the battery leads
moving presence inside the passenger
compartment (volumetric protection)
anomalous lifting/tilting of the vehicle.
Depending on the market, the activation of the alarm
causes the activation of the siren and the direction
indicators (for about 26 seconds). Alarm tripping and
the number of cycles depend on the sales market.
There are a maximum number of acoustic/visual
cycles. When this is reached the system returns to
normal operation.
Volumetric and antilifting protections are disabled by
pressing the control button installed on the front
dashboard (see paragraph "Antilift protections).IMPORTANT The engine immobilizer function is
ensured by the Fiat CODE which is automatically
activated when the key is extracted from the ignition.
TURNING THE ALARM ON
With the doors and bonnet closed and the ignition
key either turned to STOP or removed, point the
key with the remote control towards the vehicle and
press and release button
.
Except for some markets, the system produces an
acoustic warning (beep) and enables door locking.
A self-diagnostic stage precedes the turning on of the
alarm: if a fault is detected, the system produces
another acoustic signal.
In this case switch off the alarm by pressing
,
check that all the doors, bonnet and tailgate are
closed correctly; then switch the alarm back on by
pressing
.
If a door or the bonnet is not properly shut, it will
be excluded from the testing by the alarm system.
A fault has occurred in system operation if the alarm
produces an acoustic signal even when the doors,
bonnet and boot are correctly closed. Go to a
Fiat Dealership.
IMPORTANT The alarm does not come on when the
central locking is activated using the metal insert in
the key.
IMPORTANT The alarm is configured to comply with
the regulations existing in different countries.
13
KNOWING YOUR
VEHICLE
SAFETY
STARTING AND
DRIVING
WARNING LIGHTS
AND MESSAGES
IN AN EMERGENCY
SERVICING AND
CARE
TECHNICAL DATA
INDEX
Page 18 of 272
TURNING THE ALARM OFF
Press button
on the key with the remote control.
The following operations are performed (excluding
specific markets):
direction indicators flash briefly twice
two short beeps
door are unlocked.
IMPORTANT The alarm is not turned off using the
door are opened using the metal insert in the key.
VOLUMETRIC/ANTILIFTING PROTECTION
The side windows must be completely closed for
correct operation of the protection.
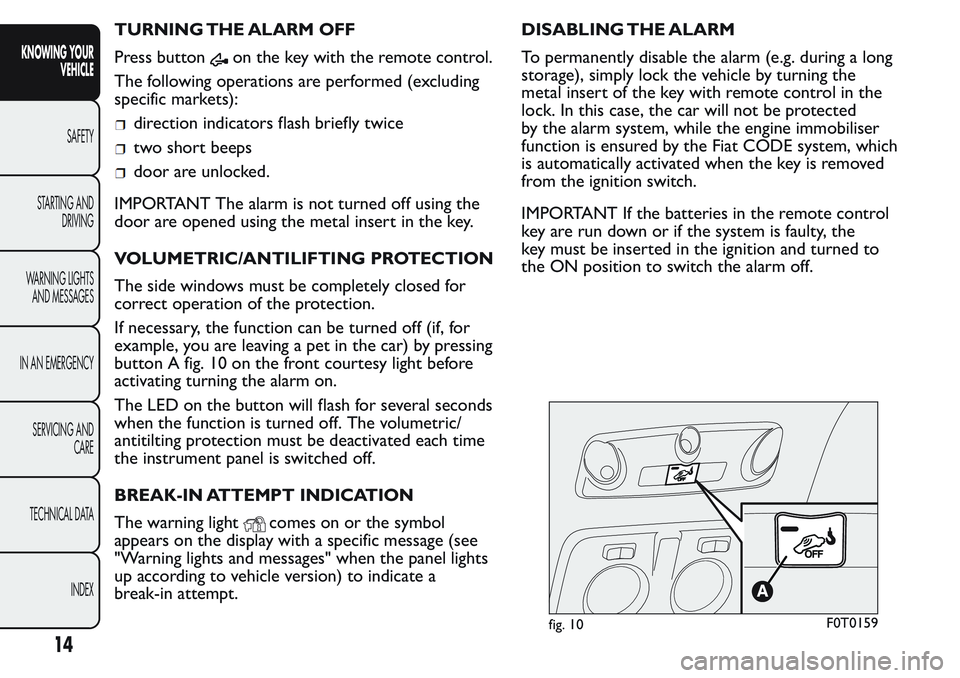
If necessary, the function can be turned off (if, for
example, you are leaving a pet in the car) by pressing
button A fig. 10 on the front courtesy light before
activating turning the alarm on.
The LED on the button will flash for several seconds
when the function is turned off. The volumetric/
antitilting protection must be deactivated each time
the instrument panel is switched off.
BREAK-IN ATTEMPT INDICATION
The warning light
comes on or the symbol
appears on the display with a specific message (see
"Warning lights and messages" when the panel lights
up according to vehicle version) to indicate a
break-in attempt.DISABLING THE ALARM
To permanently disable the alarm (e.g. during a long
storage), simply lock the vehicle by turning the
metal insert of the key with remote control in the
lock. In this case, the car will not be protected
by the alarm system, while the engine immobiliser
function is ensured by the Fiat CODE system, which
is automatically activated when the key is removed
from the ignition switch.
IMPORTANT If the batteries in the remote control
key are run down or if the system is faulty, the
key must be inserted in the ignition and turned to
the ON position to switch the alarm off.
fig. 10F0T0159
14
KNOWING YOUR
VEHICLE
SAFETY
STARTING AND
DRIVING
WARNING LIGHTS
AND MESSAGES
IN AN EMERGENCY
SERVICING AND
CARE
TECHNICAL DATA
INDEX
Page 19 of 272
IGNITION SWITCH
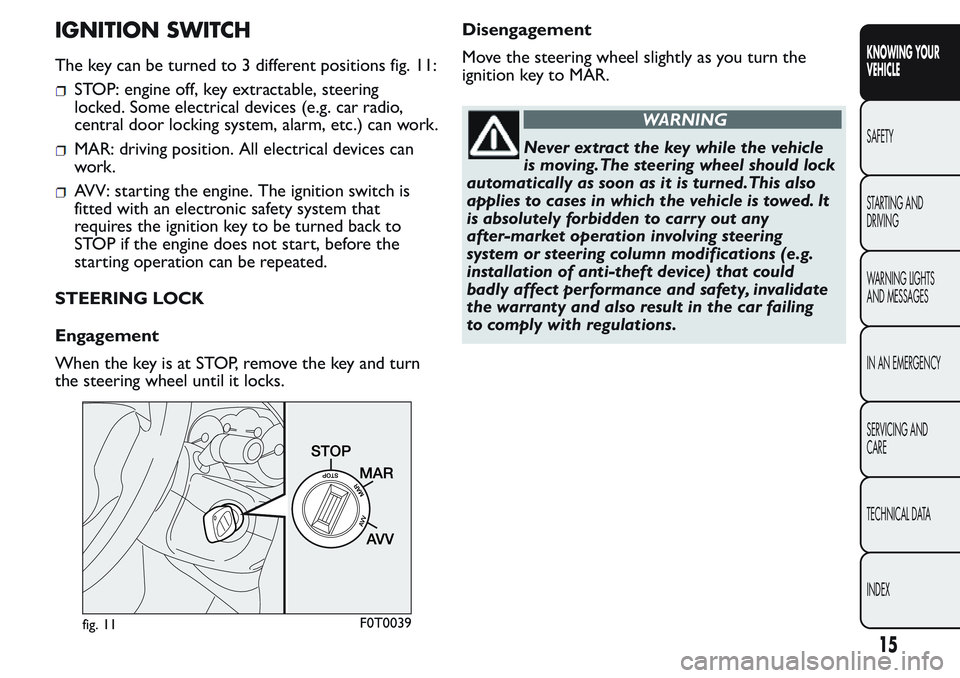
The key can be turned to 3 different positions fig. 11:
STOP: engine off, key extractable, steering
locked. Some electrical devices (e.g. car radio,
central door locking system, alarm, etc.) can work.
MAR: driving position. All electrical devices can
work.
AVV: starting the engine. The ignition switch is
fitted with an electronic safety system that
requires the ignition key to be turned back to
STOP if the engine does not start, before the
starting operation can be repeated.
STEERING LOCK
Engagement
When the key is at STOP, remove the key and turn
the steering wheel until it locks.Disengagement
Move the steering wheel slightly as you turn the
ignition key to MAR.
WARNING
Never extract the key while the vehicle
is moving.The steering wheel should lock
automatically as soon as it is turned.This also
applies to cases in which the vehicle is towed. It
is absolutely forbidden to carr y out any
after-market operation involving steering
system or steering column modifications (e.g.
installation of anti-theft device) that could
badly affect performance and safety, invalidate
the warranty and also result in the car failing
to comply with regulations.
fig. 11F0T0039
15
KNOWING YOUR
VEHICLE
SAFETY
STARTING AND
DRIVING
WARNING LIGHTS
AND MESSAGES
IN AN EMERGENCY
SERVICING AND
CARE
TECHNICAL DATA
INDEX
Page 20 of 272
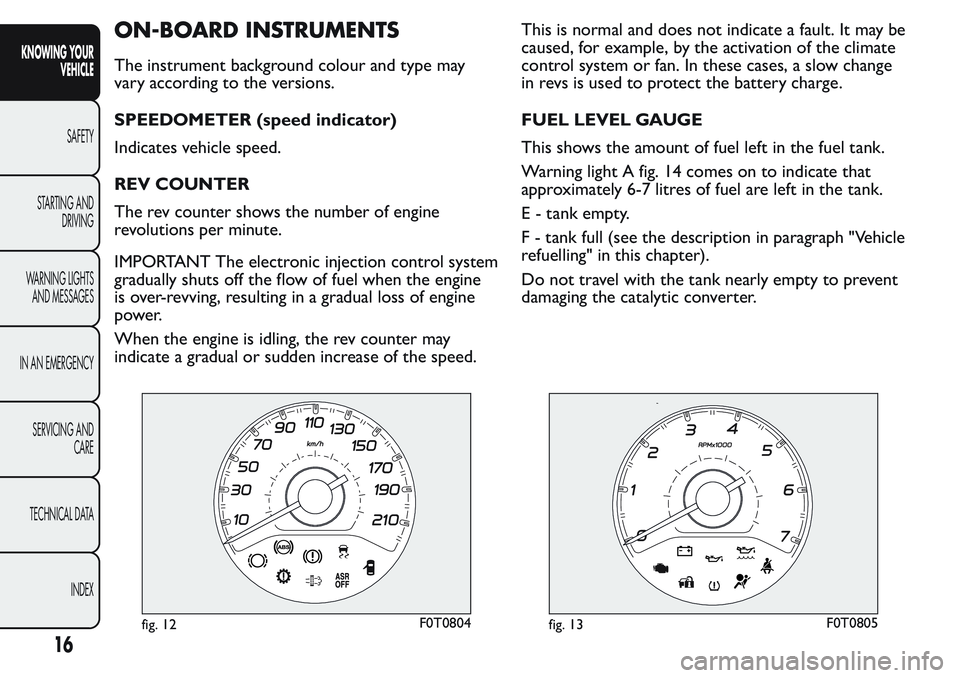
ON-BOARD INSTRUMENTS
The instrument background colour and type may
vary according to the versions.
SPEEDOMETER (speed indicator)
Indicates vehicle speed.
REV COUNTER
The rev counter shows the number of engine
revolutions per minute.
IMPORTANT The electronic injection control system
gradually shuts off the flow of fuel when the engine
is over-revving, resulting in a gradual loss of engine
power.
When the engine is idling, the rev counter may
indicate a gradual or sudden increase of the speed.This is normal and does not indicate a fault. It may be
caused, for example, by the activation of the climate
control system or fan. In these cases, a slow change
in revs is used to protect the battery charge.
FUEL LEVEL GAUGE
This shows the amount of fuel left in the fuel tank.
Warning light A fig. 14 comes on to indicate that
approximately 6-7 litres of fuel are left in the tank.
E - tank empty.
F - tank full (see the description in paragraph "Vehicle
refuelling" in this chapter).
Do not travel with the tank nearly empty to prevent
damaging the catalytic converter.
fig. 12F0T0804fig. 13F0T0805
16
KNOWING YOUR
VEHICLE
SAFETY
STARTING AND
DRIVING
WARNING LIGHTS
AND MESSAGES
IN AN EMERGENCY
SERVICING AND
CARE
TECHNICAL DATA
INDEX
Page 21 of 272
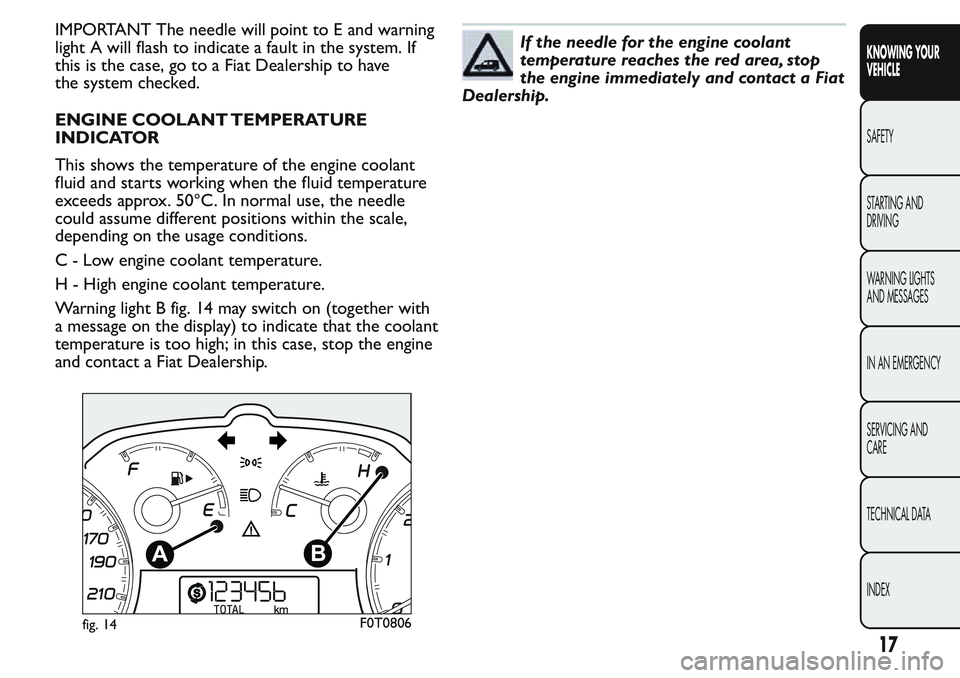
IMPORTANT The needle will point to E and warning
light A will flash to indicate a fault in the system. If
this is the case, go to a Fiat Dealership to have
the system checked.
ENGINE COOLANT TEMPERATURE
INDICATOR
This shows the temperature of the engine coolant
fluid and starts working when the fluid temperature
exceeds approx. 50°C. In normal use, the needle
could assume different positions within the scale,
depending on the usage conditions.
C - Low engine coolant temperature.
H - High engine coolant temperature.
Warning light B fig. 14 may switch on (together with
a message on the display) to indicate that the coolant
temperature is too high; in this case, stop the engine
and contact a Fiat Dealership.If the needle for the engine coolant
temperature reaches the red area, stop
the engine immediately and contact a Fiat
Dealership.
fig. 14F0T0806
17
KNOWING YOUR
VEHICLE
SAFETY
STARTING AND
DRIVING
WARNING LIGHTS
AND MESSAGES
IN AN EMERGENCY
SERVICING AND
CARE
TECHNICAL DATA
INDEX
Page 22 of 272
DIGITAL DISPLAY
STANDARD SCREEN
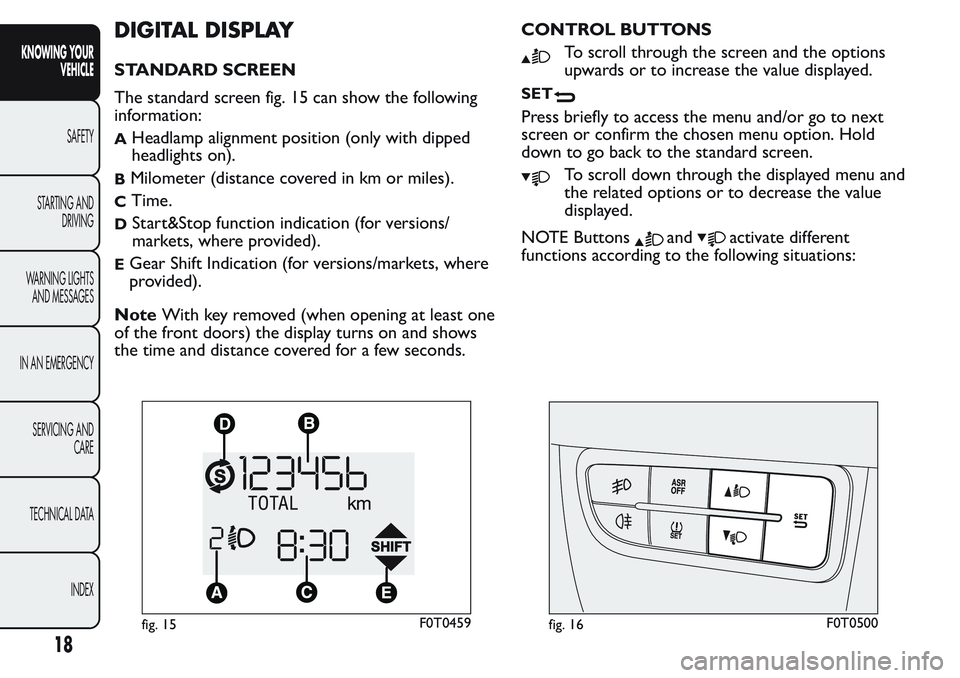
The standard screen fig. 15 can show the following
information:
AHeadlamp alignment position (only with dipped
headlights on).
BMilometer (distance covered in km or miles).
CTime.
DStart&Stop function indication (for versions/
markets, where provided).
EGear Shift Indication (for versions/markets, where
provided).
NoteWith key removed (when opening at least one
of the front doors) the display turns on and shows
the time and distance covered for a few seconds.CONTROL BUTTONS
To scroll through the screen and the options
upwards or to increase the value displayed.
SET
Press briefly to access the menu and/or go to next
screen or confirm the chosen menu option. Hold
down to go back to the standard screen.
To scroll down through the displayed menu and
the related options or to decrease the value
displayed.
NOTE Buttons
andactivate different
functions according to the following situations:
fig. 15F0T0459fig. 16F0T0500
18
KNOWING YOUR
VEHICLE
SAFETY
STARTING AND
DRIVING
WARNING LIGHTS
AND MESSAGES
IN AN EMERGENCY
SERVICING AND
CARE
TECHNICAL DATA
INDEX
Page 23 of 272
Adjusting headlight alignment
With the dipped beam headlights on, press button
orto adjust headlight alignment.
Setup menu
- in menus, to scroll up and down;
- in setting operations, to increase or decrease a
value.
19
KNOWING YOUR
VEHICLE
SAFETY
STARTING AND
DRIVING
WARNING LIGHTS
AND MESSAGES
IN AN EMERGENCY
SERVICING AND
CARE
TECHNICAL DATA
INDEX
Page 24 of 272
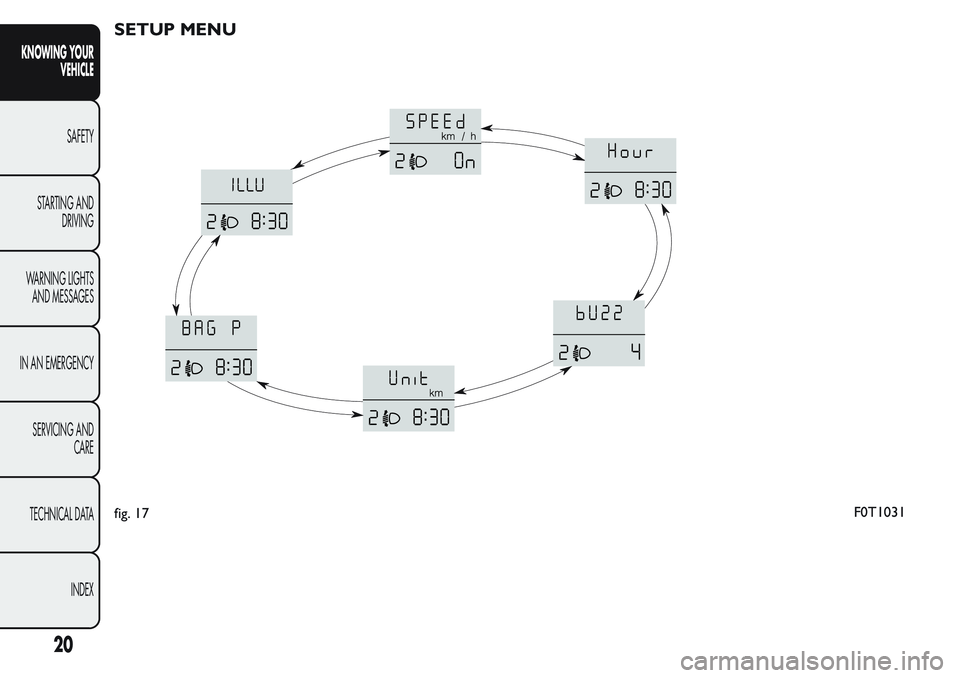
SETUP MENU
fig. 17F0T1031
20
KNOWING YOUR
VEHICLE
SAFETY
STARTING AND
DRIVING
WARNING LIGHTS
AND MESSAGES
IN AN EMERGENCY
SERVICING AND
CARE
TECHNICAL DATA
INDEX
Page 25 of 272
Setup menu function
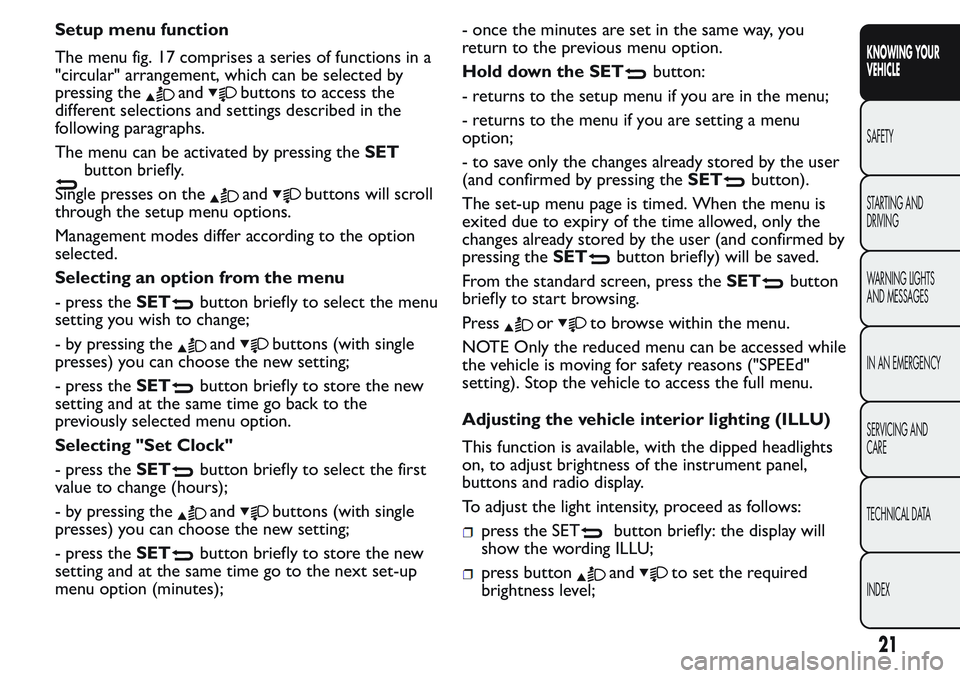
The menu fig. 17 comprises a series of functions in a
"circular" arrangement, which can be selected by
pressing the
andbuttons to access the
different selections and settings described in the
following paragraphs.
The menu can be activated by pressing theSET
button briefly.
Single presses on the
andbuttons will scroll
through the setup menu options.
Management modes differ according to the option
selected.
Selecting an option from the menu
- press theSET
button briefly to select the menu
setting you wish to change;
- by pressing the
andbuttons (with single
presses) you can choose the new setting;
- press theSET
button briefly to store the new
setting and at the same time go back to the
previously selected menu option.
Selecting "Set Clock"
- press theSET
button briefly to select the first
value to change (hours);
- by pressing the
andbuttons (with single
presses) you can choose the new setting;
- press theSET
button briefly to store the new
setting and at the same time go to the next set-up
menu option (minutes);- once the minutes are set in the same way, you
return to the previous menu option.
Hold down the SET
button:
- returns to the setup menu if you are in the menu;
- returns to the menu if you are setting a menu
option;
- to save only the changes already stored by the user
(and confirmed by pressing theSET
button).
The set-up menu page is timed. When the menu is
exited due to expiry of the time allowed, only the
changes already stored by the user (and confirmed by
pressing theSET
button briefly) will be saved.
From the standard screen, press theSET
button
briefly to start browsing.
Press
orto browse within the menu.
NOTE Only the reduced menu can be accessed while
the vehicle is moving for safety reasons ("SPEEd"
setting). Stop the vehicle to access the full menu.
Adjusting the vehicle interior lighting (ILLU)
This function is available, with the dipped headlights
on, to adjust brightness of the instrument panel,
buttons and radio display.
To adjust the light intensity, proceed as follows:
press the SETbutton briefly: the display will
show the wording ILLU;
press buttonandto set the required
brightness level;
21
KNOWING YOUR
VEHICLE
SAFETY
STARTING AND
DRIVING
WARNING LIGHTS
AND MESSAGES
IN AN EMERGENCY
SERVICING AND
CARE
TECHNICAL DATA
INDEX