brake FIAT FIORINO 2018 Owner handbook (in English)
[x] Cancel search | Manufacturer: FIAT, Model Year: 2018, Model line: FIORINO, Model: FIAT FIORINO 2018Pages: 196, PDF Size: 4.99 MB
Page 102 of 196
The parking sensors work properly
with the swing doors closed. If they are
open, they can cause the system to
send false signals: always close the rear
doors.
Also, do not apply stickers to the
sensors.
The following conditions may influence
the performance of the parking
assistance system:
Reduced sensor sensitivity and a
reduction in the parking assistance
system performance could be due to
the presence on the surface of the
sensor of: ice, snow, mud, thick paint.
The sensor may detect a non-
existent obstacle (echo noise) due to
mechanical noises, for example when
washing the vehicle, in case of rain,
strong wind, hail.
The warnings sent by the sensor
can also be altered by the presence of
ultrasonic systems (e.g. pneumatic
brakes of trucks or pneumatic drills)
near the car.
Detection of obstacles in the upper
part of the vehicle (particularly in the
case of vans or chassis cabs) may not
be guaranteed because the system
detects obstacles that could strike the
lower part of the vehicle.
WARNING
99)Parking manoeuvres, however, are
always the driver’s responsibility. While
carrying out these manoeuvres, always
make sure that no people (especially
children) or animals are in the area
concerned. Parking sensors are designed
to assist drivers; however, you must always
concentrate fully during potentially
dangerous manoeuvres, even if carried out
at low speeds.
WARNING
31)The sensor must be free of mud, dirt,
snow or ice in order for the system to
work. Be careful not to scratch or damage
the sensors while cleaning them. Avoid
using dry, rough or hard cloths. The
sensors should be washed using clean
water with the addition of car shampoo if
necessary. When using special washing
equipment such as high pressure jets
or steam cleaning, clean the sensors very
quickly keeping the jet more than 10 cm
away.
START&STOP
SYSTEM
(for versions/markets, where provided)
101) 102) 103) 104)
IN BRIEF
The Start&Stop device automatically
stops the engine each time the
vehicle is stationary and all the
conditions for automatic switch-off
have been met, and starts it again
when the driver wants to move off.
This improves the efficiency of the
vehicle by reducing fuel consumption,
the emission of harmful gases and
noise pollution.
OPERATING MODE
Stopping the engine
Versions with manual transmission
With the vehicle stationary, the engine
stops with the gearbox in neutral and
the clutch pedal released.
100
STARTING AND DRIVING
Page 103 of 196
Versions with Comfort-matic
transmission
With the vehicle stationary and the
brake pedal pressed, the engine stops
if the gear lever is in position other
thanR. In the event of stops uphill,
engine switching off is disabled to make
the "Hill Holder" function available
(works only with the engine running).
The warning light on the instrument
panel switches on to signal that the
engine has stopped.
Restarting the engine
Versions with manual transmission
Depress the clutch pedal to restart
the engine.
Versions with Comfort-matic
transmission
Releasing the brake pedal the engine
restarts automatically; the icon switches
off on the display. If the engine is
restarted with the “Hill Holder” function
off, move the lever towards (+), (-)or
Rand the engine restarts.MANUAL ACTIVATION
AND DEACTIVATION
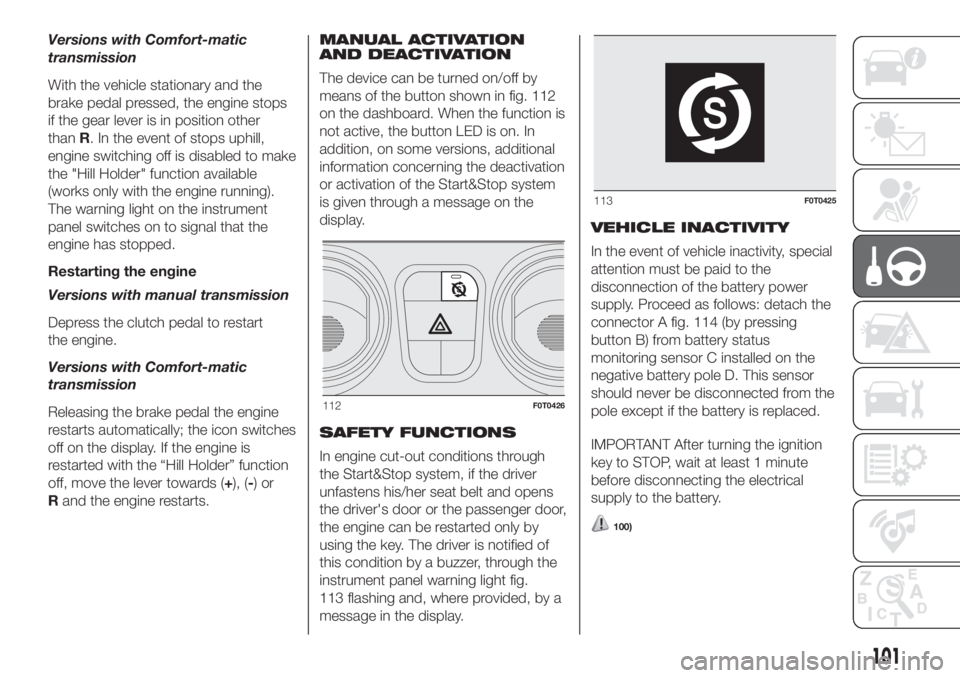
The device can be turned on/off by
means of the button shown in fig. 112
on the dashboard. When the function is
not active, the button LED is on. In
addition, on some versions, additional
information concerning the deactivation
or activation of the Start&Stop system
is given through a message on the
display.
SAFETY FUNCTIONS
In engine cut-out conditions through
the Start&Stop system, if the driver
unfastens his/her seat belt and opens
the driver's door or the passenger door,
the engine can be restarted only by
using the key. The driver is notified of
this condition by a buzzer, through the
instrument panel warning light fig.
113 flashing and, where provided, by a
message in the display.VEHICLE INACTIVITY
In the event of vehicle inactivity, special
attention must be paid to the
disconnection of the battery power
supply. Proceed as follows: detach the
connector A fig. 114 (by pressing
button B) from battery status
monitoring sensor C installed on the
negative battery pole D. This sensor
should never be disconnected from the
pole except if the battery is replaced.
IMPORTANT After turning the ignition
key to STOP, wait at least 1 minute
before disconnecting the electrical
supply to the battery.
100)
112F0T0426
113F0T0425
101
Page 104 of 196
WARNING
100)If the battery needs to be replaced,
always contact a Fiat Dealership. Replace
the battery with a new one of the same
type and specifications.
101)Before opening the bonnet, make
sure that the vehicle is switched off and the
key is in the OFF position. Please follow
the instructions on the decal near the front
crossmember. It is advisable to extract
the key when there are other people in the
vehicle.
102)The vehicle should always be
evacuated after the key has been removed
or turned to the OFF position. When
refuelling, make sure that the car is
switched off with the key in the OFF
position.103)For vehicles with robotised gearbox,
in the event of automatic engine stopping
with the car on a slope, the engine should
be restarted by moving the gear lever
towards (+) or (-) without releasing the
brake pedal. For vehicles with robotised
gearbox and Hill Holder function, in the
event of automatic engine stopping with
the car on a slope, the engine must be
restarted by moving the gear lever towards
(+) or (-) without releasing the brake pedal,
so that the Hill Holder function, active
only with the engine running, becomes
available.
104)If the climate comfort is to be
favoured, the Start&Stop system can be
deactivated, for a continuous operation of
the climate control system.
REFUELLING THE
VEHICLE
105)
32) 33)
PETROL ENGINES
Use unleaded petrol only, with an
octane number (R.O.N.) not lower than
95.
IMPORTANT Never introduce leaded
petrol to the tank, even in small
amounts in an emergency, as this
would damage the catalytic converter
beyond repair.
DIESEL ENGINES
Only use Diesel for motor vehicles
(EN590 specification).
114F0T0428
102
STARTING AND DRIVING
Page 107 of 196
WARNING
32)For diesel engines, use only diesel fuel
for motor vehicles in accordance with
EN590 European specifications. The use of
other products or mixtures may damage
the engine beyond repair and
consequently invalidate the warranty, due
to the damage caused. If you accidentally
introduce other types of fuel into the tank,
do not start the engine. Empty the tank.
If the engine has been run for even an
extremely limited amount of time, you must
not only drain the fuel tank, but the rest of
the supply circuit as well.
33)You must not open the right sliding side
door with the fuel cap open while
refuelling. Check that the fuel cap is closed
while opening/closing the sliding side
door.
34)Methane refuelling stations are not
authorised to refill the cylinders when the
inspection date has expired. The check
valve prevents the methane from flowing
back to the fuel filler.
TOWING TRAILERS
IMPORTANT NOTES
The vehicle must be equipped with a
type-approved tow hook and adequate
electrical system to tow trailers.
Installation should be carried out by
specialised technicians who will issue
the required papers for travelling on
roads.
Install any specific and/or additional
door mirrors as specified by the
Highway Code.
Remember that, when towing a trailer,
steep hills are harder to climb, braking
distances increase and overtaking
takes longer depending on the overall
weight of the trailer.
Engage a low gear when driving
downhill, rather than constantly using
the brake.
The weight of the trailer on the vehicle
tow hook will reduce the loading
capacity of the vehicle by the same
amount.
To make sure that the maximum
towable weight is not exceeded (given
in the vehicle registration document)
account should be taken of the fully
laden trailer, including accessories and
luggage.Do not exceed the speed limits specific
to each country you are driving in, in
the case of vehicles towing trailers.
In all cases, the top speed must not
exceed 80 km/h.
IMPORTANT For Natural Power
versions, trailers cannot be towed so
there are no provisions for fitting a tow
hook.
106) 107)
WARNING
106)The ABS with which the vehicle may
be equipped will not control the trailer's
braking system. Particular caution is
required on slippery roads.
107)Never modify the braking system of
the vehicle to control the trailer brake. The
trailer braking system must be fully
independent from the hydraulic system of
the vehicle.
105
Page 109 of 196
HAZARD WARNING
LIGHTS
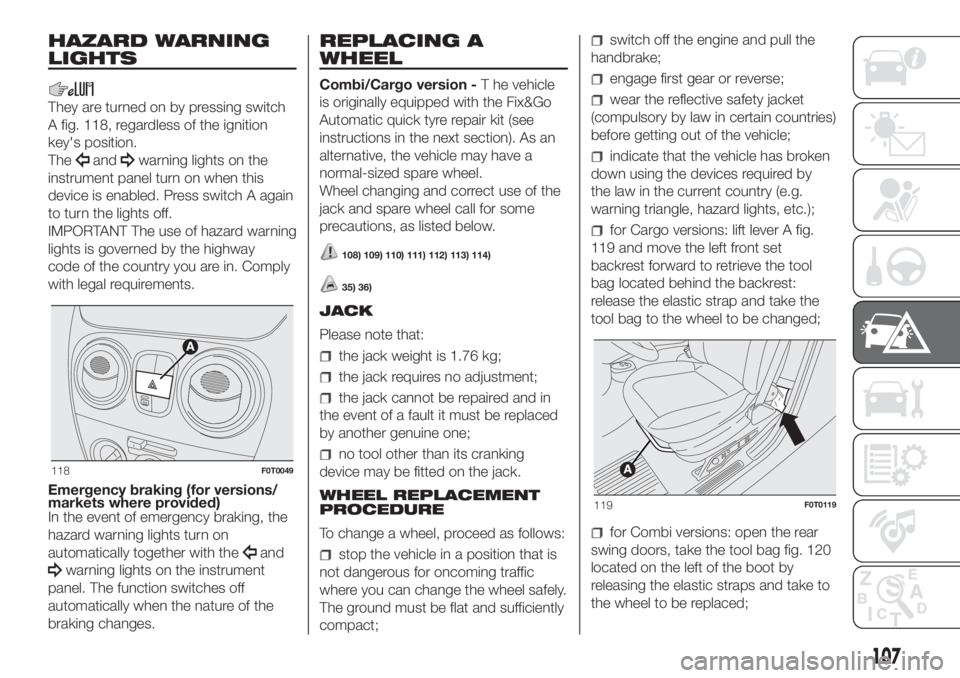
They are turned on by pressing switch
A fig. 118, regardless of the ignition
key's position.
The
andwarning lights on the
instrument panel turn on when this
device is enabled. Press switch A again
to turn the lights off.
IMPORTANT The use of hazard warning
lights is governed by the highway
code of the country you are in. Comply
with legal requirements.
Emergency braking (for versions/
markets where provided)
In the event of emergency braking, the
hazard warning lights turn on
automatically together with the
and
warning lights on the instrument
panel. The function switches off
automatically when the nature of the
braking changes.
REPLACING A
WHEEL
Combi/Cargo version -T he vehicle
is originally equipped with the Fix&Go
Automatic quick tyre repair kit (see
instructions in the next section). As an
alternative, the vehicle may have a
normal-sized spare wheel.
Wheel changing and correct use of the
jack and spare wheel call for some
precautions, as listed below.
108) 109) 110) 111) 112) 113) 114)
35) 36)
JACK
Please note that:
the jack weight is 1.76 kg;
the jack requires no adjustment;
the jack cannot be repaired and in
the event of a fault it must be replaced
by another genuine one;
no tool other than its cranking
device may be fitted on the jack.
WHEEL REPLACEMENT
PROCEDURE
To change a wheel, proceed as follows:
stop the vehicle in a position that is
not dangerous for oncoming traffic
where you can change the wheel safely.
The ground must be flat and sufficiently
compact;
switch off the engine and pull the
handbrake;
engage first gear or reverse;
wear the reflective safety jacket
(compulsory by law in certain countries)
before getting out of the vehicle;
indicate that the vehicle has broken
down using the devices required by
the law in the current country (e.g.
warning triangle, hazard lights, etc.);
for Cargo versions: lift lever A fig.
119 and move the left front set
backrest forward to retrieve the tool
bag located behind the backrest:
release the elastic strap and take the
tool bag to the wheel to be changed;
for Combi versions: open the rear
swing doors, take the tool bag fig. 120
located on the left of the boot by
releasing the elastic straps and take to
the wheel to be replaced;
118F0T0049
119F0T0119
107
Page 113 of 196
FIX&GO
AUTOMATIC KIT
115) 116)
37)
The Fix&Go automatic quick tyre repair
kit is located in a special container in
the boot.
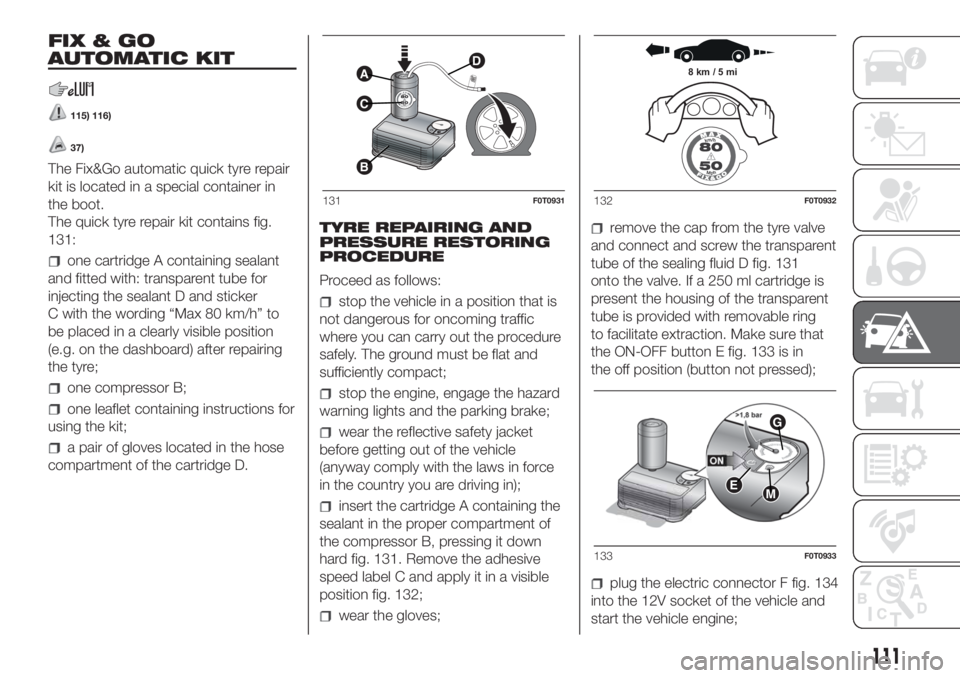
The quick tyre repair kit contains fig.
131:
one cartridge A containing sealant
and fitted with: transparent tube for
injecting the sealant D and sticker
C with the wording “Max 80 km/h” to
be placed in a clearly visible position
(e.g. on the dashboard) after repairing
the tyre;
one compressor B;
one leaflet containing instructions for
using the kit;
a pair of gloves located in the hose
compartment of the cartridge D.TYRE REPAIRING AND
PRESSURE RESTORING
PROCEDURE
Proceed as follows:
stop the vehicle in a position that is
not dangerous for oncoming traffic
where you can carry out the procedure
safely. The ground must be flat and
sufficiently compact;
stop the engine, engage the hazard
warning lights and the parking brake;
wear the reflective safety jacket
before getting out of the vehicle
(anyway comply with the laws in force
in the country you are driving in);
insert the cartridge A containing the
sealant in the proper compartment of
the compressor B, pressing it down
hard fig. 131. Remove the adhesive
speed label C and apply it in a visible
position fig. 132;
wear the gloves;
remove the cap from the tyre valve
and connect and screw the transparent
tube of the sealing fluid D fig. 131
onto the valve. If a 250 ml cartridge is
present the housing of the transparent
tube is provided with removable ring
to facilitate extraction. Make sure that
the ON-OFF button E fig. 133 is in
the off position (button not pressed);
plug the electric connector F fig. 134
into the 12V socket of the vehicle and
start the vehicle engine;
A
C
B
D
131F0T0931
8 km / 5 mi
132F0T0932
EM
G
133F0T0933
111
Page 114 of 196
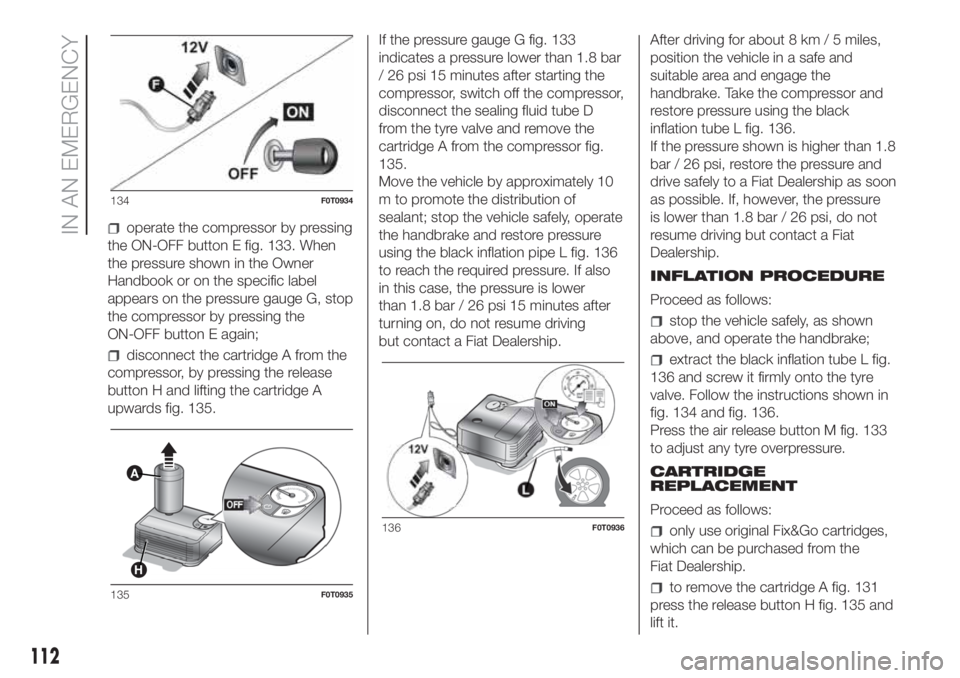
operate the compressor by pressing
the ON-OFF button E fig. 133. When
the pressure shown in the Owner
Handbook or on the specific label
appears on the pressure gauge G, stop
the compressor by pressing the
ON-OFF button E again;
disconnect the cartridge A from the
compressor, by pressing the release
button H and lifting the cartridge A
upwards fig. 135.If the pressure gauge G fig. 133
indicates a pressure lower than 1.8 bar
/ 26 psi 15 minutes after starting the
compressor, switch off the compressor,
disconnect the sealing fluid tube D
from the tyre valve and remove the
cartridge A from the compressor fig.
135.
Move the vehicle by approximately 10
m to promote the distribution of
sealant; stop the vehicle safely, operate
the handbrake and restore pressure
using the black inflation pipe L fig. 136
to reach the required pressure. If also
in this case, the pressure is lower
than 1.8 bar / 26 psi 15 minutes after
turning on, do not resume driving
but contact a Fiat Dealership.After driving for about 8 km / 5 miles,
position the vehicle in a safe and
suitable area and engage the
handbrake. Take the compressor and
restore pressure using the black
inflation tube L fig. 136.
If the pressure shown is higher than 1.8
bar / 26 psi, restore the pressure and
drive safely to a Fiat Dealership as soon
as possible. If, however, the pressure
is lower than 1.8 bar / 26 psi, do not
resume driving but contact a Fiat
Dealership.
INFLATION PROCEDURE
Proceed as follows:
stop the vehicle safely, as shown
above, and operate the handbrake;
extract the black inflation tube L fig.
136 and screw it firmly onto the tyre
valve. Follow the instructions shown in
fig. 134 and fig. 136.
Press the air release button M fig. 133
to adjust any tyre overpressure.
CARTRIDGE
REPLACEMENT
Proceed as follows:
only use original Fix&Go cartridges,
which can be purchased from the
Fiat Dealership.
to remove the cartridge A fig. 131
press the release button H fig. 135 and
lift it.
134F0T0934
A
H
135F0T0935
136F0T0936
112
IN AN EMERGENCY
Page 117 of 196

Light bulbs
Light bulbs Type Power Figure ref.
Main beam headlights H4 55W E
Dipped headlights H4 60W D
Front side lights W5W 5W A
Front direction indicators PY21W 2IW B
Side turn light WY5W 5W A
Rear direction indicators PY2IW 21W B
Tail lights/rear fog lights P4/21W 4W/21W B
Stop P21W 21W B
Number plate W5W 5W C
3rd brake light
(*)W5W 5W A
Reversing light P21W 21W B
Front fog lights (for versions/markets where provided) H1 55W E
Front roof light with movable lens C 10W C
Front ceiling light with spot lights (for versions/
markets, where provided)C 10W C
Rear roof light (for versions/markets, where provided) C 10W C
(*)IMPORTANT For versions/markets, where provided, in the versions with tinted windows replace the whole light unit, as it is sealed.
115
Page 119 of 196
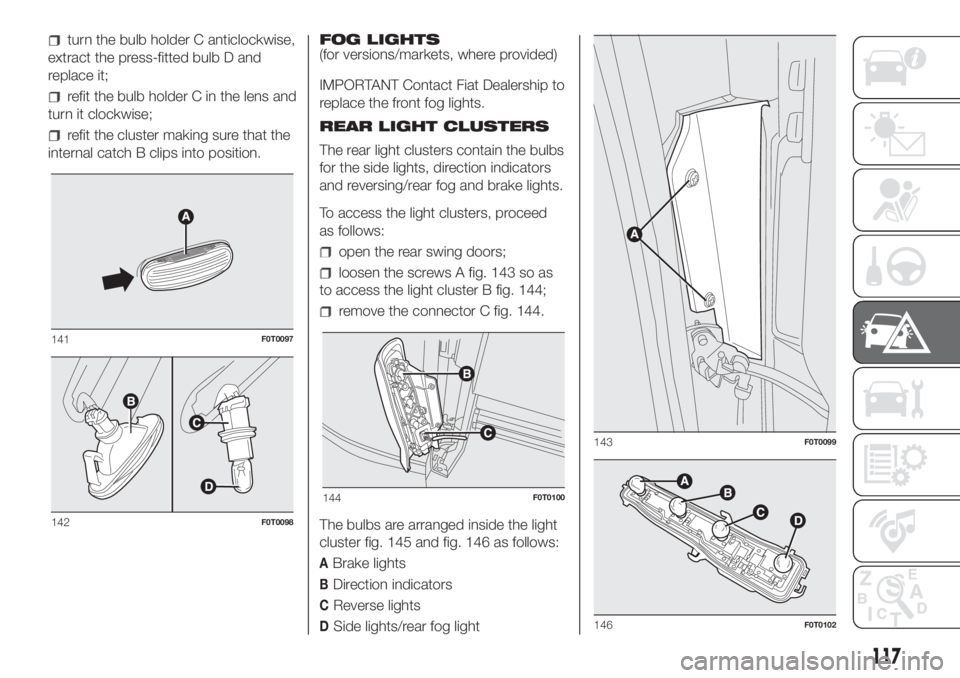
turn the bulb holder C anticlockwise,
extract the press-fitted bulb D and
replace it;
refit the bulb holder C in the lens and
turn it clockwise;
refit the cluster making sure that the
internal catch B clips into position.FOG LIGHTS
(for versions/markets, where provided)
IMPORTANT Contact Fiat Dealership to
replace the front fog lights.
REAR LIGHT CLUSTERS
The rear light clusters contain the bulbs
for the side lights, direction indicators
and reversing/rear fog and brake lights.
To access the light clusters, proceed
as follows:
open the rear swing doors;
loosen the screws A fig. 143 so as
to access the light cluster B fig. 144;
remove the connector C fig. 144.
The bulbs are arranged inside the light
cluster fig. 145 and fig. 146 as follows:
ABrake lights
BDirection indicators
CReverse lights
DSide lights/rear fog light
141F0T0097
142F0T0098
144F0T0100
143F0T0099
146F0T0102
117
Page 120 of 196

Pull the 5 tabs E fig. 145 outwards to
access the bulbs.THIRD BRAKE LIGHTS
Swing door versions
Contact Fiat Dealership to replace the
third brake lights fig. 147 .
NUMBER PLATE LIGHTS
Proceed as follows to replace the bulbs
A fig. 148:
operate the holding tabs at the
points indicated by the arrows, and
remove the bulb holder;
turn the bulb holder B fig. 149
anticlockwise, then remove bulb C.
145F0T0101
147F0T0103
148F0T0104
149F0T0105
118
IN AN EMERGENCY