remote start FIAT FREEMONT 2011 Owner handbook (in English)
[x] Cancel search | Manufacturer: FIAT, Model Year: 2011, Model line: FREEMONT, Model: FIAT FREEMONT 2011Pages: 267, PDF Size: 5.16 MB
Page 77 of 267
ILLUMINATED ENTRY
The courtesy lights will turn on when you use the
Remote Keyless Entry (RKE) transmitter to unlock the
doors or open any door or liftgate.
This feature also turns on the approach lighting in the
outside mirrors (if equipped). Refer to “Mirrors” in
“Knowing Your Vehicle” for further information.
The interior lights will fade to off after approximately
30 seconds or they will immediately fade to off once
the ignition is cycled to the ON/RUN position from the
OFF position.
NOTE:
• The front courtesy overhead console and door cour-
tesy lights do not turn on if the dimmer control is in the
"Dome ON" position (extreme top position).
• The Illuminated Entry system will not operate if the
dimmer control is in the “Dome defeat” position (ex-
treme bottom position).WINDSHIELD WIPERS AND
WASHERS
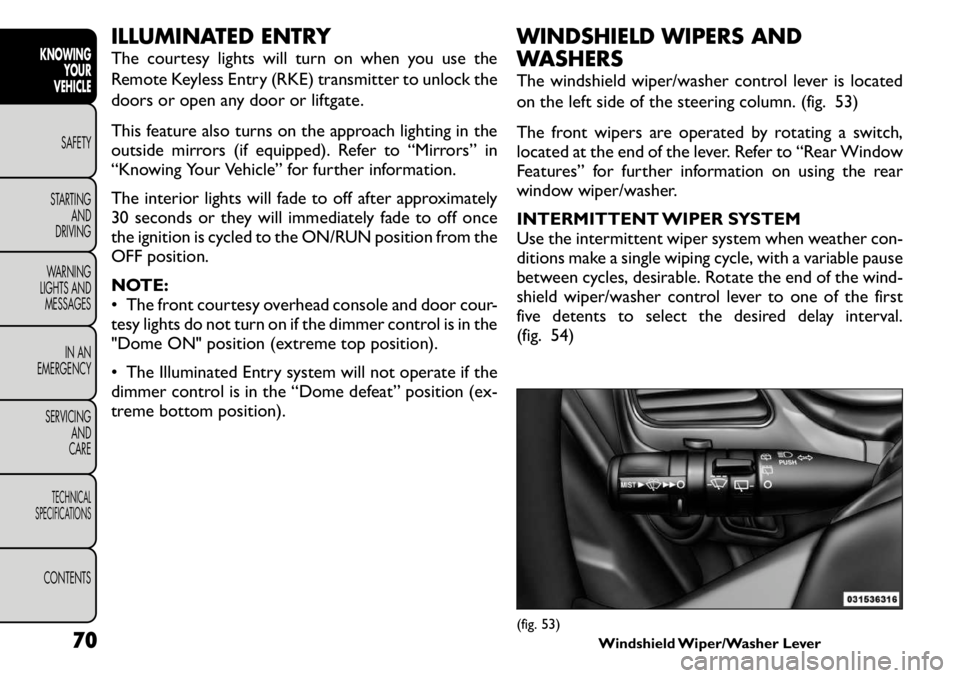
The windshield wiper/washer control lever is located
on the left side of the steering column. (fig. 53)
The front wipers are operated by rotating a switch,
located at the end of the lever. Refer to “Rear Window
Features” for further information on using the rear
window wiper/washer.
INTERMITTENT WIPER SYSTEM
Use the intermittent wiper system when weather con-
ditions make a single wiping cycle, with a variable pause
between cycles, desirable. Rotate the end of the wind-
shield wiper/washer control lever to one of the first
five detents to select the desired delay interval.
(fig. 54)
(fig. 53)
Windshield Wiper/Washer Lever
70
KNOWING
YOUR
VEHICLE
SAFETY
STARTING AND
DRIVING
WARNING
LIGHTS AND
MESSAGES
IN AN
EMERGENCY
SERVICING AND
CARETECHNICAL
SPECIFICATIONSCONTENTS
Page 84 of 267
OVERHEAD CONSOLE
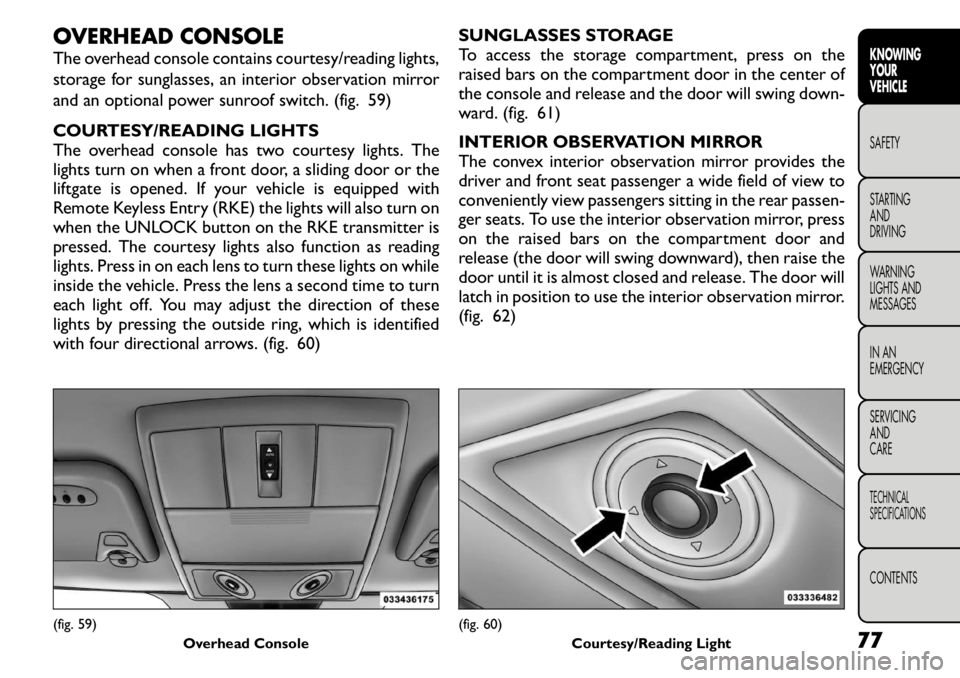
The overhead console contains courtesy/reading lights,
storage for sunglasses, an interior observation mirror
and an optional power sunroof switch. (fig. 59)
COURTESY/READING LIGHTS
The overhead console has two courtesy lights. The
lights turn on when a front door, a sliding door or the
liftgate is opened. If your vehicle is equipped with
Remote Keyless Entry (RKE) the lights will also turn on
when the UNLOCK button on the RKE transmitter is
pressed. The courtesy lights also function as reading
lights. Press in on each lens to turn these lights on while
inside the vehicle. Press the lens a second time to turn
each light off. You may adjust the direction of these
lights by pressing the outside ring, which is identified
with four directional arrows. (fig. 60)SUNGLASSES STORAGE
To access the storage compartment, press on the
raised bars on the compartment door in the center of
the console and release and the door will swing down-
ward. (fig. 61)
INTERIOR OBSERVATION MIRROR
The convex interior observation mirror provides the
driver and front seat passenger a wide field of view to
conveniently view passengers sitting in the rear passen-
ger seats. To use the interior observation mirror, press
on the raised bars on the compartment door and
release (the door will swing downward), then raise the
door until it is almost closed and release. The door will
latch in position to use the interior observation mirror.
(fig. 62)(fig. 59)
Overhead Console
(fig. 60)Courtesy/Reading Light 77
KNOWING
YOURVEHICLESAFETY
STARTING ANDDRIVING
WARNING
LIGHTS AND
MESSAGES
IN AN
EMERGENCY
SERVICING AND
CARETECHNICAL
SPECIFICATIONSCONTENTS
Page 97 of 267
WARNING!
For personal security and safety in the
event of an accident , lock the vehicle
doors before you drive as well as when you park
and leave the vehicle.
When leaving the vehicle, always remove the
Key Fob from the vehicle and lock your vehicle.
Unsupervised use of vehicle equipment may
cause severe personal injuries or death.
Never leave children alone in a vehicle. Leaving
unattended children in a vehicle is dangerous for
a number of reasons. A child or others could be
seriously or fatally injured. Do not leave the Key
Fob in the ignition. A child could operate power
windows, other controls, or move the vehicle.
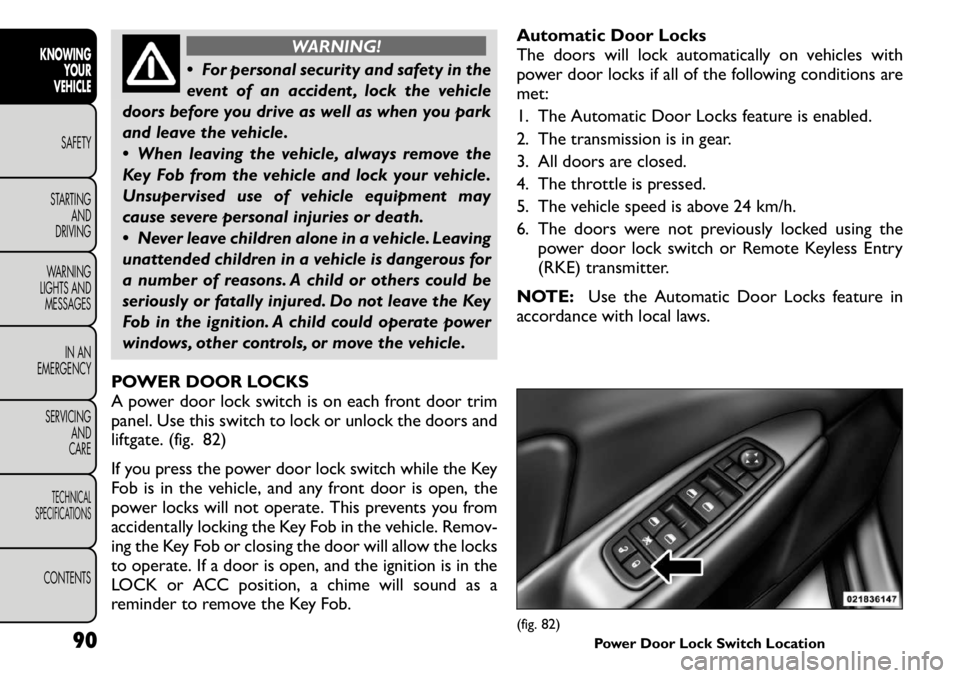
POWER DOOR LOCKS
A power door lock switch is on each front door trim
panel. Use this switch to lock or unlock the doors and
liftgate. (fig. 82)
If you press the power door lock switch while the Key
Fob is in the vehicle, and any front door is open, the
power locks will not operate. This prevents you from
accidentally locking the Key Fob in the vehicle. Remov-
ing the Key Fob or closing the door will allow the locks
to operate. If a door is open, and the ignition is in the
LOCK or ACC position, a chime will sound as a
reminder to remove the Key Fob. Automatic Door Locks
The doors will lock automatically on vehicles with
power door locks if all of the following conditions aremet:
1. The Automatic Door Locks feature is enabled.
2. The transmission is in gear.
3. All doors are closed.
4. The throttle is pressed.
5. The vehicle speed is above 24 km/h.
6. The doors were not previously locked using the
power door lock switch or Remote Keyless Entry
(RKE) transmitter.
NOTE: Use the Automatic Door Locks feature in
accordance with local laws.
(fig. 82) Power Door Lock Switch Location
90
KNOWING
YOUR
VEHICLE
SAFETY
STARTING AND
DRIVING
WARNING
LIGHTS AND
MESSAGES
IN AN
EMERGENCY
SERVICING AND
CARETECHNICAL
SPECIFICATIONSCONTENTS
Page 100 of 267
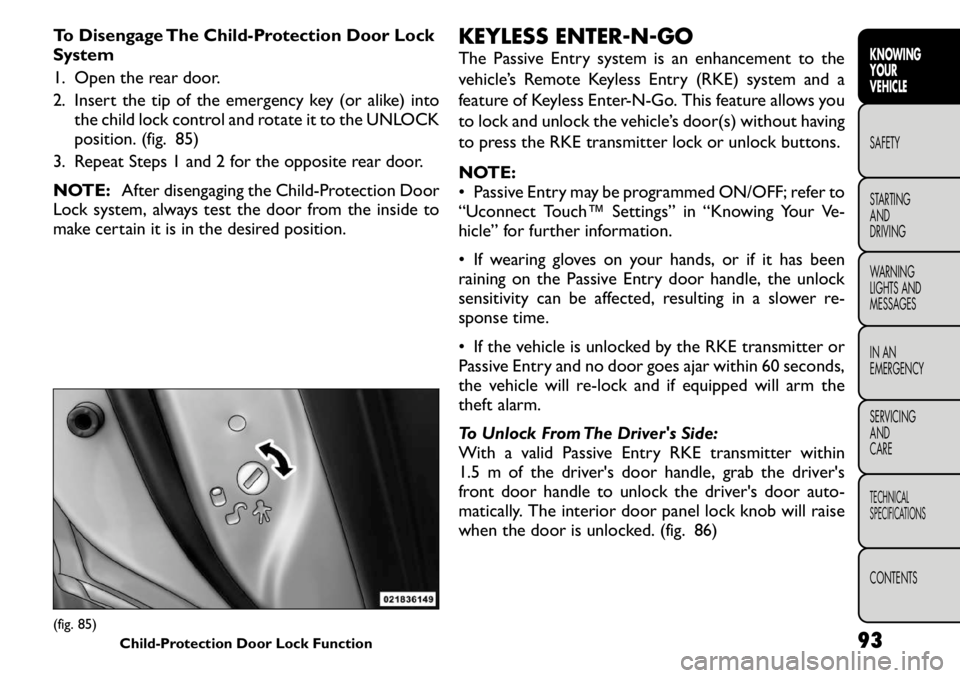
To Disengage The Child-Protection Door Lock
System
1. Open the rear door.
2. Insert the tip of the emergency key (or alike) intothe child lock control and rotate it to the UNLOCK
position. (fig. 85)
3. Repeat Steps 1 and 2 for the opposite rear door.
NOTE: After disengaging the Child-Protection Door
Lock system, always test the door from the inside to
make certain it is in the desired position. KEYLESS ENTER-N-GO
The Passive Entry system is an enhancement to the
vehicle’s Remote Keyless Entry (RKE) system and a
feature of Keyless Enter-N-Go. This feature allows you
to lock and unlock the vehicle’s door(s) without having
to press the RKE transmitter lock or unlock buttons.
NOTE:
• Passive Entry may be programmed ON/OFF; refer to
“Uconnect Touch™ Settings” in “Knowing Your Ve-
hicle” for further information.
• If wearing gloves on your hands, or if it has been
raining on the Passive Entry door handle, the unlock
sensitivity can be affected, resulting in a slower re-
sponse time.
• If the vehicle is unlocked by the RKE transmitter or
Passive Entry and no door goes ajar within 60 seconds,
the vehicle will re-lock and if equipped will arm the
theft alarm.
To Unlock From The Driver's Side:
With a valid Passive Entry RKE transmitter within
1.5 m of the driver's door handle, grab the driver's
front door handle to unlock the driver's door auto-
matically. The interior door panel lock knob will raise
when the door is unlocked. (fig. 86)(fig. 85)
Child-Protection Door Lock Function 93
KNOWING
YOURVEHICLESAFETY
STARTING ANDDRIVING
WARNING
LIGHTS AND
MESSAGES
IN AN
EMERGENCY
SERVICING AND
CARETECHNICAL
SPECIFICATIONSCONTENTS
Page 134 of 267

STEERING WHEEL AUDIO
CONTROLS — IF EQUIPPED
The remote sound system controls are located on the
rear surface of the steering wheel. The left and right-
hand controls are rocker-type switches with a pushbut-
ton in the center of each switch. Reach behind the
steering wheel to access the switches. (fig. 108)
RIGHT-HAND SWITCH FUNCTIONS
• Press the top of the switch to increase the volume.
• Press the bottom of the switch to decrease thevolume.
• Press the button in the center of the switch to change modes (i.e., AM, FM, etc.). LEFT-HAND SWITCH FUNCTIONS FOR
RADIO OPERATION
• Press the top of the switch to SEEK the next listen-
able station up from the current setting.
• Press the bottom of the switch to SEEK the next listenable station down from the current setting.
• Press the button in the center of the switch to tune to the next preset that you have programmed.
LEFT-HAND SWITCH FUNCTIONS FOR
MEDIA (I.E., CD) OPERATION
• Press the top of the switch once to listen to the next track.
• Press the bottom of the switch once either to listen to the beginning of the current track or to listen to
the beginning of the previous track if it is within one
second after the current track begins to play.
• Press the switch up or down twice to listen to the second track, three times to listen to the third track,
and so forth.
• Press the button located in the center of the switch to change to the next preset that you have
programmed.(fig. 108)Remote Sound Controls (Back View Of Steering Wheel) 127
KNOWING
YOURVEHICLESAFETY
STARTING ANDDRIVING
WARNING
LIGHTS AND
MESSAGES
IN AN
EMERGENCY
SERVICING AND
CARETECHNICAL
SPECIFICATIONSCONTENTS
Page 135 of 267
VIDEO ENTERTAINMENT SYSTEM
(VES)™ — IF EQUIPPED
The optional Video Entertainment System (VES)™
includes the following components for rear seat enter-
tainment:
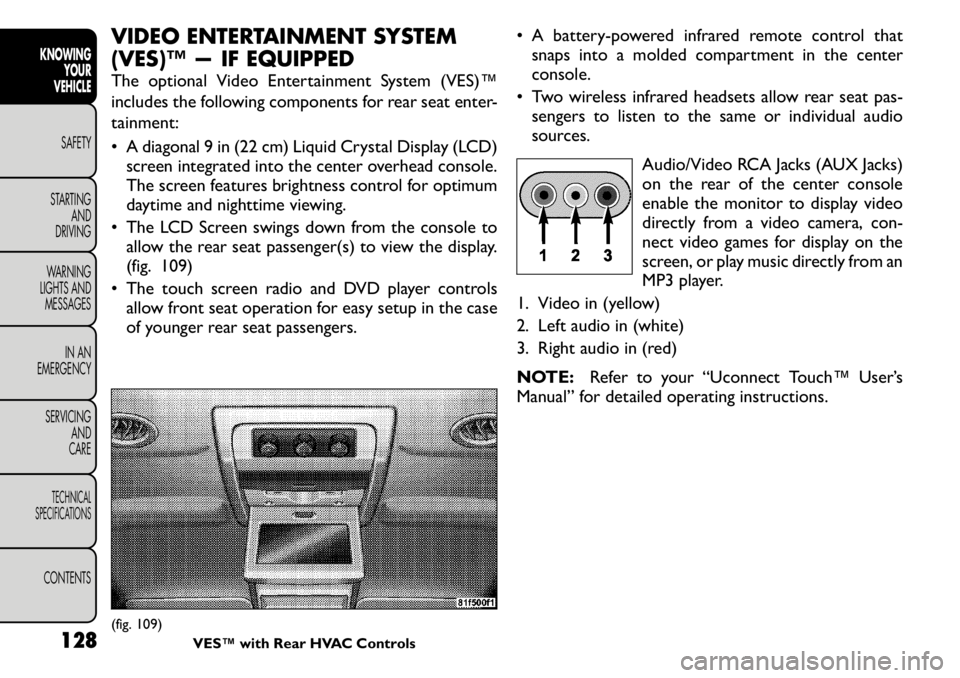
• A diagonal 9 in (22 cm) Liquid Crystal Display (LCD)screen integrated into the center overhead console.
The screen features brightness control for optimum
daytime and nighttime viewing.
• The LCD Screen swings down from the console to allow the rear seat passenger(s) to view the display.
(fig. 109)
• The touch screen radio and DVD player controls allow front seat operation for easy setup in the case
of younger rear seat passengers. • A battery-powered infrared remote control that
snaps into a molded compartment in the center
console.
• Two wireless infrared headsets allow rear seat pas- sengers to listen to the same or individual audio
sources.
Audio/Video RCA Jacks (AUX Jacks)
on the rear of the center console
enable the monitor to display video
directly from a video camera, con-
nect video games for display on the
screen, or play music directly from an
MP3 player.
1. Video in (yellow)
2. Left audio in (white)
3. Right audio in (red)
NOTE: Refer to your “Uconnect Touch™ User’s
Manual” for detailed operating instructions.(fig. 109) VES™ with Rear HVAC Controls
128
KNOWINGYOUR
VEHICLE
SAFETY
STARTING AND
DRIVING
WARNING
LIGHTS AND
MESSAGES
IN AN
EMERGENCY
SERVICING AND
CARETECHNICAL
SPECIFICATIONSCONTENTS
Page 197 of 267
IN AN EMERGENCY
JUMP-STARTING
If your vehicle has a discharged battery, it can be
jump-started using a set of jumper cables and a battery
in another vehicle or by using a portable battery
booster pack. Jump-starting can be dangerous if done
improperly so please follow the procedures in this
section carefully.
NOTE: When using a portable battery booster pack
follow the manufacturer's operating instructions and
precautions.
Do not use a portable battery booster
pack or any other booster source with a
system voltage greater than 12 Volts or
damage to the battery, starter motor, alternator
or electrical system may occur.
WARNING!
Do not attempt jump-starting if the bat-
tery is frozen. It could rupture or explode
and cause personal injury. PREPARATIONS FOR JUMP-START
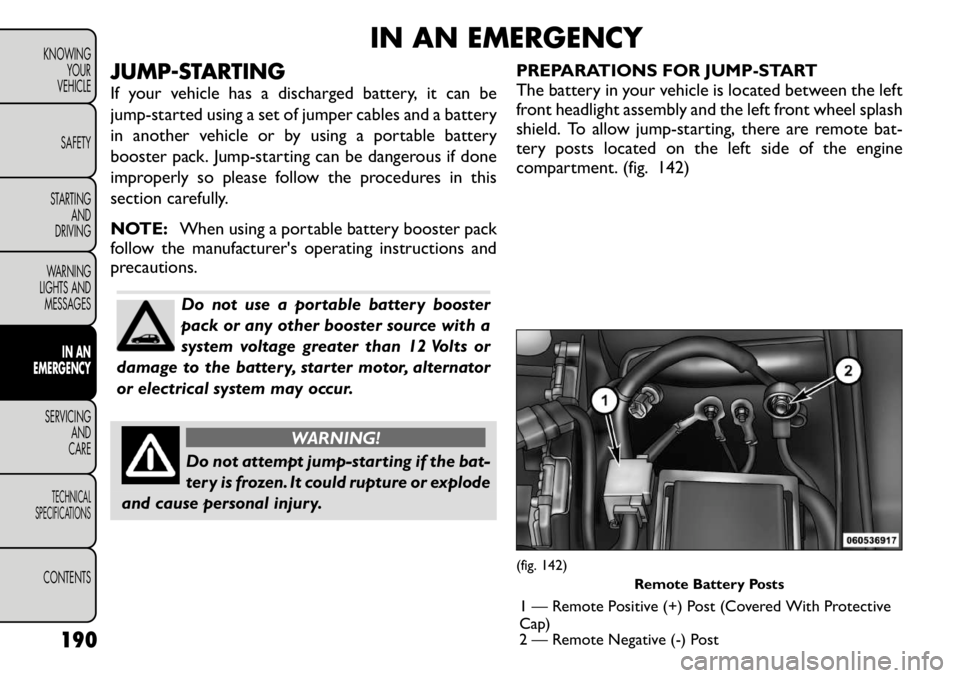
The battery in your vehicle is located between the left
front headlight assembly and the left front wheel splash
shield. To allow jump-starting, there are remote bat-
tery posts located on the left side of the engine
compartment. (fig. 142)
(fig. 142)
Remote Battery Posts
1 — Remote Positive (+) Post (Covered With Protective
Cap)
2 — Remote Negative (-) Post
190
KNOWING
YOUR
VEHICLE
SAFETY
STARTING AND
DRIVING
WARNING
LIGHTS AND
MESSAGES
IN AN
EMERGENCY
SERVICING AND
CARETECHNICAL
SPECIFICATIONSCONTENTS
Page 198 of 267
WARNING!
Take care to avoid the radiator cooling
fan whenever the hood is raised. It can
start anytime the ignition switch is ON.You can
be injured by moving fan blades.
Remove any metal jewelry such as watch bands
or bracelets that might make an inadvertent
electrical contact .You could be seriously injured.
Batteries contain sulfuric acid that can burn
your skin or eyes and generate hydrogen gas
which is flammable and explosive. Keep open
flames or sparks away from the battery.
1. Set the parking brake, shift the automatic transmis- sion into PARK and turn the ignition to LOCK.
2. Turn off the heater, radio, and all unnecessary elec- trical accessories.
3. Remove the protective cover over the remote posi- tive (+)battery post. To remove the cover, press
the locking tab and pull upward on the cover.
4. If using another vehicle to jump-start the battery, park the vehicle within the jumper cables reach, set
the parking brake and make sure the ignition is OFF.
WARNING!
Do not allow vehicles to touch each
other as this could establish a ground
connection and personal injury could result . JUMP-STARTING PROCEDURE
WARNING!
Failure to follow this procedure could
result in personal injury or property
damage due to battery explosion.Failure to follow these procedures could
result in damage to the charging system
of the booster vehicle or the discharged
vehicle.
1. Connect the positive (+)end of the jumper cable to
the remote positive (+)post of the discharged
vehicle.
2. Connect the opposite end of the positive (+)
jumper cable to the positive (+)post of the booster
battery.
3. Connect the negative end (-)of the jumper cable to
the negative (-)post of the booster battery.
4. Connect the opposite end of the negative (-)
jumper cable to the remote negative (-)post of the
vehicle with the discharged battery.
WARNING!
Do not connect the cable to the negative
post (-)of the discharged battery. The
resulting electrical spark could cause the battery
to explode and could result in personal injury.
191
KNOWING
YOURVEHICLE SAFETY
STARTING ANDDRIVING
WARNING
LIGHTS AND
MESSAGESIN AN
EMERGENCYSERVICING AND
CARETECHNICAL
SPECIFICATIONSCONTENTS
Page 199 of 267

5. Start the engine in the vehicle that has the boosterbattery, let the engine idle a few minutes, and then
start the engine in the vehicle with the discharged
battery.
Once the engine is started, remove the jumper
cables in the reverse sequence:
6. Disconnect the negative (-)jumper cable from the
remote negative (-)post of the vehicle with the
discharged battery.
7. Disconnect the negative end (-)of the jumper cable
from the negative (-)post of the booster battery.
8. Disconnect the opposite end of the positive (+)
jumper cable from the positive (+)post of the
booster battery.
9. Disconnect the positive (+)end of the jumper cable
from the remote positive (+)post of the discharged
vehicle.
10. Reinstall the protective cover over the remote positive (+)battery post of the discharged vehicle.
If frequent jump-starting is required to start your
vehicle, you should have the battery and charging
system inspected at your authorized dealer.
Accessories that can be plugged into the
vehicle power outlets draw power from
the vehicle’s battery, even when not in
use (i.e., cellular phones, etc .). Eventually, if
plugged in long enough, the vehicle’s battery will
discharge sufficiently to degrade battery life
and/or prevent the engine from starting.
192
KNOWING YOUR
VEHICLE
SAFETY
STARTING AND
DRIVING
WARNING
LIGHTS AND
MESSAGES
IN AN
EMERGENCY
SERVICING AND
CARETECHNICAL
SPECIFICATIONSCONTENTS
Page 227 of 267
Disposing of Used Engine Oil And Oil Filters
Care should be taken in disposing of used engine oil and
oil filters from your vehicle. Used oil and oil filters,
indiscriminately discarded, can present a problem to
the environment. Contact your authorized dealer, ser-
vice station, or governmental agency for advice on how
and where used oil and oil filters can be safely discarded
in your area.
ENGINE AIR CLEANER FILTER
Refer to the “Maintenance Schedule” for the proper
maintenance intervals.
WARNING!
The air induction system (air cleaner,
hoses, etc .) can provide a measure of
protection in the case of engine backfire. Do not
remove the air induction system (air cleaner,
hoses, etc .) unless such removal is necessary for
repair or maintenance. Make sure that no one is
near the engine compartment before starting the
vehicle with the air induction system (air cleaner,
hoses, etc .) removed. Failure to do so can result in
serious personal injury.
Engine Air Cleaner Filter Selection
The quality of replacement engine air cleaner filters
varies considerably. Only high quality filters should be
used to assure most efficient service. MAINTENANCE-FREE BATTERY
You will never have to add water, nor is periodic
maintenance required.
NOTE:
The battery is stored in a compartment that
is located behind the left front fender and is accessible
through the wheel well. The wheel and tire assemble
do not need to be removed to access the compart-
ment. Remote battery terminals are located in the
engine compartment for jump-starting.
To access the battery, turn the steering wheel fully to
the right and remove the access panel from the inner
fender shield.
WARNING!
Battery fluid is a corrosive acid solu-
tion and can burn or even blind you. Do
not allow battery fluid to contact your eyes, skin,
or clothing. Do not lean over a battery when
attaching clamps. If acid splashes in eyes or on
skin, flush the area immediately with large
amounts of water.
Battery gas is flammable and explosive. Keep
flame or sparks away from the battery. Do not
use a booster battery or any other booster source
with an output greater than 12 Volts. Do not
allow cable clamps to touch each other.
Battery posts, terminals, and related accesso-
ries contain lead and lead compounds. Wash
hands after handling.
220
KNOWING YOUR
VEHICLE
SAFETY
STARTING AND
DRIVING
WARNING
LIGHTS AND
MESSAGES
IN AN
EMERGENCYSERVICING AND
CARETECHNICAL
SPECIFICATIONSCONTENTS