stop start FIAT FREEMONT 2012 Owner handbook (in English)
[x] Cancel search | Manufacturer: FIAT, Model Year: 2012, Model line: FREEMONT, Model: FIAT FREEMONT 2012Pages: 332, PDF Size: 5.61 MB
Page 12 of 332
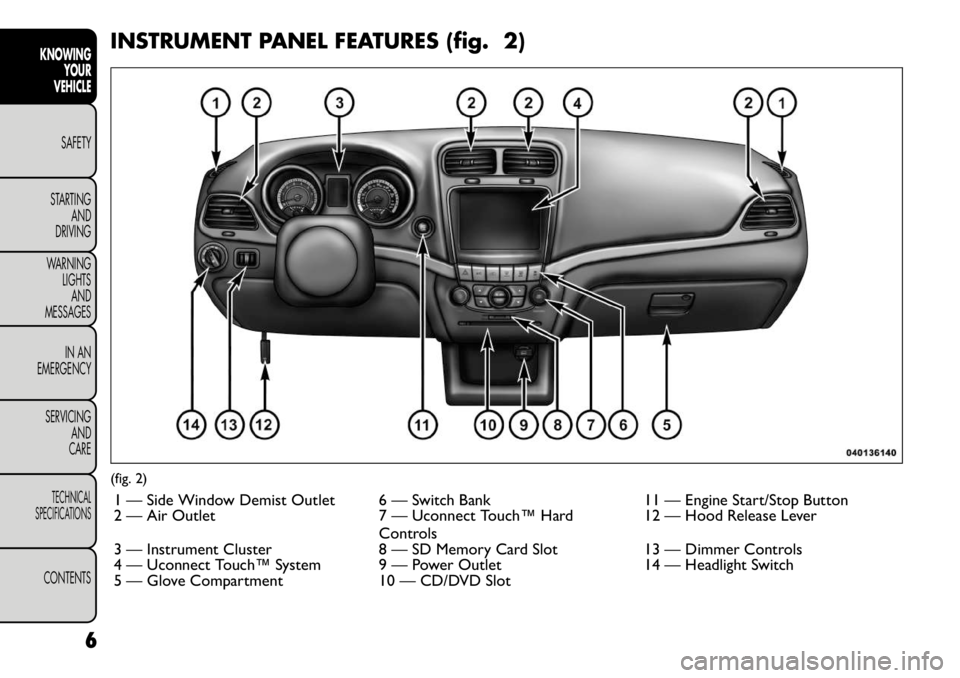
INSTRUMENT PANEL FEATURES (fig. 2)(fig. 2)1 — Side Window Demist Outlet 6 — Switch Bank 11 — Engine Start/Stop Button
2 — Air Outlet 7 — Uconnect Touch™ Hard Controls12 — Hood Release Lever
3 — Instrument Cluster 8 — SD Memory Card Slot 13 — Dimmer Controls
4 — Uconnect Touch™ System 9 — Power Outlet 14 — Headlight Switch
5 — Glove Compartment 10 — CD/DVD Slot
6
KNOWING YOUR
VEHICLE
SAFETY
STARTING AND
DRIVING
WARNING LIGHTSAND
MESSAGES
IN AN
EMERGENCY
SERVICING AND
CARETECHNICAL
SPECIFICATIONSCONTENTS
Page 14 of 332
The gauge pointer will likely indicate a high tempera-
ture when driving in hot weather, up mountain grades,
in heavy traffic, or when towing a trailer. If the pointer
rises to the “H” mark, safely pull over and stop the
vehicle. If the Air Conditioning A/C system is on, turn
it off. Also, shift the transmission into NEUTRAL and
idle the vehicle. If the needle remains on the “H” mark,
turn the engine OFF immediately and call for service.
Do not leave your vehicle unattended
with the engine running, as you would not
be able to react to the temperature indi-
cator light if the engine overheats. A WORD ABOUT YOUR KEYS
Your vehicle uses a keyless ignition system. This system
consists of a Key Fob with Remote Keyless Entry (RKE)
transmitter and a Keyless Ignition Node (KIN).
Keyless Enter-N-Go Feature
This vehicle is equipped with the Keyless Enter-N-Go
feature, refer to “Starting Procedure” in “Starting And
Driving” for further information.
KEYLESS IGNITION NODE (KIN)
This feature allows the driver to operate the ignition
switch with the push of a button, as long as the Remote
Keyless Entry (RKE) transmitter is in the passenger
compartment.
The Keyless Ignition Node (KIN) has four operating
positions, three of which are labeled and will illuminate
when in position. The three positions are OFF, ACC,
and ON/RUN. The fourth position is START, during
start RUN will illuminate.
NOTE:
In case the ignition switch does not change
with the push of a button, the RKE transmitter (Key
Fob) may have a low or dead battery. In this situation a
back up method can be used to operate the ignition
switch. Put the nose side (side opposite of the emer-
gency key) of the Key Fob against the ENGINE START/
STOP button and push to operate the ignition switch.
(fig. 4)
8
KNOWING YOUR
VEHICLE
SAFETY
STARTING AND
DRIVING
WARNING LIGHTSAND
MESSAGES
IN AN
EMERGENCY
SERVICING AND
CARETECHNICAL
SPECIFICATIONSCONTENTS
Page 21 of 332

VEHICLE SECURITY ALARM (for
versions/markets, where
provided)
The Vehicle Security Alarm (VSA) system monitors the
vehicle doors, hood, and liftgate for unauthorized en-
try and the ignition switch for unauthorized operation.
If something triggers the alarm, the system will prevent
the vehicle from starting, sound the horn intermit-
tently, flash the headlights and taillights, and flash the
Vehicle Security Light in the instrument cluster.
REARMING OF THE SYSTEM
If something triggers the alarm, and no action is taken
to disarm it, the system will turn off the horn after
approximately 29 seconds, turn off all of the visual
signals after one minute, and then the system will
rearm itself.
TO ARM THE SYSTEM
Follow these steps to arm the Vehicle Security Alarm:
1. Remove the key from the ignition system (refer to"Starting Procedures" in "Starting And Driving" for
further information).
• For vehicles equipped with Keyless Enter-N-Go,
make sure the vehicle ignition system is "OFF".
• For vehicles not equipped with Keyless Enter-N-Go,
make sure the vehicle ignition system is "OFF" and the
key is physically removed from the ignition. 2. Perform one of the following methods to lock the
vehicle:
• Press LOCK on the interior power door lock
switch with the driver and/or passenger door open.
• Press the LOCK button on the exterior Passive Entry
Door Handle with a valid Key Fob available in the same
exterior zone (refer to "Keyless Enter-N-Go" in
"Knowing Your Vehicle" for further information).
• Press the LOCK button on the Remote Keyless Entry
(RKE) transmitter.
3. If any doors are open, close them.
TO DISARM THE SYSTEM
The Vehicle Security Alarm can be disarmed using any
of the following methods:
• Press the UNLOCK button on the Remote Keyless Entry (RKE) transmitter.
• Grasp the Passive Entry Unlock Door Handle (for versions/markets, where provided refer to "Keyless
Enter-N-Go" in "Knowing Your Vehicle" for further
information).
• Cycle the vehicle ignition system out of the OFF position.
• For vehicles equipped with Keyless Enter-N-Go, press the Keyless Enter-N-Go Start/Stop button
(requires at least one valid Key Fob in the vehicle).
• For vehicles not equipped with Keyless Enter-N- Go, insert a valid key into the ignition switch and
turn the key to the ON position.
15
KNOWING
YOURVEHICLESAFETY
STARTING ANDDRIVING
WARNING LIGHTSAND
MESSAGES
IN AN
EMERGENCY
SERVICING AND
CARETECHNICAL
SPECIFICATIONSCONTENTS
Page 23 of 332

• For vehicles equipped with Keyless Enter-N-Go,
make sure the vehicle ignition system is "OFF".
• For vehicles not equipped with Keyless Enter-N-Go,
make sure the vehicle ignition system is "OFF" and the
key is physically removed from the ignition.
2. Perform one of the following methods to lock the vehicle:
• Press LOCK on the interior power door lock
switch with the driver and/or passenger door open.
• Press the LOCK button on the exterior Passive Entry
Door Handle with a valid Key Fob available in the same
exterior zone (refer to "Keyless Enter-N-Go" in
"Knowing Your Vehicle" for further information).
• Press the LOCK button on the Remote Keyless Entry
(RKE) transmitter.
3. If any doors are open, close them.
TO DISARM THE SYSTEM
The Vehicle Security Alarm can be disarmed using any
of the following methods:
• Press the UNLOCK button on the Remote Keyless Entry (RKE) transmitter.
• Grasp the Passive Entry Unlock Door Handle with a valid key fob available in the same exterior zone (for
versions/markets, where provided refer to "Keyless
Enter-N-Go" in "Knowing Your Vehicle" for further
information).
• Cycle the vehicle ignition system out of the OFF position. • For vehicles equipped with Keyless Enter-N-Go,
press the Keyless Enter-N-Go Start/Stop button
(requires at least one valid Key Fob in the vehicle).
• For vehicles not equipped with Keyless Enter-N- Go, insert a valid key into the ignition switch and
turn the key to the ON position.
NOTE:
• The driver's door key cylinder and the liftgate button
on the RKE transmitter cannot arm or disarm the
Vehicle Security Alarm.
• When the Vehicle Security Alarm is armed, the
interior power door lock switches will not unlock thedoors.
The Vehicle Security Alarm is designed to protect your
vehicle; however, you can create conditions where the
system will give you a false alarm. If one of the previ-
ously described arming sequences has occurred, the
Vehicle Security Alarm will arm regardless of whether
you are in the vehicle or not. If you remain in the
vehicle and open a door, the alarm will sound. If this
occurs, disarm the Vehicle Security Alarm.
If the Vehicle Security Alarm is armed and the battery
becomes disconnected, the Vehicle Security Alarm will
remain armed when the battery is reconnected; the
exterior lights will flash, the horn will sound. If this
occurs, disarm the Vehicle Security Alarm.
17
KNOWING
YOURVEHICLESAFETY
STARTING ANDDRIVING
WARNING LIGHTSAND
MESSAGES
IN AN
EMERGENCY
SERVICING AND
CARETECHNICAL
SPECIFICATIONSCONTENTS
Page 28 of 332
Windshield Washer Fluid Low IndicatorThis light will turn on to indicate the wind-
shield washer fluid is low.
EVIC RED TELLTALE LIGHTS
This area will show reconfigurable red telltales. These
telltales include:
Door Ajar This light will turn on to indicate that one or
more doors may be ajar.
Oil Pressure Warning Light This light indicates low engine oil pressure. If the
light turns on while driving, stop the vehicle and
shut off the engine as soon as possible. A chime will
sound for four minutes when this light turns on.
Do not operate the vehicle until the cause is corrected.
This light does not show how much oil is in the engine.
The engine oil level must be checked under the hood.
Charging System Light
This light shows the status of the electrical
charging system. The light should come on when
the ignition is first cycled ON and remain on briefly as
a bulb check. If the light stays on or comes on while
driving, turn off some of the vehicle's non-essential
electrical devices or increase engine speed (if at idle). If
the charging system light remains on, it means that the vehicle is experiencing a problem with the charging
system. Obtain SERVICE IMMEDIATELY. See an autho-
rized dealer.
If jump starting is required, refer to “Jump Starting
Procedures” in “In An Emergency”.
Electronic Throttle Control (ETC) Light
This light informs you of a problem with the
Electronic Throttle Control (ETC) system.
The light will come on when the ignition is
first turned ON and remain on briefly as a
bulb check. If the light does not come on during
starting, have the system checked by an authorized
dealer.
If a problem is detected, the light will come on while
the engine is running. Cycle the ignition key when the
vehicle has completely stopped and the shift lever is
placed in the PARK position. The light should turn off.
If the light remains lit with the engine running, your
vehicle will usually be drivable. However, see an autho-
rized dealer for service as soon as possible. If the light
is flashing when the engine is running, immediate ser-
vice is required. You may experience reduced perfor-
mance, an elevated/rough idle or engine stall and your
vehicle may require towing.
Engine Temperature Warning Light
This light warns of an overheated engine condi-
tion. As temperatures rise and the gauge ap-
proaches H,this indicator will illuminate and a
single chime will sound after reaching a set threshold.
22
KNOWING YOUR
VEHICLE
SAFETY
STARTING AND
DRIVING
WARNING LIGHTSAND
MESSAGES
IN AN
EMERGENCY
SERVICING AND
CARETECHNICAL
SPECIFICATIONSCONTENTS
Page 29 of 332
Further overheating will cause the temperature gauge
to passH,the indicator will continuously flash and a
continuous chime will occur until the engine is allowed
to cool.
If the light turns on while driving, safely pull over and
stop the vehicle. If the A/C system is on, turn it off.
Also, shift the transmission into NEUTRAL and idle the
vehicle. If the temperature reading does not return to
normal, turn the engine off immediately and call for
service.
Transmission Temperature Warning Light This light indicates that the transmission fluid
temperature is running hot. This may occur
with severe usage, such as trailer towing. If
this light turns on, safely pull over and stop
the vehicle. Then, shift the transmission into NEU-
TRAL and run the engine at idle or faster until the light
turns off.
Continuous driving with the Transmission
Temperature Warning Light illuminated
will eventually cause severe transmission
damage or transmission failure.
WARNING!
If the Transmission Temperature Warning
Light is illuminated and you continue
operating the vehicle, in some circumstances you
could cause the fluid to boil over, come in contact
with hot engine or exhaust components and
cause a fire.
OIL CHANGE DUE
Your vehicle is equipped with an engine oil change
indicator system. The “Oil Change Due” message will
flash in the EVIC display for approximately 10 seconds
after a single chime has sounded to indicate the next
scheduled oil change interval. The engine oil change
indicator system is duty cycle based, which means the
engine oil change interval may fluctuate dependent
upon your personal driving style.
Unless reset, this message will continue to display each
time you cycle the ignition to the ON/RUN position.
To turn off the message temporarily, press and release
the BACK button. To reset the oil change indicator
system please refer to a Fiat Dealership.
FUEL ECONOMY
Press and release the UP or DOWN button until “Fuel
Economy” displays highlighted in the EVIC and press
the SELECT button. The following Fuel Economy func-
tions will display in the EVIC:
23KNOWING
YOURVEHICLESAFETY
STARTING ANDDRIVING
WARNING LIGHTSAND
MESSAGES
IN AN
EMERGENCY
SERVICING AND
CARETECHNICAL
SPECIFICATIONSCONTENTS
Page 36 of 332

selection, press the Flash Headlights with Lock soft-
key, select On or Off followed by pressing the arrow
back soft-key.
Doors & Locks
Auto Unlock on Exit (for versions/markets,where provided)
Press the Auto Unlock on Exit soft-key to change this
display. When this feature is selected, all doors will
unlock when the vehicle is stopped and the transmis-
sion is in the PARK or NEUTRAL position and the
driver's door is opened. To make your selection, press
the Auto Unlock on Exit soft-key, select On or Off
followed by pressing the arrow back soft-key.
Flash Lights with Lock (for versions/markets,
where provided)
Press the Flash Lights with Lock soft-key to change this
display. When this feature is selected, the front and
rear turn signals will flash when the doors are locked or
unlocked with the RKE transmitter. To make your
selection, press the Flash Lights with Lock soft-key,
select On or Off followed by pressing the arrow back
soft-key.
Remote Door Unlock Order (for versions/ markets, where provided)
Press the Remote Door Unlock Order soft-key to
change this display. When Unlock Driver Door Only
On 1st Press is selected, only the driver's door will
unlock on the first press of the RKE transmitter UN- LOCK button. When Driver Door 1st Press is se-
lected, you must press the RKE transmitter UNLOCK
button twice to unlock the passenger's doors. When
Unlock All Doors On 1st Press
is selected, all of the
doors will unlock on the first press of the RKE trans-
mitter UNLOCK button.
NOTE: If the vehicle is equipped with Keyless Enter-
N-Go (Passive Entry) and the EVIC is programmed to
Unlock All Doors 1st Press, all doors will unlock no
matter which Passive Entry equipped door handle is
grasped. If Driver Door 1st Press is programmed, only
the driver’s door will unlock when the driver’s door is
grasped. With Passive Entry, if Driver Door 1st Press is
programmed touching the handle more than once will
only result in the driver’s door opening. If driver door
first is selected, once the driver door is opened, the
interior door lock/unlock switch can be used to unlock
all doors (or use RKE transmitter).
Passive Entry (Keyless Enter-N-Go) (for versions/markets, where provided)
Press the Passive Entry soft-key to change this display.
This feature allows you to lock and unlock the vehicle’s
door(s) without having to press the RKE transmitter
lock or unlock buttons. To make your selection, press
the Passive Entry soft-key, select ON or OFF followed
by pressing the arrow back soft-key. Refer to “Keyless
Enter-N-Go” in “Knowing Your Vehicle”.
30
KNOWING YOUR
VEHICLE
SAFETY
STARTING AND
DRIVING
WARNING LIGHTSAND
MESSAGES
IN AN
EMERGENCY
SERVICING AND
CARETECHNICAL
SPECIFICATIONSCONTENTS
Page 43 of 332

Auto Dim High Beams (for versions/markets,where provided)
When this feature is selected, the high beam headlights
will deactivate automatically under certain conditions.
To make your selection, press the Auto High Beams
soft-key, select ON or OFF followed by pressing the
arrow back soft-key. Refer to “Lights/SmartBeam™
(for versions/markets, where provided)” in “Knowing
Your Vehicle” for further information.
Headlight Dip (Traffic Changeover) (for versions/markets, where provided)
Low beam headlights have more control of upward
light and direct most of their light downward and either
to the right for right hand drive countries or to the left
for left hand drive countries to provide safe forward
visibility without excessive glare.
Flash Headlights With Lock (for versions/ markets, where provided)
When this feature is selected, the front and rear turn
signals will flash when the doors are locked or unlocked
with the RKE transmitter. To make your selection,
press the Flash Headlights with Lock soft-key, select
On or Off followed by pressing the arrow back soft-key.
Doors & Locks
Auto Unlock on Exit (for versions/markets, where provided)
When this feature is selected, all doors will unlock
when the vehicle is stopped and the transmission is in the PARK or NEUTRAL position and the driver's door
is opened. To make your selection, press the Auto
Unlock on Exit soft-key, select On or Off followed by
pressing the arrow back soft-key.
Flash Headlight with Lock (for versions/markets,
where provided)
When this feature is selected, the front and rear turn
signals will flash when the doors are locked or unlocked
with the RKE transmitter. To make your selection,
press the Flash Lights with Lock soft-key, select On or
Off followed by pressing the arrow back soft-key.
1st Press of Key Fob Unlocks (for versions/markets, where provided)
When Unlock Driver Door Only On 1st Press is
selected, only the driver's door will unlock on the first
press of the RKE transmitter UNLOCK button. When
Driver Door 1st Press is selected, you must press the
RKE transmitter UNLOCK button twice to unlock the
passenger's doors. When Unlock All Doors On 1st
Press is selected, all of the doors will unlock on the
first press of the RKE transmitter UNLOCK button.
NOTE: If the vehicle is equipped with Keyless Enter-
N-Go (Passive Entry) and the EVIC is programmed to
Unlock All Doors 1st Press, all doors will unlock no
matter which Passive Entry equipped door handle is
grasped. If Driver Door 1st Press is programmed, only
the driver’s door will unlock when the driver’s door is
grasped. With Passive Entry, if Driver Door 1st Press is
programmed touching the handle more than once will
37
KNOWING
YOURVEHICLESAFETY
STARTING ANDDRIVING
WARNING LIGHTSAND
MESSAGES
IN AN
EMERGENCY
SERVICING AND
CARETECHNICAL
SPECIFICATIONSCONTENTS
Page 47 of 332
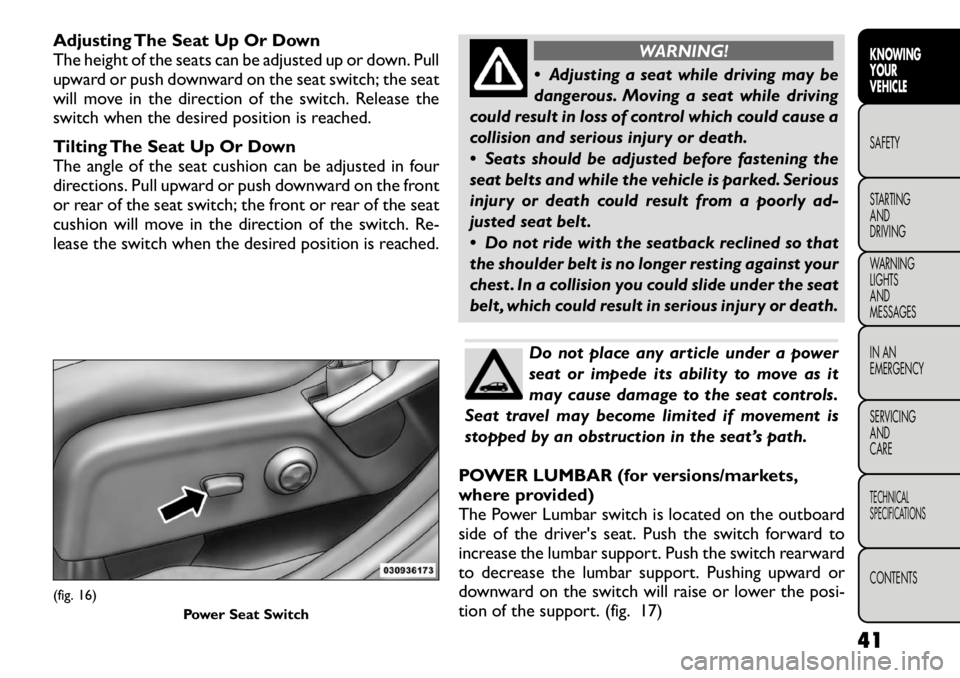
Adjusting The Seat Up Or Down
The height of the seats can be adjusted up or down. Pull
upward or push downward on the seat switch; the seat
will move in the direction of the switch. Release the
switch when the desired position is reached.
Tilting The Seat Up Or Down
The angle of the seat cushion can be adjusted in four
directions. Pull upward or push downward on the front
or rear of the seat switch; the front or rear of the seat
cushion will move in the direction of the switch. Re-
lease the switch when the desired position is reached.
WARNING!
Adjusting a seat while driving may be
dangerous. Moving a seat while driving
could result in loss of control which could cause a
collision and serious injury or death.
Seats should be adjusted before fastening the
seat belts and while the vehicle is parked. Serious
injury or death could result from a poorly ad-
justed seat belt .
Do not ride with the seatback reclined so that
the shoulder belt is no longer resting against your
chest . In a collision you could slide under the seat
belt , which could result in serious injury or death.Do not place any article under a power
seat or impede its ability to move as it
may cause damage to the seat controls.
Seat travel may become limited if movement is
stopped by an obstruction in the seat’s path.
POWER LUMBAR (for versions/markets,
where provided)
The Power Lumbar switch is located on the outboard
side of the driver's seat. Push the switch forward to
increase the lumbar support. Push the switch rearward
to decrease the lumbar support. Pushing upward or
downward on the switch will raise or lower the posi-
tion of the support. (fig. 17)
(fig. 16) Power Seat Switch
41
KNOWING
YOURVEHICLESAFETY
STARTING ANDDRIVING
WARNING LIGHTSAND
MESSAGES
IN AN
EMERGENCY
SERVICING AND
CARETECHNICAL
SPECIFICATIONSCONTENTS
Page 54 of 332
(Continued)
Active Head Restraints may be deployed if they
are struck by an object such as a hand, foot or
loose cargo. To avoid accidental deployment of
the Active Head Restraint ensure that all cargo is
secured, as loose cargo could contact the Active
Head Restraint during sudden stops. Failure to
follow this warning could cause personal injury if
the Active Head Restraint is deployed.
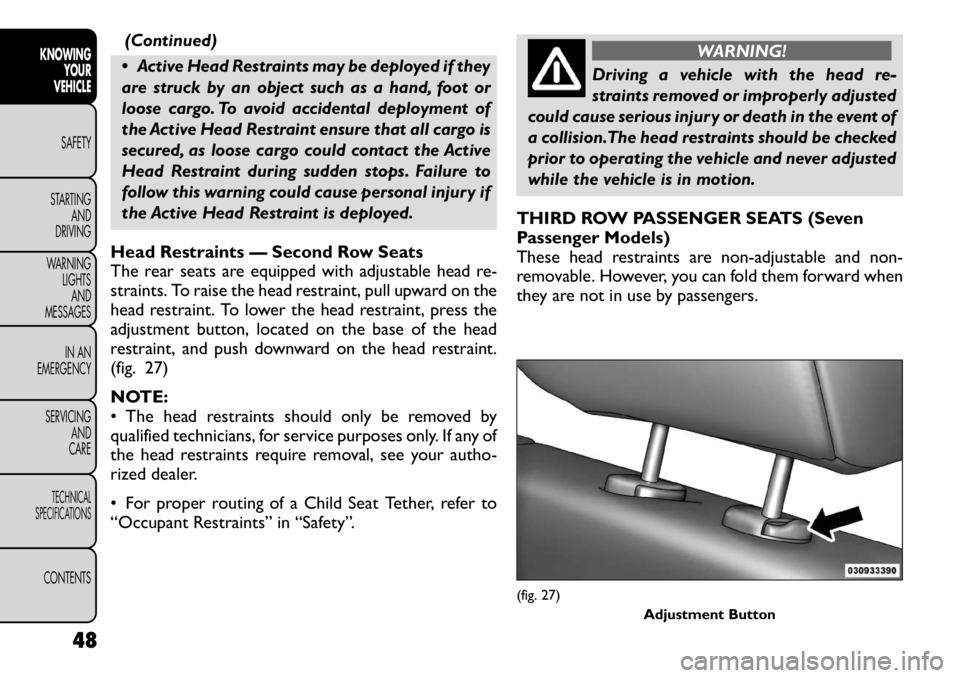
Head Restraints — Second Row Seats
The rear seats are equipped with adjustable head re-
straints. To raise the head restraint, pull upward on the
head restraint. To lower the head restraint, press the
adjustment button, located on the base of the head
restraint, and push downward on the head restraint.
(fig. 27)
NOTE:
• The head restraints should only be removed by
qualified technicians, for service purposes only. If any of
the head restraints require removal, see your autho-
rized dealer.
• For proper routing of a Child Seat Tether, refer to
“Occupant Restraints” in “Safety”.
WARNING!
Driving a vehicle with the head re-
straints removed or improperly adjusted
could cause serious injury or death in the event of
a collision.The head restraints should be checked
prior to operating the vehicle and never adjusted
while the vehicle is in motion.
THIRD ROW PASSENGER SEATS (Seven
Passenger Models)
These head restraints are non-adjustable and non-
removable. However, you can fold them forward when
they are not in use by passengers.
(fig. 27) Adjustment Button
48
KNOWING YOUR
VEHICLE
SAFETY
STARTING AND
DRIVING
WARNING LIGHTSAND
MESSAGES
IN AN
EMERGENCY
SERVICING AND
CARETECHNICAL
SPECIFICATIONSCONTENTS