engine FIAT FREEMONT 2013 Owner handbook (in English)
[x] Cancel search | Manufacturer: FIAT, Model Year: 2013, Model line: FREEMONT, Model: FIAT FREEMONT 2013Pages: 352, PDF Size: 5.22 MB
Page 30 of 352
EVIC RED TELLTALE LIGHTS
This area will show reconfigurable red telltales. These
telltales include:
Door AjarThis light will turn on to indicate that one or
more doors may be ajar.
Oil Pressure Warning Light This light indicates low engine oil pressure. If the
light turns on while driving, stop the vehicle and
shut off the engine as soon as possible. A chime will
sound for four minutes when this light turns on.
Do not operate the vehicle until the cause is corrected.
This light does not show how much oil is in the engine.
The engine oil level must be checked under the hood.
Charging System Light This light shows the status of the electrical
charging system. The light should come on when
the ignition is first cycled ON and remain on briefly as
a bulb check. If the light stays on or comes on while
driving, turn off some of the vehicle's non-essential
electrical devices or increase engine speed (if at idle). If
the charging system light remains on, it means that the
vehicle is experiencing a problem with the charging
system. Obtain SERVICE IMMEDIATELY. See an autho-
rized dealer. If jump starting is required, refer to “Jump Starting
Procedures” in “In An Emergency”.
Electronic Throttle Control (ETC) Light
This light informs you of a problem with the
Electronic Throttle Control (ETC) system.
The light will come on when the ignition is
first turned ON and remain on briefly as a
bulb check. If the light does not come on during
starting, have the system checked by an authorized
dealer.
If a problem is detected, the light will come on while
the engine is running. Cycle the ignition key when the
vehicle has completely stopped and the shift lever is
placed in the PARK position (for versions/markets,
where provided). The light should turn off.
If the light remains lit with the engine running, your
vehicle will usually be drivable. However, see an autho-
rized dealer for service as soon as possible. If the light
is flashing when the engine is running, immediate ser-
vice is required. You may experience reduced perfor-
mance, an elevated/rough idle or engine stall and your
vehicle may require towing.
Engine Temperature Warning Light This light warns of an overheated engine condi-
tion. As temperatures rise and the gauge ap-
proaches H,this indicator will illuminate and a
24
KNOWING
YOUR
VEHICLE
SAFETY
S
TARTING AND
DRIVING
WARNING LIGHTSAND
MESSAGES
IN AN
EMERGENCY
SERVICING AND
CARETECHNICAL
SPECIFICATIONSCONTENTS
Page 31 of 352
single chime will sound after reaching a set threshold.
Further overheating will cause the temperature gauge
to passH,the indicator will continuously flash and a
continuous chime will occur until the engine is allowed
to cool.
If the light turns on while driving, safely pull over and
stop the vehicle. If the A/C system is on, turn it off.
Also, shift the transmission into NEUTRAL and idle the
vehicle. If the temperature reading does not return to
normal, turn the engine off immediately and call for
service.
Transmission Temperature Warning Light (for
versions/markets, where provided) This light indicates that the transmission fluid
temperature is running hot. This may occur
with severe usage, such as trailer towing. If
this light turns on, safely pull over and stop
the vehicle. Then, shift the transmission into NEU-
TRAL and run the engine at idle or faster until the light
turns off.
Continuous driving with the Transmission
Temperature Warning Light illuminated
will eventually cause severe transmission
damage or transmission failure.
WARNING!
If the Transmission Temperature Warning
L
ight is illuminated and you continue
operating the vehicle, in some circumstances you
could cause the fluid to boil over, come in contact
with hot engine or exhaust components and
cause a fire.
OIL CHANGE DUE
Your vehicle is equipped with an engine oil change
indicator system. The “Oil Change Due” message will
flash in the EVIC display for approximately 10 seconds
after a single chime has sounded to indicate the next
scheduled oil change interval. The engine oil change
indicator system is duty cycle based, which means the
engine oil change interval may fluctuate dependent
upon your personal driving style.
Unless reset, this message will continue to display each
time you cycle the ignition to the ON/RUN position.
To turn off the message temporarily, press and release
the BACK button. To reset the oil change indicator
system please refer to a Fiat Dealership.
25KNOWING
YOUR
VEHICLE
SAFETY
S
TARTING
AND
DRIVING
WARNING
LIGHTS
AND
MESSAGES
IN AN
EMERGENCY
SERVICING
AND
CARETECHNICAL
SPECIFICATIONSCONTENTS
Page 34 of 352
VEHICLE INFO (CUSTOMER
INFORMATION FEATURES) (for
versions/markets, where provided)
Press and release the UP or DOWN button until
“Vehicle Info” displays in the EVIC and press the SE-
LECT button. Press the UP and DOWN button to
scroll through the available information displays that
may be equipped.
Coolant Temp
Displays the actual coolant temperature.
Oil Temperature
Displays the actual oil temperature.
Oil Pressure
Displays the actual oil pressure.
Trans Temperature
Displays the actual transmission temperature.
Engine Hours
Displays the number of hours of engine operation.MESSAGES
In the Main Menu, press and release the UP or DOWN
button until “Messages: XX” displays highlighted in the
EVIC. If there is more than one message, pressing the
SELECT button will display a stored warning message.
Press and release the UP and DOWN buttons if there
is more than one message to step through the remain-
ing stored messages. If there are no message, pressing
the SELECT button will do nothing.
TURN MENU OFF
Select from Main Menu using the DOWN button.
Pressing the SELECT button blanks the menu display.
Pressing any one of the four steering wheel buttons
brings the menu back.
28
KNOWING YOUR
VEHICLE
SAFETY
S
TARTING AND
DRIVING
WARNING LIGHTSAND
MESSAGES
IN AN
EMERGENCY
SERVICING AND
CARETECHNICAL
SPECIFICATIONSCONTENTS
Page 35 of 352
Uconnect Touch™ SETTINGS
HARD-KEYS
Hard-Keys are located on the left and right side of the
Uconnect Touch™ 4.3 screen. In addition, there is a
Scroll/Enter control knob located on the right side of
the Climate Controls in the center of the instrument
panel. Turn the control knob to scroll through menus
and change settings (i.e., 30, 60, 90), press the center of
the control knob one or more times to select or
change a setting (i.e., ON, OFF).
SOFT-KEYS
Soft-Keys are accessible on the Uconnect Touch™
display.
CUSTOMER PROGRAMMABLE FEATURES
— Uconnect Touch™ SYSTEM 4.3 SETTINGS
In this mode the Uconnect Touch™ system allows you
to access programmable features that may be equipped
such as Display, Clock, Safety/Assistance, Lights, Doors
& Locks, Heated Seats (for versions/markets, where
provided), Engine Off Operation, Compass Settings,
Audio and Phone/Bluetooth settings through hard-keys
and soft-keys.
NOTE:Only one touchscreen area may be selected
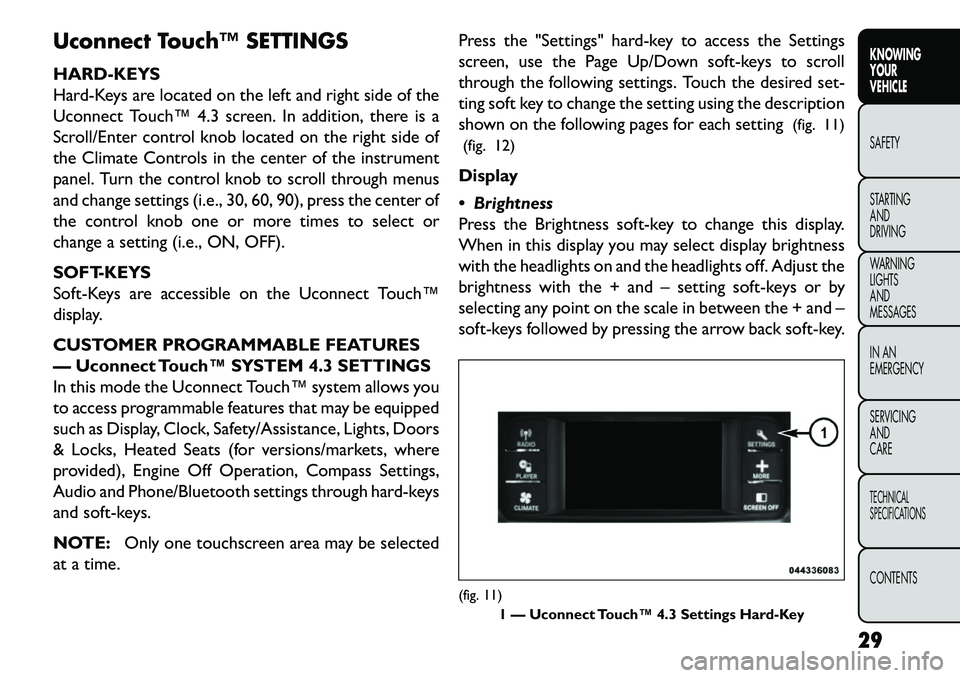
at a time. Press the "Settings" hard-key to access the Settings
screen, use the Page Up/Down soft-keys to scroll
through the following settings. Touch the desired set-
ting soft key to change the setting using the description
shown on the following pages for each setting
(fig. 11)
(fig. 12)
Display
Brightness
Press the Brightness soft-key to change this display.
When in this display you may select display brightness
with the headlights on and the headlights off. Adjust the
brightness with the + and – setting soft-keys or by
selecting any point on the scale in between the + and –
soft-keys followed by pressing the arrow back soft-key.
(fig. 11) 1 — Uconnect Touch™ 4.3 Settings Hard-Key
29
KNOWING
YOUR
VEHICLE
SAFETY
S
TARTING
AND
DRIVING
WARNING
LIGHTS
AND
MESSAGES
IN AN
EMERGENCY
SERVICING
AND
CARETECHNICAL
SPECIFICATIONSCONTENTS
Page 40 of 352
heated seat will automatically turn on when tempera-
tures are below 4.4° C. To make your selection, press
the Auto Heated Seats soft-key, select On or Off
followed by pressing the arrow back soft-key.
Engine Off Options
Headlight Off Delay
Press the Headlight Off Delay soft-key to change this
display. When this feature is selected, the driver can
choose to have the headlights remain on for 0, 30, 60,
or 90 seconds when exiting the vehicle. To change the
Headlight Off Delay status press the 0, 30, 60 or 90
soft-key followed by pressing the arrow back soft-key.
Engine Off Power Delay (for versions/markets,
where provided)
Press the Engine Off Power Delay soft-key to change
this display. When this feature is selected, the power
window switches, radio, Uconnect™ phone system
(for versions/markets, where provided), DVD video
system (for versions/markets, where provided), power
sunroof (for versions/markets, where provided), and
power outlets will remain active for up to 10 minutes
after the ignition is cycled to OFF. Opening either front
vehicle door will cancel this feature. To change the
Engine Off Power Delay status press the 0 seconds, 45
seconds, 5 minutes or 10 minutes soft-key followed by
pressing the arrow back soft-key.Compass Settings
Variance (for versions/markets, where provided)
Press the Variance soft-key to change this display.
Compass Variance is the difference between Magnetic
North and Geographic North. To compensate for the
differences the variance should be set for the zone
where the vehicle is driven, per the zone map. Once
properly set, the compass will automatically compen-
sate for the differences, and provide the most accurate
compass heading.
NOTE:
Keep magnetic materials away from the top
of the instrument panel, such as iPod's, Mobile Phones,
Laptops and Radar Detectors. This is where the com-
pass module is located, and it can cause interference
with the compass sensor, and it may give false readings. (fig. 13)
Calibration (for versions/markets, where pro-
vided)
Press the Calibration key to change this setting. This
compass is self-calibrating, which eliminates the need
to manually reset the compass. When the vehicle is
new, the compass may appear erratic and the EVIC will
display CAL until the compass is calibrated. You may
also calibrate the compass by pressing the ON soft-key
and completing one or more 360–degree turns (in an
area free from large metal or metallic objects) until the
34
KNOWING YOUR
VEHICLE
SAFETY
S
TARTING AND
DRIVING
WARNING LIGHTSAND
MESSAGES
IN AN
EMERGENCY
SERVICING AND
CARETECHNICAL
SPECIFICATIONSCONTENTS
Page 42 of 352
Balance / Fade (for versions/markets, where pro-
vided)
Press the Balance / Fade soft-key to change this display.
When in this display you may adjust the Balance and
Fade settings.
Speed Adjusted Volume (for versions/markets,
where provided)
Press the Speed Adjusted Volume soft-key to change
this display. Decreases volume relative to vehicle
speed. To change the Speed Adjusted Volume press the
Off, 1, 2 or 3 soft-key followed by pressing the arrow
back soft-key.
Surround Sound (for versions/markets, where
provided)
Press the Surround Sound soft-key to change this
display. Provides simulated surround sound mode. To
make your selection, press the Surround Sound soft-
key, select ON or OFF followed by pressing the arrow
back soft-key.
Phone / Bluetooth
Paired Devices
This feature shows which phones are paired to the
Phone/Bluetooth system. For further information, re-
fer to the Uconnect Touch™ Supplement.CUSTOMER PROGRAMMABLE FEATURES
— Uconnect Touch™ SYSTEM 8.4 SETTINGS
In this mode the Uconnect Touch™ system allows you
to access programmable features that may be equipped
such as Display, Clock, Safety/Assistance, Lights, Doors
& Locks, Auto-On Comfort , Engine Off Operation,
Compass Settings, Audio and Phone/Bluetooth set-
tings.
NOTE:
Only one touchscreen area may be selected
at a time.
When making a selection, scroll up or down until the
preferred setting is highlighted, then press and release
the preferred setting until a check-mark appears next
to the setting, showing that setting has been selected.
Display
Display Mode (for versions/markets, where pro-
vided)
When in this display you may select one of the auto
display settings. To change Mode status press and
release the Day, Night or Auto soft-key followed by
pressing the arrow back soft-key.
Display Brightness with Headlights ON (for
versions/markets, where provided)
When in this display you may select display brightness
with the headlights on and the headlights off. Adjust the
brightness with the + and – setting soft-keys or by
36
KNOWING YOUR
VEHICLE
SAFETY
S
TARTING AND
DRIVING
WARNING LIGHTSAND
MESSAGES
IN AN
EMERGENCY
SERVICING AND
CARETECHNICAL
SPECIFICATIONSCONTENTS
Page 46 of 352
press the Flash Headlights with Lock soft-key, select
On or Off followed by pressing the arrow back soft-key.
Doors & Locks
Auto Unlock on Exit (for versions/markets,
where provided)
When this feature is selected, all doors will unlock
when the vehicle is stopped and the transmission is in
the PARK (for versions/markets, where provided) or
NEUTRAL position and the driver's door is opened. To
make your selection, press the Auto Unlock on Exit
soft-key, select On or Off followed by pressing the
arrow back soft-key.
Flash Headlight with Lock (for versions/markets,
where provided)
When this feature is selected, the front and rear turn
signals will flash when the doors are locked or unlocked
with the RKE transmitter. To make your selection,
press the Flash Lights with Lock soft-key, select On or
Off followed by pressing the arrow back soft-key.
1st Press of Key Fob Unlocks (for versions/
markets, where provided)
WhenUnlock Driver Door Only On 1st Press is
selected, only the driver's door will unlock on the first
press of the RKE transmitter UNLOCK button. When
Driver Door 1st Press is selected, you must press the
RKE transmitter UNLOCK button twice to unlock the passenger's doors. When
Unlock All Doors On 1st
Press is selected, all of the doors will unlock on the
first press of the RKE transmitter UNLOCK button.
NOTE: If the vehicle is equipped with Keyless Enter-
NGo™ (Passive Entry) and the EVIC is programmed
to Unlock All Doors 1st Press, all doors will unlock no
matter which Passive Entry equipped door handle is
grasped. If Driver Door 1st Press is programmed, only
the driver’s door will unlock when the driver’s door is
grasped. With Passive Entry, if Driver Door 1st Press is
programmed touching the handle more than once will
only result in the driver’s door opening. If driver door
first is selected, once the driver door is opened, the
interior door lock/unlock switch can be used to unlock
all doors (or use RKE transmitter).
Passive Entry (for versions/markets, where pro-
vided)
This feature allows you to lock and unlock the vehicle’s
door(s) without having to press the RKE transmitter
lock or unlock buttons. To make your selection, press
the Passive Entry soft-key, select ON or OFF followed
by pressing the arrow back soft-key. Refer to “Keyless
EnterNGo™” in “Knowing Your Vehicle”.
Engine Off Options
Engine Off Power Delay
When this feature is selected, the power window
40
KNOWING YOUR
VEHICLE
SAFETY
S
TARTING AND
DRIVING
WARNING LIGHTSAND
MESSAGES
IN AN
EMERGENCY
SERVICING AND
CARETECHNICAL
SPECIFICATIONSCONTENTS
Page 47 of 352
switches, radio, Uconnect™ phone system (for
versions/markets, where provided), DVD video system
(for versions/markets, where provided), power sunroof
(for versions/markets, where provided), and power
outlets will remain active for up to 10 minutes after the
ignition is cycled OFF. Opening either front vehicle
door will cancel this feature. To change the Engine Off
Power Delay status press the 0 seconds, 45 seconds, 5
minutes or 10 minutes soft-key followed by pressing
the arrow back soft-key.
Headlight Off Delay (for versions/markets,
where provided)
When this feature is selected, the driver can choose to
have the headlights remain on for 0, 30, 60, or 90
seconds when exiting the vehicle. To change the Head-
light Off Delay status press the 0, 30, 60 or 90 soft-key
followed by pressing the arrow back soft-key.Compass Settings
Variance (for versions/markets, where provided)
Compass Variance is the difference between Magnetic
North and Geographic North. To compensate for the
differences the variance should be set for the zone
where the vehicle is driven, per the zone map. Once
properly set, the compass will automatically compen-
sate for the differences, and provide the most accurate
compass heading.
NOTE:
Keep magnetic materials away from the top
of the instrument panel, such as iPod's, Mobile Phones,
Laptops and Radar Detectors. This is where the com-
pass module is located, and it can cause interference
with the compass sensor, and it may give false readings.
(fig. 14)
41
KNOWING
YOUR
VEHICLE
SAFETY
STARTING
AND
DRIVING
WARNING
LIGHTS
AND
MESSAGES
IN AN
EMERGENCY
SERVICING
AND
CARETECHNICAL
SPECIFICATIONSCONTENTS
Page 75 of 352
Soft-keys are accessible on the Uconnect Touch™
system screen.
Automatic Operation
1. Press the AUTO hard-key or soft-key button (9) onthe Automatic Temperature Control (ATC) Panel.
2. Next, adjust the temperature you would like the system to maintain by adjusting the driver and pas-
senger temperature hard or soft control buttons (8,
9, 14, 15). Once the desired temperature is dis-
played, the system will achieve and automatically
maintain that comfort level.
3. When the system is set up for your comfort level, it is not necessary to change the settings. You will
experience the greatest efficiency by simply allowing
the system to function automatically.
NOTE:
It is not necessary to move the temperature settings for cold or hot vehicles. The system automatically
adjusts the temperature, mode, and blower speed to
provide comfort as quickly as possible.
The temperature can be displayed in U.S. or Metric units by selecting the US/M customer-programmable
feature. Refer to the “Uconnect Touch™ System
Settings” in this section of the manual. To provide you with maximum comfort in the Auto-
matic mode, during cold start-ups the blower fan will
remain on low until the engine warms up. The blower
will increase in speed and transition into Auto mode.
Manual Operation
The system allows for manual selection of blower
speed, air distribution mode, A/C status and recircula-
tion control.
The blower fan speed can be set to any fixed speed by
adjusting the blower control. The fan will now operate
at a fixed speed until additional speeds are selected.
This allows the front occupants to control the volume
of air circulated in the vehicle and cancel the Auto
mode.
The operator can also select the direction of the
airflow by selecting one of the available mode settings.
A/C operation and Recirculation control can also be
manually selected in Manual operation.
69
KNOWING
YOUR
VEHICLE
SAFETY
STARTING
AND
DRIVING
WARNING
LIGHTS
AND
MESSAGES
IN AN
EMERGENCY
SERVICING
AND
CARETECHNICAL
SPECIFICATIONSCONTENTS
Page 79 of 352
Summer Operation
The engine cooling system in air-conditioned vehicles
must be protected with a high-quality antifreeze cool-
ant to provide proper corrosion protection and to
protect against engine overheating. A solution of 50%
ethylene glycol antifreeze coolant and 50% water is
recommended. Refer to “Maintenance Procedures” in
“Servicing And Care” for proper coolant selection.
Winter Operation
Use of the air Recirculation mode during Winter
months is not recommended because it may cause
window fogging.
Vacation Storage
Any time you store your vehicle or keep it out of
service (i.e., vacation) for two weeks or more, run the
air conditioning system at idle for about five minutes in
the fresh air and high blower setting. This will ensure
adequate system lubrication to minimize the possibility
of compressor damage when the system is started
again.
Window Fogging
Interior fogging on the windshield can be quickly re-
moved by turning the mode selector to Defrost. The
Defrost/Floor mode can be used to maintain a clear
windshield and provide sufficient heating. If side win-
dow fogging becomes a problem, increase the blowerspeed. Vehicle windows tend to fog on the inside in
mild but rainy or humid weather.
NOTE:
Recirculation mode without A/C should not
be used for long periods, as fogging may occur.
Outside Air Intake
Make sure the air intake, located directly in front of the
windshield, is free of obstructions such as leaves.
Leaves collected in the air intake may reduce airflow,
and if they enter the plenum, they could plug the water
drains. In winter months, make sure the air intake is
clear of ice, slush, and snow.
A/C Air Filter
The climate control system filters outside air contain-
ing dust, pollen and some odors. Strong odors cannot
be totally filtered out. Refer to “Maintenance Proce-
dures” in “Servicing And Care” for filter replacement
instructions.
73
KNOWING
YOUR
VEHICLE
SAFETY
STARTING
AND
DRIVING
WARNING
LIGHTS
AND
MESSAGES
IN AN
EMERGENCY
SERVICING
AND
CARETECHNICAL
SPECIFICATIONSCONTENTS