FIAT FREEMONT 2013 Owner handbook (in English)
Manufacturer: FIAT, Model Year: 2013, Model line: FREEMONT, Model: FIAT FREEMONT 2013Pages: 352, PDF Size: 5.22 MB
Page 41 of 352
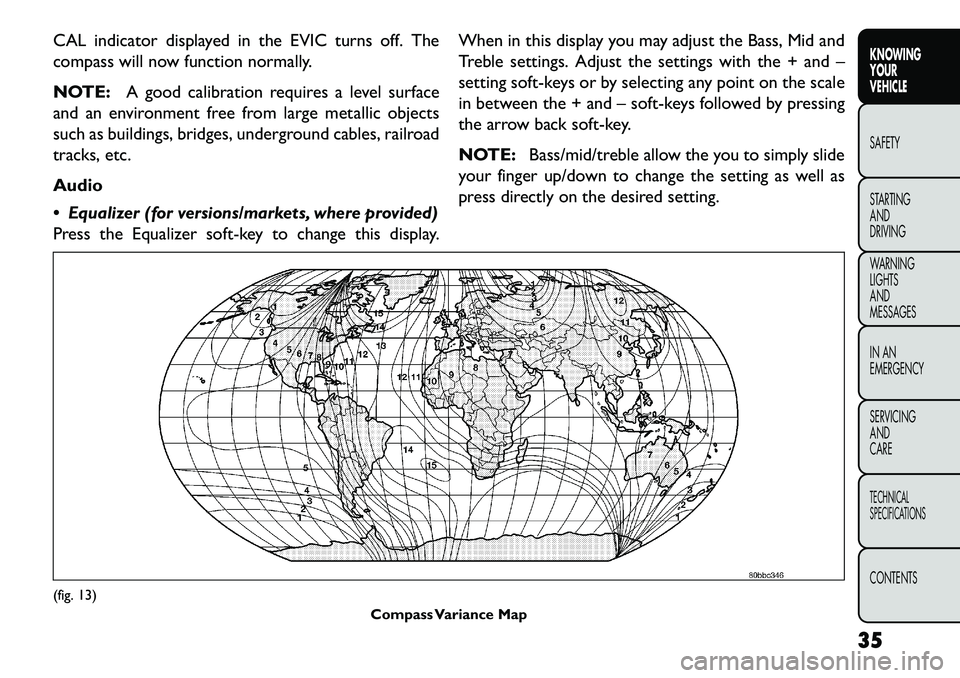
CAL indicator displayed in the EVIC turns off. The
compass will now function normally.
NOTE:A good calibration requires a level surface
and an environment free from large metallic objects
such as buildings, bridges, underground cables, railroad
tracks, etc.
Audio
Equalizer (for versions/markets, where provided)
Press the Equalizer soft-key to change this display. When in this display you may adjust the Bass, Mid and
Treble settings. Adjust the settings with the + and –
setting soft-keys or by selecting any point on the scale
in between the + and – soft-keys followed by pressing
the arrow back soft-key.
NOTE:
Bass/mid/treble allow the you to simply slide
your finger up/down to change the setting as well as
press directly on the desired setting.(fig. 13) Compass Variance Map
35
KNOWING
YOUR
VEHICLE
SAFETY
S
TARTING
AND
DRIVING
WARNING
LIGHTS
AND
MESSAGES
IN AN
EMERGENCY
SERVICING
AND
CARETECHNICAL
SPECIFICATIONSCONTENTS
Page 42 of 352
Balance / Fade (for versions/markets, where pro-
vided)
Press the Balance / Fade soft-key to change this display.
When in this display you may adjust the Balance and
Fade settings.
Speed Adjusted Volume (for versions/markets,
where provided)
Press the Speed Adjusted Volume soft-key to change
this display. Decreases volume relative to vehicle
speed. To change the Speed Adjusted Volume press the
Off, 1, 2 or 3 soft-key followed by pressing the arrow
back soft-key.
Surround Sound (for versions/markets, where
provided)
Press the Surround Sound soft-key to change this
display. Provides simulated surround sound mode. To
make your selection, press the Surround Sound soft-
key, select ON or OFF followed by pressing the arrow
back soft-key.
Phone / Bluetooth
Paired Devices
This feature shows which phones are paired to the
Phone/Bluetooth system. For further information, re-
fer to the Uconnect Touch™ Supplement.CUSTOMER PROGRAMMABLE FEATURES
— Uconnect Touch™ SYSTEM 8.4 SETTINGS
In this mode the Uconnect Touch™ system allows you
to access programmable features that may be equipped
such as Display, Clock, Safety/Assistance, Lights, Doors
& Locks, Auto-On Comfort , Engine Off Operation,
Compass Settings, Audio and Phone/Bluetooth set-
tings.
NOTE:
Only one touchscreen area may be selected
at a time.
When making a selection, scroll up or down until the
preferred setting is highlighted, then press and release
the preferred setting until a check-mark appears next
to the setting, showing that setting has been selected.
Display
Display Mode (for versions/markets, where pro-
vided)
When in this display you may select one of the auto
display settings. To change Mode status press and
release the Day, Night or Auto soft-key followed by
pressing the arrow back soft-key.
Display Brightness with Headlights ON (for
versions/markets, where provided)
When in this display you may select display brightness
with the headlights on and the headlights off. Adjust the
brightness with the + and – setting soft-keys or by
36
KNOWING YOUR
VEHICLE
SAFETY
S
TARTING AND
DRIVING
WARNING LIGHTSAND
MESSAGES
IN AN
EMERGENCY
SERVICING AND
CARETECHNICAL
SPECIFICATIONSCONTENTS
Page 43 of 352
selecting any point on the scale in between the + and –
soft-keys followed by pressing the arrow back soft-key.
Display Brightness with Headlights OFF (for
versions/markets, where provided)
When in this display you may select display brightness
with the headlights on and the headlights off. Adjust the
brightness with the + and – setting soft-keys or by
selecting any point on the scale in between the + and –
soft-keys followed by pressing the arrow back soft-key.
Set Language (for versions/markets, where pro-
vided)
When in this display you may select a different language
for all display nomenclature, including the trip functions
and the navigation system (for versions/markets, where
provided). Press the German, French, Spanish, Italian,
Dutch or English button to select the language pre-
ferred followed by pressing the arrow back soft-key.
Then, as you continue, the information will display in
the selected language.
Units (for versions/markets, where provided)
When in this display you may select to have the EVIC,
odometer, and navigation system (for versions/
markets, where provided) changed between US and
Metric units of measure. Press US or Metric followed
by pressing the arrow back soft-key. Then, as you
continue, the information will display in the selected
units of measure. Voice Response Length (for versions/markets,
where provided)
When in this display you may change the Voice Re-
sponse Length settings. To change the Voice Response
Length press and release the Brief or Detailed soft-key
followed by pressing the arrow back soft-key.
Touchscreen Beep
When in this display you may turn on or shut off the
sound heard when a touch screen button (soft-key) is
pressed. To change the Touch Screen Beep setting
press and release the On or Off soft-key followed by
pressing the arrow back soft-key.
Navigation Turn-By-Turn in Cluster (for
versions/markets, where provided)
When this feature is selected, the turn-by-turn direc-
tions will appear in the display as the vehicle ap-
proaches a designated turn within a programmed
route. To make your selection, press the Navigation
Turn-By-Turn in Cluster soft-key, select On or Off
followed by pressing the arrow back soft-key.
Clock
Sync Time with GPS (for versions/markets,
where provided)
When in this display you may automatically have the
radio set the time. To change the Sync Time setting
37
KNOWING
YOUR
VEHICLE
SAFETY
STARTING
AND
DRIVING
WARNING
LIGHTS
AND
MESSAGES
IN AN
EMERGENCY
SERVICING
AND
CARETECHNICAL
SPECIFICATIONSCONTENTS
Page 44 of 352
press and release the On or Off soft-key followed by
pressing the arrow back soft-key.
Set Time Hours
When in this display you may select the time display
settings. To make your selection, press the Set Time
soft-key, adjust the hours using the up and down
soft-keys, followed by pressing the arrow back soft-key
when all selections are complete.
Set Time Minutes
When in this display you may select the time display
settings. To make your selection, press the Set Time
soft-key, adjust the minutes using the up and down
soft-keys, followed by pressing the arrow back soft-key
when all selections are complete.
Time Format
When in this display you may select the time display
settings. To make your selection, press the Set Time
soft-key, select 12 hr or 24 hr followed by pressing the
arrow back soft-key when all selections are complete.
Show Time in Status Bar (for versions/markets,
where provided)
When in this display you may turn on or shut off the
digital clock in the status bar. To change the Show Time
Status setting press and release the On or Off soft-key
followed by pressing the arrow back soft-key.Safety / Assistance
Park Assist (for versions/markets, where pro-
vided)
The Rear Park Assist system will scan for objects
behind the vehicle when the transmission shift lever is
in REVERSE and the vehicle speed is less than 18 km/h.
The system can be enabled with Sound Only, Sound
and Display, or turned OFF. To change the Park Assist
status press and release the Off, Sound Only or Sounds
and Display button followed by pressing the arrow back
soft-key.
Parkview Backup Camera (for versions/markets,
where provided)
Your vehicle may be equipped with the ParkView
®
Rear Back Up Camera that allows you to see an
on-screen image of the rear surroundings of your
vehicle whenever the shift lever is put into REVERSE.
The image will be displayed on the radio touchscreen
display along with a caution note to “check entire
surroundings” across the top of the screen. After five
seconds this note will disappear. The ParkView
®cam-
era is located on the rear of the vehicle above the rear
License plate. To make your selection, press the
Parkview Backup Camera soft-key, select On or Off
followed by pressing the arrow back soft-key.
Hill Start Assist (for versions/markets, where
provided)
38
KNOWING YOUR
VEHICLE
SAFETY
S
TARTING AND
DRIVING
WARNING LIGHTSAND
MESSAGES
IN AN
EMERGENCY
SERVICING AND
CARETECHNICAL
SPECIFICATIONSCONTENTS
Page 45 of 352
When this feature is selected, the Hill Start Assist
(HSA) system is active. Refer to “Electronic Brake
Control System” in “Starting And Driving” for system
function and operating information. To make your
selection, press the Hill Start Assist soft-key, select On
or Off followed by pressing the arrow back soft-key.
Lights
Headlight Off Delay
When this feature is selected, the driver can choose to
have the headlights remain on for 0, 30, 60, or 90
seconds when exiting the vehicle. To change the Head-
light Off Delay status press the 0, 30, 60 or 90 soft-key
followed by pressing the arrow back soft-key.
Headlight Illumination on Approach (for
versions/markets, where provided)
When this feature is selected, the headlights will acti-
vate and remain on for 0, 30, 60, or 90 seconds when
the doors are unlocked with the RKE transmitter. To
change the Illuminated Approach status press the 0, 30,
60 or 90 soft-key followed by pressing the arrow back
soft-key.
Headlights with Wipers (for versions/markets,
where provided)
When this feature is selected, and the headlight switch
is in the AUTO position, the headlights will turn on
approximately 10 seconds after the wipers are turnedon. The headlights will also turn off when the wipers
are turned off if they were turned on by this feature. To
make your selection, press the Headlights with Wipers
soft-key, select On or Off followed by pressing the
arrow back soft-key.
Auto Dim High Beams “SmartBeam™” (for
versions/markets, where provided)
When this feature is selected, the high beam headlights
will deactivate automatically under certain conditions.
To make your selection, press the Auto High Beams
soft-key, select ON or OFF followed by pressing the
arrow back soft-key. Refer to “Lights/SmartBeam™
(for versions/markets, where provided)” in “Knowing
Your Vehicle” for further information.
Headlight Dipped Beam (Traffic Changeover)
(for versions/markets, where provided)
Low beam headlights have more control of upward
light and direct most of their light downward and either
to the left for right hand drive countries or to the right
for left hand drive countries to provide safe forward
visibility without excessive glare.
Flash Headlights With Lock (for versions/
markets, where provided)
When this feature is selected, the front and rear turn
signals will flash when the doors are locked or unlocked
with the RKE transmitter. To make your selection,
39
KNOWING
YOUR
VEHICLE
SAFETY
S
TARTING
AND
DRIVING
WARNING
LIGHTS
AND
MESSAGES
IN AN
EMERGENCY
SERVICING
AND
CARETECHNICAL
SPECIFICATIONSCONTENTS
Page 46 of 352
press the Flash Headlights with Lock soft-key, select
On or Off followed by pressing the arrow back soft-key.
Doors & Locks
Auto Unlock on Exit (for versions/markets,
where provided)
When this feature is selected, all doors will unlock
when the vehicle is stopped and the transmission is in
the PARK (for versions/markets, where provided) or
NEUTRAL position and the driver's door is opened. To
make your selection, press the Auto Unlock on Exit
soft-key, select On or Off followed by pressing the
arrow back soft-key.
Flash Headlight with Lock (for versions/markets,
where provided)
When this feature is selected, the front and rear turn
signals will flash when the doors are locked or unlocked
with the RKE transmitter. To make your selection,
press the Flash Lights with Lock soft-key, select On or
Off followed by pressing the arrow back soft-key.
1st Press of Key Fob Unlocks (for versions/
markets, where provided)
WhenUnlock Driver Door Only On 1st Press is
selected, only the driver's door will unlock on the first
press of the RKE transmitter UNLOCK button. When
Driver Door 1st Press is selected, you must press the
RKE transmitter UNLOCK button twice to unlock the passenger's doors. When
Unlock All Doors On 1st
Press is selected, all of the doors will unlock on the
first press of the RKE transmitter UNLOCK button.
NOTE: If the vehicle is equipped with Keyless Enter-
NGo™ (Passive Entry) and the EVIC is programmed
to Unlock All Doors 1st Press, all doors will unlock no
matter which Passive Entry equipped door handle is
grasped. If Driver Door 1st Press is programmed, only
the driver’s door will unlock when the driver’s door is
grasped. With Passive Entry, if Driver Door 1st Press is
programmed touching the handle more than once will
only result in the driver’s door opening. If driver door
first is selected, once the driver door is opened, the
interior door lock/unlock switch can be used to unlock
all doors (or use RKE transmitter).
Passive Entry (for versions/markets, where pro-
vided)
This feature allows you to lock and unlock the vehicle’s
door(s) without having to press the RKE transmitter
lock or unlock buttons. To make your selection, press
the Passive Entry soft-key, select ON or OFF followed
by pressing the arrow back soft-key. Refer to “Keyless
EnterNGo™” in “Knowing Your Vehicle”.
Engine Off Options
Engine Off Power Delay
When this feature is selected, the power window
40
KNOWING YOUR
VEHICLE
SAFETY
S
TARTING AND
DRIVING
WARNING LIGHTSAND
MESSAGES
IN AN
EMERGENCY
SERVICING AND
CARETECHNICAL
SPECIFICATIONSCONTENTS
Page 47 of 352
switches, radio, Uconnect™ phone system (for
versions/markets, where provided), DVD video system
(for versions/markets, where provided), power sunroof
(for versions/markets, where provided), and power
outlets will remain active for up to 10 minutes after the
ignition is cycled OFF. Opening either front vehicle
door will cancel this feature. To change the Engine Off
Power Delay status press the 0 seconds, 45 seconds, 5
minutes or 10 minutes soft-key followed by pressing
the arrow back soft-key.
Headlight Off Delay (for versions/markets,
where provided)
When this feature is selected, the driver can choose to
have the headlights remain on for 0, 30, 60, or 90
seconds when exiting the vehicle. To change the Head-
light Off Delay status press the 0, 30, 60 or 90 soft-key
followed by pressing the arrow back soft-key.Compass Settings
Variance (for versions/markets, where provided)
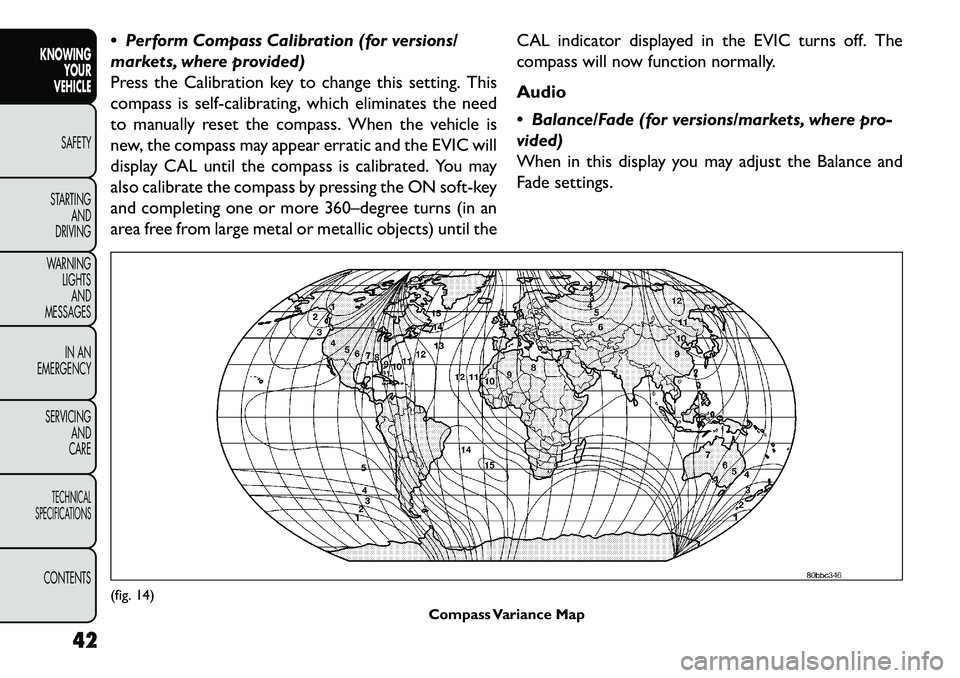
Compass Variance is the difference between Magnetic
North and Geographic North. To compensate for the
differences the variance should be set for the zone
where the vehicle is driven, per the zone map. Once
properly set, the compass will automatically compen-
sate for the differences, and provide the most accurate
compass heading.
NOTE:
Keep magnetic materials away from the top
of the instrument panel, such as iPod's, Mobile Phones,
Laptops and Radar Detectors. This is where the com-
pass module is located, and it can cause interference
with the compass sensor, and it may give false readings.
(fig. 14)
41
KNOWING
YOUR
VEHICLE
SAFETY
STARTING
AND
DRIVING
WARNING
LIGHTS
AND
MESSAGES
IN AN
EMERGENCY
SERVICING
AND
CARETECHNICAL
SPECIFICATIONSCONTENTS
Page 48 of 352
Perform Compass Calibration (for versions/
markets, where provided)
Press the Calibration key to change this setting. This
compass is self-calibrating, which eliminates the need
to manually reset the compass. When the vehicle is
new, the compass may appear erratic and the EVIC will
display CAL until the compass is calibrated. You may
also calibrate the compass by pressing the ON soft-key
and completing one or more 360–degree turns (in an
area free from large metal or metallic objects) until theCAL indicator displayed in the EVIC turns off. The
compass will now function normally.
Audio
Balance/Fade (for versions/markets, where pro-
vided)
When in this display you may adjust the Balance and
Fade settings.(fig. 14)
Compass Variance Map
42
KNOWING YOUR
VEHICLE
SAFETY
S
TARTING AND
DRIVING
WARNING LIGHTSAND
MESSAGES
IN AN
EMERGENCY
SERVICING AND
CARETECHNICAL
SPECIFICATIONSCONTENTS
Page 49 of 352
Equalizer (for versions/markets, where provided)
When in this display you may adjust the Bass, Mid and
Treble settings. Adjust the settings with the + and –
setting soft-keys or by selecting any point on the scale
in between the + and – soft-keys followed by pressing
the arrow back soft-key.
NOTE:Bass/mid/treble allow the you to simply slide
your finger up/down to change the setting as well as
press directly on the desired setting.
Speed Adjusted Volume (for versions/markets,
where provided)
Decreases volume relative to vehicle speed. To change
the Speed Adjusted Volume press the Off, 1, 2 or 3
soft-key followed by pressing the arrow back soft-key.
Music Info Cleanup (for versions/markets, where
provided)
This feature helps organize music files for optimized
music navigation. To make your selection, press the
Music Info Cleanup soft-key, select On or Off followed
by pressing the arrow back soft-key.
Phone / Bluetooth
Paired Devices
This feature shows which phones are paired to the
Phone/Bluetooth system. For further information, re-
fer to the Uconnect Touch™ Supplement. SEATS
Seats are a part of the Occupant Restraint System of
the vehicle.
WARNING!
It
is dangerous to ride in a cargo area,
inside or outside of a vehicle. In a colli-
sion, people riding in these areas are more likely
to be seriously injured or killed.
Do not allow people to ride in any area of your
vehicle that is not equipped with seats and seat
belts. In a collision, people riding in these areas
are more likely to be seriously injured or killed.
Be sure everyone in your vehicle is in a seat
and using a seat belt properly.
DRIVER'S POWER SEAT (for versions/
markets, where provided)
The power seat switch is on the outboard side of the
seat near the floor. Use this switch to move the seat up,
down, forward, rearward or to tilt the seat. (fig. 15)
Adjusting The Seat Forward Or Rearward
The seat can be adjusted both forward and rearward.
Push the seat switch forward or rearward, the seat will
move in the direction of the switch. Release the switch
when the desired position has been reached.
43
KNOWING
YOUR
VEHICLE
SAFETY
STARTING
AND
DRIVING
WARNING
LIGHTS
AND
MESSAGES
IN AN
EMERGENCY
SERVICING
AND
CARETECHNICAL
SPECIFICATIONSCONTENTS
Page 50 of 352
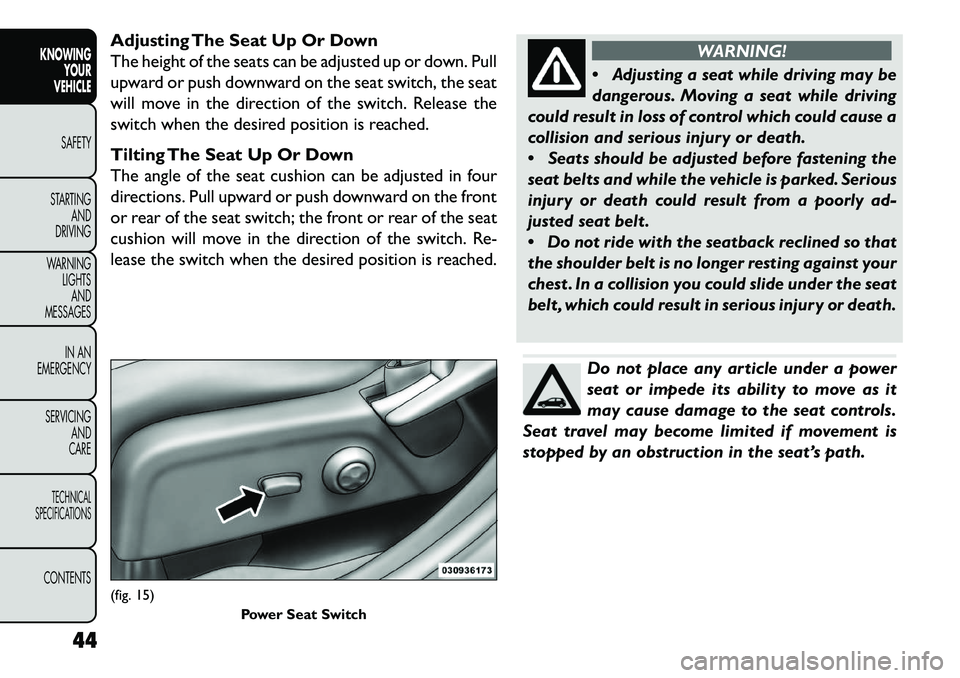
Adjusting The Seat Up Or Down
The height of the seats can be adjusted up or down. Pull
upward or push downward on the seat switch, the seat
will move in the direction of the switch. Release the
switch when the desired position is reached.
Tilting The Seat Up Or Down
The angle of the seat cushion can be adjusted in four
directions. Pull upward or push downward on the front
or rear of the seat switch; the front or rear of the seat
cushion will move in the direction of the switch. Re-
lease the switch when the desired position is reached.
WARNING!
A
djusting a seat while driving may be
dangerous. Moving a seat while driving
could result in loss of control which could cause a
collision and serious injury or death.
Seats should be adjusted before fastening the
seat belts and while the vehicle is parked. Serious
injury or death could result from a poorly ad-
justed seat belt .
Do not ride with the seatback reclined so that
the shoulder belt is no longer resting against your
chest . In a collision you could slide under the seat
belt , which could result in serious injury or death.Do not place any article under a power
seat or impede its ability to move as it
may cause damage to the seat controls.
Seat travel may become limited if movement is
stopped by an obstruction in the seat’s path.
(fig. 15) Power Seat Switch
44
KNOWING YOUR
VEHICLE
SAFETY
S
TARTING AND
DRIVING
WARNING LIGHTSAND
MESSAGES
IN AN
EMERGENCY
SERVICING AND
CARETECHNICAL
SPECIFICATIONSCONTENTS