headlamp FIAT FULLBACK 2018 Owner handbook (in English)
[x] Cancel search | Manufacturer: FIAT, Model Year: 2018, Model line: FULLBACK, Model: FIAT FULLBACK 2018Pages: 316, PDF Size: 10.52 MB
Page 202 of 316
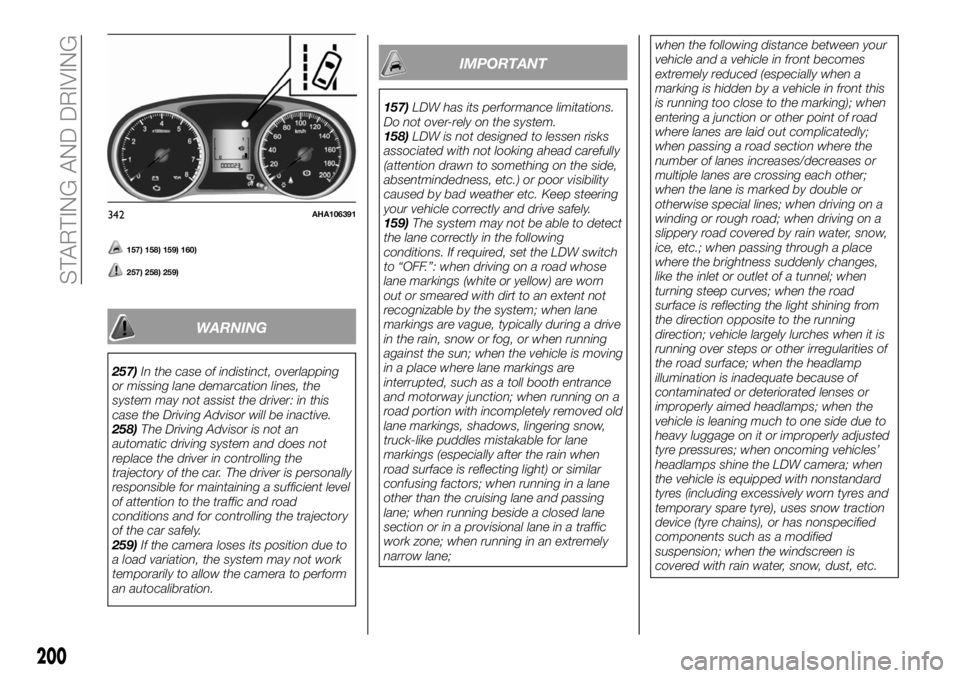
157) 158) 159) 160)
257) 258) 259)
WARNING
257)In the case of indistinct, overlapping
or missing lane demarcation lines, the
system may not assist the driver: in this
case the Driving Advisor will be inactive.
258)The Driving Advisor is not an
automatic driving system and does not
replace the driver in controlling the
trajectory of the car. The driver is personally
responsible for maintaining a sufficient level
of attention to the traffic and road
conditions and for controlling the trajectory
of the car safely.
259)If the camera loses its position due to
a load variation, the system may not work
temporarily to allow the camera to perform
an autocalibration.
IMPORTANT
157)LDW has its performance limitations.
Do not over-rely on the system.
158)LDW is not designed to lessen risks
associated with not looking ahead carefully
(attention drawn to something on the side,
absentmindedness, etc.) or poor visibility
caused by bad weather etc. Keep steering
your vehicle correctly and drive safely.
159)The system may not be able to detect
the lane correctly in the following
conditions. If required, set the LDW switch
to “OFF.”: when driving on a road whose
lane markings (white or yellow) are worn
out or smeared with dirt to an extent not
recognizable by the system; when lane
markings are vague, typically during a drive
in the rain, snow or fog, or when running
against the sun; when the vehicle is moving
in a place where lane markings are
interrupted, such as a toll booth entrance
and motorway junction; when running on a
road portion with incompletely removed old
lane markings, shadows, lingering snow,
truck-like puddles mistakable for lane
markings (especially after the rain when
road surface is reflecting light) or similar
confusing factors; when running in a lane
other than the cruising lane and passing
lane; when running beside a closed lane
section or in a provisional lane in a traffic
work zone; when running in an extremely
narrow lane;when the following distance between your
vehicle and a vehicle in front becomes
extremely reduced (especially when a
marking is hidden by a vehicle in front this
is running too close to the marking); when
entering a junction or other point of road
where lanes are laid out complicatedly;
when passing a road section where the
number of lanes increases/decreases or
multiple lanes are crossing each other;
when the lane is marked by double or
otherwise special lines; when driving on a
winding or rough road; when driving on a
slippery road covered by rain water, snow,
ice, etc.; when passing through a place
where the brightness suddenly changes,
like the inlet or outlet of a tunnel; when
turning steep curves; when the road
surface is reflecting the light shining from
the direction opposite to the running
direction; vehicle largely lurches when it is
running over steps or other irregularities of
the road surface; when the headlamp
illumination is inadequate because of
contaminated or deteriorated lenses or
improperly aimed headlamps; when the
vehicle is leaning much to one side due to
heavy luggage on it or improperly adjusted
tyre pressures; when oncoming vehicles’
headlamps shine the LDW camera; when
the vehicle is equipped with nonstandard
tyres (including excessively worn tyres and
temporary spare tyre), uses snow traction
device (tyre chains), or has nonspecified
components such as a modified
suspension; when the windscreen is
covered with rain water, snow, dust, etc.
342AHA106391
200
STARTING AND DRIVING
Page 204 of 316
the Multi Communication System
(MCS), the Smartphone Link Display
Audio or the DISPLAY AUDIO. When
you move the gearshift lever or the
selector lever to any other position, the
screen will return to its original
indication.
162)
NOTE Because the rear view camera
has a special lens, the lines on the
ground between parking spaces may
not look parallel on the screen.
NOTE In the following situations, the
screen indication may be difficult to see.
There is no abnormality.
Low light (night time)
When the light of the sun or the light
from a vehicle’s headlamps shines
directly into the lens
If a fluorescent light shines directly
into the lens, the screen indication may
be flicker. There is no abnormality.
NOTE If the camera is hot and is then
cooled by rain or a car wash, the lens
can mist up. This phenomenon does
not indicate a malfunction.
NOTE If the atmospheric temperature
is extremely hot or extremely cold, the
rear view camera images may not be
clear. There is no abnormality.NOTE If a radio set is installed near the
camera, the rear view camera images
may cause electrical system
interference and the system may stop
functioning properly.
NOTE It is not possible to fully see
obstacles when the lens is dirty. If the
lens becomes contaminated by water
droplets, snow, mud, or oil, wipe off the
contamination, taking care not to
scratch the lens.
NOTE Please observe the following
cautions. Ignoring them could lead to a
camera malfunction.
Do not subject the camera to
physical shock such as striking it
strongly or throwing a thing.
Do not adhere organic substances,
waxes, oil remover, and glass cleaner to
the camera. If adhered to them,
immediately wipe off.
Do not splash the camera with
boiling water.
Never spray or splash water on the
camera or around it.
Do not disconnect, disassemble or
modify the camera.
Do not scratch the camera, as this
may cause damage to the rear view
camera images.
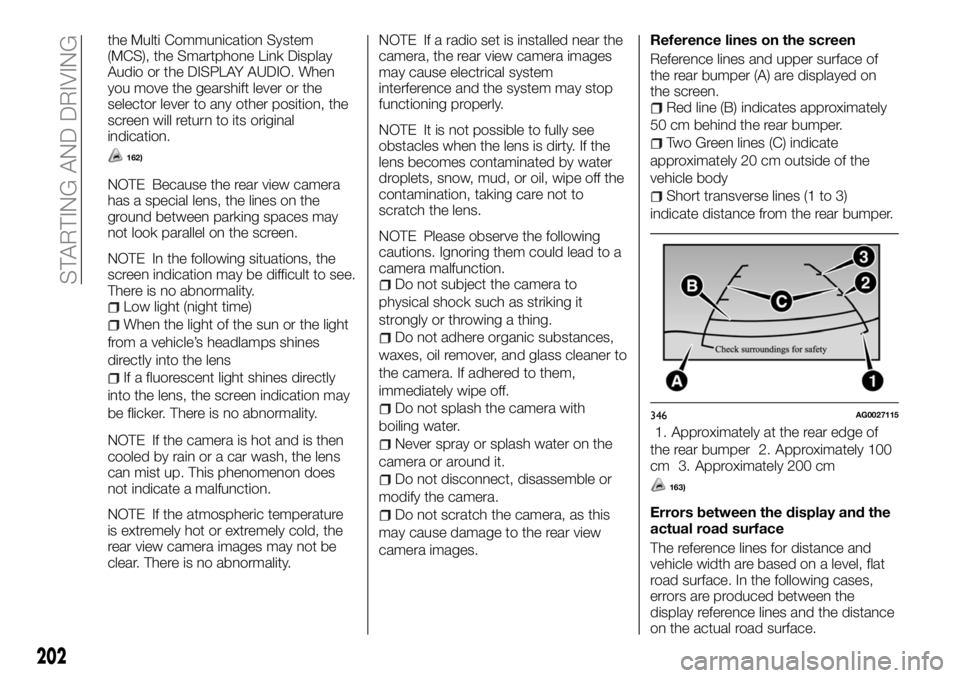
Reference lines on the screen
Reference lines and upper surface of
the rear bumper (A) are displayed on
the screen.
Red line (B) indicates approximately
50 cm behind the rear bumper.
Two Green lines (C) indicate
approximately 20 cm outside of the
vehicle body
Short transverse lines (1 to 3)
indicate distance from the rear bumper.
1. Approximately at the rear edge of
the rear bumper 2. Approximately 100
cm 3. Approximately 200 cm
163)
Errors between the display and the
actual road surface
The reference lines for distance and
vehicle width are based on a level, flat
road surface. In the following cases,
errors are produced between the
display reference lines and the distance
on the actual road surface.
346AG0027115
202
STARTING AND DRIVING
Page 237 of 316
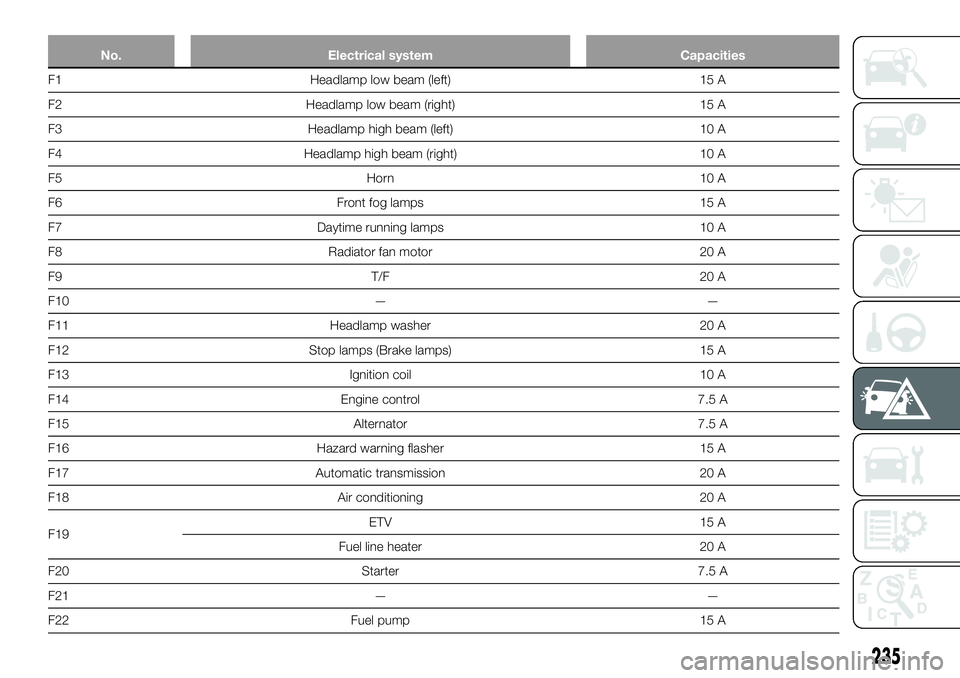
No. Electrical system Capacities
F1 Headlamp low beam (left) 15 A
F2 Headlamp low beam (right) 15 A
F3 Headlamp high beam (left) 10 A
F4 Headlamp high beam (right) 10 A
F5 Horn 10 A
F6 Front fog lamps 15 A
F7 Daytime running lamps 10 A
F8 Radiator fan motor 20 A
F9 T/F 20 A
F10 — —
F11 Headlamp washer 20 A
F12 Stop lamps (Brake lamps) 15 A
F13 Ignition coil 10 A
F14 Engine control 7.5 A
F15 Alternator 7.5 A
F16 Hazard warning flasher 15 A
F17 Automatic transmission 20 A
F18 Air conditioning 20 A
F19ETV 15 A
Fuel line heater 20 A
F20 Starter 7.5 A
F21 — —
F22 Fuel pump 15 A
235
Page 240 of 316
REPLACEMENT OF
LAMP BULBS
350) 351) 352) 353) 354) 355) 356) 357) 358) 359) 360)
Before replacing a bulb, ensure the
lamp is off. Do not touch the glass part
of the new bulb with your bare fingers;
the skin oil left on the glass will
evaporate when the bulb gets hot and
the vapour will condense on the
reflector and dim the surface.
NOTE If you are unsure of how to carry
out the work as required, we
recommend you to consult a specialist.
Be careful not to scratch the vehicle
body when removing a lamp and lens.
When it rains, or when the vehicle has
been washed, the inside of the lens
sometimes becomes foggy.This is the same phenomenon as when
window glass mists up on a humid day,
and does not indicate a functional
problem. When the lamp is switched
on, the heat will remove the fog.
However, if water gathers inside the
lamp, we recommend you to have the
lamp checked.
Bulb location and capacity
When replacing a bulb, be sure to use a
new bulb of the same type, wattage,
and colour. If you install a different bulb,
the bulb could malfunction or fail to
come on and could lead to a vehicle
fire.
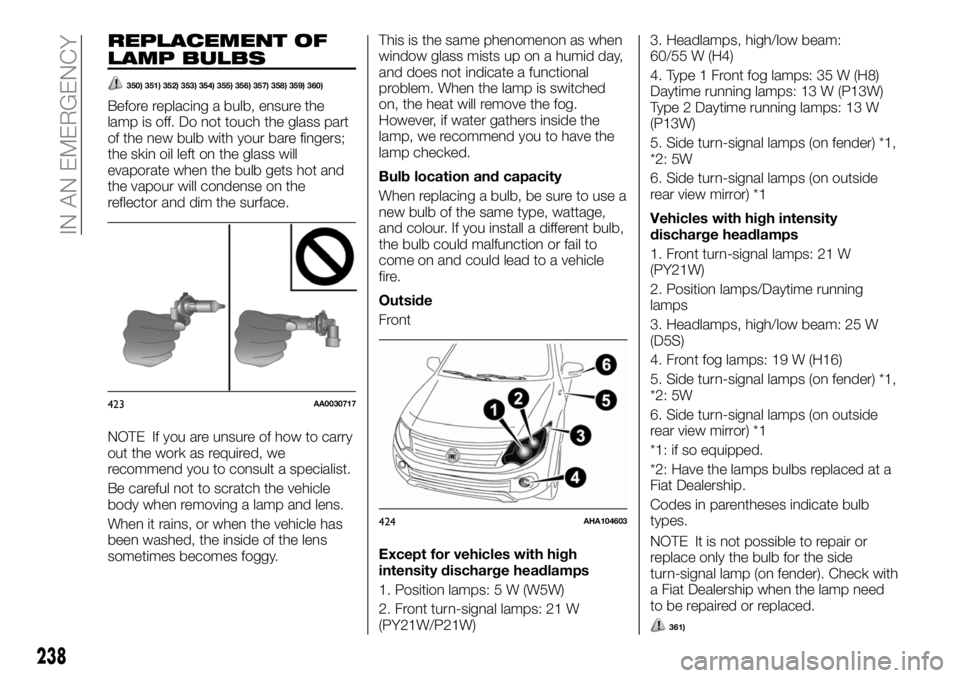
Outside
Front
Except for vehicles with high
intensity discharge headlamps
1. Position lamps: 5 W (W5W)
2. Front turn-signal lamps: 21 W
(PY21W/P21W)3. Headlamps, high/low beam:
60/55 W (H4)
4. Type 1 Front fog lamps: 35 W (H8)
Daytime running lamps: 13 W (P13W)
Type 2 Daytime running lamps: 13 W
(P13W)
5. Side turn-signal lamps (on fender) *1,
*2: 5W
6. Side turn-signal lamps (on outside
rear view mirror) *1
Vehicles with high intensity
discharge headlamps
1. Front turn-signal lamps: 21 W
(PY21W)
2. Position lamps/Daytime running
lamps
3. Headlamps, high/low beam: 25 W
(D5S)
4. Front fog lamps: 19 W (H16)
5. Side turn-signal lamps (on fender) *1,
*2: 5W
6. Side turn-signal lamps (on outside
rear view mirror) *1
*1: if so equipped.
*2: Have the lamps bulbs replaced at a
Fiat Dealership.
Codes in parentheses indicate bulb
types.
NOTE It is not possible to repair or
replace only the bulb for the side
turn-signal lamp (on fender). Check with
a Fiat Dealership when the lamp need
to be repaired or replaced.
423AA0030717
424AHA104603
238
IN AN EMERGENCY
361)
Page 241 of 316
Rear
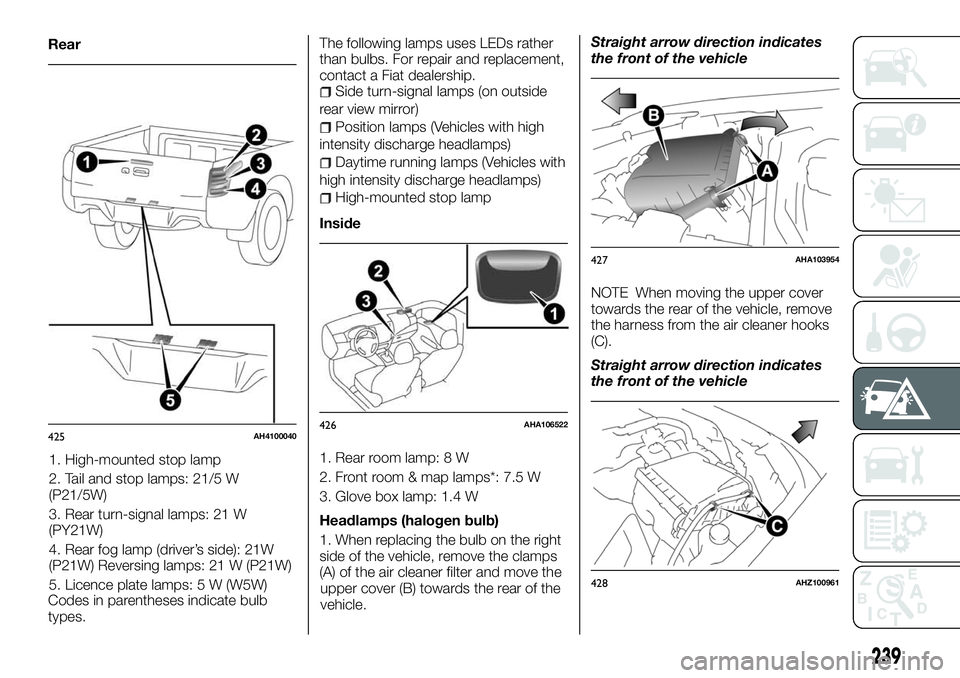
1. High-mounted stop lamp
2. Tail and stop lamps: 21/5 W
(P21/5W)
3. Rear turn-signal lamps: 21 W
(PY21W)
4. Rear fog lamp (driver’s side): 21W
(P21W) Reversing lamps: 21 W (P21W)
5. Licence plate lamps: 5 W (W5W)
Codes in parentheses indicate bulb
types.The following lamps uses LEDs rather
than bulbs. For repair and replacement,
contact a Fiat dealership.
Side turn-signal lamps (on outside
rear view mirror)
Position lamps (Vehicles with high
intensity discharge headlamps)
Daytime running lamps (Vehicles with
high intensity discharge headlamps)
High-mounted stop lamp
Inside
1. Rear room lamp: 8 W
2. Front room & map lamps*: 7.5 W
3. Glove box lamp: 1.4 W
Headlamps (halogen bulb)
1. When replacing the bulb on the right
side of the vehicle, remove the clamps
(A) of the air cleaner filter and move the
upper cover (B) towards the rear of the
vehicle.Straight arrow direction indicates
the front of the vehicle
NOTE When moving the upper cover
towards the rear of the vehicle, remove
the harness from the air cleaner hooks
(C).
Straight arrow direction indicates
the front of the vehicle
425AH4100040426AHA106522
427AHA103954
428AHZ100961
239
Page 242 of 316
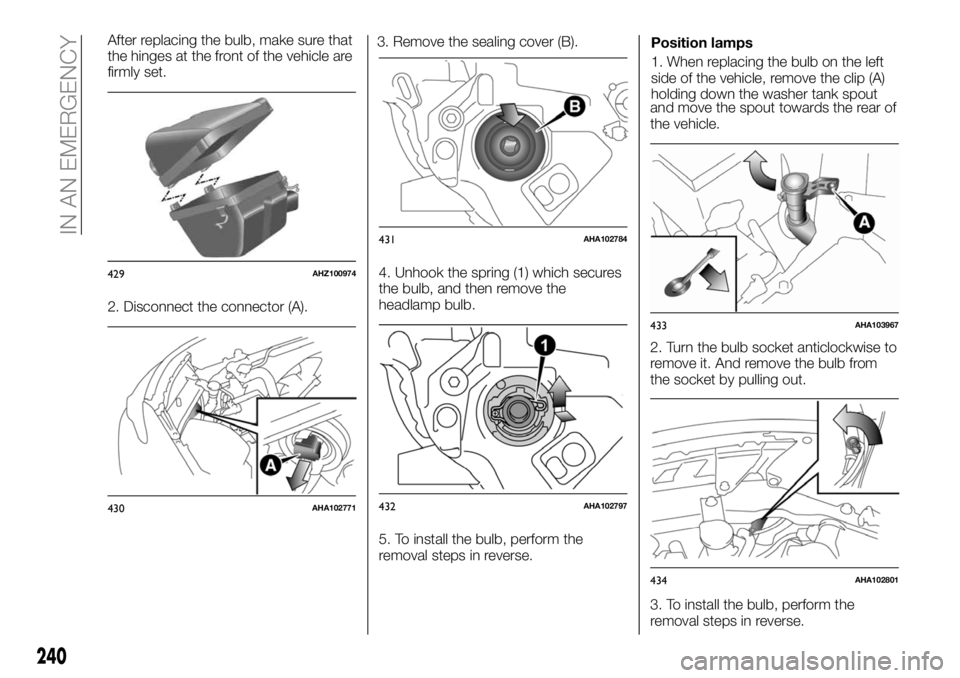
After replacing the bulb, make sure that
the hinges at the front of the vehicle are
firmly set.
2. Disconnect the connector (A).3. Remove the sealing cover (B).
4. Unhook the spring (1) which secures
the bulb, and then remove the
headlamp bulb.
5. To install the bulb, perform the
removal steps in reverse.Position lamps
1. When replacing the bulb on the left
side of the vehicle, remove the clip (A)
holding down the washer tank spout
and move the spout towards the rear of
the vehicle.
2. Turn the bulb socket anticlockwise to
remove it. And remove the bulb from
the socket by pulling out.
3. To install the bulb, perform the
removal steps in reverse.
429AHZ100974
430AHA102771
431AHA102784
432AHA102797
433AHA103967
434AHA102801
240
IN AN EMERGENCY
Page 243 of 316
Front turn-signal lamps
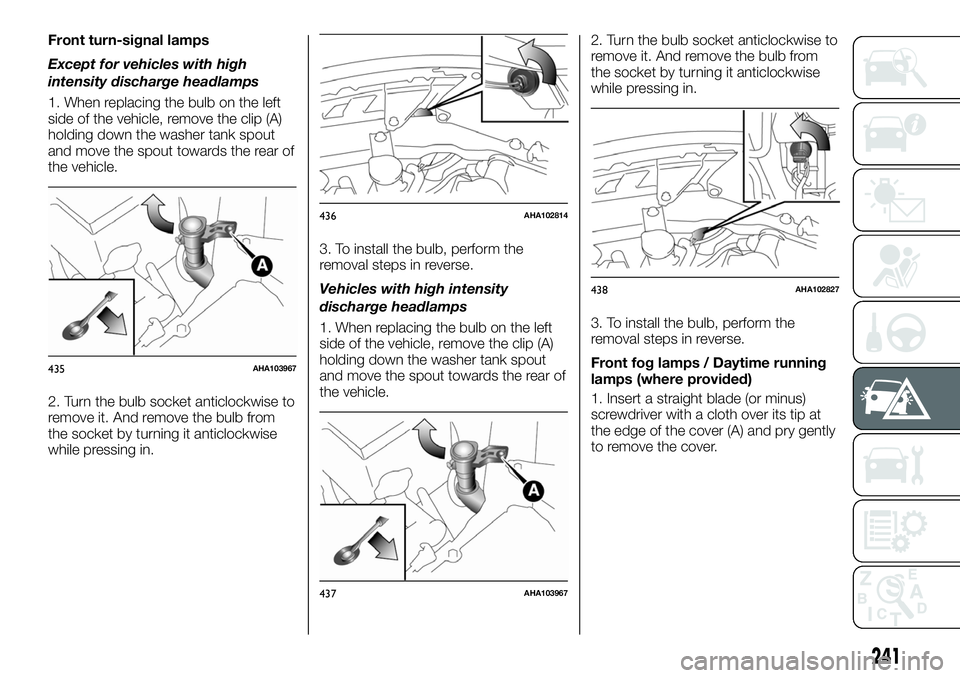
Except for vehicles with high
intensity discharge headlamps
1. When replacing the bulb on the left
side of the vehicle, remove the clip (A)
holding down the washer tank spout
and move the spout towards the rear of
the vehicle.
2. Turn the bulb socket anticlockwise to
remove it. And remove the bulb from
the socket by turning it anticlockwise
while pressing in.3. To install the bulb, perform the
removal steps in reverse.
Vehicles with high intensity
discharge headlamps
1. When replacing the bulb on the left
side of the vehicle, remove the clip (A)
holding down the washer tank spout
and move the spout towards the rear of
the vehicle.2. Turn the bulb socket anticlockwise to
remove it. And remove the bulb from
the socket by turning it anticlockwise
while pressing in.
3. To install the bulb, perform the
removal steps in reverse.
Front fog lamps / Daytime running
lamps (where provided)
1. Insert a straight blade (or minus)
screwdriver with a cloth over its tip at
the edge of the cover (A) and pry gently
to remove the cover.
435AHA103967
436AHA102814
437AHA103967
438AHA102827
241
Page 247 of 316
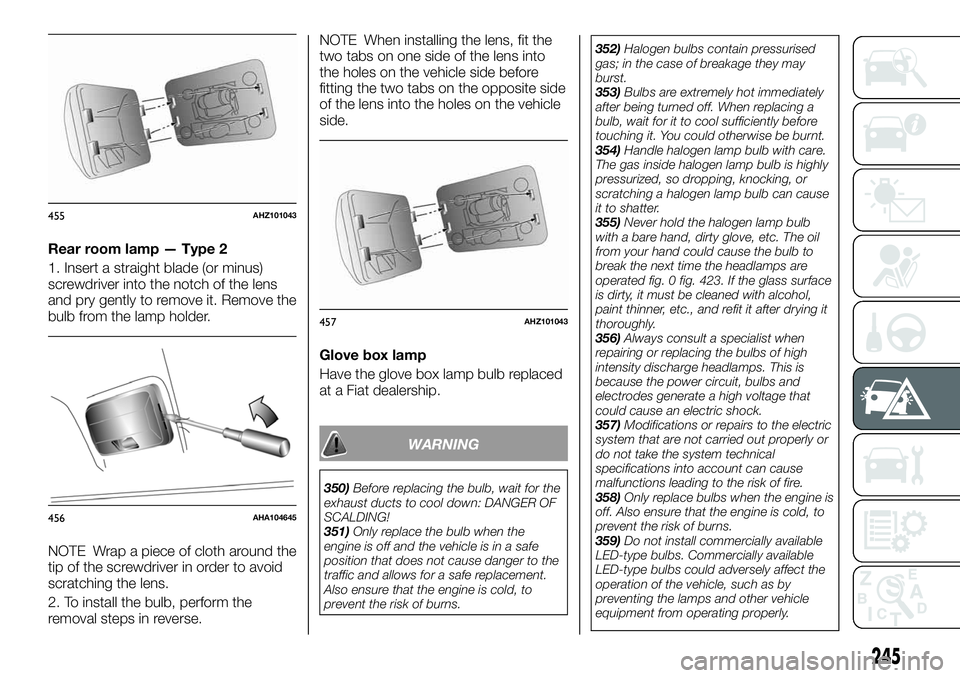
Rear room lamp — Type 2
1. Insert a straight blade (or minus)
screwdriver into the notch of the lens
and pry gently to remove it. Remove the
bulb from the lamp holder.
NOTE Wrap a piece of cloth around the
tip of the screwdriver in order to avoid
scratching the lens.
2. To install the bulb, perform the
removal steps in reverse.NOTE When installing the lens, fit the
two tabs on one side of the lens into
the holes on the vehicle side before
fitting the two tabs on the opposite side
of the lens into the holes on the vehicle
side.
Glove box lamp
Have the glove box lamp bulb replaced
at a Fiat dealership.
WARNING
350)Before replacing the bulb, wait for the
exhaust ducts to cool down: DANGER OF
SCALDING!
351)Only replace the bulb when the
engine is off and the vehicle is in a safe
position that does not cause danger to the
traffic and allows for a safe replacement.
Also ensure that the engine is cold, to
prevent the risk of burns.352)Halogen bulbs contain pressurised
gas; in the case of breakage they may
burst.
353)Bulbs are extremely hot immediately
after being turned off. When replacing a
bulb, wait for it to cool sufficiently before
touching it. You could otherwise be burnt.
354)Handle halogen lamp bulb with care.
The gas inside halogen lamp bulb is highly
pressurized, so dropping, knocking, or
scratching a halogen lamp bulb can cause
it to shatter.
355)Never hold the halogen lamp bulb
with a bare hand, dirty glove, etc. The oil
from your hand could cause the bulb to
break the next time the headlamps are
operated fig. 0 fig. 423. If the glass surface
is dirty, it must be cleaned with alcohol,
paint thinner, etc., and refit it after drying it
thoroughly.
356)Always consult a specialist when
repairing or replacing the bulbs of high
intensity discharge headlamps. This is
because the power circuit, bulbs and
electrodes generate a high voltage that
could cause an electric shock.
357)Modifications or repairs to the electric
system that are not carried out properly or
do not take the system technical
specifications into account can cause
malfunctions leading to the risk of fire.
358)Only replace bulbs when the engine is
off. Also ensure that the engine is cold, to
prevent the risk of burns.
359)Do not install commercially available
LED-type bulbs. Commercially available
LED-type bulbs could adversely affect the
operation of the vehicle, such as by
preventing the lamps and other vehicle
equipment from operating properly.
455AHZ101043
456AHA104645
457AHZ101043
245
Page 248 of 316
360)When replacing a bulb, be sure to use
a new bulb of the same type, wattage, and
colour. If you install a different bulb, the
bulb could malfunction or fail to come on
and could lead to a vehicle fire.
361)Check with an authorised Fiat
dealership when it is necessary to repair a
high intensity discharge headlamp or to
replace the bulb. High voltage is generated
in the high intensity discharge headlamp
bulb and electrodes, which may cause a
severe shock when the bulb and connector
are removed or disconnected.
246
IN AN EMERGENCY
Page 256 of 316
PERIODIC CHECKS
Before long journeys, check and, if
necessary, restore:
engine coolant level;
brake fluid level;
windscreen washer fluid level;
operation of lighting system
(headlamps, direction indicators, hazard
warning lights, etc.);
tyre inflation pressure and condition;
tyre alignment;
operation of screen washer/wiper
system and positioning/wear of
windscreen/rear window wiper blades.
To ensure that the vehicle is always
efficient and well maintained, it is
advisable to make sure that you carry
out the above operations regularly
(approximately every 1000 km and
every 3000 km for checking and
topping up engine oil is advisable).
DEMANDING
VEHICLE USE
If the vehicle is mostly used in one of
the following conditions:
towing a trailer or caravan;
dusty roads;
short, repeated journeys (less than
7-8 km) at sub-zero outside
temperatures;
engine often idling or driving long
distances at low speeds or long periods
of inactivity;
the following checks must be carried
out more often than indicated in the
Scheduled Servicing Plan:
check front disc brake pad
conditions and wear;
check cleanliness of bonnet and
boot locks, cleanliness and lubrication
of linkage;
visually inspect conditions of: engine,
gearbox, transmission, pipes and hoses
(exhaust - fuel system - brakes) and
rubber elements (boots - sleeves -
bushes - etc.);
check battery charge and battery
fluid level (electrolyte);
visually inspect condition of the
accessory drive belts;
check and, if necessary, change
engine oil and replace oil filter;
check and, if necessary, replace
pollen filter.
254
SERVICING AND MAINTENANCE