engine FIAT IDEA 2008 1.G Service Manual
[x] Cancel search | Manufacturer: FIAT, Model Year: 2008, Model line: IDEA, Model: FIAT IDEA 2008 1.GPages: 210, PDF Size: 3.64 MB
Page 134 of 210
133
CAR
MAINTENANCE
TECHNICAL
SPECIFICATIONS
INDEX
DASHBOARD
AND CONTROLS
SAFETY
DEVICES
CORRECT USE
OF THE CAR
WARNING
LIGHTS AND
MESSAGES
IN AN
EMERGENCY
DOOR OPENING/CLOSING ........................................... 134
ENGINE STARTING ............................................................ 134
FIX & GO automatic (QUICK TYRE REPAIR KIT) ...... 136
IF A TYRE IS PUNCTURED ............................................... 140
WHEN NEEDING TO CHANGE A BULB ................... 144
IF AN EXTERIOR LIGHT BURNS OUT ......................... 147
IF AN INTERIOR LIGHT BURNS OUT .......................... 152
IF A FUSE BLOWS................................................................ 153
IF THE BATTERY IS FLAT .................................................. 158
JACKING THE CAR............................................................. 158
TOWING THE CAR............................................................ 159
II I
N N
A A
N N
E E
M M
E E
R R
G G
E E
N N
C C
Y Y
In an emergency we recommend that you call the toll-free number found on the
Warranty Booklet. You can also connect to the site www.fiat.com
to search for the nearest Fiat Dealership point.
133-160 idea GB 1 ed 10-07-2008 8:30 Pagina 133
Page 135 of 210
134
CAR
MAINTENANCE
TECHNICAL
SPECIFICATIONS
INDEX
DASHBOARD
AND CONTROLS
SAFETY
DEVICES
CORRECT USE
OF THE CAR
WARNING
LIGHTS AND
MESSAGES
IN AN
EMERGENCY
DOOR
OPENING/CLOSING
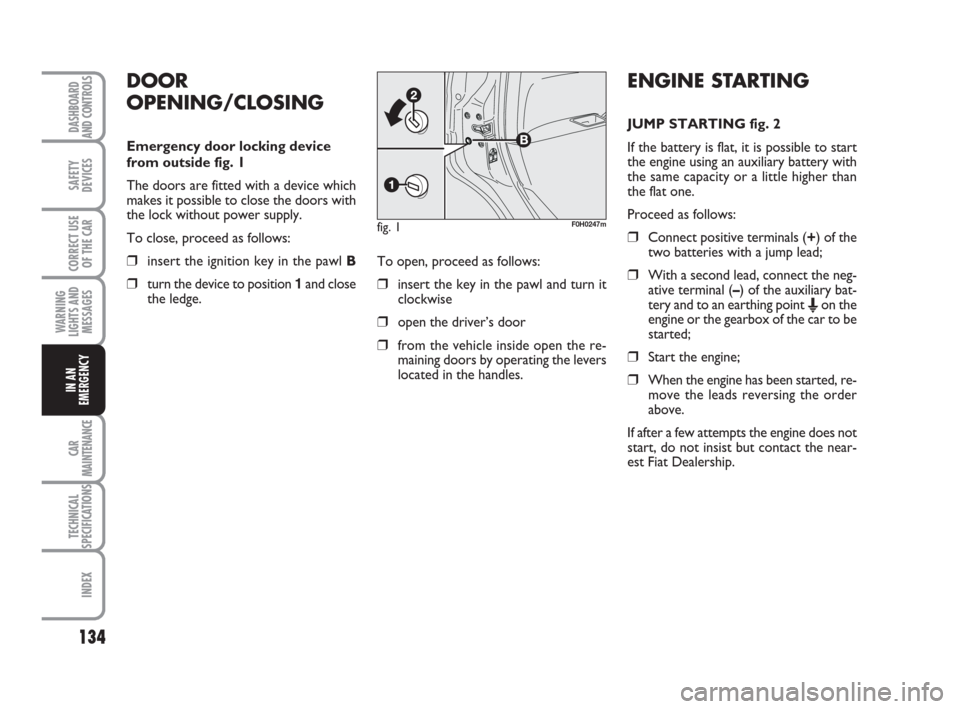
Emergency door locking device
from outside fig. 1
The doors are fitted with a device which
makes it possible to close the doors with
the lock without power supply.
To close, proceed as follows:
❒insert the ignition key in the pawl B
❒turn the device to position 1and close
the ledge.To open, proceed as follows:❒insert the key in the pawl and turn it
clockwise
❒open the driver’s door
❒from the vehicle inside open the re-
maining doors by operating the levers
located in the handles.
fig. 1F0H0247m
ENGINE STARTING
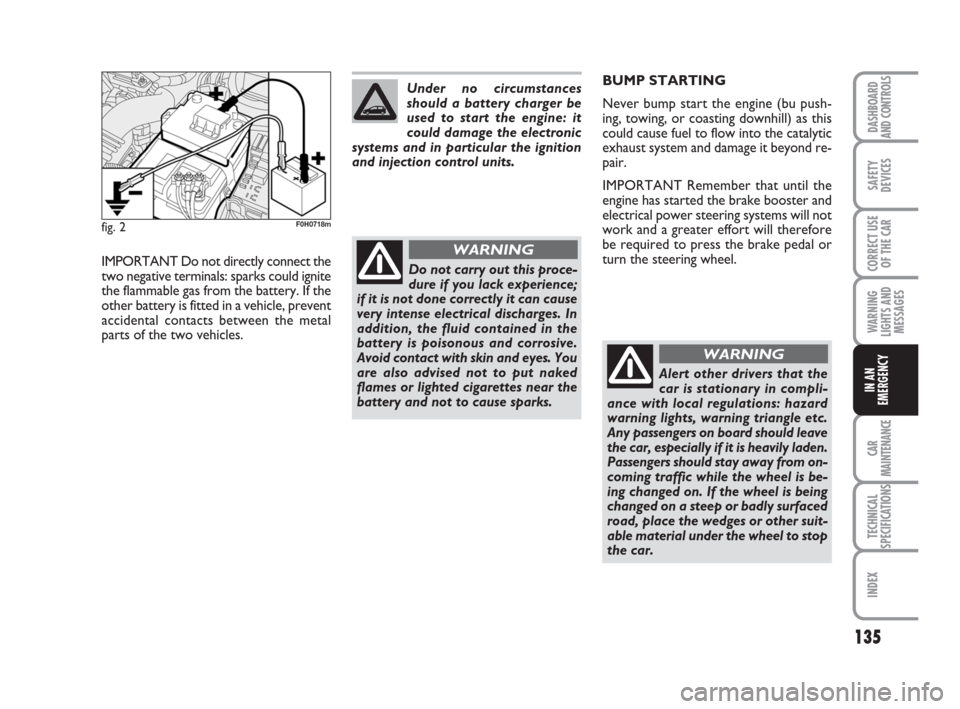
JUMP STARTING fig. 2
If the battery is flat, it is possible to start
the engine using an auxiliary battery with
the same capacity or a little higher than
the flat one.
Proceed as follows:
❒Connect positive terminals (+) of the
two batteries with a jump lead;
❒With a second lead, connect the neg-
ative terminal (–) of the auxiliary bat-
tery and to an earthing point
Eon the
engine or the gearbox of the car to be
started;
❒Start the engine;
❒When the engine has been started, re-
move the leads reversing the order
above.
If after a few attempts the engine does not
start, do not insist but contact the near-
est Fiat Dealership.
133-160 idea GB 1 ed 10-07-2008 8:30 Pagina 134
Page 136 of 210
135
CAR
MAINTENANCE
TECHNICAL
SPECIFICATIONS
INDEX
DASHBOARD
AND CONTROLS
SAFETY
DEVICES
CORRECT USE
OF THE CAR
WARNING
LIGHTS AND
MESSAGES
IN AN
EMERGENCY
fig. 2F0H0718m
IMPORTANT Do not directly connect the
two negative terminals: sparks could ignite
the flammable gas from the battery. If the
other battery is fitted in a vehicle, prevent
accidental contacts between the metal
parts of the two vehicles.Do not carry out this proce-
dure if you lack experience;
if it is not done correctly it can cause
very intense electrical discharges. In
addition, the fluid contained in the
battery is poisonous and corrosive.
Avoid contact with skin and eyes. You
are also advised not to put naked
flames or lighted cigarettes near the
battery and not to cause sparks.
WARNING
Under no circumstances
should a battery charger be
used to start the engine: it
could damage the electronic
systems and in particular the ignition
and injection control units.BUMP STARTING
Never bump start the engine (bu push-
ing, towing, or coasting downhill) as this
could cause fuel to flow into the catalytic
exhaust system and damage it beyond re-
pair.
IMPORTANT Remember that until the
engine has started the brake booster and
electrical power steering systems will not
work and a greater effort will therefore
be required to press the brake pedal or
turn the steering wheel.
Alert other drivers that the
car is stationary in compli-
ance with local regulations: hazard
warning lights, warning triangle etc.
Any passengers on board should leave
the car, especially if it is heavily laden.
Passengers should stay away from on-
coming traffic while the wheel is be-
ing changed on. If the wheel is being
changed on a steep or badly surfaced
road, place the wedges or other suit-
able material under the wheel to stop
the car.
WARNING
133-160 idea GB 1 ed 10-07-2008 8:30 Pagina 135
Page 139 of 210
138
CAR
MAINTENANCE
TECHNICAL
SPECIFICATIONS
INDEX
DASHBOARD
AND CONTROLS
SAFETY
DEVICES
CORRECT USE
OF THE CAR
WARNING
LIGHTS AND
MESSAGES
IN AN
EMERGENCY
fig. 6F0H0357mfig. 7F0H0177mfig. 8F0H0748m
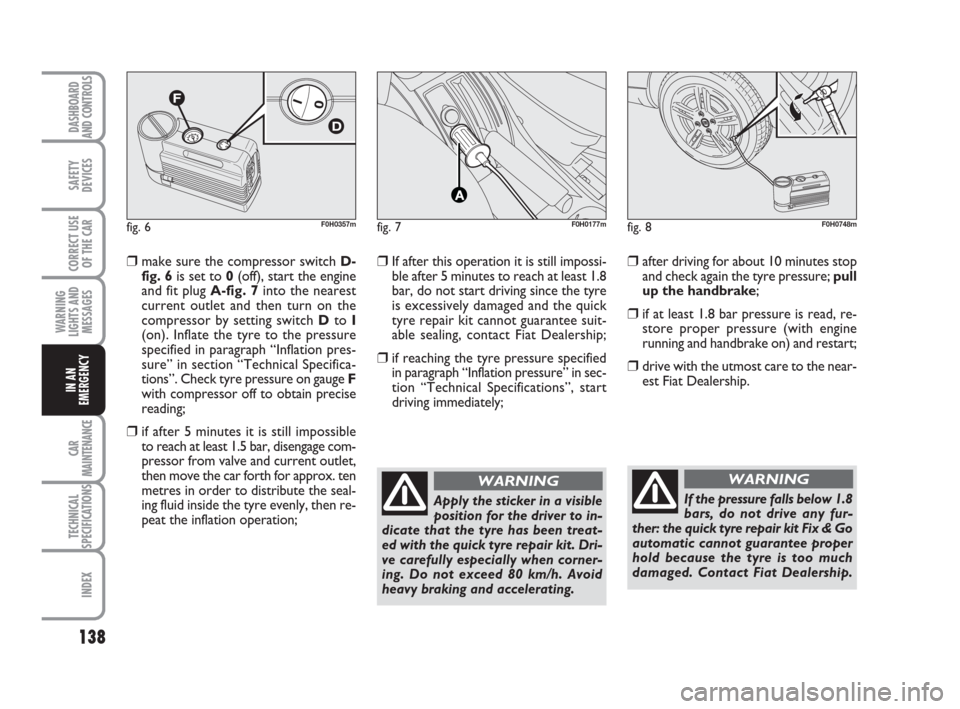
❒make sure the compressor switch D-
fig. 6is set to 0(off), start the engine
and fit plug A-fig. 7into the nearest
current outlet and then turn on the
compressor by setting switch Dto I
(on). Inflate the tyre to the pressure
specified in paragraph “Inflation pres-
sure” in section “Technical Specifica-
tions”. Check tyre pressure on gauge F
with compressor off to obtain precise
reading;
❒if after 5 minutes it is still impossible
to reach at least 1.5 bar, disengage com-
pressor from valve and current outlet,
then move the car forth for approx. ten
metres in order to distribute the seal-
ing fluid inside the tyre evenly, then re-
peat the inflation operation;
❒If after this operation it is still impossi-
ble after 5 minutes to reach at least 1.8
bar, do not start driving since the tyre
is excessively damaged and the quick
tyre repair kit cannot guarantee suit-
able sealing, contact Fiat Dealership;
❒if reaching the tyre pressure specified
in paragraph “Inflation pressure” in sec-
tion “Technical Specifications”, start
driving immediately;
Apply the sticker in a visible
position for the driver to in-
dicate that the tyre has been treat-
ed with the quick tyre repair kit. Dri-
ve carefully especially when corner-
ing. Do not exceed 80 km/h. Avoid
heavy braking and accelerating.
WARNING
If the pressure falls below 1.8
bars, do not drive any fur-
ther: the quick tyre repair kit Fix & Go
automatic cannot guarantee proper
hold because the tyre is too much
damaged. Contact Fiat Dealership.
WARNING
❒after driving for about 10 minutes stop
and check again the tyre pressure; pull
up the handbrake;
❒if at least 1.8 bar pressure is read, re-
store proper pressure (with engine
running and handbrake on) and restart;
❒drive with the utmost care to the near-
est Fiat Dealership.
133-160 idea GB 1 ed 10-07-2008 8:30 Pagina 138
Page 142 of 210
141
CAR
MAINTENANCE
TECHNICAL
SPECIFICATIONS
INDEX
DASHBOARD
AND CONTROLS
SAFETY
DEVICES
CORRECT USE
OF THE CAR
WARNING
LIGHTS AND
MESSAGES
IN AN
EMERGENCY
The jack should only be used
to change a wheel on the car
for which it was designed. It should
not be put to other uses or employed
to raise other models of cars. Under
no circumstances should it be used
when carrying out repairs under the
car. An incorrectly positioned jack
may cause the car to fall. Do not use
the jack to lift loads exceeding that
indicated on the label attached to the
jack itself. Do not fit snow chains on
a space-saver spare wheel. If a front
wheel (drive wheel) is punctured and
you require snow chains to proceed,
take a standard wheel from the rear
axle and fit the space-saver spare
wheel in its place. Having fitted two
standard wheels on the front drive
axle you can use snow chains, thus
solving the emergency situation.
WARNING
Fasten the wheel cap cor-
rectly to prevent the wheel
from coming free in motion. Never
tamper with the inflation valve. Nev-
er place tools between the rim and
tyre. Check the tyre and space-saver
spare wheel pressure regularly. The
tyre inflation pressure is shown in the
“Technical specifications” chapter.
WARNINGPlease note:
❒the jack cannot be repaired. If it breaks
it must be replaced with a new jack;
❒no tool other than its cranking device
may be fitted on the jack.
To change a wheel proceed as follows:
❒Stop the car in a position that is not
dangerous for oncoming traffic where
you can change the wheel safely. The
ground should be flat and adequately
firm;
❒Turn the engine off and pull up the
handbrake;
❒Engage first gear or reverse;
❒Lift the luggage compartment panel
mat;
❒Loosen the fastener A-fig. 11;
❒Take the tool bag Band go to the
wheel to be replaced;
❒Take the space-saver spare wheel C;
❒If the car is fitted with alloy rims, re-
move the wheel hub with the screw-
driver provided levering in the groove
E-fig. 12, as shown in the figure;
133-160 idea GB 1 ed 10-07-2008 8:30 Pagina 141
Page 155 of 210
154
CAR
MAINTENANCE
TECHNICAL
SPECIFICATIONS
INDEX
DASHBOARD
AND CONTROLS
SAFETY
DEVICES
CORRECT USE
OF THE CAR
WARNING
LIGHTS AND
MESSAGES
IN AN
EMERGENCY
F0H0720m
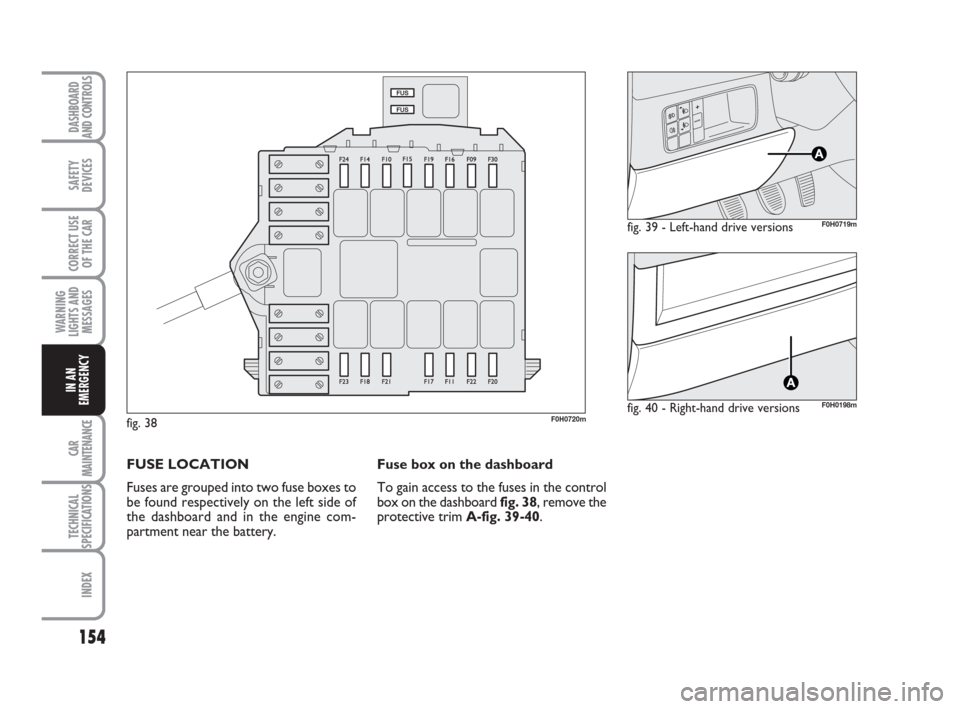
FUSE LOCATION
Fuses are grouped into two fuse boxes to
be found respectively on the left side of
the dashboard and in the engine com-
partment near the battery.Fuse box on the dashboard
To gain access to the fuses in the control
box on the dashboard fig. 38, remove the
protective trim A-fig. 39-40.
fig. 39 - Left-hand drive versionsF0H0719m
fig. 40 - Right-hand drive versionsF0H0198m
fig. 38
133-160 idea GB 1 ed 10-07-2008 8:30 Pagina 154
Page 157 of 210
156
CAR
MAINTENANCE
TECHNICAL
SPECIFICATIONS
INDEX
DASHBOARD
AND CONTROLS
SAFETY
DEVICES
CORRECT USE
OF THE CAR
WARNING
LIGHTS AND
MESSAGES
IN AN
EMERGENCY
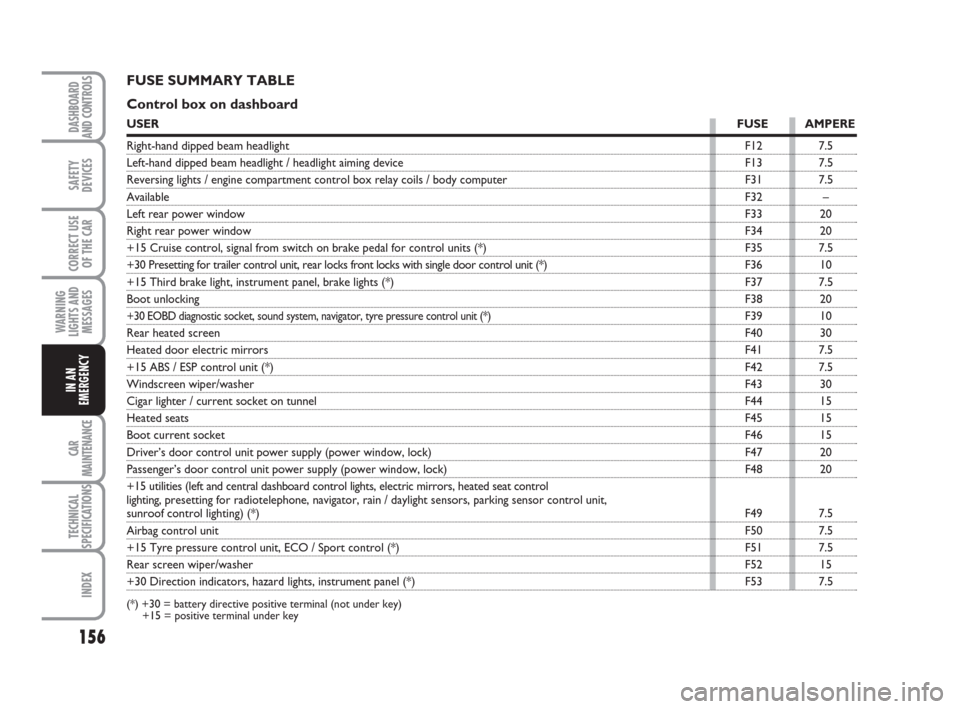
FUSE SUMMARY TABLE
Control box on dashboard
USERFUSE AMPERE
Right-hand dipped beam headlightF12 7.5
Left-hand dipped beam headlight / headlight aiming device F13 7.5
Reversing lights / engine compartment control box relay coils / body computer F31 7.5
AvailableF32 –
Left rear power windowF33 20
Right rear power windowF34 20
+15 Cruise control, signal from switch on brake pedal for control units (*) F35 7.5
+30 Presetting for trailer control unit, rear locks front locks with single door control unit (*) F36 10
+15 Third brake light, instrument panel, brake lights (*) F37 7.5
Boot unlockingF38 20
+30 EOBD diagnostic socket, sound system, navigator, tyre pressure control unit (*)F39 10
Rear heated screenF40 30
Heated door electric mirrorsF41 7.5
+15 ABS / ESP control unit (*)F42 7.5
Windscreen wiper/washerF43 30
Cigar lighter / current socket on tunnelF44 15
Heated seatsF45 15
Boot current socketF46 15
Driver’s door control unit power supply (power window, lock) F47 20
Passenger’s door control unit power supply (power window, lock) F48 20
+15 utilities (left and central dashboard control lights, electric mirrors, heated seat control
lighting,presetting for radiotelephone, navigator, rain / daylight sensors, parking sensor control unit,
sunroof control lighting) (*)F49 7.5
Airbag control unitF50 7.5
+15 Tyre pressure control unit, ECO / Sport control (*) F51 7.5
Rear screen wiper/washerF52 15
+30 Direction indicators, hazard lights, instrument panel (*) F53 7.5
(*) +30 = battery directive positive terminal (not under key)
+15 = positive terminal under key
133-160 idea GB 1 ed 10-07-2008 8:30 Pagina 156
Page 158 of 210
157
CAR
MAINTENANCE
TECHNICAL
SPECIFICATIONS
INDEX
DASHBOARD
AND CONTROLS
SAFETY
DEVICES
CORRECT USE
OF THE CAR
WARNING
LIGHTS AND
MESSAGES
IN AN
EMERGENCY
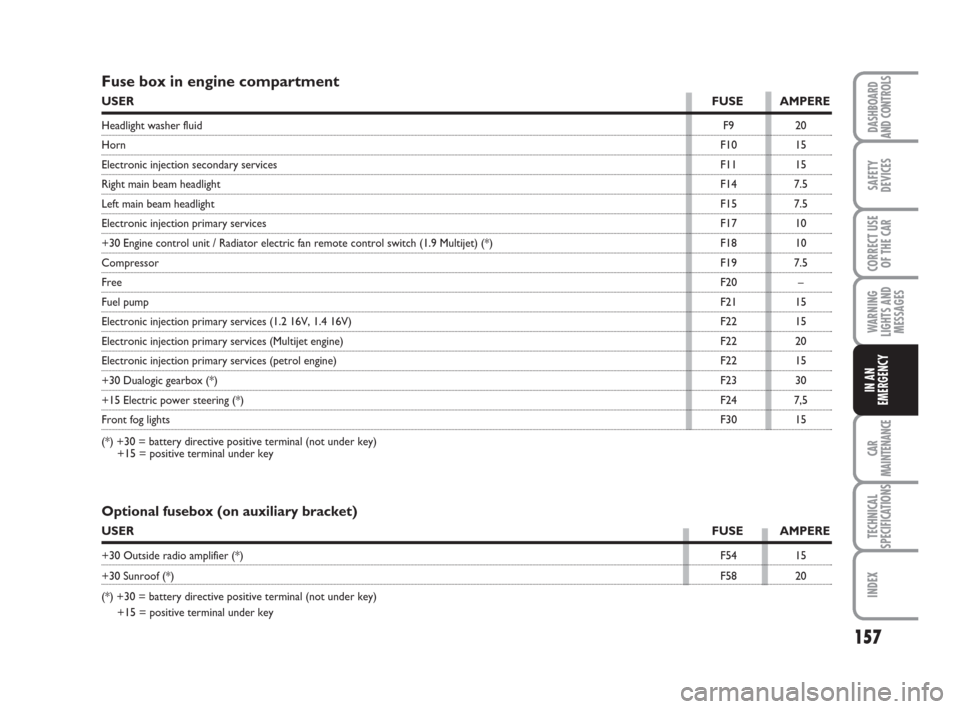
Fuse box in engine compartment
USERFUSE AMPERE
Headlight washer fluidF9 20
HornF10 15
Electronic injection secondary servicesF11 15
Right main beam headlightF14 7.5
Left main beam headlightF15 7.5
Electronic injection primary servicesF17 10
+30 Engine control unit / Radiator electric fan remote control switch (1.9 Multijet) (*) F18 10
CompressorF19 7.5
FreeF20 –
Fuel pumpF21 15
Electronic injection primary services (1.2 16V, 1.4 16V)F22 15
Electronic injection primary services (Multijet engine)F22 20
Electronic injection primary services (petrol engine)F22 15
+30 Dualogic gearbox (*)F23 30
+15 Electric power steering (*)F24 7,5
Front fog lightsF30 15
(*) +30 = battery directive positive terminal (not under key)
+15 = positive terminal under key
Optional fusebox (on auxiliary bracket)
USERFUSE AMPERE
+30 Outside radio amplifier (*)F54 15
+30 Sunroof (*)F58 20
(*) +30 = battery directive positive terminal (not under key)
+15 = positive terminal under key
133-160 idea GB 1 ed 10-07-2008 8:30 Pagina 157
Page 161 of 210
160
CAR
MAINTENANCE
TECHNICAL
SPECIFICATIONS
INDEX
DASHBOARD
AND CONTROLS
SAFETY
DEVICES
CORRECT USE
OF THE CAR
WARNING
LIGHTS AND
MESSAGES
IN AN
EMERGENCY
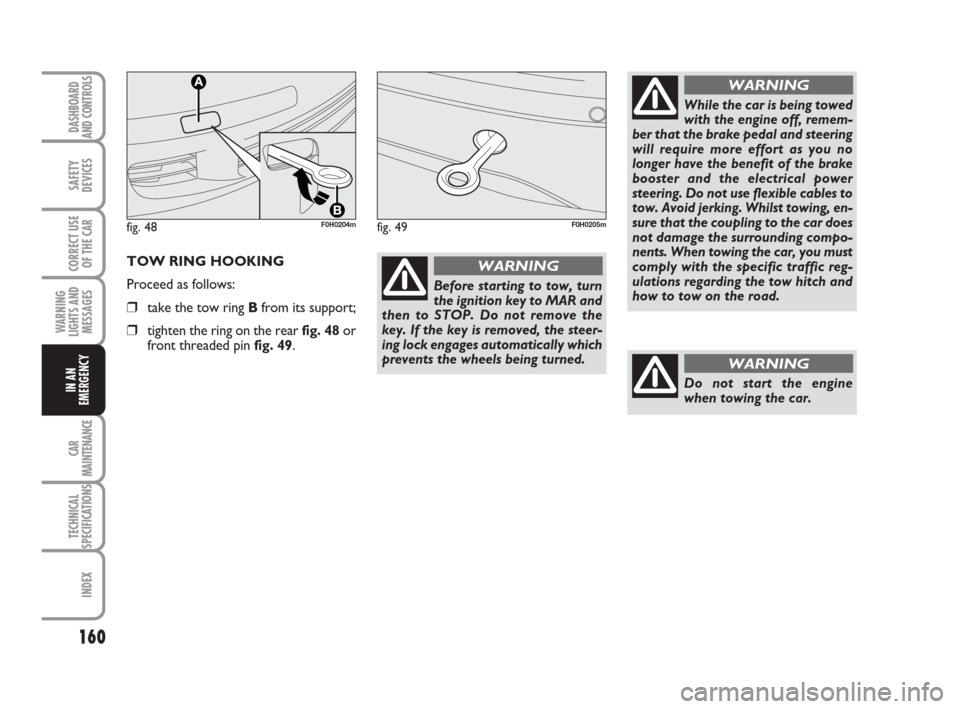
TOW RING HOOKING
Proceed as follows:
❒take the tow ring Bfrom its support;
❒tighten the ring on the rear fig. 48 or
front threaded pin fig. 49.
fig. 48F0H0204mfig. 49F0H0205m
Before starting to tow, turn
the ignition key to MAR and
then to STOP. Do not remove the
key. If the key is removed, the steer-
ing lock engages automatically which
prevents the wheels being turned.
WARNING
While the car is being towed
with the engine off, remem-
ber that the brake pedal and steering
will require more effort as you no
longer have the benefit of the brake
booster and the electrical power
steering. Do not use flexible cables to
tow. Avoid jerking. Whilst towing, en-
sure that the coupling to the car does
not damage the surrounding compo-
nents. When towing the car, you must
comply with the specific traffic reg-
ulations regarding the tow hitch and
how to tow on the road.
WARNING
Do not start the engine
when towing the car.
WARNING
133-160 idea GB 1 ed 10-07-2008 8:30 Pagina 160
Page 164 of 210
163
TECHNICAL
SPECIFICATIONS
INDEX
DASHBOARD
AND CONTROLS
SAFETY
DEVICES
CORRECT USE
OF THE CAR
WARNING
LIGHTS AND
MESSAGES
IN AN
EMERGENCY
CAR
MAINTENANCE
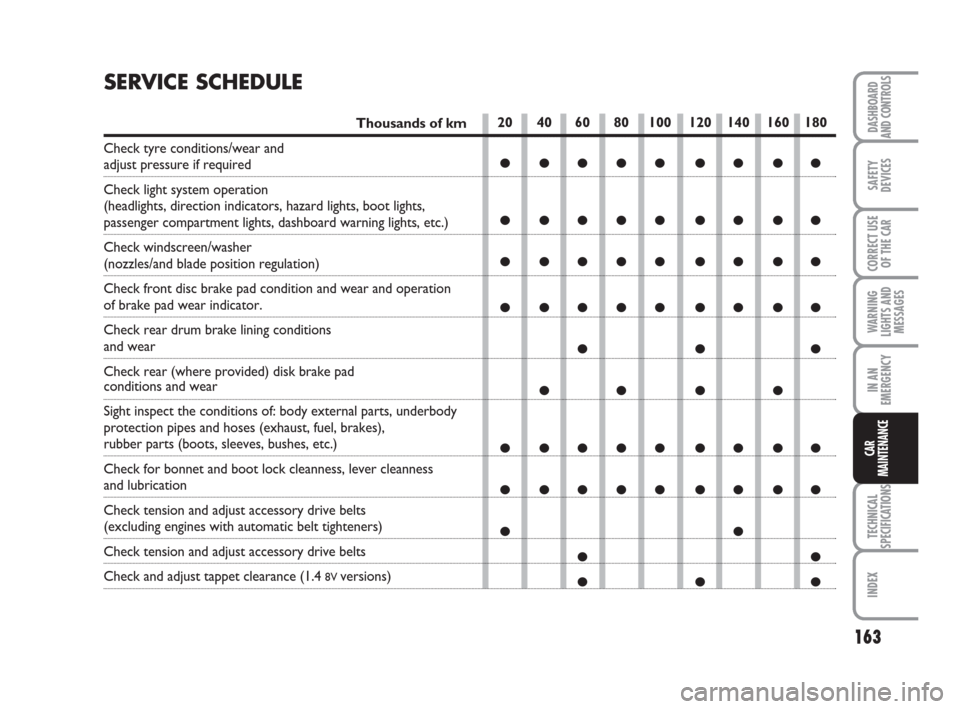
SERVICE SCHEDULE
Thousands of km
Check tyre conditions/wear and
adjust pressure if required
Check light system operation
(headlights, direction indicators, hazard lights, boot lights,
passenger compartment lights, dashboard warning lights, etc.)
Check windscreen/washer
(nozzles/and blade position regulation)
Check front disc brake pad condition and wear and operation
of brake pad wear indicator.
Check rear drum brake lining conditions
and wear
Check rear (where provided) disk brake pad
conditions and wear
Sight inspect the conditions of: body external parts, underbody
protection pipes and hoses (exhaust, fuel, brakes),
rubber parts (boots, sleeves, bushes, etc.)
Check for bonnet and boot lock cleanness, lever cleanness
and lubrication
Check tension and adjust accessory drive belts
(excluding engines with automatic belt tighteners)
Check tension and adjust accessory drive belts
Check and adjust tappet clearance (1.4 8V versions)
20 40 60 80 100 120 140 160 180
●●●●● ●●●●
●●●●● ●●●●
●●●●● ●●●●
●●●●● ●●●●
●●●
●● ● ●
●●●●● ●●●●
●●●●● ●●●●
●●
●●
●●●
161-180 idea GB 1 ed 10-07-2008 8:30 Pagina 163