technical specifications FIAT IDEA 2012 1.G Owners Manual
[x] Cancel search | Manufacturer: FIAT, Model Year: 2012, Model line: IDEA, Model: FIAT IDEA 2012 1.GPages: 210, PDF Size: 3.65 MB
Page 175 of 210
174
TECHNICAL
SPECIFICATIONS
INDEX
DASHBOARD
AND CONTROLS
SAFETY
DEVICES
CORRECT USE
OF THE CAR
WARNING
LIGHTS AND
MESSAGES
IN AN
EMERGENCY
CAR
MAINTENANCE
IMPORTANT If the charge level remains
for a long time under 50%, the battery is
damaged by sulphation, reducing its ca-
pacity and starting attitude.
The battery will also be more at risk of
freezing (e.g. already at –10°C).
Refer to the paragraph “Car inactivity” in
“Starting and driving” if the car is left
parked for a long time.
If after buying the car, you want to install
electric accessories which require per-
manent electric supply (alarm, etc.) con-
tact the Fiat Dealership whose qualified
personnel, in addition to suggesting the
most suitable devices beloning to the Fi-
at Lineaccessori line, will evaluate the
overall electric absorption, checking
whether the car’s electric system is capa-
ble of withstanding the load required, or
whether it should be integrated with a
more powerful battery.
Since these devices continue absorbing en-
ergy even when the ignition key is off, they
gradually run down the battery. USEFUL ADVICE FOR
LENGTHENING THE LIFE OF
YOUR BATTERY
To avoid draining your battery and to
lengthen its life, observe the following in-
dications:
❒when you park your car, ensure that
doors, bonnet and flaps are well
closed in order to ensure that no lights
remain on inside the passenger com-
partment;
❒switch off all lights inside the car: the
car is however equipped with a system
which switches all internal lights off au-
tomatically;
❒when the engine is off, do not keep de-
vices running for long periods (e.g.
sound system, hazard lights etc.);
❒before performing any operation on
the electrical system, disconnect the
battery negative terminal cable;
❒screw the terminals of the battery
down hard.Batteries contain substances
that can be very dangerous for
the environment. t is advisable
to have the battery changed
by a Fiat Dealership where it will be
disposed of according to the law.
If the vehicle must remain
unused for a long time at
very low temperatures, remove the
battery and carry it to a warm place,
to avoid freezing.
WARNING
When performing any oper-
ations on the battery or near
it, always protect your eyes with the
special goggles.
WARNING
161-180 idea GB 1 ed 10-07-2008 8:30 Pagina 174
Page 176 of 210
175
TECHNICAL
SPECIFICATIONS
INDEX
DASHBOARD
AND CONTROLS
SAFETY
DEVICES
CORRECT USE
OF THE CAR
WARNING
LIGHTS AND
MESSAGES
IN AN
EMERGENCY
CAR
MAINTENANCE
WHEELS AND TYRES
Check the pressure of each tyre, includ-
ing the spare, every two weeks and before
long journeys. The pressure should be
checked with the tyre rested and cold.
For the correct tyre inflation pressure, see
“Wheels” in “Technical specifications”
section.
Incorrect pressure causes abnormal tyre
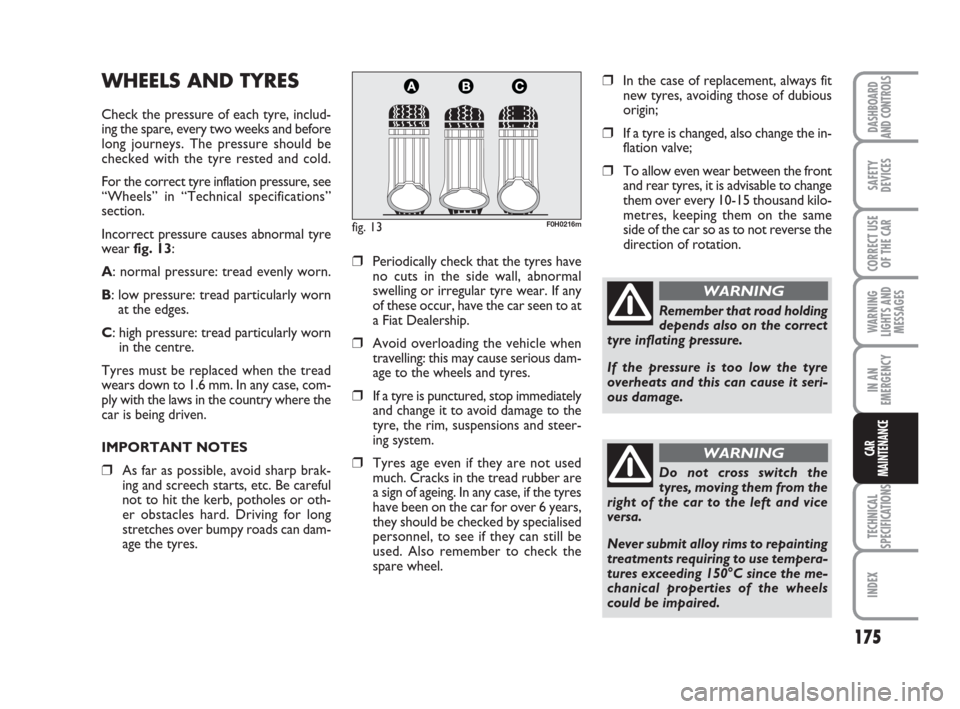
wear fig. 13:
A: normal pressure: tread evenly worn.
B: low pressure: tread particularly worn
at the edges.
C: high pressure: tread particularly worn
in the centre.
Tyres must be replaced when the tread
wears down to 1.6 mm. In any case, com-
ply with the laws in the country where the
car is being driven.
IMPORTANT NOTES
❒As far as possible, avoid sharp brak-
ing and screech starts, etc. Be careful
not to hit the kerb, potholes or oth-
er obstacles hard. Driving for long
stretches over bumpy roads can dam-
age the tyres.
❒Periodically check that the tyres have
no cuts in the side wall, abnormal
swelling or irregular tyre wear. If any
of these occur, have the car seen to at
a Fiat Dealership.
❒Avoid overloading the vehicle when
travelling: this may cause serious dam-
age to the wheels and tyres.
❒If a tyre is punctured, stop immediately
and change it to avoid damage to the
tyre, the rim, suspensions and steer-
ing system.
❒Tyres age even if they are not used
much. Cracks in the tread rubber are
a sign of ageing. In any case, if the tyres
have been on the car for over 6 years,
they should be checked by specialised
personnel, to see if they can still be
used. Also remember to check the
spare wheel.
fig. 13F0H0216m
Remember that road holding
depends also on the correct
tyre inflating pressure.
If the pressure is too low the tyre
overheats and this can cause it seri-
ous damage.
WARNING
Do not cross switch the
tyres, moving them from the
right of the car to the left and vice
versa.
Never submit alloy rims to repainting
treatments requiring to use tempera-
tures exceeding 150°C since the me-
chanical properties of the wheels
could be impaired.
WARNING
❒In the case of replacement, always fit
new tyres, avoiding those of dubious
origin;
❒If a tyre is changed, also change the in-
flation valve;
❒To allow even wear between the front
and rear tyres, it is advisable to change
them over every 10-15 thousand kilo-
metres, keeping them on the same
side of the car so as to not reverse the
direction of rotation.
161-180 idea GB 1 ed 10-07-2008 8:30 Pagina 175
Page 177 of 210
176
TECHNICAL
SPECIFICATIONS
INDEX
DASHBOARD
AND CONTROLS
SAFETY
DEVICES
CORRECT USE
OF THE CAR
WARNING
LIGHTS AND
MESSAGES
IN AN
EMERGENCY
CAR
MAINTENANCE
RUBBER HOSES
As far as the brake system and fuel rubber
hoses are concerned, carefully follow the
“Service schedule” in this section.
Indeed ozone, high temperatures and pro-
longed lack of fluid in the system may
cause hardening and cracking of the hoses,
with possible leaks. Careful control is
therefore necessary.
WINDSCREEN/
REAR WINDOW
WIPERS
BLADES
Periodically clean the rubber part using
special products; TUTELA PROFES-
SIONAL SC 35 is recommended.
If the rubber blades are bent or worn they
should be replaced. In any case they
should be changed once a year.
A few simple notions can reduce the pos-
sibility of damage to the blades:
❒if the temperature fall below zero,
make sure that ice has not frozen the
rubber against glass. If necessary, thaw
using an antifreeze product;
❒remove any snow from the glass: in ad-
dition to protecting the blades, this
prevents effort on the motor and
overheating;
❒do not operate the windscreen and
rear window wipers on dry glass.
Driving with worn wiper
blades is a serious hazard,
because visibility is reduced in bad
weather.
WARNING
Changing the windscreen wiper
blades fig. 14
Proceed as follows:
❒raise the windscreen wiper arm Aand
position the blade so that it forms an
angle of 90° with the arm;
❒press tab Bof the coupling spring and
remove the blade to be replaced from
the arm A;
❒fit the new blade by inserting the tab
into the special slot in the arm. Make
sure it is properly locked into place.
161-180 idea GB 1 ed 10-07-2008 8:30 Pagina 176
Page 178 of 210
177
TECHNICAL
SPECIFICATIONS
INDEX
DASHBOARD
AND CONTROLS
SAFETY
DEVICES
CORRECT USE
OF THE CAR
WARNING
LIGHTS AND
MESSAGES
IN AN
EMERGENCY
CAR
MAINTENANCE
fig. 14F0H0217mfig. 15F0H0218m
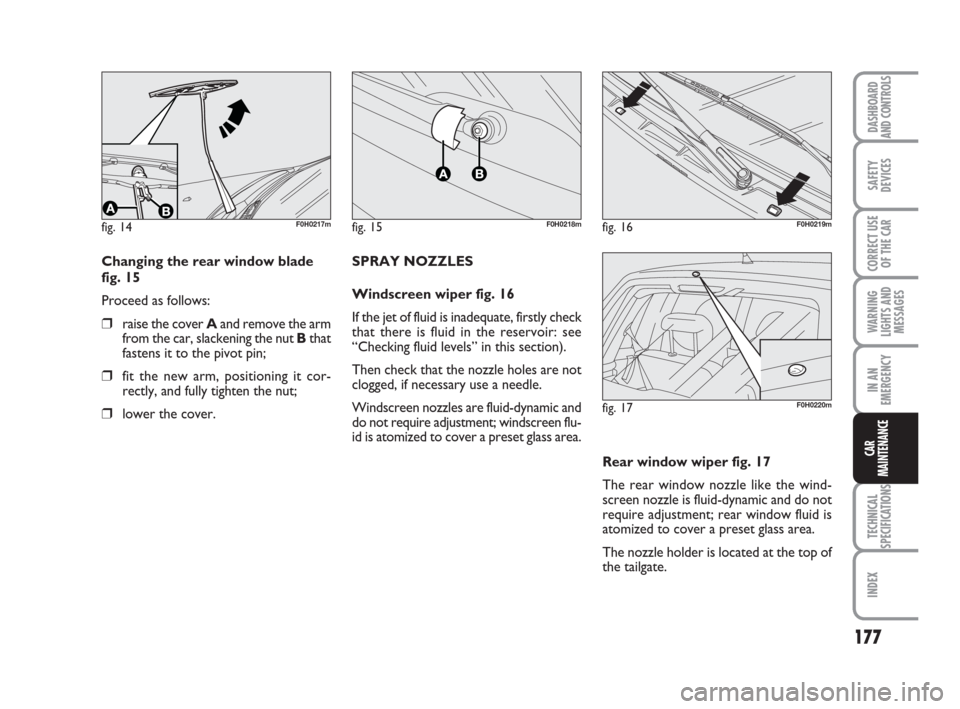
Changing the rear window blade
fig. 15
Proceed as follows:
❒raise the cover Aand remove the arm
from the car, slackening the nut Bthat
fastens it to the pivot pin;
❒fit the new arm, positioning it cor-
rectly, and fully tighten the nut;
❒lower the cover.SPRAY NOZZLES
Windscreen wiper fig. 16
If the jet of fluid is inadequate, firstly check
that there is fluid in the reservoir: see
“Checking fluid levels” in this section).
Then check that the nozzle holes are not
clogged, if necessary use a needle.
Windscreen nozzles are fluid-dynamic and
do not require adjustment; windscreen flu-
id is atomized to cover a preset glass area.
fig. 16F0H0219m
fig. 17F0H0220m
Rear window wiper fig. 17
The rear window nozzle like the wind-
screen nozzle is fluid-dynamic and do not
require adjustment; rear window fluid is
atomized to cover a preset glass area.
The nozzle holder is located at the top of
the tailgate.
161-180 idea GB 1 ed 10-07-2008 8:30 Pagina 177
Page 179 of 210
178
TECHNICAL
SPECIFICATIONS
INDEX
DASHBOARD
AND CONTROLS
SAFETY
DEVICES
CORRECT USE
OF THE CAR
WARNING
LIGHTS AND
MESSAGES
IN AN
EMERGENCY
CAR
MAINTENANCE
BODYWORK
PROTECTION FROM
ATMOSPHERIC AGENTS
The main causes of corrosion are the fol-
lowing:
❒atmospheric pollution;
❒salty air and humidity (coastal areas,
or hot humid climates);
❒seasonal environment conditions.
Not to be underestimated is also the abra-
sive action of wind-borne atmospheric
dust and sand and mud and gravel raised
by other vehicles.
On your Fiat Idea, Fiat implemented the
best manufacturing technologies to effec-
tively protect the bodywork against cor-
rosion.
These include:
❒Painting products and systems which
give the car particular resistance to
corrosion and abrasion;
❒Use of galvanised (or pretreated) steel
sheets, with high resistance to corro-
sion;
❒Spraying of plastic parts, with a pro-
tective function, in the more exposed
points: underdoor, inner fender parts,
edges, etc.;
❒Use of “open” boxed sections to pre-
vent condensation and pockets of
moisture from triggering rust inside.
BODY AND UNDERBODY
WARRANTY
Your Fiat Idea is covered by warranty
against perforation due to rust of any orig-
inal element of the structure or body. For
the general terms of this warranty, refer
to “FIAT WARRANTY” booklet.
ADVICE FOR PRESERVING THE
BODYWORK
Paint
Paintwork does not only serve an aesteth-
ic purpose, but also protects the under-
lying sheet metal.
In the case of deep scrapes or scores, you
are advised to have the necessary touch-
ing up carried out immediately to avoid
the formation of rust. Use only original
paint products for touching up (see “Body-
work paint identification plate” in section
“Technical specification”).
Normal paint maintenance consists in
washing at intervals depending on the con-
ditions and environment of use. For ex-
ample, in highly polluted areas, or if the
roads are sprayed with salt, it is wise to
wash the car more frequently.To correctly wash the car:
❒remove the aerial from the roof to
prevent damage to it if the car is
washed in an automatic system;
❒wash the body using a low pressure jet
of water;
❒wipe a sponge with a slightly soapy so-
lution over the bodywork, frequently
rinsing with the sponge;
❒rinse well with water and dry with a
jet of air or a chamois leather.
When drying, take particular care with the
less visible parts like door surrounds, bon-
net and around the headlights where wa-
ter may stagnate. The car should not be
taken to a closed area immediately, but left
in the open so that residual water can
evaporate.
Do not wash the car after it has been left
in the sun or with the bonnet hot: this may
alter the shine of the paintwork.
Exterior plastic parts must be cleaned in
the same way as the rest of the vehicle.
Where possible, do not park under trees;
the resinous substance many species re-
lease give the paint a dull appearance and
increase the possibility of triggering rust
processes.
161-180 idea GB 1 ed 10-07-2008 8:30 Pagina 178
Page 180 of 210
179
TECHNICAL
SPECIFICATIONS
INDEX
DASHBOARD
AND CONTROLS
SAFETY
DEVICES
CORRECT USE
OF THE CAR
WARNING
LIGHTS AND
MESSAGES
IN AN
EMERGENCY
CAR
MAINTENANCE
IMPORTANT Bird droppings must be
washed off immediately and thoroughly as
the acid they contain is particularly ag-
gressive.
Windows
Use specific window cleaner products.
Use also clean cloths to avoid scratching
the glass or damaging the transparency.
IMPORTANT The inside of the
rearscreen should be wiped gently with a
cloth in the direction of the filaments to
avoid damaging the heating device.Front headlights
IMPORTANT When cleaning plastic lens-
es of front headlights, never use aromat-
ic substances (e.g. petrol) or ketones (e.g.:
acetone).
Engine compartment
At the end of the winter the engine com-
partment should be carefully washed,
without directing the jet against electron-
ic control units. Contact a specialised
workshop to have this done.
IMPORTANT Washing should be carried
out with the engine cold and the ignition
key at STOP. After washing make sure
that the various protections (e.g.: rubber
caps and various covers) have not been
damaged or removed.Detergents cause water pollu-
tion. Therefore the car should
be washed in areas equipped
for collecting and purifying
the liquid used in the washing process.
Never use flammable prod-
ucts like oil ether or rectified
petrol for cleaning car interiors. Elec-
trostatic discharges generated by rub-
bing during cleaning operations could
cause fire.
WARNING
161-180 idea GB 1 ed 10-07-2008 8:30 Pagina 179
Page 181 of 210
180
TECHNICAL
SPECIFICATIONS
INDEX
DASHBOARD
AND CONTROLS
SAFETY
DEVICES
CORRECT USE
OF THE CAR
WARNING
LIGHTS AND
MESSAGES
IN AN
EMERGENCY
CAR
MAINTENANCE
INTERIORS
Periodically check that water is not
trapped under the mats (due to water
dripping off shoes, umbrellas, etc.) which
could cause oxidisation of the sheet met-
al.
CLEANING SEATS AND FABRIC
AND VELVET PARTS
Use a soft brush or vacuum cleaner to re-
move dust. Velvet is cleaned better if the
brush is moistened.
Rub the seats with a sponge moistened
with a solution of water and neutral de-
tergent.
CLEANING LEATHER SEATS
Remove dried on dirt with lightly moist-
ened chamois leather or cloth without
pressing too hard.
Remove liquid or grease stains with a dry
absorbent cloth without rubbing. Then
wipe with a soft cloth or chamois leather
with water and neutral soap.
If the stain persists, use specific products,
carefully following the instructions for use.
IMPORTANT Never use spirit or alcohol-
based products.INTERIOR PLASTIC PARTS
For routine cleaning, wipe with a cloth
with water and neutral non-abrasive de-
tergent. Remove grease or persistent
stains with appropriate products designed
to preserve the appearance of compo-
nents.
IMPORTANT Never use spirit or petro-
leum to clean the instrument panel or oth-
er plastic parts.
Do not keep aerosol cans in
the car: they might explode.
Aerosol cans must never be exposed
to a temperature above 50°C. The
temperature inside the car exposed
to the sun may go well beyond that
figure.
WARNING
Upholstery of your car has
been designed to withstand
wear deriving from common
use of the car. You are how-
ever recommended to avoid strong
and/or continuous scratching with
clothing accessories such as metallic
buckles, studs, Velcro fastenings and
the like, since these items cause cir-
cumscribed stress of the cover fabric
that could lead to yarn breaking, and
damage the cover as a consequence.
STEERING WHEEL / GEARBOX
LEVER KNOB AND SEATS
COATED WITH REAL LEATHER
These components shall only be cleaned
with water and neutral soap. Never use
spirit or alcohol-based products.
Before using special products for clean-
ing interiors, read carefully label instruc-
tions and indications to make sure they
are free from spirit and/or alcohol-based
substances.
If when cleaning the windscreen with spe-
cial glass products, some drops fall on the
leather covering of the steering wheel/gear
lever knob remove them immediately and
then clean with water and neutral soap.
IMPORTANT Take the utmost care when
engaging the steering lock to prevent
scratching the leather covering.
161-180 idea GB 1 ed 10-07-2008 8:30 Pagina 180
Page 182 of 210
181
INDEX
DASHBOARD
AND CONTROLS
SAFETY
DEVICES
CORRECT USE
OF THE CAR
WARNING
LIGHTS AND
MESSAGES
IN AN
EMERGENCY
CAR
MAINTENANCE
TECHNICAL
SPECIFICATIONS
IDENTIFICATION DATA ................................................. 182
ENGINE CODES - BODYWORK VERSIONS .............. 184
ENGINE ................................................................................. 185
FUEL FEED/IGNITION ....................................................... 187
TRANSMISSION .................................................................. 187
BRAKES ................................................................................... 188
SUSPENSIONS ....................................................................... 188
STEERING............................................................................... 188
WHEELS .................................................................................. 189
DIMENSIONS ........................................................................ 193
PERFORMANCE ................................................................... 193
WEIGHTS ............................................................................... 194
CAPACITIES........................................................................... 195
FLUIDS AND LUBRICANTS ............................................. 196
FUEL CONSUMPTION ....................................................... 198
CO
2EMISSIONS ................................................................. 199
TT T
E E
C C
H H
N N
I I
C C
A A
L L
S S
P P
E E
C C
I I
F F
I I
C C
A A
T T
I I
O O
N N
S S
181-199 idea GB 1 ed 10-07-2008 8:31 Pagina 181
Page 183 of 210
182
INDEX
DASHBOARD
AND CONTROLS
SAFETY
DEVICES
CORRECT USE
OF THE CAR
WARNING
LIGHTS AND
MESSAGES
IN AN
EMERGENCY
CAR
MAINTENANCE
TECHNICAL
SPECIFICATIONS
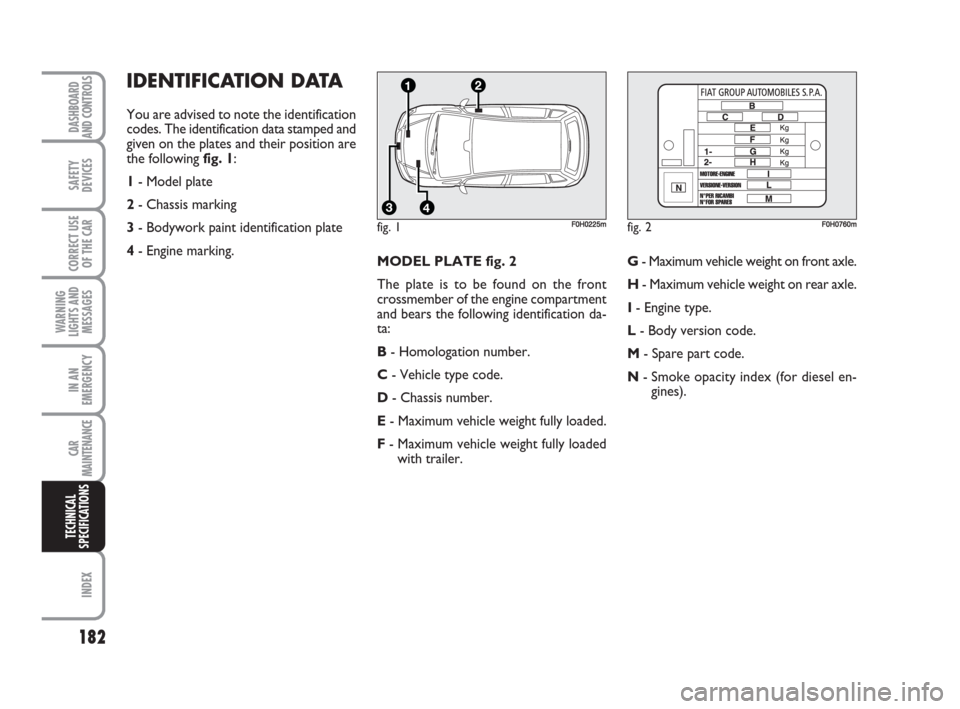
IDENTIFICATION DATA
You are advised to note the identification
codes. The identification data stamped and
given on the plates and their position are
the following fig. 1:
1- Model plate
2- Chassis marking
3- Bodywork paint identification plate
4- Engine marking.
MODEL PLATE fig. 2
The plate is to be found on the front
crossmember of the engine compartment
and bears the following identification da-
ta:
B- Homologation number.
C- Vehicle type code.
D- Chassis number.
E- Maximum vehicle weight fully loaded.
F- Maximum vehicle weight fully loaded
with trailer.G- Maximum vehicle weight on front axle.
H- Maximum vehicle weight on rear axle.
I - Engine type.
L- Body version code.
M- Spare part code.
N- Smoke opacity index (for diesel en-
gines).
fig. 1
4
21
3F0H0225mfig. 2F0H0760m
181-199 idea GB 1 ed 10-07-2008 8:31 Pagina 182
Page 184 of 210
183
INDEX
DASHBOARD
AND CONTROLS
SAFETY
DEVICES
CORRECT USE
OF THE CAR
WARNING
LIGHTS AND
MESSAGES
IN AN
EMERGENCY
CAR
MAINTENANCE
TECHNICAL
SPECIFICATIONS
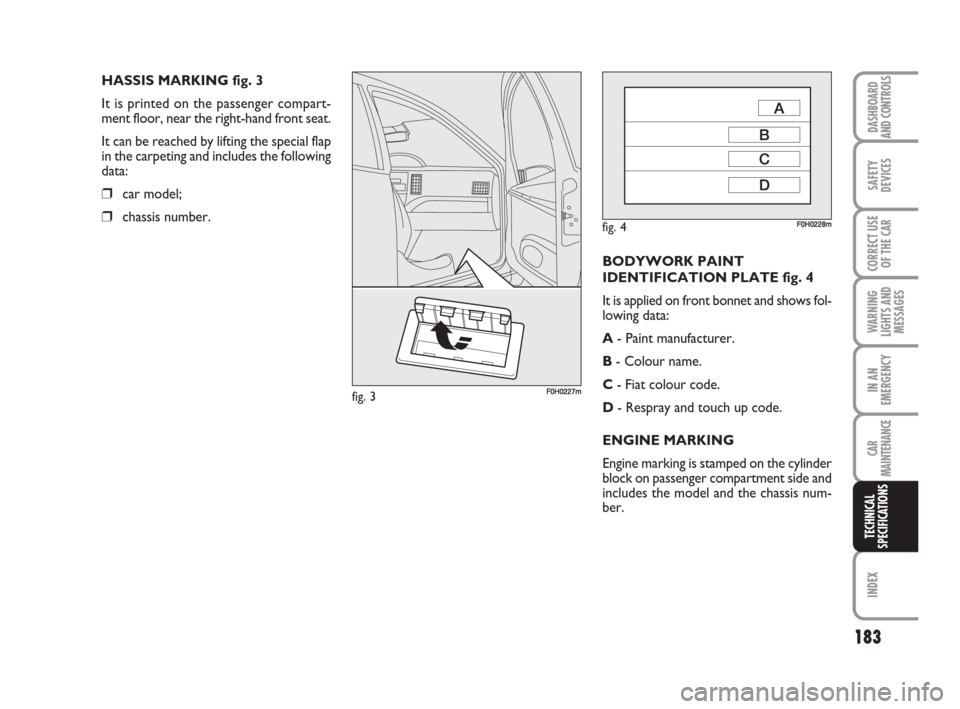
HASSIS MARKING fig. 3
It is printed on the passenger compart-
ment floor, near the right-hand front seat.
It can be reached by lifting the special flap
in the carpeting and includes the following
data:
❒car model;
❒chassis number.
fig. 3F0H0227m
fig. 4F0H0228m
BODYWORK PAINT
IDENTIFICATION PLATE fig. 4
It is applied on front bonnet and shows fol-
lowing data:
A- Paint manufacturer.
B- Colour name.
C- Fiat colour code.
D- Respray and touch up code.
ENGINE MARKING
Engine marking is stamped on the cylinder
block on passenger compartment side and
includes the model and the chassis num-
ber.
181-199 idea GB 1 ed 10-07-2008 8:31 Pagina 183