Heat FIAT MAREA 2000 1.G User Guide
[x] Cancel search | Manufacturer: FIAT, Model Year: 2000, Model line: MAREA, Model: FIAT MAREA 2000 1.GPages: 330
Page 84 of 330
Marea- Marea Weekend 9
2000 range ©
Engine
Fuel feed system
10.
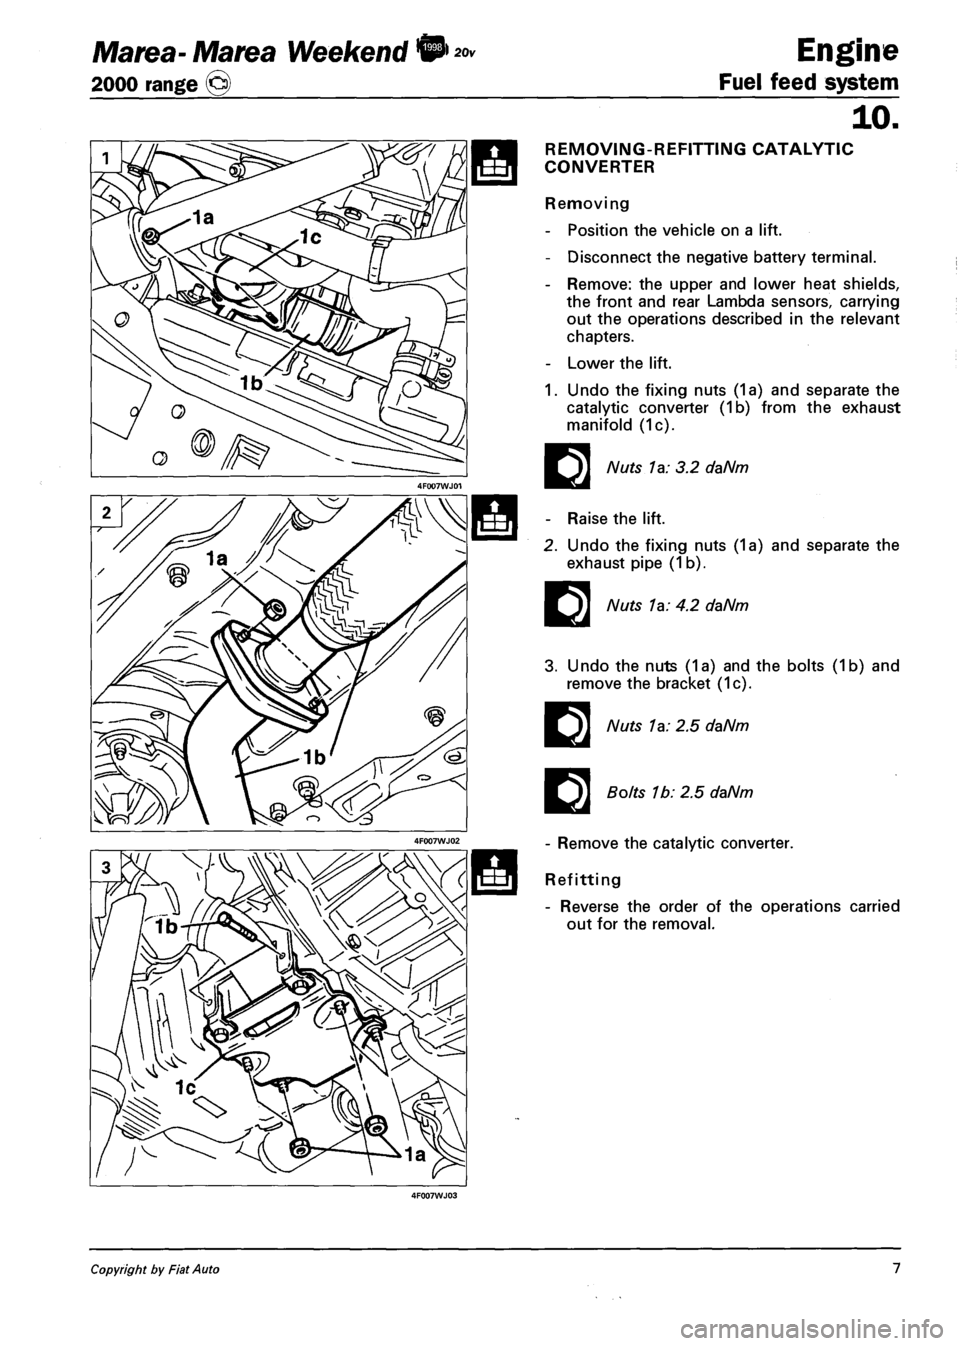
REMOVING-REFITTING CATALYTIC
CONVERTER
Removing
- Position the vehicle on a lift.
- Disconnect the negative battery terminal.
- Remove: the upper and lower heat shields,
the front and rear Lambda sensors, carrying
out the operations described in the relevant
chapters.
- Lower the lift.
1. Undo the fixing nuts (1a) and separate the
catalytic converter (1b) from the exhaust
manifold (1c).
E
Nuts la: 3.2 daNm
- Raise the lift.
2. Undo the fixing nuts (1a) and separate the
exhaust pipe (1 b).
EI
Nuts 1a: 4.2 daNm
3. Undo the nuts (1a) and the bolts (1b) and
remove the bracket (1c).
E
E
Nuts 1a: 2.5 daNm
Bolts 1b: 2.5 daNm
- Remove the catalytic converter.
Refitting
- Reverse the order of the operations carried
out for the removal.
Copyright by Fiat Auto 7
Page 86 of 330
Marea- Marea Weekend 9 \) JTD
2000 range O
Engine
Index
FUEL SYSTEM
- Introduction
- System management strategies
- Fuel system functional diagram
- Diagram showing information ente
ring/leaving the control unit and
sensors/actuators
INJECTION SYSTEM WIRING DIA
GRAM
- Injection electronic control unit
- Rpm sensor
- Timing sensor
- Air flow meter
- Injectors
- Engine coolant temperature sensor
- Fuel temperature sensor
- Fuel pressure sensor
- Heater plugs control unit
- Accelerator pedal potentiometer
- Brake pedal switch
- Clutch pedal switch
- Excess pressure sensor
- Atmospheric pressure sensor
page
1
1
1
2
8
10
12
13
13
14
15
15
15
16
16
17
17
17
17
THROTTLE CASING
- Removing-refitting
E.G.R. VALVE
- Removing-refitting
E.G.R. VALVE SELF-ADJUSTMENT
MOTOR
- Removing-refitting
E.G.R. VALVE HEAT EXCHANGER
- Removing-refitting
SOLENOID VALVE ON VACUUM
RESERVOIR FOR THROTTLE CA
SING PNEUMATIC VALVE
- Removing-refitting
VACUUM RESERVOIR
- Removing-refitting
10.
page
30
31
32
32
34
34
FUEL SUPPLY CIRCUIT 18
- Immersed (auxiliary) pump and fuel
gauge assembly 19
- Fuel filter 19
- Pressure pump 20
- Fuel pressure regulator 20
- Multifunction valve 21
- Supply manifold (rail) 21
- Inertia safety switch 22
AIR SUPPLY CIRCUIT 23
- Throttle case 24
- Turbocharger 25
SUPERCHARGING PRESSURE
CONTROL SOLENOID VALVE
- Removing-refitting 35
FUEL FILTER
- Removing-refitting 35
PRESSURE REGULATOR
- Removing-refitting 36
EMISSION CONTROL DEVICES 27
- Oxidizing catalytic converter 27
- Exhaust gas recirculation circuit
(EGR) 27
- Recirculation circuit for crankcase
vapours (blow-by) 29
Copyright by Fiat Auto VI 01 Cancels anil replaces
Page 88 of 330
Engine
Fuel feed system
Marea- Marea Weekend © ™
2000 range ©
10.
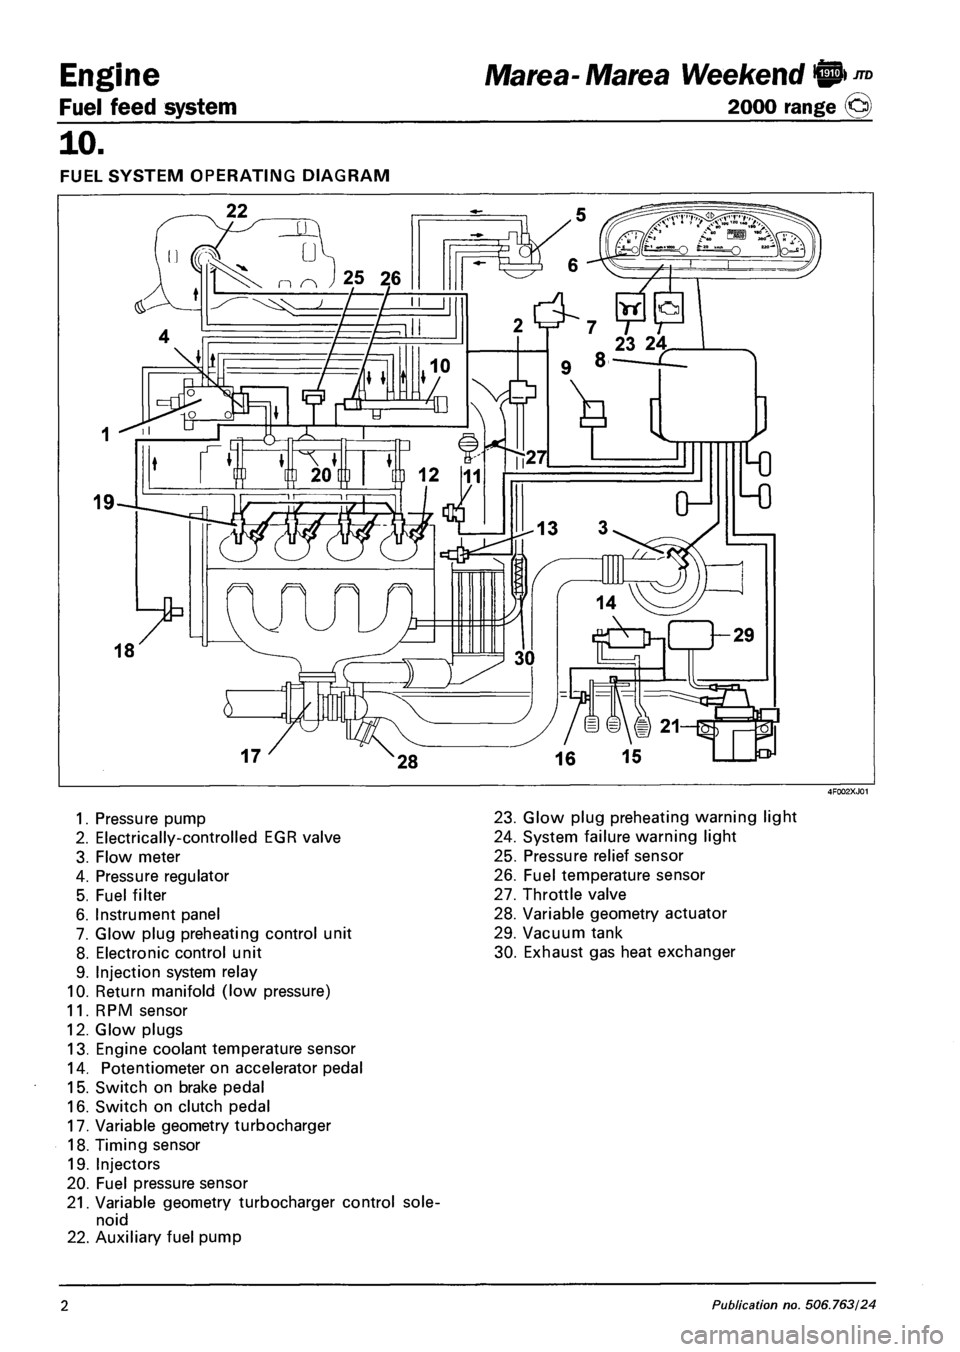
FUEL SYSTEM OPERATING DIAGRAM
1. Pressure pump
2. Electrically-controlled EGR valve
3. Flow meter
4. Pressure regulator
5. Fuel filter
6. Instrument panel
7. Glow plug preheating control unit
8. Electronic control unit
9. Injection system relay
10. Return manifold (low pressure)
11. RPM sensor
12. Glow plugs
13. Engine coolant temperature sensor
14. Potentiometer on accelerator pedal
15. Switch on brake pedal
16. Switch on clutch pedal
17. Variable geometry turbocharger
18. Timing sensor
19. Injectors
20. Fuel pressure sensor
21. Variable geometry turbocharger control sole
noid
22. Auxiliary fuel pump
23. Glow plug preheating warning light
24. System failure warning light
25. Pressure relief sensor
26. Fuel temperature sensor
27. Throttle valve
28. Variable geometry actuator
29. Vacuum tank
30. Exhaust gas heat exchanger
2 Publication no. 506.763/24
Page 90 of 330
Fuel feed system
Engine Marea- Marea Weekend 9 ™
2000 range (Q)
10.
Control of idle speed
On the basis of signals from the rpm sensor and engine coolant temperature sensor, the injection control
unit controls the pressure governor and alters the injector control times to maintain idle speed stable at all
times.
Under certain conditions, the idle speed control unit also considers battery voltage.
Control of maximum speed limitation
According to rpm level, the injection control unit limits maximum speed by means of two types of inter
vention:
- as maximum speed approaches, it reduces the amount of fuel injected to reduce line pressure;
- when maximum speed is exceeded, it inhibits operation of the auxiliary pump and injectors.
Control of maximum torque limitation
On the basis of rpm level, the injection control unit computes limit torque and maximum permitted fume
index parameters on the basis of predefined, stored maps.
It then corrects the above parameters using engine coolant temperature and car speed data. The resulting
values are then used to modulate the amount of fuel to be injected by adjusting the pressure regulator and
injectors.
Control of fuel temperature
The injection control uint is kept constantly informed of fuel temperature by a sensor on the return mani
fold.
If fuel temperature exceeds a set value (about 110 °C), the control unit reduces line pressure by adjusting
the pressure governor, leaving injection times unaltered.
Control of coolant temperature
The injection control unit is constantly informed of coolant temperature by a sensor on the thermostat.
If engine coolant temperature or air conditioning fluid pressure exceeds certain levels, the control unit
performs the following actions:
- It reduces the amount of fuel injected by adjusting the pressure governor and injectors (power reduc
tion);
- it controls the engine radiator cooling fan.
Control of glow plugs
The injection control unit controls operation of the glow plug preheating control unit to bring the tem
perature in the combution chambers up to levels that promote fuel self-ignition and thus make start-up
easier.
The control unit controls the operation of the glow plug control unit for a certain time both before (pre
heating) and after (postheating) engine start-up and also controls activation of the warning light on the
control panel.
Preheating, postheating and glow plug warning light activation times vary according to engine coolant
temperature.
4 Publication no. 506.763/24
Page 93 of 330
Marea- Marea Weekend 9 ™
2000 range ©
Engine
Fuel feed system
10.
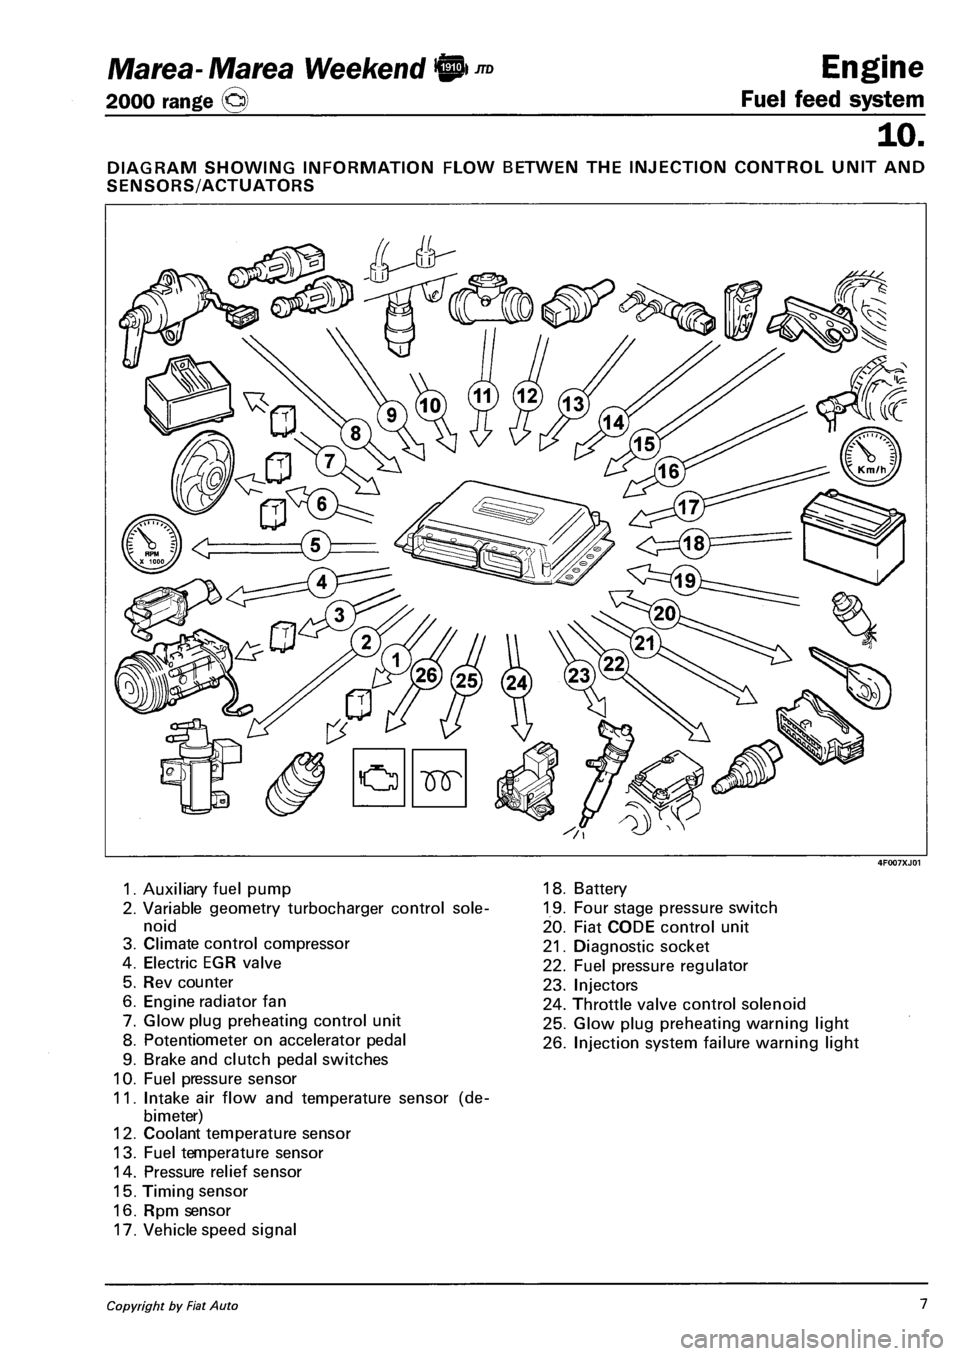
DIAGRAM SHOWING INFORMATION FLOW BETWEN THE INJECTION CONTROL UNIT AND
SENSORS/ACTUATORS
1. Auxiliary fuel pump
2. Variable geometry turbocharger control sole
noid
3. Climate control compressor
4. Electric EGR valve
5. Rev counter
6. Engine radiator fan
7. Glow plug preheating control unit
8. Potentiometer on accelerator pedal
9. Brake and clutch pedal switches
10. Fuel pressure sensor
11. Intake air flow and temperature sensor (de-
bimeter)
12. Coolant temperature sensor
13. Fuel temperature sensor
14. Pressure relief sensor
15. Timing sensor
16. Rpm sensor
17. Vehicle speed signal
18. Battery
19. Four stage pressure switch
20. Fiat CODE control unit
21. Diagnostic socket
22. Fuel pressure regulator
23. Injectors
24. Throttle valve control solenoid
25. Glow plug preheating warning light
26. Injection system failure warning light
Copyright by Fiat Auto 1
Page 95 of 330
Marea- Marea Weekend 9 ™
2000 range ©) Fuel feed system
Engine
10.
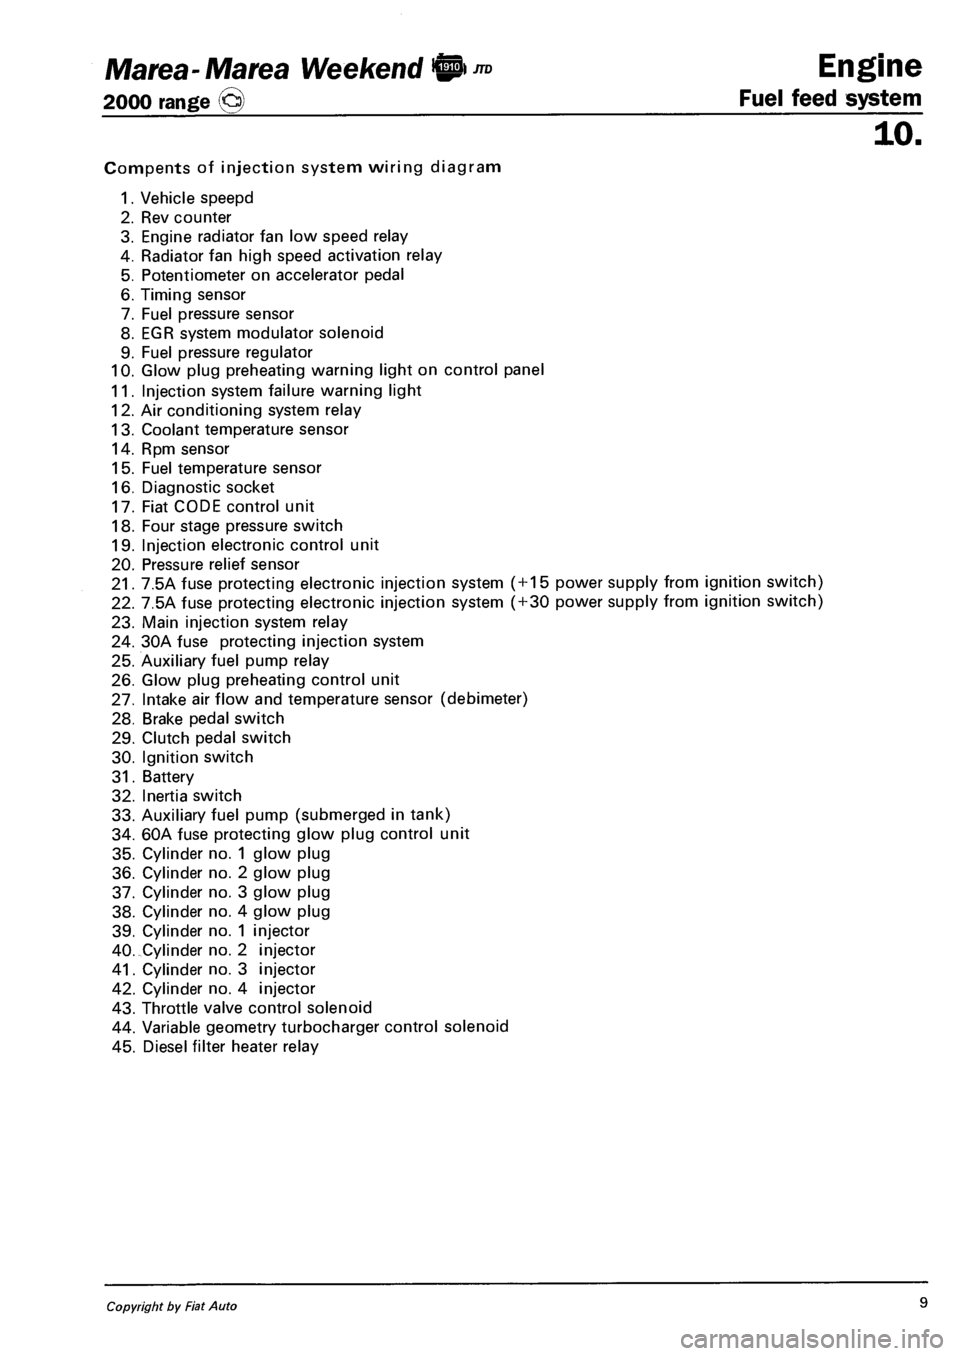
Compents of injection system wiring diagram
1. Vehicle speepd
2. Rev counter
3. Engine radiator fan low speed relay
4. Radiator fan high speed activation relay
5. Potentiometer on accelerator pedal
6. Timing sensor
7. Fuel pressure sensor
8. EGR system modulator solenoid
9. Fuel pressure regulator
10. Glow plug preheating warning light on control panel
11. Injection system failure warning light
12. Air conditioning system relay
13. Coolant temperature sensor
14. Rpm sensor
15. Fuel temperature sensor
16. Diagnostic socket
17. Fiat CODE control unit
18. Four stage pressure switch
19. Injection electronic control unit
20. Pressure relief sensor
21. 7.5A fuse protecting electronic injection system ( + 15 power supply from ignition switch)
22. 7.5A fuse protecting electronic injection system ( + 30 power supply from ignition switch)
23. Main injection system relay
24. 30A fuse protecting injection system
25. Auxiliary fuel pump relay
26. Glow plug preheating control unit
27. Intake air flow and temperature sensor (debimeter)
28. Brake pedal switch
29. Clutch pedal switch
30. Ignition switch
31. Battery
32. Inertia switch
33. Auxiliary fuel pump (submerged in tank)
34. 60A fuse protecting glow plug control unit
35. Cylinder no. 1 glow plug
36. Cylinder no. 2 glow plug
37. Cylinder no. 3 glow plug
38. Cylinder no. 4 glow plug
39. Cylinder no. 1 injector
40. Cylinder no. 2 injector
41. Cylinder no. 3 injector
42. Cylinder no. 4 injector
43. Throttle valve control solenoid
44. Variable geometry turbocharger control solenoid
45. Diesel filter heater relay
Copyright by Fiat Auto 9
Page 97 of 330
Ma tea- Ma tea Weekend !@ ™
2000 range ©
Engine
Fuel feed system
10.
37 Not connected
38 Not connected
39 Not connected
40 Not connected
41 Not connected
42 Not connected
43 Not connected
44 Not connected
45 Not connected
46 Not connected
47 Engine rpm signal output
48 Diagnostic line k
49 Vehicle speed signal input
50 Not connected
51 Activation signal from 4-stage pressure switch
52 Activation signal from 3-stage pressure switch
53 Not connected
54 Not connected
55 Not connected
56 Not connected
57 Not connected
58 Key ON signal
59 Brake switch
60 Air conditioner activation request
61 Clutch switch
62 Glow plug diagnosis
63 Not connected
64 Not connected
65 Not connected
66 Not connected
67 Not connected
68 Not connected
69 Not connected
70 Not connected
71 Not connected
72 Not connected
73 Not connected
74 Not connected
75 Not connected
76 Accelerator pedal 1 earth
77 Accelerator pedal 1 signal
78 Accelerator pedal 1 power supply
79 Accelerator pedal 2 earth
80 Accelerator pedal 2 signal
81 Accelerator pedal 2 power supply
82 Diesel temperature sensor (pin 1)
83 Diesel temperature sensor (pin 2)
84 Coolant temperature sensor (pin 1)
85 Coolant temperature sensor (pin 2)
86 Air flow meter (pin 1)
87 Not connected
88 Air flow meter (pin 3)
89 Air flow meter (pin 5)
90 Fuel pressure sensor (pin 3)
91 Fuel pressure sensor (pin 2)
92 Fuel pressure sensor (pin 1)
93 Turbo pressure sensor (pin 1)
94 Turbo pressure sensor (pin 3)
95 Turbo pressure sensor (pin 2)
96 Not connected
97 Air flow meter (pin 4)
98 Not connected
99 RPM sensor (pin 1)
100 RPM sensor (pin 2)
101 RPM sensor (pin 3)
102 RPM sensor (pin 1)
103 Timing sensor (pin 2)
104 Timing sensor (pin 3)
105 Not connected
106 Not connected
107 Not connected
108 Fuel pressure regulator
109 Fuel pressure regulator
110 Not connected
111 Heater relay control Fuel filter
112 Not connected
113 Not connected
114 Cylinder 4 injector control
115 Not connected
116 Not connected
117 Cylinder 1 and 2 injector power supply
118 Cylinder 3 and 4 injector power supply
119 Cylinder 1 injector control
120 Cylinder 2 injector control
121 Cylinder 3 injector control
Copyright by Fiat Auto 11
Page 99 of 330
Marea- Marea Weekend 9"°
2000 range ©
Engine
Fuel feed system
10.
TIMING SENSOR
The Hall effect sensor is fitted to the cylinder head and faces the camshaft pulley.
An opening on the pulley allows the timing sensor to detect the engine timing position and indicate it to
the injection control unit.
The injection control unit uses the timing sensor signal to detect TDC at the end of compression.
Operation
A semi-condulator layer, through which a current passes, immersed in a magnetic field (lines of force per
pendicular to the direction of the current), produces a difference in power, known as Hall voltage.
If the intensity of the current remains constant, the voltage produced only depends on the intensity of the
magnetic field. The intensity of the field can simply be altered periodically to produce a modulated electri
cal signal. Signal frequency is proportional to the speed with which the magnetic field changes.
To achieve this change, the sensor is crossed by a metal ring (inner part of the pulley) with an opening.
When it moves, the metal part of the ring covers the sensor to magnetic field and the output signal is
therefore low; Conversely, the sensor generates a high signal at the opening when the magnetic field is
present.
This signal, together with the rpm and TDC signals, allows the injection control unit to identify piston po
sition and determine injection point.
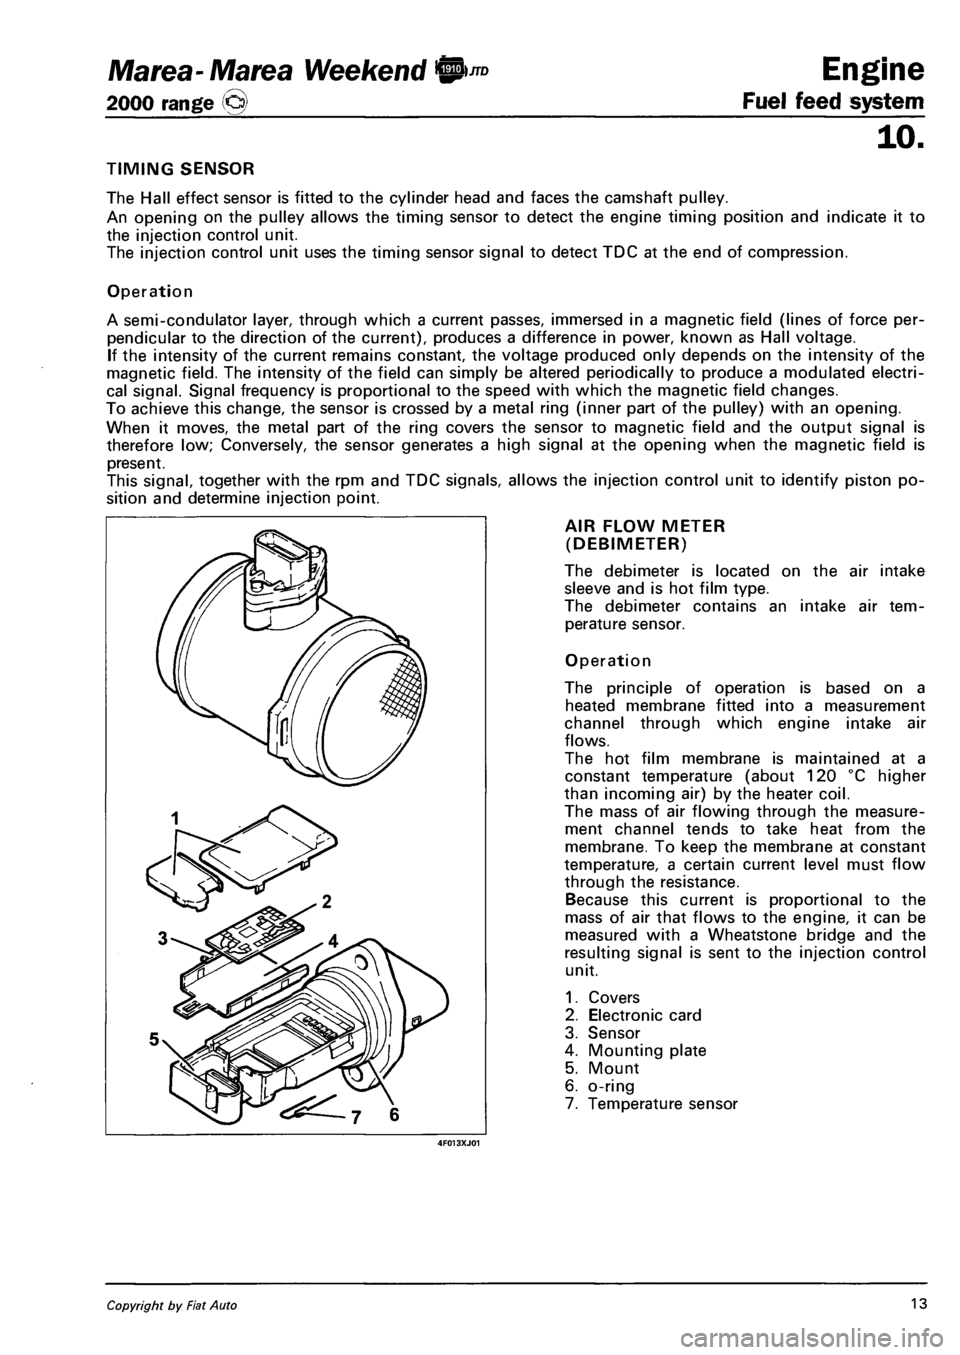
AIR FLOW METER
(DEBIMETER)
The debimeter is located on the air intake
sleeve and is hot film type.
The debimeter contains an intake air tem
perature sensor.
Operation
The principle of operation is based on a
heated membrane fitted into a measurement
channel through which engine intake air
flows.
The hot film membrane is maintained at a
constant temperature (about 120 °C higher
than incoming air) by the heater coil.
The mass of air flowing through the measure
ment channel tends to take heat from the
membrane. To keep the membrane at constant
temperature, a certain current level must flow
through the resistance.
Because this current is proportional to the
mass of air that flows to the engine, it can be
measured with a Wheatstone bridge and the
resulting signal is sent to the injection control
unit.
1. Covers
2. Electronic card
3. Sensor
4. Mounting plate
5. Mount
6. o-ring
7. Temperature sensor
Copyright by Fiat Auto 13
Page 102 of 330
![FIAT MAREA 2000 1.G User Guide Engine
Fuel feed system
JTD Marea-Marea Weekend ©
2000 range ©
10.
iH
ft
B I 0 ] I D
[ 0 0 1 1
D
0 1 <fi=2 1 1 15J
GLOW PLUG PREHEATING CONTROL
UNIT
The glow plugs are controlled by mea FIAT MAREA 2000 1.G User Guide Engine
Fuel feed system
JTD Marea-Marea Weekend ©
2000 range ©
10.
iH
ft
B I 0 ] I D
[ 0 0 1 1
D
0 1 <fi=2 1 1 15J
GLOW PLUG PREHEATING CONTROL
UNIT
The glow plugs are controlled by mea](/img/10/4653/w960_4653-101.png)
Engine
Fuel feed system
JTD Marea-Marea Weekend ©
2000 range ©
10.
iH
ft
B I 0 ] I D
[ 0 0 1 1
D
0 1
UNIT
The glow plugs are controlled by means of a
preheating control unit under the direct con
trol of the injection control unit.
The preheating control unit contains a smart
relay that sends a return response (feedback)
to the injection control unit, which is thus in
formed of faults in the preheating control unit
or glow plug short-circuits to earth.
The figure shows the connectors on the base
of the preheating control unit and the pin-out
1. Earth
2. Injection control unit (pin 22)
3. Power supply from main injection relay
4. Not connected
5. Injection control unit (pin 62)
8. Positive from battery (+30)
G. Glow plugs (only four outputs are used)
ACCELERATOR
PEDAL POTENTIOMETER
Accelerator pedal position is converted to an
electrical voltage signal and send to the injec
tion control unit by a potentiometer connected
to the accelerator pedal.
Accelerator pedal position is processed to
gether with rpm information to provide injec
tion times and pressure.
The sensor consists of a case (1) secured to
the pedal by a flange, which contains an axi-
ally-positioned shaft (2) connected to two
potentiometers (3): main and safety potenti
ometers.
A coil spring on the shaft ensures the correct
resistance to pressure while a second spring
ensures return upon release.
16 Publication no. 506.763/24
Page 104 of 330
Engine
Fuel feed system
JTD Marea- Marea Weekend 0
2000 range ©
10.
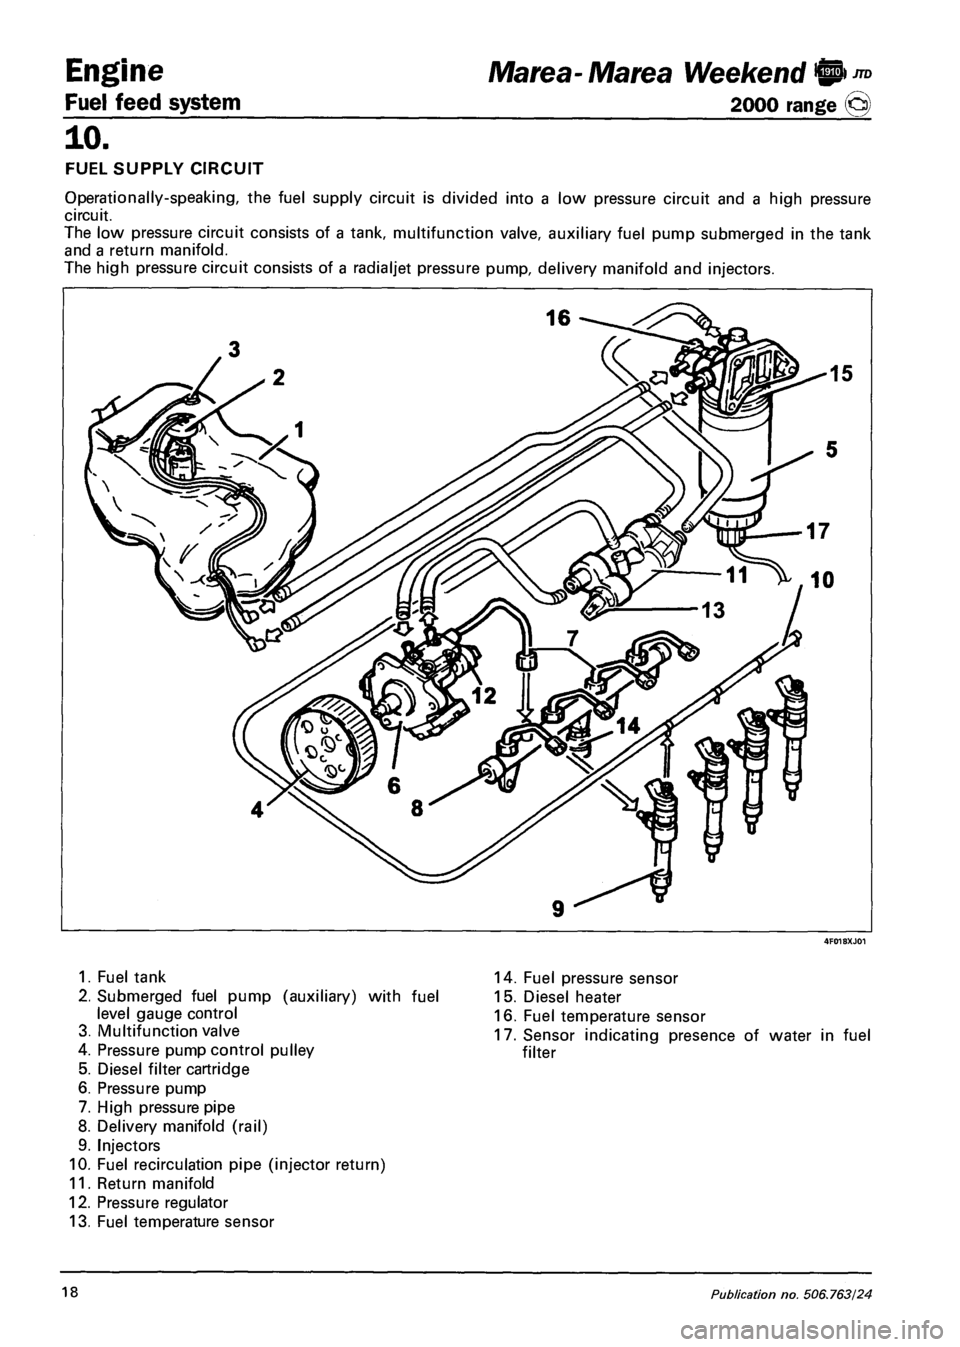
FUEL SUPPLY CIRCUIT
Operationally-speaking, the fuel supply circuit is divided into a low pressure circuit and a high pressure
circuit.
The low pressure circuit consists of a tank, multifunction valve, auxiliary fuel pump submerged in the tank
and a return manifold.
The high pressure circuit consists of a radialjet pressure pump, delivery manifold and injectors.
1. Fuel tank
2. Submerged fuel pump (auxiliary) with fuel
level gauge control
3. Multifunction valve
4. Pressure pump control pulley
5. Diesel filter cartridge
6. Pressure pump
7. High pressure pipe
8. Delivery manifold (rail)
9. Injectors
10. Fuel recirculation pipe (injector return)
11. Return manifold
12. Pressure regulator
13. Fuel temperature sensor
14. Fuel pressure sensor
15. Diesel heater
16. Fuel temperature sensor
17. Sensor indicating presence of water in fuel
filter
18 Publication no. 506.763/24