child lock FIAT QUBO 2017 1.G Owners Manual
[x] Cancel search | Manufacturer: FIAT, Model Year: 2017, Model line: QUBO, Model: FIAT QUBO 2017 1.GPages: 260, PDF Size: 4.74 MB
Page 12 of 260
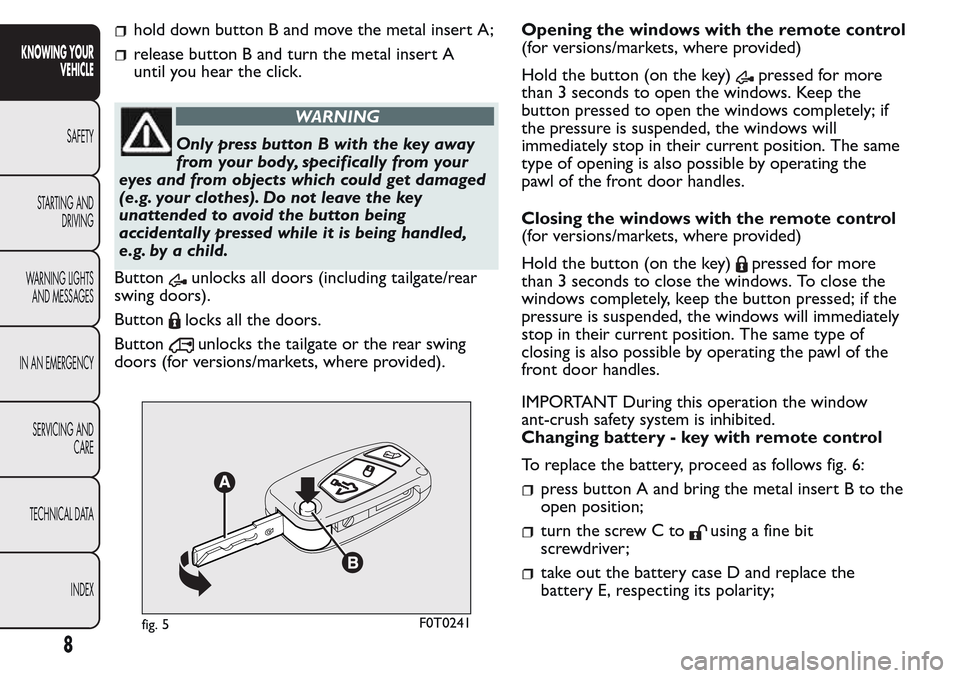
hold down button B and move the metal insert A;
release button B and turn the metal insert A
until you hear the click.
WARNING
Only press button B with the key away
from your body, specifically from your
eyes and from objects which could get damaged
(e.g. your clothes). Do not leave the key
unattended to avoid the button being
accidentally pressed while it is being handled,
e.g. by a child.
Button
unlocks all doors (including tailgate/rear
swing doors).
Button
locks all the doors.
Button
unlocks the tailgate or the rear swing
doors (for versions/markets, where provided).Opening the windows with the remote control
(for versions/markets, where provided)
Hold the button (on the key)
pressed for more
than 3 seconds to open the windows. Keep the
button pressed to open the windows completely; if
the pressure is suspended, the windows will
immediately stop in their current position. The same
type of opening is also possible by operating the
pawl of the front door handles.
Closing the windows with the remote control
(for versions/markets, where provided)
Hold the button (on the key)
pressed for more
than 3 seconds to close the windows. To close the
windows completely, keep the button pressed; if the
pressure is suspended, the windows will immediately
stop in their current position. The same type of
closing is also possible by operating the pawl of the
front door handles.
IMPORTANT During this operation the window
ant-crush safety system is inhibited.
Changing battery - key with remote control
To replace the battery, proceed as follows fig. 6:
press button A and bring the metal insert B to the
open position;
turn the screw C tousing a fine bit
screwdriver;
take out the battery case D and replace the
battery E, respecting its polarity;
fig. 5F0T0241
8
KNOWING YOUR
VEHICLE
SAFETY
STARTING AND
DRIVING
WARNING LIGHTS
AND MESSAGES
IN AN EMERGENCY
SERVICING AND
CARE
TECHNICAL DATA
INDEX
Page 61 of 260
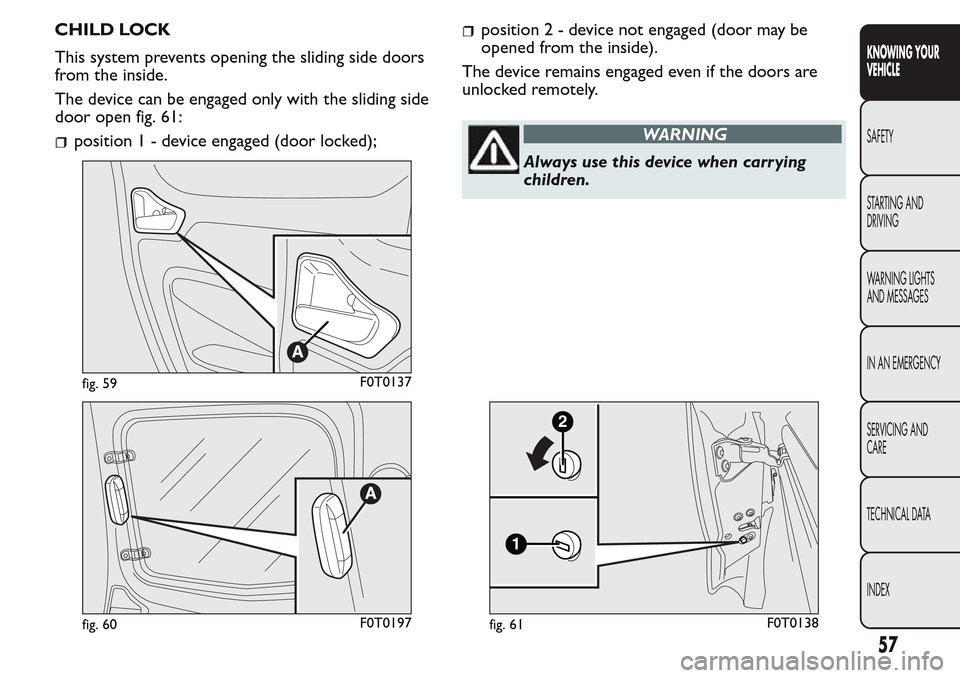
CHILD LOCK
This system prevents opening the sliding side doors
from the inside.
The device can be engaged only with the sliding side
door open fig. 61:
position1-device engaged (door locked);
position2-device not engaged (door may be
opened from the inside).
The device remains engaged even if the doors are
unlocked remotely.
WARNING
Always use this device when carr ying
children.
fig. 59F0T0137
fig. 60F0T0197
1
2
fig. 61F0T0138
57
KNOWING YOUR
VEHICLE
SAFETY
STARTING AND
DRIVING
WARNING LIGHTS
AND MESSAGES
IN AN EMERGENCY
SERVICING AND
CARE
TECHNICAL DATA
INDEX
Page 101 of 260
SAFETY
OCCUPANT PROTECTION SYSTEMS
Some of the most important safety equipment of the
vehicle comprise the following protection systems:
seat belts;
SBR (Seat Belt Reminder) system;
head restraints;
child restraint systems;
front, side airbag (for versions/markets, where
provided).
Read the information given the following pages with
the utmost care.
It is of fundamental importance that the protection
systems are used in the correct way to guarantee the
maximum possible safety level for the driver and
the passengers.
For the description of the head restraint adjustment
see the "Head restraints" paragraph in the "Knowing
your vehicle" chapter.
SEAT BELTS
USING THE SEAT BELTS
All vehicle seats are equipped with seat belts with
three anchor points and a retractor.
The retractor mechanism operates locking the belt in
the event of sharp braking or strong deceleration
due to an impact.
This allows the belt strap to slide freely and to adapt
to the body of the occupant.
In the event of an accident, the belt will lock
reducing the risk of impact inside the passenger
compartment and of being projected outside the
vehicle. The driver is responsible for respecting, and
ensuring that all the other occupants of the vehicle
also respect, the local laws in force in relation to the
use of the seat belts.
Always fasten the seat belts before setting off.
The seat belt should be worn keeping the chest
straight and rested against the backrest.
To fasten the seat belts, hold the tongue A fig. 103
and insert it into the buckle B, until it clicks into
place.
If the seat belt jams during removal, let it rewind for
a short stretch, then pull it out again without jerking.
97
KNOWING YOUR
VEHICLE
SAFETY
STARTING AND
DRIVING
WARNING LIGHTS
AND MESSAGES
IN AN EMERGENCY
SERVICING AND
CARE
TECHNICAL DATA
INDEX
Page 129 of 260
HANDBRAKE
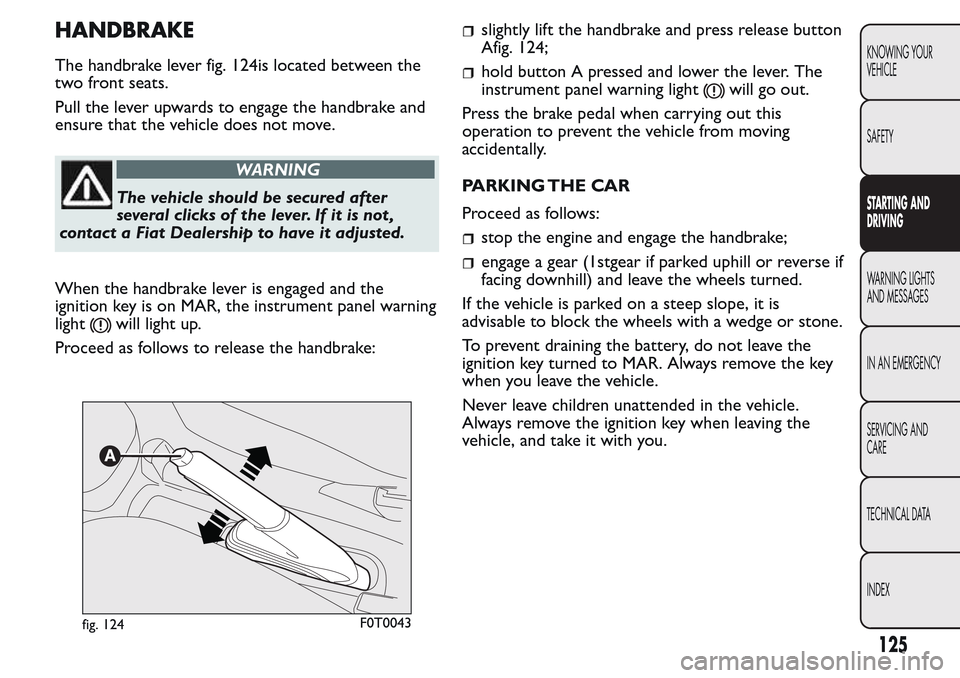
The handbrake lever fig. 124is located between the
two front seats.
Pull the lever upwards to engage the handbrake and
ensure that the vehicle does not move.
WARNING
The vehicle should be secured after
several clicks of the lever. If it is not ,
contact a Fiat Dealership to have it adjusted.
When the handbrake lever is engaged and the
ignition key is on MAR, the instrument panel warning
light
will light up.
Proceed as follows to release the handbrake:
slightly lift the handbrake and press release button
Afig. 124;
hold button A pressed and lower the lever. The
instrument panel warning light
will go out.
Press the brake pedal when carrying out this
operation to prevent the vehicle from moving
accidentally.
PARKING THE CAR
Proceed as follows:
stop the engine and engage the handbrake;
engage a gear (1stgear if parked uphill or reverse if
facing downhill) and leave the wheels turned.
If the vehicle is parked on a steep slope, it is
advisable to block the wheels with a wedge or stone.
To prevent draining the battery, do not leave the
ignition key turned to MAR. Always remove the key
when you leave the vehicle.
Never leave children unattended in the vehicle.
Always remove the ignition key when leaving the
vehicle, and take it with you.
fig. 124F0T0043
125
KNOWING YOUR
VEHICLE
SAFETY
STARTING AND
DRIVING
WARNING LIGHTS
AND MESSAGES
IN AN EMERGENCY
SERVICING AND
CARE
TECHNICAL DATA
INDEX
Page 160 of 260
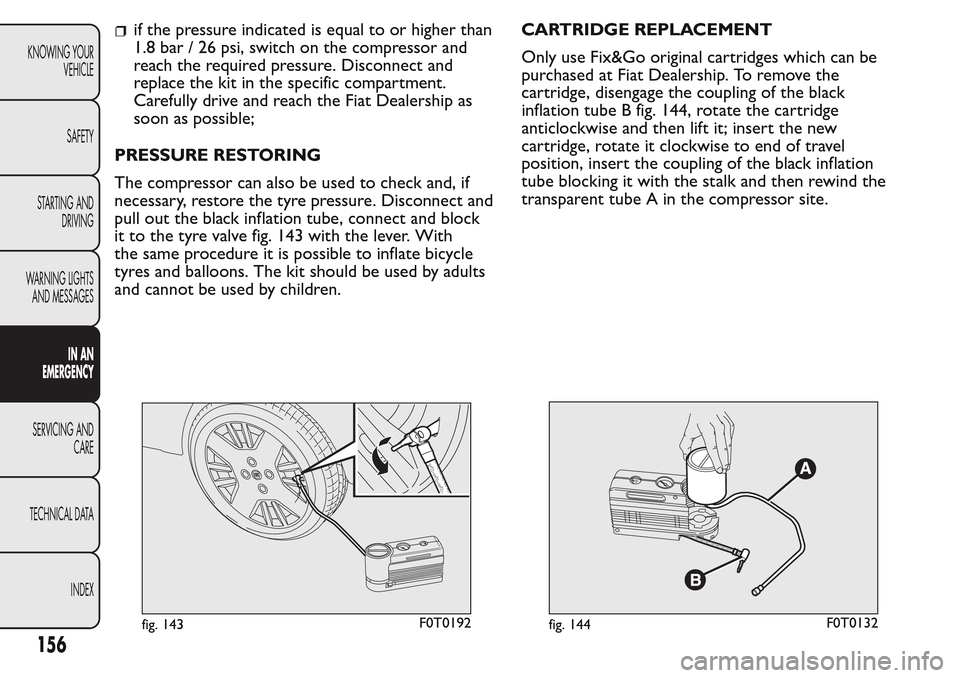
if the pressure indicated is equal to or higher than
1.8 bar / 26 psi, switch on the compressor and
reach the required pressure. Disconnect and
replace the kit in the specific compartment.
Carefully drive and reach the Fiat Dealership as
soon as possible;
PRESSURE RESTORING
The compressor can also be used to check and, if
necessary, restore the tyre pressure. Disconnect and
pull out the black inflation tube, connect and block
it to the tyre valve fig. 143 with the lever. With
the same procedure it is possible to inflate bicycle
tyres and balloons. The kit should be used by adults
and cannot be used by children.CARTRIDGE REPLACEMENT
Only use Fix&Go original cartridges which can be
purchased at Fiat Dealership. To remove the
cartridge, disengage the coupling of the black
inflation tube B fig. 144, rotate the cartridge
anticlockwise and then lift it; insert the new
cartridge, rotate it clockwise to end of travel
position, insert the coupling of the black inflation
tube blocking it with the stalk and then rewind the
transparent tube A in the compressor site.
fig. 143F0T0192fig. 144F0T0132
156
KNOWING YOUR
VEHICLE
SAFETY
STARTING AND
DRIVING
WARNING LIGHTS
AND MESSAGES
IN AN
EMERGENCY
SERVICING AND
CARE
TECHNICAL DATA
INDEX
Page 255 of 260
Front ceiling light with map
reading lights (changing a
bulb) ............................................ 166
Front light clusters .................... 160
Front light clusters
(changing a bulb) ...................... 160
Front power socket ................... 53
Fuel (reserve warning light) ..... 139
Fuel cap ......................................... 94
Fuel consumption ...................... 233
Fuel cut-off system ..................... 95
Fuel filter (water in fuel
warning light) ............................ 140
Fuel level gauge ........................... 14
Fuel reserve warning light........ 139
Fuses (replacement) .................. 169
Gear lever.................................... 127
Gear Shift Indication ................. 145
Generic failure indication
(warning light)........................... 142
Generic failure indication
warning light.............................. 142
Glove compartment................... 52
Glow plug preheating fault
warning light.............................. 140
Glow plugs (preheating/fault
warning light) ........................... 140Glow plugs preheating
warning light.............................. 140
Handbrake (warning light) ....... 133
Handbrake lever ......................... 125
Hazard lights ................................ 51
Headlight alignment
corrector .................................... 70
Headlights
– Headlight alignment
corrector................................. 70
– Light beam direction ............ 70
Headrest
– Front ........................................ 30
– Rear .......................................... 31
Heating and ventilation ............. 36
Heating and ventilation
system; ........................................ 35
Heavy use of the vehicle .......... 189
Hill Holder (system) .................. 74
How to warm up the engine
after it has just started ........... 124
Identification data ...................... 208
Ignition switch
– Ignition .................................... 12
– Steering lock ......................... 12
In an emergency ......................... 146
Inflation pressure ....................... 221Inflation procedure .................... 154
Injection system/EOBD
engine control system
(warning light)........................... 138
Injection system/EOBD
engine control system fault
warning light.............................. 138
Installing
electrical/electronic devices ... 92
Instrument panel ......................... 4
Interior fittings ............................ 52
Interiors ....................................... 206
Isofix child restraint systems
(setup) ........................................ 109
– Arrangement possibilities
for child restraint system
on seats of vehicle ............... 111
Isofix child seat assembly
setup ........................................... 109
iTPMS ............................................ 78
Jack ................................................ 148
Jump starting ............................... 146
Keys
– Key with remote control..... 7
– Key without remote
control .................................... 7
– Ordering additional
remote controls .................... 9
KNOWING YOUR
VEHICLE
SAFETY
STARTING AND
DRIVING
WARNING LIGHTS
AND MESSAGES
IN AN EMERGENCY
SERVICING AND
CARE
TECHNICAL DATA
INDEX