tow FIAT SCUDO 2014 Owner handbook (in English)
[x] Cancel search | Manufacturer: FIAT, Model Year: 2014, Model line: SCUDO, Model: FIAT SCUDO 2014Pages: 227, PDF Size: 4.45 MB
Page 16 of 227
12SAFETY
DEVICESCORRECT USE
OF THE VEHICLE
WARNING
LIGHTS AND
MESSAGESIN AN
EMERGENCYVEHICLE
MAINTENANCETECHNICAL
SPECIFICATIONSINDEXDASHBOARD
AND CONTROLS
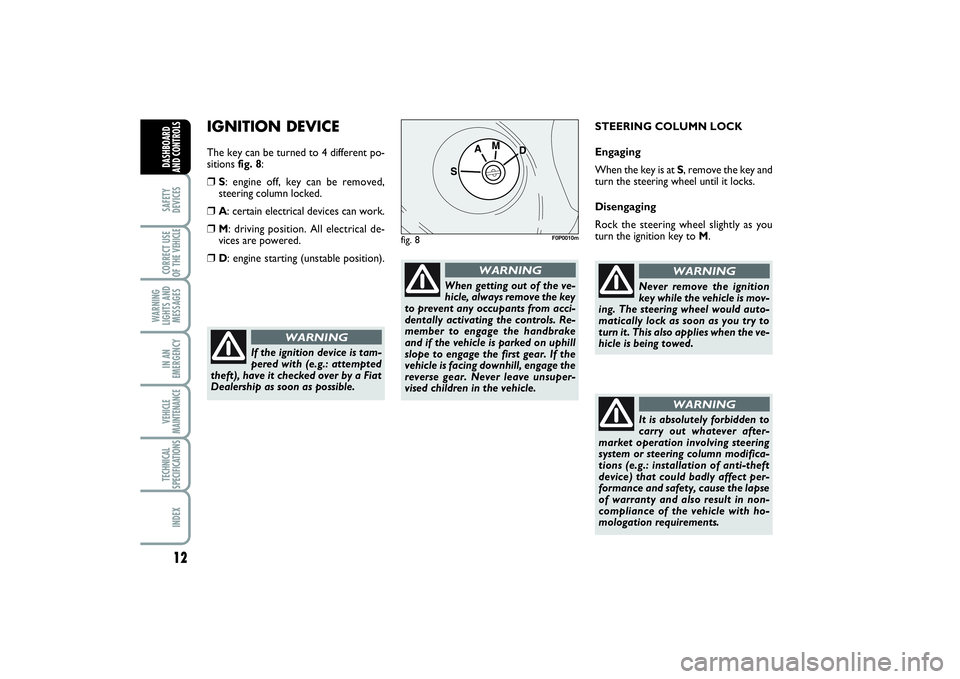
IGNITION DEVICEThe key can be turned to 4 different po-
sitions fig. 8:❒
S: engine off, key can be removed,
steering column locked.
❒
A: certain electrical devices can work.
❒
M: driving position. All electrical de-
vices are powered.
❒
D: engine starting (unstable position).STEERING COLUMN LOCK
Engaging
When the key is at S, remove the key and
turn the steering wheel until it locks.
Disengaging
Rock the steering wheel slightly as you
turn the ignition key to M.
If the ignition device is tam-
pered with (e.g.: attempted
theft), have it checked over by a Fiat
Dealership as soon as possible.
WARNING
When getting out of the ve-
hicle, always remove the key
to prevent any occupants from acci-
dentally activating the controls. Re-
member to engage the handbrake
and if the vehicle is parked on uphill
slope to engage the first gear. If the
vehicle is facing downhill, engage the
reverse gear. Never leave unsuper-
vised children in the vehicle.
WARNING
fig. 8
F0P0010m
Never remove the ignition
key while the vehicle is mov-
ing. The steering wheel would auto-
matically lock as soon as you try to
turn it. This also applies when the ve-
hicle is being towed.
WARNING
It is absolutely forbidden to
carry out whatever after-
market operation involving steering
system or steering column modifica-
tions (e.g.: installation of anti-theft
device) that could badly affect per-
formance and safety, cause the lapse
of warranty and also result in non-
compliance of the vehicle with ho-
mologation requirements.
WARNING
001-019 SCUDO LUM GB 19/11/13 08.26 Pagina 12
Page 30 of 227
STEERING WHEELThe driver can adjust the steering wheel
position both axially and in height.
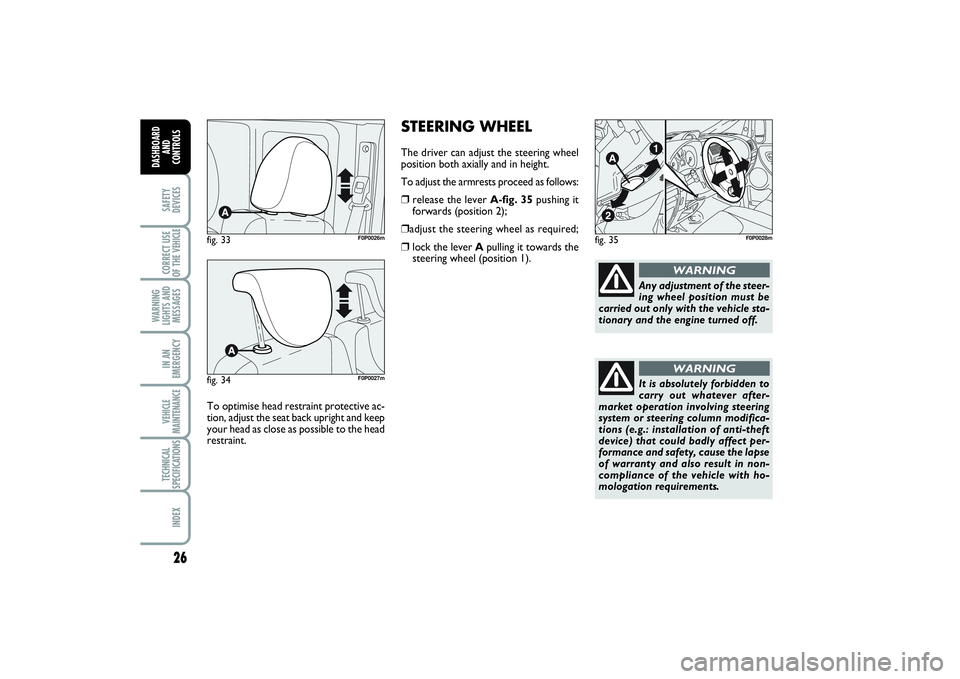
To adjust the armrests proceed as follows:❒
release the lever A-fig. 35pushing it
forwards (position 2);
❒adjust the steering wheel as required;❒
lock the lever Apulling it towards the
steering wheel (position 1).
fig. 35
F0P0028m
Any adjustment of the steer-
ing wheel position must be
carried out only with the vehicle sta-
tionary and the engine turned off.
WARNING
It is absolutely forbidden to
carry out whatever after-
market operation involving steering
system or steering column modifica-
tions (e.g.: installation of anti-theft
device) that could badly affect per-
formance and safety, cause the lapse
of warranty and also result in non-
compliance of the vehicle with ho-
mologation requirements.
WARNING
26SAFETY
DEVICESCORRECT USE
OF THE VEHICLE
WARNING
LIGHTS AND
MESSAGESIN AN
EMERGENCYVEHICLE
MAINTENANCETECHNICAL
SPECIFICATIONSINDEX
DASHBOARD
AND
CONTROLS
fig. 33
F0P0026m
fig. 34
F0P0027m
To optimise head restraint protective ac-
tion, adjust the seat back upright and keep
your head as close as possible to the head
restraint.
020-082 SCUDO LUM GB 19/11/13 09.54 Pagina 26
Page 45 of 227
41
SAFETY
DEVICESCORRECT USE
OF THE VEHICLE WARNING
LIGHTS AND
MESSAGESIN AN
EMERGENCYVEHICLE
MAINTENANCETECHNICAL
SPECIFICATIONSINDEX DASHBOARD
AND CONTROLS
During fully automatic operation, the on-
ly manual settings required are the fol-
lowing:❒
Ω
air recirculation, to keep it always
on or off;
❒
-
to speed up demisting/defrosting
of windscreen, side windows, rear win-
dow and door mirrors;
❒
(
to demist/defrost heated rear win-
dow and door mirrors;
❒π
to select air distribution during ven-
tilation.
During full automatic system operation,
you can change at any time set tempera-
tures, air distribution and fan speed by us-
ing the relevant buttons or knobs: the sys-
tem will automatically change its settings
to adjust to the new requirements.Air temperature adjusting knobs
M - I
Turning the knobs clockwise or counter-
clockwise, respectively increases or de-
creases the temperature of the air required
respectively in the front left zone (knob M)
and in the right zone (knob I) f the passen-
ger compartment. Since the system controls
two zones of the passenger compartment,
it is possible to personalise required tem-
peratures (driver and passenger) with a
maximum difference of 7 °C.
The temperatures set are shown on the dis-
play near the relevant knobs. Pressing but-
ton AUTOwill activate automatic opera-
tion in order to have two separate ventila-
tion temperatures between driver and pas-
senger’s side.
With automatic operation on, pressing again
button AUTOwill align the temperature
on the passenger’s side with that on the dri-
ver’s side.
Turn the knobs fully clockwise or counter-
clockwise to engage respectively HI(max-
imum heating) or LO(maximum cooling).
To deactivate these two functions, just
turn the temperature knob and set the re-
quired temperature.Front air distribution button D
Pressing this button it is possible to
choose manually one of the seven possi-
ble air distributions to the passenger com-
partment (right or left side):
æ
Air flow to the windscreen and front
side window vents to demist or de-
frost them.
ø
Air flow at central and side dash-
board vents to ventilate the chest and
the face during the hot season.
¿
Air flow towards the front and rear
lower parts of the passenger com-
partment. Due to the natural ten-
dency of heat to spread upwards, this
type of distribution allows heating of
the passenger compartment in the
shortest time, also giving a prompt
feeling of warmth.
020-082 SCUDO LUM GB 19/11/13 09.54 Pagina 41
Page 48 of 227
44SAFETY
DEVICESCORRECT USE
OF THE VEHICLE
WARNING
LIGHTS AND
MESSAGESIN AN
EMERGENCYVEHICLE
MAINTENANCETECHNICAL
SPECIFICATIONSINDEX
DASHBOARD
AND
CONTROLS
When outside temperature is cold, recir-
culation is forced to off (outside air inlet)
to prevent window misting up.
In automatic operation inside air recircu-
lation will be controlled automatically by
the system according to outside environ-
mental conditions.Climate control compressor on/off
button A
Pressing button A/Cwill activate the com-
pressor and the display may show the
same wording A/Cto confirm activation.
With compressor on, pressing button
A/Cagain will deactivate the climate con-
trol compressor and therefore the word-
ing will disappear from the display.
When turning the compressor off, the sys-
tem will deactivate air recirculation to pre-
vent window misting up. If the system is
no longer able to keep the required tem-
perature, temperature value will flash and
the wording AUTOwill disappear from
the display.IMPORTANT With the climate control
compressor off, it is not possible to admit
air to the passenger compartment with a
temperature below the outside tempera-
ture; moreover, under certain environ-
mental conditions, windows could mist up
fastly since air is not dehumidified.
The switching off of the climate control
compressor remains in storage even when
the engine has been stopped. To restore
automatic control for switching on the cli-
mate control compressor, press again but-
ton A/Cor press button AUTO.
With climate control compressor off, the
fan speed can be set to zero manually.
With compressor on and engine running,
the fan speed cannot be lower that one
bar on the display.
It is inadvisable to use air re-
circulation on rainy/cold
days as it would considerably increase
the possibility of windows misting up
inside.
WARNING
020-082 SCUDO LUM GB 19/11/13 09.54 Pagina 44
Page 53 of 227
49
SAFETY
DEVICESCORRECT USE
OF THE VEHICLE WARNING
LIGHTS AND
MESSAGESIN AN
EMERGENCYVEHICLE
MAINTENANCETECHNICAL
SPECIFICATIONSINDEX DASHBOARD
AND CONTROLS
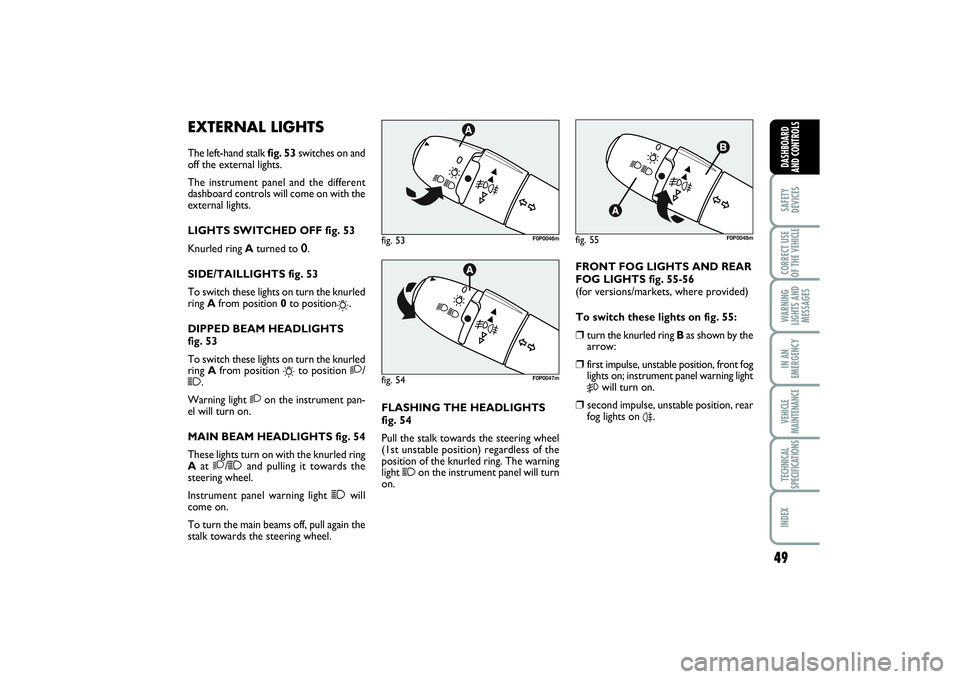
EXTERNAL LIGHTSThe left-hand stalk fig. 53switches on and
off the external lights.
The instrument panel and the different
dashboard controls will come on with the
external lights.
LIGHTS SWITCHED OFF fig. 53
Knurled ring Aturned to 0.
SIDE/TAILLIGHTS fig. 53
To switch these lights on turn the knurled
ring Afrom position 0 to position
6
.
DIPPED BEAM HEADLIGHTS
fig. 53
To switch these lights on turn the knurled
ring Afrom position
6
to position
2
/
1
.
Warning light 2on the instrument pan-
el will turn on.
MAIN BEAM HEADLIGHTS fig. 54
These lights turn on with the knurled ring
Aat 2/1and pulling it towards the
steering wheel.
Instrument panel warning light 1will
come on.
To turn the main beams off, pull again the
stalk towards the steering wheel.FLASHING THE HEADLIGHTS
fig. 54
Pull the stalk towards the steering wheel
(1st unstable position) regardless of the
position of the knurled ring. The warning
light
1
on the instrument panel will turn
on.
fig. 53
F0P0046m
fig. 54
F0P0047m
fig. 55
F0P0048m
FRONT FOG LIGHTS AND REAR
FOG LIGHTS fig. 55-56
(for versions/markets, where provided)
To switch these lights on fig. 55:❒
turn the knurled ring Bas shown by the
arrow:
❒
first impulse, unstable position, front fog
lights on; instrument panel warning light5
will turn on.
❒
second impulse, unstable position, rear
fog lights on
4.
020-082 SCUDO LUM GB 19/11/13 09.54 Pagina 49
Page 55 of 227
51
SAFETY
DEVICESCORRECT USE
OF THE VEHICLE WARNING
LIGHTS AND
MESSAGESIN AN
EMERGENCYVEHICLE
MAINTENANCETECHNICAL
SPECIFICATIONSINDEX DASHBOARD
AND CONTROLS
Follow me home
(for versions/markets, where provided)
This function allows the illumination of the
space in front of the vehicle for a preset
period of time (45 seconds). To activate
it the ignition key shall be at Sor removed
and the left stalk shall be pushed towards
the dashboard within 2 minutes from
when the engine is turned off.
If the vehicle is fitted with automatic de-
vice for turning on side lights and dipped
beams, the follow me home function will
activate automatically when opening the
doors.AUTOMATIC HEADLIGHTS
SENSOR (daylight sensor)
(for versions/markets, where provided)
It detects the changes of the external light
intensity of the vehicle according to the
light sensitivity set: the greater the sensi-
tivity is, the smaller the amount of exter-
nal light necessary to control the switch-
ing-on of the external headlights will be.
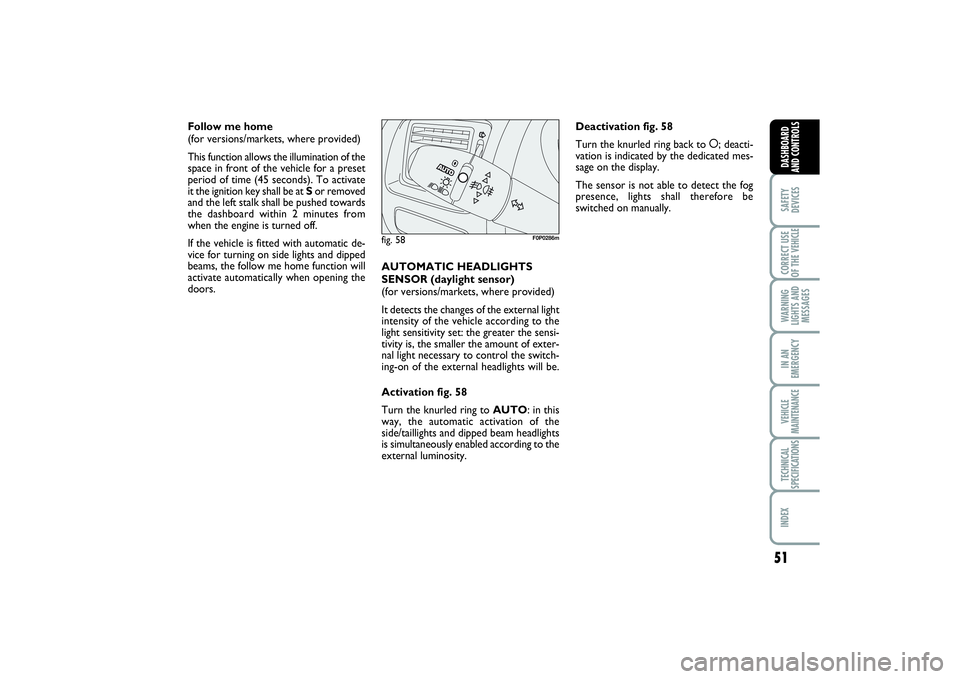
Activation fig. 58
Turn the knurled ring to AUTO: in this
way, the automatic activation of the
side/taillights and dipped beam headlights
is simultaneously enabled according to the
external luminosity.
fig. 58
F0P0286m
Deactivation fig. 58
Turn the knurled ring back to å; deacti-
vation is indicated by the dedicated mes-
sage on the display.
The sensor is not able to detect the fog
presence, lights shall therefore be
switched on manually.
020-082 SCUDO LUM GB 19/11/13 09.54 Pagina 51
Page 56 of 227
52SAFETY
DEVICESCORRECT USE
OF THE VEHICLE
WARNING
LIGHTS AND
MESSAGESIN AN
EMERGENCYVEHICLE
MAINTENANCETECHNICAL
SPECIFICATIONSINDEX
DASHBOARD
AND
CONTROLS
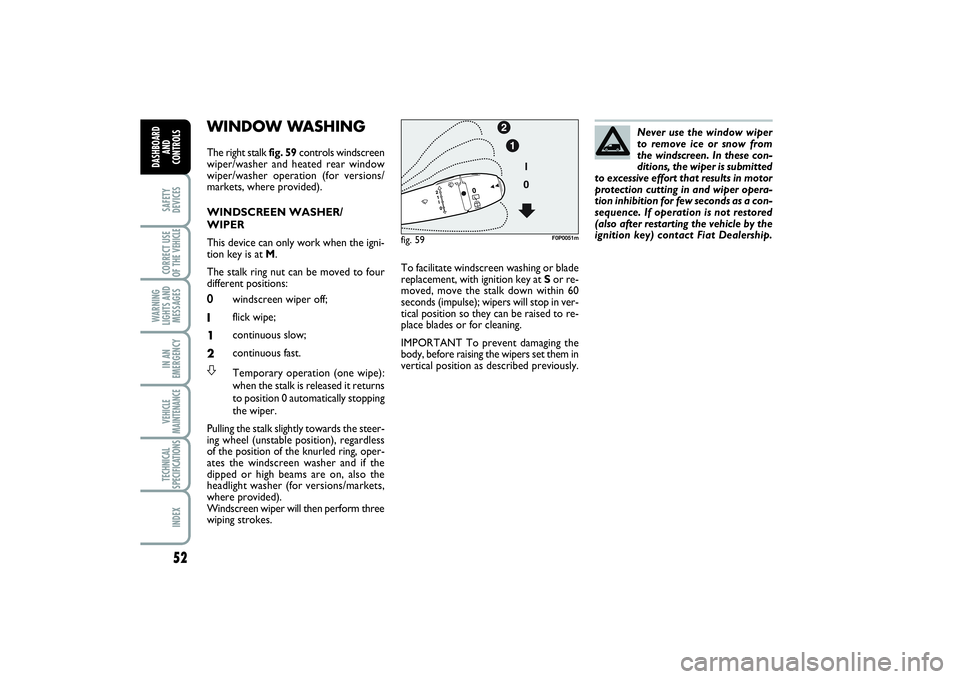
WINDOW WASHING The right stalk fig. 59controls windscreen
wiper/washer and heated rear window
wiper/washer operation (for versions/
markets, where provided).
WINDSCREEN WASHER/
WIPER
This device can only work when the igni-
tion key is at M.
The stalk ring nut can be moved to four
different positions:
0windscreen wiper off;
Iflick wipe;
1continuous slow;
2continuous fast.S
Temporary operation (one wipe):
when the stalk is released it returns
to position 0 automatically stopping
the wiper.
Pulling the stalk slightly towards the steer-
ing wheel (unstable position), regardless
of the position of the knurled ring, oper-
ates the windscreen washer and if the
dipped or high beams are on, also the
headlight washer (for versions/markets,
where provided).
Windscreen wiper will then perform three
wiping strokes.Never use the window wiper
to remove ice or snow from
the windscreen. In these con-
ditions, the wiper is submitted
to excessive effort that results in motor
protection cutting in and wiper opera-
tion inhibition for few seconds as a con-
sequence. If operation is not restored
(also after restarting the vehicle by the
ignition key) contact Fiat Dealership.
To facilitate windscreen washing or blade
replacement, with ignition key at Sor re-
moved, move the stalk down within 60
seconds (impulse); wipers will stop in ver-
tical position so they can be raised to re-
place blades or for cleaning.
IMPORTANT To prevent damaging the
body, before raising the wipers set them in
vertical position as described previously.fig. 59
F0P0051m
020-082 SCUDO LUM GB 19/11/13 09.54 Pagina 52
Page 58 of 227
54SAFETY
DEVICESCORRECT USE
OF THE VEHICLE
WARNING
LIGHTS AND
MESSAGESIN AN
EMERGENCYVEHICLE
MAINTENANCETECHNICAL
SPECIFICATIONSINDEX
DASHBOARD
AND
CONTROLS
Operating the windscreen washer with
the rain sensor activated the normal wash-
ing cycle is performed at the end of which
the rain sensor resumes its normal auto-
matic function.
So as to deactivate the rain sensor, put the
windscreen wiper command in the I, 1or
2positions. The deactivation is accompa-
nied by a message on the display.
To activate the rain sensor you have to
move the stalk to another position and
then back to AUTO.The rain sensor is able to recognize and
automatically adjust itself in the presence
of the following particular conditions:
❒
impurities on the controlled surface
(salt, dirt, etc...);
❒
streaks of water produced by worn
wiper blades;
❒
difference between day and night (hu-
man eye is more bothered by wet glass
at night).Pulling the stalk towards the steering
wheel (unstable position), regardless of
the position of the knurled ring, operates
the windscreen washer and if the dipped
or high beams are on, also the headlight
washer (for versions/markets, where pro-
vided).
Windscreen wiper will then perform three
wiping strokes.
Do not activate the rain sen-
sor when washing the vehi-
cle at automatic car-wash stations.
WARNING
When cleaning or washing
the windscreen make sure the
rain sensor is off.
WARNING
Do not activate the rain sen-
sor if the windscreen is icy.
WARNING
020-082 SCUDO LUM GB 19/11/13 09.54 Pagina 54
Page 85 of 227

81
SAFETY
DEVICESCORRECT USE
OF THE VEHICLE WARNING
LIGHTS AND
MESSAGESIN AN
EMERGENCYVEHICLE
MAINTENANCETECHNICAL
SPECIFICATIONSINDEX DASHBOARD
AND CONTROLS
AUTOMATIC ADJUSTMENT
The controls fig.110are located in the
bottom rear of the vehicle.
If the vehicle is fitted with pneumatic sus-
pensions with automatic adjustment, the
system will adjust automatically the height
of the vehicle according to the load.
The warning light
…
on the instrument
panel will blink when the height level is not
adequate and is to be adjusted: in this case
let the engine run without accelerating un-
til the warning light turns off (optimum
suspension adjustment).
Under certain conditions it could be tem-
porarily not possible to perform the re-
quired adjustment:
❒
one or more doors open;
❒
vehicle braked (brake pedal pressed,
e.g. stop at red light).
Turning the system off
and on again
To turn the system off: keep button A-
fig. 110pressed until hearing the beep.
Double beep and button led Aturning on
will confirm deactivation.Once the system is deactivated, to reac-
tivate it (only with vehicle stationary) keep
button A-fig. 110pressed until hearing
the beep. Double beep and button led A
turning on will confirm reactivation.
fig. 110
F0P0288m
LOAD
RECOMMENDATIONSThis vehicle has been designed and ap-
proved on the basis of several set maxi-
mum weights (see the tables “Weights” in
section “Technical Specifications”):❒
kerb weight;
❒
payload;
❒
total weight;
❒
max. load on front axle;
❒
max. load on rear axle;
❒
towable load.
Each of these limits must be
borne in mind and MUST
NEVER BE EXCEEDED under any cir-
cumstances. In particular, never ex-
ceed the maximum weight permitted
on the front and rear axles when ar-
ranging loads in the vehicle (espe-
cially for special version vehicles).
WARNING
Deactivate the automatic
regulation in case of:
The substitution of a wheel
The transportation of the vehicle on
a lorry, train, ferry, ship, etc.
WARNING
020-082 SCUDO LUM GB 19/11/13 09.54 Pagina 81
Page 104 of 227
100CORRECT USE
OF THE VEHICLE
WARNING
LIGHTS AND
MESSAGESIN AN
EMERGENCYVEHICLE
MAINTENANCETECHNICAL
SPECIFICATIONSIINDEXDASHBOARD
AND CONTROLSSAFETY
DEVICES
Operations which lead to im-
pacts, vibrations or localised
heating (over 100°C for a maximum of
six hours) in the area around the pre-
tensioners may damage or deploy
them. Contact a Fiat Dealership should
intervention be necessary on these
components.
WARNING
PRETENSIONERSTo increase the efficiency of the front seat
belts, the vehicle is equipped with pre-
tensioners, that reduce slack in the belts
in the event of a severe frontal impact.
This guarantees the perfect adherence of
the seat belts to the occupants’ bodies be-
fore the restraining action begins.
It is evident that the pretensioners have
been activated when the belt withdraws
towards the retractor.
IMPORTANT To obtain the highest de-
gree of protection from the action of the
pretensioner, wear the seat belt tight to
the chest and pelvis. A slight discharge of
smoke may be produced during the acti-
vation of the pretensioner. This smoke is
not harmful and does not involve any fire
hazard. The pretensioner does not require
any maintenance or lubrication. Any
changes to its original conditions will in-
validate its efficiency. If, due to unusual nat-
ural events (floods, sea storms, etc.), the
device has been affected by water and
mud, it must be replaced.
The pretensioner may be
used only once. Contact a Fi-
at Dealership to have it replaced af-
ter it has been deployed.
WARNING
SBR SYSTEMThe vehicle is equipped with the SBR (Seat
Belt Reminder) system, which consists in
a device which, in conjunction with the
warning light coming on, warns the dri-
ver and front passenger that their seat
belts have not been fastened.
097-118 SCUDO LUM GB 18/11/13 14.26 Pagina 100