window FIAT STILO 2004 1.G Connect NavPlus Manual
[x] Cancel search | Manufacturer: FIAT, Model Year: 2004, Model line: STILO, Model: FIAT STILO 2004 1.GPages: 166, PDF Size: 3.8 MB
Page 32 of 166

CONNECT Nav+
31
IMPORTANTIt may occur that
the Autostore function is unable to
find 6 stations with a strong signal; in
this case only the stations found are
stored.
IMPORTANTActivating the “Au-
tostore” function cancels the stations
stored previously in the FMAST or
AMAST band.“Band Scan” FUNCTION
The “Band scan” function activates
station scanning in the chosen fre-
quency band. Each station frequency
will be displayed for about 10 seconds.
To turn on the “Band scan” function,
select the “Band scan” icon with the
encoder 14-fig. 1, then press “EN-
TER” 15-fig. 1to confirm.
During scanning, the display will
show “Band Scan”.
To stop the band scan function, press
“ENTER” 15-fig. 1again.“Preset Scan” FUNCTION
The “Preset scan” function activates
stored station scanning in the chosen
frequency band. Each stored station
will be played for about 10 seconds.
To turn on the “Preset scan” func-
tion, select the “Preset scan” icon with
the encoder 14-fig. 1, then press
“ENTER” 15-fig. 1to confirm.
During stations scan, the scanned
one is highlighted in the stored sta-
tions window and corresponding low-
bar button too. During operations the
string “Preset Scan” is displayed in the
main window.
To stop the preset scan function,
press “ENTER” 15-fig. 1again.
Page 33 of 166
CONNECT Nav+
32
Choosing and confirming “OK”, goes
back to the previous screen storing
the adjustments set. Pressing “ES-
CAPE” 13-fig. 1goes back to the pre-
vious screen resuming the settings
stored previously.
LOC/DX function
(tuner sensitivity adjustment)
With this function it is possible to
change the sensitivity of automatic ra-
dio station searching. When low sen-
sitivity “LOC” is set, only stations with
excellent reception are sought; when
high sensitivity “DX” is set, all the sta-
tions are sought. If you are in an area
with a large number of broadcasters
and you want the ones with the
strongest signal, choose low sensitivi-
ty “LOC”.
To choose between low or high
tuner sensitivity, repeatedly press
“ENTER” 15-fig. 1after selecting the
“LOC/DX” function with the encoder
14-fig. 1. The abbreviation of the sen-
sitivity chosen will be shown on the
display:
– LOC = low sensitivity;
– DX = high sensitivity.Mono/Stereo function
To pass from “Mono” to “Stereo” or
vice versa, select “Mono/Stereo” by
turning the encoder 14-fig. 1, and
then press “ENTER” 15-fig. 1to con-
firm. This function is only available on
FM band.
When stereo reception is on the dis-
play shows “STEREO”, when it is off
the display shows “MONO”.
When the signal of the station tuned
is weak, to improve the sound quality,
it is advisable to switch to “MONO”. “Radio setup” FUNCTION
To turn on the “Radio Setup” func-
tion, select the “Radio Setup” icon
with the encoder 14-fig. 1, then
press “ENTER” 15-fig. 1to confirm.
This function enables to go to next
window to adjust radio settings.
When in this window it is not possi-
ble to change the audio source. The
following functions are displayed
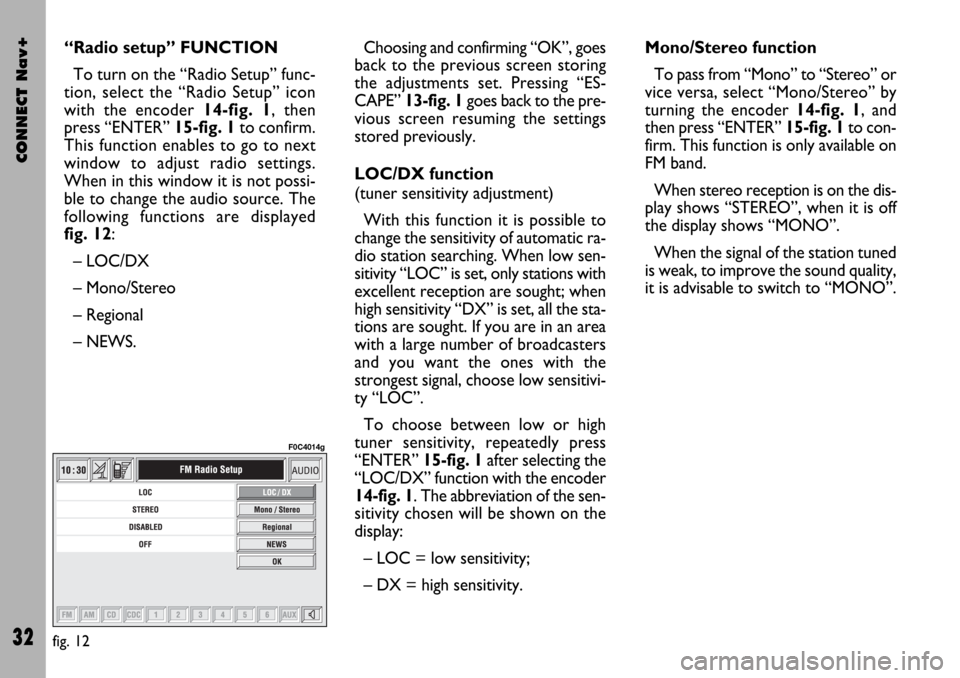
fig. 12:
– LOC/DX
– Mono/Stereo
– Regional
– NEWS.
fig. 12
F0C4014g
Page 53 of 166

CONNECT Nav+
52
To stop the MP3 CD, press briefly
“
11/˙˙” 21-fig. 1. To restart playing,
press briefly again “
11/˙˙” 21-fig. 1.
To pause the MP3 CD, press contin-
uously “
11/˙˙” 21-fig. 1. “Stop” and
“Pause” cause the stop of track play-
ing, maintaining in the main screen in-
formation about the last played song.
To eject MP3 CD 5-fig. 1press but-
ton 9-fig. 1.“Audio setup” FUNCTION
(AUDIO ADJUSTMENTS)
To access the audio setup menu
while listening to a MP3 CD, select the
“Setup” icon rotating the encoder 14-
fig. 1and press “ENTER” to confirm
15-fig. 1.
For the description of the different
functions available in the menu, see
previous specifications in the corre-
sponding paragraph in this chapter.
“Define Playlist” FUNCTION
“Define playlist” function allows the
management of max. 100 music pieces
among those included in the MP3 CD,
to be played in a specified sequence.
Dedicated windows allow the tracks
choice, addition or cancellation. It is
possible to add a single track or an en-
tire folder. This function is described
in detail in a specific paragraph below.
“Define playlist” icon key is disabled
when a MP3 CD is playing, you must
stop CD playing to enable it.“Playlist” FUNCTION
“Playlist” function enables or disables
playback of the previously user pro-
grammed track list. To turn this func-
tion on/off, select the corresponding
icon with the encoder 14-fig. 1and
then press “ENTER” to confirm 15-
fig. 1.
When the “Playlist” function is on,
symbol “✓” is shown near the corre-
sponding icon.
When inserting a MP3 CD coupled
to a playlist the “Playlist” function is
enabled automatically and symbol “✓”
will be displayed; otherwise the playlist
function is disabled automatically and
symbol “✓” near the icon will disap-
pear.
The icon key is disabled when a MP3
CD is playing, independently from
“Playlist” function enabling/disabling;
stop the CD to enable the icon key.
Page 68 of 166
CONNECT Nav+
67
INCOMING CALLS
Whichever is the CONNECT Nav+
system active mode, when an external
telephone call comes in, a dialog box
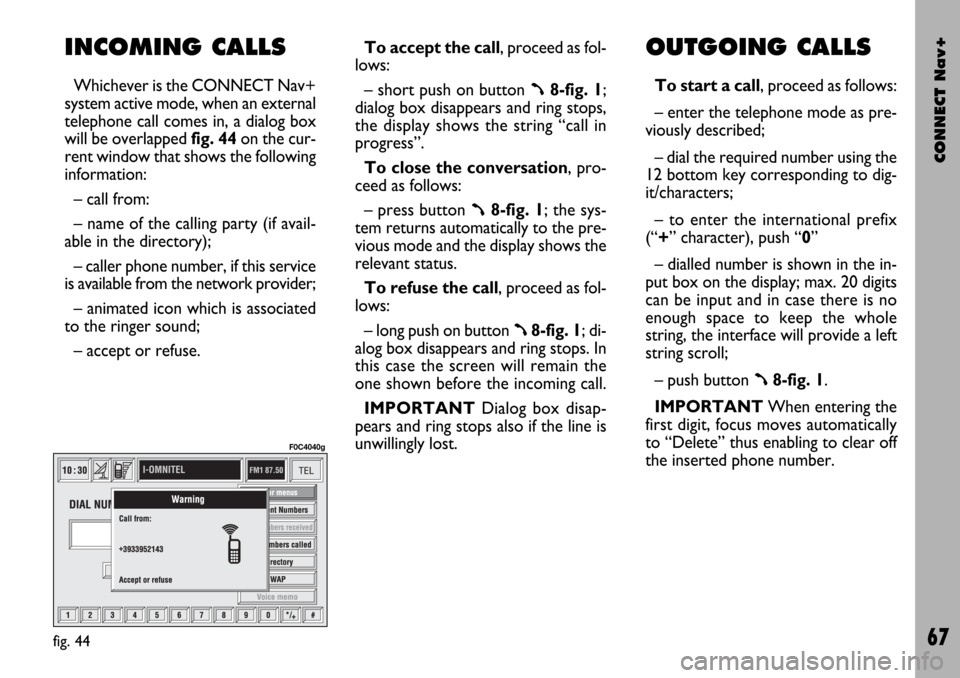
will be overlapped fig. 44on the cur-
rent window that shows the following
information:
– call from:
– name of the calling party (if avail-
able in the directory);
– caller phone number, if this service
is available from the network provider;
– animated icon which is associated
to the ringer sound;
– accept or refuse.To accept the call, proceed as fol-
lows:
– short push on button ß8-fig. 1;
dialog box disappears and ring stops,
the display shows the string “call in
progress”.
To close the conversation, pro-
ceed as follows:
– press button
ß8-fig. 1; the sys-
tem returns automatically to the pre-
vious mode and the display shows the
relevant status.
To refuse the call, proceed as fol-
lows:
– long push on button
ß8-fig. 1; di-
alog box disappears and ring stops. In
this case the screen will remain the
one shown before the incoming call.
IMPORTANT Dialog box disap-
pears and ring stops also if the line is
unwillingly lost.
OUTGOING CALLS
To start a call, proceed as follows:
– enter the telephone mode as pre-
viously described;
– dial the required number using the
12 bottom key corresponding to dig-
it/characters;
– to enter the international prefix
(“+” character), push “0”
– dialled number is shown in the in-
put box on the display; max. 20 digits
can be input and in case there is no
enough space to keep the whole
string, the interface will provide a left
string scroll;
– push button
ß8-fig. 1.
IMPORTANTWhen entering the
first digit, focus moves automatically
to “Delete” thus enabling to clear off
the inserted phone number.
fig. 44
F0C4040g
Page 72 of 166
CONNECT Nav+
71
To call directly one of the entries in
the list proceed as follows:
– select an entry in the list by rotat-
ing the encoder 14-fig. 1;
– push
ß8-fig. 1to start the call
(seefig. 42).After selecting the required entry,
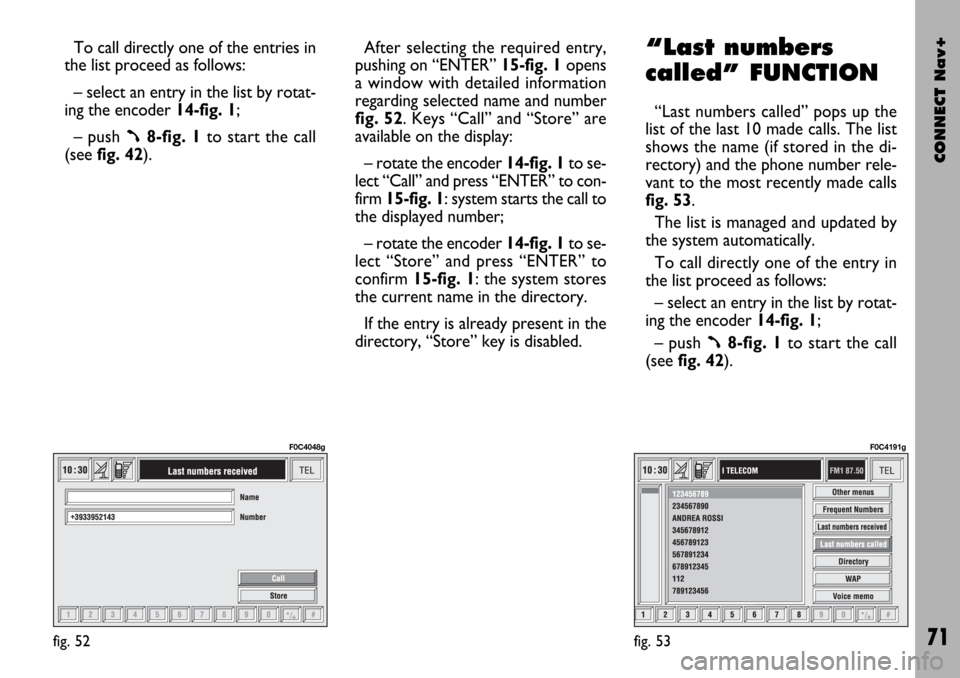
pushing on “ENTER” 15-fig. 1 opens
a window with detailed information
regarding selected name and number
fig. 52. Keys “Call” and “Store” are
available on the display:
– rotate the encoder 14-fig. 1to se-
lect “Call” and press “ENTER” to con-
firm 15-fig. 1: system starts the call to
the displayed number;
– rotate the encoder 14-fig. 1to se-
lect “Store” and press “ENTER” to
confirm 15-fig. 1: the system stores
the current name in the directory.
If the entry is already present in the
directory, “Store” key is disabled.
“Last numbers
called” FUNCTION
“Last numbers called” pops up the
list of the last 10 made calls. The list
shows the name (if stored in the di-
rectory) and the phone number rele-
vant to the most recently made calls
fig. 53.
The list is managed and updated by
the system automatically.
To call directly one of the entry in
the list proceed as follows:
– select an entry in the list by rotat-
ing the encoder 14-fig. 1;
– push
ß8-fig. 1to start the call
(see fig. 42).
fig. 52
F0C4048g
fig. 53
F0C4191g
Page 73 of 166
CONNECT Nav+
72
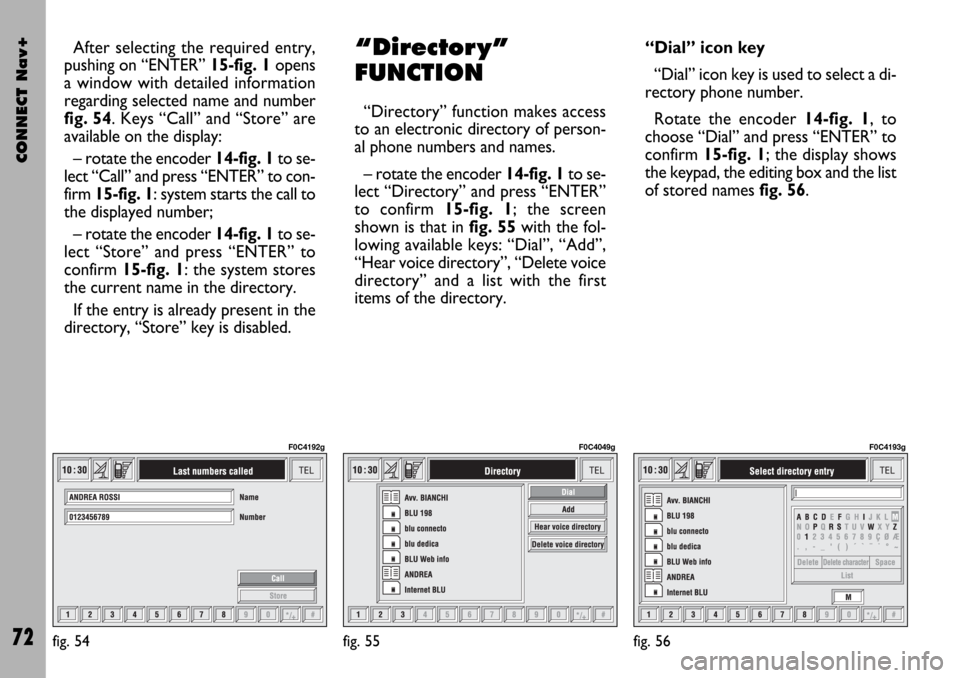
After selecting the required entry,
pushing on “ENTER” 15-fig. 1opens
a window with detailed information
regarding selected name and number
fig. 54. Keys “Call” and “Store” are
available on the display:
– rotate the encoder 14-fig. 1to se-
lect “Call” and press “ENTER” to con-
firm 15-fig. 1: system starts the call to
the displayed number;
– rotate the encoder 14-fig. 1to se-
lect “Store” and press “ENTER” to
confirm 15-fig. 1: the system stores
the current name in the directory.
If the entry is already present in the
directory, “Store” key is disabled.“Director y”
FUNCTION
“Directory” function makes access
to an electronic directory of person-
al phone numbers and names.
– rotate the encoder 14-fig. 1to se-
lect “Directory” and press “ENTER”
to confirm 15-fig. 1; the screen
shown is that in fig. 55with the fol-
lowing available keys: “Dial”, “Add”,
“Hear voice directory”, “Delete voice
directory” and a list with the first
items of the directory.“Dial” icon key
“Dial” icon key is used to select a di-
rectory phone number.
Rotate the encoder 14-fig. 1, to
choose “Dial” and press “ENTER” to
confirm 15-fig. 1; the display shows
the keypad, the editing box and the list
of stored names fig. 56.
fig. 55
F0C4049g
fig. 56
F0C4193g
fig. 54
F0C4192g
Page 75 of 166
CONNECT Nav+
74
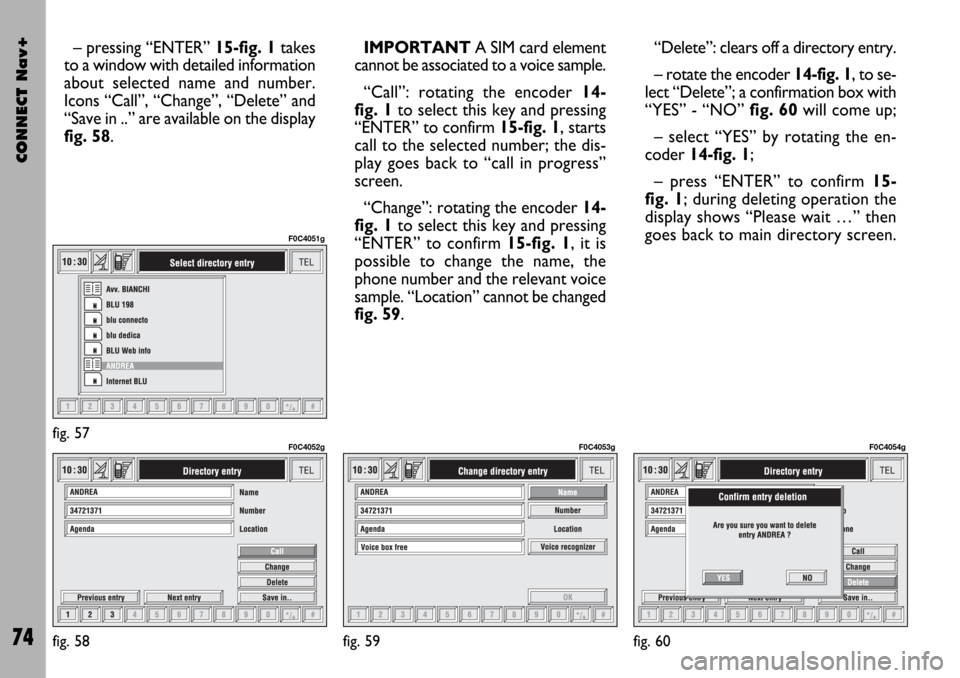
– pressing “ENTER” 15-fig. 1takes
to a window with detailed information
about selected name and number.
Icons “Call”, “Change”, “Delete” and
“Save in ..” are available on the display
fig. 58.IMPORTANT A SIM card element
cannot be associated to a voice sample.
“Call”: rotating the encoder 14-
fig. 1to select this key and pressing
“ENTER” to confirm 15-fig. 1, starts
call to the selected number; the dis-
play goes back to “call in progress”
screen.
“Change”: rotating the encoder 14-
fig. 1to select this key and pressing
“ENTER” to confirm 15-fig. 1, it is
possible to change the name, the
phone number and the relevant voice
sample. “Location” cannot be changed
fig. 59. “Delete”: clears off a directory entry.
– rotate the encoder14-fig. 1, to se-
lect “Delete”; a confirmation box with
“YES” - “NO” fig. 60will come up;
– select “YES” by rotating the en-
coder 14-fig. 1;
– press “ENTER” to confirm 15-
fig. 1; during deleting operation the
display shows “Please wait …” then
goes back to main directory screen.
fig. 57
F0C4051g
fig. 58
F0C4052g
fig. 59
F0C4053g
fig. 60
F0C4054g
Page 80 of 166
CONNECT Nav+
79
“Delete voice directory”
icon key
This icon key (Delete voice directo-
ry) allows to clear off previously
recorded voice samples; proceed as
follows:
– rotate the encoder 14-fig. 1, se-
lect “Delete voice directory” icon and
then press “ENTER” to confirm 15-
fig. 1; the display will show the fol-
lowing string: “Press “ENTER” to con-
firm, “ESCAPE” to cancel”.
– pressing “ENTER” 15-fig. 1clears
off voice samples, during deletion the
display will show “Please wait…”.
– pressing “ESCAPE” 13-fig. 1dele-
tion is not performed and previous
screen is displayed.“WAP” FUNCTION
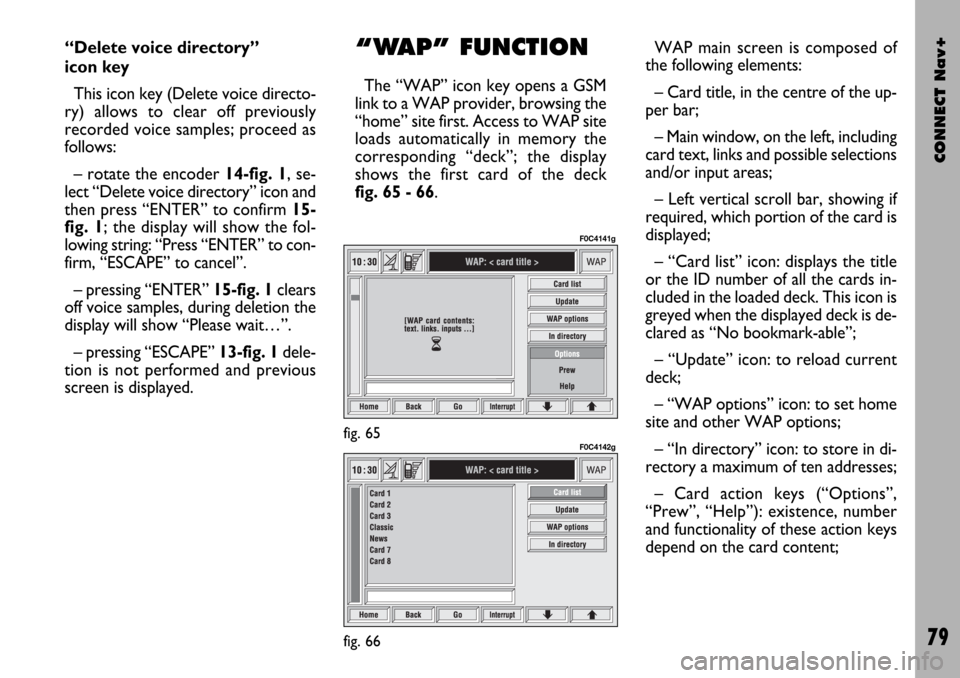
The “WAP” icon key opens a GSM
link to a WAP provider, browsing the
“home” site first. Access to WAP site
loads automatically in memory the
corresponding “deck”; the display
shows the first card of the deck
fig. 65 - 66.WAP main screen is composed of
the following elements:
– Card title, in the centre of the up-
per bar;
– Main window, on the left, including
card text, links and possible selections
and/or input areas;
– Left vertical scroll bar, showing if
required, which portion of the card is
displayed;
– “Card list” icon: displays the title
or the ID number of all the cards in-
cluded in the loaded deck. This icon is
greyed when the displayed deck is de-
clared as “No bookmark-able”;
– “Update” icon: to reload current
deck;
– “WAP options” icon: to set home
site and other WAP options;
– “In directory” icon: to store in di-
rectory a maximum of ten addresses;
– Card action keys (“Options”,
“Prew”, “Help”): existence, number
and functionality of these action keys
depend on the card content;
fig. 65
F0C4141g
fig. 66
F0C4142g
Page 81 of 166

CONNECT Nav+
80
– Lower horizontal bar icon keys, en-
abled or disabled according to the
case:
“Home”: makes access to the ad-
dress defined as Home.
“Back”: displays previously shown
card.
“Go”: goes to input address screen
(direct access or “bookmark” recall);
“Interrupt”: stops current deck load-
ing;
“
¨”, “´”: scrolls up/down when card
cannot be entirely displayed.
During loading operations, an hour-
glass is displayed on the current page.Low bar and right icon keys are ac-
tive only when they are necessary and
they are greyed when not consistent;
for example “
¨” and “´” keys are ac-
tive only when window size is not
enough to show the entire card.
Rotate the encoder 14-fig. 1to se-
lect card action key; after selecting the
required key press “ENTER” to con-
firm 15-fig. 1; the relevant screen will
be displayed.
Press “ESCAPE” 13-fig. 1and con-
firm to quit the WAP mode, the dis-
play will return to the main telephone
screen (TEL).
“Go” low bar icon key
This key fig. 65 - 66, selected by ro-
tating the encoder 14-fig. 1and then
confirmed by “ENTER” 15-fig. 1,
makes access to a specified net ad-
dress (if the Provider allows such op-
eration).Proceed as follows:
– rotate the encoder 14-fig. 1to se-
lect the “Address” icon fig. 67and
then press “ENTER” to confirm 15-
fig. 1; the display will show a keypad
for typing in the required net address;
or, if address is already stored in the
directory:
– rotate the encoder 14-fig. 1to se-
lect the “Site directory” key fig. 67
and then press “ENTER” to confirm
15-fig. 1; the display will show the
stored site directory;
– rotate the encoder 14-fig. 1to se-
lect the required address and then
press “ENTER” to confirm 15-fig. 1.
During these operations “
¨”, “´”,
“Home”, “Back” and “Interrupt” are
disabled.
Page 125 of 166
CONNECT Nav+
124
“Personal info” function
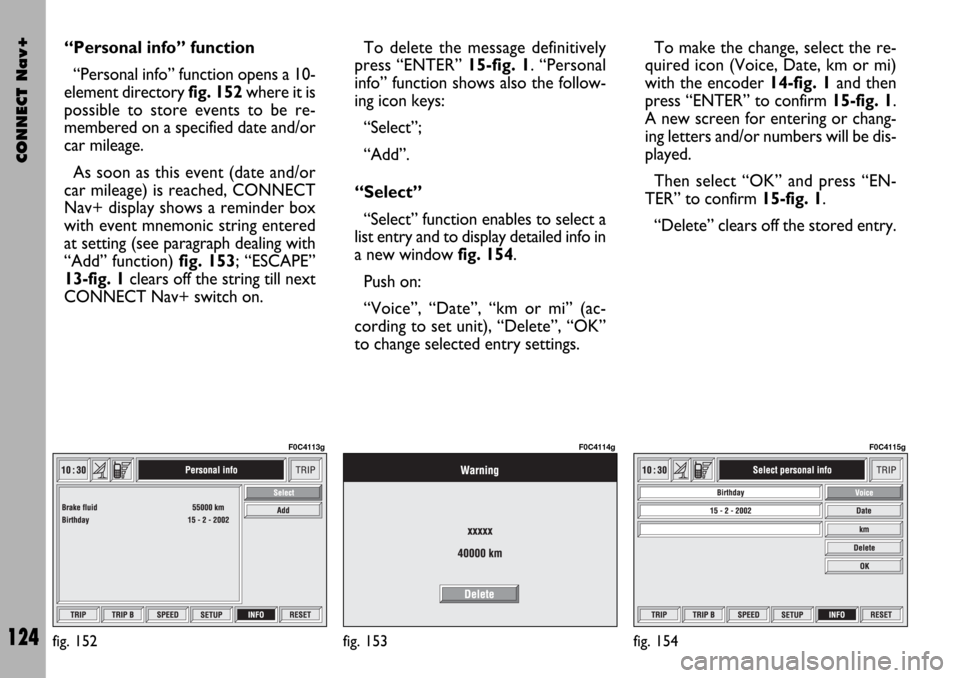
“Personal info” function opens a 10-
element directory fig. 152where it is
possible to store events to be re-
membered on a specified date and/or
car mileage.
As soon as this event (date and/or
car mileage) is reached, CONNECT
Nav+ display shows a reminder box
with event mnemonic string entered
at setting (see paragraph dealing with
“Add” function) fig. 153; “ESCAPE”
13-fig. 1clears off the string till next
CONNECT Nav+ switch on.To delete the message definitively
press “ENTER” 15-fig. 1. “Personal
info” function shows also the follow-
ing icon keys:
“Select”;
“Add”.
“Select”
“Select” function enables to select a
list entry and to display detailed info in
a new window fig. 154.
Push on:
“Voice”, “Date”, “km or mi” (ac-
cording to set unit), “Delete”, “OK”
to change selected entry settings.To make the change, select the re-
quired icon (Voice, Date, km or mi)
with the encoder 14-fig. 1and then
press “ENTER” to confirm 15-fig. 1.
A new screen for entering or chang-
ing letters and/or numbers will be dis-
played.
Then select “OK” and press “EN-
TER” to confirm 15-fig. 1.
“Delete” clears off the stored entry.
fig. 152
F0C4113g
fig. 153
F0C4114g
fig. 154
F0C4115g