engine FORD BRONCO 2023 Owners Manual
[x] Cancel search | Manufacturer: FORD, Model Year: 2023, Model line: BRONCO, Model: FORD BRONCO 2023Pages: 642, PDF Size: 14.71 MB
Page 366 of 642
WARNING: This vehicle may havemore than one battery. Removing thebattery cables from only one batterydoes not disconnect your vehicleelectrical system. Make sure youdisconnect the battery cables from allbatteries when disconnecting power.Failure to do so may cause seriouspersonal injury or property damage.
WARNING: For vehicles withAuto-Start-Stop the battery requirementis different. You must replace the batterywith one of exactly the samespecification.
WHAT IS THE BATTERYMANAGEMENT SYSTEM
The battery management system monitorsbattery conditions and takes actions toextend battery life.
HOW DOES THE BATTERYMANAGEMENT SYSTEM WORK
If excessive battery drain is detected, thesystem temporarily disables someelectrical systems to protect the battery.
Systems included are:
•Heated rear window.
•Heated seats.
•Climate control.
•Heated steering wheel.
•Audio unit.
•Navigation system.
A message could appear in the informationdisplay to alert you that battery protectionactions are active. This message is only fornotification that an action is taking place,and not intended to indicate an electricalproblem or that the battery requiresreplacement.
BATTERY MANAGEMENT SYSTEMLIMITATIONS
After battery replacement, or in somecases after charging the battery with anexternal charger, the battery managementsystem requires eight hours of vehicle sleeptime to relearn the battery state of charge.During this time, your vehicle must remainfully locked with the ignition switched off.
Note:Prior to relearning the battery stateof charge, the battery management systemcould temporarily disable some electricalsystems.
Electrical Accessory Installation
To make sure the battery managementsystem works correctly, do not connect anelectrical device ground connectiondirectly to the battery negative post. Thiscan cause inaccurate measurements ofthe battery condition and potentialincorrect system operation.
Note:If you add electrical accessories orcomponents to the vehicle, it couldadversely affect battery performance anddurability. This could also affect theperformance of other electrical systems inthe vehicle.
CHANGING THE 12V BATTERY
The battery is in the engine compartment.See Maintenance (page 349).
Your vehicle has a maintenance-freebattery. It does not require additionalwater during service.
If the vehicle battery has a cover, makesure you correctly install it after cleaningor replacing the battery.
362
2023 Bronco (TG1) Canada/United States of America, enUSA, Edition date: 202208, DOMMaintenance
Page 367 of 642
For longer, trouble-free operation, keep thetop of the battery clean and dry and thebattery cables tightly fastened to thebattery terminals. If any corrosion ispresent on the battery or terminals, removethe cables from the terminals and cleanwith a wire brush. You can neutralize theacid with a solution of baking soda andwater.
We recommend that you disconnect thenegative battery cable terminal from thebattery if you plan to store your vehicle foran extended period.
Note:If you only disconnect the negativebattery cable terminal, make sure it isisolated or placed away from the batteryterminal to avoid unintended connection orarcing.
If you disconnect or replace the batteryand your vehicle has an automatictransmission, it must relearn its adaptivestrategy. Because of this, the transmissionmay shift firmly when first driven. This isnormal operation while the transmissionfully updates its operation to optimumshift feel.
Removing the Battery
1.Apply the parking brake and switch theignition off.
2.Switch all electrical equipment off, forexample lights and radio.
3.Wait a minimum of two minutes beforedisconnecting the battery.
Note:The engine management system hasa power hold function and remains poweredfor a period of time after you switch theignition off. This is to allow diagnostic andadaptive tables to be stored. Disconnectingthe battery without waiting can causedamage not covered by the vehicleWarranty.
4.Disconnect and isolate the negativebattery cable terminal.
5.Disconnect and isolate the positivebattery cable terminal.
6.Remove the battery securing clamp.
7.Remove the battery.
If you disconnect or replace the vehiclebattery, you must reset the followingfeatures:
•Window bounce-back. See WindowBounce-Back (page 114).
•Clock Settings.
•Pre-set radio stations.
Replacing the Battery
Note:Before reconnecting the battery,make sure the ignition remains switched off.
You must replace the battery with one ofexactly the same specification.
To install, reverse the removal procedure.
Note:Make sure that you correctly installthe battery terminal covers, battery coverand battery cable terminals.
RESETTING THE BATTERYSENSOR
When you install a new battery, reset thebattery sensor by doing the following:
1.Switch the ignition on, and leave theengine off.
Note:Complete Steps 2 and 3 within 10seconds.
2.Flash the high beam headlamps fivetimes, ending with the high beams off.
3.Press and release the brake pedal threetimes.
The battery warning lamp flashes threetimes to confirm that the reset issuccessful.
363
2023 Bronco (TG1) Canada/United States of America, enUSA, Edition date: 202208, DOMMaintenance
Page 369 of 642
DetailsMessage
The battery management system determines that the 12Vbattery is at a low state of charge. Start the engine to chargethe battery or charge the battery using an aftermarket batterycharger. Always use the vehicle ground point when connectingthe negative cable of the external battery charger. See JumpStarting the Vehicle (page 330). This message clears onceyou restart your vehicle and the battery state of charge hasrecovered. Do not switch on the ignition when a batterycharger is in use to charge the battery.
Battery State of ChargeLow
The battery management system determines that the batteryis at a low state of charge. Turn the ignition off as soon aspossible to protect the battery. This message will clear oncethe vehicle has been started and the battery state of chargehas recovered. Turning off unnecessary electrical loads willallow faster battery state-of-charge recovery.
Turn Power Off To SaveBattery
Displayed when the battery management system detects anextended low-voltage condition. Various vehicle features willbe disabled to help preserve the battery. Turn off as many ofthe electrical loads as soon as possible to improve systemvoltage. If the system voltage has recovered, the disabledfeatures will operate again as normal.
Electrical Power SaverActive Some FeaturesTurned Off See Manual
ADJUSTING THE HEADLAMPS
Vertical Aim Adjustment
The headlamps on your vehicle areproperly aimed at the assembly plant. Ifyour vehicle has been in an accident,contact an authorized dealer to have yourvehicle headlamps checked for properalignment.
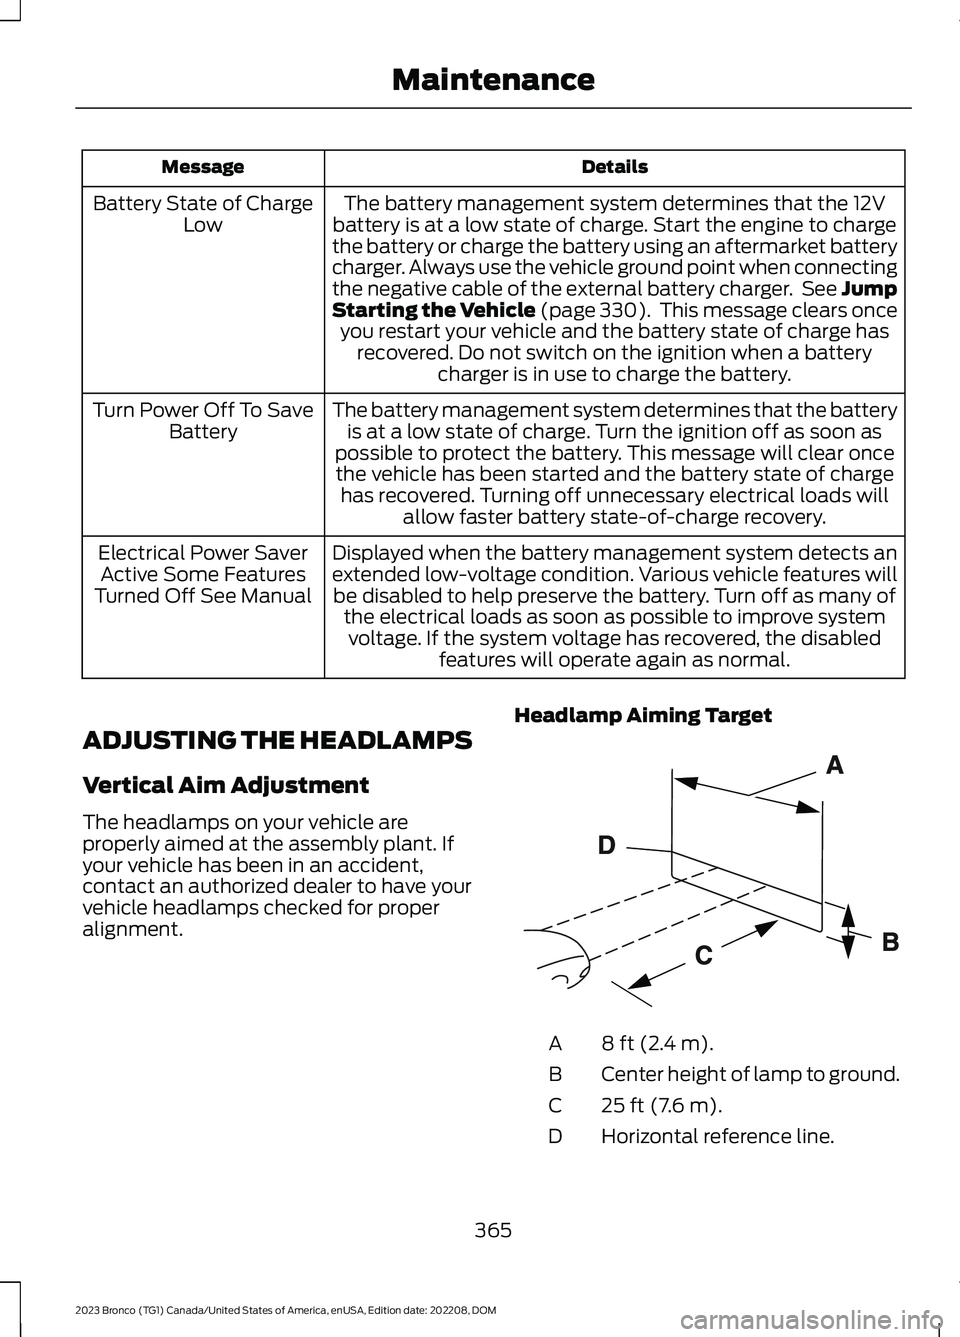
Headlamp Aiming Target
8 ft (2.4 m).A
Center height of lamp to ground.B
25 ft (7.6 m).C
Horizontal reference line.D
365
2023 Bronco (TG1) Canada/United States of America, enUSA, Edition date: 202208, DOMMaintenanceE142592
Page 373 of 642
7.Remove the three retaining boltssecuring the rear lamp to the body.
Note:Remove and install the retaining boltnear the wheel well before the retainingbolts near the luggage compartment.
8.Pull the rear lamp away from thevehicle and disconnect the electricalconnectors as needed.
9.To install, reverse the removalprocedure.
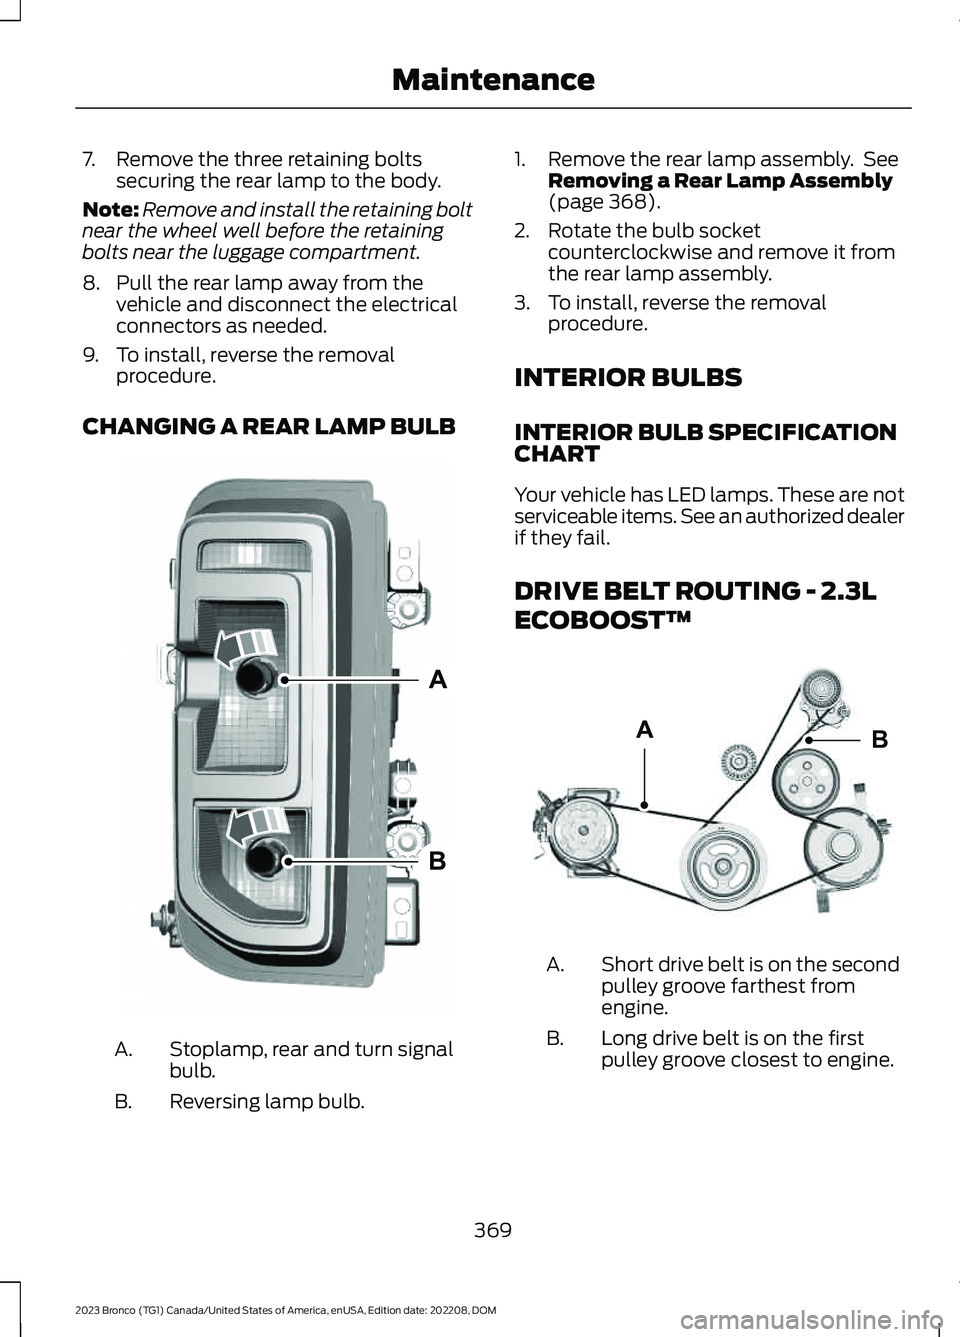
CHANGING A REAR LAMP BULB
Stoplamp, rear and turn signalbulb.A.
Reversing lamp bulb.B.
1.Remove the rear lamp assembly. SeeRemoving a Rear Lamp Assembly(page 368).
2.Rotate the bulb socketcounterclockwise and remove it fromthe rear lamp assembly.
3.To install, reverse the removalprocedure.
INTERIOR BULBS
INTERIOR BULB SPECIFICATIONCHART
Your vehicle has LED lamps. These are notserviceable items. See an authorized dealerif they fail.
DRIVE BELT ROUTING - 2.3L
ECOBOOST™
Short drive belt is on the secondpulley groove farthest fromengine.
A.
Long drive belt is on the firstpulley groove closest to engine.B.
369
2023 Bronco (TG1) Canada/United States of America, enUSA, Edition date: 202208, DOMMaintenanceABE339583 BAE357477
Page 405 of 642
12.To make sure the temporarymounting pins are properly engagedwith the rock rail, the three runningboard tabs must be flush against therock rail.
13.Install a bolt on the remaining hole inthe rear running board mounting taband two bolts each on the middle andfront running board mounting tabs.
14.Use the hex tool to tighten the bolts.
Note:We recommend that you use a torquewrench to make sure you tighten all thebolts to the required 20 lb.ft (27 Nm)specification.
15.To install the additional runningboard, repeat Steps 1-14 for theopposite side
16.Return the hex tool to the tool pouchand secure it in the vehicle.
REMOVABLE FRONT BUMPER
END CAPS - RAPTOR
REMOVING AND INSTALLING THEFRONT BUMPER END CAPS
WARNING: Do not store thebumper end-caps in the vehicle.Unsecured end-caps could become aprojectile in a sudden stop or crash.
Note:Front bumper end caps are not ratedfor rock crawl use or off-road conditionswhere ground contact is likely to occur. Werecommend removing the end caps beforeuse on roads under these conditions to avoiddamage.
Removing the Front Bumper EndCap
1.Park your vehicle on level ground andmake sure the transmission is in park(P) and the engine is off.
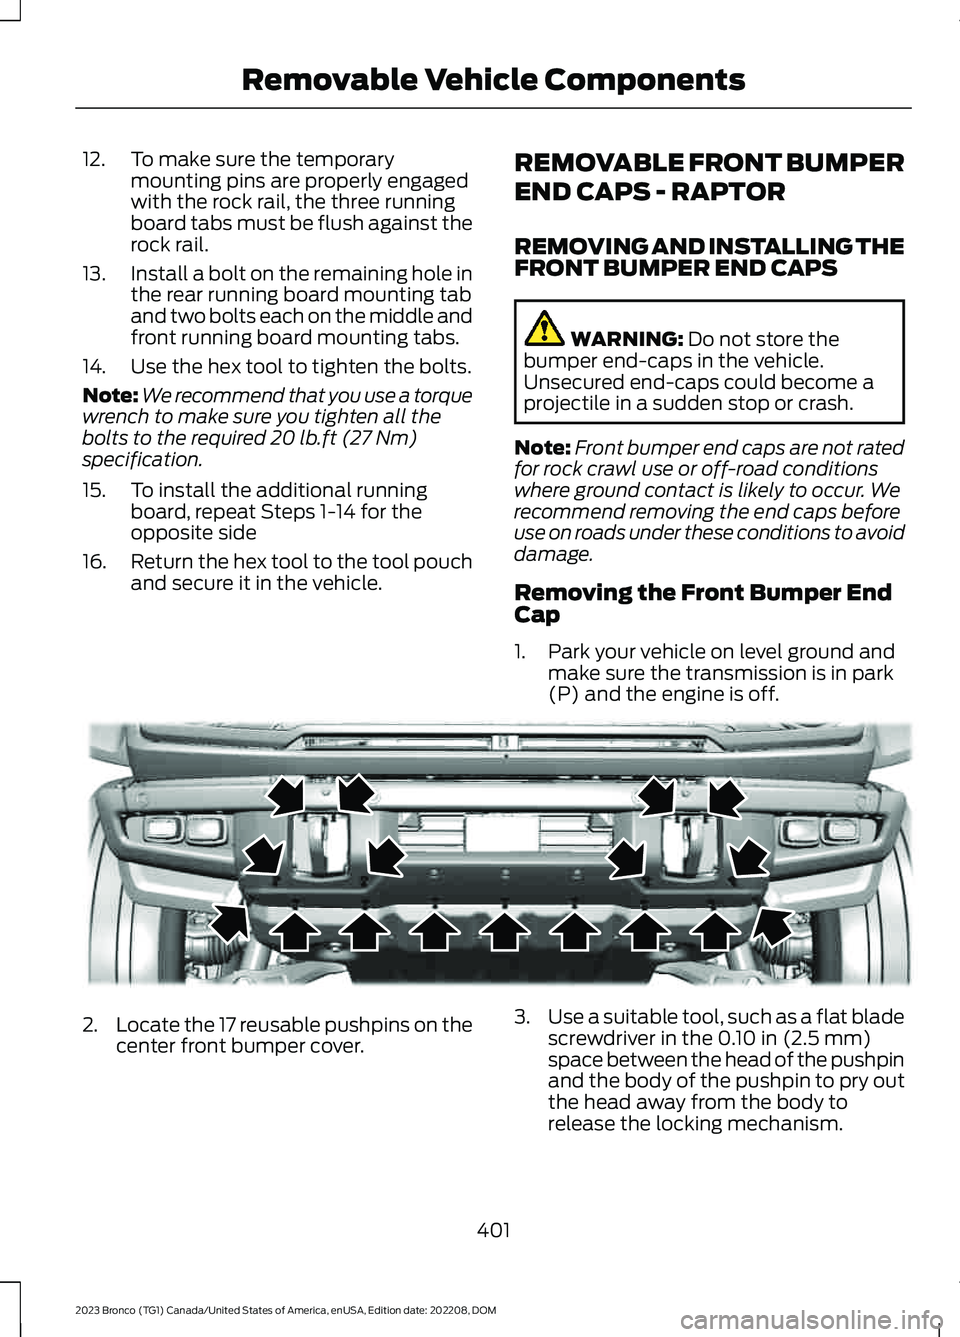
2.Locate the 17 reusable pushpins on thecenter front bumper cover.
3.Use a suitable tool, such as a flat bladescrewdriver in the 0.10 in (2.5 mm)space between the head of the pushpinand the body of the pushpin to pry outthe head away from the body torelease the locking mechanism.
401
2023 Bronco (TG1) Canada/United States of America, enUSA, Edition date: 202208, DOMRemovable Vehicle ComponentsE366945
Page 408 of 642
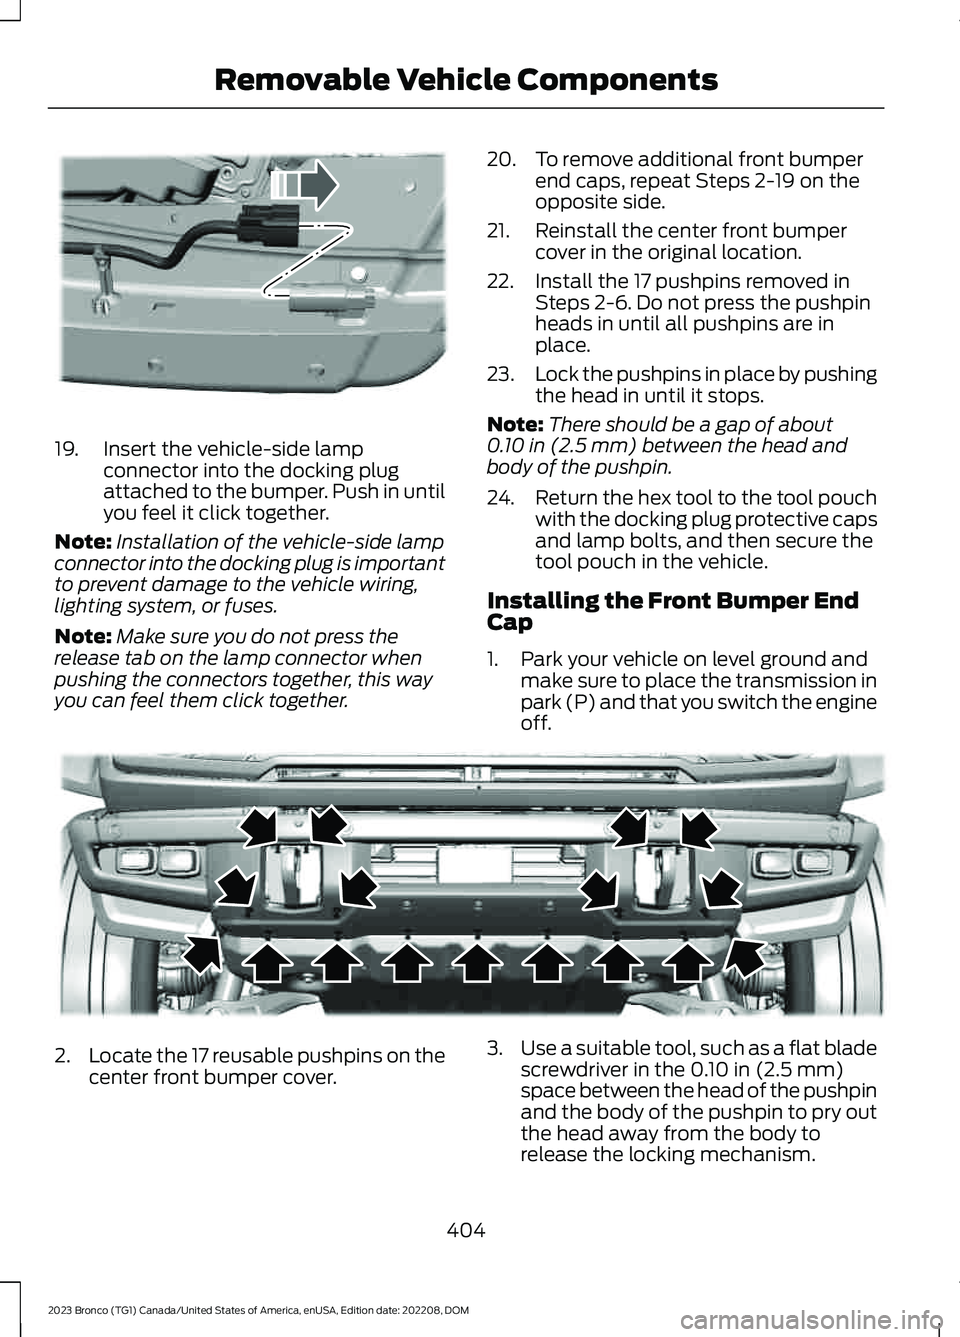
19.Insert the vehicle-side lampconnector into the docking plugattached to the bumper. Push in untilyou feel it click together.
Note:Installation of the vehicle-side lampconnector into the docking plug is importantto prevent damage to the vehicle wiring,lighting system, or fuses.
Note:Make sure you do not press therelease tab on the lamp connector whenpushing the connectors together, this wayyou can feel them click together.
20.To remove additional front bumperend caps, repeat Steps 2-19 on theopposite side.
21.Reinstall the center front bumpercover in the original location.
22.Install the 17 pushpins removed inSteps 2-6. Do not press the pushpinheads in until all pushpins are inplace.
23.Lock the pushpins in place by pushingthe head in until it stops.
Note:There should be a gap of about0.10 in (2.5 mm) between the head andbody of the pushpin.
24.Return the hex tool to the tool pouchwith the docking plug protective capsand lamp bolts, and then secure thetool pouch in the vehicle.
Installing the Front Bumper EndCap
1.Park your vehicle on level ground andmake sure to place the transmission inpark (P) and that you switch the engineoff.
2.Locate the 17 reusable pushpins on thecenter front bumper cover.
3.Use a suitable tool, such as a flat bladescrewdriver in the 0.10 in (2.5 mm)space between the head of the pushpinand the body of the pushpin to pry outthe head away from the body torelease the locking mechanism.
404
2023 Bronco (TG1) Canada/United States of America, enUSA, Edition date: 202208, DOMRemovable Vehicle ComponentsE366953 E366945
Page 425 of 642
CLEANING PRODUCTS
Materials
For best results, use the following products
or products of equivalent quality:
For additional information and assistance,we recommend that you contact anauthorized dealer.
SpecificationName
Motorcraft® Bug and Tar Remover, ZC-42 (U.S. & Canada)
ESR-M5B194-BMotorcraft® Custom Bright Metal Cleaner, ZC-15 (U.S. & Canada)
ESR-M14P4-AMotorcraft® Detail Wash, ZC-3-A (U.S. & Canada)
ESR-M14P3-AMotorcraft® Engine Shampoo and Degreaser, ZC-20 (U.S.)
Motorcraft® Engine Shampoo, CXC-66-A (Canada)
Motorcraft® Premium Leather and Vinyl Cleaner, ZC-56 (U.S. &Canada)
Motorcraft® Multi-Purpose Cleaner, CXC-101 (Canada)
WSS-M14P19-AMotorcraft® Premium Windshield Wash Concentrate withBitterant, ZC-32-B2 (U.S.)
WSS-M14P19-AMotorcraft® Premium Quality Windshield Washer Fluid, CXC-37-F/M (Canada)
Motorcraft® Professional Strength Carpet & Upholstery Cleaner,ZC-54 (U.S. & Canada)
ESR-M14P5-AMotorcraft® Premium Glass Cleaner, CXC-100 (Canada)
Motorcraft® Spot and Stain Remover, ZC-14 (U.S.)
ESR-M14P5-AMotorcraft® Ultra-Clear Spray Glass Cleaner, ZC-23 (U.S.)
Motorcraft® Wheel and Tire Cleaner, ZC-37-A (U.S. & Canada)
421
2023 Bronco (TG1) Canada/United States of America, enUSA, Edition date: 202208, DOMVehicle Care
Page 427 of 642
If you intend on parking your vehicle for anextended period after cleaning the wheelswith a wheel cleaner, drive your vehicle fora few minutes before parking your vehicle.This reduces the risk of corrosion of thebrake discs, brake pads and linings.
Do not clean the wheels when they are hot.
Note: Some car washes could damagewheel rims and covers.
Note: Using non-recommended cleaners,harsh cleaning products, chrome wheelcleaners or abrasive materials coulddamage wheel rims and covers.
CLEANING THE ENGINECOMPARTMENT
Use a vacuum cleaner to remove debrisfrom the screen area below windshield.
Note:If you are not familiar with the partsaround the engine do not wash the enginecompartment. Avoid frequent enginewashes.
When washing the engine compartment:
•Never wash or rinse the engine while itis hot or running.
•Never wash or rinse any ignition coil,spark plug wire or spark plug well.
•Cover the battery, power distributionbox, and air filter assembly to preventwater damage.
Note:If your vehicle has an engine coverremove the cover before application ofshampoo and degreaser.
•Spray an approved engine shampooand degreaser on all parts that requirecleaning and rinse with water.
CLEANING THE CONVERTIBLETOP
Remove lint with a lint roller or vacuumwith a soft bristle brush.
Wash with an approved high qualityconvertible top cleaner and protectant.
Note:Do not use stiff bristle brushes,abrasive materials or household cleaningproducts.
Note:High pressure water may cause waterleaks and possible seal damage to theconvertible top.
Cleaning the Soft Top Windows
We recommend that you only clean thesoft top windows in the following way:
1.Use only a microfiber cloth, cold orlukewarm water, and a mild soap andwater solution to clean the soft topwindows in a circular motion.
2.Rinse thoroughly with cold water, thenwipe with a soft, damp cloth.
3.Use a small amount of soft top windowcleaner or equivalent to remove finescratches and to improve visibility andprovide UV protection to help preventyellowing.
4.For additional information andassistance, we recommend that youcontact an authorized dealer.
Note:Test any cleaner on an inconspicuousarea before applying broadly.
Note:Do not use hot water or anythingstronger than mild soap on the soft topwindow.
Note:Do not use solvents such as alcoholor harsh cleaning agents on the soft topwindow.
Note:Do not use a scraper or de-icingchemicals to remove frost, snow, or ice. Usewarm water only.
Note:Do not paste stickers, gummed labelsor any tape on the soft top window surface.
423
2023 Bronco (TG1) Canada/United States of America, enUSA, Edition date: 202208, DOMVehicle Care
Page 432 of 642
PREPARING YOUR VEHICLE
FOR STORAGE
If you plan on storing your vehicle for 30days or more, the following maintenancerecommendations ensures your vehiclestays in good operating condition.
Under various conditions, long-termstorage may lead to degraded engineperformance or failure unless you usespecific precautions to preserve yourvehicle.
General
•Store all vehicles in a dry, ventilatedplace.
•If vehicles are stored outside, theyrequire regular maintenance to protectagainst rust and weather damage.
•Make sure all linkages, cables, leversand pins under your vehicle are coveredwith grease to prevent rust.
•Move vehicles at least 25 ft (7.5 m)every 15 days to lubricate working partsand prevent corrosion.
•Fill the fuel tank with high-quality fueluntil the first automatic shutoff of thefuel pump nozzle.
Engine
•Change the engine oil and filter prior tostorage because used engine oilcontains contaminants which maycause engine damage.
•Start the engine every 15 days for aminimum of 15 minutes. Run at fastidle with the climate controls set todefrost until the engine reaches normaloperating temperature.
•With your foot on the brake, shiftthrough all the gears while the engineis running.
Body
•Wash your vehicle thoroughly toremove dirt, grease, oil, tar or mud fromexterior surfaces, rear wheel housingsand the underside of front fenders.
•Periodically wash your vehicle if it isstored in exposed locations.
•Touch-up exposed or primed metal toprevent rust.
•Cover chrome and stainless steel partswith a thick coat of auto wax to preventdiscoloration. Rewax as necessarywhen you wash your vehicle.
•Lubricate all hood, door and luggagecompartment hinges and latches witha light grade oil.
•Cover interior trim to prevent fading.
•Keep all rubber parts free from oil andsolvents.
12 Volt Battery
•When storing your vehicle for greaterthan 30 days the state of chargeshould be approximately 50%.Additionally, we recommenddisconnecting the 12v battery whichwill reduce system loads on thebattery.
•Check and recharge as necessary. Keepconnections clean.
Note:It is necessary to reset memoryfeatures if you disconnect the batterycables.
Brakes
Make sure the brakes and parking brakerelease fully.
Note:If you intend on parking your vehiclefor an extended period after cleaning thewheels with a wheel cleaner, drive yourvehicle for a few minutes before doing so toreduce the risk of increased corrosion of thebrake discs, brake pads and linings.
428
2023 Bronco (TG1) Canada/United States of America, enUSA, Edition date: 202208, DOMStoring Your Vehicle
Page 433 of 642
Tires
Maintain recommended air pressure.
Note:If you intend on parking your vehiclefor an extended period after cleaning thewheels with a wheel cleaner, drive yourvehicle for a few minutes before doing so.This reduces the risk of corrosion of thebrake discs, brake pads and linings.
REMOVING YOUR VEHICLE
FROM STORAGE
When your vehicle is ready to come out ofstorage, do the following:
•We recommend that you change theengine oil before you use your vehicleagain.
•Wash your vehicle to remove any dirtor grease film build-up on windowsurfaces.
•Check windshield wipers for anydeterioration.
•Check the underhood for any foreignmaterials such as mice or squirrelnests.
•Check the exhaust for any foreignmaterials.
•Check tire pressures and set tireinflation per the Tire Label.
•Check brake pedal operation. Corrodedbrake rotors could cause brake noise.Drive your vehicle and gently apply andrelease the brakes repeatedly over a10-minute drive to reduce the corrosionfrom the brakes.
•Check fluid levels (including coolant,oil and gas) to make sure there are noleaks, and fluids are at recommendedlevels.
•If you remove the battery, clean thebattery cable ends and check fordamage.
Contact an authorized dealer if you haveany concerns or issues.
429
2023 Bronco (TG1) Canada/United States of America, enUSA, Edition date: 202208, DOMStoring Your Vehicle