FORD C MAX ENERGI 2016 Owners Manual
Manufacturer: FORD, Model Year: 2016, Model line: C MAX ENERGI, Model: FORD C MAX ENERGI 2016Pages: 395, PDF Size: 6.78 MB
Page 231 of 395
CHANGING THE 12V BATTERY
WARNINGS
Batteries normally produce explosivegases which can cause personalinjury. Therefore, do not allowflames, sparks or lighted substances tocome near the battery. When working nearthe battery, always shield your face andprotect your eyes. Always provide correctventilation.
When lifting a plastic-cased battery,excessive pressure on the end wallscould cause acid to flow through thevent caps, resulting in personal injury anddamage to the vehicle or battery. Lift thebattery with a battery carrier or with yourhands on opposite corners.
Keep batteries out of reach ofchildren. Batteries contain sulfuricacid. Avoid contact with skin, eyes orclothing. Shield your eyes when workingnear the battery to protect against possiblesplashing of acid solution. In case of acidcontact with skin or eyes, flushimmediately with water for a minimum of15 minutes and get prompt medicalattention. If acid is swallowed, call aphysician immediately.
Battery posts, terminals and relatedaccessories contain lead and leadcompounds. Wash hands afterhandling.
Your vehicle has a Motorcraft®maintenance-free battery which normallydoes not require additional water duringits life of service.
Note:If your vehicle's battery has a coveror shield, make sure it is reinstalled after thebattery has been cleaned or replaced.
Note:See an authorized dealer for lowvoltage battery access, testing, orreplacement.
When a low voltage battery replacementis necessary, see an authorized dealer toreplace the low voltage battery with a Fordrecommended replacement low voltagebattery that matches the electricalrequirements of the vehicle.
To ensure proper operation of the batterymanagement system (BMS), do not allowa technician to connect any electricaldevice ground connection directly to thelow voltage battery negative post. Aconnection at the low voltage batterynegative post can cause inaccuratemeasurements of the battery conditionand potential incorrect system operation.
Note:If a person adds electrical orelectronic accessories or components to thevehicle, the accessories or components mayadversely affect the low voltage batteryperformance and durability and may alsoaffect the performance of other electricalsystems in the vehicle.
For longer, trouble-free operation, keep thetop of the battery clean and dry. Also,make certain the battery cables are alwaystightly fastened to the battery terminals.
If you see any corrosion on the battery orterminals, remove the cables from theterminals and clean with a wire brush. Youcan neutralize the acid with a solution ofbaking soda and water.
When a battery replacement is required,the battery should only be replaced witha Ford recommended replacement batterythat matches the electrical requirementsof the vehicle.
Because your vehicle’s engine iselectronically-controlled by a computer,some engine control settings aremaintained by power from the low voltagebattery. Some engine computer settings,like the idle trim and fuel trim strategy,optimize the driveability and performanceof the engine. Some other computersettings, like the clock and radio station
228
C-MAX (CCG) Canada/United States of America, enUSA, First Printing
Maintenance
Page 232 of 395
presets, are also maintained in memory bypower from the low voltage battery. Whena technician disconnects and connects thelow voltage battery, these settings areerased. Complete the following procedurein order to restore the settings:
1. With the vehicle at a complete stop,set the parking brake.
2. Shift into park (P).
3. Switch off all accessories.
4. Fully press the brake pedal and startthe vehicle.
5. Run the engine until it reaches normaloperating temperature. While theengine is warming up, complete thefollowing: Reset the clock. See AudioSystem (page 283). Reset the powerwindows bounce-back feature. SeeWindows and Mirrors (page 80).Reset the radio station presets. SeeAudio System (page 283).
6.Allow the engine to idle for at least oneminute. If the engine turns off, pressthe accelerator pedal to start theengine.
7. While the engine is running, press thebrake pedal and shift into neutral (N).
8.Allow the engine to run for at least oneminute by pressing on the acceleratorpedal.
9.Drive the vehicle at least 12 mi (20 km)to completely relearn the idle and fueltrim strategy.
Note:If you do not allow the engine torelearn the idle and fuel trim strategy, theidle quality of your vehicle may be adverselyaffected until the engine computereventually relearns the idle trim and fueltrim strategy.
Make sure that you dispose of old batteriesin an environmentally friendly way. Seekadvice from your local authority aboutrecycling old batteries.
CHECKING THE WIPER
BLADES
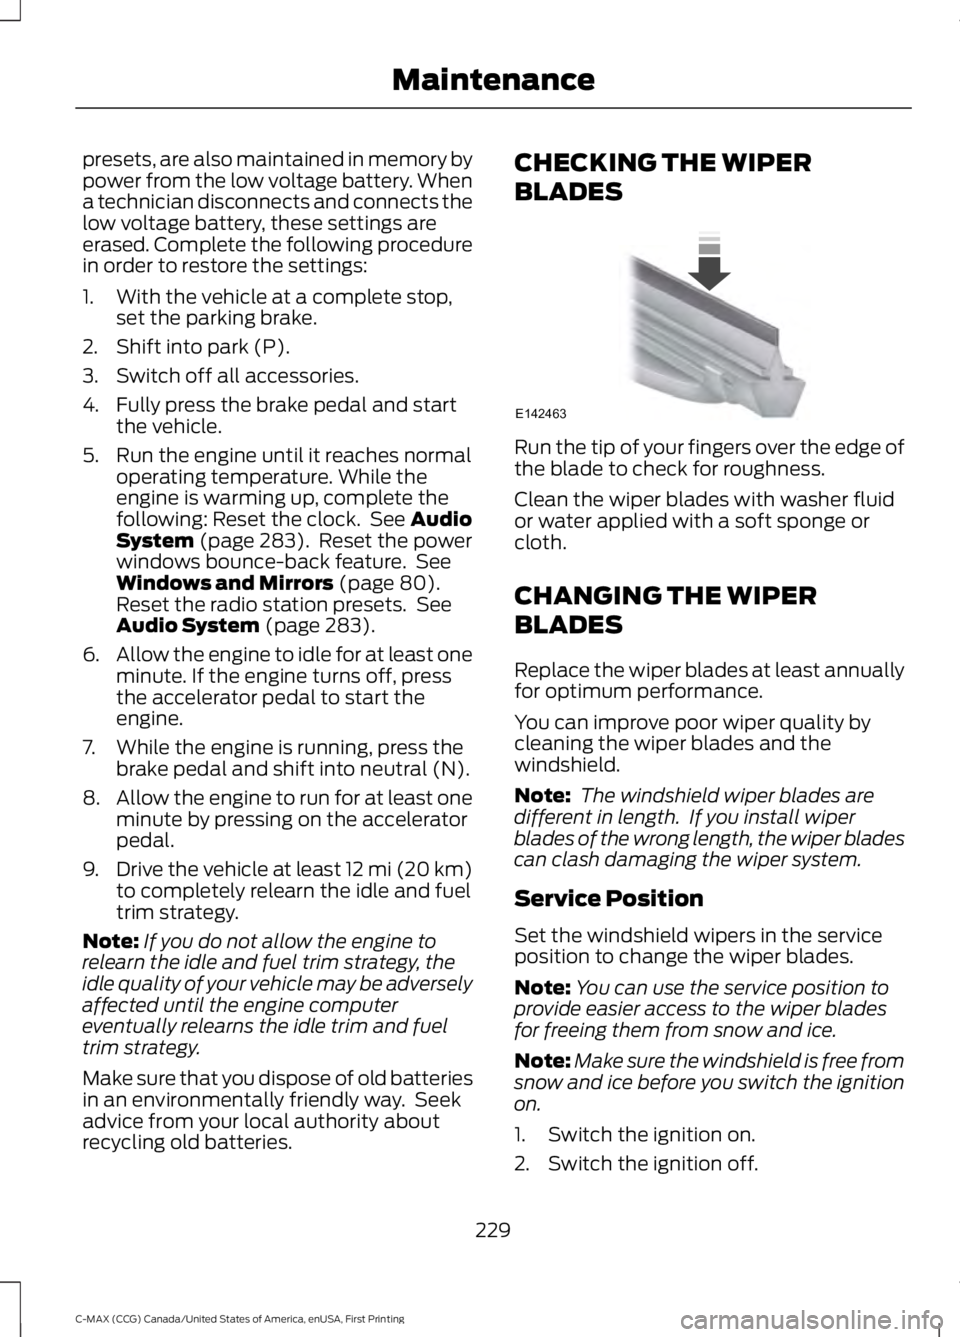
Run the tip of your fingers over the edge ofthe blade to check for roughness.
Clean the wiper blades with washer fluidor water applied with a soft sponge orcloth.
CHANGING THE WIPER
BLADES
Replace the wiper blades at least annuallyfor optimum performance.
You can improve poor wiper quality bycleaning the wiper blades and thewindshield.
Note: The windshield wiper blades aredifferent in length. If you install wiperblades of the wrong length, the wiper bladescan clash damaging the wiper system.
Service Position
Set the windshield wipers in the serviceposition to change the wiper blades.
Note:You can use the service position toprovide easier access to the wiper bladesfor freeing them from snow and ice.
Note:Make sure the windshield is free fromsnow and ice before you switch the ignitionon.
1. Switch the ignition on.
2. Switch the ignition off.
229
C-MAX (CCG) Canada/United States of America, enUSA, First Printing
MaintenanceE142463
Page 233 of 395
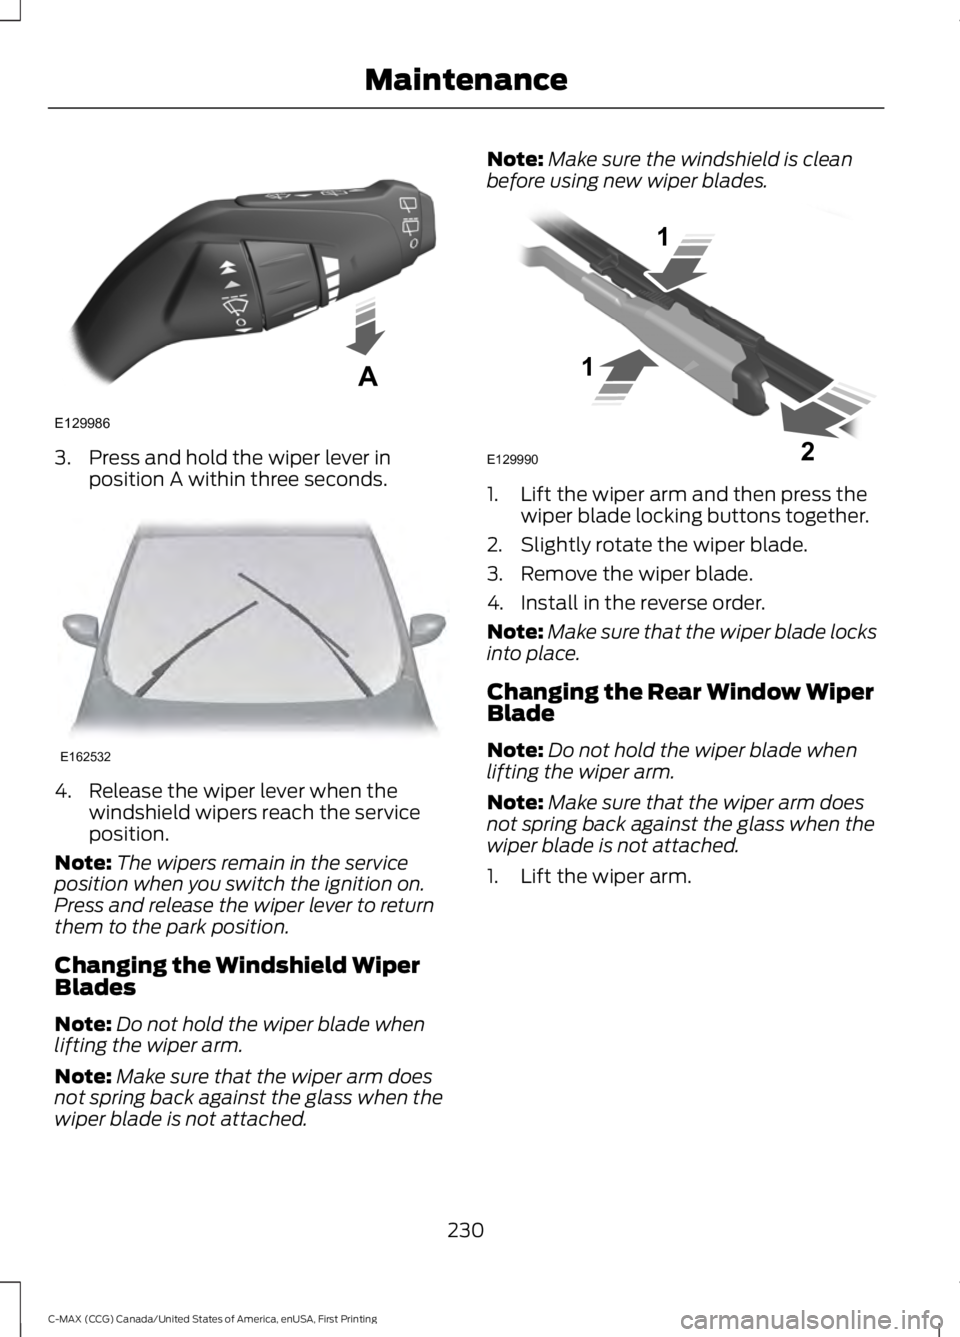
3. Press and hold the wiper lever inposition A within three seconds.
4. Release the wiper lever when thewindshield wipers reach the serviceposition.
Note:The wipers remain in the serviceposition when you switch the ignition on.Press and release the wiper lever to returnthem to the park position.
Changing the Windshield WiperBlades
Note:Do not hold the wiper blade whenlifting the wiper arm.
Note:Make sure that the wiper arm doesnot spring back against the glass when thewiper blade is not attached.
Note:Make sure the windshield is cleanbefore using new wiper blades.
1. Lift the wiper arm and then press thewiper blade locking buttons together.
2. Slightly rotate the wiper blade.
3. Remove the wiper blade.
4. Install in the reverse order.
Note:Make sure that the wiper blade locksinto place.
Changing the Rear Window WiperBlade
Note:Do not hold the wiper blade whenlifting the wiper arm.
Note:Make sure that the wiper arm doesnot spring back against the glass when thewiper blade is not attached.
1. Lift the wiper arm.
230
C-MAX (CCG) Canada/United States of America, enUSA, First Printing
MaintenanceE129986
A E162532 E129990
1
1 2
Page 234 of 395
2. Slightly rotate the wiper blade.
3. Disengage the wiper blade from thewiper arm.
4. Remove the wiper blade.
5. Install in the reverse order.
Note:Make sure that the wiper blade locksinto place.
ADJUSTING THE HEADLAMPS
Vertical Aim Adjustment
The headlamps on your vehicle areproperly aimed at the assembly plant. Ifyour vehicle has been in an accident, thealignment of your headlamps should bechecked by your authorized dealer.
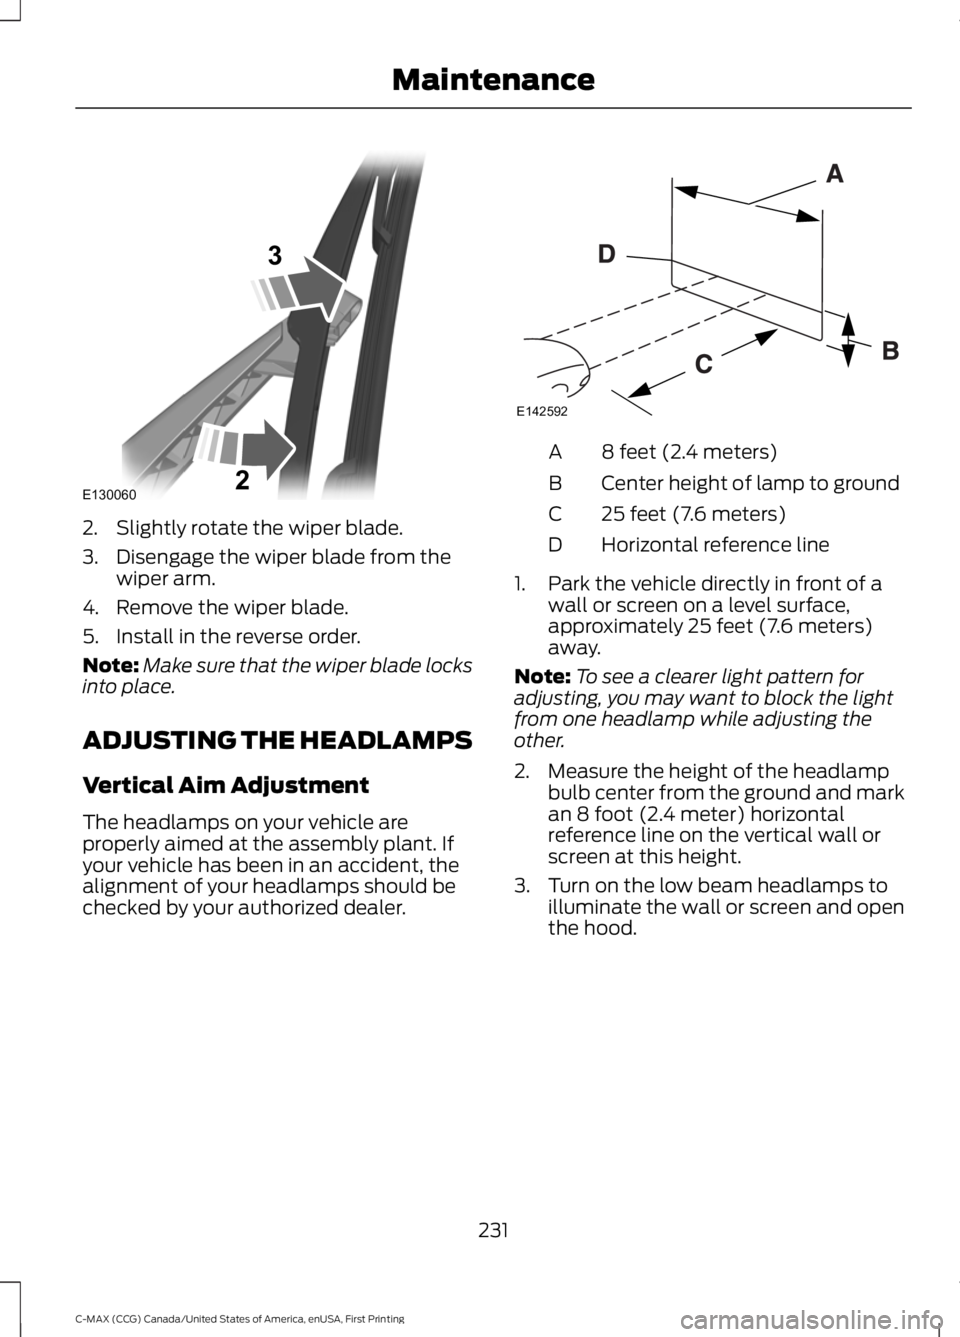
8 feet (2.4 meters)A
Center height of lamp to groundB
25 feet (7.6 meters)C
Horizontal reference lineD
1. Park the vehicle directly in front of awall or screen on a level surface,approximately 25 feet (7.6 meters)away.
Note:To see a clearer light pattern foradjusting, you may want to block the lightfrom one headlamp while adjusting theother.
2. Measure the height of the headlampbulb center from the ground and markan 8 foot (2.4 meter) horizontalreference line on the vertical wall orscreen at this height.
3. Turn on the low beam headlamps toilluminate the wall or screen and openthe hood.
231
C-MAX (CCG) Canada/United States of America, enUSA, First Printing
MaintenanceE130060
3
2 E142592
Page 235 of 395
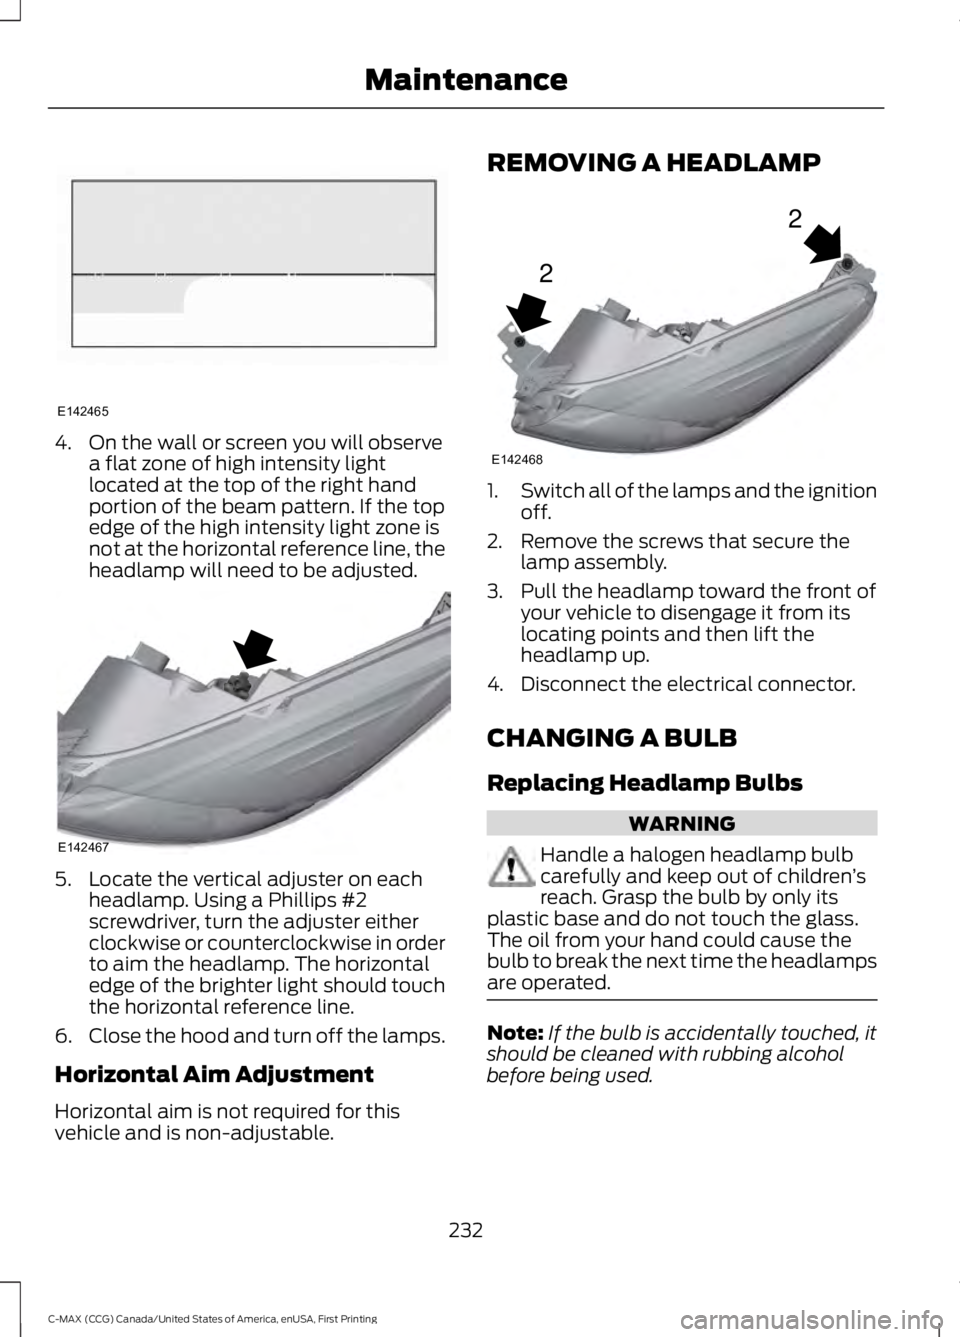
4. On the wall or screen you will observea flat zone of high intensity lightlocated at the top of the right handportion of the beam pattern. If the topedge of the high intensity light zone isnot at the horizontal reference line, theheadlamp will need to be adjusted.
5. Locate the vertical adjuster on eachheadlamp. Using a Phillips #2screwdriver, turn the adjuster eitherclockwise or counterclockwise in orderto aim the headlamp. The horizontaledge of the brighter light should touchthe horizontal reference line.
6.Close the hood and turn off the lamps.
Horizontal Aim Adjustment
Horizontal aim is not required for thisvehicle and is non-adjustable.
REMOVING A HEADLAMP
1.Switch all of the lamps and the ignitionoff.
2. Remove the screws that secure thelamp assembly.
3. Pull the headlamp toward the front ofyour vehicle to disengage it from itslocating points and then lift theheadlamp up.
4. Disconnect the electrical connector.
CHANGING A BULB
Replacing Headlamp Bulbs
WARNING
Handle a halogen headlamp bulbcarefully and keep out of children’sreach. Grasp the bulb by only itsplastic base and do not touch the glass.The oil from your hand could cause thebulb to break the next time the headlampsare operated.
Note:If the bulb is accidentally touched, itshould be cleaned with rubbing alcoholbefore being used.
232
C-MAX (CCG) Canada/United States of America, enUSA, First Printing
MaintenanceE142465 E142467 2
2
E142468
Page 236 of 395
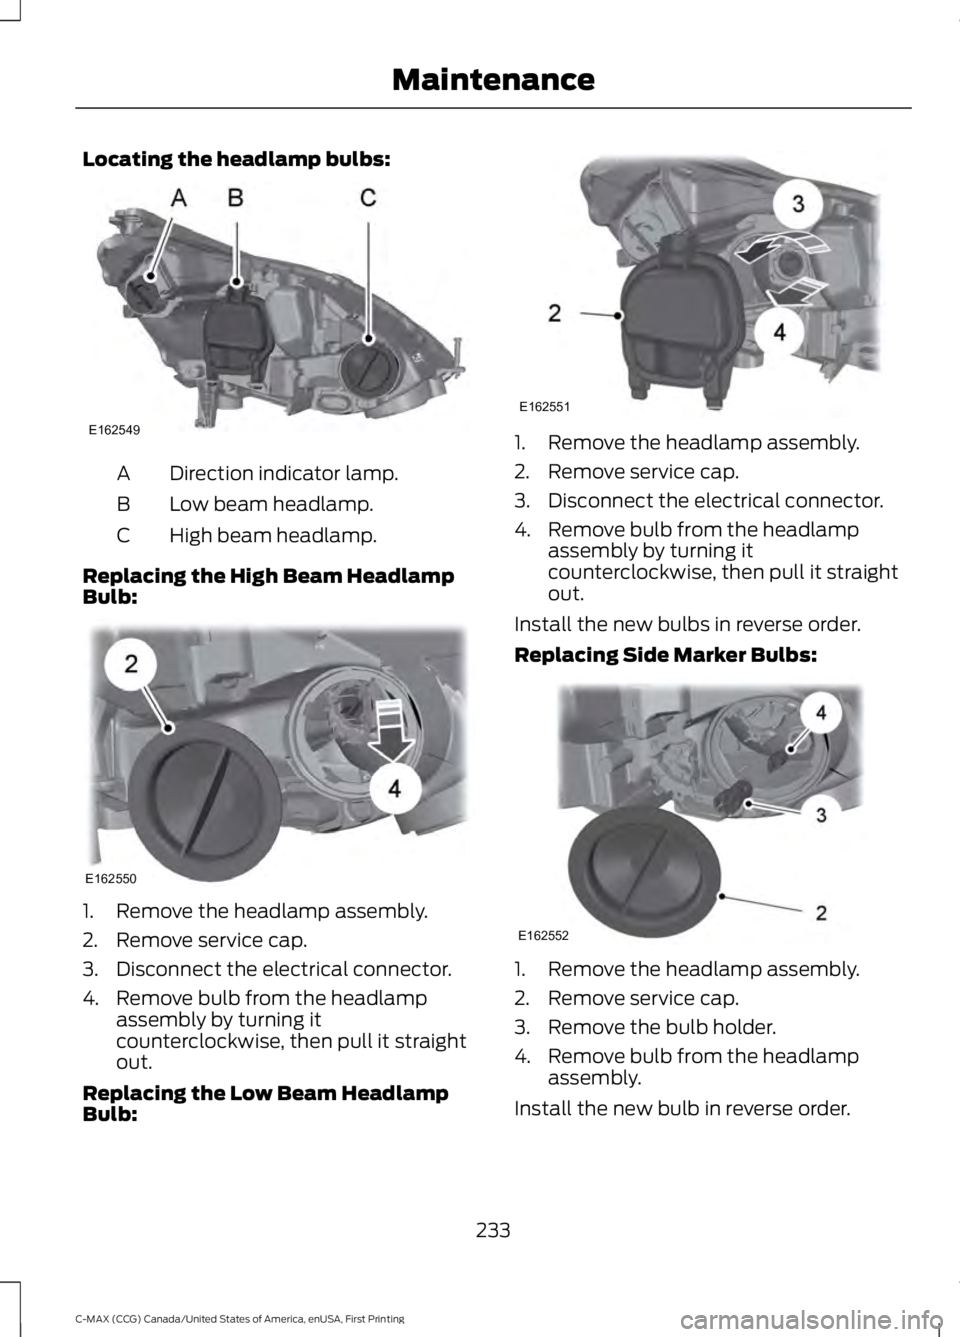
Locating the headlamp bulbs:
Direction indicator lamp.A
Low beam headlamp.B
High beam headlamp.C
Replacing the High Beam HeadlampBulb:
1. Remove the headlamp assembly.
2. Remove service cap.
3. Disconnect the electrical connector.
4. Remove bulb from the headlampassembly by turning itcounterclockwise, then pull it straightout.
Replacing the Low Beam HeadlampBulb:
1. Remove the headlamp assembly.
2. Remove service cap.
3. Disconnect the electrical connector.
4. Remove bulb from the headlampassembly by turning itcounterclockwise, then pull it straightout.
Install the new bulbs in reverse order.
Replacing Side Marker Bulbs:
1. Remove the headlamp assembly.
2. Remove service cap.
3. Remove the bulb holder.
4. Remove bulb from the headlampassembly.
Install the new bulb in reverse order.
233
C-MAX (CCG) Canada/United States of America, enUSA, First Printing
MaintenanceE162549 E162550 E162551 E162552
Page 237 of 395
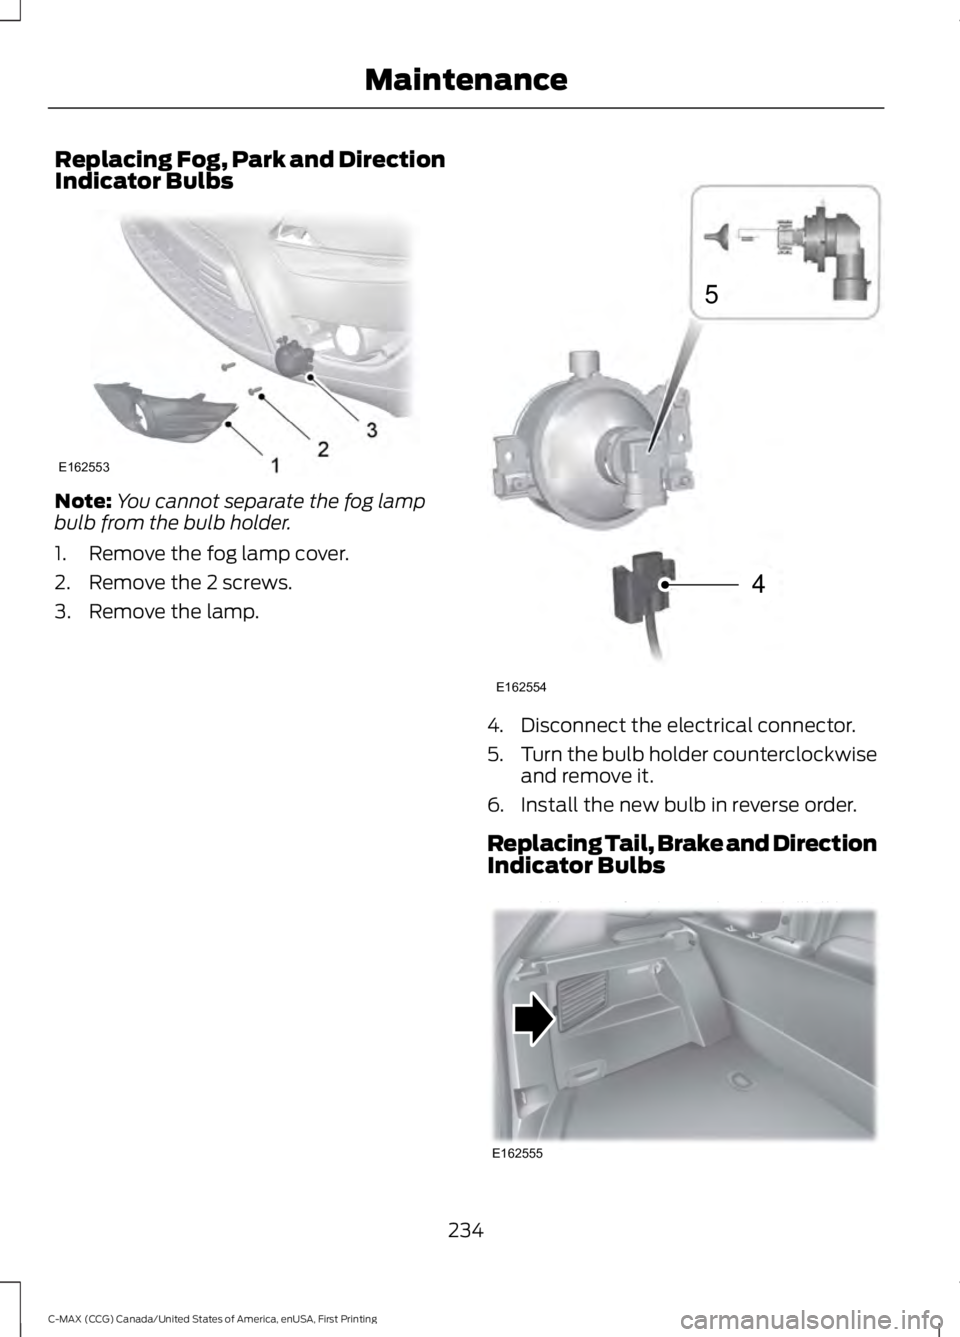
Replacing Fog, Park and DirectionIndicator Bulbs
Note:You cannot separate the fog lampbulb from the bulb holder.
1. Remove the fog lamp cover.
2. Remove the 2 screws.
3. Remove the lamp.
4. Disconnect the electrical connector.
5.Turn the bulb holder counterclockwiseand remove it.
6. Install the new bulb in reverse order.
Replacing Tail, Brake and DirectionIndicator Bulbs
234
C-MAX (CCG) Canada/United States of America, enUSA, First Printing
MaintenanceE162553 4
5
E162554 E162555
Page 238 of 395
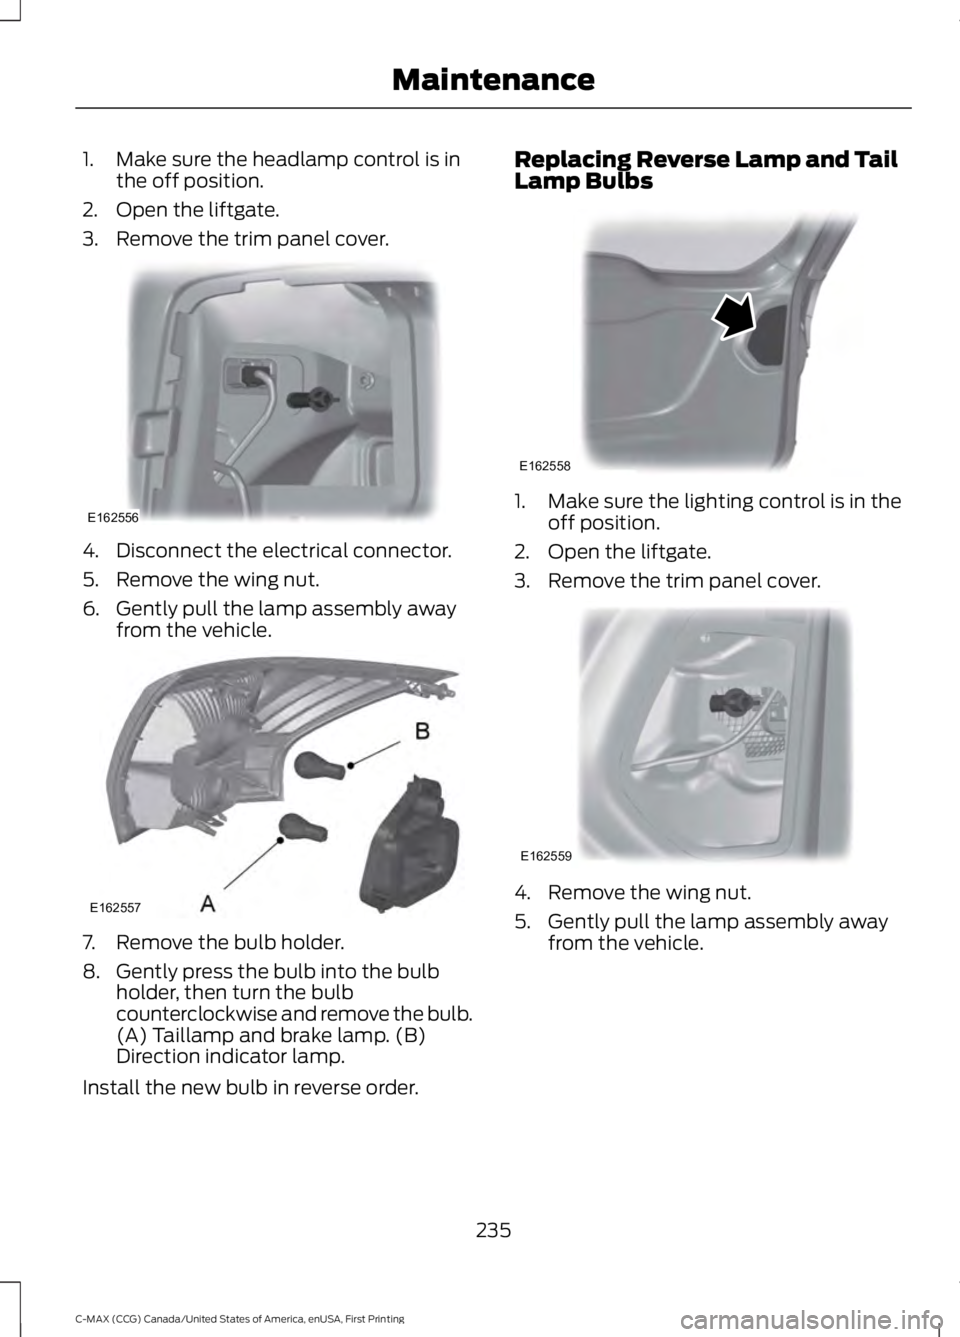
1. Make sure the headlamp control is inthe off position.
2. Open the liftgate.
3. Remove the trim panel cover.
4. Disconnect the electrical connector.
5. Remove the wing nut.
6. Gently pull the lamp assembly awayfrom the vehicle.
7. Remove the bulb holder.
8. Gently press the bulb into the bulbholder, then turn the bulbcounterclockwise and remove the bulb.(A) Taillamp and brake lamp. (B)Direction indicator lamp.
Install the new bulb in reverse order.
Replacing Reverse Lamp and TailLamp Bulbs
1. Make sure the lighting control is in theoff position.
2. Open the liftgate.
3. Remove the trim panel cover.
4. Remove the wing nut.
5. Gently pull the lamp assembly awayfrom the vehicle.
235
C-MAX (CCG) Canada/United States of America, enUSA, First Printing
MaintenanceE162556 E162557 E162558 E162559
Page 239 of 395
6. Disconnect the electrical connector.
7. Remove the bulb holder.
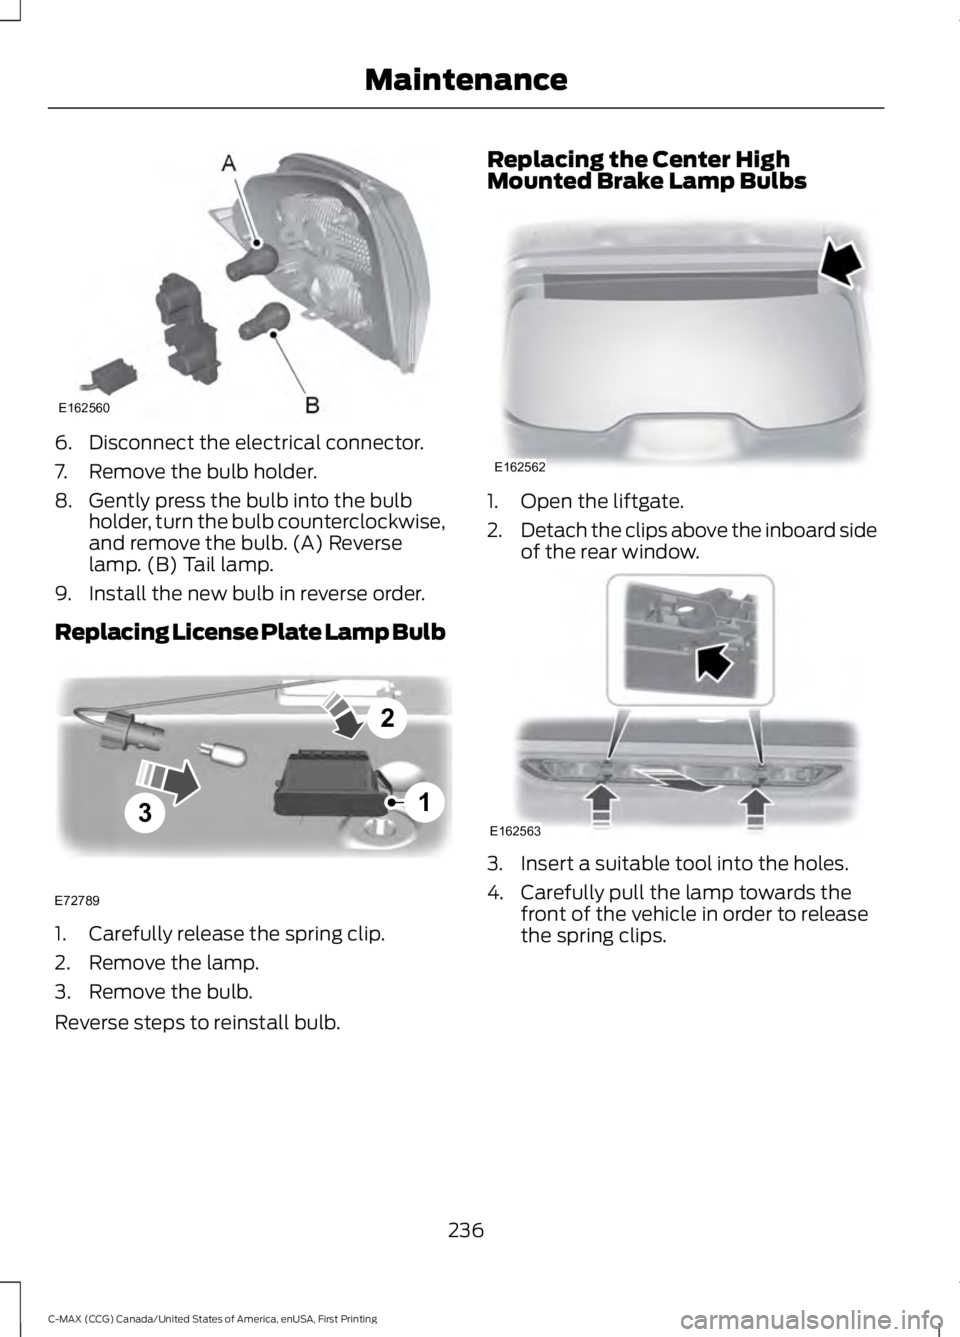
8. Gently press the bulb into the bulbholder, turn the bulb counterclockwise,and remove the bulb. (A) Reverselamp. (B) Tail lamp.
9. Install the new bulb in reverse order.
Replacing License Plate Lamp Bulb
1. Carefully release the spring clip.
2. Remove the lamp.
3. Remove the bulb.
Reverse steps to reinstall bulb.
Replacing the Center HighMounted Brake Lamp Bulbs
1. Open the liftgate.
2.Detach the clips above the inboard sideof the rear window.
3. Insert a suitable tool into the holes.
4. Carefully pull the lamp towards thefront of the vehicle in order to releasethe spring clips.
236
C-MAX (CCG) Canada/United States of America, enUSA, First Printing
MaintenanceE162560 3
2
1
E72789 E162562 E162563
Page 240 of 395
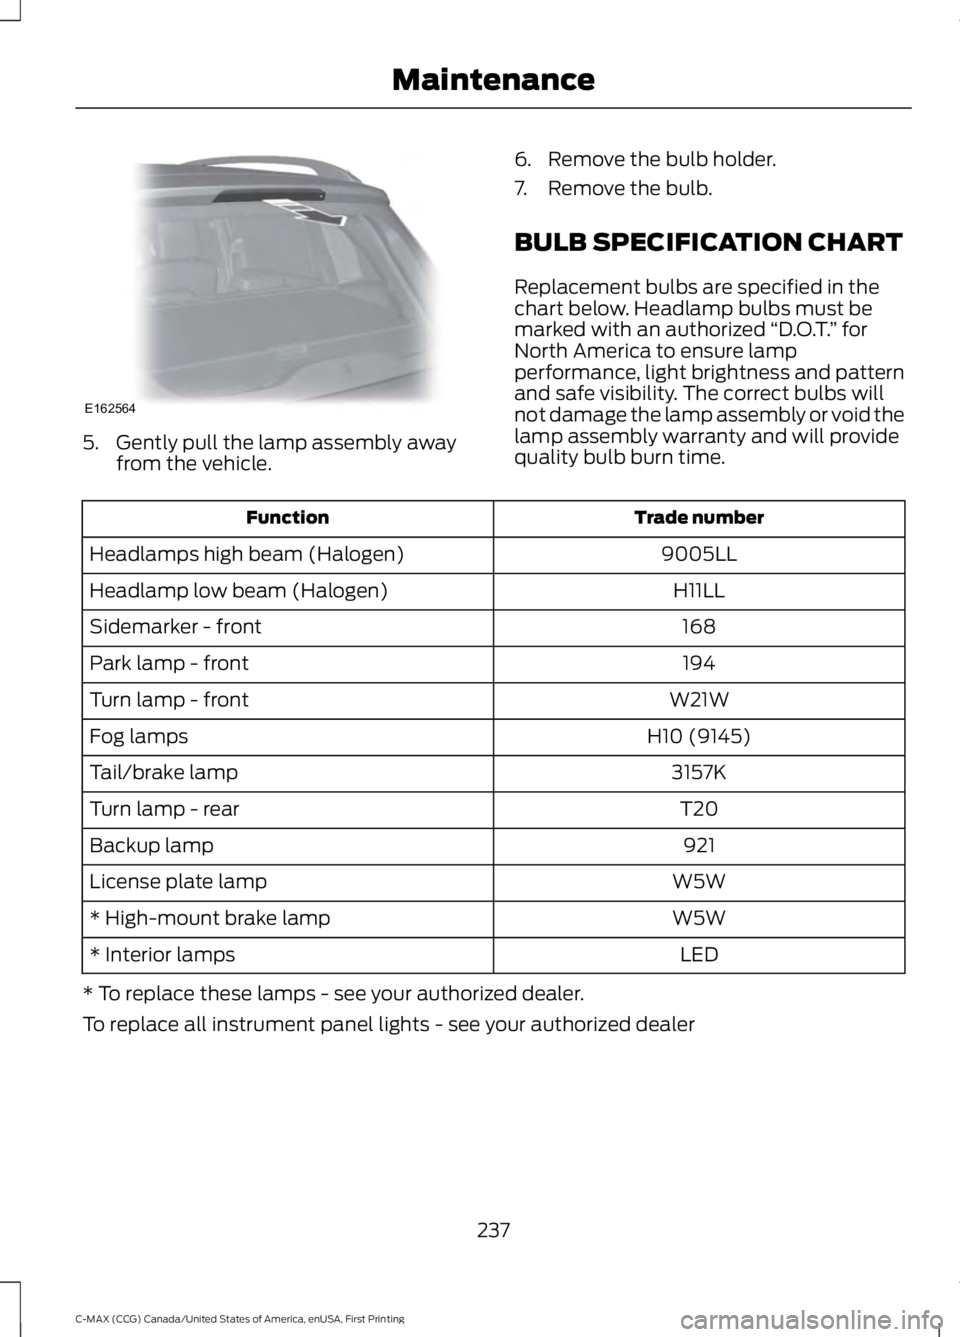
5. Gently pull the lamp assembly awayfrom the vehicle.
6. Remove the bulb holder.
7. Remove the bulb.
BULB SPECIFICATION CHART
Replacement bulbs are specified in thechart below. Headlamp bulbs must bemarked with an authorized “D.O.T.” forNorth America to ensure lampperformance, light brightness and patternand safe visibility. The correct bulbs willnot damage the lamp assembly or void thelamp assembly warranty and will providequality bulb burn time.
Trade numberFunction
9005LLHeadlamps high beam (Halogen)
H11LLHeadlamp low beam (Halogen)
168Sidemarker - front
194Park lamp - front
W21WTurn lamp - front
H10 (9145)Fog lamps
3157KTail/brake lamp
T20Turn lamp - rear
921Backup lamp
W5WLicense plate lamp
W5W* High-mount brake lamp
LED* Interior lamps
* To replace these lamps - see your authorized dealer.
To replace all instrument panel lights - see your authorized dealer
237
C-MAX (CCG) Canada/United States of America, enUSA, First Printing
MaintenanceE162564