automatic FORD E SERIES 2015 4.G User Guide
[x] Cancel search | Manufacturer: FORD, Model Year: 2015, Model line: E SERIES, Model: FORD E SERIES 2015 4.GPages: 360, PDF Size: 3.28 MB
Page 68 of 360
INTERIOR MIRROR (IF EQUIPPED)
WARNING:Do not adjust the mirror when your vehicle is
moving.
Note:Do not clean the housing or glass of any mirror with harsh
abrasives, fuel or other petroleum or ammonia based cleaning products.
You can adjust the interior mirror to your preference. Some mirrors also
have a second pivot point. This lets you move the mirror head up or
down and from side to side.
Pull the tab below the mirror toward you to reduce glare at night.
Auto-Dimming Mirror (If Equipped)
Note:Do not block the sensors on the front and back of the mirror.
Mirror performance may be affected. A rear center passenger or raised
rear center head restraint may also block light from reaching the sensor.
The mirror will dim automatically to reduce glare when bright lights are
detected from behind your vehicle. It will automatically return to normal
reflection when you select reverse gear to make sure you have a clear
view when backing up.
SUN VISORS
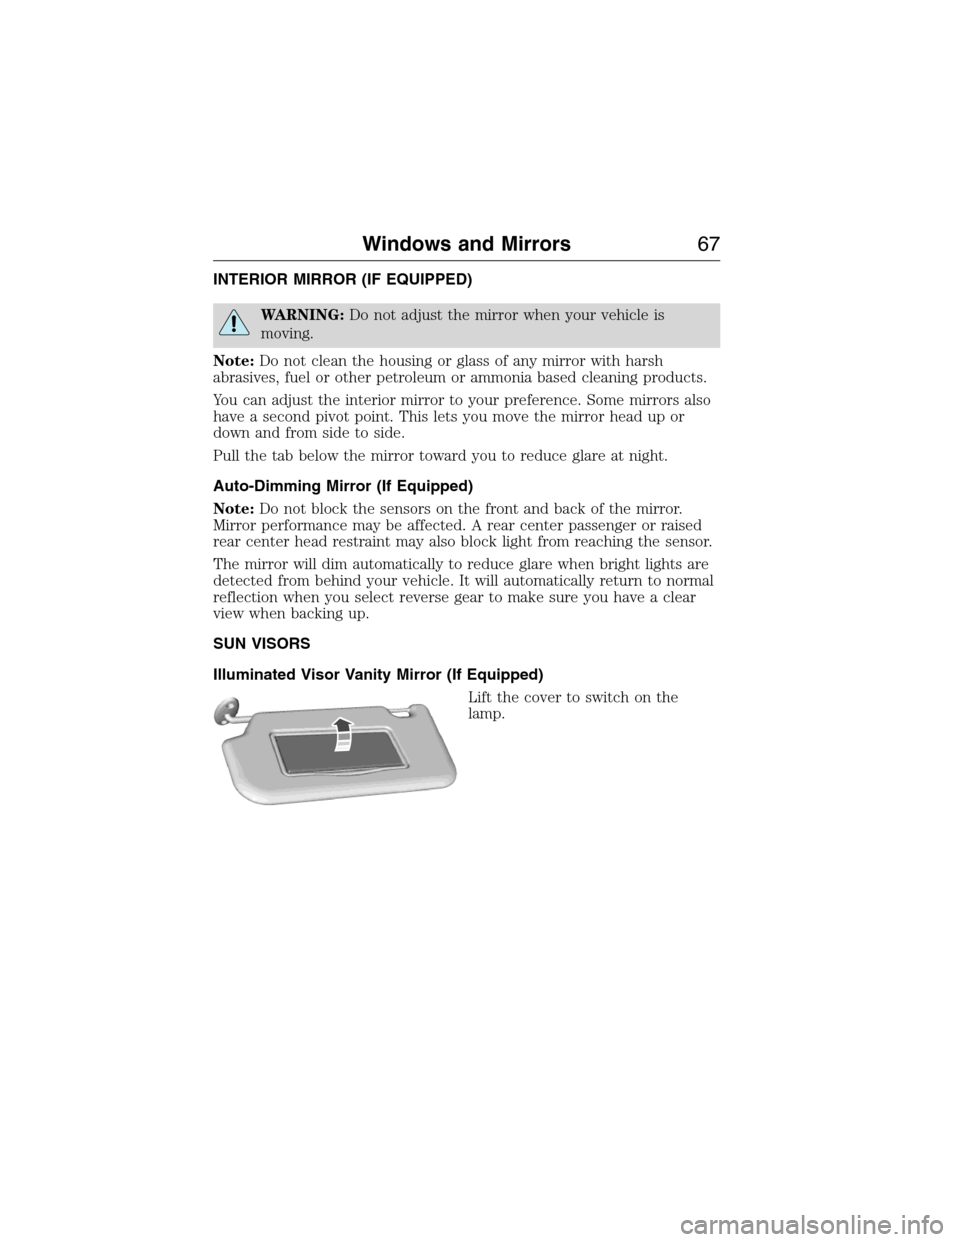
Illuminated Visor Vanity Mirror (If Equipped)
Lift the cover to switch on the
lamp.
Windows and Mirrors67
2015 Econoline(eco)
Owners Guide gf, 1st Printing, June 2014
USA(fus)
Page 78 of 360
•UNITS ENG / METRIC: Displays the current units in English or Metric.
•AUTOLOCK: This feature automatically locks all vehicle doors when
the vehicle is shifted into any gear, putting the vehicle in motion.
•AUTOUNLOCK: This feature automatically unlocks all vehicle doors
when the driver’s door is opened within 10 minutes of the ignition
being turned off.
•COMPASS (if equipped): Displays the vehicle’s heading direction.
The compass reading may be affected when you drive near large
buildings, bridges, power lines and powerful broadcast antenna. Magnetic
or metallic objects placed in, on or near the vehicle may also affect
compass accuracy. If the compass appears to be inaccurate, a manual
calibration may be necessary. Refer toCompass zone adjustment
Compass zone adjustment
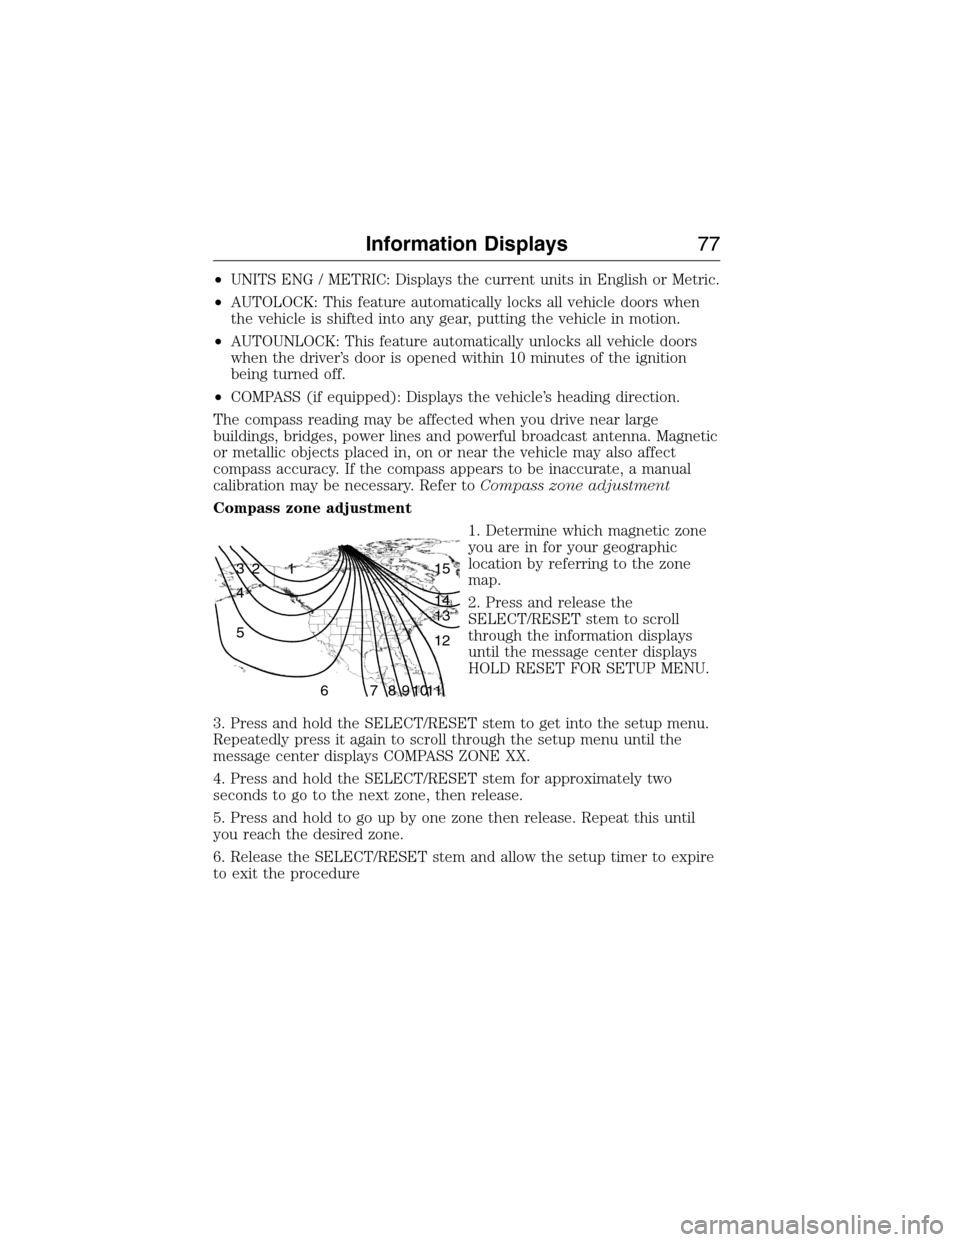
1. Determine which magnetic zone
you are in for your geographic
location by referring to the zone
map.
2. Press and release the
SELECT/RESET stem to scroll
through the information displays
until the message center displays
HOLD RESET FOR SETUP MENU.
3. Press and hold the SELECT/RESET stem to get into the setup menu.
Repeatedly press it again to scroll through the setup menu until the
message center displays COMPASS ZONE XX.
4. Press and hold the SELECT/RESET stem for approximately two
seconds to go to the next zone, then release.
5. Press and hold to go up by one zone then release. Repeat this until
you reach the desired zone.
6. Release the SELECT/RESET stem and allow the setup timer to expire
to exit the procedure
1 2 3
4
5
6 7 8 9 101112 13 14 15
Information Displays77
2015 Econoline(eco)
Owners Guide gf, 1st Printing, June 2014
USA(fus)
Page 80 of 360
INFORMATION MESSAGES
Press the SELECT/RESET stem to acknowledge and remove some
messages from the information display. Other messages will be removed
automatically after a short time. Certain messages need to be confirmed
before you can access the menus.
AdvanceTrac® /
Traction Control
MessagesAction / Description
SERVICE
ADVANCETRACDisplayed when the AdvanceTrac® system has
detected a condition that requires service.
Contact your authorized dealer as soon as
possible.
Brake System
MessagesAction / Description
BRAKE FLUID
LEVEL LOWIndicates the brake fluid level is low and the
brake system should be inspected immediately.
Refer toBrake fluidin theMaintenance
chapter.
CHECK BRAKE
SYSTEMDisplayed when the brake system needs
servicing. If the warning stays on or continues
to come on, contact your authorized dealer as
soon as possible.
PARK BRAKE
ENGAGEDDisplayed when the parking brake is set and
the vehicle is in motion.
Fuel Messages Action / Description
XXX MILES TO E
FUEL LEVEL LOWDisplayed as an early reminder of a low fuel
condition.
Information Displays79
2015 Econoline(eco)
Owners Guide gf, 1st Printing, June 2014
USA(fus)
Page 84 of 360
MANUAL CLIMATE CONTROL
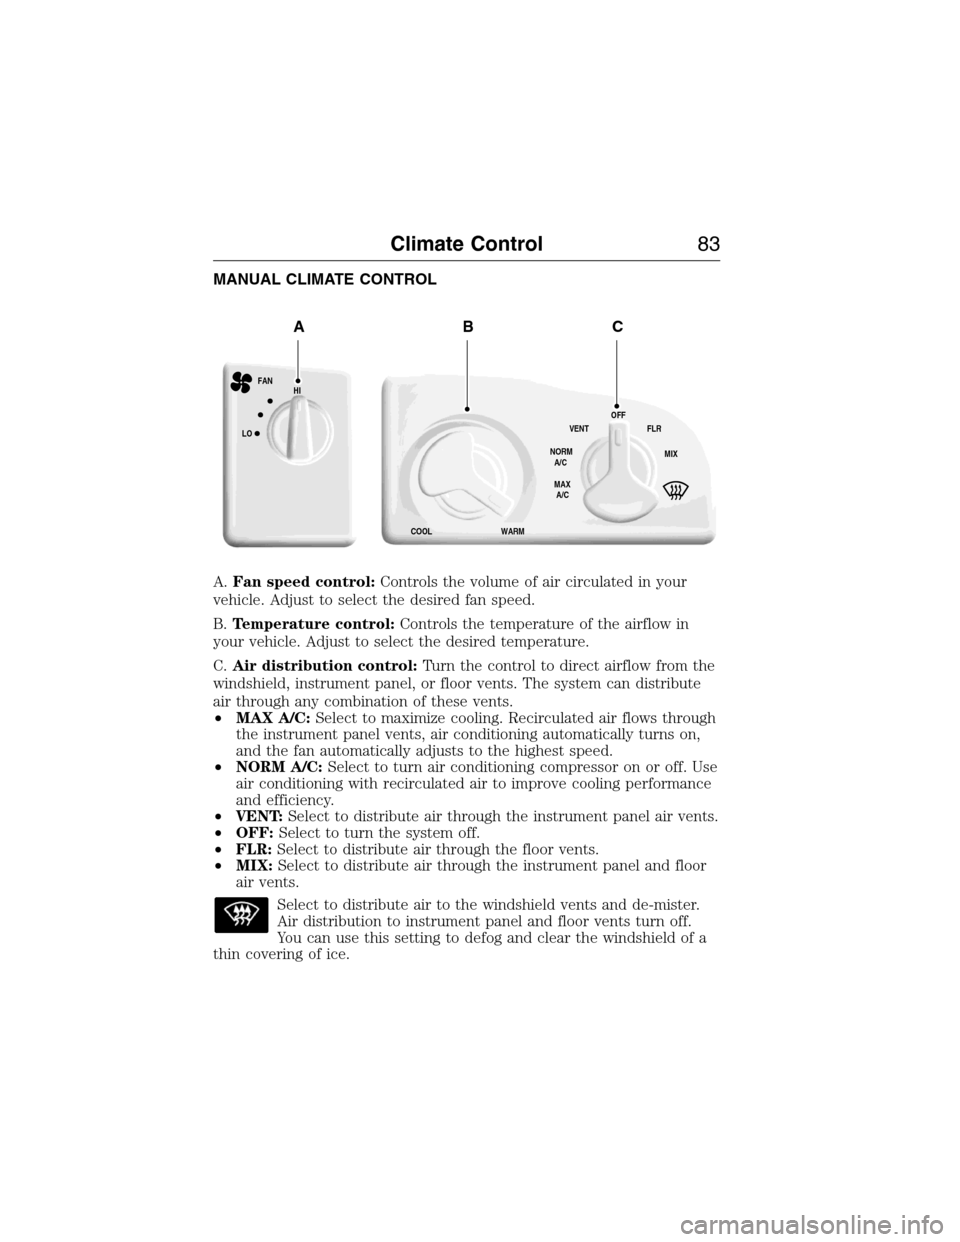
A.Fan speed control:Controls the volume of air circulated in your
vehicle. Adjust to select the desired fan speed.
B.Temperature control:Controls the temperature of the airflow in
your vehicle. Adjust to select the desired temperature.
C.Air distribution control:Turn the control to direct airflow from the
windshield, instrument panel, or floor vents. The system can distribute
air through any combination of these vents.
•MAX A/C:Select to maximize cooling. Recirculated air flows through
the instrument panel vents, air conditioning automatically turns on,
and the fan automatically adjusts to the highest speed.
•NORM A/C:Select to turn air conditioning compressor on or off. Use
air conditioning with recirculated air to improve cooling performance
and efficiency.
•VENT:Select to distribute air through the instrument panel air vents.
•OFF:Select to turn the system off.
•FLR:Select to distribute air through the floor vents.
•MIX:Select to distribute air through the instrument panel and floor
air vents.
Select to distribute air to the windshield vents and de-mister.
Air distribution to instrument panel and floor vents turn off.
You can use this setting to defog and clear the windshield of a
thin covering of ice.
HI
LO
COOL WARMVENT
NORM
A/C
MAX
A/COFF
MIX FLR FAN
ABC
Climate Control83
2015 Econoline(eco)
Owners Guide gf, 1st Printing, June 2014
USA(fus)
Page 95 of 360
IGNITION SWITCH
Note:Do not store the key in the ignition after the vehicle is turned off
and you have left the vehicle. This could cause a drain on the battery.
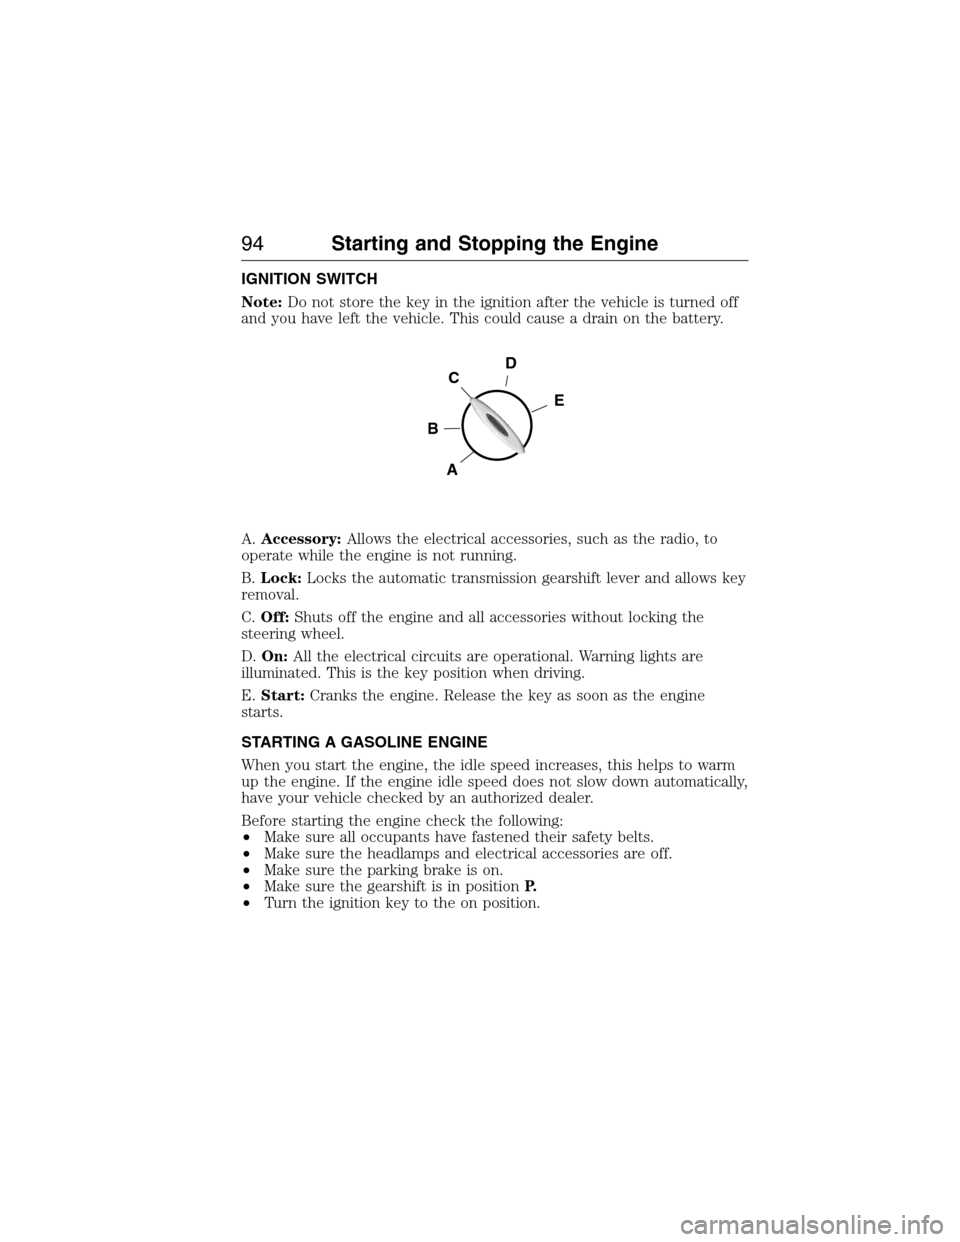
A.Accessory:Allows the electrical accessories, such as the radio, to
operate while the engine is not running.
B.Lock:Locks the automatic transmission gearshift lever and allows key
removal.
C.Off:Shuts off the engine and all accessories without locking the
steering wheel.
D.On:All the electrical circuits are operational. Warning lights are
illuminated. This is the key position when driving.
E.Start:Cranks the engine. Release the key as soon as the engine
starts.
STARTING A GASOLINE ENGINE
When you start the engine, the idle speed increases, this helps to warm
up the engine. If the engine idle speed does not slow down automatically,
have your vehicle checked by an authorized dealer.
Before starting the engine check the following:
•Make sure all occupants have fastened their safety belts.
•Make sure the headlamps and electrical accessories are off.
•Make sure the parking brake is on.
•Make sure the gearshift is in positionP.
•Turn the ignition key to the on position.
D
E
C
B
A
94Starting and Stopping the Engine
2015 Econoline(eco)
Owners Guide gf, 1st Printing, June 2014
USA(fus)
Page 96 of 360
Note:Do not touch the accelerator pedal.
1. Fully press the brake pedal.
2.
Turn the key to the start position. Release the key when the engine starts.
Note:The engine may continue cranking for up to 15 seconds or until it
starts.
Note:If you cannot start the engine on the first try, wait for a short
period and try again.
Failure to Start
If you cannot start the engine after three attempts, wait 10 seconds and
follow this procedure:
1. Fully press the brake pedal.
2. Fully press the accelerator pedal and hold it there.
3. Start the engine.
Stopping the Engine When Your Vehicle Is Stationary
1. Move the transmission selector lever to positionP.
2. Turn the key to the off position.
3. Apply the parking brake.
Note:This switches off the ignition, all electrical circuits, warning lamps
and indicators.
Note:If the engine is idling for 30 minutes, the ignition and engine
automatically shut down.
Stopping the Engine When Your Vehicle Is Moving
WARNING:Switching off the engine when the vehicle is still
moving will result in a loss of brake and steering assistance.
The steering will not lock, but higher effort will be required. When the
ignition is switched off, some electrical circuits, warning lamps and
indicators may also be off.
1. Move the transmission selector lever to positionNand use the brakes
to bring your vehicle to a safe stop.
2. When your vehicle has stopped, move the transmission selector lever
to positionPand turn the key to the off position.
3. Apply the parking brake.
Starting and Stopping the Engine95
2015 Econoline(eco)
Owners Guide gf, 1st Printing, June 2014
USA(fus)
Page 103 of 360
RUNNING OUT OF FUEL
Avoid running out of fuel because this situation may have an adverse
effect on powertrain components.
If you have run out of fuel:
•You may need to cycle the ignition from off to on several times after
refueling to allow the fuel system to pump the fuel from the tank to
the engine. On restarting, crank time will be a few seconds longer
than normal. With keyless ignition, just start the engine. Crank time
will be longer than usual.
•Normally, adding 1 gallon (3.8 liters) of fuel is enough to restart the
engine. If the vehicle is out of fuel and on a steep grade, more than
1 gallon (3.8 liters) may be required.
•The service engine soon indicator may come on. For more information
on the service engine soon indicator, seeWarning Lamps and
Indicatorsin theInstrument Clusterchapter.
REFUELING
WARNING:Fuel vapor burns violently and a fuel fire can cause
severe injuries. To help avoid injuries to you and others:
•Read and follow all the instructions on the pump island.
•Turn off your engine when you are refueling.
•Do not smoke if you are near fuel or refueling your vehicle.
•Keep sparks, flames and smoking materials away from fuel.
•Stay outside your vehicle and do not leave the fuel pump unattended
when refueling your vehicle - this is against the law in some places.
•Keep children away from the fuel pump; never let children pump
fuel.
•Do not use personal electronic devices while refueling.
WARNING:Stop refueling after the fuel pump nozzle
automatically shuts off for the second time. Failure to follow this
will fill the expansion space in the fuel tank and could lead to fuel
overflowing.
Note:Wait at least 10 seconds before removing the fuel pump nozzle to
allow any residual fuel to drain into the fuel tank.
102Fuel and Refueling
2015 Econoline(eco)
Owners Guide gf, 1st Printing, June 2014
USA(fus)
Page 105 of 360
FUEL CONSUMPTION
Filling the Tank
The advertised capacity is the indicated capacity and the empty reserve
combined. Indicated capacity is the difference in the amount of fuel in a
full tank and a tank when the fuel gauge indicates empty. Empty reserve
is the amount of fuel in the tank after the fuel gauge indicates empty.
Note:The amount of usable fuel in the empty reserve varies and should
not be relied upon to increase driving range. When refueling your vehicle
after the fuel gauge indicates empty, you might not be able to refuel the
full amount of the advertised capacity of the fuel tank due to the empty
reserve still present in the tank.
For consistent results when filling the fuel tank:
•Turn the ignition off before fueling; an inaccurate reading results if the
engine is left running.
•Use the same fill rate (low–medium–high) each time the tank is filled.
•Allow no more than two automatic click–offs when filling.
Results are most accurate when the filling method is consistent.
Calculating Fuel Economy
Do not measure fuel economy during the first 1000 miles
(1600 kilometers) of driving (this is your engine’s break-in period); a
more accurate measurement is obtained after 2000 miles–3000 miles
(3200 kilometers–4800 kilometers). Also, fuel expense, frequency of
fill-ups or fuel gauge readings are not accurate ways to measure fuel
economy.
1. Fill the fuel tank completely and record the initial odometer reading.
2. Each time you fill the tank, record the amount of fuel added.
3. After at least three to five tank fill-ups, fill the fuel tank and record
the current odometer reading.
4. Subtract your initial odometer reading from the current odometer
reading.
5. Calculate fuel economy as follows:
Standard: Divide miles traveled by gallons used.
Metric: Multiply liters used by 100, then divide by kilometers traveled.
Keep a record for at least one month and record the type of driving (city
or highway). This provides an accurate estimate of the vehicle’s fuel
104Fuel and Refueling
2015 Econoline(eco)
Owners Guide gf, 1st Printing, June 2014
USA(fus)
Page 109 of 360
AUTOMATIC TRANSMISSION OPERATION
Understanding the Shift Positions of the 5–Speed Automatic
Transmission
WARNING:Always set the parking brake fully and make sure
the gearshift is latched in P (Park). Turn the ignition to the lock
position and remove the key whenever you leave your vehicle.
WARNING:Do not use the tow/haul feature when driving in icy
or slippery conditions as the increased engine braking can cause
the rear wheels to slide and the vehicle to swing around with the
possible loss of vehicle control.
Your vehicle has been designed to improve fuel economy by reducing
fuel usage during coasting or deceleration. When you take your foot off
the accelerator pedal and the vehicle begins to slow down the torque
converter clutch locks up and aggressively shuts off fuel flow to the
engine while decelerating. This fuel economy benefit may be perceived
as a light to medium braking sensation when removing your foot from
the accelerator pedal.
P (Park)
This position locks the transmission and prevents the rear wheels from
turning.
To put your vehicle in gear:
1. Start the engine
2. Press the brake pedal
3. Move the gearshift lever into the desired gear
To put your vehicle in P (Park):
1. Come to a complete stop.
2. Move the gearshift lever and securely latch it in P (Park).
R (Reverse)
With the gearshift lever in R (Reverse), your vehicle will move backward.
Always come to a complete stop before shifting into and out of R
(Reverse).
108Transmission
2015 Econoline(eco)
Owners Guide gf, 1st Printing, June 2014
USA(fus)
Page 110 of 360
N (Neutral)
With the gearshift lever in N (Neutral), your vehicle can be started and
is free to roll. Hold the brake pedal down while in this position.
D (Drive with Overdrive) with Tow/Haul off
D (Overdrive) with tow/haul off is the normal driving position for the
best fuel economy. The overdrive function allows automatic upshifts and
downshifts through gears one through five.
D (Drive with Overdrive) with Tow/Haul on
The tow/haul feature improves transmission operation when towing a
trailer or a heavy load. All transmission gear ranges are available when
using tow/haul.
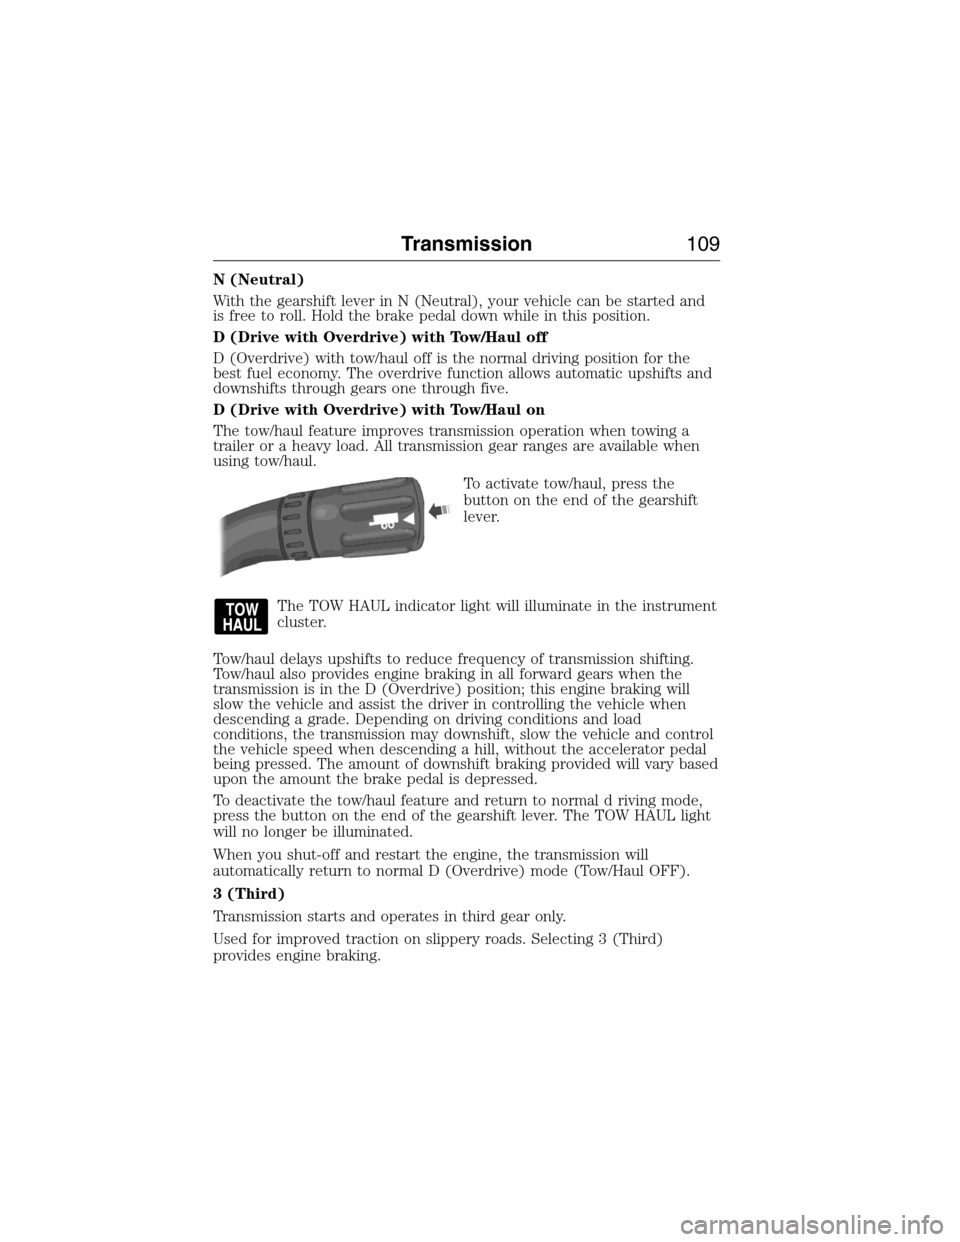
To activate tow/haul, press the
button on the end of the gearshift
lever.
The TOW HAUL indicator light will illuminate in the instrument
cluster.
Tow/haul delays upshifts to reduce frequency of transmission shifting.
Tow/haul also provides engine braking in all forward gears when the
transmission is in the D (Overdrive) position; this engine braking will
slow the vehicle and assist the driver in controlling the vehicle when
descending a grade. Depending on driving conditions and load
conditions, the transmission may downshift, slow the vehicle and control
the vehicle speed when descending a hill, without the accelerator pedal
being pressed. The amount of downshift braking provided will vary based
upon the amount the brake pedal is depressed.
To deactivate the tow/haul feature and return to normal d riving mode,
press the button on the end of the gearshift lever. The TOW HAUL light
will no longer be illuminated.
When you shut-off and restart the engine, the transmission will
automatically return to normal D (Overdrive) mode (Tow/Haul OFF).
3 (Third)
Transmission starts and operates in third gear only.
Used for improved traction on slippery roads. Selecting 3 (Third)
provides engine braking.
Transmission109
2015 Econoline(eco)
Owners Guide gf, 1st Printing, June 2014
USA(fus)