light FORD E SERIES 2023 Manual PDF
[x] Cancel search | Manufacturer: FORD, Model Year: 2023, Model line: E SERIES, Model: FORD E SERIES 2023Pages: 292, PDF Size: 6.81 MB
Page 214 of 292
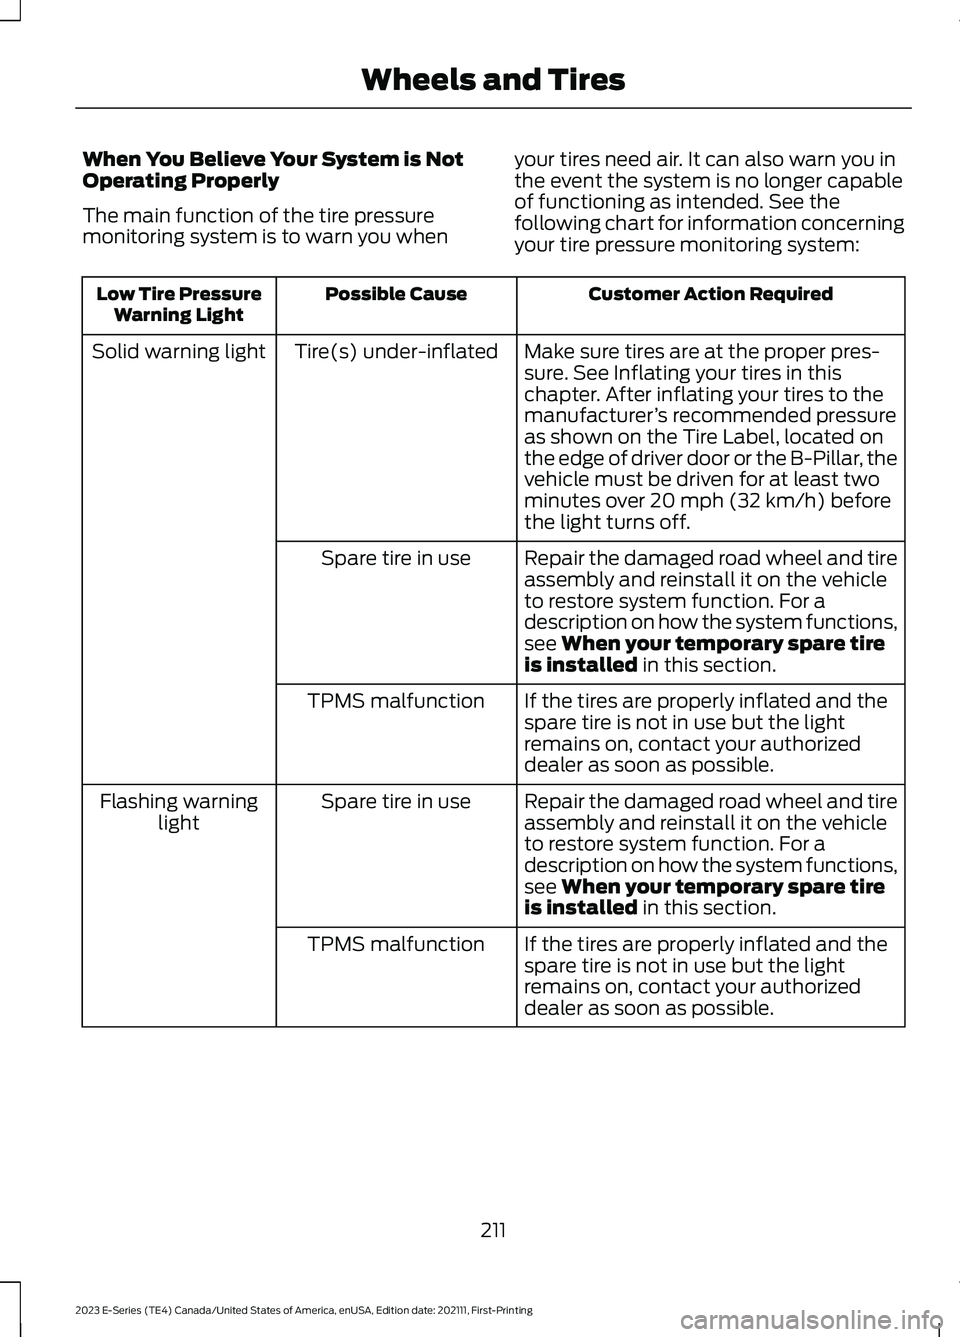
When You Believe Your System is NotOperating Properly
The main function of the tire pressuremonitoring system is to warn you when
your tires need air. It can also warn you inthe event the system is no longer capableof functioning as intended. See thefollowing chart for information concerningyour tire pressure monitoring system:
Customer Action RequiredPossible CauseLow Tire PressureWarning Light
Make sure tires are at the proper pres-sure. See Inflating your tires in thischapter. After inflating your tires to themanufacturer’s recommended pressureas shown on the Tire Label, located onthe edge of driver door or the B-Pillar, thevehicle must be driven for at least twominutes over 20 mph (32 km/h) beforethe light turns off.
Tire(s) under-inflatedSolid warning light
Repair the damaged road wheel and tireassembly and reinstall it on the vehicleto restore system function. For adescription on how the system functions,see When your temporary spare tireis installed in this section.
Spare tire in use
If the tires are properly inflated and thespare tire is not in use but the lightremains on, contact your authorizeddealer as soon as possible.
TPMS malfunction
Repair the damaged road wheel and tireassembly and reinstall it on the vehicleto restore system function. For adescription on how the system functions,see When your temporary spare tireis installed in this section.
Spare tire in useFlashing warninglight
If the tires are properly inflated and thespare tire is not in use but the lightremains on, contact your authorizeddealer as soon as possible.
TPMS malfunction
211
2023 E-Series (TE4) Canada/United States of America, enUSA, Edition date: 202111, First-PrintingWheels and Tires
Page 215 of 292
When Inflating Your Tires
When putting air into your tires, such as ata gas station or in your garage, the tirepressure monitoring system may notrespond immediately to the air added toyour tires.
It may take up to two minutes of drivingover 20 mph (32 km/h) for the light to turnoff after you have filled your tires to therecommended inflation pressure.
How Temperature Affects Your TirePressure
The tire pressure monitoring systemmonitors tire pressure in each pneumatictire. When driving in a normal manner, atypical passenger tire inflation pressuremay increase about 2–4 psi (14–28 kPa)from a cold start situation. If the vehicle isstationary overnight with the outsidetemperature significantly lower than thedaytime temperature, the tire pressure maydecrease about 3 psi (21 kPa) for a drop of30°F (17°C) in ambient temperature. Thislower pressure value may be detected bythe tire pressure monitoring system asbeing significantly lower than therecommended inflation pressure andactivate the system warning light for lowtire pressure. If the low tire pressurewarning light is on, visually check each tireto verify that no tire is flat. If one or moretires are flat, repair as necessary. Checkthe air pressure in the road tires. If any tireis under-inflated, carefully drive the vehicleto the nearest location where air can beadded to the tires. Inflate all the tires tothe recommended inflation pressure.
Tire Pressure Monitoring System ResetProcedure
WARNING: To determine therequired pressure(s) for your vehicle, seethe Safety Compliance CertificationLabel (on the door hinge pillar,door-latch post or the door edge thatmeets the door-latch post, next to thedriver seat) or the Tire Label on theB-Pillar or the edge of the driver door.
Note:You need to perform the tire pressuremonitoring system reset procedure aftereach tire rotation.
To provide the vehicle's load carryingcapability, some vehicles require differentrecommended tire pressures in the fronttires as compared to the rear tires. The tirepressure monitoring system on thesevehicles illuminate the low tire pressurewarning light at two different pressures:one for the front tires and one for the reartires.
Since tires need to be rotated to provideconsistent performance and maximum tirelife, the tire pressure monitoring systemneeds to know when the tires are rotatedto determine which set of tires are on thefront and which are on the rear. With thisinformation, the system can detect andproperly warn of low tire pressures.
System reset tips:
212
2023 E-Series (TE4) Canada/United States of America, enUSA, Edition date: 202111, First-PrintingWheels and Tires
Page 218 of 292
12.Turn the ignition off. If two short hornbeeps are heard, the reset procedurewas unsuccessful and you mustrepeat it. If after repeating theprocedure and two short beeps areheard when the ignition is turned tooff, seek assistance from yourauthorized dealer.
13.Set all six tires to the recommendedair pressure as indicated on theSafety Compliance CertificationLabel, affixed to either the door hingepillar, door-latch post, or the dooredge that meets the door-latch post,next to the driver seating position orTire Label located on the B-Pillar orthe edge of the driver door.
CHANGING A ROAD WHEEL
WARNING: To determine therequired pressure(s) for your vehicle, seethe Safety Compliance CertificationLabel (on the door hinge pillar,door-latch post or the door edge thatmeets the door-latch post, next to thedriver seat) or the Tire Label on theB-Pillar or the edge of the driver door.
Note:You should only use tire sealants inroadside emergencies as they may causedamage to the tire pressure monitoringsystem sensor.
Note:The tire pressure monitoring systemindicator light illuminates when the sparetire is in use. To restore the full function ofthe monitoring system, all road wheelsequipped with tire pressure monitoringsensors must be mounted on the vehicle.
Note:Do not use wheels or lug nutsdifferent than the original equipment, as thismay damage the wheel or mounting system.
If you get a flat tire when driving, do notapply the brake heavily. Instead, graduallydecrease your speed. Hold the steeringwheel firmly and slowly move to a safeplace on the side of the road.
Have a flat serviced by an authorizeddealer to prevent damage to the tirepressure monitoring system sensors. SeeTire Pressure Monitoring System (page209). Replace the spare tire with a road tireas soon as possible. During repairing orreplacing of the flat tire, have theauthorized dealer inspect the tire pressuremonitoring system sensor for damage.
Dissimilar Spare Wheel and TireAssembly Information
WARNING: Failure to follow theseguidelines could result in an increasedrisk of loss of vehicle control, injury ordeath.
If you have a dissimilar spare wheel andtire, then it is intended for temporary useonly. This means that if you need to use it,you should replace it as soon as possiblewith a road wheel and tire assembly thatis the same size and type as the road tiresand wheels that were originally providedby Ford. If the dissimilar spare tire or wheelis damaged, it should be replaced ratherthan repaired.
A dissimilar spare wheel and tire assemblyis defined as a spare wheel and tireassembly that is different in brand, size orappearance from the road tires and wheelsand can be one of three types:
1.T-type mini-spare: This spare tirebegins with the letter T for tire size andmay have Temporary Use Only molded inthe sidewall.
215
2023 E-Series (TE4) Canada/United States of America, enUSA, Edition date: 202111, First-PrintingWheels and Tires
Page 224 of 292
with the valve stem facing outward.For vehicles with dual rear wheels, thevalve stem of the spare must faceoutward when replacing an innerwheel, but must face inward whenreplacing an outboard wheel.
2.Install the lug nuts and finger tighten.Do not fully tighten the lug nuts untilthe wheel has been lowered.
3.Lower the vehicle completely byturning the jack handlecounterclockwise.
Note:For hydraulic jacks, insert the releasevalve, open release valve slightly by turningthe handle counterclockwise. Stop turningthe release valve when vehicle start tolower. Close the valve when the vehicle iscompletely lowered.
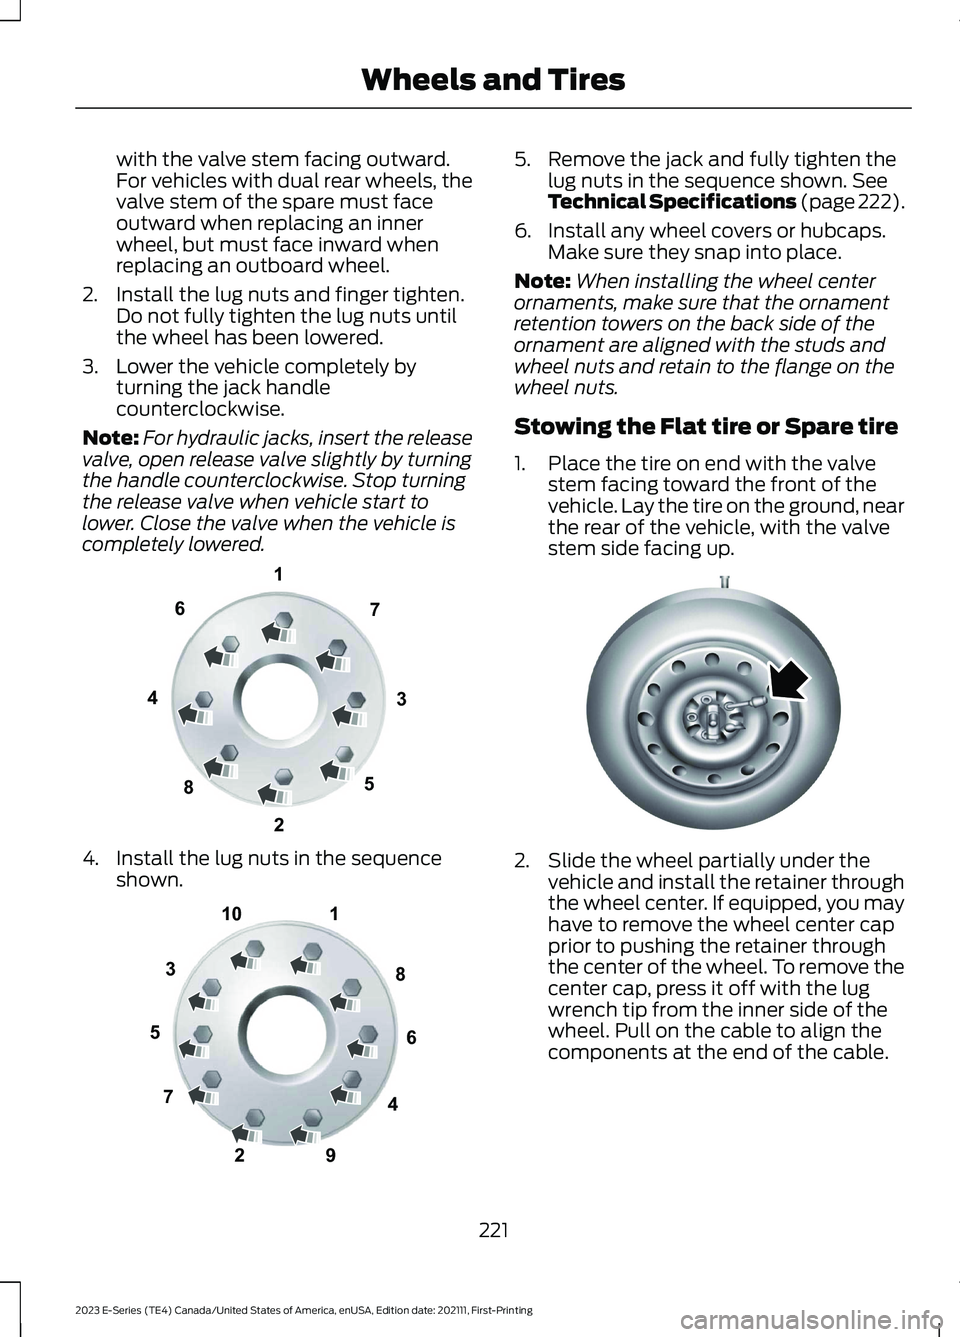
4.Install the lug nuts in the sequenceshown.
5.Remove the jack and fully tighten thelug nuts in the sequence shown. SeeTechnical Specifications (page 222).
6.Install any wheel covers or hubcaps.Make sure they snap into place.
Note:When installing the wheel centerornaments, make sure that the ornamentretention towers on the back side of theornament are aligned with the studs andwheel nuts and retain to the flange on thewheel nuts.
Stowing the Flat tire or Spare tire
1.Place the tire on end with the valvestem facing toward the front of thevehicle. Lay the tire on the ground, nearthe rear of the vehicle, with the valvestem side facing up.
2.Slide the wheel partially under thevehicle and install the retainer throughthe wheel center. If equipped, you mayhave to remove the wheel center capprior to pushing the retainer throughthe center of the wheel. To remove thecenter cap, press it off with the lugwrench tip from the inner side of thewheel. Pull on the cable to align thecomponents at the end of the cable.
221
2023 E-Series (TE4) Canada/United States of America, enUSA, Edition date: 202111, First-PrintingWheels and Tires13427658E161441 12345678910E169375 E162800
Page 229 of 292
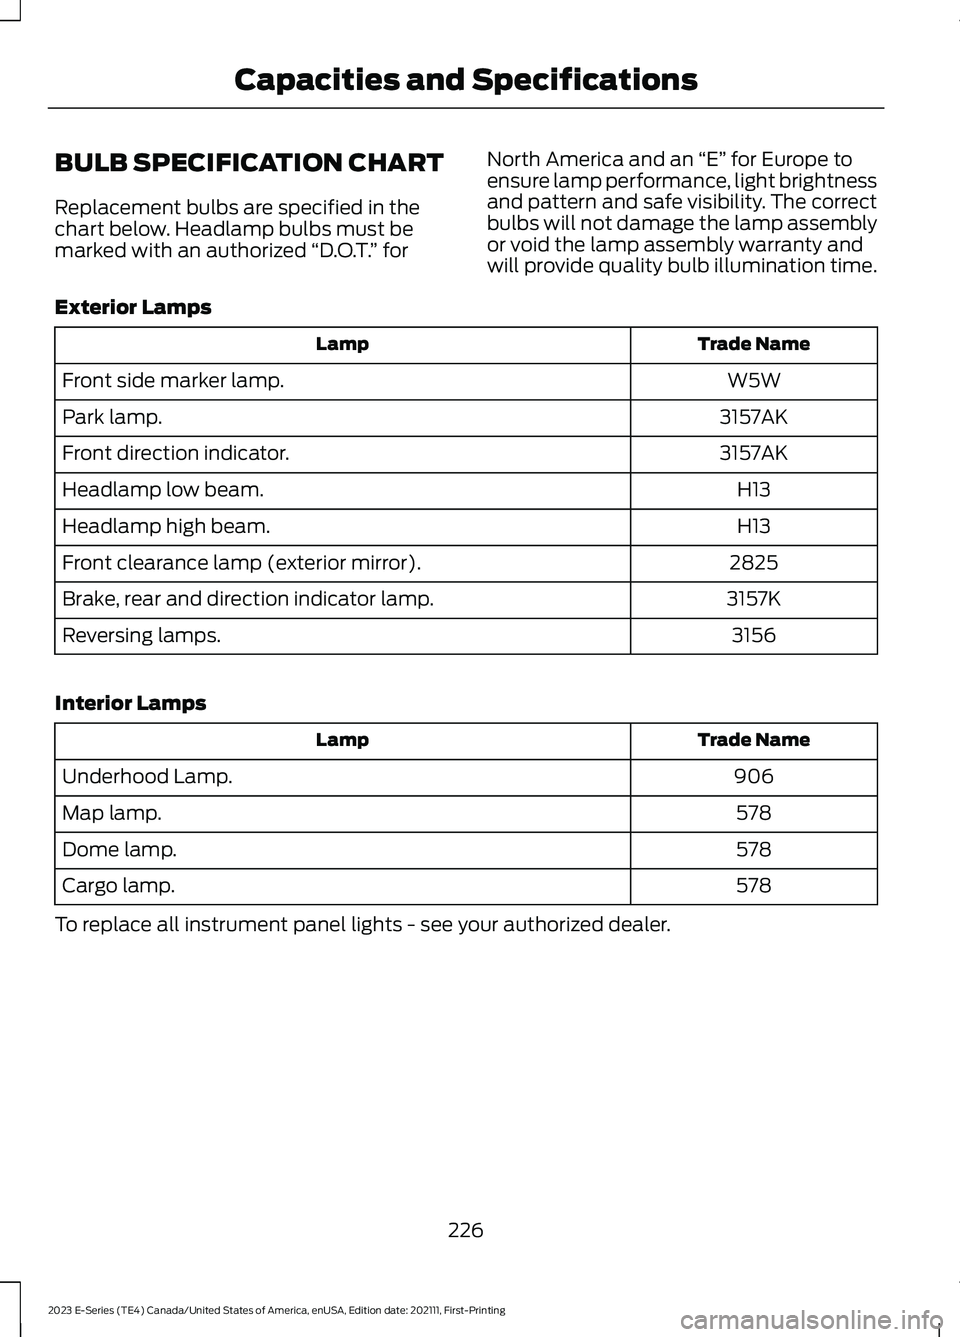
BULB SPECIFICATION CHART
Replacement bulbs are specified in thechart below. Headlamp bulbs must bemarked with an authorized “D.O.T.” for
North America and an “E” for Europe toensure lamp performance, light brightnessand pattern and safe visibility. The correctbulbs will not damage the lamp assemblyor void the lamp assembly warranty andwill provide quality bulb illumination time.
Exterior Lamps
Trade NameLamp
W5WFront side marker lamp.
3157AKPark lamp.
3157AKFront direction indicator.
H13Headlamp low beam.
H13Headlamp high beam.
2825Front clearance lamp (exterior mirror).
3157KBrake, rear and direction indicator lamp.
3156Reversing lamps.
Interior Lamps
Trade NameLamp
906Underhood Lamp.
578Map lamp.
578Dome lamp.
578Cargo lamp.
To replace all instrument panel lights - see your authorized dealer.
226
2023 E-Series (TE4) Canada/United States of America, enUSA, Edition date: 202111, First-PrintingCapacities and Specifications
Page 251 of 292
Ford Motor Company has recommendedmaintenance intervals for various partsand component systems based uponengineering testing. Ford Motor Companyrelies upon this testing to determine themost appropriate mileage for replacementof oils and fluids to protect your vehicle atthe lowest overall cost to you andrecommends against maintenanceschedules that deviate from the scheduledmaintenance information.
We strongly recommend the use of onlygenuine Ford, Motorcraft orFord-authorized re-manufacturedreplacement parts engineered for yourvehicle.
Additives and Chemicals
This owner's manual and the FordWorkshop Manual list the recommendedadditives and chemicals for your vehicle.We do not recommend using chemicals oradditives not approved by us as part ofyour vehicle’s normal maintenance. Pleaseconsult your warranty information.
Oils, Fluids and Flushing
In many cases, fluid discoloration is anormal operating characteristic and, byitself, does not necessarily indicate aconcern or that the fluid needs to bechanged. However, a qualified expert, suchas the factory-trained technicians at yourdealership, should inspect discolored fluidsthat also show signs of overheating orforeign material contaminationimmediately.
Make sure to change your vehicle’s oils andfluids at the specified intervals or inconjunction with a repair. Flushing is aviable way to change fluid for many vehiclesub-systems during scheduledmaintenance. It is critical that systems areflushed only with new fluid that is the sameas that required to fill and operate thesystem or using a Ford-approved flushingchemical.
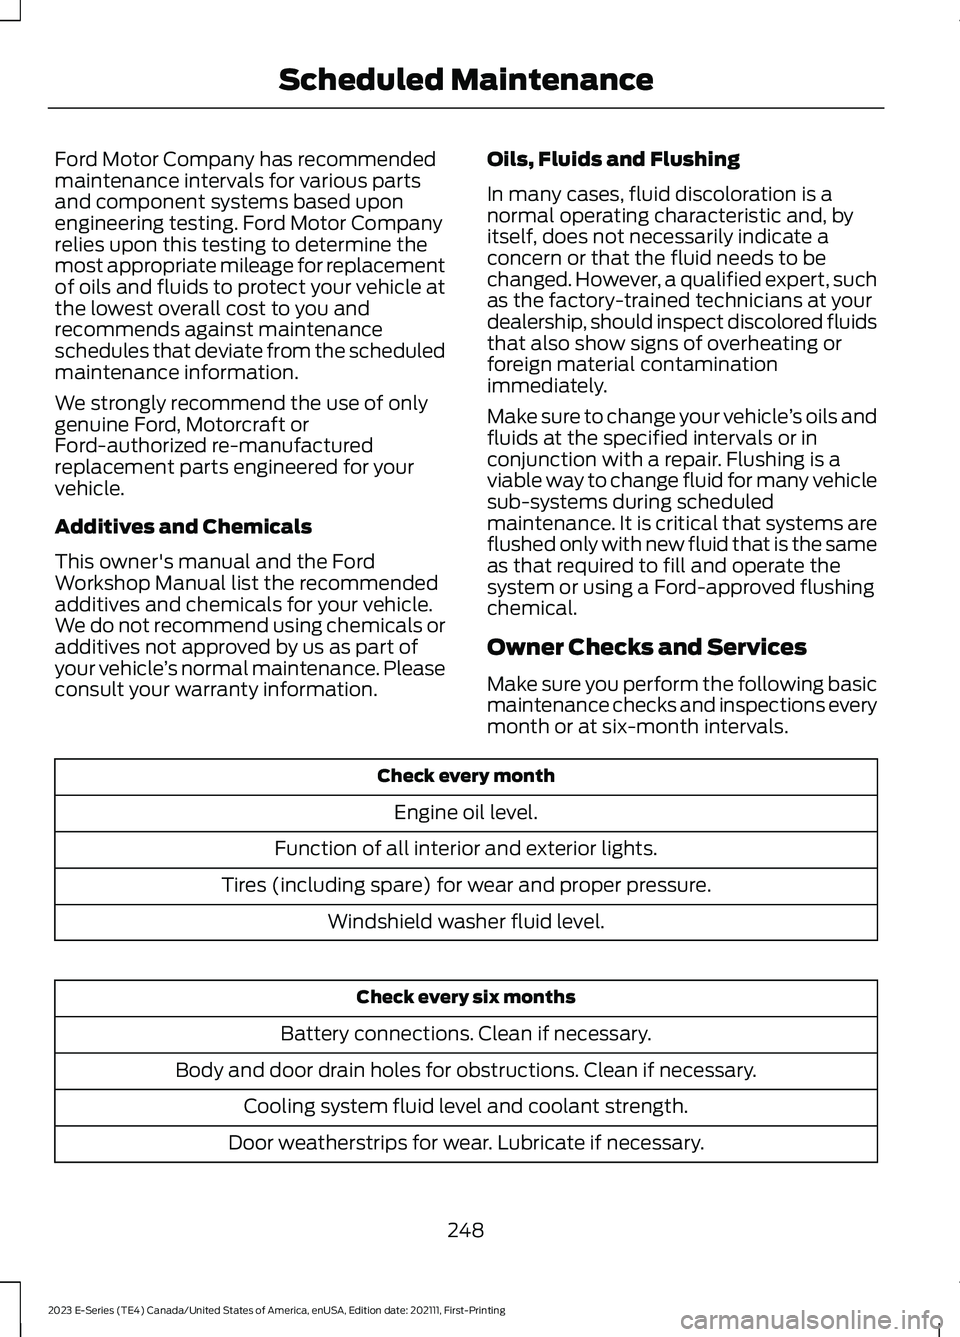
Owner Checks and Services
Make sure you perform the following basicmaintenance checks and inspections everymonth or at six-month intervals.
Check every month
Engine oil level.
Function of all interior and exterior lights.
Tires (including spare) for wear and proper pressure.
Windshield washer fluid level.
Check every six months
Battery connections. Clean if necessary.
Body and door drain holes for obstructions. Clean if necessary.
Cooling system fluid level and coolant strength.
Door weatherstrips for wear. Lubricate if necessary.
248
2023 E-Series (TE4) Canada/United States of America, enUSA, Edition date: 202111, First-PrintingScheduled Maintenance
Page 290 of 292
Hazard Flashers.............................................142Headlamp AdjustingSee: Adjusting the Headlamps......................176Headlamp RemovalSee: Removing a Headlamp...........................178HeadrestSee: Head Restraints...........................................77Head Restraints...............................................77HeatingSee: Climate Control...........................................74Hill Start Assist..............................................102Hints on Controlling the InteriorClimate............................................................75Hints on Driving With Anti-LockBrakes.............................................................101Hood LockSee: Opening and Closing the Hood...........162Horn....................................................................50Hydraulic Power Steering Fluid Capacityand Specification......................................234
I
Ignition Switch.................................................82In California (U.S. Only)..............................147Information Display Control......................50Information Displays.....................................65General Information............................................65Information Messages.................................69Installing Child Restraints...........................22Instrument Cluster........................................59Instrument Lighting Dimmer.....................53Instrument Panel............................................18Interior Mirror...................................................58Introduction.........................................................7
J
Jump Starting the Vehicle.........................143
K
Keys and Remote Controls.........................42
L
Lane Keeping System..................................116Lighting Control..............................................52
Lighting...............................................................52General Information............................................52Load Carrying.................................................124Load Limit........................................................124Locking and Unlocking.................................45Lug NutsSee: Changing a Road Wheel.........................215
M
Maintenance..................................................162General Information..........................................162Manual Climate Control...............................74Manual Seats...................................................78Message CenterSee: Information Displays.................................65MirrorsSee: Windows and Mirrors................................57Mobile Communications Equipment.......12Mobile Device Data........................................16Motorcraft Parts...........................................224
N
Normal Scheduled Maintenance..........250
O
Oil Change Indicator Reset.......................165Oil CheckSee: Engine Oil Check.......................................164Opening and Closing the Hood...............162Ordering Additional Owner'sLiterature......................................................150Overriding Automatic High BeamControl............................................................56
P
Parking Aids...................................................106Parking Brake..................................................101Passive Anti-Theft System........................48PATSSee: Passive Anti-Theft System.....................48Perchlorate..........................................................9Playing Media From a USB Device.......240Power Door LocksSee: Locking and Unlocking.............................45
287
2023 E-Series (TE4) Canada/United States of America, enUSA, Edition date: 202111, First-PrintingIndex