FORD F250 SUPER DUTY 2017 Owners Manual
Manufacturer: FORD, Model Year: 2017, Model line: F250 SUPER DUTY, Model: FORD F250 SUPER DUTY 2017Pages: 642, PDF Size: 12.35 MB
Page 341 of 642
Engine and Secondary CoolingSystem Refill Procedure
The following procedure should be usedwhen refilling the engine or secondarycooling systems after it has been drainedor become extremely low:
1. Before you remove the cap, turn theengine off and let it cool.
2. When the engine is cool, wrap a thickcloth around the cap. Slowly turn capcounterclockwise until pressure beginsto release.
3.Step back while the pressure releases.
4.When you are sure that all the pressurehas been released, use the cloth to turnit counterclockwise and remove thecap.
5. Slowly add prediluted engine coolantto the coolant reservoir until thecoolant level is within the minimumand maximum range as listed on thereservoir.
6. Reinstall the pressure relief cap.
7. Start and run the engine at 2000 rpmfor 2 minutes.
8. Shut engine off, and remove thepressure relief cap as previouslyoutlined.
9. If required, add prediluted enginecoolant to the coolant reservoir untilthe coolant level is within the minimumand maximum range as listed on thereservoir.
10.Engine cooling system: RepeatStep 5 until the coolant level hasstabilized (is no longer dropping aftereach step) and the upper radiatorhose at the radiator is warm to thetouch (indicating that the enginethermostat is open and coolant isflowing through the radiator).
11.Check the secondary cooling system.Repeat Step 5 until the coolant levelhas stabilized (is no longer droppingafter each step) and the lowerpassenger side of the secondaryradiator is warm to the touch(indicating secondary thermostat isopen and coolant is flowing throughthe entire system).
12.Reinstall the pressure relief cap. Shutthe engine off and let it cool.
13. Check the coolant level in thereservoir before you drive your vehiclethe next few times.
14. If necessary, add prediluted enginecoolant to the coolant reservoir untilthe coolant level is within theminimum and maximum range aslisted on the reservoir. After anycoolant has been added, check thecoolant concentration.
Recycled Coolant
We do not recommend the use of recycledcoolant as an approved recycling processis not yet available.
Dispose of used engine coolant in anappropriate manner. Follow yourcommunity’s regulations and standardsfor recycling and disposing of automotivefluids.
Severe Climates
If you drive in extremely cold climates:
•It may be necessary to increase thecoolant concentration above 50%.
•A coolant concentration of 60%provides improved freeze pointprotection. Coolant concentrationsabove 60% decrease the overheatprotection characteristics of thecoolant and may cause enginedamage.
338
Super Duty (TFE) Canada/United States of America, enUSA, Edition date: 201710, Second Printing
Maintenance
Page 342 of 642
If you drive in extremely hot climates:
•You can decrease the coolantconcentration to 40%.
•Coolant concentrations below 40%decrease the freeze and corrosionprotection characteristics of thecoolant and may cause enginedamage.
Vehicles driven year-round in non-extremeclimates should use prediluted enginecoolant for optimum cooling system andengine protection.
Checking Coolant CorrosionInhibitor Additive Strength
At specific mileage intervals as listed in thescheduled maintenance informationchapter, the coolant corrosion inhibitoradditive should be checked. An informationmessage may display in the optionalinformation display at this time. Thepurpose of checking is to verify the correctengine coolant concentration (freeze pointprotection) and corrosion inhibitor additivelevel (strength) of the coolant formaximum engine performance andprotection.
Three products are available to confirmthe life and health of the coolant, one tool,a test kit and a coolant inhibitor additive:
•Robinair® Coolant and BatteryRefractometer 75240 –Recommended refractometer to testcoolant concentration. (Rotunda toolpart number: ROB75240).
•Rotunda 328-R071–ELC (AntifreezeCoolant ELC Contamination Kit) –Evaluates the corrosion inhibitoradditive strength. Note the first step isto verify the vehicle’s coolantconcentration is in the correct range of40 – 60%. Coolant concentrationsoutside this range will not provide validtest results. If the report results in apass, for example the cooling systemdoes not show excessivecontamination, the corrosion inhibitoradditive strength is sufficient, and noaction is required. If the report resultsas insufficient (does not pass), thecorrosion inhibitor additive strength ofthe coolant is too low. If the enginecooling system corrosion inhibitoradditive strength is low, add 47 fl oz(1.4 L) of Motorcraft Specialty OrangeEngine Coolant Revitalizer. If thesecondary cooling system corrosioninhibitor additive strength is low, add16 fl oz (0.47 L) of Motorcraft SpecialtyOrange Engine Coolant Revitalizer.
•Motorcraft Specialty Orange EngineCoolant Revitalizer – Additive toboost the corrosion inhibitor levelbased upon the test results of theAntifreeze Coolant ELC ContaminationKit. The Revitalizer may be added twotimes over the life of the coolant. Ifadditional dosages are required, thecooling system must be flushed andrefilled per the instructions in theWorkshop Manual.
Make sure to follow the proper coolant andadditive specifications. See Capacitiesand Specifications (page 415).
339
Super Duty (TFE) Canada/United States of America, enUSA, Edition date: 201710, Second Printing
Maintenance
Page 343 of 642
Coolant Change
At specific mileage intervals, as listed inthe scheduled maintenance information,the coolant should be changed. Theinformation display may display a messageto change coolant at this time. Addprediluted coolant approved to the correctspecification. See Capacities andSpecifications (page 415).
Engine-driven Cooling Fan (FanClutch)
Your vehicle may have an engine drivencooling fan drive (also called a fan clutch).This fan drive changes the fan speed tomatch the vehicle’s changing cooling airflow requirements. Fan speed, fan noiselevel and fuel consumption all will increasebased on the driving conditions thatinclude trailer towing, hill climbing, heavyloads, high speed and high ambienttemperature, individually or in combination.
The fan drive is designed to provide theminimum fan speed (and resultingminimum fan noise and fuel consumption)required to meet the ever changing vehiclecooling air flow requirements. You will hearthe amount of fan noise increasing anddecreasing as the engine powerrequirements and vehicle driving conditionschange as you drive. This is to be expectedas being normal to the operation of yourvehicle. High levels of fan noise might alsobe heard when your engine is first started,and should normally decrease after drivingfor a short time.
AUTOMATIC TRANSMISSION
FLUID CHECK
Have an authorized dealer check andchange the transmission fluid and filter atthe correct service interval. SeeScheduled Maintenance (page 573).
Do not use supplemental transmissionfluid additives, treatments or cleaningagents. The use of these materials mayaffect transmission operation and resultin damage to internal transmissioncomponents.
Checking Automatic TransmissionFluid
For scheduled intervals of the fluid checksand changes, See ScheduledMaintenance (page 573). Yourtransmission does not consume fluid.However, the fluid level should be checkedif the transmission is not working properly,i.e., if the transmission slips or shifts slowlyor if you notice some sign of fluid leakage.
Automatic transmission fluid expandswhen warmed. To obtain an accurate fluidcheck, drive the vehicle until it is at normaloperating temperature (approximately19 mi (30 km)). Verify that thetransmission fluid temperature gauge,located on the instrument cluster, is withinnormal range.
1. Drive the vehicle 19 mi (30 km)until itreaches normal operating temperature.
2.Park the vehicle on a level surface andengage the parking brake.
3.With the engine running, parking brakeengaged and your foot on the brakepedal, move the gearshift lever throughall of the gear ranges. Allow sufficienttime for each gear to engage.
4.Latch the gearshift lever in P and leavethe engine running.
5. Remove the dipstick, wiping it cleanwith a clean, dry lint free rag. Ifnecessary, refer to the Under HoodOverview in this chapter for thelocation of the dipstick.
340
Super Duty (TFE) Canada/United States of America, enUSA, Edition date: 201710, Second Printing
Maintenance
Page 344 of 642
6.Install the dipstick making sure it is fullyseated in the filler tube.
7. Remove the dipstick and inspect thefluid level. The fluid should be in thedesignated area for normal operatingtemperature or ambient temperature.
Low Fluid Level
Type A
Type B
Do not drive the vehicle if there is noindication of fluid on the dipstick and theambient temperature is above 50°F(10°C).
Correct Fluid Level
Type A
Type B
For vehicles equipped with 5-speedtransmissions, check the fluid at thenormal operating temperature of 151°F(66°C) to 170°F (77°C) on a level surface.For vehicles equipped with 6-speedtransmissions, check the fluid at thenormal operating temperature of 196°F(91°C) to 215°F (102°C) on a level surface.The normal operating temperature can bereached after approximately 19 mi(30 km).
High Fluid Level
Type A
341
Super Duty (TFE) Canada/United States of America, enUSA, Edition date: 201710, Second Printing
MaintenanceE163739 E163740 E163741 E163742
Page 345 of 642
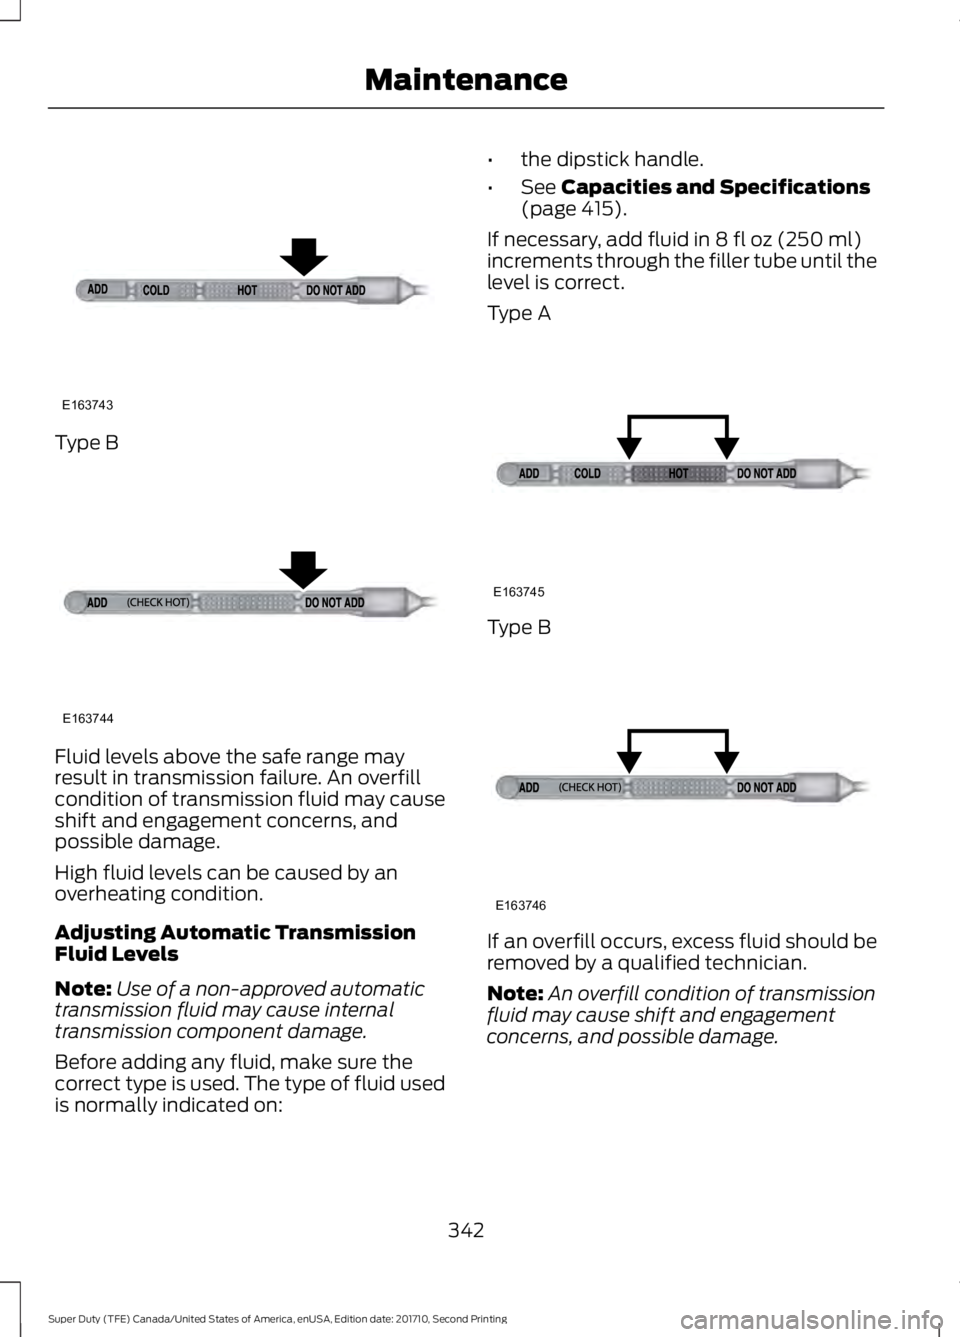
Type B
Fluid levels above the safe range mayresult in transmission failure. An overfillcondition of transmission fluid may causeshift and engagement concerns, andpossible damage.
High fluid levels can be caused by anoverheating condition.
Adjusting Automatic TransmissionFluid Levels
Note:Use of a non-approved automatictransmission fluid may cause internaltransmission component damage.
Before adding any fluid, make sure thecorrect type is used. The type of fluid usedis normally indicated on:
•the dipstick handle.
•See Capacities and Specifications(page 415).
If necessary, add fluid in 8 fl oz (250 ml)increments through the filler tube until thelevel is correct.
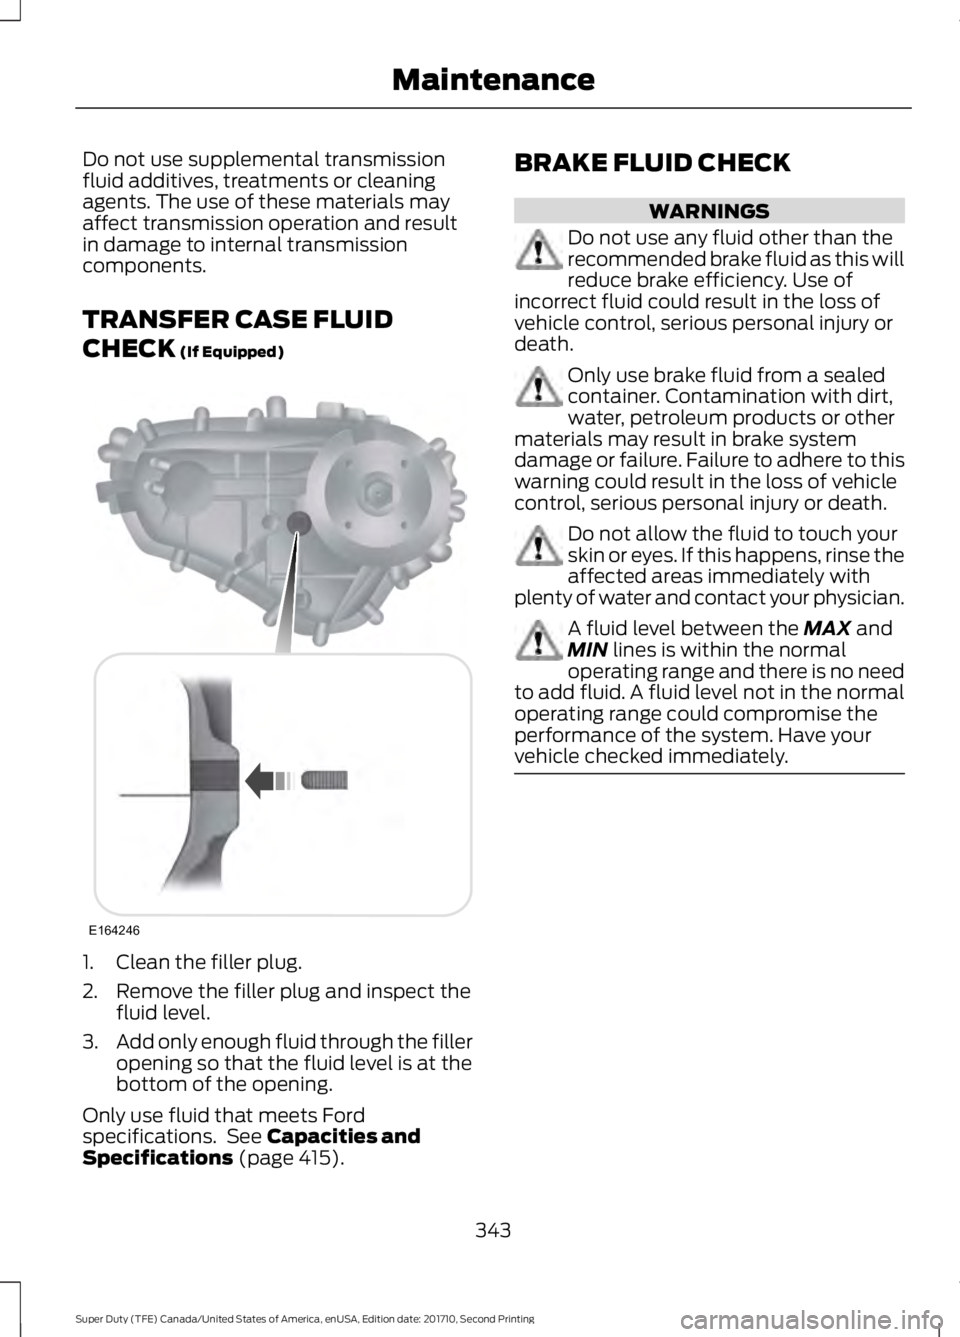
Type A
Type B
If an overfill occurs, excess fluid should beremoved by a qualified technician.
Note:An overfill condition of transmissionfluid may cause shift and engagementconcerns, and possible damage.
342
Super Duty (TFE) Canada/United States of America, enUSA, Edition date: 201710, Second Printing
MaintenanceE163743 E163744 E163745 E163746
Page 346 of 642
Do not use supplemental transmissionfluid additives, treatments or cleaningagents. The use of these materials mayaffect transmission operation and resultin damage to internal transmissioncomponents.
TRANSFER CASE FLUID
CHECK (If Equipped)
1. Clean the filler plug.
2. Remove the filler plug and inspect thefluid level.
3.Add only enough fluid through the filleropening so that the fluid level is at thebottom of the opening.
Only use fluid that meets Fordspecifications. See Capacities andSpecifications (page 415).
BRAKE FLUID CHECK
WARNINGS
Do not use any fluid other than therecommended brake fluid as this willreduce brake efficiency. Use ofincorrect fluid could result in the loss ofvehicle control, serious personal injury ordeath.
Only use brake fluid from a sealedcontainer. Contamination with dirt,water, petroleum products or othermaterials may result in brake systemdamage or failure. Failure to adhere to thiswarning could result in the loss of vehiclecontrol, serious personal injury or death.
Do not allow the fluid to touch yourskin or eyes. If this happens, rinse theaffected areas immediately withplenty of water and contact your physician.
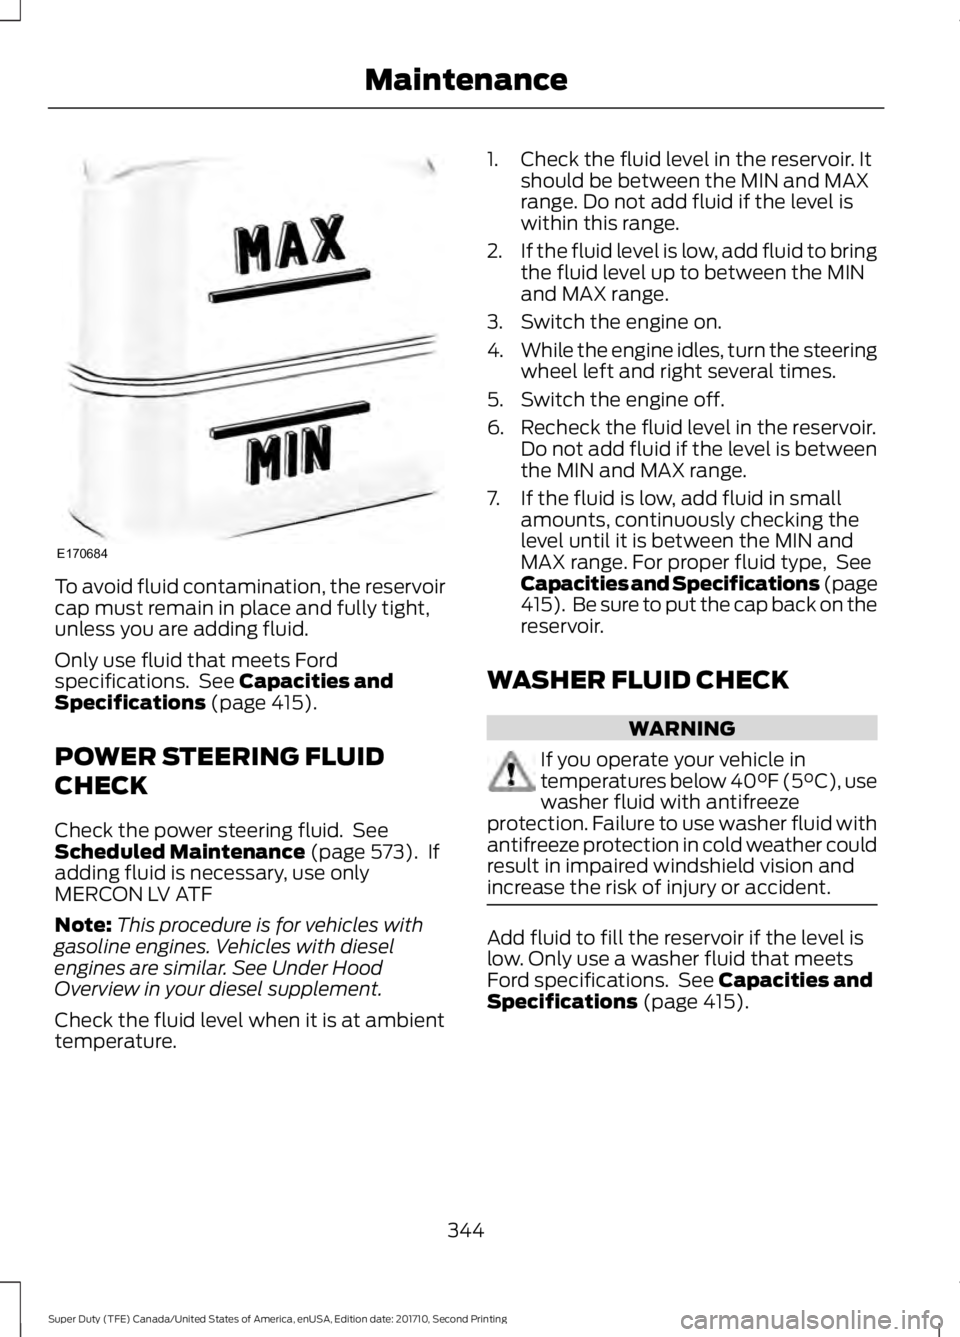
A fluid level between the MAX andMIN lines is within the normaloperating range and there is no needto add fluid. A fluid level not in the normaloperating range could compromise theperformance of the system. Have yourvehicle checked immediately.
343
Super Duty (TFE) Canada/United States of America, enUSA, Edition date: 201710, Second Printing
MaintenanceE164246
Page 347 of 642
To avoid fluid contamination, the reservoircap must remain in place and fully tight,unless you are adding fluid.
Only use fluid that meets Fordspecifications. See Capacities andSpecifications (page 415).
POWER STEERING FLUID
CHECK
Check the power steering fluid. SeeScheduled Maintenance (page 573). Ifadding fluid is necessary, use onlyMERCON LV ATF
Note:This procedure is for vehicles withgasoline engines. Vehicles with dieselengines are similar. See Under HoodOverview in your diesel supplement.
Check the fluid level when it is at ambienttemperature.
1. Check the fluid level in the reservoir. Itshould be between the MIN and MAXrange. Do not add fluid if the level iswithin this range.
2.If the fluid level is low, add fluid to bringthe fluid level up to between the MINand MAX range.
3. Switch the engine on.
4.While the engine idles, turn the steeringwheel left and right several times.
5. Switch the engine off.
6. Recheck the fluid level in the reservoir.Do not add fluid if the level is betweenthe MIN and MAX range.
7. If the fluid is low, add fluid in smallamounts, continuously checking thelevel until it is between the MIN andMAX range. For proper fluid type, SeeCapacities and Specifications (page415). Be sure to put the cap back on thereservoir.
WASHER FLUID CHECK
WARNING
If you operate your vehicle intemperatures below 40°F (5°C), usewasher fluid with antifreezeprotection. Failure to use washer fluid withantifreeze protection in cold weather couldresult in impaired windshield vision andincrease the risk of injury or accident.
Add fluid to fill the reservoir if the level islow. Only use a washer fluid that meetsFord specifications. See Capacities andSpecifications (page 415).
344
Super Duty (TFE) Canada/United States of America, enUSA, Edition date: 201710, Second Printing
MaintenanceE170684
Page 348 of 642
State or local regulations on volatileorganic compounds may restrict the useof methanol, a common windshield washerantifreeze additive. Washer fluidscontaining non-methanol antifreezeagents should be used only if they providecold weather protection without damagingthe vehicle’s paint finish, wiper blades orwasher system.
DRAINING THE FUEL FILTER
WATER TRAP - 6.7L DIESEL
WARNING
Do not dispose of fuel in thehousehold refuse or the publicsewage system. Use an authorizedwaste disposal facility.
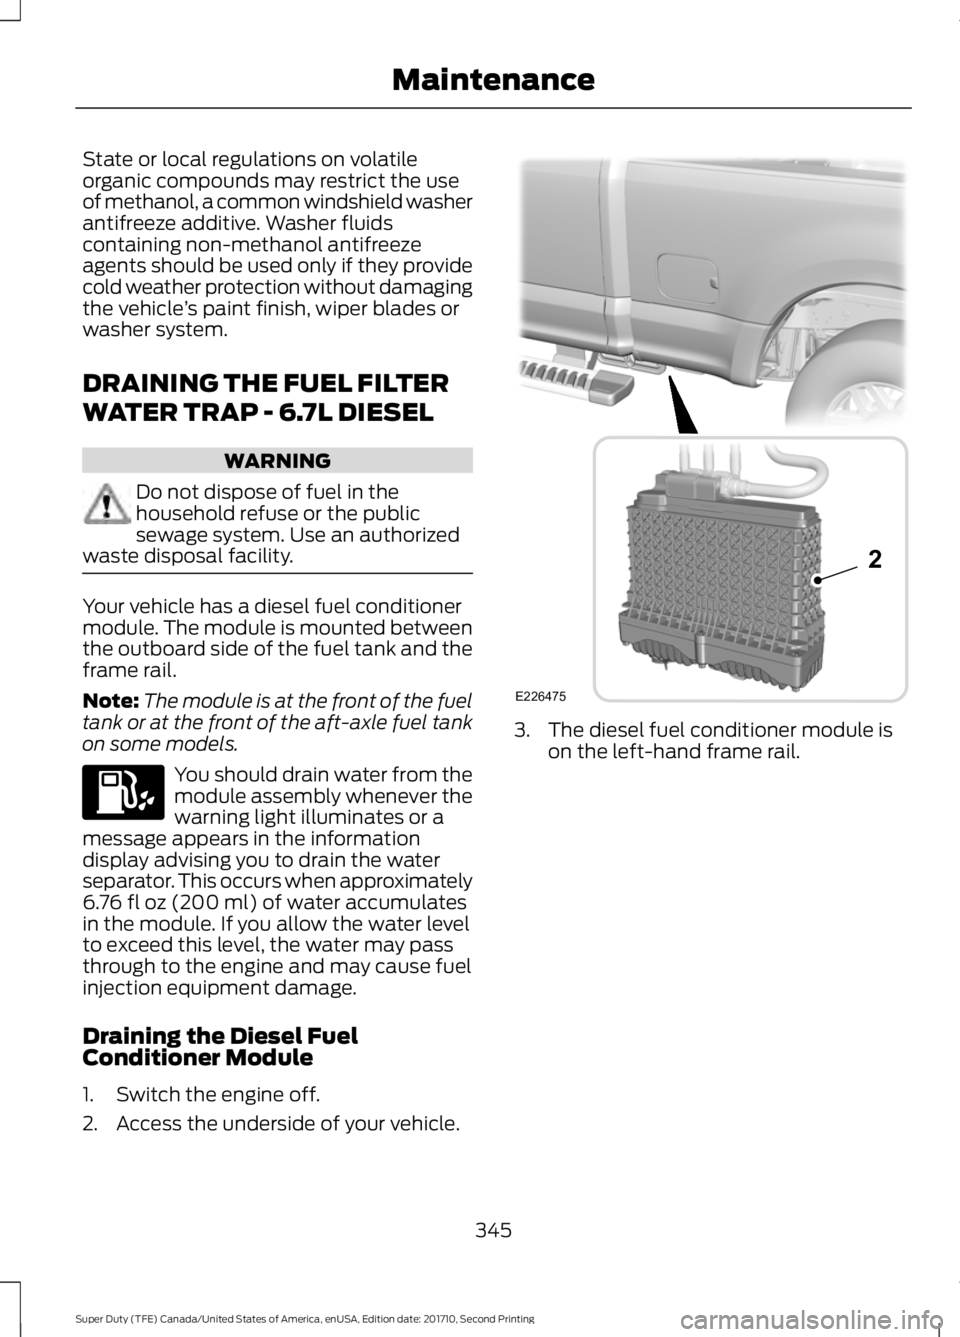
Your vehicle has a diesel fuel conditionermodule. The module is mounted betweenthe outboard side of the fuel tank and theframe rail.
Note:The module is at the front of the fueltank or at the front of the aft-axle fuel tankon some models.
You should drain water from themodule assembly whenever thewarning light illuminates or amessage appears in the informationdisplay advising you to drain the waterseparator. This occurs when approximately6.76 fl oz (200 ml) of water accumulatesin the module. If you allow the water levelto exceed this level, the water may passthrough to the engine and may cause fuelinjection equipment damage.
Draining the Diesel FuelConditioner Module
1. Switch the engine off.
2. Access the underside of your vehicle.
3. The diesel fuel conditioner module ison the left-hand frame rail.
345
Super Duty (TFE) Canada/United States of America, enUSA, Edition date: 201710, Second Printing
Maintenance E226475
2
Page 349 of 642
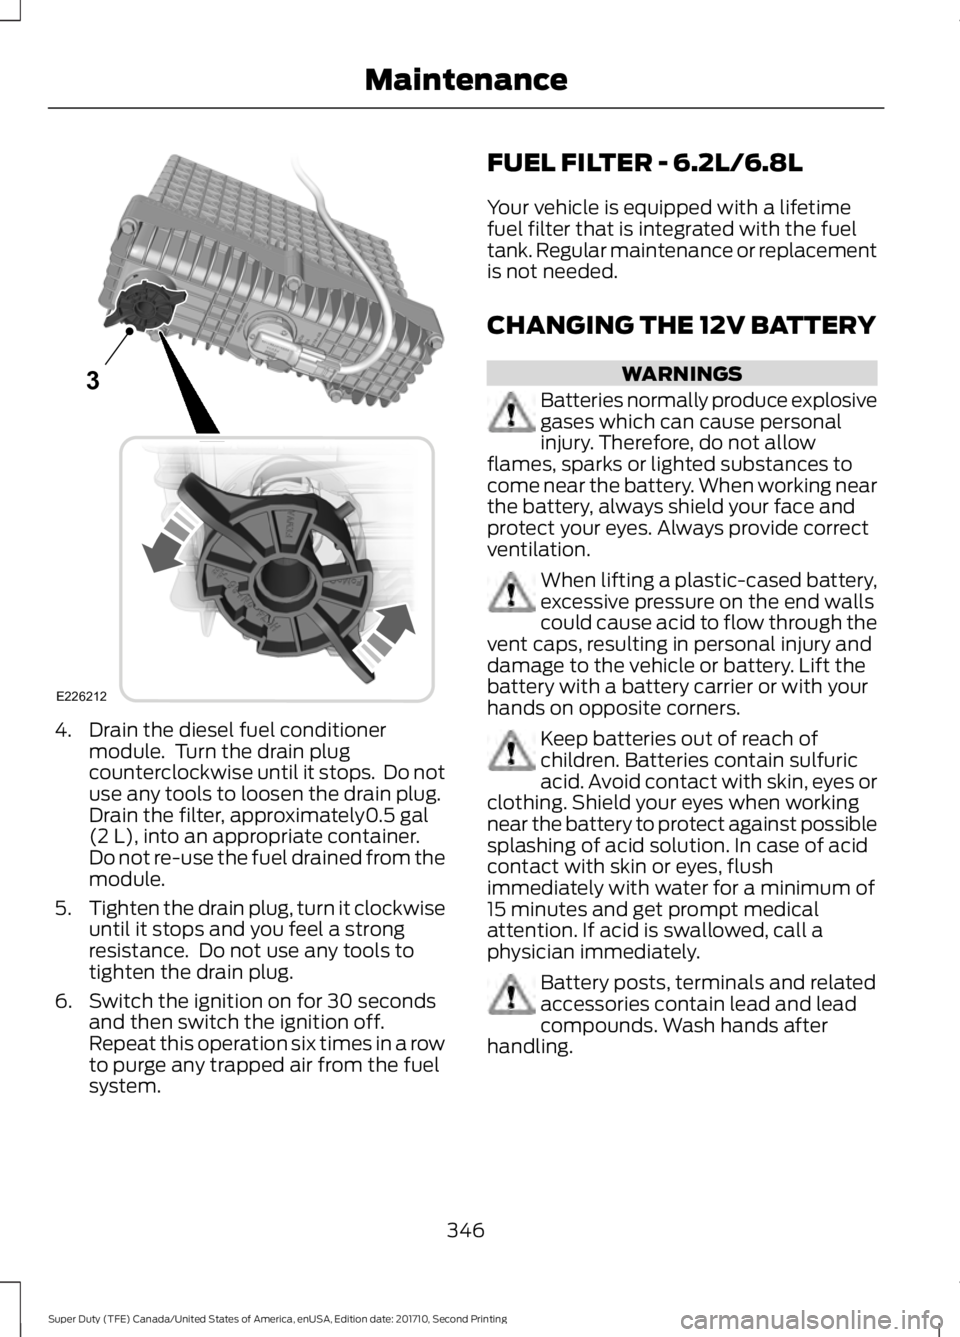
4. Drain the diesel fuel conditionermodule. Turn the drain plugcounterclockwise until it stops. Do notuse any tools to loosen the drain plug.Drain the filter, approximately0.5 gal(2 L), into an appropriate container.Do not re-use the fuel drained from themodule.
5.Tighten the drain plug, turn it clockwiseuntil it stops and you feel a strongresistance. Do not use any tools totighten the drain plug.
6. Switch the ignition on for 30 secondsand then switch the ignition off.Repeat this operation six times in a rowto purge any trapped air from the fuelsystem.
FUEL FILTER - 6.2L/6.8L
Your vehicle is equipped with a lifetimefuel filter that is integrated with the fueltank. Regular maintenance or replacementis not needed.
CHANGING THE 12V BATTERY
WARNINGS
Batteries normally produce explosivegases which can cause personalinjury. Therefore, do not allowflames, sparks or lighted substances tocome near the battery. When working nearthe battery, always shield your face andprotect your eyes. Always provide correctventilation.
When lifting a plastic-cased battery,excessive pressure on the end wallscould cause acid to flow through thevent caps, resulting in personal injury anddamage to the vehicle or battery. Lift thebattery with a battery carrier or with yourhands on opposite corners.
Keep batteries out of reach ofchildren. Batteries contain sulfuricacid. Avoid contact with skin, eyes orclothing. Shield your eyes when workingnear the battery to protect against possiblesplashing of acid solution. In case of acidcontact with skin or eyes, flushimmediately with water for a minimum of15 minutes and get prompt medicalattention. If acid is swallowed, call aphysician immediately.
Battery posts, terminals and relatedaccessories contain lead and leadcompounds. Wash hands afterhandling.
346
Super Duty (TFE) Canada/United States of America, enUSA, Edition date: 201710, Second Printing
Maintenance3
E226212
Page 350 of 642
WARNINGS
This vehicle may be fitted with morethan one battery. Removing thebattery cables from only one batterydoes not disconnect your vehicle electricalsystem. Make sure you disconnect thebattery cables from all batteries whendisconnecting power. Failure to do so maycause serious personal injury or propertydamage.
Your vehicle is fitted with a Motorcraftmaintenance-free battery which normallydoes not require additional water.
When a battery replacement is required,you must use a recommendedreplacement battery that matches theelectrical requirements of the vehicle.
Note:After cleaning or replacing thebattery, make sure you reinstall the batterycover or shield.
Note:If you add electrical accessories orcomponents to the vehicle, it may adverselyaffect the low voltage battery performanceand durability. This may also affect theperformance of other electrical systems inthe vehicle.
For longer, trouble-free operation, keep thetop of the battery clean and dry.
If you see any corrosion on the battery orterminals, remove the cables from theterminals and clean with a wire brush. Youcan neutralize the acid with a solution ofbaking soda and water.
Because your vehicle’s engine iselectronically controlled by a computer,some control conditions are maintainedby power from the battery. When thebattery is disconnected or a new batteryis installed, the engine must relearn its idleand fuel trim strategy for optimumdriveability and performance. Flexible fuelvehicles (FFV) must also relearn theethanol content of the fuel for optimumdriveability and performance.
To restore the settings, do the following:
1. Apply the parking brake.
2. Shift into park (P) or neutral (N).
3. Switch off all accessories.
4. Press the brake pedal and start yourvehicle.
5. Run the engine until it reaches normaloperating temperature. While theengine is warming up, complete thefollowing: Reset the clock. See AudioSystem (page 441). Reset the powerwindows bounce-back feature. SeeWindows and Mirrors (page 95).Reset the radio station presets. SeeAudio System (page 441).
6.Allow the engine to idle for at least oneminute.
7.Drive the vehicle at least 10 mi (16 km)to completely relearn the idle trim andfuel trim strategy.
Note:If you do not allow the engine torelearn the idle and fuel trim strategy, theidle quality of your vehicle may be adverselyaffected until the engine computereventually relearns the idle trim and fueltrim strategy.
Note:For flexible fuel vehicles, if you areoperating on E85, you may experience poorstarts or an inability to start the engine anddriveability problems until the fuel trim andethanol content have been relearned.
347
Super Duty (TFE) Canada/United States of America, enUSA, Edition date: 201710, Second Printing
Maintenance