FORD FIESTA 2007 Workshop Manual
Manufacturer: FORD, Model Year: 2007, Model line: FIESTA, Model: FORD FIESTA 2007Pages: 1226, PDF Size: 61.26 MB
Page 861 of 1226
303-05-23 Accessory Drive 303-05-23
REMOVAL AND INSTALLATION
11. N0TE:Only turn the engine in the normal
direction of rotation.
Turn the engine through
360 degrees.
12. Check that the accessory drive belt is
correctly positioned in the grooves of the
pulleys.
Repeat the installation procedure if the
accessory drive belt is misaligned.
Discard the installation tool.
13.
Remove the belt guide tool from the
accessory drive belt.
Discard the belt guide tool.
14.
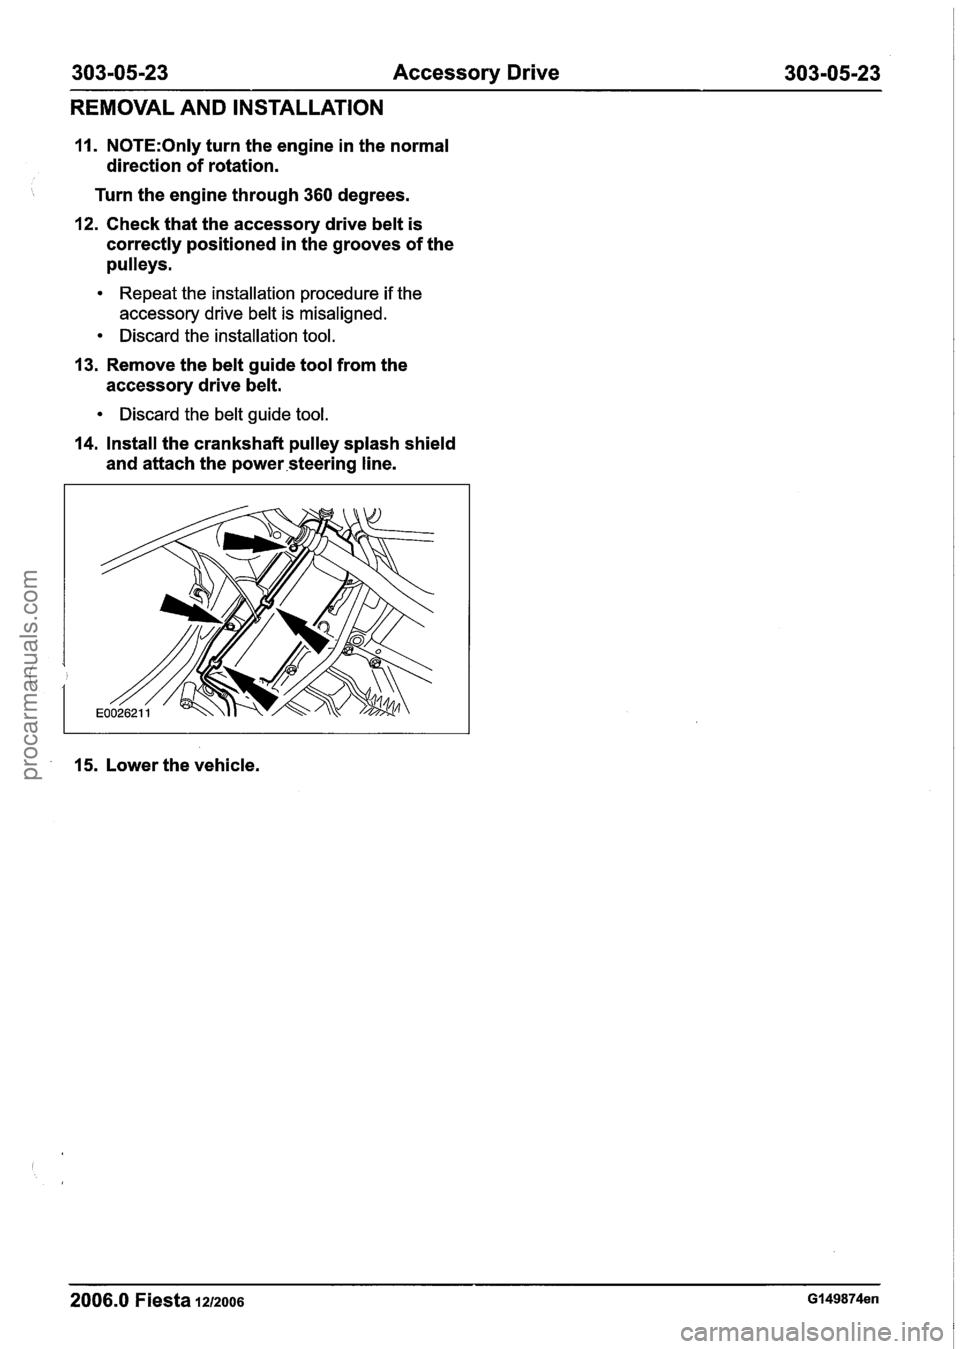
Install the crankshaft pulley splash shield
and attach the
powersteering line.
' 15. Lower the vehicle.
- -- - - -- - - --
2066.0 Fiesta ~znoos GI 49874en
procarmanuals.com
Page 862 of 1226
303-05-24 Accessory Drive 303-05-24
REMOVAL AND INSTALLATION
Power Steering Pump Belt - 1.4L Duratec-1 6V (Sigma)/l .6L
Duratec-1 6V (Sigma), Vehicles With: Air
Conditioning(21 567 0)
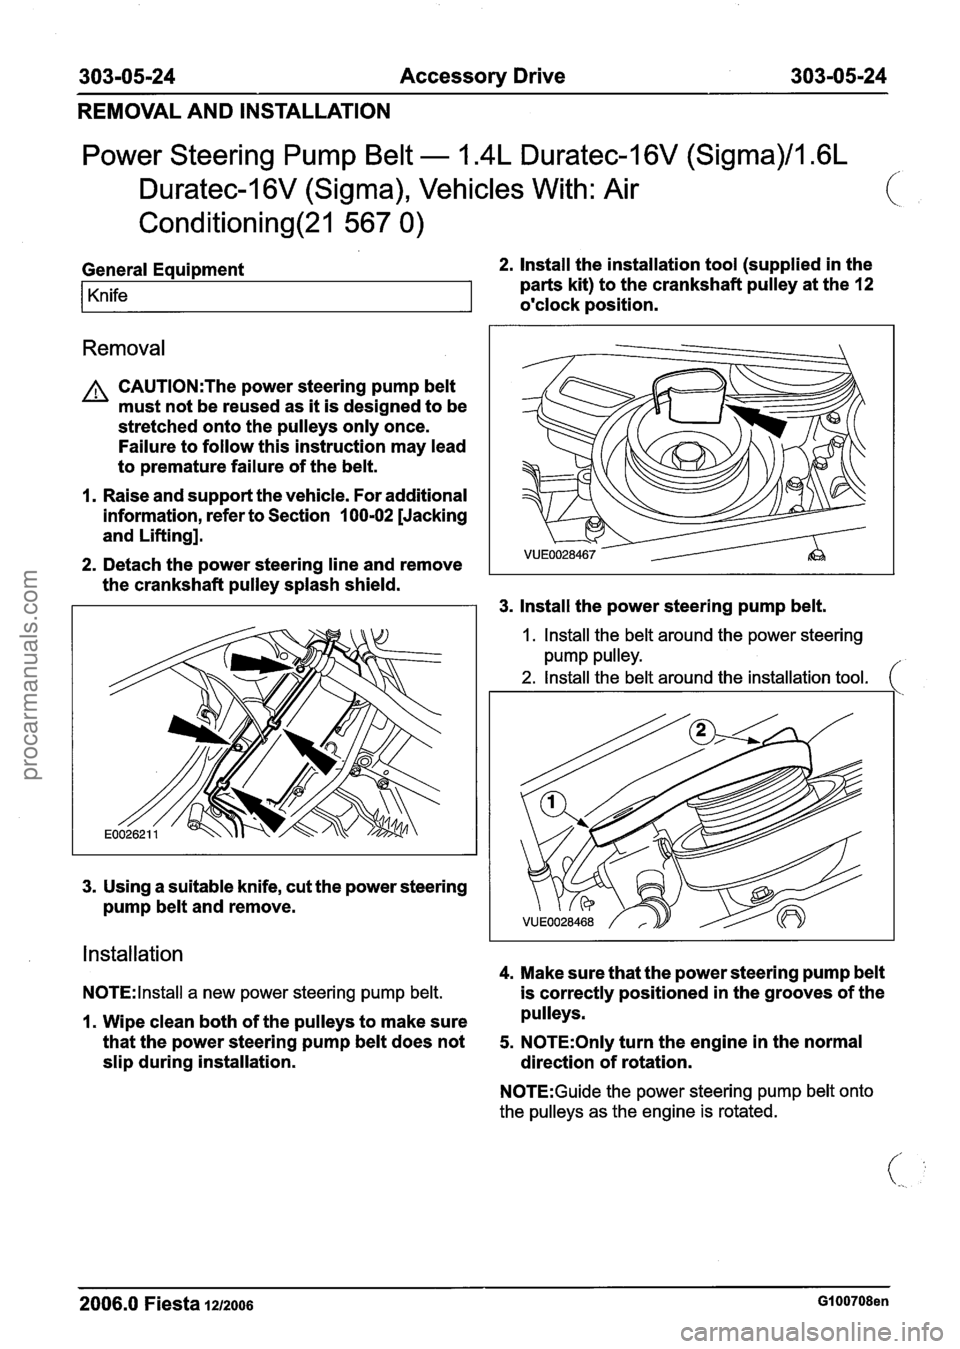
General Equipment 2. Install the installation tool (supplied in the
Knife parts kit) to the crankshaft pulley at the 12
o'clock position.
Removal
A CAUTI0N:The power steering pump belt
must not be reused as it is designed to be
stretched onto the pulleys only once.
Failure to follow this instruction may lead
to premature failure of the belt.
1. Raise and support the vehicle. For additional
information, refer to Section
100-02 [Jacking
and Lifting].
2. Detach the power steering line and remove
the crankshaft pulley splash shield.
3. Install the power steering pump belt.
I. Install the belt around the power steering
pump pulley.
2. Install the belt around the installation tool. (
Installation
4. Make sure that the power steering pump belt
N0TE:lnstall a new power steering pump belt. is correctly positioned in the grooves of the
1. Wipe clean both of the pulleys to make sure pulleys.
that the power steering pump belt does not
5. N0TE:Only turn the engine in the normal
slip during installation.
direction of rotation.
N0TE:Guide the power steering pump belt onto
the pulleys as the engine is rotated.
2006.0 Fiesta 1212006 GI 00708en
procarmanuals.com
Page 863 of 1226
303-05-25 Accessory Drive 303-05-25
REMOVAL AND INSTALLATION
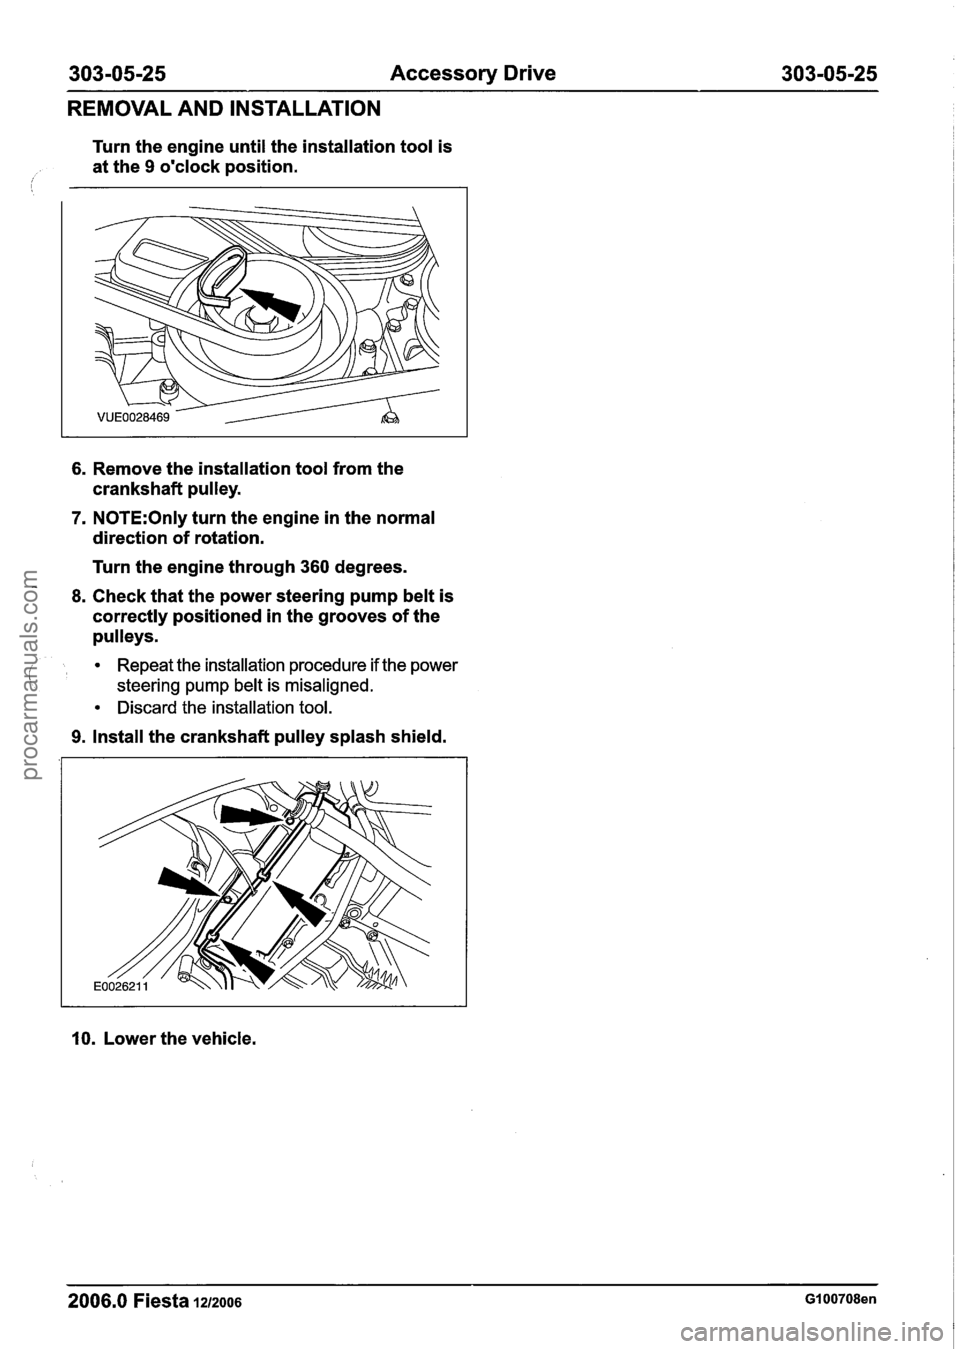
Turn the engine until the installation tool is
at the
9 o'clock position.
i
6. Remove the installation tool from the
crankshaft pulley.
7. N0TE:Only turn the engine in the normal
direction of rotation.
Turn the engine through
360 degrees. 1
8. Check that the power steering pump belt is
correctly positioned in the grooves of the
pulleys.
i Repeat the installation procedure if the power
steering pump belt is misaligned.
Discard the installation tool.
9. Install the crankshaft pulley splash shield.
10. Lower the vehicle.
2006.0 Fiesta 1212006 GI 00708en
procarmanuals.com
Page 864 of 1226
303-05-26 Accessory Drive 303-05-26
REMOVAL AND INSTALLATION
Accessory Drive Belt - 2.OL Duratec-HE (M14)(21 567 0)
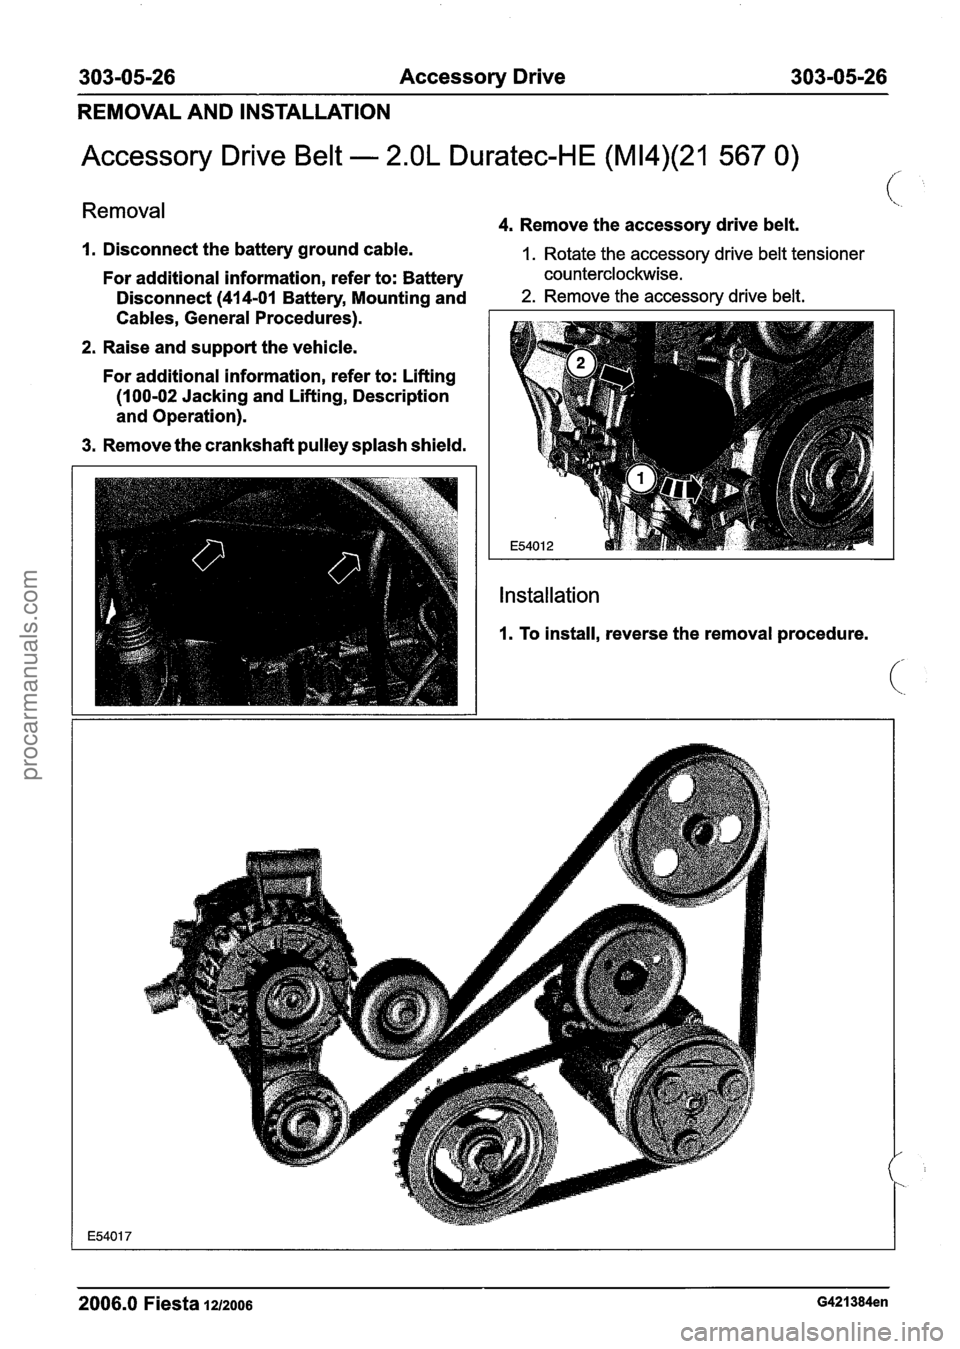
Removal 4. Remove the accessory drive belt.
I. Disconnect the battery ground cable. 1. Rotate the accessory drive belt tensioner
For additional information, refer to: Battery counterclockwise.
Disconnect
(41 4-01 Battery, Mounting and 2. Remove the accessory drive belt.
Cables,
~eneral procedures).
-
2. Raise and support the vehicle.
For additional information, refer to: Lifting
(100-02 Jacking and Lifting, Description
and Operation).
3. Remove the crankshaft pulley splash shield.
2006.0 Fiesta 1212006 G421384en
procarmanuals.com
Page 865 of 1226
303-06-1 Starting System 303-06-1
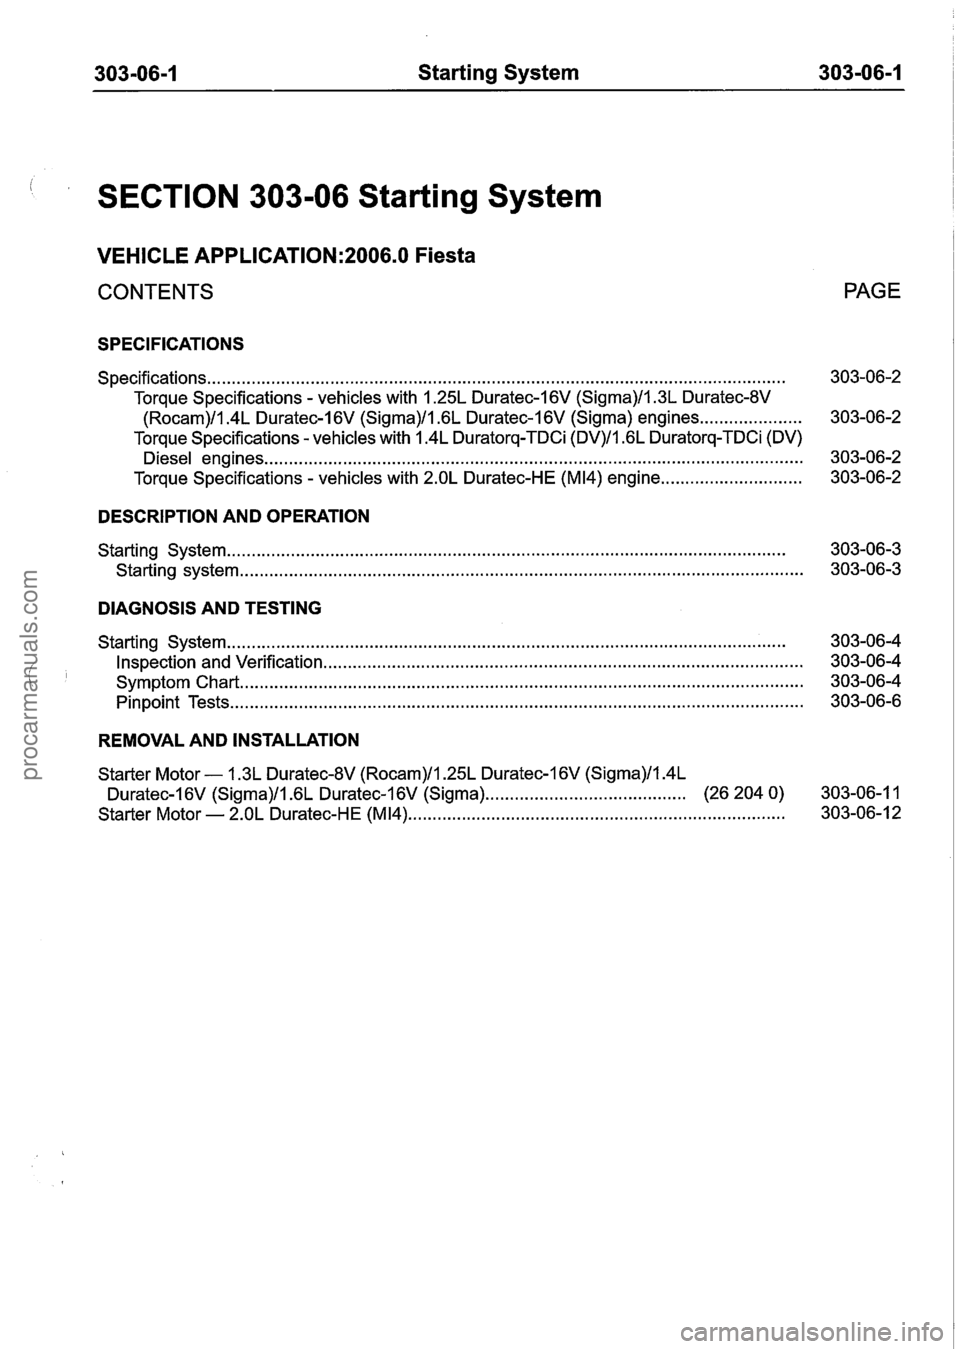
SECTION 303-06 Starting System
VEHICLE APPLICATION:2006.0 Fiesta
CONTENTS
SPECIFICATIONS
Specifications.. . . . . . . . . . . . . . . . . . . . . . . . . . . . . . . . . . . . . . . . . . . . . . . . . . . . . . . . . . . . . . . . . . . . . . . . . . . . . . . . . . . . . . . . . . . . . . . . . . . . . . . . . . . . . . . . . . . . .
Torque Specifications - vehicles with 1.25L Duratec-1 6V (Sigma)ll.3L Duratec-8V
(Rocam)/l.4L Duratec-I 6V (Sigma)ll .6L Duratec-1 6V (Sigma) engines ...... . . . . .. . . .. .. .. .
Torque Specifications - vehicles with 1.4L Duratorq-TDCi (DV)/1.6L Duratorq-TDCi (DV)
Diesel engines ........................................................................\
......................................
Torque Specifications - vehicles with 2.OL Duratec-HE (M14) engine .............................
DESCRIPTION AND OPERATION
Starting System ........................................................................\
..........................................
Starting system ........................................................................\
...........................................
DIAGNOSIS AND TESTING
Starting System ........................................................................\
..........................................
Inspection and Verification ........................................................................\
..........................
Symptom Chart ........................................................................\
...........................................
Pinpoint Tests ........................................................................\
.............................................
REMOVAL AND INSTALLATION
PAGE
Starter Motor - 1.3L Duratec-8V (Rocam)/l.25L Duratec-1 6V (Sigma)ll.4L
Duratec-1 6V (Sigma)/l .6L Duratec-1 6V (Sigma). . . . . . . . . . . . . . . . . . . . . . . . . . . . . . . . . . . . . . . . . (26 204 0) 303-06-1 1
Starter
Motor - 2.OL Duratec-HE (M14) ............................. ................................................ 303-06-1 2
procarmanuals.com
Page 866 of 1226
procarmanuals.com
Page 867 of 1226
303-06-3 Starting System 303-06-3
DESCRIPTION AND OPERATION
Starting System
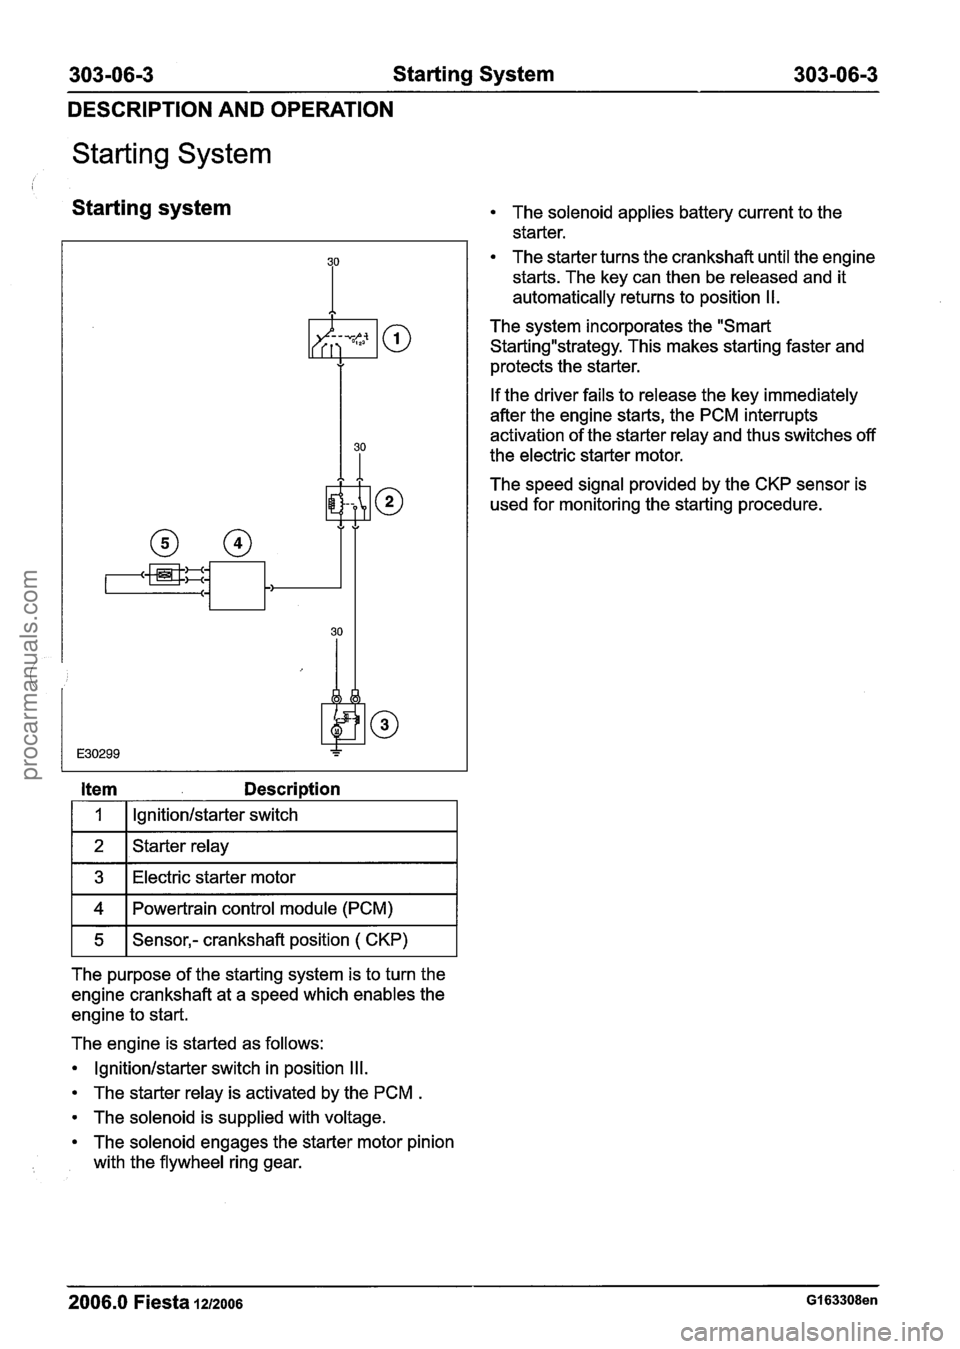
Starting system
1 tern Description
I 1 I lgnitionlstarter switch I
1 2 1 Starter relay I
1 3 1 Electric starter motor I
1 4 1 Powertrain control module (PCM) I
1 5 1 Sensor,- crankshaft position ( CKP) I
The purpose of the starting system is to turn the
engine crankshaft at a speed which enables the
engine to start.
The engine is started as follows:
Ignitionlstarter switch in position
Ill.
The starter relay is activated by the PCM .
The solenoid is supplied with voltage.
The solenoid engages the starter motor pinion
with the flywheel ring gear.
The solenoid applies battery current to the
starter.
The starter turns the crankshaft until the engine
starts. The key can then be released and it
automatically returns to position
I I.
The system incorporates the "Smart
StartingWstrategy. This makes starting faster and
protects the starter.
If the driver fails to release the key immediately
after the engine starts, the PCM interrupts
activation of the starter relay and thus switches off
the electric starter motor.
The speed signal provided by the CKP sensor is
used for monitoring the starting procedure.
2006.0 Fiesta 1212006 GI 63308en
procarmanuals.com
Page 868 of 1226
303-06-4 Starting System 303-06-4
DIAGNOSIS AND TESTING
Starting System
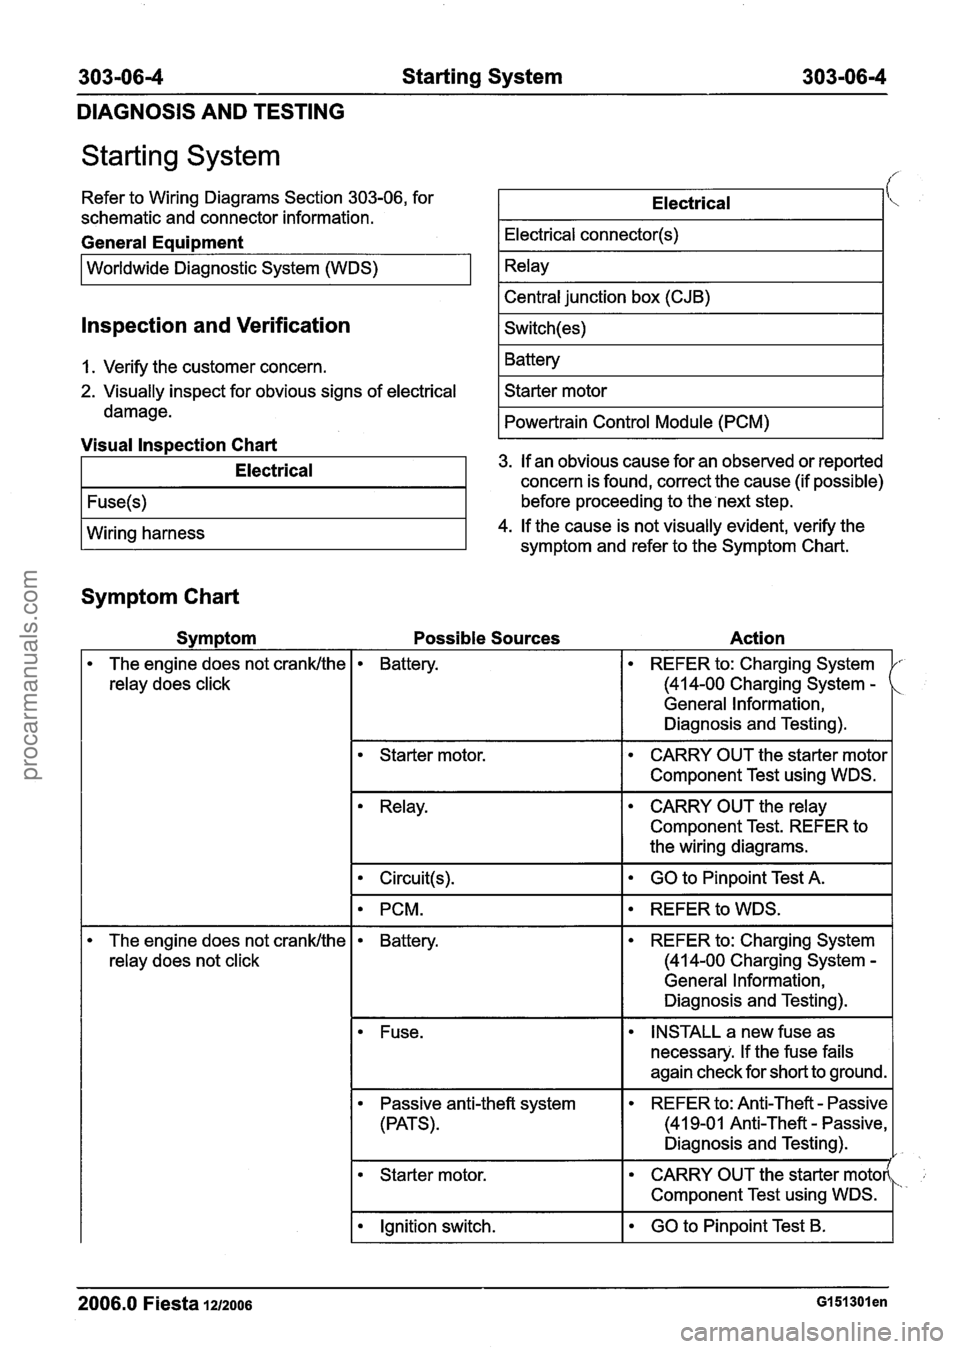
Refer to Wiring Diagrams Section 303-06, for
schematic and connector information.
General Eaui~ment
I Worldwide Diagnostic System (WDS) I
Electrical
Electrical connector(s)
Relay
Central junction box (CJB)
Switch(es)
Battery
Starter motor
Powertrain Control Module (PCM)
lnspection and Verification
I. Verify the customer concern.
2. Visually inspect for obvious signs of electrical
damage.
Visual lnspection Chart
Symptom Chart
Electrical
Fuse(s)
Wiring harness
Symptom
The engine does not crank/the
relay does click 3.
If an obvious cause for an observed or reported
concern is found, correct the cause (if possible)
before proceeding to the next step.
4. If the cause is not visually evident, verify the
The engine does not crank/the
relay does not click symptom
and refer to the Symptom Chart.
Possible Sources Action
Battery. REFER to: Charging System
(414-00 Charging System
-
General Information,
Diagnosis and Testing).
1
Starter motor. CARRY OUT the starter motor
I Component Test using WDS.
Relay. CARRY OUT the relay
Component Test. REFER to
the wiring diagrams.
I Circuit(s). I GO to Pinpoint Test A. I
I PCM. I REFER to WDS. I
Battery. REFER to: Charging System
(414-00 Charging System -
General Information,
Diagnosis and Testing).
Fuse. INSTALL a new fuse as
necessary. If the fuse fails
again check for short to ground.
Passive anti-theft system
(PATS). REFER to: Anti-Theft - Passive
(41 9-01 Anti-Theft
- Passive,
Diagnosis and Testing).
I
Starter motor. CARRY OUT the starter motor(
I Component Test using WDS.
I Ignition switch. I GO to Pinpoint Test B. I
2006.0 Fiesta la2006 GI 51 301 en
procarmanuals.com
Page 869 of 1226
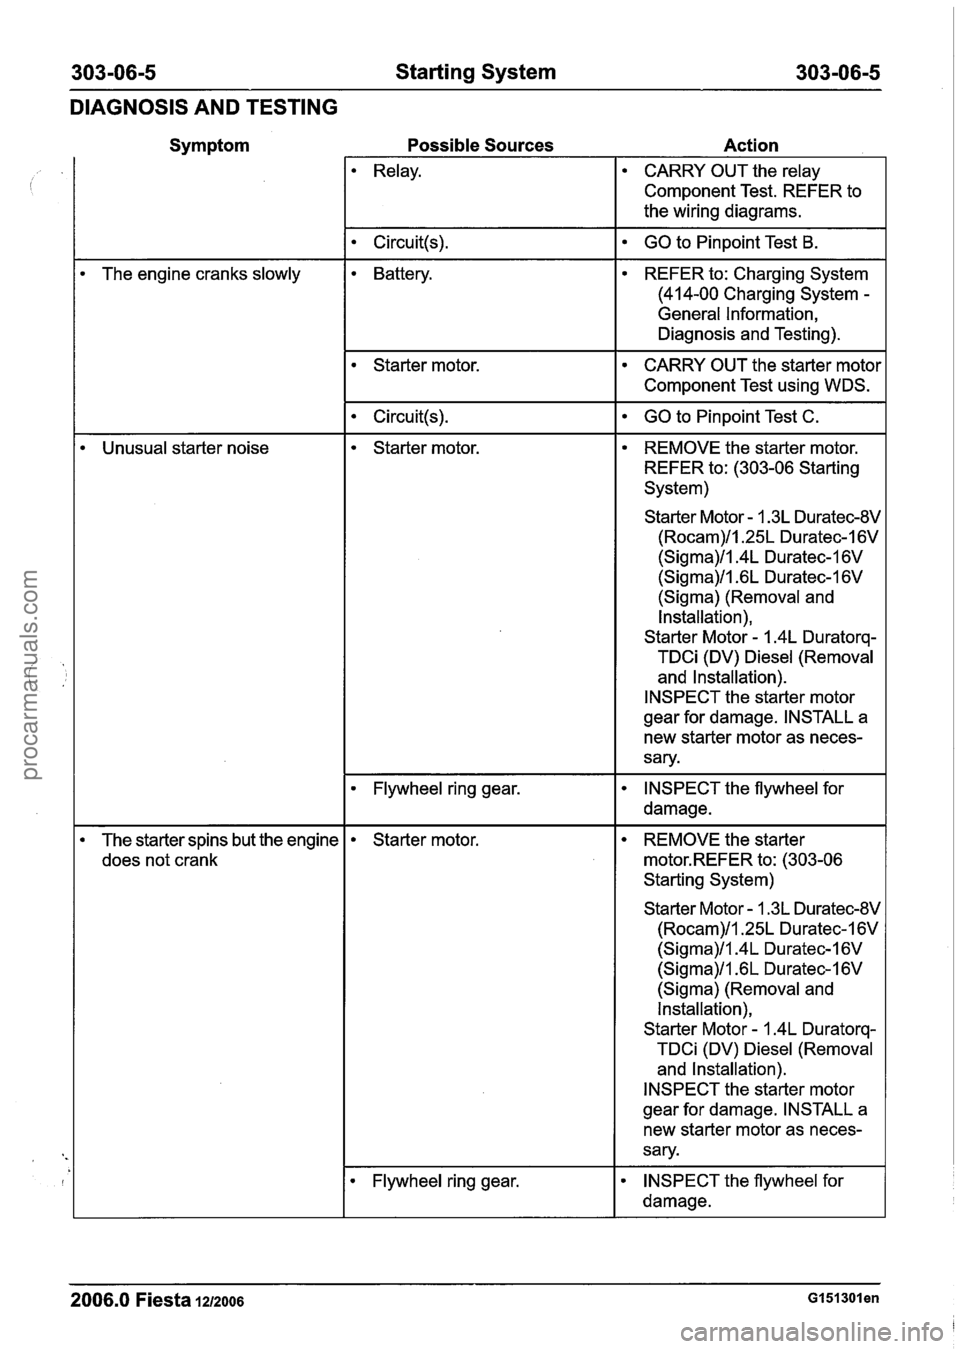
303-06-5 Starting System 303-06-5
DIAGNOSIS AND TESTING
Symptom
The engine cranks slowly
Unusual starter noise
The starter spins but the engine
does not crank
Possible Sources Action
Relay.
Battery.
Starter motor.
Starter motor.
Flywheel ring gear.
Starter motor.
Flywheel ring gear.
CARRY OUT the relay
Component Test. REFER to
the wiring diagrams.
GO to Pinpoint Test B.
REFER to: Charging System
(414-00 Charging System
-
General Information,
Diagnosis and Testing).
CARRY OUT the starter motor
Component Test using WDS.
GO to Pinpoint Test C.
REMOVE the starter motor.
REFER to: (303-06 Starting
System)
Starter Motor
- 1.3L Duratec-8V
(Rocam)/l.25L Duratec-I 6V
(Sigma)/l.4L Duratec-1 6V
(Sigma)/l .6L Duratec-1 6V
(Sigma) (Removal and
Installation),
Starter Motor - 1.4L Duratorq-
TDCi (DV)
Diesel (Removal
and Installation).
INSPECT the starter motor
gear for damage. INSTALL a
new starter motor as neces-
sary.
INSPECT the flywheel for
damage.
REMOVE the starter
motor.REFER to: (303-06
Starting System)
Starter Motor
- 1.3L Duratec-8V
(Rocam)/l.25L Duratec-1 6V
(Sigma)/l.4L Duratec-I 6V
(Sigma)ll .6L Duratec-I 6V
(Sigma) (Removal and
Installation),
Starter Motor - 1.4L Duratorq-
TDCi (DV)
Diesel (Removal
and Installation).
INSPECT the starter motor
gear for damage. INSTALL a
new starter motor as neces-
sary.
INSPECT the flywheel for
damage.
2006.0 Fiesta 1212006 Gl51301en
procarmanuals.com
Page 870 of 1226
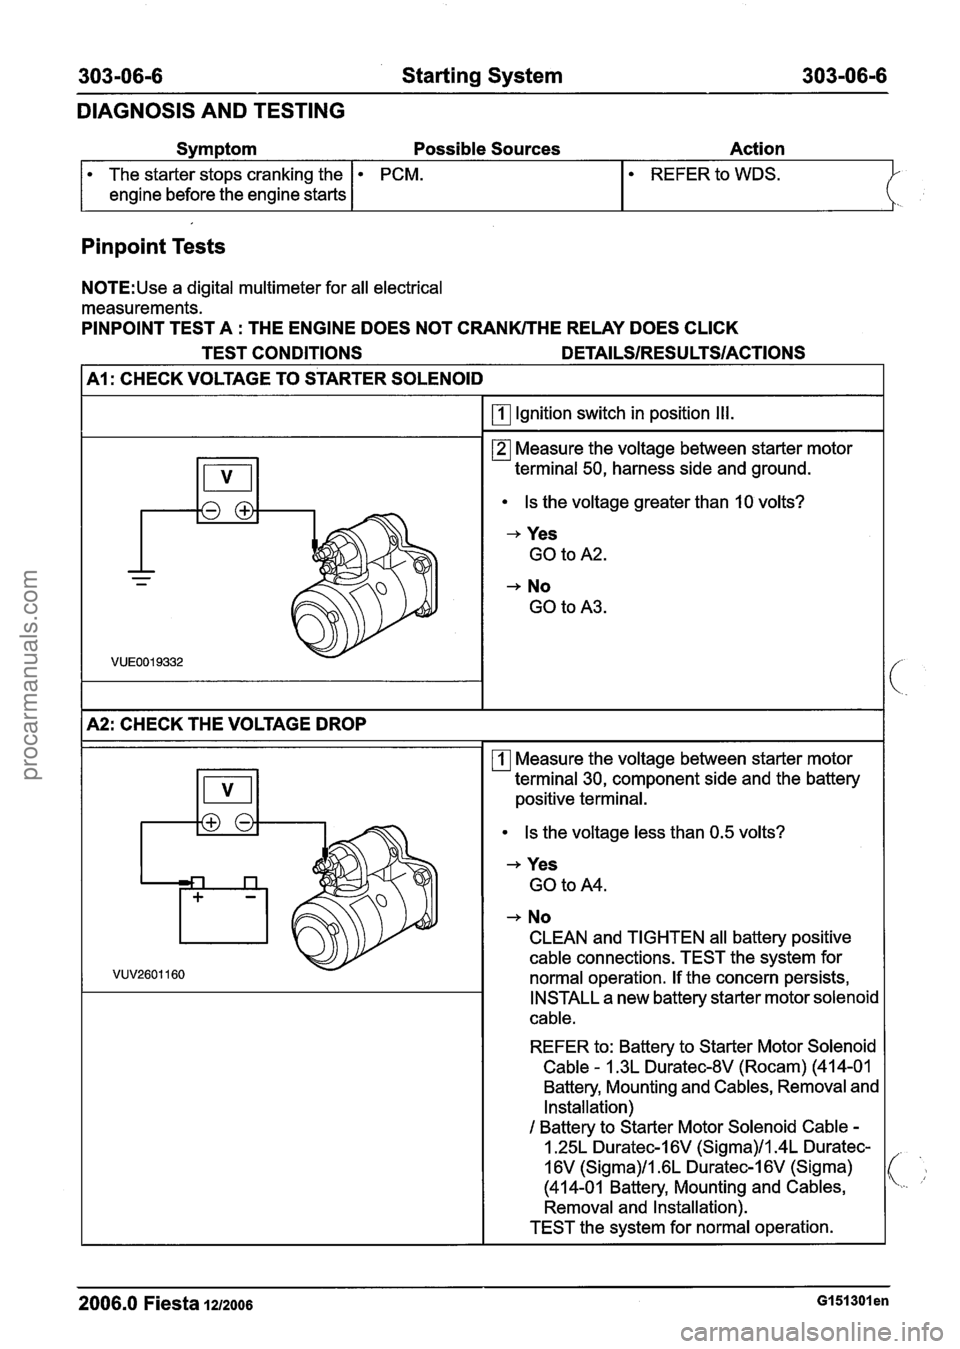
303-06-6 Starting System 303-06-6
DIAGNOSIS AND TESTING
Symptom Possible Sources Action
Pinpoint Tests
The starter stops cranking the
engine before the engine starts
N0TE:Use a digital multimeter for all electrical
measurements.
PINPOINT TEST A
: THE ENGINE DOES NOT CRANKITHE REWY DOES CLICK
PCM.
TEST CONDITIONS
DETAILSIRESU LTSIACTIONS
I A1 : CHECK VOLTAGE TO STARTER SOLENOID I
I I Ignition switch in position Ill. I
Measure the voltage between starter motor
terminal 50, harness side and ground.
Is the voltage greater than I0 volts?
+ Yes
GO to
A2.
+ No
GO to A3.
1~2: CHECK THE VOLTAGE DROP I
Measure the voltage between starter motor
terminal 30, component side and the battery
positive
terminal.
Is the voltage less than 0.5 volts?
+ Yes
GO to A4.
+ No
CLEAN and TIGHTEN
all battery positive
cable connections. TEST the system for
normal operation. If the concern persists,
INSTALL a new battery starter motor
solenoic
cable.
REFER to: Battery to Starter Motor Solenoid
Cable - 1.3L Duratec-8V (Rocam) (41 4-0 1
Battery, Mounting and
Cables, Removal and
Installation)
I Battery to Starter Motor Solenoid Cable -
1.25L Duratec-I 6V (Sigma)ll.4L Duratec-
1
6V (Sigma)ll .6L Duratec-1 6V (Sigma)
(414-01 Battery, Mounting and
Cables,
Removal and Installation).
TEST the system for normal operation.
2006.0 Fiesta 1212006 GI 51 301 en
procarmanuals.com