sensor FORD FIESTA 2007 Workshop Manual
[x] Cancel search | Manufacturer: FORD, Model Year: 2007, Model line: FIESTA, Model: FORD FIESTA 2007Pages: 1226, PDF Size: 61.26 MB
Page 100 of 1226
204-01 -2 Front Suspension 204-01 -2
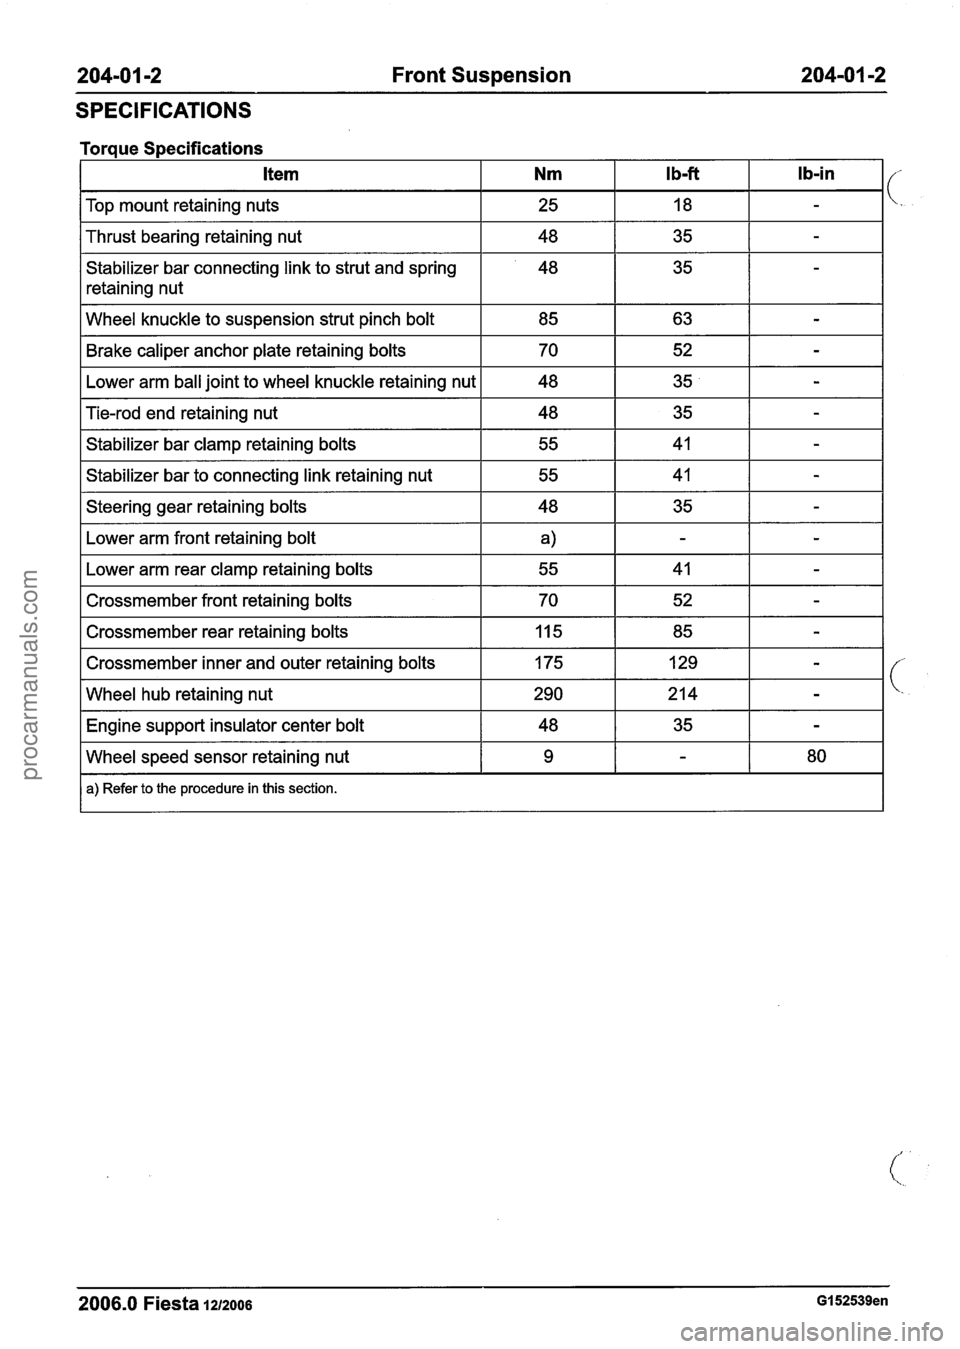
SPECIFICATIONS
I Top mount retaining nuts I 25 I 18 I - I
Torque Specifications
I Thrust bearing retaining nut I 48 I 35 I - I
Stabilizer bar connecting link to strut and spring
retaining nut Ib-in
I Wheel
knuckle to suspension strut pinch bolt I 85 I 63 I - I
Ib-ft Item Nm
Brake caliper anchor plate retaining bolts
Lower arm ball joint to wheel knuckle retaining nut
I Steering gear retaining bolts I 48 I 35 I - I
Tie-rod end retaining nut
Stabilizer bar clamp retaining bolts
Stabilizer bar to connecting link retaining nut
Fb.wer arm front retaining bolt I
70
48
I Lower arm rear clamp retaining bolts I 55 I 41 I - I
48
55
55
I Crossmember front retaining bolts I 70 I 52 I - I
52
35
I Crossmember rear retaining bolts 1 Iq5 1 85 I - I
-
-
35
41
41
I Crossmember inner and outer retaining bolts 1 175 1 129 1 - I
-
-
-
I Wheel hub retaining nut 1290 1214 1 - I
I Engine support insulator center bolt I 48 I 35 I - I
2006.0 Fiesta 1212006 GI 52539en
Wheel speed sensor retaining nut
a) Refer to the procedure in this section.
9 - 80
procarmanuals.com
Page 101 of 1226
204-01 -3 Front Suspension 204-01 -3
DESCRIPTION AND OPERATION
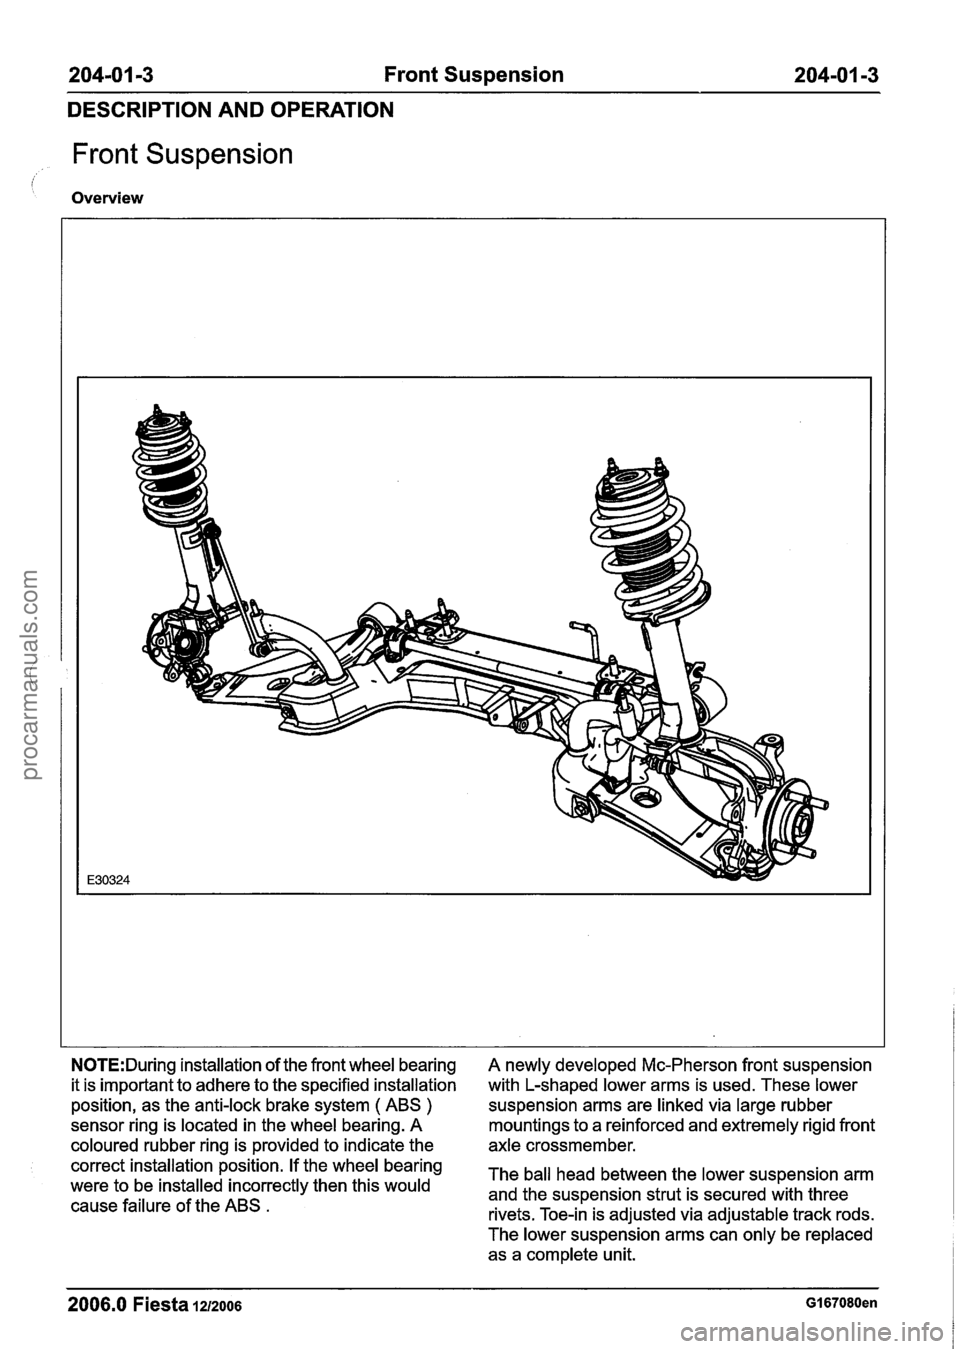
Front Suspension
Overview
N0TE:During installation of the front wheel bearing
it is important to adhere to the specified installation
position, as the anti-lock brake system
( ABS )
sensor ring is located in the wheel bearing. A
coloured rubber ring is provided to indicate the
correct installation position. If the wheel bearing
were to be installed incorrectly then this would
cause failure of the ABS
.
A newly developed Mc-Pherson front suspension
with L-shaped lower arms is used. These lower
suspension arms are linked via large rubber
mountings to a reinforced and extremely rigid front
axle crossmember.
The ball head between the lower suspension arm
and the suspension strut is secured with three
rivets. Toe-in is adjusted via adjustable track rods.
The lower suspension arms can only be replaced as a complete unit.
2006.0 Fiesta IZIZOO~ GI 67080en
procarmanuals.com
Page 112 of 1226

204-01 -1 4 Front Suspension 204-01 -1 4
REMOVAL AND INSTALLATION
Detach the brake caliper and anchor plate N0TE:Use a 5 mm Allen key to prevent the ball
from the wheel knuckle. joint stud from rotating. f
6. Remove the brake disc.
Remove and discard the retaining washer (if
equipped).
Vehicles with anti-lock brakes
7. Detach the wheel speed sensor from the
wheel knuckle.
All vehicles
*= &AUTION:L~~~~ the tie-rod end retaining
nut in place to protect the ball joint stud. Loosen
the tie-rod end retaining nut.
k
&AuTl~N:~rotect the ball joint seal using
a soft cloth to prevent damage.
Using the special tool, detach the tie-rod end
from the wheel knuckle.
1. Release the tie-rod end.
2. Remove and discard the tie rod end retaining
nut.
/'-
lorn A~AuT10N:~rotect the ball joint seal
using a soft cloth to prevent damage.
Detach the lower arm ball joint from the
wheel knuckle.
2006.0 Fiesta 1212006 GI 83759en
procarmanuals.com
Page 114 of 1226
204-01 -1 6 Front Suspension 204-01 -1 6
REMOVAL AND INSTALLATION
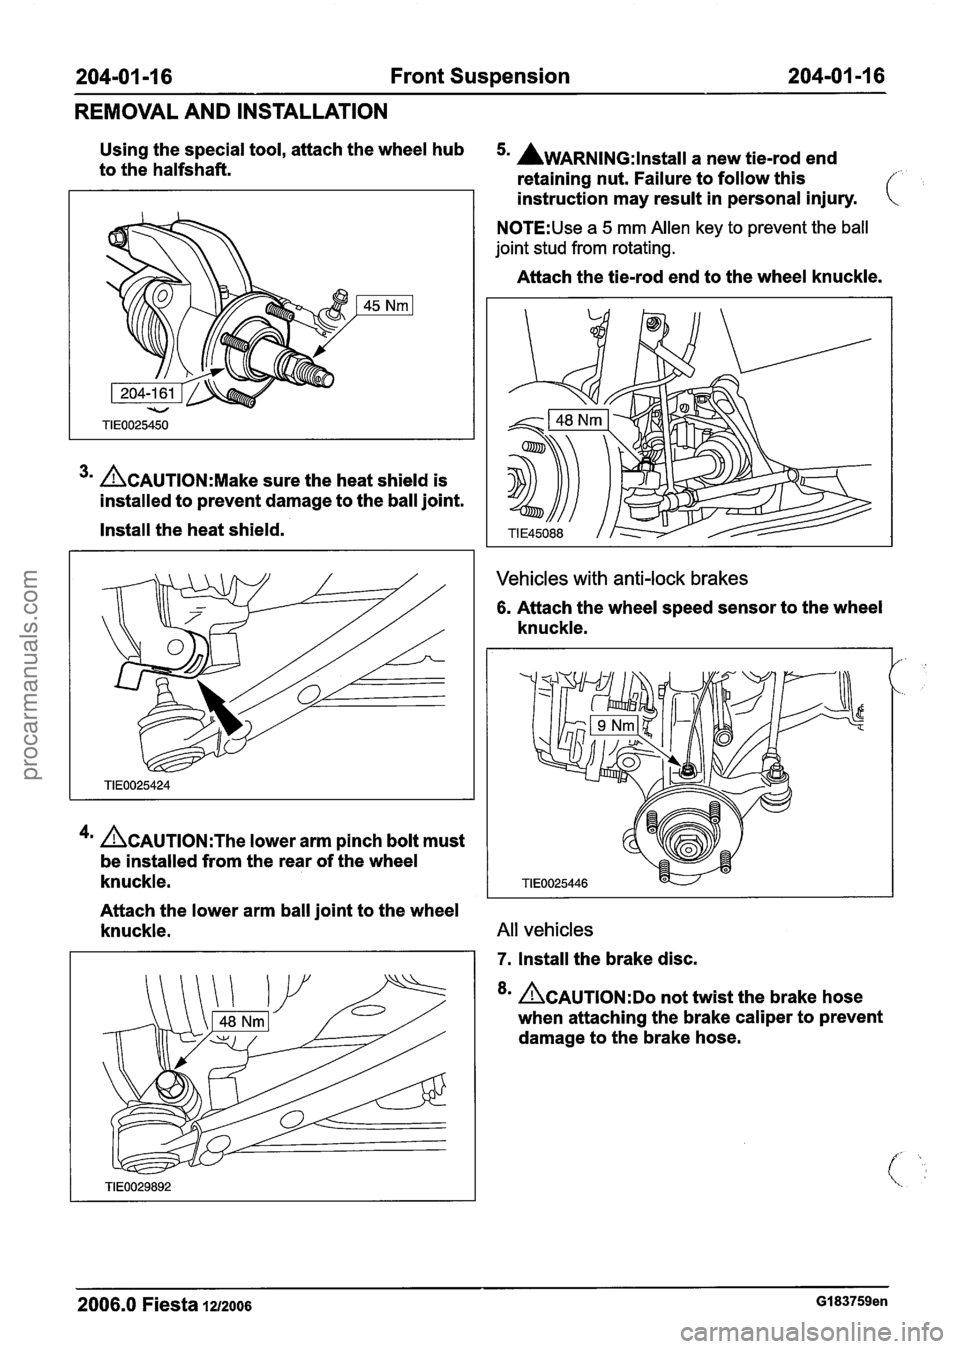
Using the special tool, attach the wheel hub 5. AWARNING:lnstall a new tie-rod end to the halfshaft.
retaining nut. Failure to follow this f
3m ACAUTION:M~~~ sure the heat shield is
installed to prevent damage to the ball joint.
Install the heat shield.
4m &AUTION:T~~ lower arm pinch bolt must
be installed from the rear of the wheel
knuckle. instruction
may result in personal injury.
N0TE:Use a 5 mm Allen key to prevent the ball
joint stud from rotating.
Attach the tie-rod end to the wheel knuckle.
Vehicles with anti-lock brakes
6. Attach the wheel speed sensor to the wheel
knuckle.
Attach the lower arm ball joint to the wheel
knuckle.
All vehicles
7. Install the brake disc.
8m &AUTION:DO not twist the brake hose
when attaching the brake caliper to prevent
damage to the brake hose.
2006.0 Fiesta 1212006 GI 83759en
procarmanuals.com
Page 120 of 1226
204-01 -22 Front Suspension 204101 122
REMOVAL AND INSTALLATION
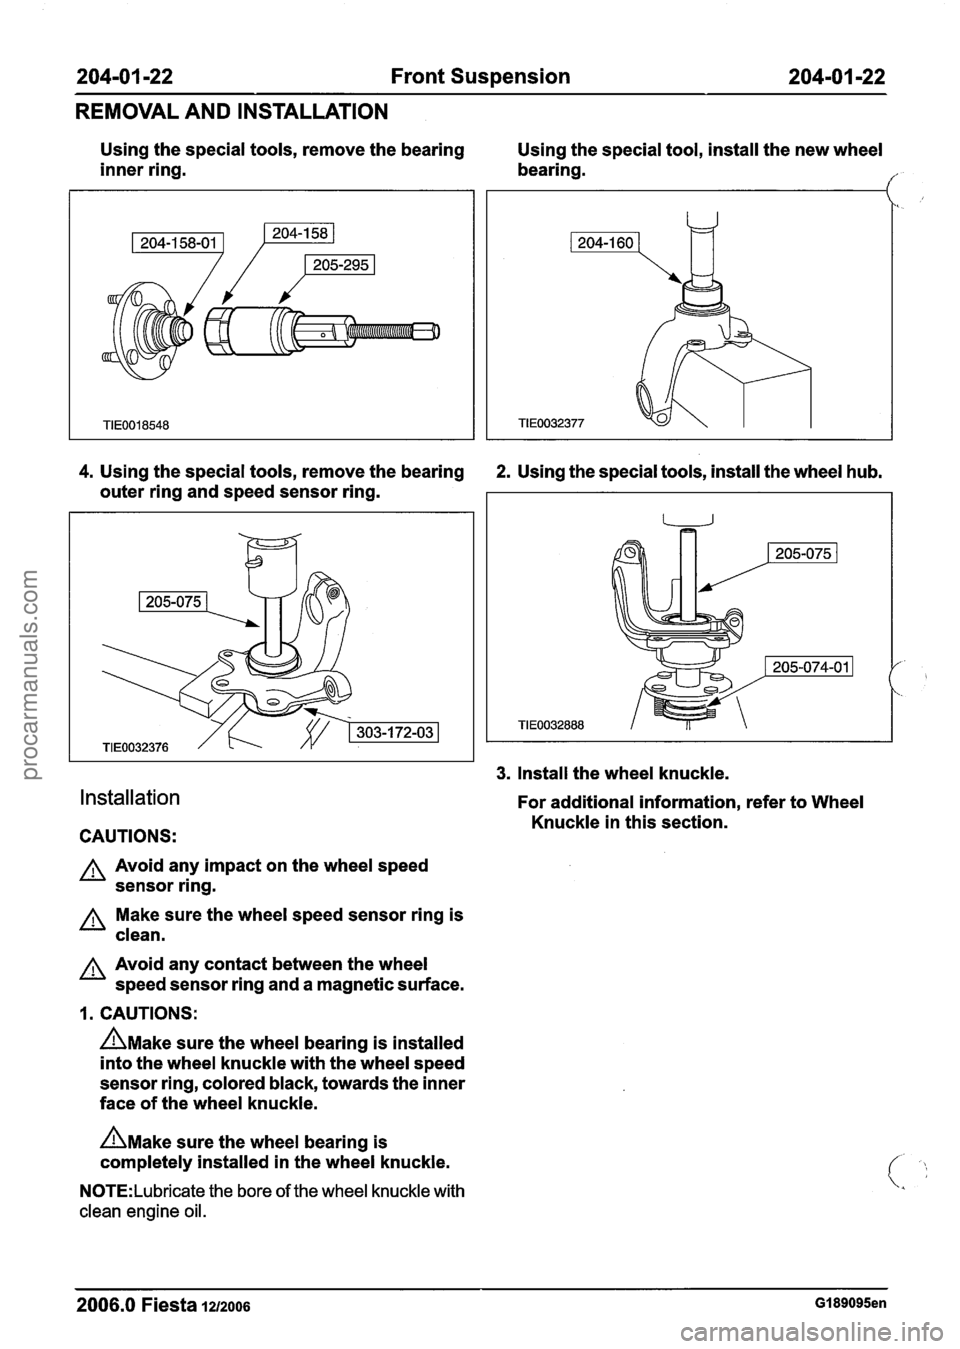
Using the special tools, remove the bearing
Using the special tool, install the new wheel
inner ring. bearing.
I"
4. Using the special tools, remove the bearing 2. Using the special tools, install the wheel hub.
outer ring and speed sensor ring.
Installation
CAUTIONS:
A Avoid any impact on the wheel speed
sensor ring.
Make sure the wheel speed sensor ring is
clean.
A Avoid any contact between the wheel
speed sensor ring and a magnetic surface.
1. CAUTIONS:
n~ake sure the wheel bearing is installed
into the wheel knuckle with the wheel speed
sensor ring, colored black, towards the inner
face of the wheel knuckle.
n~ake sure the wheel bearing is
completely installed in the wheel knuckle.
N0TE:Lubricate the bore of the wheel knuckle with
clean engine oil.
3. Install the wheel knuckle.
For additional information, refer to Wheel
Knuckle in this section.
--
2006.0 Fiesta 1212006 GI 89095en
procarmanuals.com
Page 124 of 1226
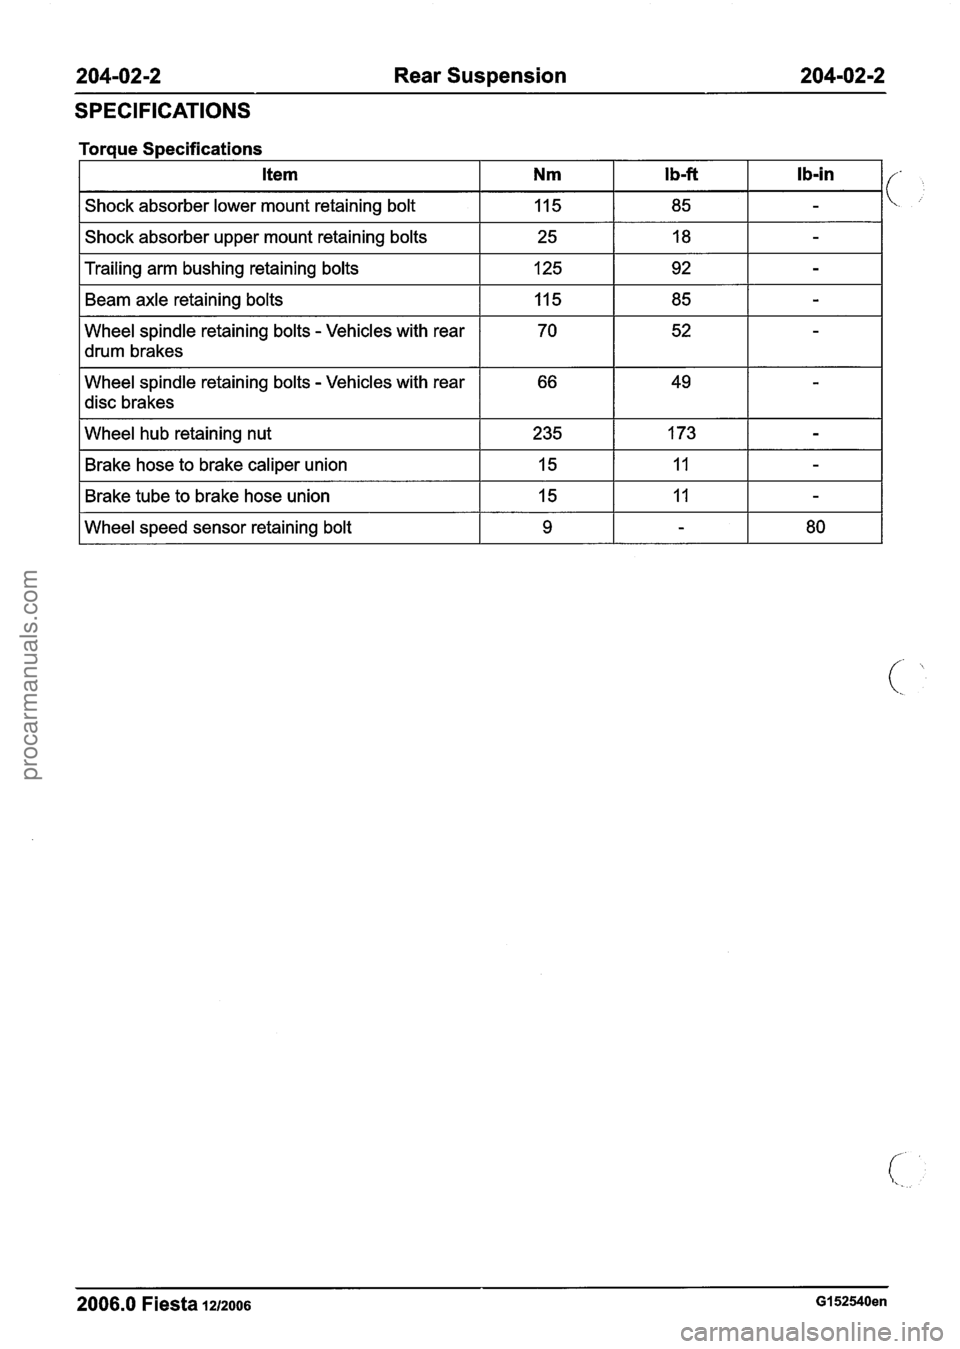
204-02-2 Rear Suspension 204-02-2
SPECIFICATIONS
Torque Specifications
I Shock absorber upper mount retaining bolts I 25 I 18 I - I
Item
Shock absorber lower mount retaining bolt
I Trailing arm bushing retaining bolts I 125 1 92 I - I
Nm
115
I drum brakes I I I I
Beam axle retaining bolts
Wheel spindle retaining bolts
- Vehicles with rear
Wheel spindle retaining bolts
- Vehicles with rear
disc brakes
Ib-ft
85
I Wheel hub retaining nut 1 235 1 173 1 - I
I b-in
-
115
70
I Brake hose to brake caliper union I 15 I 11 I - I
I Brake tube to brake hose union I 15 I 11 I - I
85
52
I Wheel speed sensor retaining bolt I 9 I - I 80 I
-
-
2006.0 Fiesta 1212006 GI 52540en
procarmanuals.com
Page 126 of 1226
204-0214 Rear Suspension 204-02-4
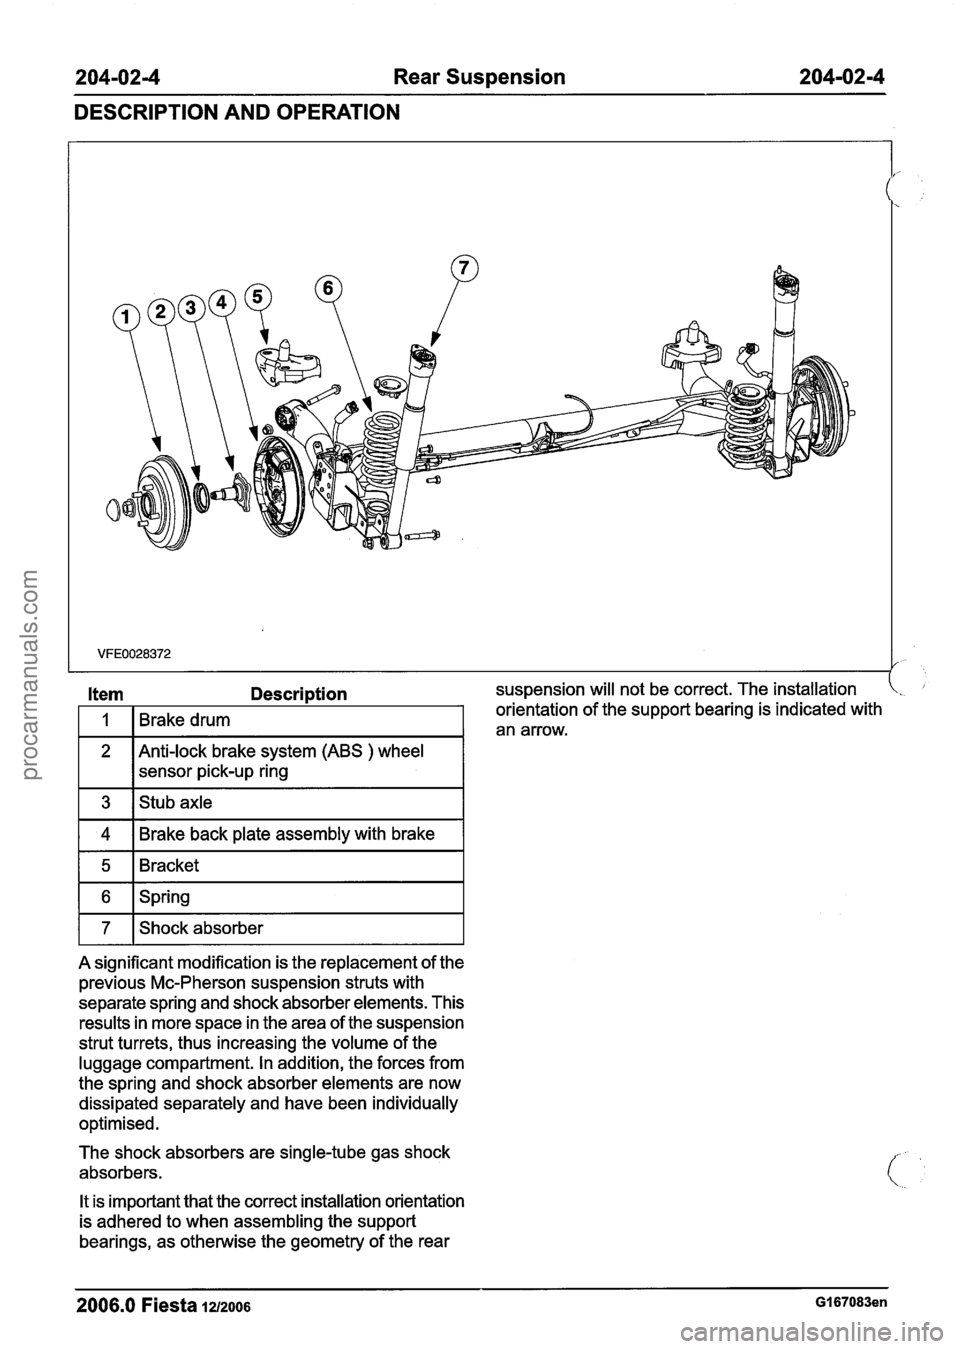
DESCRIPTION AND OPERATION
suspension will not be correct. The installation .
orientation of the support bearing is indicated with
an arrow.
sensor pick-up ring
1 3 1 stub axle I
1 4 1 Brake back plate assembly with brake I
1 5 1 Bracket I
1 6 1 Spring I
1 7 1 Shock absorber I
A significant modification is the replacement of the
previous Mc-Pherson suspension struts with
separate spring and shock absorber elements. This
results in more space in the area of the suspension
strut turrets, thus increasing the volume of the
luggage compartment. In addition, the forces from
the spring and shock absorber elements are now
dissipated separately and have been individually
optimised.
The shock absorbers are single-tube gas shock
absorbers.
It is important that the correct installation orientation
is adhered to when assembling the support
bearings, as otherwise the geometry of the rear
- -
2006.0 Fiesta 1212006 GI 67083en
procarmanuals.com
Page 132 of 1226
204-02-1 0 Rear Suspension 204-02-1 0
REMOVAL AND INSTALLATION
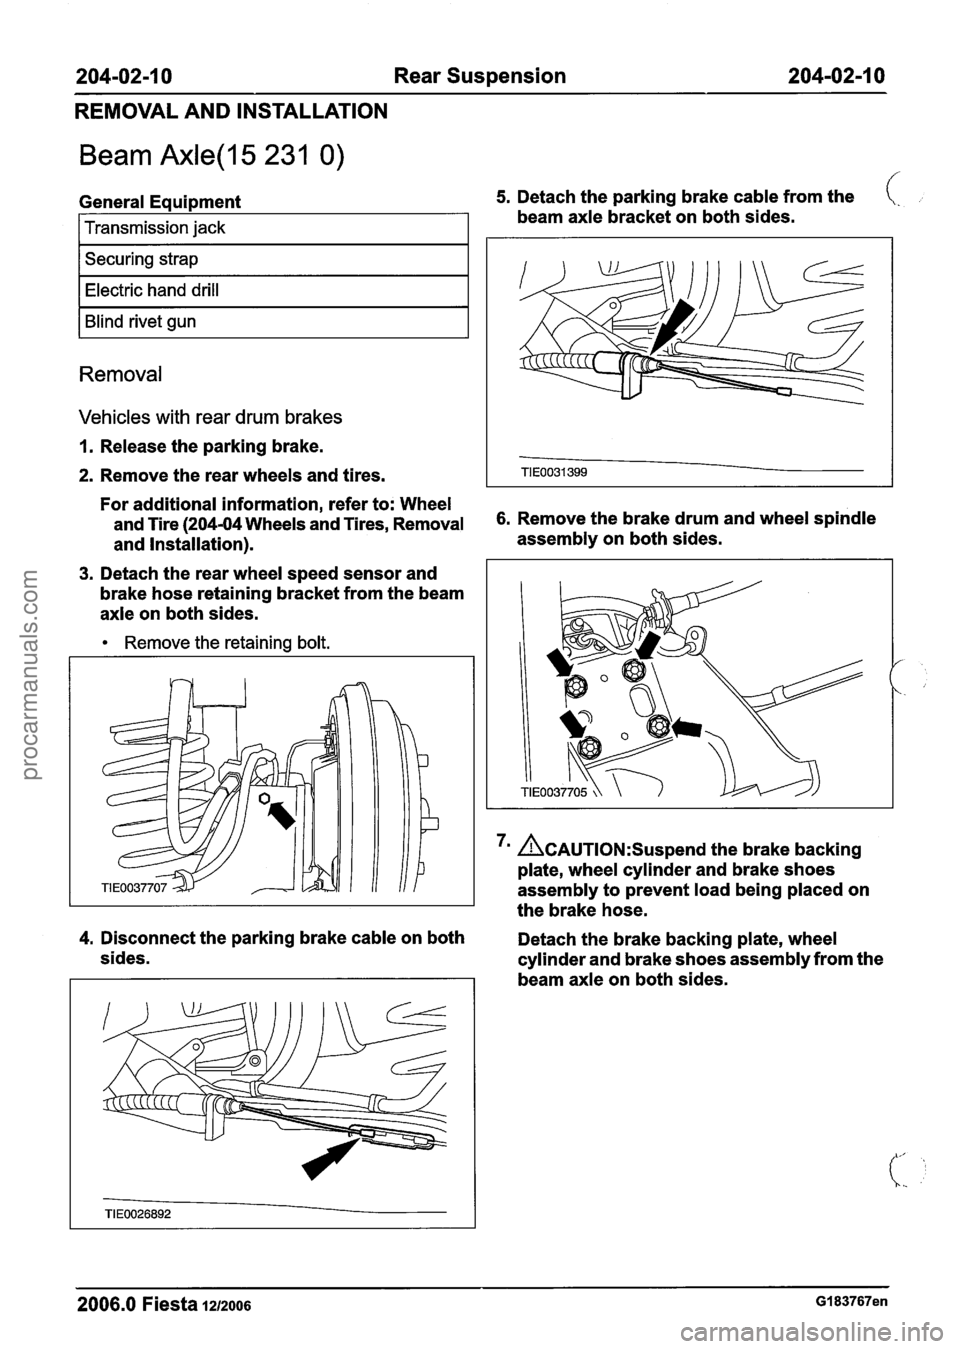
Beam Axle(l5 231 0)
f
General Equipment 5. Detach the parking brake cable from the (.
beam axle bracket on both sides. I Transmission jack
I Securing strap I
I Electric hand drill I
I Blind rivet gun I
Removal
Vehicles with rear drum brakes
1. Release the parking brake.
2. Remove the rear wheels and tires.
For additional information, refer to: Wheel
and Tire (204.04 Wheels and Tires, Removal 6. Remove the brake dIIlm and wheel spindle
and Installation). assembly
on both sides.
3. Detach the rear wheel speed sensor and
brake hose retaining bracket from the beam
axle on both sides.
Remove the retaining bolt.
7m &AUTION:S~~~~~~ the brake backing
plate, wheel cylinder and brake shoes
assembly to prevent load being placed on
the brake hose.
4. Disconnect the parking brake cable on both
Detach the brake backing plate, wheel
sides. cylinder and brake shoes assembly from the
beam axle on both sides.
2006.0 Fiesta 1212006 G183767en
procarmanuals.com
Page 133 of 1226
204-02-1 1 Rear Suspension 204-02-1 1
REMOVAL AND INSTALLATION
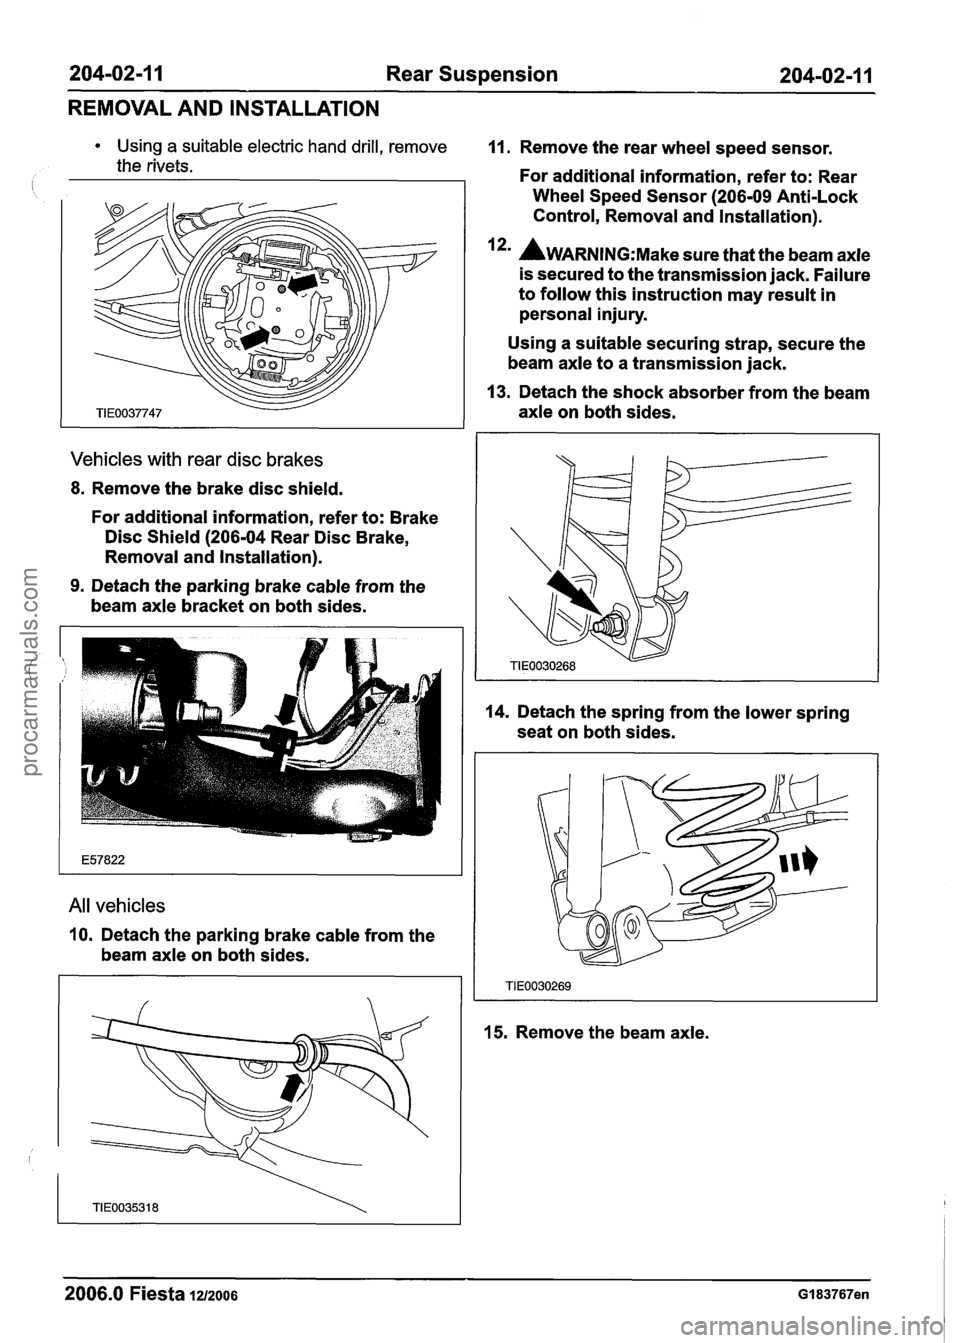
Using a suitable electric hand drill, remove
the rivets.
Vehicles with rear disc brakes
8. Remove the brake disc shield.
For additional information, refer to: Brake
Disc Shield
(206-04 Rear Disc Brake,
Removal and Installation).
9. Detach the parking brake cable from the
beam axle bracket on both sides.
All vehicles
10. Detach the parking brake cable from the
beam axle on both sides.
11. Remove the rear wheel speed sensor.
For additional information, refer to: Rear
Wheel Speed Sensor
(206-09 Anti-Lock
Control, Removal and Installation).
I*' AWARNING:M~~~ sure that the beam axle
is secured to the transmission jack. Failure
to follow this instruction may result in
personal injury.
Using a suitable securing strap, secure the
beam axle to a transmission jack.
13. Detach the shock absorber from the beam
axle on both sides.
14. Detach the spring from the lower spring
seat on both sides.
15. Remove the beam axle.
2006.0 Fiesta 1212006 GI 83767en
procarmanuals.com
Page 134 of 1226
204-02-1 2 Rear Suspension 204-02-1 2
REMOVAL AND INSTALLATION
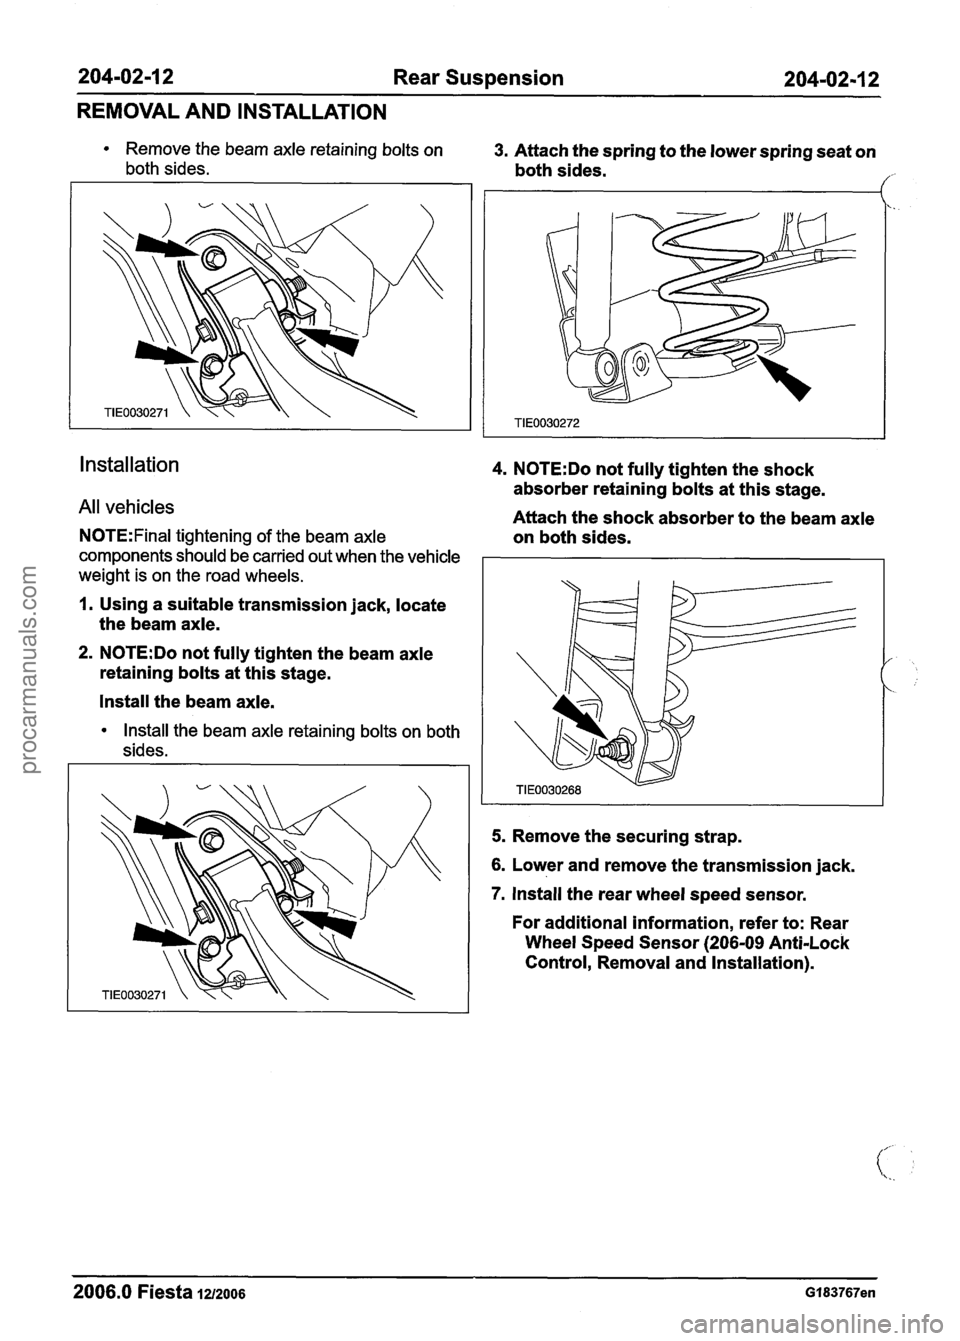
Remove the beam axle retaining bolts on 3. Attach the spring to the lower spring seat on
both sides. both sides. /'
installation 4. N0TE:Do not fully tighten the shock
absorber retaining bolts at this stage.
All vehicles Attach the shock absorber to the beam axle
N0TE:Final tightening of the beam axle on both sides.
components should be carried out when the vehicle I I
weight is on the road wheels.
1. Using a suitable transmission jack, locate
the beam axle.
2. N0TE:Do not fully tighten the beam axle
retaining bolts at this stage.
Install the beam axle.
Install the beam axle retaining bolts on both
sides.
5. Remove the securing strap.
6. Lower and remove the transmission jack.
7. Install the rear wheel speed sensor.
For additional information, refer to: Rear
Wheel Speed Sensor
(206-09 Anti-Lock
Control, Removal and Installation).
2006.0 Fiesta 1212006 Gl83767en
procarmanuals.com