FORD FUSION (AMERICAS) 2014 2.G Owners Manual
Manufacturer: FORD, Model Year: 2014, Model line: FUSION (AMERICAS), Model: FORD FUSION (AMERICAS) 2014 2.GPages: 458, PDF Size: 27.89 MB
Page 121 of 458
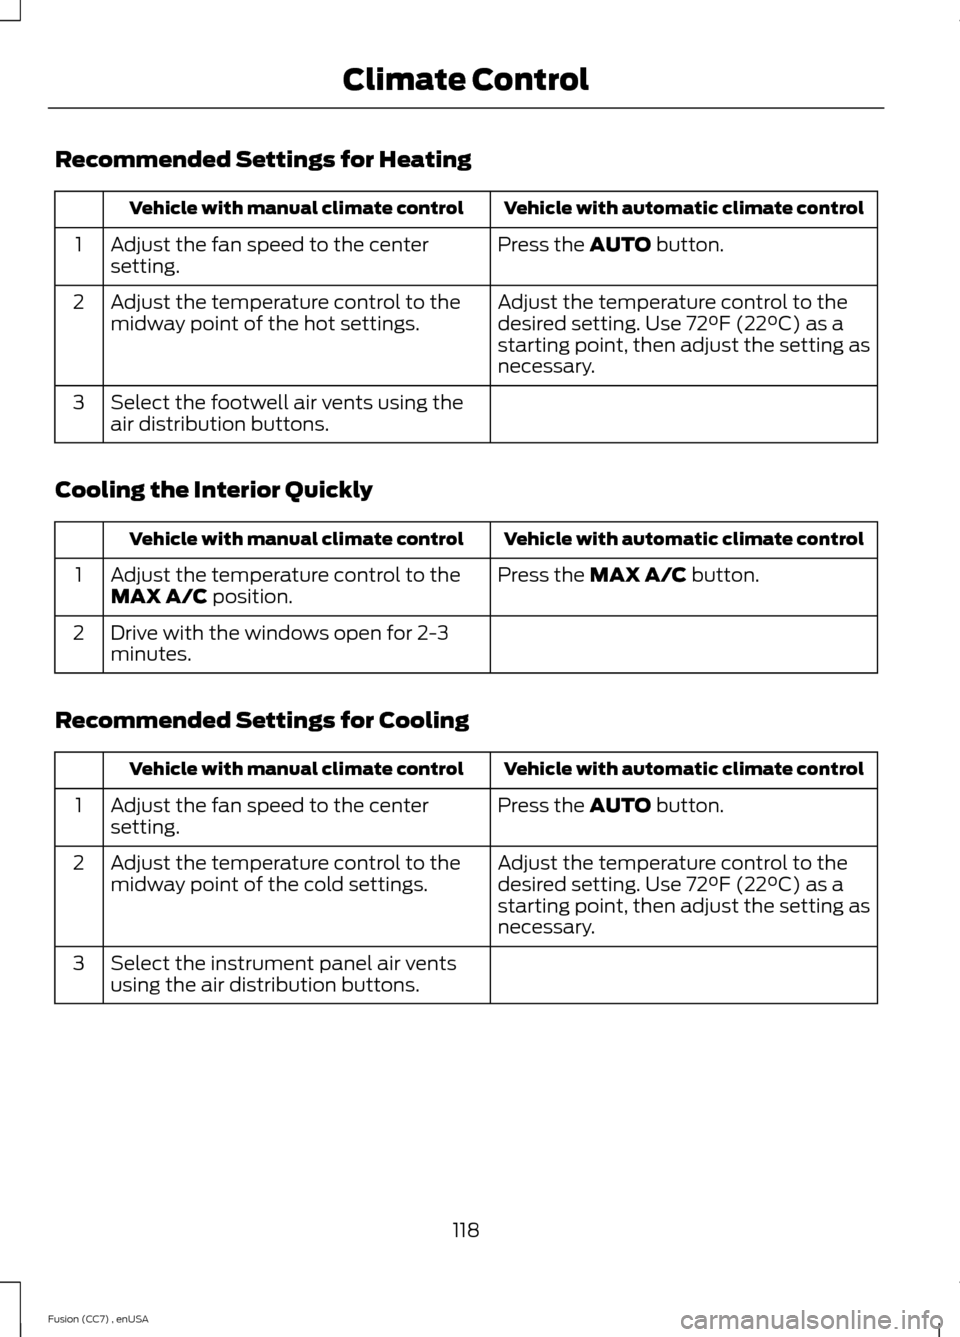
Recommended Settings for Heating
Vehicle with automatic climate controlVehicle with manual climate control
Press the AUTO button.Adjust the fan speed to the centersetting.1
Adjust the temperature control to thedesired setting. Use 72°F (22°C) as astarting point, then adjust the setting asnecessary.
Adjust the temperature control to themidway point of the hot settings.2
Select the footwell air vents using theair distribution buttons.3
Cooling the Interior Quickly
Vehicle with automatic climate controlVehicle with manual climate control
Press the MAX A/C button.Adjust the temperature control to theMAX A/C position.1
Drive with the windows open for 2-3minutes.2
Recommended Settings for Cooling
Vehicle with automatic climate controlVehicle with manual climate control
Press the AUTO button.Adjust the fan speed to the centersetting.1
Adjust the temperature control to thedesired setting. Use 72°F (22°C) as astarting point, then adjust the setting asnecessary.
Adjust the temperature control to themidway point of the cold settings.2
Select the instrument panel air ventsusing the air distribution buttons.3
118Fusion (CC7) , enUSAClimate Control
Page 122 of 458
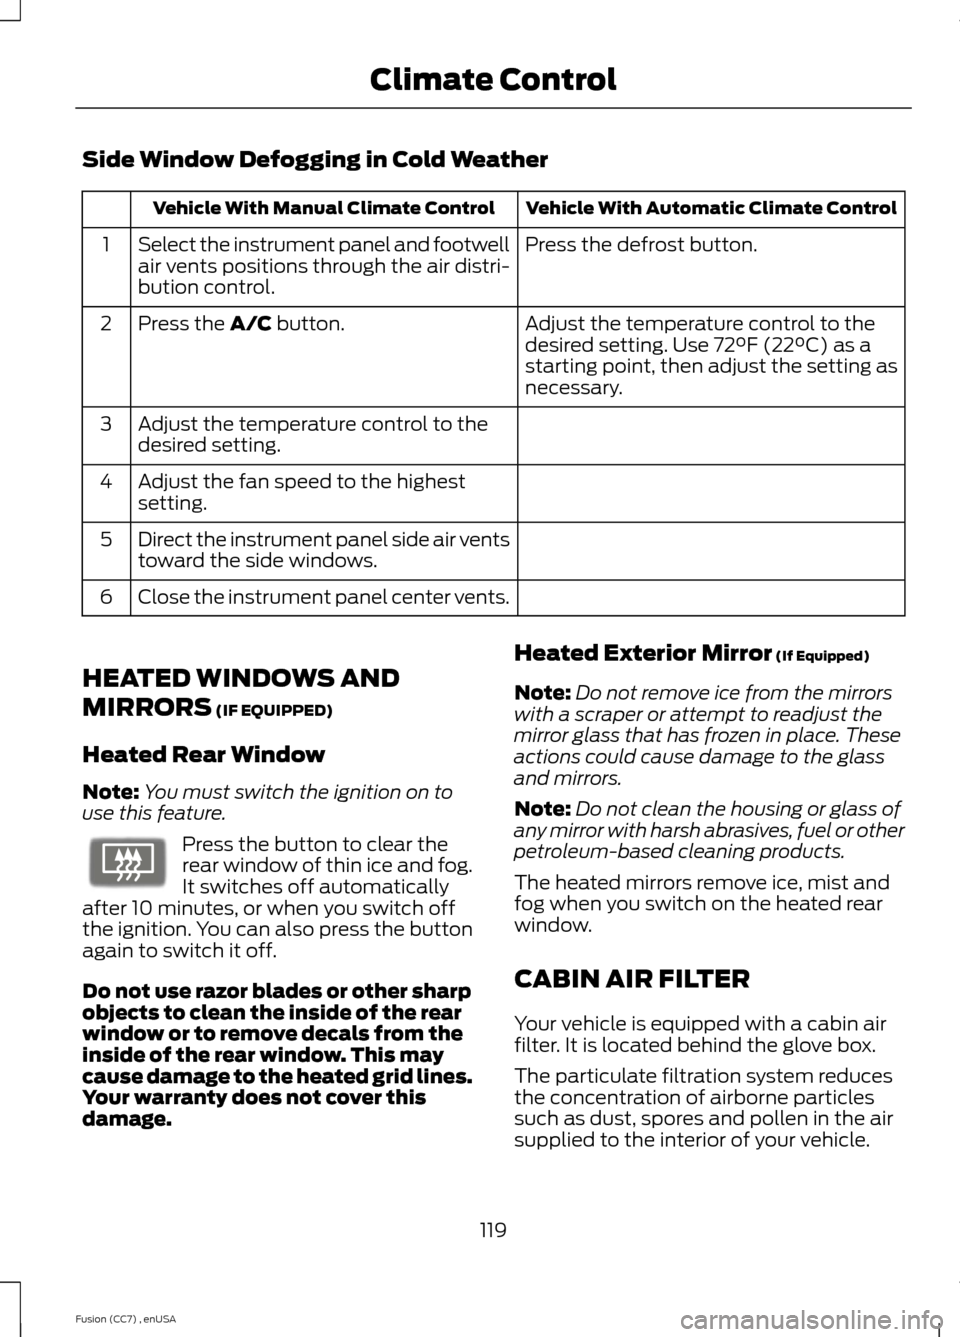
Side Window Defogging in Cold Weather
Vehicle With Automatic Climate ControlVehicle With Manual Climate Control
Press the defrost button.Select the instrument panel and footwellair vents positions through the air distri-bution control.
1
Adjust the temperature control to thedesired setting. Use 72°F (22°C) as astarting point, then adjust the setting asnecessary.
Press the A/C button.2
Adjust the temperature control to thedesired setting.3
Adjust the fan speed to the highestsetting.4
Direct the instrument panel side air ventstoward the side windows.5
Close the instrument panel center vents.6
HEATED WINDOWS AND
MIRRORS (IF EQUIPPED)
Heated Rear Window
Note:You must switch the ignition on touse this feature.
Press the button to clear therear window of thin ice and fog.It switches off automaticallyafter 10 minutes, or when you switch offthe ignition. You can also press the buttonagain to switch it off.
Do not use razor blades or other sharpobjects to clean the inside of the rearwindow or to remove decals from theinside of the rear window. This maycause damage to the heated grid lines.Your warranty does not cover thisdamage.
Heated Exterior Mirror (If Equipped)
Note:Do not remove ice from the mirrorswith a scraper or attempt to readjust themirror glass that has frozen in place. Theseactions could cause damage to the glassand mirrors.
Note:Do not clean the housing or glass ofany mirror with harsh abrasives, fuel or otherpetroleum-based cleaning products.
The heated mirrors remove ice, mist andfog when you switch on the heated rearwindow.
CABIN AIR FILTER
Your vehicle is equipped with a cabin airfilter. It is located behind the glove box.
The particulate filtration system reducesthe concentration of airborne particlessuch as dust, spores and pollen in the airsupplied to the interior of your vehicle.
119Fusion (CC7) , enUSAClimate ControlE72507
Page 123 of 458
Note:Make sure you have a cabin air filterinstalled at all times. This prevents foreignobjects from entering the system. Runningthe system without a filter in place couldresult in degradation or damage to thesystem.
The particulate filtration system gives youand your passengers the followingbenefits:
•It improves your driving comfort byreducing particle concentration.
•It improves the interior compartmentcleanliness.
•It protects the climate controlcomponents from particle deposits.
Replace the filter at regular intervals. SeeScheduled Maintenance (page 428).
For additional cabin air filter information,or to replace the filter, see an authorizeddealer.
REMOTE START (IF EQUIPPED)
The remote start feature allows you topre-condition the interior of your vehicle.The climate control system works toachieve comfort according to your previoussettings.
Note:You cannot adjust the system duringremote start operation.
Turn the ignition on to return the systemto its previous settings. You can now makeadjustments normally, but you need to turncertain vehicle-dependent features backon, such as:
•Heated seats.
•Cooled seats.
•Heated steering wheel.
•Heated mirrors.
•Heated rear window.
You can adjust the default remote startsettings using the information displaycontrols. See Information Displays(page 87).
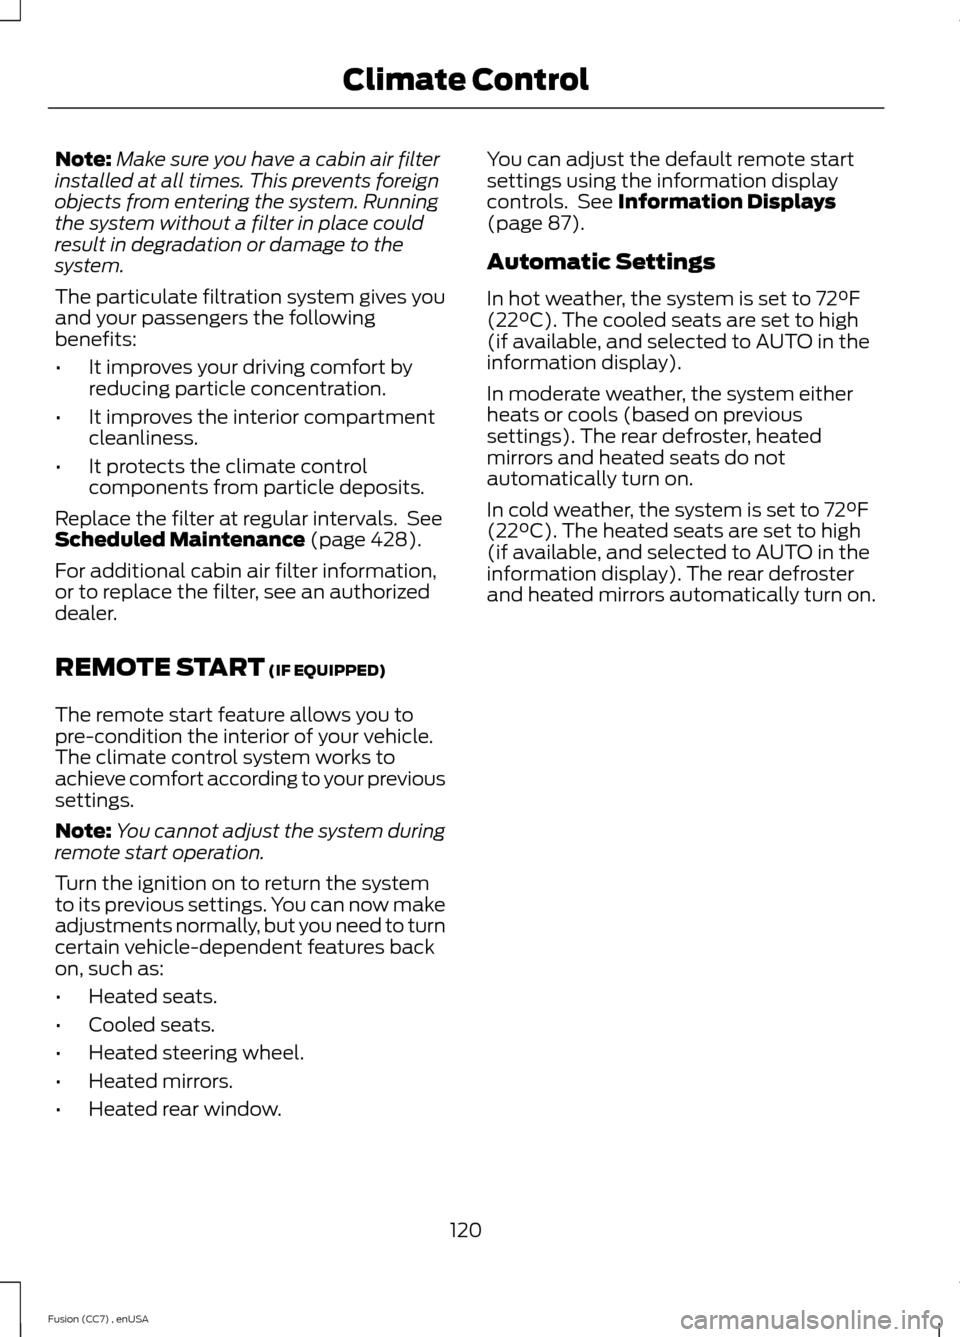
Automatic Settings
In hot weather, the system is set to 72°F(22°C). The cooled seats are set to high(if available, and selected to AUTO in theinformation display).
In moderate weather, the system eitherheats or cools (based on previoussettings). The rear defroster, heatedmirrors and heated seats do notautomatically turn on.
In cold weather, the system is set to 72°F(22°C). The heated seats are set to high(if available, and selected to AUTO in theinformation display). The rear defrosterand heated mirrors automatically turn on.
120Fusion (CC7) , enUSAClimate Control
Page 124 of 458
SITTING IN THE CORRECT
POSITION
WARNINGS
Sitting improperly, out of position orwith the seat back reclined too farcan take weight off the seat cushionand affect the decision of the passengersensing system, resulting in serious injuryor death in the event of a crash. Always situpright against your seat back, with yourfeet on the floor.
Do not recline the seat back as thiscan cause the occupant to slideunder the safety belt, resulting inserious injury in the event of a crash.
Do not place objects higher than theseat back to reduce the risk ofserious injury in the event of a crashor during heavy braking.
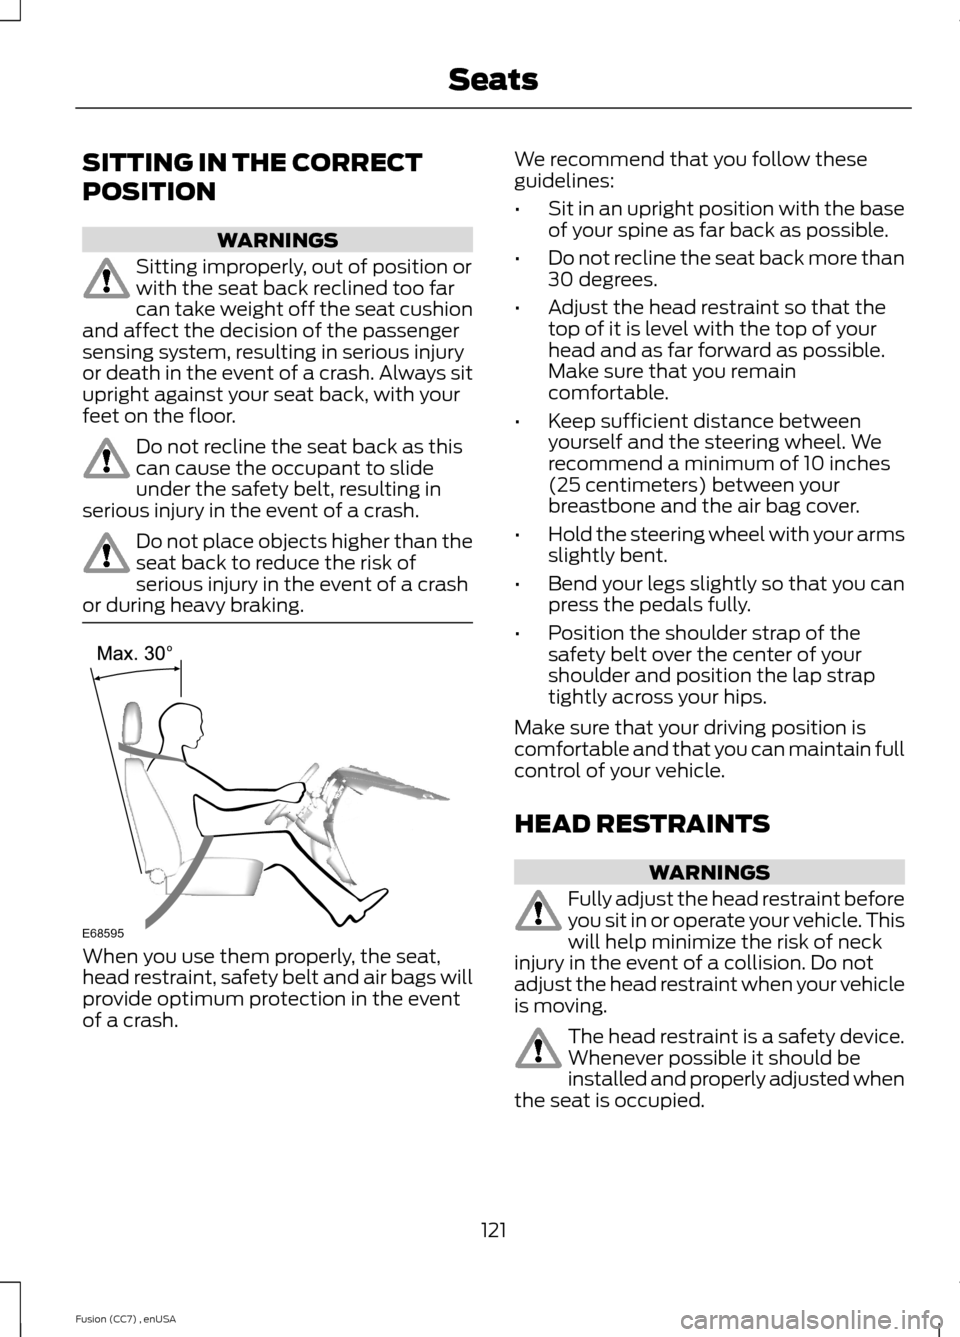
When you use them properly, the seat,head restraint, safety belt and air bags willprovide optimum protection in the eventof a crash.
We recommend that you follow theseguidelines:
•Sit in an upright position with the baseof your spine as far back as possible.
•Do not recline the seat back more than30 degrees.
•Adjust the head restraint so that thetop of it is level with the top of yourhead and as far forward as possible.Make sure that you remaincomfortable.
•Keep sufficient distance betweenyourself and the steering wheel. Werecommend a minimum of 10 inches(25 centimeters) between yourbreastbone and the air bag cover.
•Hold the steering wheel with your armsslightly bent.
•Bend your legs slightly so that you canpress the pedals fully.
•Position the shoulder strap of thesafety belt over the center of yourshoulder and position the lap straptightly across your hips.
Make sure that your driving position iscomfortable and that you can maintain fullcontrol of your vehicle.
HEAD RESTRAINTS
WARNINGS
Fully adjust the head restraint beforeyou sit in or operate your vehicle. Thiswill help minimize the risk of neckinjury in the event of a collision. Do notadjust the head restraint when your vehicleis moving.
The head restraint is a safety device.Whenever possible it should beinstalled and properly adjusted whenthe seat is occupied.
121Fusion (CC7) , enUSASeatsE68595
Page 125 of 458
WARNINGS
Install the head restraint properly tohelp minimize the risk of neck injuryin the event of a collision.
Note:Adjust the seat back to an uprightdriving position before adjusting the headrestraint. Adjust the head restraint so thatthe top of it is level with the top of your headand as far forward as possible. Make surethat you remain comfortable. If you areextremely tall, adjust the head restraint toits highest position.
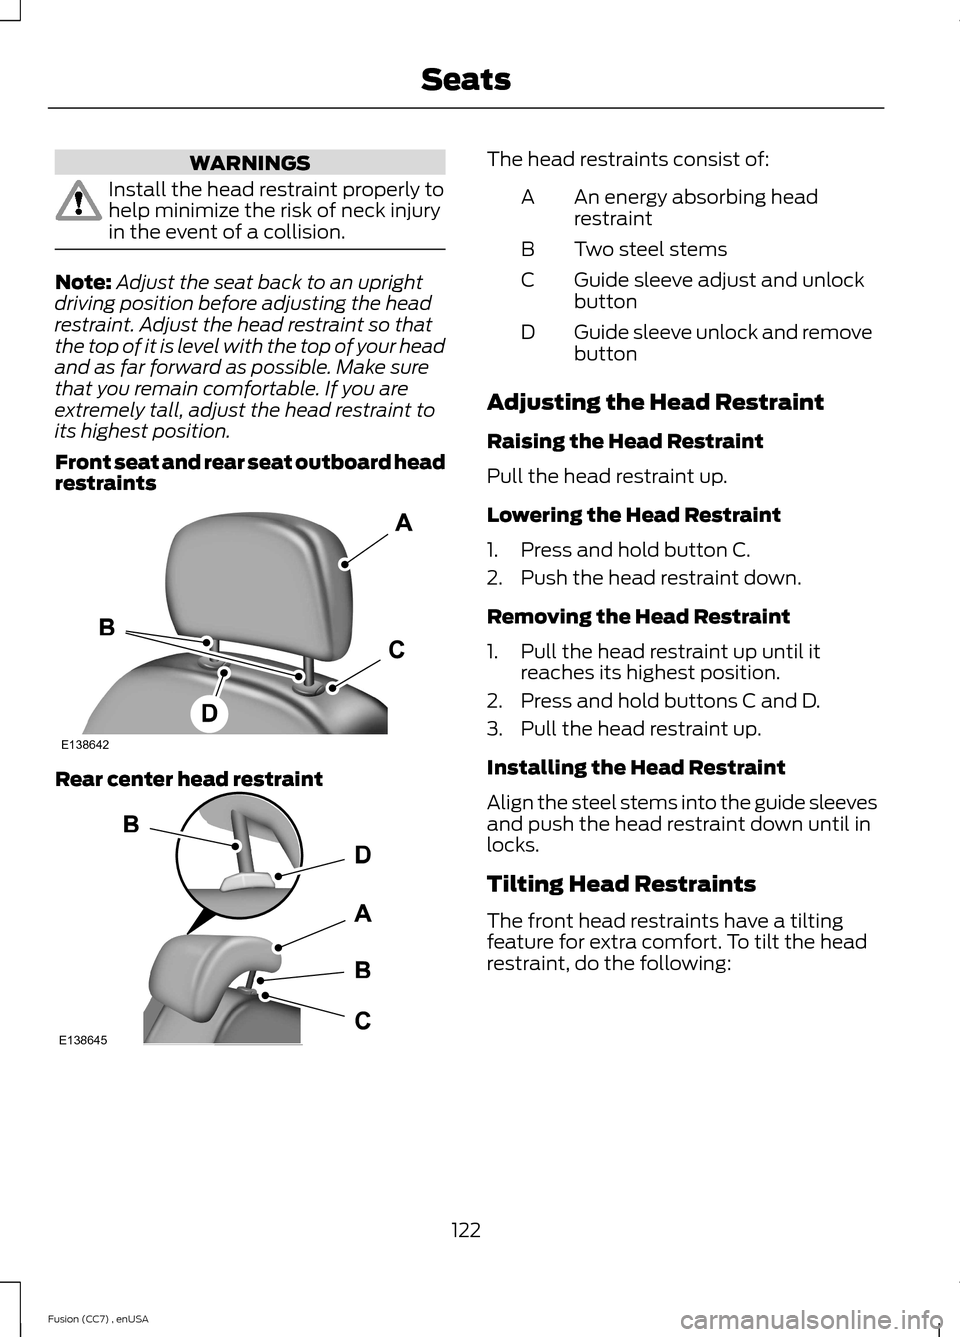
Front seat and rear seat outboard headrestraints
Rear center head restraint
The head restraints consist of:
An energy absorbing headrestraintA
Two steel stemsB
Guide sleeve adjust and unlockbuttonC
Guide sleeve unlock and removebuttonD
Adjusting the Head Restraint
Raising the Head Restraint
Pull the head restraint up.
Lowering the Head Restraint
1.Press and hold button C.
2.Push the head restraint down.
Removing the Head Restraint
1.Pull the head restraint up until itreaches its highest position.
2.Press and hold buttons C and D.
3.Pull the head restraint up.
Installing the Head Restraint
Align the steel stems into the guide sleevesand push the head restraint down until inlocks.
Tilting Head Restraints
The front head restraints have a tiltingfeature for extra comfort. To tilt the headrestraint, do the following:
122Fusion (CC7) , enUSASeatsE138642 E138645
Page 126 of 458
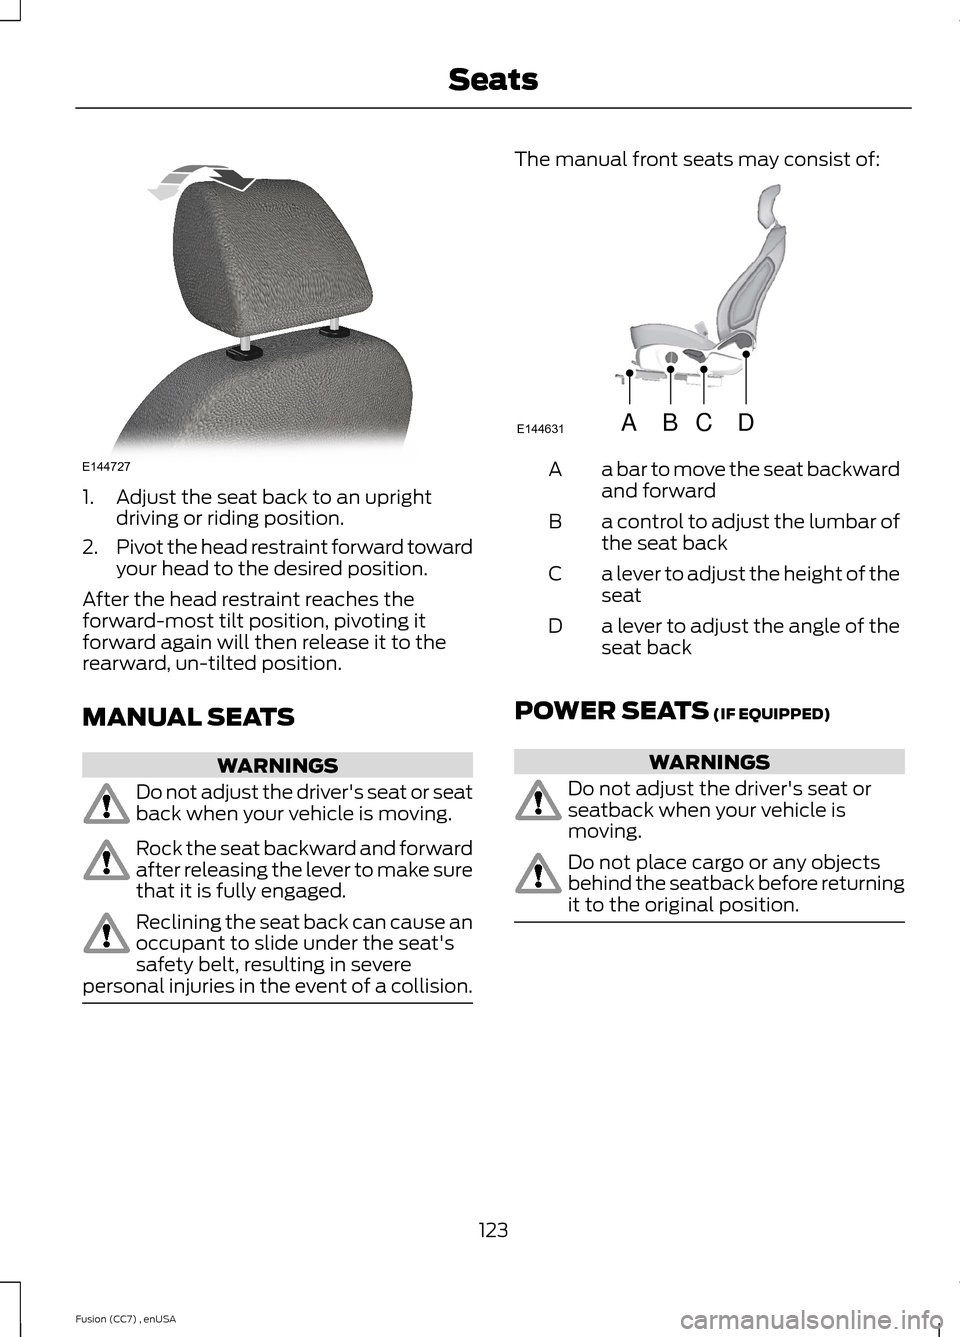
1.Adjust the seat back to an uprightdriving or riding position.
2.Pivot the head restraint forward towardyour head to the desired position.
After the head restraint reaches theforward-most tilt position, pivoting itforward again will then release it to therearward, un-tilted position.
MANUAL SEATS
WARNINGS
Do not adjust the driver's seat or seatback when your vehicle is moving.
Rock the seat backward and forwardafter releasing the lever to make surethat it is fully engaged.
Reclining the seat back can cause anoccupant to slide under the seat'ssafety belt, resulting in severepersonal injuries in the event of a collision.
The manual front seats may consist of:
a bar to move the seat backwardand forwardA
a control to adjust the lumbar ofthe seat backB
a lever to adjust the height of theseatC
a lever to adjust the angle of theseat backD
POWER SEATS (IF EQUIPPED)
WARNINGS
Do not adjust the driver's seat orseatback when your vehicle ismoving.
Do not place cargo or any objectsbehind the seatback before returningit to the original position.
123Fusion (CC7) , enUSASeatsE144727 ABCDE144631
Page 127 of 458
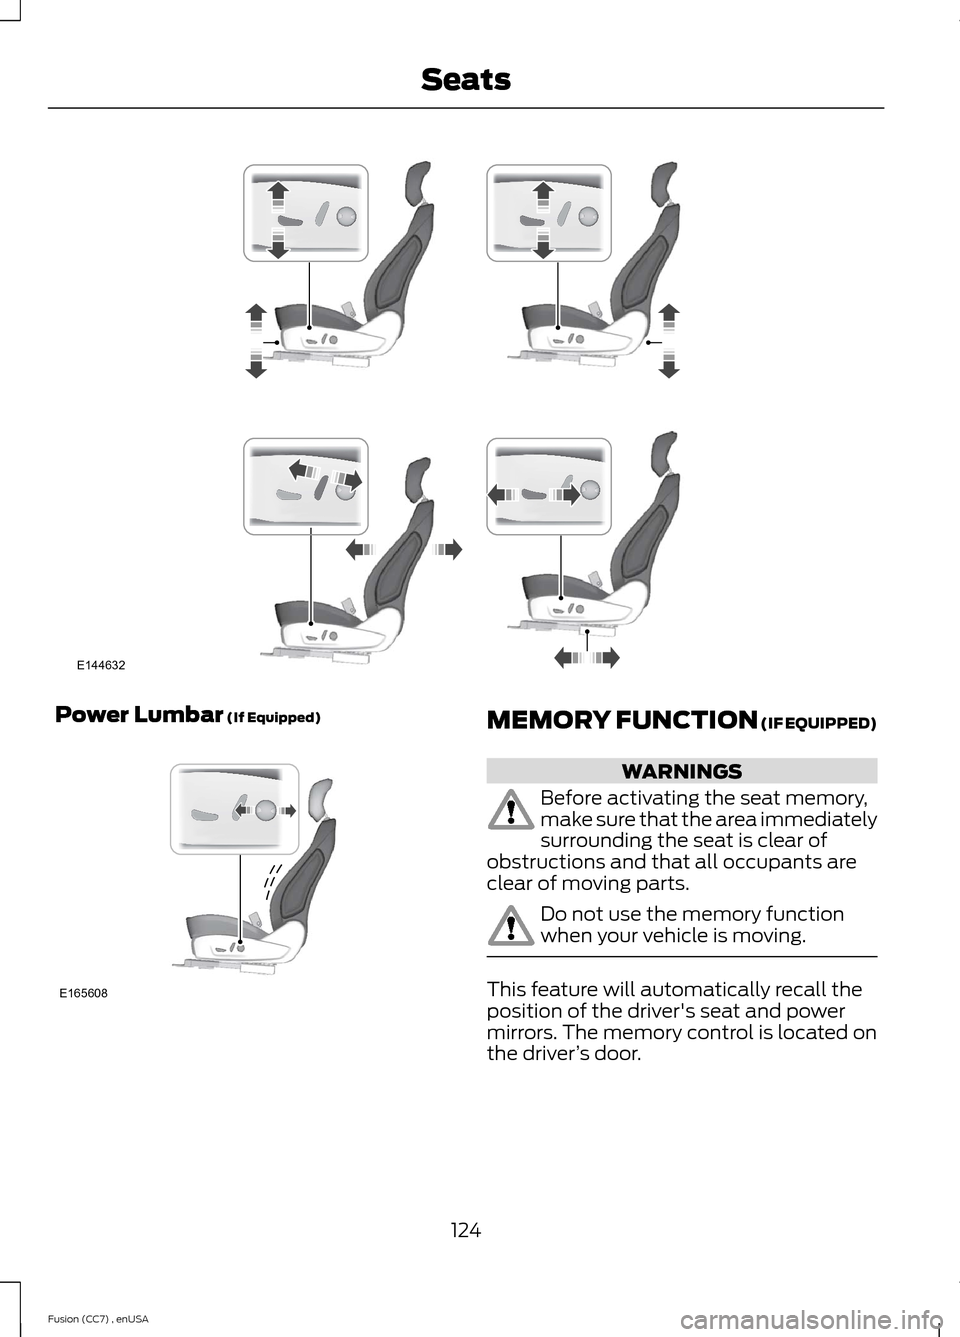
Power Lumbar (If Equipped)MEMORY FUNCTION (IF EQUIPPED)
WARNINGS
Before activating the seat memory,make sure that the area immediatelysurrounding the seat is clear ofobstructions and that all occupants areclear of moving parts.
Do not use the memory functionwhen your vehicle is moving.
This feature will automatically recall theposition of the driver's seat and powermirrors. The memory control is located onthe driver’s door.
124Fusion (CC7) , enUSASeatsE144632 E165608
Page 128 of 458
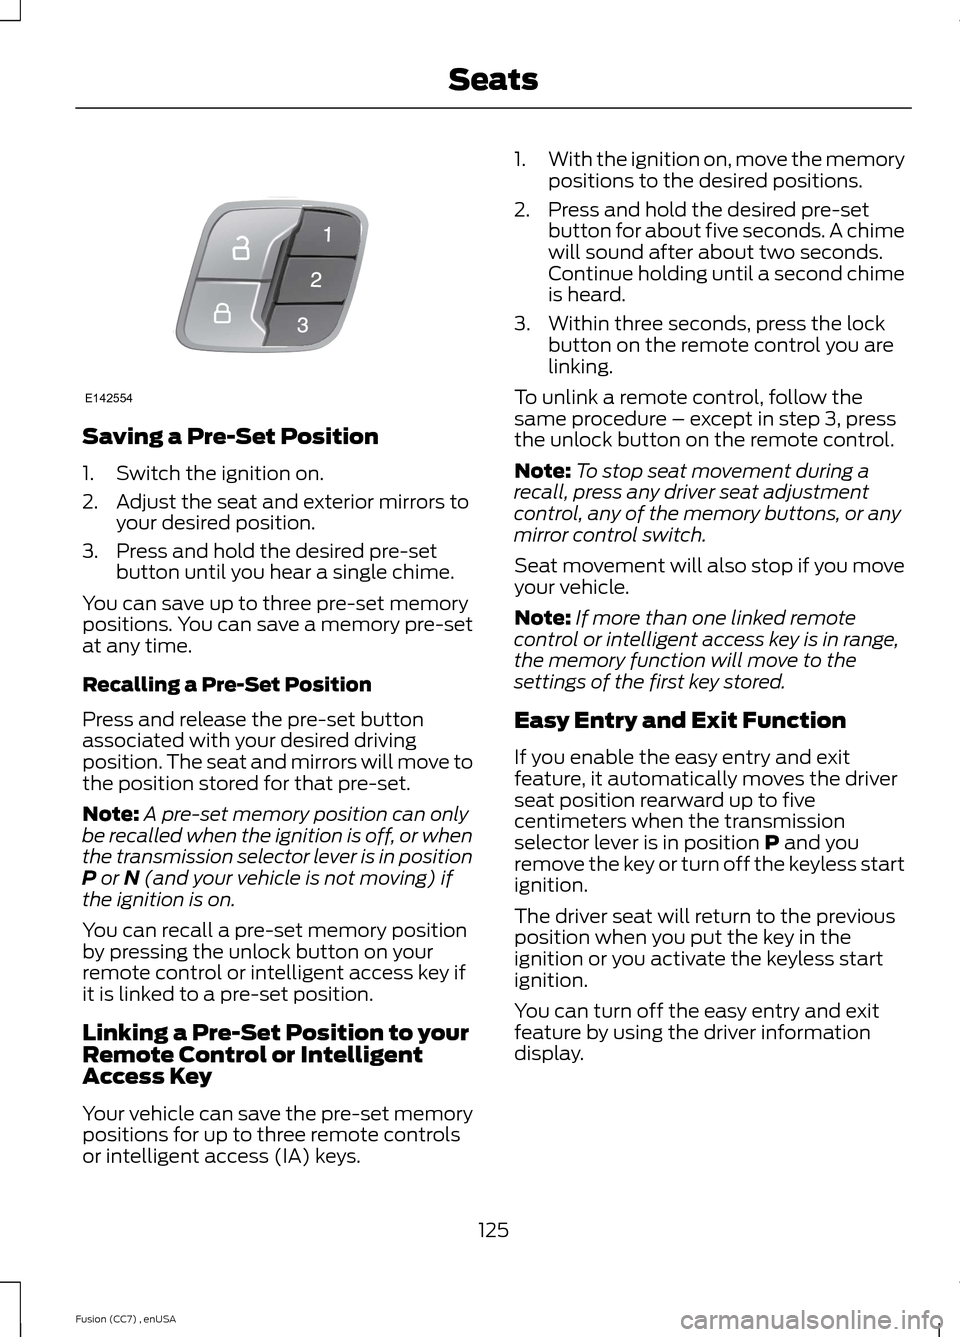
Saving a Pre-Set Position
1.Switch the ignition on.
2.Adjust the seat and exterior mirrors toyour desired position.
3.Press and hold the desired pre-setbutton until you hear a single chime.
You can save up to three pre-set memorypositions. You can save a memory pre-setat any time.
Recalling a Pre-Set Position
Press and release the pre-set buttonassociated with your desired drivingposition. The seat and mirrors will move tothe position stored for that pre-set.
Note:A pre-set memory position can onlybe recalled when the ignition is off, or whenthe transmission selector lever is in positionP or N (and your vehicle is not moving) ifthe ignition is on.
You can recall a pre-set memory positionby pressing the unlock button on yourremote control or intelligent access key ifit is linked to a pre-set position.
Linking a Pre-Set Position to yourRemote Control or IntelligentAccess Key
Your vehicle can save the pre-set memorypositions for up to three remote controlsor intelligent access (IA) keys.
1.With the ignition on, move the memorypositions to the desired positions.
2.Press and hold the desired pre-setbutton for about five seconds. A chimewill sound after about two seconds.Continue holding until a second chimeis heard.
3.Within three seconds, press the lockbutton on the remote control you arelinking.
To unlink a remote control, follow thesame procedure – except in step 3, pressthe unlock button on the remote control.
Note:To stop seat movement during arecall, press any driver seat adjustmentcontrol, any of the memory buttons, or anymirror control switch.
Seat movement will also stop if you moveyour vehicle.
Note:If more than one linked remotecontrol or intelligent access key is in range,the memory function will move to thesettings of the first key stored.
Easy Entry and Exit Function
If you enable the easy entry and exitfeature, it automatically moves the driverseat position rearward up to fivecentimeters when the transmissionselector lever is in position P and youremove the key or turn off the keyless startignition.
The driver seat will return to the previousposition when you put the key in theignition or you activate the keyless startignition.
You can turn off the easy entry and exitfeature by using the driver informationdisplay.
125Fusion (CC7) , enUSASeatsE142554
Page 129 of 458
REAR SEATS
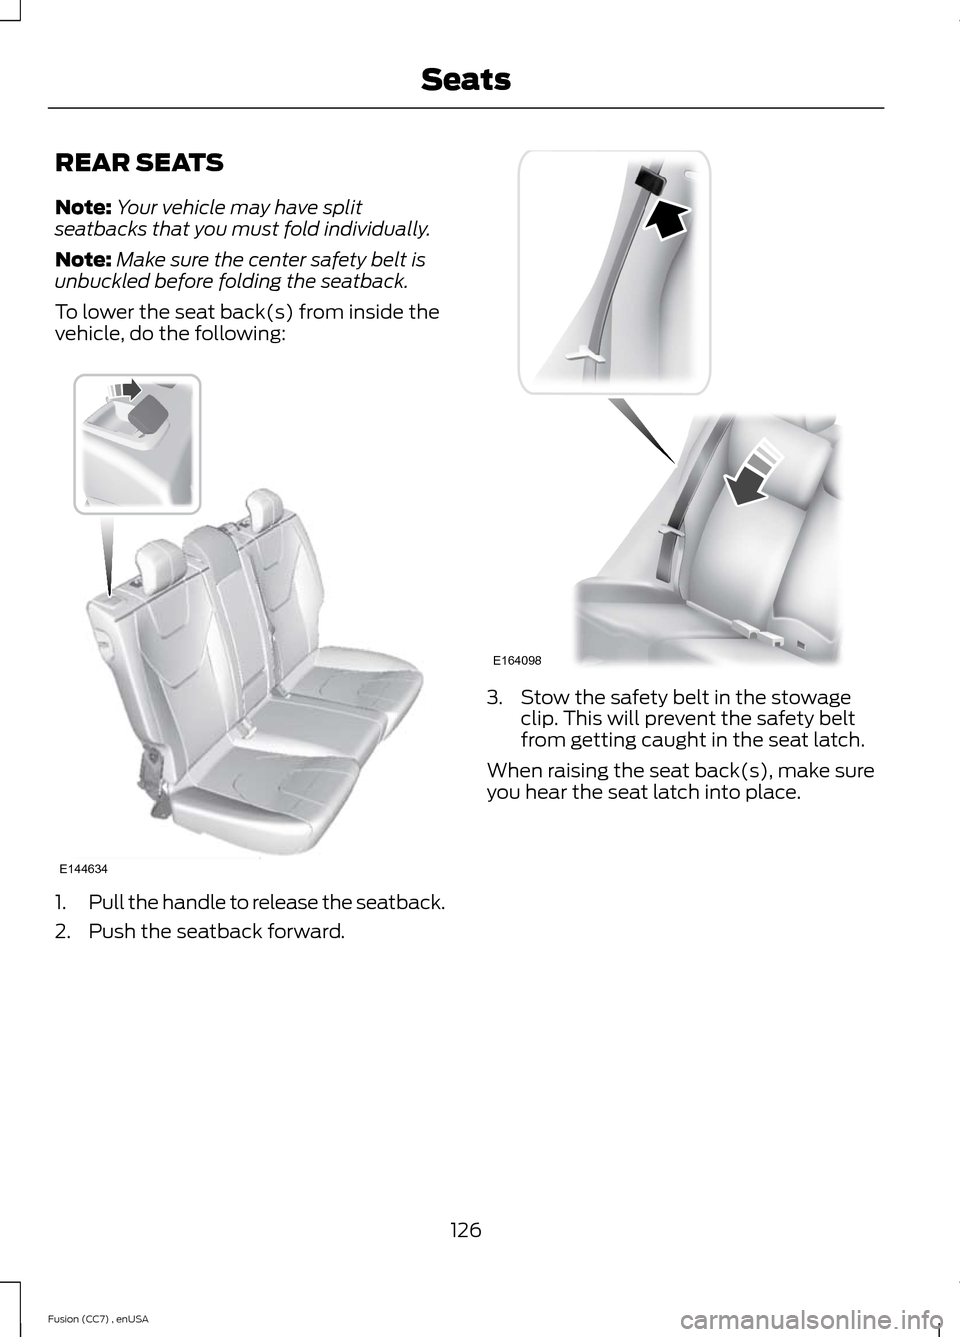
Note:Your vehicle may have splitseatbacks that you must fold individually.
Note:Make sure the center safety belt isunbuckled before folding the seatback.
To lower the seat back(s) from inside thevehicle, do the following:
1.Pull the handle to release the seatback.
2.Push the seatback forward.
3.Stow the safety belt in the stowageclip. This will prevent the safety beltfrom getting caught in the seat latch.
When raising the seat back(s), make sureyou hear the seat latch into place.
126Fusion (CC7) , enUSASeatsE144634 E164098
Page 130 of 458
HEATED SEATS (IF EQUIPPED)
WARNING
People who are unable to feel painto their skin because of advancedage, chronic illness, diabetes, spinalcord injury, medication, alcohol use,exhaustion or other physical conditions,must exercise care when using the heatedseat. The heated seat may cause burnseven at low temperatures, especially ifused for long periods of time. Do not placeanything on the seat that insulates againstheat, such as a blanket or cushion. Thismay cause the heated seat to overheat.Do not puncture the seat with pins, needlesor other pointed objects. This may damagethe heating element which may cause theheated seat to overheat. An overheatedseat may cause serious personal injury.
Do not do the following:
•Place heavy objects on the seat.
•Operate the heated seat if water or anyother liquid is spilled on the seat. Allowthe seat to dry thoroughly.
•Operate the heated seats unless theengine is running. Doing so can causethe battery to lose charge.
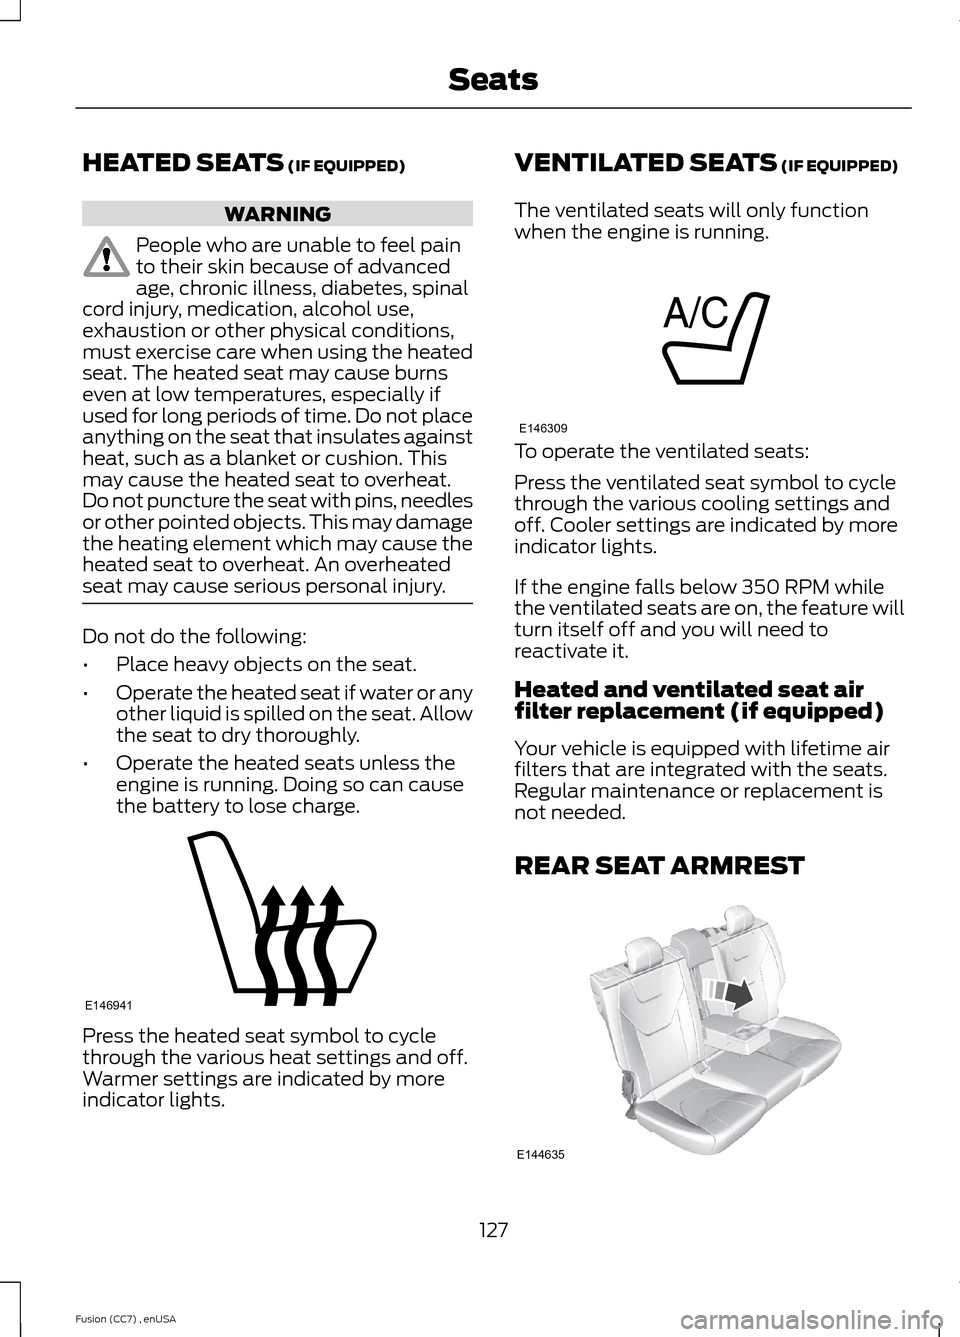
Press the heated seat symbol to cyclethrough the various heat settings and off.Warmer settings are indicated by moreindicator lights.
VENTILATED SEATS (IF EQUIPPED)
The ventilated seats will only functionwhen the engine is running.
To operate the ventilated seats:
Press the ventilated seat symbol to cyclethrough the various cooling settings andoff. Cooler settings are indicated by moreindicator lights.
If the engine falls below 350 RPM whilethe ventilated seats are on, the feature willturn itself off and you will need toreactivate it.
Heated and ventilated seat airfilter replacement (if equipped)
Your vehicle is equipped with lifetime airfilters that are integrated with the seats.Regular maintenance or replacement isnot needed.
REAR SEAT ARMREST
127Fusion (CC7) , enUSASeatsE146941 E146309 E144635