remote start FORD FUSION HYBRID 2014 User Guide
[x] Cancel search | Manufacturer: FORD, Model Year: 2014, Model line: FUSION HYBRID, Model: FORD FUSION HYBRID 2014Pages: 473, PDF Size: 5.93 MB
Page 62 of 473
Anti-Scan Feature
The keypad will go into an anti-scan mode
if you enter the wrong code seven times
(35 consecutive button presses). This
mode disables the keypad for one minute
and the keypad lamp will flash.
The anti-scan feature will turn off after:
• one minute of keypad inactivity
• pressing the unlock button on the
remote control
• switching the ignition on
• unlocking your vehicle using intelligent
access.
Unlocking and Locking the Doors
To Unlock the Driver Door
Enter the factory-set 5-digit code or your
personal code. You must press each
number within five seconds of each other.
The interior lamps will illuminate.
Note: All doors will unlock if you enable the
all-door unlocking mode. See Locking and
Unlocking (page 54).
To Unlock All Doors
Enter the factory-set code or your personal
code, then press 3·4 within five seconds.
To Lock All Doors
Press and hold 7·8 and 9·0 at the same
time (with the driver door closed). You do
not need to enter the keypad code first.
To Release the Trunk
Enter the factory-set code or your personal
code, then press 5·6 within five seconds.
Displaying the Factory Set Code
With Integrated Keyhead Transmitters
Note: You will need to have two
programmed passive anti-theft keys for this
procedure. To display the factory-set code in the
information display:
1. Insert a key into the ignition and switch
the ignition on for a few seconds.
2. Switch the ignition off and remove the
key.
3. Insert the second key into the ignition
and switch the ignition on.
The factory-set code will display for a few
seconds.
Note: The code may not display until after
any other warning messages first display.
With Intelligent Access Keys
Note: You will need to have two
programmed intelligent access keys for this
procedure.
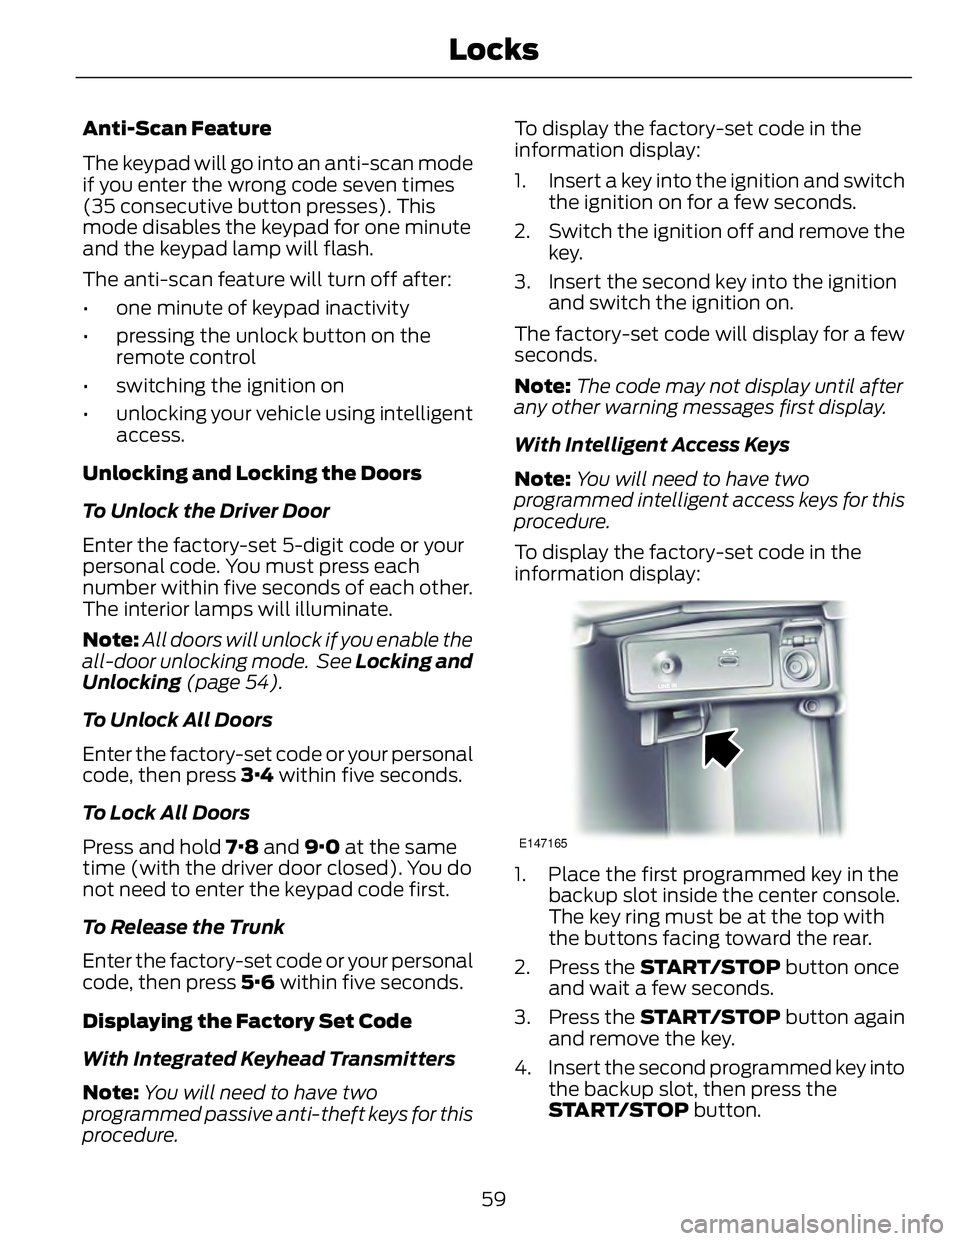
To display the factory-set code in the
information display:
E147165
1. Place the first programmed key in the
backup slot inside the center console.
The key ring must be at the top with
the buttons facing toward the rear.
2. Press the START/STOP button once
and wait a few seconds.
3. Press the START/STOP button again
and remove the key.
4. Insert the second programmed key into
the backup slot, then press the
START/STOP button.
59Locks
Page 64 of 473
PASSIVE ANTI-THEFT
SYSTEM Note: The system is not compatible with
non-Ford aftermarket remote start systems.
Use of these systems may result in vehicle
starting problems and a loss of security
protection.
Note: Metallic objects, electronic devices
or a second coded key on the same key
chain may cause vehicle starting problems
if they are too close to the key when starting
your vehicle. Prevent these objects from
touching the coded key while starting your
vehicle. Switch the ignition off, move all
objects on the key chain away from the
coded key and restart your vehicle if a
problem occurs.
Note: Do not leave a duplicate coded key
in your vehicle. Always take your keys and
lock all doors when leaving your vehicle.
SecuriLock® The system helps prevent your vehicle
from starting unless you use a coded key
programmed to your vehicle. Using the
wrong key may prevent your vehicle from
starting. A message may appear in the
information display.
If you are unable to start your vehicle with
a correctly coded key, a malfunction has
happened. A message may appear in the
information display.
Automatic Arming
Your vehicle arms immediately after
switching the ignition off.
Automatic Disarming
Switching the ignition on with a coded key
disarms your vehicle. Replacement Keys
Note: Your vehicle comes equipped with
two integrated keyhead transmitters or two
intelligent access keys.
The integrated keyhead transmitter
functions as a programmed ignition key
that operates all the locks and starts your
vehicle, as well as a remote control.
The intelligent access key functions as a
programmed key that operates the driver
door lock and activates the intelligent
access with push button start system, as
well as a remote control.
If your programmed transmitters or
standard SecuriLock coded keys
(integrated keyhead transmitters only) are
lost or stolen and you do not have an extra
coded key, you will need to have your
vehicle towed to an authorized dealer. You
need to erase the key codes from your
vehicle and program new coded keys.
Store an extra programmed key away from
your vehicle in a safe place to help prevent
any inconveniences. See your authorized
dealer to purchase additional spare or
replacement keys.
Programming a Spare Integrated
Keyhead Transmitter
Note: You can program a maximum of eight
coded keys to your vehicle. All eight can be
integrated keyhead transmitters.
You can program your own integrated
keyhead transmitter or standard
SecuriLock coded keys to your vehicle. This
procedure will program both the vehicle
immobilizer keycode and the remote entry
portion of the remote control to your
vehicle.
Only use integrated keyhead transmitters
or standard SecuriLock keys.
61Security
Page 65 of 473
You must have two previously
programmed coded keys and the new
unprogrammed key readily accessible. See
an authorized dealer to have the spare key
programmed if two previously
programmed coded keys are not available.
Read and understand the entire procedure
before you begin.
1. Insert the first previously programmed
coded key into the ignition.
2. Switch the ignition from off to on. Keep
the ignition on for at least three
seconds, but no more than 10 seconds.
3. Switch the ignition off and remove the
first coded key from the ignition.
4. After three seconds but within 10
seconds of switching the ignition off,
insert the second previously coded key
into the ignition.
5. Switch the ignition from off to on. Keep
the ignition on for at least three
seconds, but no more than 10 seconds.
6. Switch the ignition off and remove the
second previously programmed coded
key from the ignition.
7. After three seconds but within 10
seconds of switching the ignition off
and removing the previously
programmed coded key, insert the new
unprogrammed key into the ignition.
8. Switch the ignition from off to on. Keep
the ignition on for at least six seconds.
9. Remove the newly programmed coded
key from the ignition.
If the key has been successfully
programmed it will start your vehicle and
operate the remote entry system (if the
new key is an integrated keyhead
transmitter).
If programming was not successful, wait
10 seconds and repeat Steps 1 through 8.
If you are still unsuccessful, take your
vehicle to an authorized dealer. Programming a Spare Intelligent
Access Key
Note: You can program a maximum for four
intelligent access keys to your vehicle.
You must have two previously
programmed intelligent access keys inside
your vehicle and the new unprogrammed
intelligent access keys readily accessible.
See an authorized dealer to have the spare
key programmed if two previously
programmed keys are not available.
Make sure that your vehicle is off before
beginning this procedure. Make sure that
you close all the doors before beginning
and that they remain closed throughout
the procedure. Perform all steps within 30
seconds of starting the sequence. Stop
and wait for at least one minute before
starting again if you perform any steps out
of sequence.
Read and understand the entire procedure
before you begin.
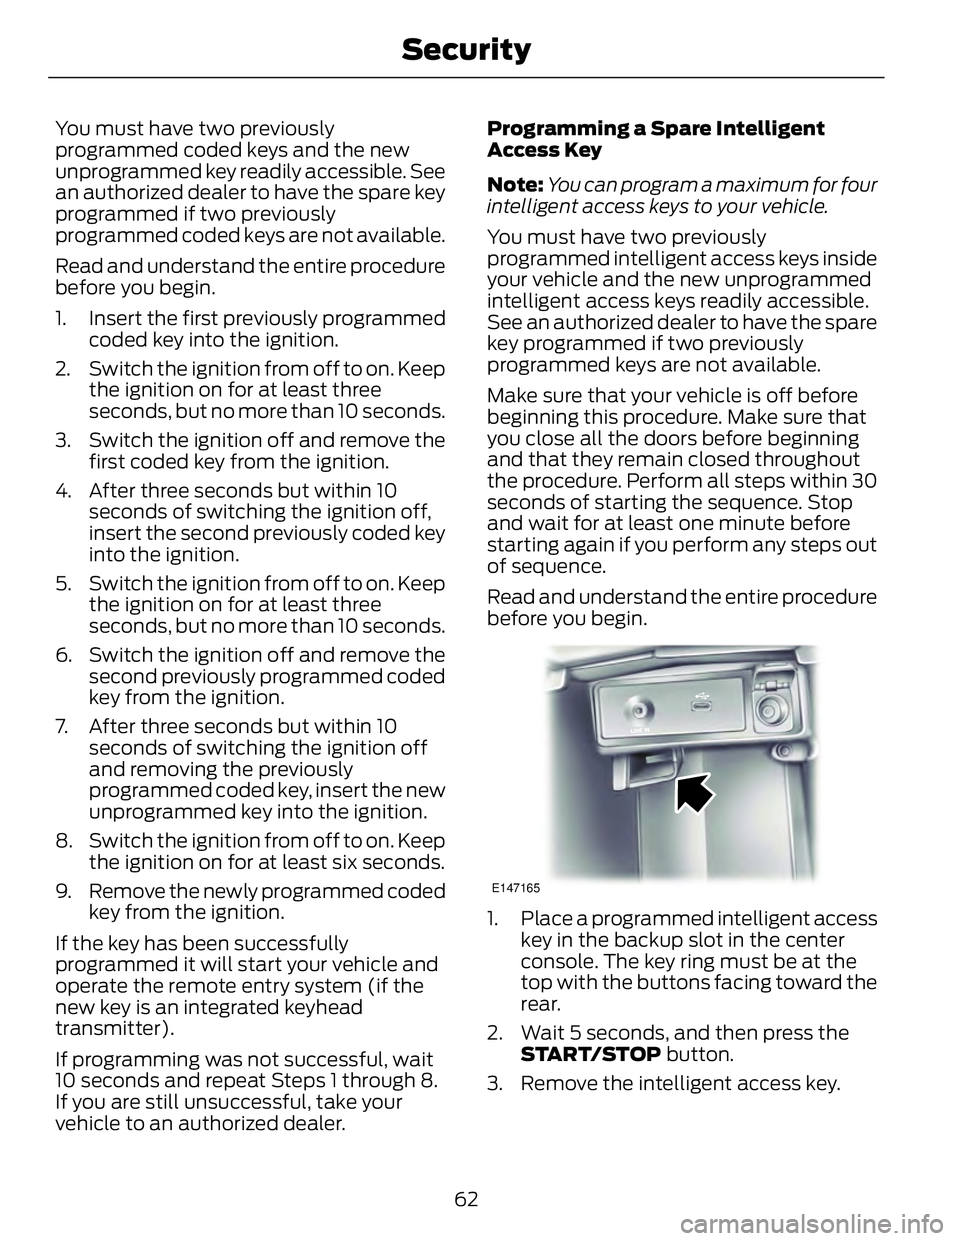
E147165
1. Place a programmed intelligent access
key in the backup slot in the center
console. The key ring must be at the
top with the buttons facing toward the
rear.
2. Wait 5 seconds, and then press the
START/STOP button.
3. Remove the intelligent access key.
62Security
Page 66 of 473
4. Within 10 seconds, place a second
programmed intelligent access key in
the backup slot and press the
START/STOP button.
5. Wait 5 seconds, and then press the
START/STOP button again.
6. Remove the intelligent access key.
7. Wait 5 seconds, then place the
unprogrammed intelligent access key
in the backup slot and press the
START/STOP button.
Programming is now complete. Verify the
remote control functions operate and your
vehicle starts with the new intelligent
access key.
If programming was not successful, wait
10 seconds and repeat Steps 1 through 7.
If you are still unsuccessful, take your
vehicle to your authorized dealer.
ANTI-THEFT ALARM The system will warn you of an
unauthorized entry to your vehicle. It will
be triggered if any door, the luggage
compartment or the hood is opened
without using the key, remote control or
keyless entry keypad.
The direction indicators will flash and the
horn will sound if unauthorized entry is
attempted while the alarm is armed.
Take all remote controls to an authorized
dealer if there is any potential alarm
problem with your vehicle.
Arming the Alarm
The alarm is ready to arm when there is
not a key in the ignition. Electronically lock
the vehicle to arm the alarm.
Disarming the Alarm
Disarm the alarm by any of the following
actions: • Unlock the doors or luggage
compartment with the remote control
or keyless entry keypad.
• Switch the ignition on or start the
vehicle.
• Use a key in the driver’s door to unlock
the vehicle, then switch the ignition on
within 12 seconds.
Note: Pressing the panic button on the
remote control will stop the horn and signal
indicators, but will not disarm the system.
63Security
Page 78 of 473
GLOBAL OPENING AND
CLOSING You can use the remote control to operate
the windows with the ignition off.
Note: You can enable or disable this feature
in the information display or see an
authorized dealer. See General
Information (page 86).
Note: To operate this feature, accessory
delay must not be active.
Opening the Windows You can only open the windows for a short
time after you unlock your vehicle with the
remote control. After you unlock your
vehicle, press and hold the remote control
unlock button to open the windows and
vent the moonroof. Release the button
once movement starts. Press the lock or
unlock button to stop movement.
Closing the Windows WARNING
When closing the windows and
moonroof, you should verify they are
free of obstructions and make sure
that children and pets are not in the
proximity of the window openings.
To close the windows and moonroof, press
and hold the remote control lock button.
Release the button once movement starts.
Press the lock or unlock button to stop
movement.
EXTERIOR MIRRORS
Power Exterior Mirrors
WARNING
Do not adjust the mirrors when your
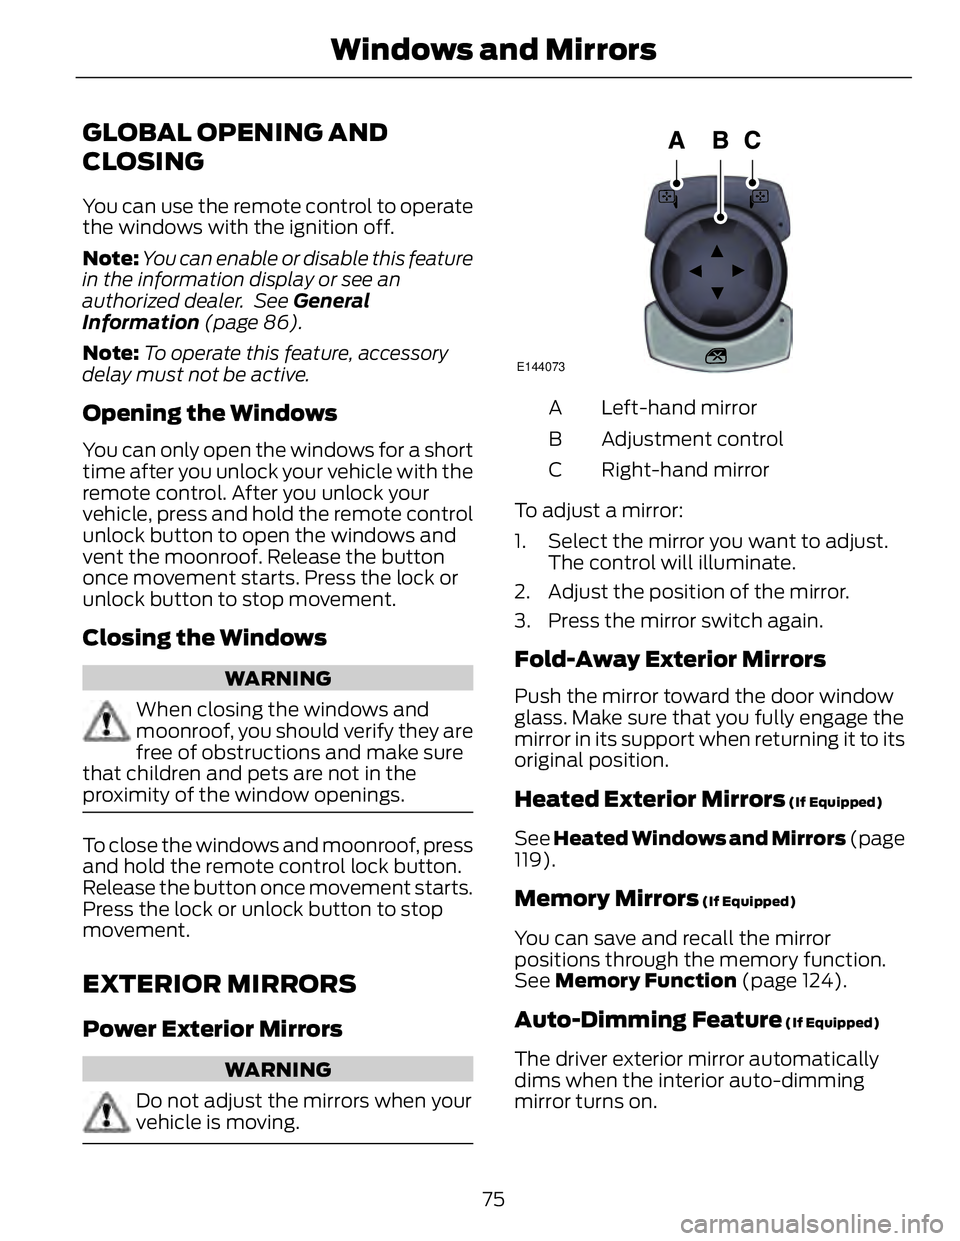
vehicle is moving. E144073
Left-hand mirrorA
Adjustment controlB
Right-hand mirrorC
To adjust a mirror:
1. Select the mirror you want to adjust.
The control will illuminate.
2. Adjust the position of the mirror.
3. Press the mirror switch again.
Fold-Away Exterior Mirrors Push the mirror toward the door window
glass. Make sure that you fully engage the
mirror in its support when returning it to its
original position.
Heated Exterior Mirrors (If Equipped)
See Heated Windows and Mirrors (page
119).
Memory Mirrors (If Equipped)
You can save and recall the mirror
positions through the memory function.
See Memory Function (page 124).
Auto-Dimming Feature (If Equipped)
The driver exterior mirror automatically
dims when the interior auto-dimming
mirror turns on.
75Windows and Mirrors
Page 99 of 473
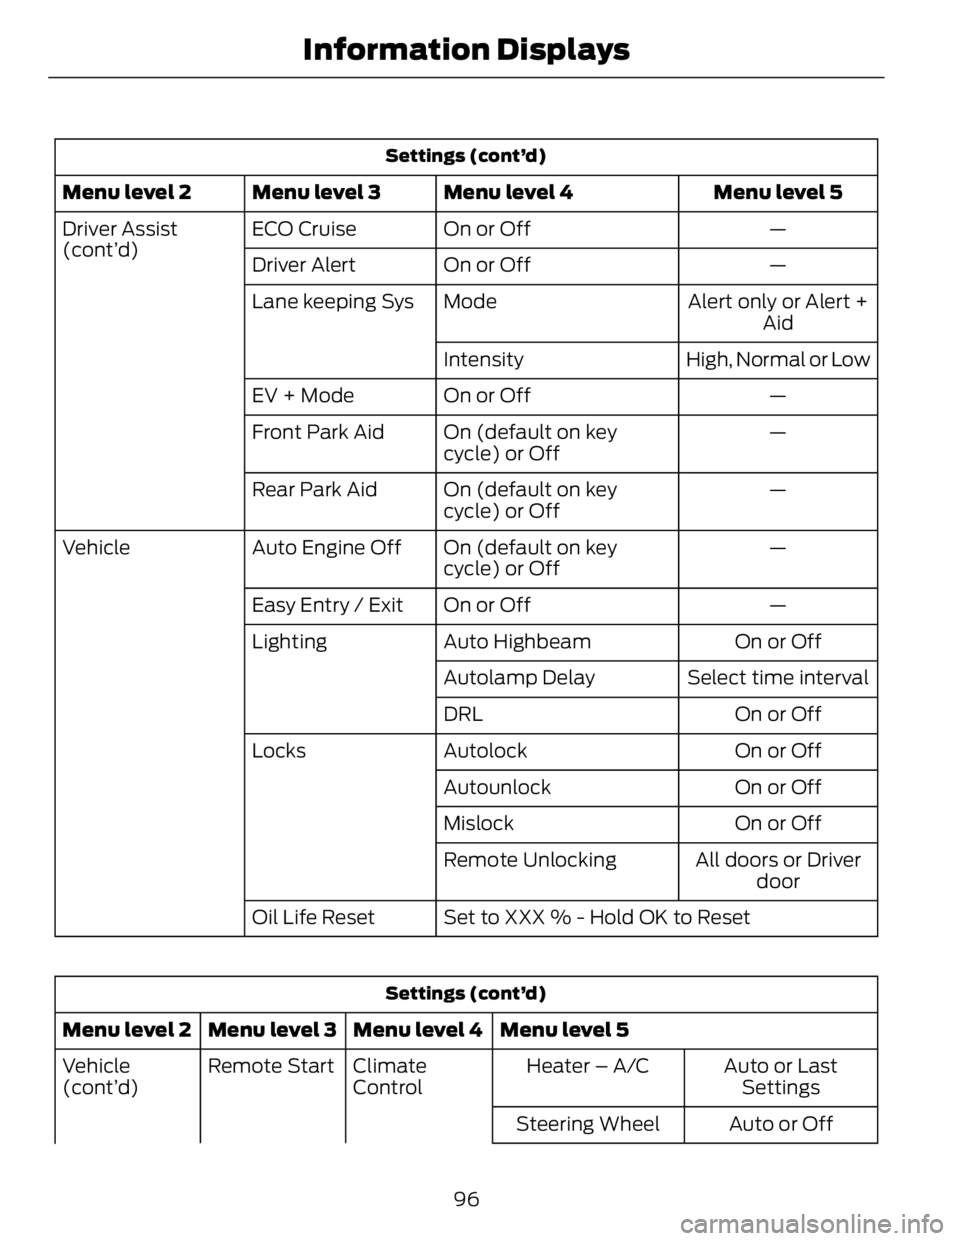
Settings (cont’d)
Menu level 5Menu level 4Menu level 3Menu level 2
—On or OffECO CruiseDriver Assist
(cont’d)
—On or OffDriver Alert
Alert only or Alert +
AidModeLane keeping Sys
High, Normal or LowIntensity
—On or OffEV + Mode
—On (default on key
cycle) or OffFront Park Aid
—On (default on key
cycle) or OffRear Park Aid
—On (default on key
cycle) or OffAuto Engine OffVehicle
—On or OffEasy Entry / Exit
On or OffAuto HighbeamLighting
Select time intervalAutolamp Delay
On or OffDRL
On or OffAutolockLocks
On or OffAutounlock
On or OffMislock
All doors or Driver
doorRemote Unlocking
Set to XXX % - Hold OK to ResetOil Life Reset
Settings (cont’d)
Menu level 5Menu level 4Menu level 3Menu level 2
Auto or Last
SettingsHeater – A/CClimate
ControlRemote StartVehicle
(cont’d)
Auto or OffSteering Wheel
96Information Displays
Page 100 of 473
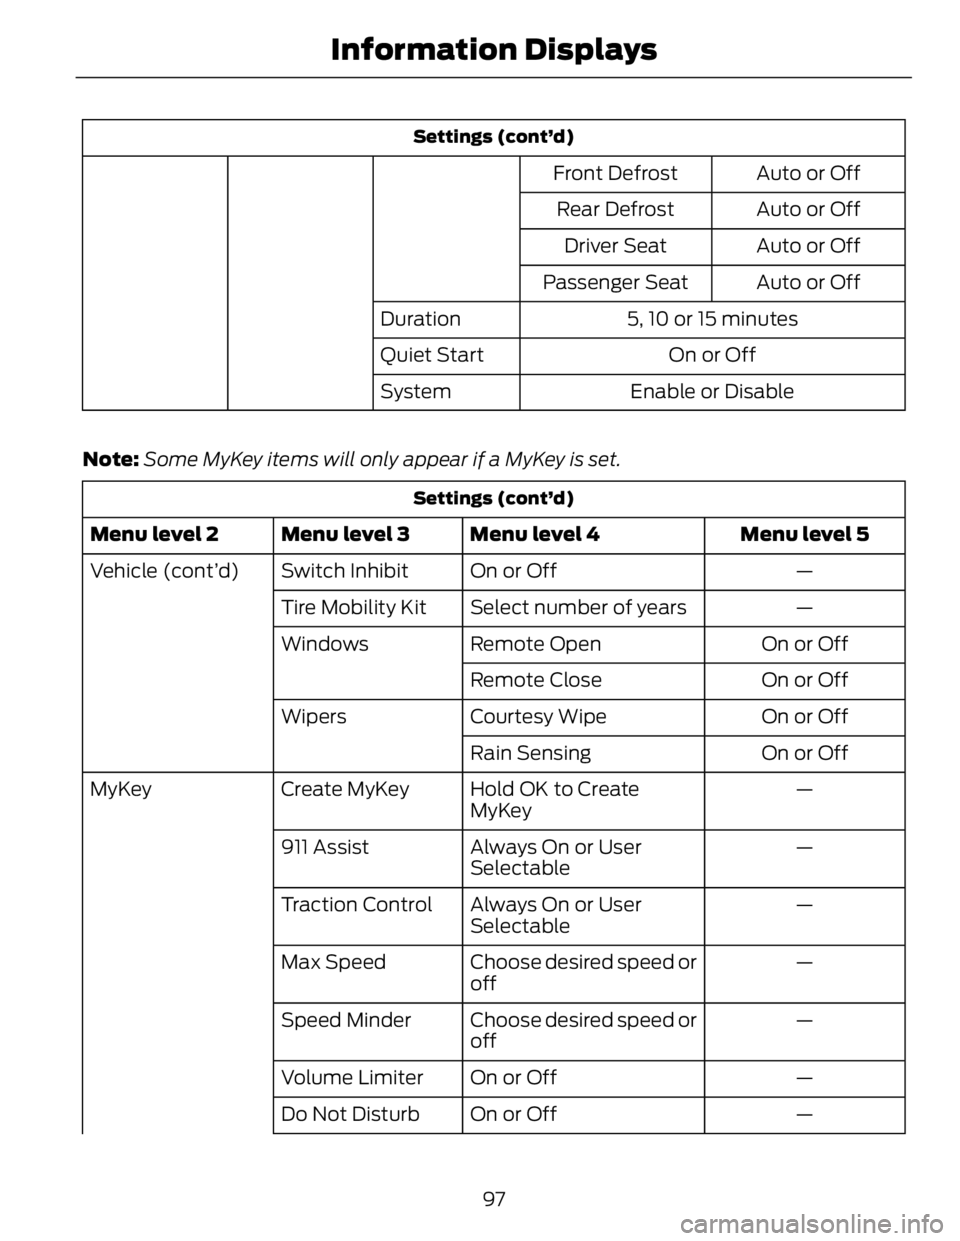
Settings (cont’d)
Auto or OffFront Defrost
Auto or OffRear Defrost
Auto or OffDriver Seat
Auto or OffPassenger Seat
5, 10 or 15 minutesDuration
On or OffQuiet Start
Enable or DisableSystem
Note: Some MyKey items will only appear if a MyKey is set. Settings (cont’d)
Menu level 5Menu level 4Menu level 3Menu level 2
—On or OffSwitch InhibitVehicle (cont’d)
—Select number of yearsTire Mobility Kit
On or OffRemote OpenWindows
On or OffRemote Close
On or OffCourtesy WipeWipers
On or OffRain Sensing
—Hold OK to Create
MyKeyCreate MyKeyMyKey
—Always On or User
Selectable911 Assist
—Always On or User
SelectableTraction Control
—Choose desired speed or
offMax Speed
—Choose desired speed or
offSpeed Minder
—On or OffVolume Limiter
—On or OffDo Not Disturb
97Information Displays
Page 112 of 473
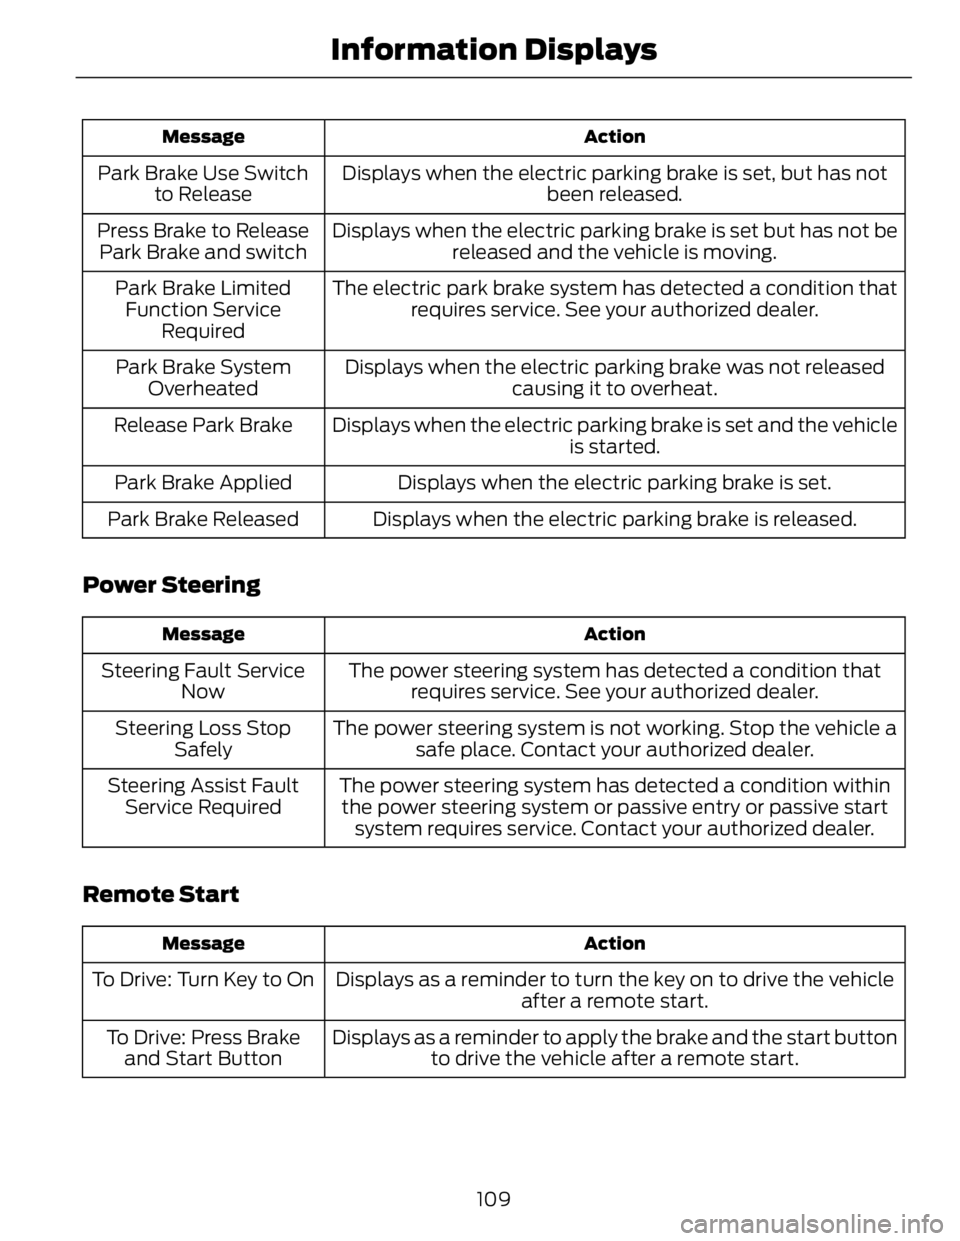
ActionMessage
Displays when the electric parking brake is set, but has not
been released.Park Brake Use Switch
to Release
Displays when the electric parking brake is set but has not be
released and the vehicle is moving.Press Brake to Release
Park Brake and switch
The electric park brake system has detected a condition that
requires service. See your authorized dealer.Park Brake Limited
Function Service
Required
Displays when the electric parking brake was not released
causing it to overheat.Park Brake System
Overheated
Displays when the electric parking brake is set and the vehicle
is started.Release Park Brake
Displays when the electric parking brake is set.Park Brake Applied
Displays when the electric parking brake is released.Park Brake Released
Power Steering ActionMessage
The power steering system has detected a condition that
requires service. See your authorized dealer.Steering Fault Service
Now
The power steering system is not working. Stop the vehicle a
safe place. Contact your authorized dealer.Steering Loss Stop
Safely
The power steering system has detected a condition within
the power steering system or passive entry or passive start
system requires service. Contact your authorized dealer.Steering Assist Fault
Service Required
Remote Start ActionMessage
Displays as a reminder to turn the key on to drive the vehicle
after a remote start.To Drive: Turn Key to On
Displays as a reminder to apply the brake and the start button
to drive the vehicle after a remote start.To Drive: Press Brake
and Start Button
109Information Displays
Page 123 of 473
REMOTE START (IF EQUIPPED)
The climate control system adjusts the
cabin temperature during remote start.
You cannot adjust the system during
remote start operation. Turn the ignition
on to return the system to its previous
settings. You can now make adjustments.
You need to turn certain
vehicle-dependent features back on, such
as:
• heated seats
• heated mirrors
• heated rear window.
You can adjust the settings using the
information display controls. See
Information Displays (page 86).
Automatic Settings You can set the climate control to operate
in AUTO mode through the information
display setting: Remote Start > Climate
Control > Heater-A/C > Auto. The climate
control system automatically sets the
interior temperature to 72°F (22°C).
In hot weather, the system is set to 72°F
(22°C).
In moderate weather, the system either
heats or cools (based on previous
settings). The rear defroster, heated
mirrors and heated seats do not
automatically turn on.
In cold weather, the system is set to 72°F
(22°C). The heated seats are set to high
(if available, and selected to AUTO in the
information display). The rear defroster
and heated mirrors automatically turn on. Last Settings You can set the climate control to operate
using the last climate control settings
through the information display setting:
Remote Start > Climate Control >
Heater–A/C > Last Settings. The climate
control system automatically uses the
settings last selected before you turned
off the engine.
Heated and Cooled Devices The climate control system controls other
heated and cooled devices inside the
vehicle. You can switch these devices on
(if available, and selected to AUTO in the
information displays) during remote start.
Heated devices usually switch on during
cold weather, and cooled devices during
hot weather.
120Climate Control
Page 128 of 473
E142554
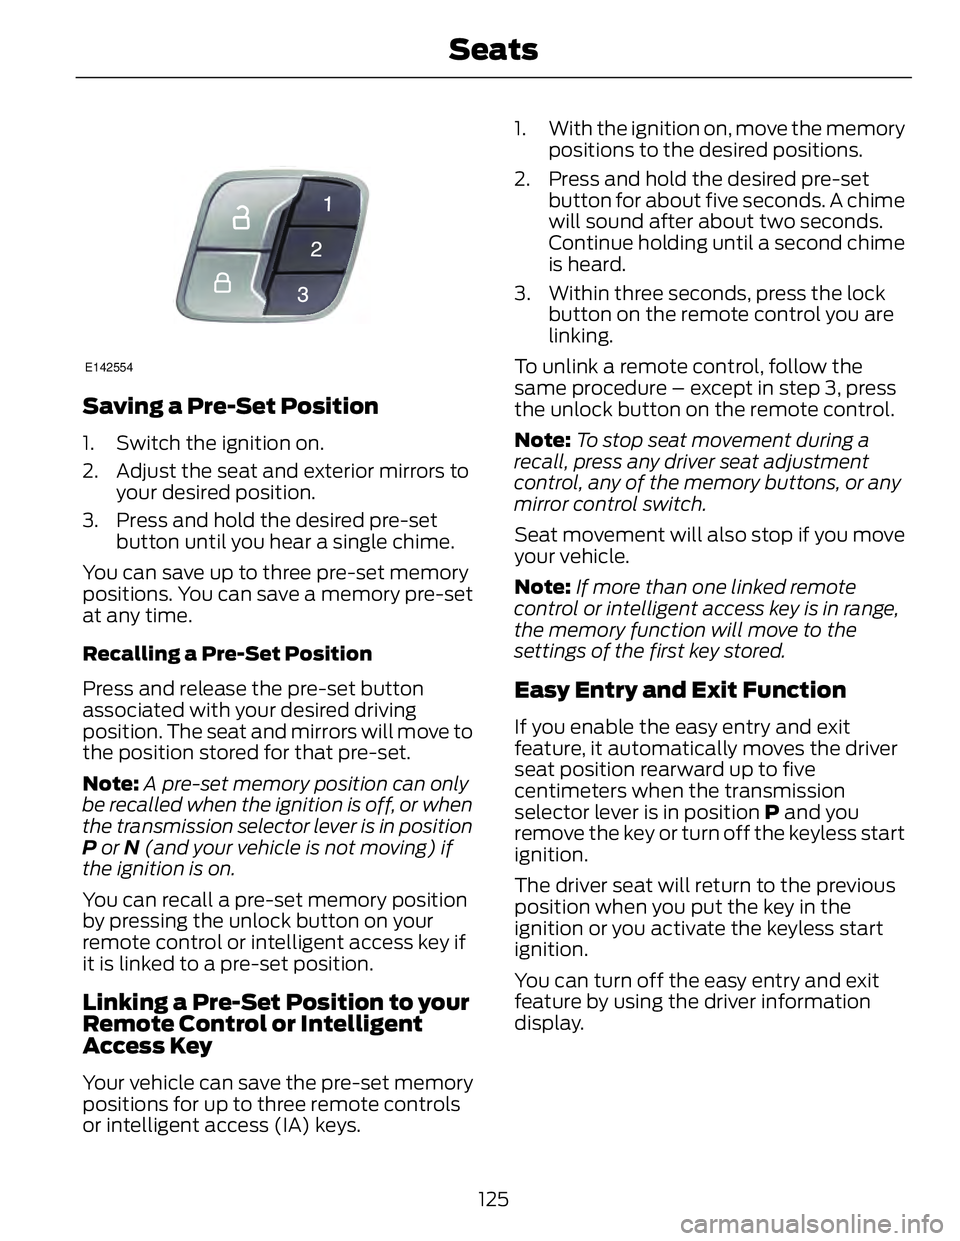
Saving a Pre-Set Position 1. Switch the ignition on.
2. Adjust the seat and exterior mirrors to
your desired position.
3. Press and hold the desired pre-set
button until you hear a single chime.
You can save up to three pre-set memory
positions. You can save a memory pre-set
at any time.
Recalling a Pre-Set Position
Press and release the pre-set button
associated with your desired driving
position. The seat and mirrors will move to
the position stored for that pre-set.
Note: A pre-set memory position can only
be recalled when the ignition is off, or when
the transmission selector lever is in position
P or N (and your vehicle is not moving) if
the ignition is on.
You can recall a pre-set memory position
by pressing the unlock button on your
remote control or intelligent access key if
it is linked to a pre-set position.
Linking a Pre-Set Position to your
Remote Control or Intelligent
Access Key
Your vehicle can save the pre-set memory
positions for up to three remote controls
or intelligent access (IA) keys. 1. With the ignition on, move the memory
positions to the desired positions.
2. Press and hold the desired pre-set
button for about five seconds. A chime
will sound after about two seconds.
Continue holding until a second chime
is heard.
3. Within three seconds, press the lock
button on the remote control you are
linking.
To unlink a remote control, follow the
same procedure – except in step 3, press
the unlock button on the remote control.
Note: To stop seat movement during a
recall, press any driver seat adjustment
control, any of the memory buttons, or any
mirror control switch.
Seat movement will also stop if you move
your vehicle.
Note: If more than one linked remote
control or intelligent access key is in range,
the memory function will move to the
settings of the first key stored.
Easy Entry and Exit Function If you enable the easy entry and exit
feature, it automatically moves the driver
seat position rearward up to five
centimeters when the transmission
selector lever is in position P and you
remove the key or turn off the keyless start
ignition.
The driver seat will return to the previous
position when you put the key in the
ignition or you activate the keyless start
ignition.
You can turn off the easy entry and exit
feature by using the driver information
display.
125Seats