jump start FORD FUSION HYBRID 2014 Owners Manual
[x] Cancel search | Manufacturer: FORD, Model Year: 2014, Model line: FUSION HYBRID, Model: FORD FUSION HYBRID 2014Pages: 473, PDF Size: 5.93 MB
Page 7 of 473
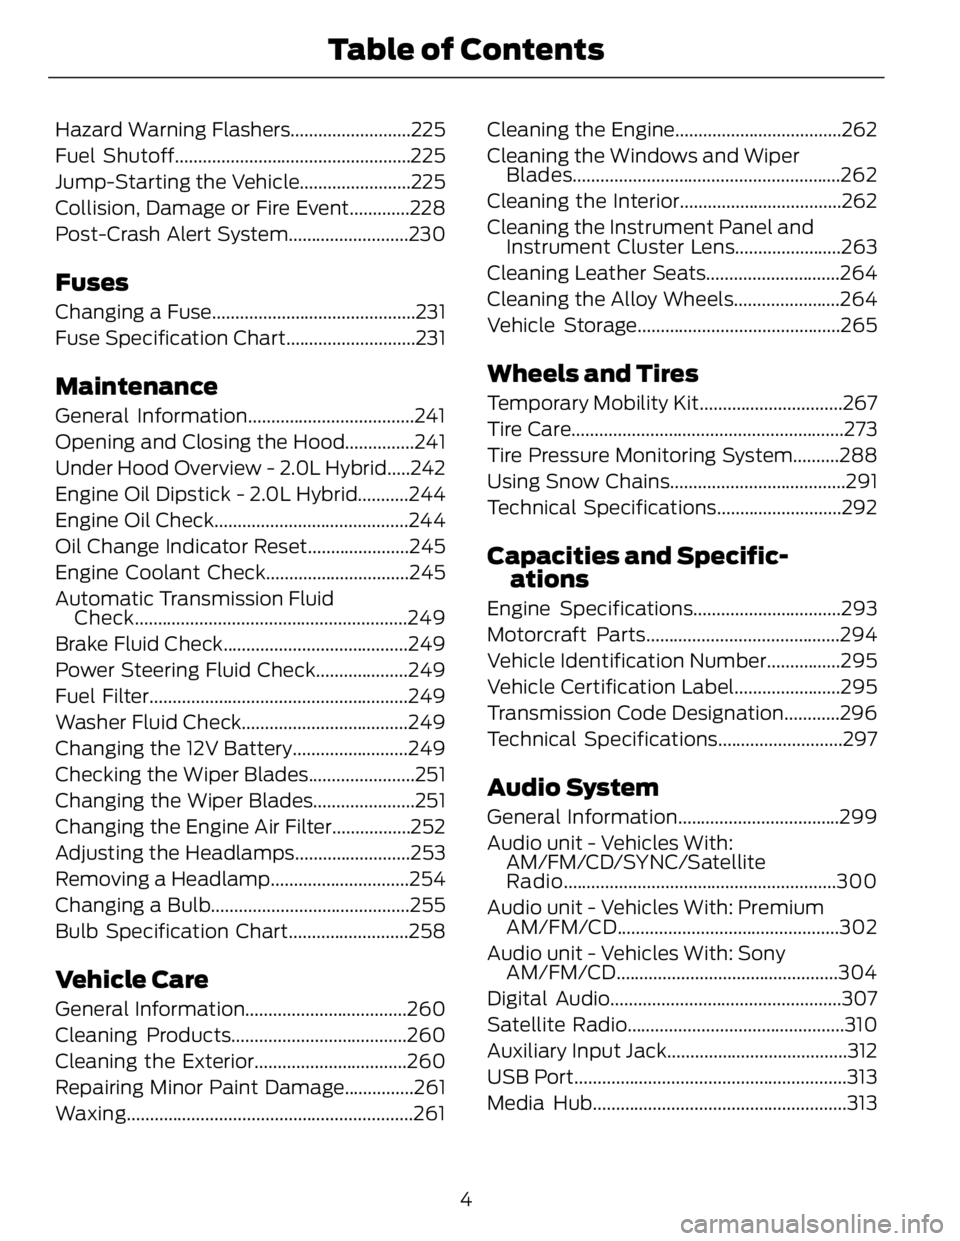
Hazard Warning Flashers..........................225
Fuel Shutoff...................................................225
Jump-Starting the Vehicle........................225
Collision, Damage or Fire Event.............228
Post-Crash Alert System..........................230
Fuses Changing a Fuse............................................231
Fuse Specification Chart............................231
Maintenance General Information....................................241
Opening and Closing the Hood...............241
Under Hood Overview - 2.0L Hybrid.....242
Engine Oil Dipstick - 2.0L Hybrid...........244
Engine Oil Check..........................................244
Oil Change Indicator Reset......................245
Engine Coolant Check...............................245
Automatic Transmission Fluid
Check...........................................................249
Brake Fluid Check........................................249
Power Steering Fluid Check....................249
Fuel Filter........................................................249
Washer Fluid Check....................................249
Changing the 12V Battery.........................249
Checking the Wiper Blades.......................251
Changing the Wiper Blades......................251
Changing the Engine Air Filter.................252
Adjusting the Headlamps.........................253
Removing a Headlamp..............................254
Changing a Bulb...........................................255
Bulb Specification Chart..........................258
Vehicle Care General Information...................................260
Cleaning Products......................................260
Cleaning the Exterior.................................260
Repairing Minor Paint Damage...............261
Waxing ..............................................................261 Cleaning the Engine....................................262
Cleaning the Windows and Wiper
Blades..........................................................262
Cleaning the Interior...................................262
Cleaning the Instrument Panel and
Instrument Cluster Lens.......................263
Cleaning Leather Seats.............................264
Cleaning the Alloy Wheels.......................264
Vehicle Storage............................................265
Wheels and Tires Temporary Mobility Kit...............................267
Tire Care...........................................................273
Tire Pressure Monitoring System..........288
Using Snow Chains......................................291
Technical Specifications...........................292
Capacities and Specific-
ations Engine Specifications................................293
Motorcraft Parts..........................................294
Vehicle Identification Number................295
Vehicle Certification Label.......................295
Transmission Code Designation............296
Technical Specifications...........................297
Audio System General Information...................................299
Audio unit - Vehicles With:
AM/FM/CD/SYNC/Satellite
Radio...........................................................300
Audio unit - Vehicles With: Premium
AM/FM/CD ................................................302
Audio unit - Vehicles With: Sony
AM/FM/CD ................................................304
Digital Audio..................................................307
Satellite Radio...............................................310
Auxiliary Input Jack.......................................312
USB Port...........................................................313
Media Hub.......................................................313
4Table of Contents
Page 175 of 473
Automatic release - drive away release
Note: The driver's door must be closed and
the driver's safety belt must be fastened
before this feature will operate.
Note: If the electric parking brake warning
lamp stays illuminated, the electric parking
brake will not automatically release. You
must release the electric parking brake using
the electric parking brake switch.
Note: The engine must be running and the
accelerator pedal must be pressed before
the drive away release feature will operate.
Note: On hybrid vehicles, the vehicle must
be Ready-to-Drive as indicated by the green
Ready indicator light.
The brake system warning lamp will go off
to confirm that the electric parking brake
has been released.
Note: The electric parking brake drive away
release makes starting on a hill easier. This
feature will release the parking brake
automatically when the vehicle has
sufficient drive force to move up the hill. To
assure drive away release when starting
uphill, press the accelerator pedal quickly.
Battery With No Charge WARNING
You will not be able to apply or
release the electric parking brake if
the battery is low or has no charge.
If the battery is low or has no charge, use
jumper cables and a booster battery.
HILL START ASSIST WARNINGS
The system does not replace the
parking brake. When you leave your
vehicle, always apply the parking
brake and put the vehicle in position P. WARNINGS
You must remain in your vehicle once
you have activated the system.
During all times, you are responsible
for controlling your vehicle,
supervising the system and
intervening, if required.
If the engine is revved excessively, or
if a malfunction is detected, the
system will be deactivated.
The system makes it easier to pull away
when your vehicle is on a slope without the
need to use the parking brake.
When the system is active, your vehicle will
remain stationary on the slope for two to
three seconds after you release the brake
pedal. This allows you time to move your
foot from the brake to the accelerator
pedal. The brakes are released
automatically once the engine has
developed sufficient drive to prevent your
vehicle from rolling down the slope. This
is an advantage when pulling away on a
slope, (for example from a car park ramp,
traffic lights or when reversing uphill into
a parking space).
The system will activate automatically on
any slope that will cause significant vehicle
rollback.
Using Hill Start Assist 1. Press the brake pedal to bring your
vehicle to a complete standstill. Keep
the brake pedal pressed.
2. If the sensors detect that your vehicle
is on a slope, the system will activate
automatically.
172Brakes
Page 227 of 473
ROADSIDE ASSISTANCE Vehicles Sold In The U.S.: Getting
Roadside Assistance To fully assist you should you have a
vehicle concern, Ford Motor Company
offers a complimentary roadside
assistance program. This program is
separate from the New Vehicle Limited
Warranty. The service is available:
• 24 hours, seven days a week.
• for the coverage period listed on the
Roadside Assistance Card included in
your Owner's Manual portfolio.
Roadside assistance will cover:
• a flat tire change with a good spare, if
provided with the vehicle (except
vehicles that have been supplied with
a tire inflation kit).
• battery jump start.
• lock-out assistance (key replacement
cost is the customer's responsibility).
• fuel delivery — Independent Service
Contractors, if not prohibited by state,
local or municipal law, shall deliver up
to 2.0 gallons (7.5 liters) of gasoline or
5.0 gallons (18.9 liters) of diesel fuel
to a disabled vehicle. Fuel delivery
service is limited to two no-charge
occurrences within a 12-month period.
• winch out — available within 100 feet
(30.5 meters) of a paved or county
maintained road, no recoveries.
• towing — Ford and Lincoln eligible
vehicles towed to an authorized dealer
within 35 miles (56.3 kilometers) of the
disablement location or to the nearest
authorized dealer. If a member
requests to be towed to an authorized
dealer more than 35 miles (56.3
kilometers) from the disablement
location, the member shall be
responsible for any mileage costs in
excess of 35 miles (56.3 kilometers). Trailers shall be covered up to $200 if the
disabled eligible vehicle requires service at
the nearest authorized dealer. If the trailer
is disabled, but the towing vehicle is
operational, the trailer does not qualify for
any roadside services.
Vehicles Sold In The U.S. : Using
Roadside Assistance Complete the roadside assistance
identification card and place it in your
wallet for quick reference. This card is
found in the owner's information portfolio
in the glove compartment.
U.S. Ford vehicle customers who require
Roadside Assistance, call 1-800-241-3673.
If you need to arrange roadside assistance
for yourself, Ford Motor Company will
reimburse a reasonable amount for towing
to the nearest dealership within 35 miles
(56.3 kilometers). To obtain
reimbursement information, U.S. Ford
vehicle customers call 1-800-241-3673.
Customers will be asked to submit their
original receipts.
Vehicles Sold In Canada : Getting
Roadside Assistance Canadian customers who require roadside
assistance, call 1-800-665-2006.
Vehicles Sold In Canada : Using
Roadside Assistance For your convenience, you may complete
the roadside assistance identification card
found in the centerfold of your warranty
guide and retain for future reference.
Canadian roadside coverage and benefits
may differ from the U.S. coverage. If you
require more information, please refer to
the coverage section of your warranty
guide, call us in Canada at
1-800-665-2006, or visit our website at
www.ford.ca.
224Roadside Emergencies
Page 228 of 473
HAZARD WARNING FLASHERS Note: If used when the vehicle is not
running, the battery will lose charge. There
may be insufficient power to restart your
vehicle.
The hazard warning button is
located on the instrument panel.
Use it when your vehicle is
creating a safety hazard for other
motorists.
• Press the button to turn on the hazard
warning function, and the front and
rear direction indicators will flash.
• Press the button again to turn them
off.
FUEL SHUTOFF WARNING
Failure to inspect and, if necessary,
repair fuel leaks after a collision may
increase the risk of fire and serious
injury. Ford Motor Company recommends
that the fuel system be inspected by an
authorized dealer after any collision.
In the event of a moderate to severe
collision, this vehicle is equipped with a
fuel pump shut-off feature that stops the
flow of fuel to the engine. Not every impact
will cause a shut-off.
Should your vehicle shut off after a
collision, you may restart your vehicle by
doing the following:
1. Turn the ignition off.
2. Turn the ignition to crank.
3. Turn the ignition off.
4. Turn the ignition on again to re-enable
the fuel pump.
For vehicles equipped with a push button
start system: 1. Press the START/STOP button to
turn the ignition off.
2. Press the brake pedal and press the
START/STOP button (crank
attempt).
3. Remove your foot from the brake pedal
and press the START/STOP button
(ignition off).
4. Press the START/STOP button again
to re-enable the fuel system.
JUMP-STARTING THE VEHICLE WARNINGS
The gases around the battery can
explode if exposed to flames, sparks,
or lit cigarettes. An explosion could
result in injury or vehicle damage.
Batteries contain sulfuric acid which
can burn skin, eyes and clothing, if
contacted.
Do not attempt to push-start your
automatic transmission vehicle. Automatic
transmissions do not have push-start
capability. Attempting to push-start a
vehicle with an automatic transmission
may cause transmission damage.
Preparing Your Vehicle Note: Use only a 12-volt supply to start your
vehicle.
Note: Do not disconnect the battery of the
disabled vehicle as this could damage the
vehicle's electrical system.
1. Park the booster vehicle close to the
hood of the disabled vehicle making
sure the two vehicles do not touch. Set
the parking brake on both vehicles and
stay clear of the engine cooling fan and
other moving parts.
225Roadside Emergencies
Page 229 of 473
2. Check all battery terminals and remove
any excessive corrosion before you
attach the battery cables. Ensure that
vent caps are tight and level.
3. Turn the heater fan on in both vehicles
to protect from any electrical surges.
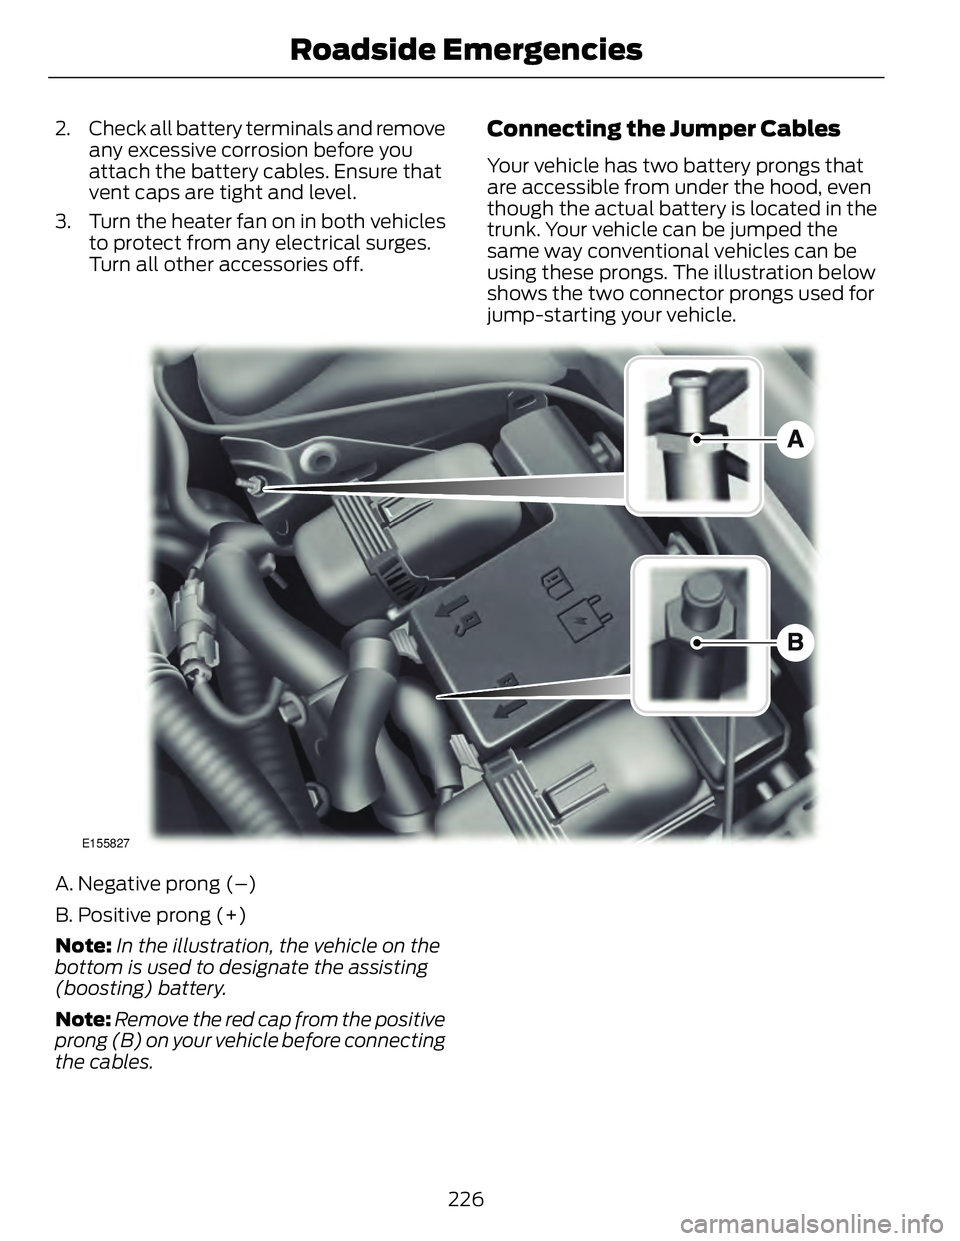
Turn all other accessories off. Connecting the Jumper Cables Your vehicle has two battery prongs that
are accessible from under the hood, even
though the actual battery is located in the
trunk. Your vehicle can be jumped the
same way conventional vehicles can be
using these prongs. The illustration below
shows the two connector prongs used for
jump-starting your vehicle.
E155827
A. Negative prong (–)
B. Positive prong (+)
Note: In the illustration, the vehicle on the
bottom is used to designate the assisting
(boosting) battery.
Note: Remove the red cap from the positive
prong (B) on your vehicle before connecting
the cables.
226Roadside Emergencies
Page 230 of 473
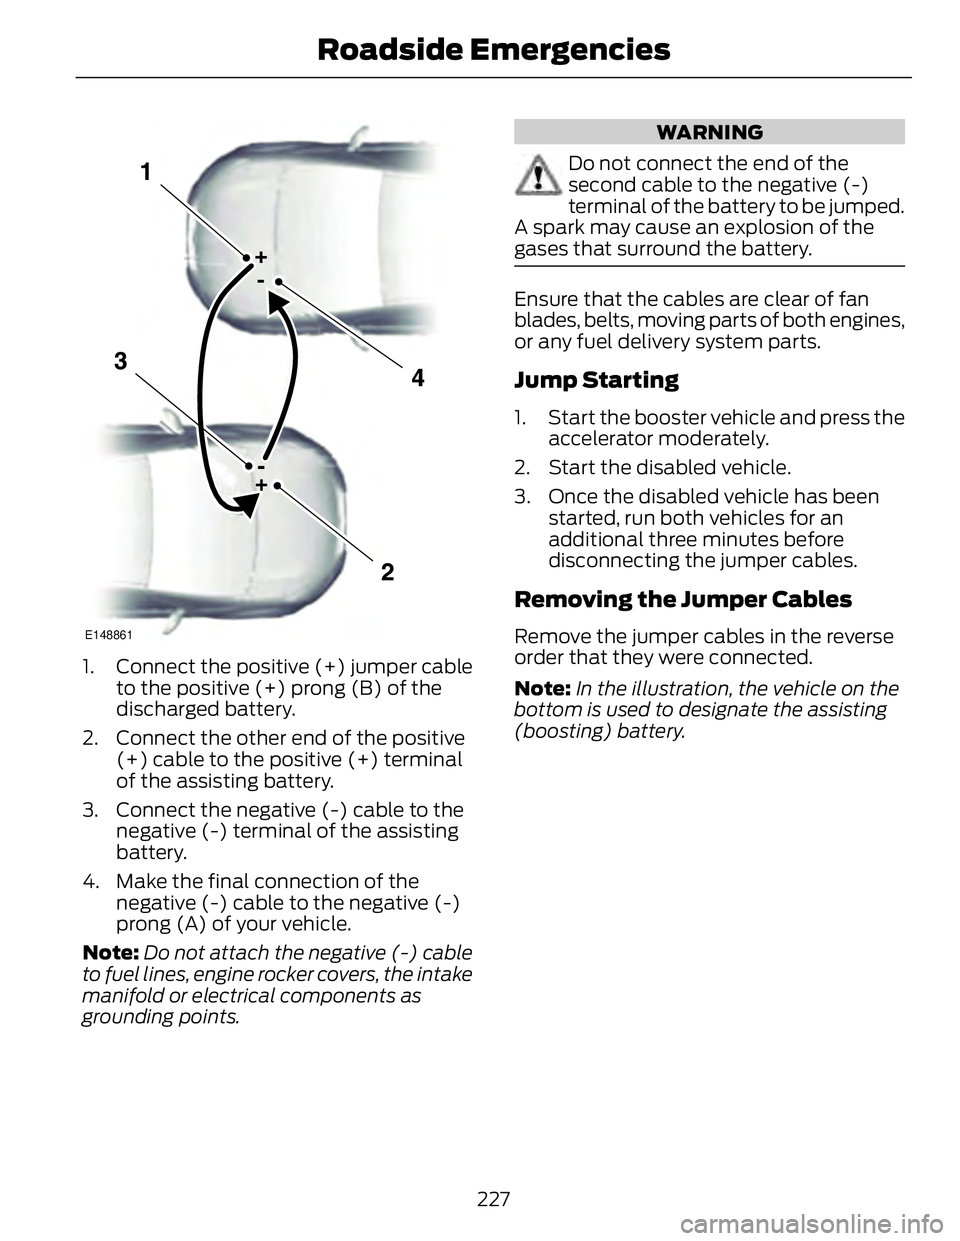
E148861
1. Connect the positive (+) jumper cable
to the positive (+) prong (B) of the
discharged battery.
2. Connect the other end of the positive
(+) cable to the positive (+) terminal
of the assisting battery.
3. Connect the negative (-) cable to the
negative (-) terminal of the assisting
battery.
4. Make the final connection of the
negative (-) cable to the negative (-)
prong (A) of your vehicle.
Note: Do not attach the negative (-) cable
to fuel lines, engine rocker covers, the intake
manifold or electrical components as
grounding points. WARNING
Do not connect the end of the
second cable to the negative (-)
terminal of the battery to be jumped.
A spark may cause an explosion of the
gases that surround the battery.
Ensure that the cables are clear of fan
blades, belts, moving parts of both engines,
or any fuel delivery system parts.
Jump Starting 1. Start the booster vehicle and press the
accelerator moderately.
2. Start the disabled vehicle.
3. Once the disabled vehicle has been
started, run both vehicles for an
additional three minutes before
disconnecting the jumper cables.
Removing the Jumper Cables Remove the jumper cables in the reverse
order that they were connected.
Note: In the illustration, the vehicle on the
bottom is used to designate the assisting
(boosting) battery.
227Roadside Emergencies
Page 231 of 473
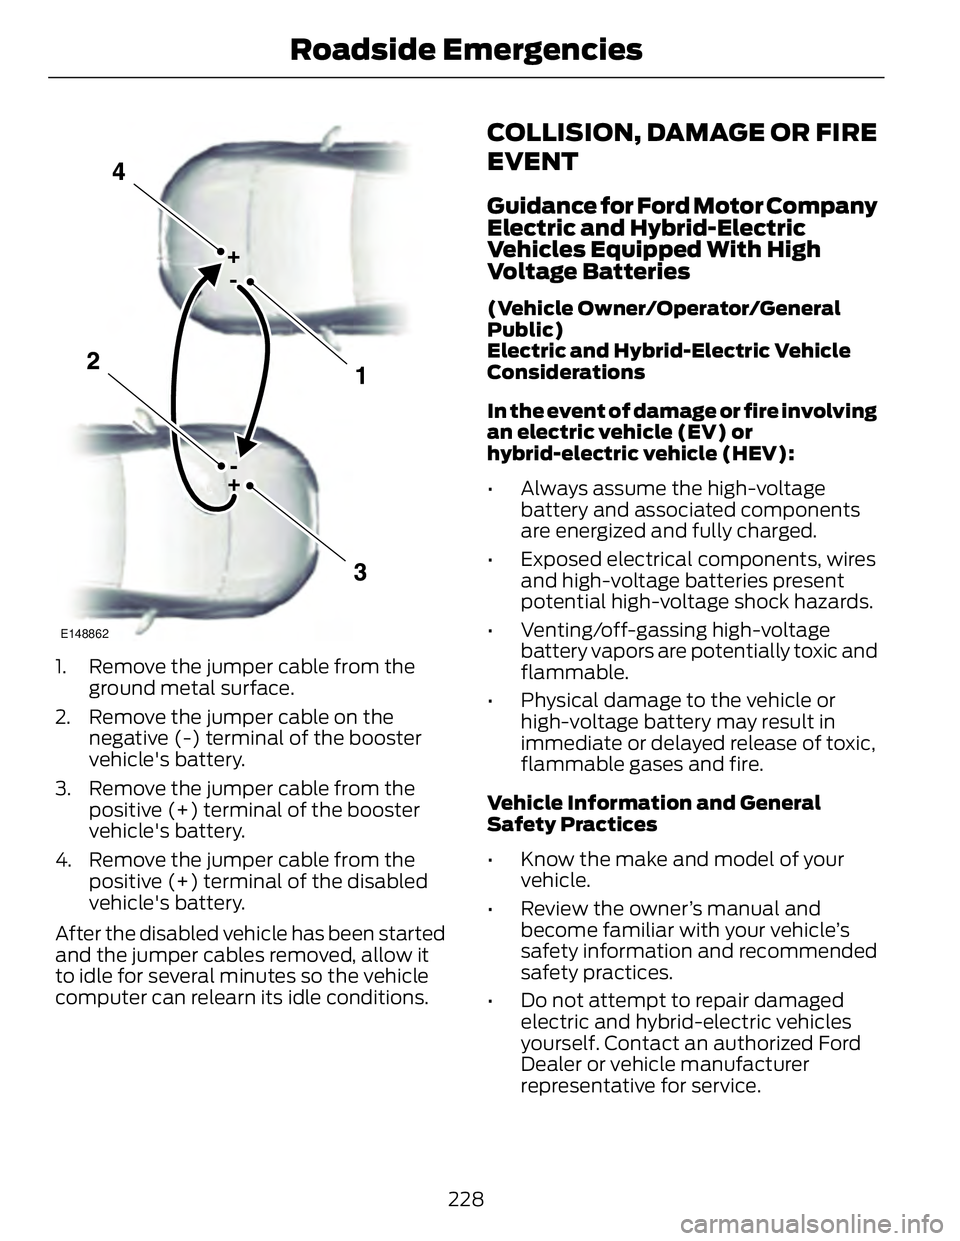
E148862
1. Remove the jumper cable from the
ground metal surface.
2. Remove the jumper cable on the
negative (-) terminal of the booster
vehicle's battery.
3. Remove the jumper cable from the
positive (+) terminal of the booster
vehicle's battery.
4. Remove the jumper cable from the
positive (+) terminal of the disabled
vehicle's battery.
After the disabled vehicle has been started
and the jumper cables removed, allow it
to idle for several minutes so the vehicle
computer can relearn its idle conditions. COLLISION, DAMAGE OR FIRE
EVENT Guidance for Ford Motor Company
Electric and Hybrid-Electric
Vehicles Equipped With High
Voltage Batteries (Vehicle Owner/Operator/General
Public)
Electric and Hybrid-Electric Vehicle
Considerations
In the event of damage or fire involving
an electric vehicle (EV) or
hybrid-electric vehicle (HEV):
• Always assume the high-voltage
battery and associated components
are energized and fully charged.
• Exposed electrical components, wires
and high-voltage batteries present
potential high-voltage shock hazards.
• Venting/off-gassing high-voltage
battery vapors are potentially toxic and
flammable.
• Physical damage to the vehicle or
high-voltage battery may result in
immediate or delayed release of toxic,
flammable gases and fire.
Vehicle Information and General
Safety Practices
• Know the make and model of your
vehicle.
• Review the owner’s manual and
become familiar with your vehicle’s
safety information and recommended
safety practices.
• Do not attempt to repair damaged
electric and hybrid-electric vehicles
yourself. Contact an authorized Ford
Dealer or vehicle manufacturer
representative for service.
228Roadside Emergencies
Page 319 of 473
PROTECT YOURSELF FROM THE RISING
COST OF VEHICLE REPAIRS WITH A FORD
EXTENDED SERVICE PLAN.
SERVICE PLANS (U.S. Only) More than 32 million Ford and Lincoln
owners have dis covered the powerful
protection of Ford Extended Service Plan.
It is the only extended service plan backed
by Ford Motor Company, and provides
peace of mind protection beyond the New
Vehicle Limited Warranty coverage.
Ford ESP Can Quickly Pay for Itself
One service bill – the cost of parts and
labor – can easily exceed the price of your
Ford Extended Service Plan. With Ford
ESP, you minimize your risk for unexpected
repair bills and rising repair costs.
Up to 500+ Covered Vehicle
Components
There are four Extended Service Plans with
different levels of coverage. Ask your
authorized dealer for details.
1. PremiumCARE - Our most
comprehensive coverage. With over
500 covered c omponents, this plan is
so complete that we generally only
discuss what’s not covered.
2. ExtraCARE - Covers 113 components,
and includes many high-tech items.
3. BaseCARE - Covers 84 components.
4. PowertrainCARE - Covers 29 critical
components.
Ford Extended Service Plan is honored by
all authorized Ford and Lincoln dealers in
the U.S. and Canada. It is the only extended
service plan authorized and backed by Ford
Motor Company. That means you get:
• Reliable, quality service anywhere you
go
• Repairs performed by factory trained
technicians, using Genuine Ford and
Lincoln parts
Rental Car Reimbursement
1st day Rental Benefit
You take advantage of replacement
transportation if your vehicle is at your
authorized dealer for same day covered
repairs.
Extended Rental Benefits
If your vehicle is kept overnight for covered
repairs, you are eligible for rental car
coverage, including Bumper to Bumper
warranty repairs, or Field Service Actions.
Roadside Assistance
Exclusive 24/7 roadside assistance,
including:
• Towing, flat-tire change and battery
jump starts
• Out of fuel and lock-out assistance
• Travel expense reimbursement for
lodging, meals and rental car
• Destination assistance for taxi, shuttle,
rental car coverage and emergency
transportation
Transferable Coverage
If you sell your vehicle before your Ford
Extended Service Plan coverage expires,
you can transfer any remaining coverage
to the new owner. Whenever you sell your
vehicle, prospective buyers may have a
higher degree of confidence that vehicle
was properly maintained with Ford ESP,
thereby improving resale value.
316Ford Extended Service Plan (ESP)
Page 468 of 473
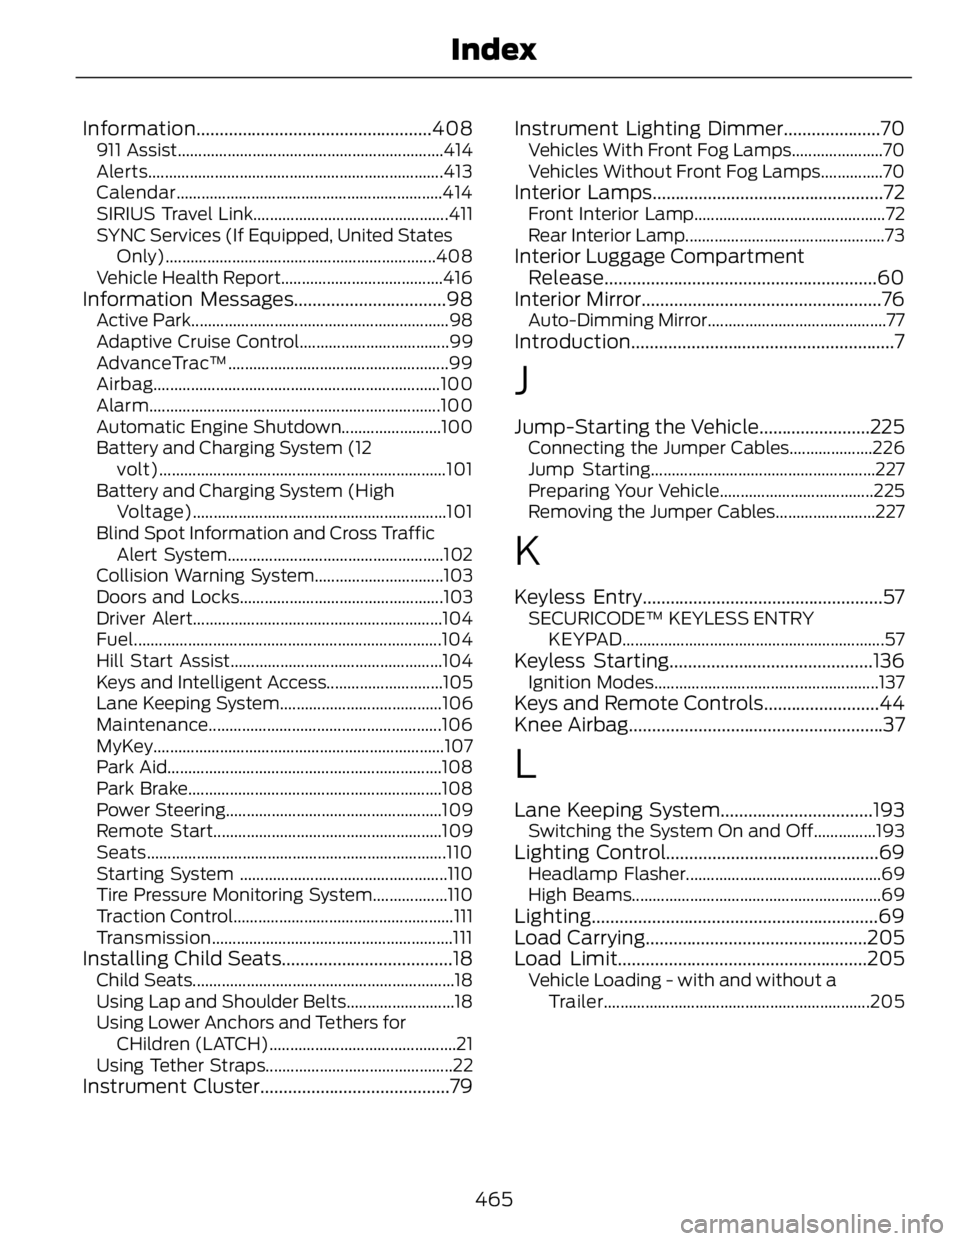
Information ...................................................408911 Assist................................................................414
Alerts.......................................................................413
Calendar ................................................................414
SIRIUS Travel Link...............................................411
SYNC Services (If Equipped, United States
Only).................................................................408
Vehicle Health Report.......................................416
Information Messages.................................98 Active Park..............................................................98
Adaptive Cruise Control....................................99
AdvanceTrac™.....................................................99
Airbag .....................................................................100
Alarm......................................................................100
Automatic Engine Shutdown........................100
Battery and Charging System (12
volt).....................................................................101
Battery and Charging System (High
Voltage).............................................................101
Blind Spot Information and Cross Traffic
Alert System....................................................102
Collision Warning System...............................103
Doors and Locks.................................................103
Driver Alert............................................................104
Fuel ..........................................................................104
Hill Start Assist...................................................104
Keys and Intelligent Access............................105
Lane Keeping System.......................................106
Maintenance ........................................................ 106
MyKey......................................................................107
Park Aid..................................................................108
Park Brake.............................................................108
Power Steering....................................................109
Remote Start.......................................................109
Seats........................................................................110
Starting System ..................................................110
Tire Pressure Monitoring System..................110
Traction Control.....................................................111
Transmission ..........................................................111
Installing Child Seats.....................................18 Child Seats...............................................................18
Using Lap and Shoulder Belts..........................18
Using Lower Anchors and Tethers for
CHildren (LATCH).............................................21
Using Tether Straps.............................................22
Instrument Cluster.........................................79 Instrument Lighting Dimmer.....................70 Vehicles With Front Fog Lamps......................70
Vehicles Without Front Fog Lamps...............70
Interior Lamps..................................................72 Front Interior Lamp..............................................72
Rear Interior Lamp................................................73
Interior Luggage Compartment
Release...........................................................60
Interior Mirror....................................................76 Auto-Dimming Mirror...........................................77
Introduction .........................................................7
J Jump-Starting the Vehicle........................225 Connecting the Jumper Cables....................226
Jump Starting......................................................227
Preparing Your Vehicle.....................................225
Removing the Jumper Cables........................227
K Keyless Entry....................................................57 SECURICODE™ KEYLESS ENTRY
KEYPAD ...............................................................57
Keyless Starting............................................136 Ignition Modes......................................................137
Keys and Remote Controls.........................44
Knee Airbag.......................................................37
L Lane Keeping System.................................193 Switching the System On and Off...............193
Lighting Control..............................................69 Headlamp Flasher...............................................69
High Beams............................................................69
Lighting ..............................................................69
Load Carrying................................................205
Load Limit......................................................205 Vehicle Loading - with and without a
Trailer................................................................205
465Index