FORD MONDEO 2006 2.G Owners Manual
Manufacturer: FORD, Model Year: 2006, Model line: MONDEO, Model: FORD MONDEO 2006 2.GPages: 198, PDF Size: 4.69 MB
Page 91 of 198
Downloaded from www.Manualslib.com manuals search engine The electric sunroof is equipped withanti-trap protection. The sunroof willstop automatically while closing andreverse some distance if there is anobstacle in the way.
To override anti-trap protection whenthere is a resistance, e. g. in thewinter, proceed as follows:
Close the sunroof twice until itreaches the resistance and let itreverse. Close the sunroof a thirdtime to the resistance. Briefly releasethe switch and press againimmediately. The sunroof will overridethe resistance and can then beclosed fully.
Sunroof safety mode
If the system detects a malfunction,it enters a safety mode. The sunroofwill move for only about 0.5 secondsat a time and then stop again. Closethe sunroof by pressing the buttonagain when the sunroof stopsmoving. When the rear of the sunroofis lifted, lift the rear all the way andthen close the sunroof. Have thesystem checked by an expertimmediately.
Sunroof relearning
In case the sunroof no longer closesproperly, follow this relearningprocedure:
•Tilt the rear of the sunroof as faras possible. Release the button.
•Press and hold the same buttonagain for 30 seconds until you seethe sunroof move.
•Release the button andimmediately press and hold itagain. The sunroof will close, openfully and then close again. Do notrelease the button before thesunroof has reached the closedposition for the second time.
If the button is not pressedcontinuously, the relearning functionwill be interrupted. Start theprocedure once more from thebeginning.
89
Climate control
Page 92 of 198
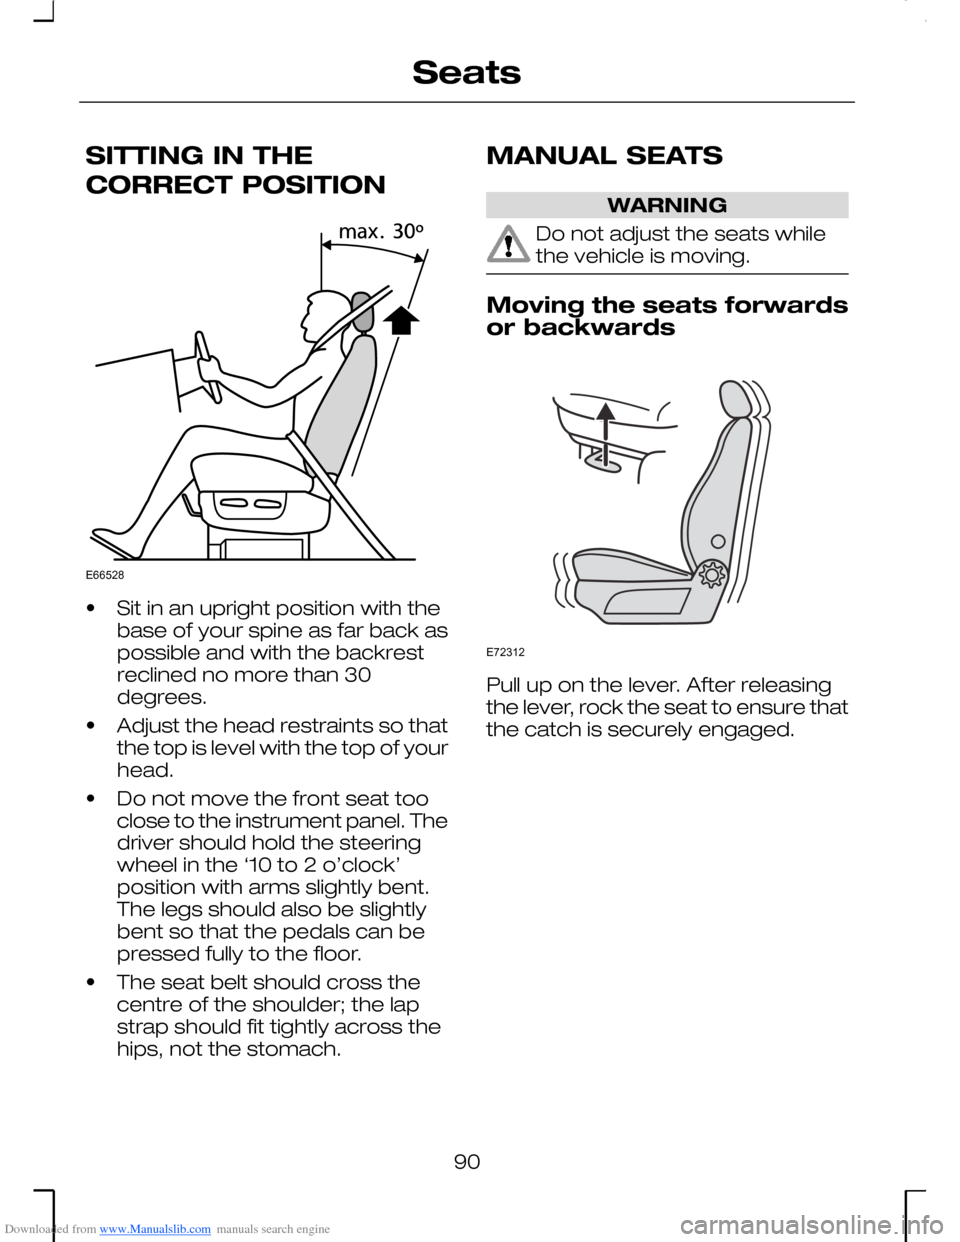
Downloaded from www.Manualslib.com manuals search engine SITTING IN THE
CORRECT POSITION
•Sit in an upright position with thebase of your spine as far back aspossible and with the backrestreclined no more than 30degrees.
•Adjust the head restraints so thatthe top is level with the top of yourhead.
•Do not move the front seat tooclose to the instrument panel. Thedriver should hold the steeringwheel in the ‘10 to 2 o’clock’position with arms slightly bent.The legs should also be slightlybent so that the pedals can bepressed fully to the floor.
•The seat belt should cross thecentre of the shoulder; the lapstrap should fit tightly across thehips, not the stomach.
MANUAL SEATS
WARNING
Do not adjust the seats whilethe vehicle is moving.
Moving the seats forwardsor backwards
Pull up on the lever. After releasingthe lever, rock the seat to ensure thatthe catch is securely engaged.
90
SeatsE66528 E72312
Page 93 of 198
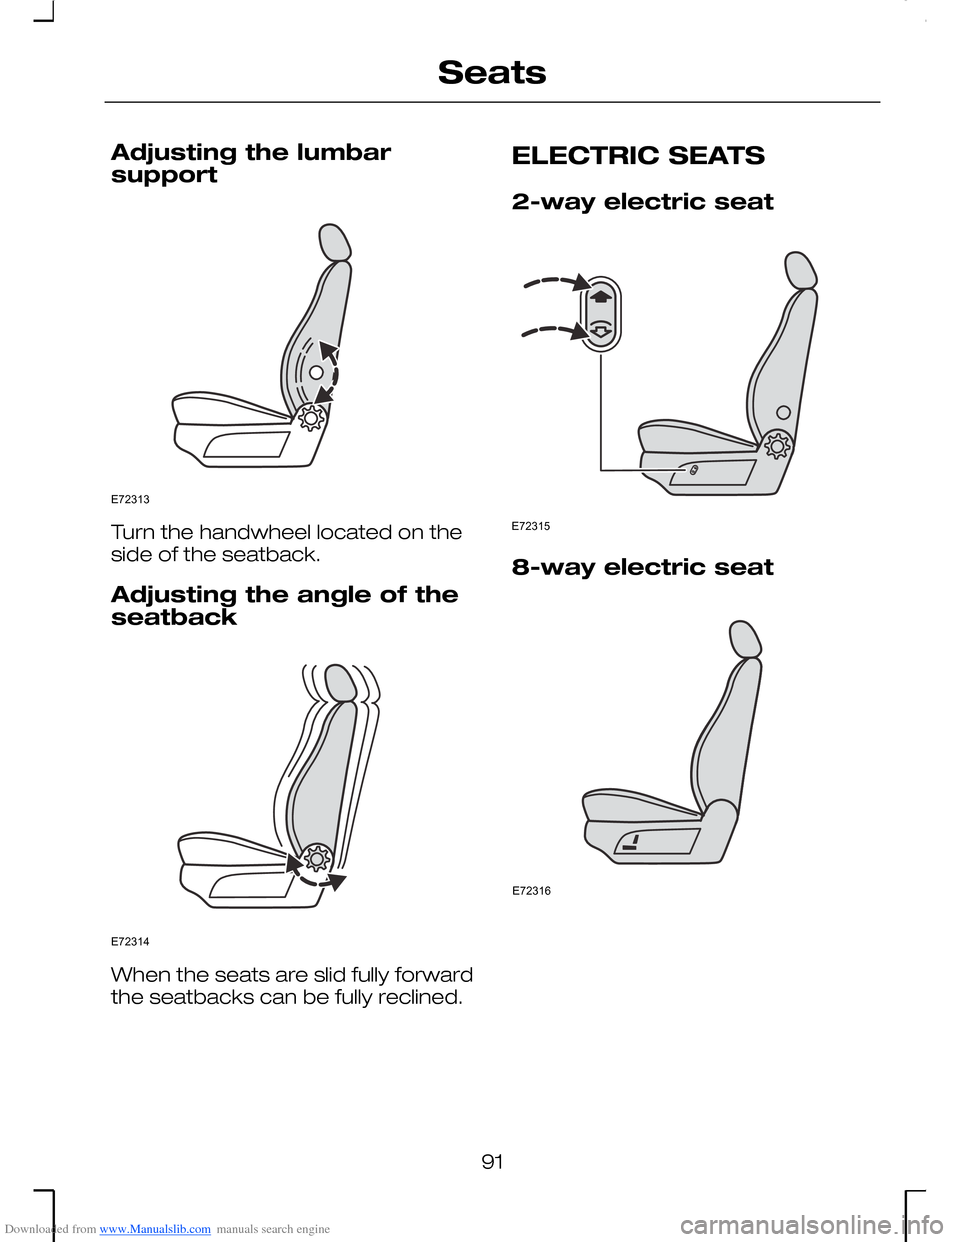
Downloaded from www.Manualslib.com manuals search engine Adjusting the lumbarsupport
Turn the handwheel located on theside of the seatback.
Adjusting the angle of the
seatback
When the seats are slid fully forwardthe seatbacks can be fully reclined.
ELECTRIC SEATS
2-way electric seat
8-way electric seat
91
SeatsE72313 E72314 E72315 E72316
Page 94 of 198
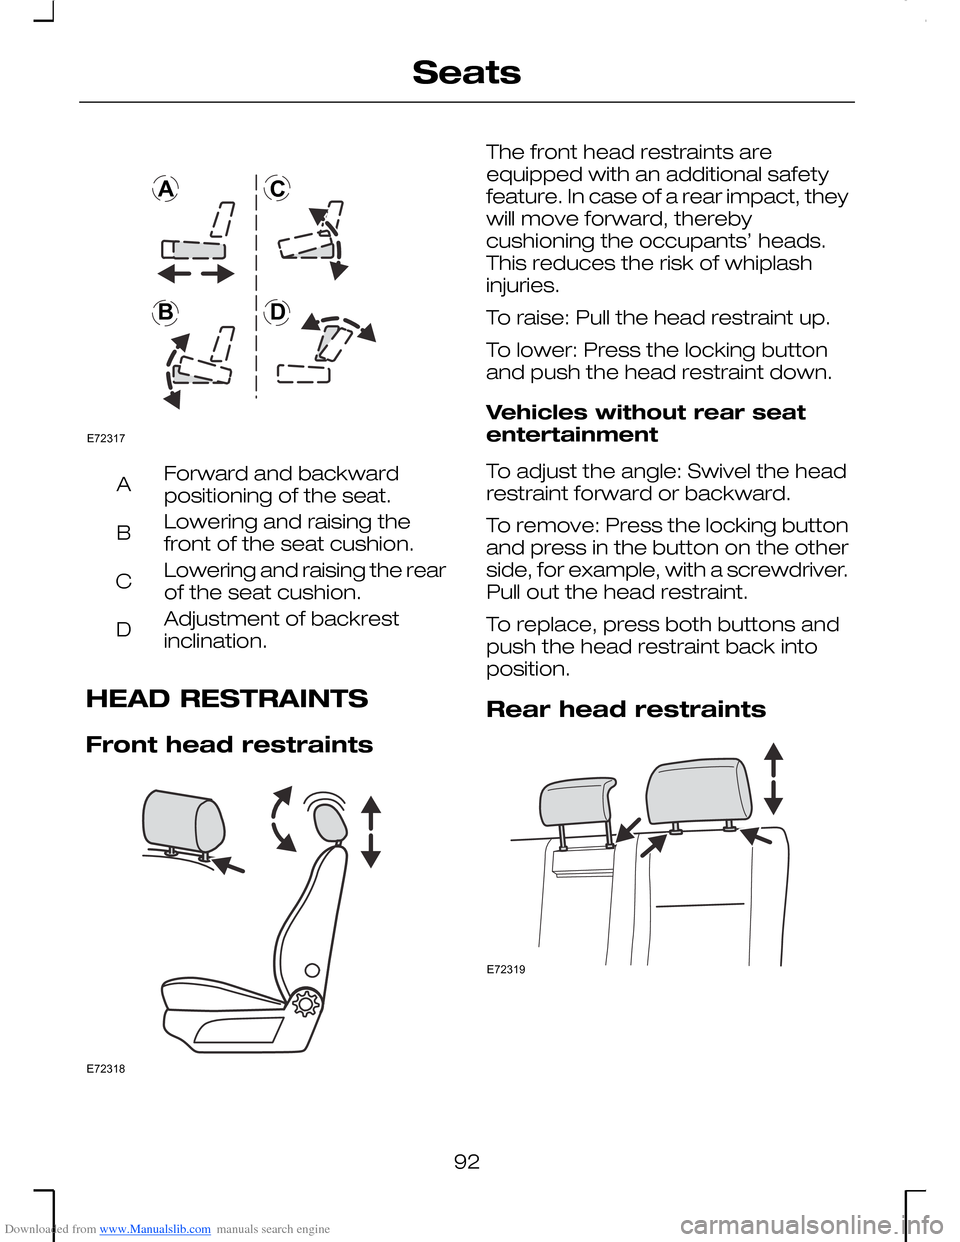
Downloaded from www.Manualslib.com manuals search engine Forward and backwardpositioning of the seat.A
Lowering and raising thefront of the seat cushion.B
Lowering and raising the rearof the seat cushion.C
Adjustment of backrestinclination.D
HEAD RESTRAINTS
Front head restraints
The front head restraints areequipped with an additional safetyfeature. In case of a rear impact, theywill move forward, therebycushioning the occupants’ heads.This reduces the risk of whiplashinjuries.
To raise: Pull the head restraint up.
To lower: Press the locking buttonand push the head restraint down.
Vehicles without rear seatentertainment
To adjust the angle: Swivel the headrestraint forward or backward.
To remove: Press the locking buttonand press in the button on the otherside, for example, with a screwdriver.Pull out the head restraint.
To replace, press both buttons andpush the head restraint back intoposition.
Rear head restraints
92
SeatsE72317ABCD E72318 E72319
Page 95 of 198
Downloaded from www.Manualslib.com manuals search engine WARNING
Always have the rear headrestraint raised when the rearseat is occupied by a passenger ora child restraint.
To raise: Pull the head restraint up.
To lower the outer head restraints:Press both locking buttons and pushthe head restraint down.
To lower the centre head restraint:Press the locking button and pushthe head restraint down.
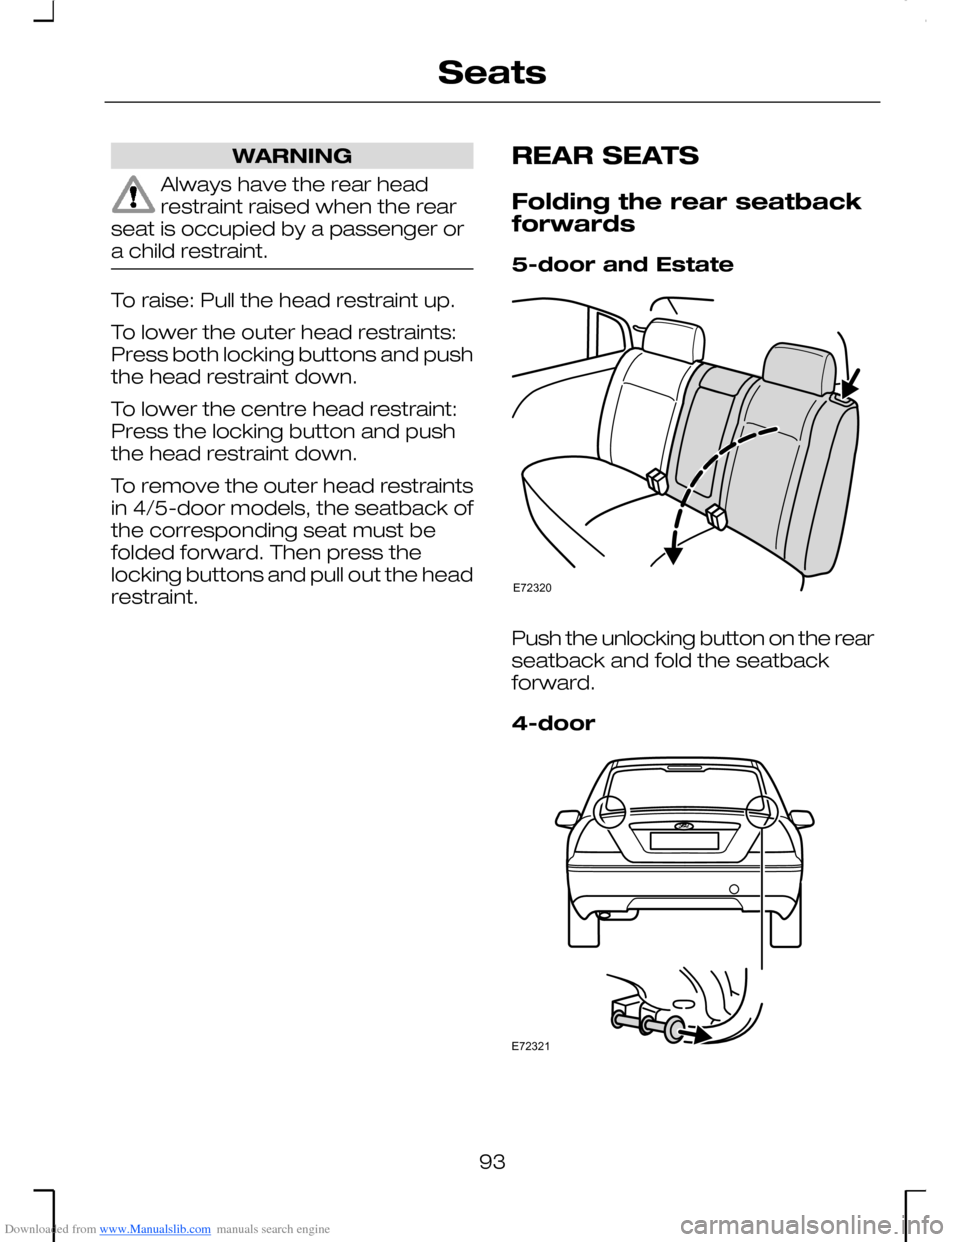
To remove the outer head restraintsin 4/5-door models, the seatback ofthe corresponding seat must befolded forward. Then press thelocking buttons and pull out the headrestraint.
REAR SEATS
Folding the rear seatbackforwards
5-door and Estate
Push the unlocking button on the rearseatback and fold the seatbackforward.
4-door
93
SeatsE72320 E72321
Page 96 of 198
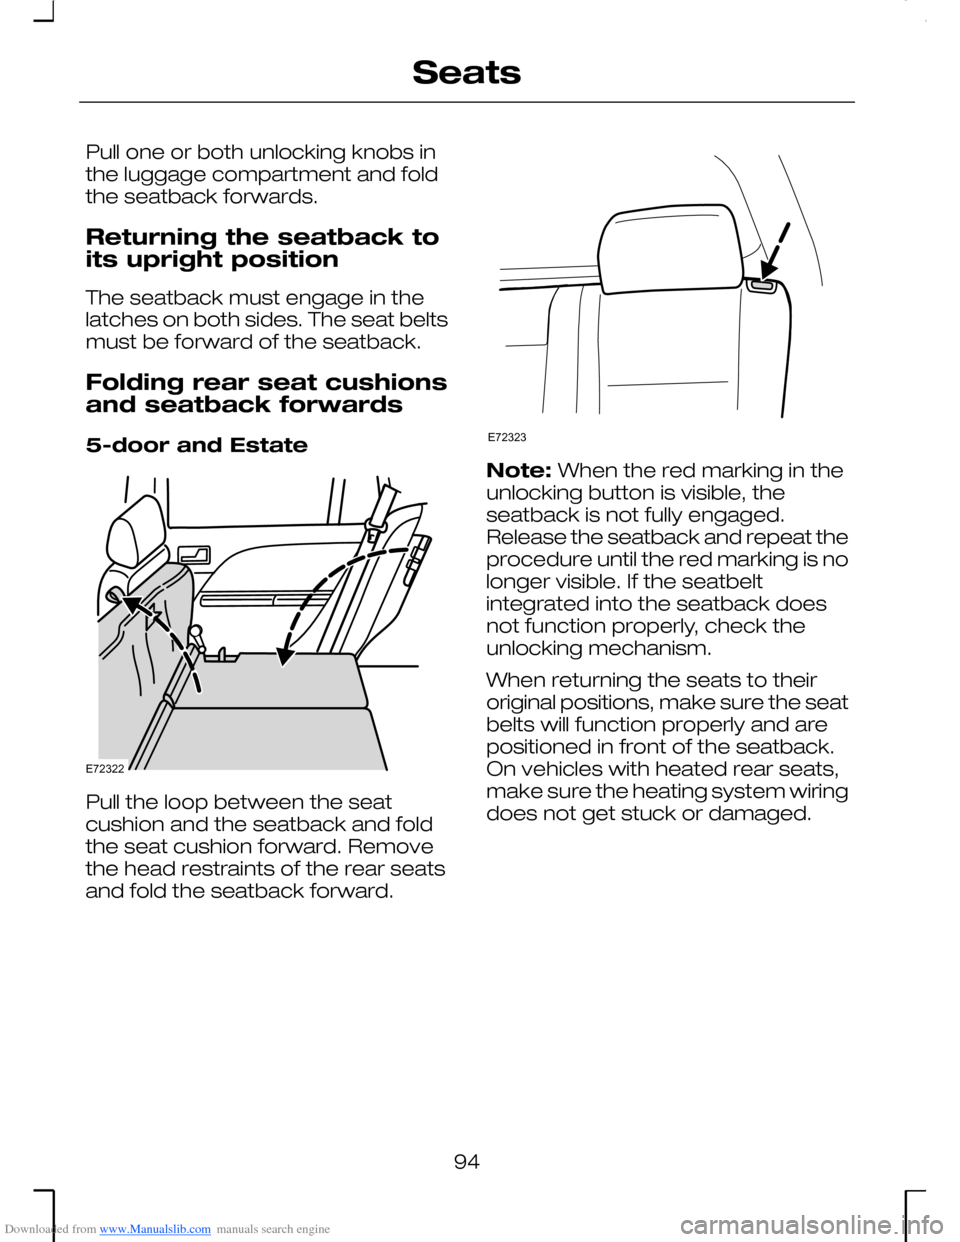
Downloaded from www.Manualslib.com manuals search engine Pull one or both unlocking knobs inthe luggage compartment and foldthe seatback forwards.
Returning the seatback toits upright position
The seatback must engage in thelatches on both sides. The seat beltsmust be forward of the seatback.
Folding rear seat cushionsand seatback forwards
5-door and Estate
Pull the loop between the seatcushion and the seatback and foldthe seat cushion forward. Removethe head restraints of the rear seatsand fold the seatback forward.
Note: When the red marking in theunlocking button is visible, theseatback is not fully engaged.Release the seatback and repeat theprocedure until the red marking is nolonger visible. If the seatbeltintegrated into the seatback doesnot function properly, check theunlocking mechanism.
When returning the seats to theiroriginal positions, make sure the seatbelts will function properly and arepositioned in front of the seatback.On vehicles with heated rear seats,make sure the heating system wiringdoes not get stuck or damaged.
94
SeatsE72322 E72323
Page 97 of 198
Downloaded from www.Manualslib.com manuals search engine HEATED SEATS
WARNING
Heating with the engine off willdrain the battery.
Note: The settings of the heatedseats are stored when the ignition isswitched off. When the ignition isswitched on again the settings arerestored automatically.
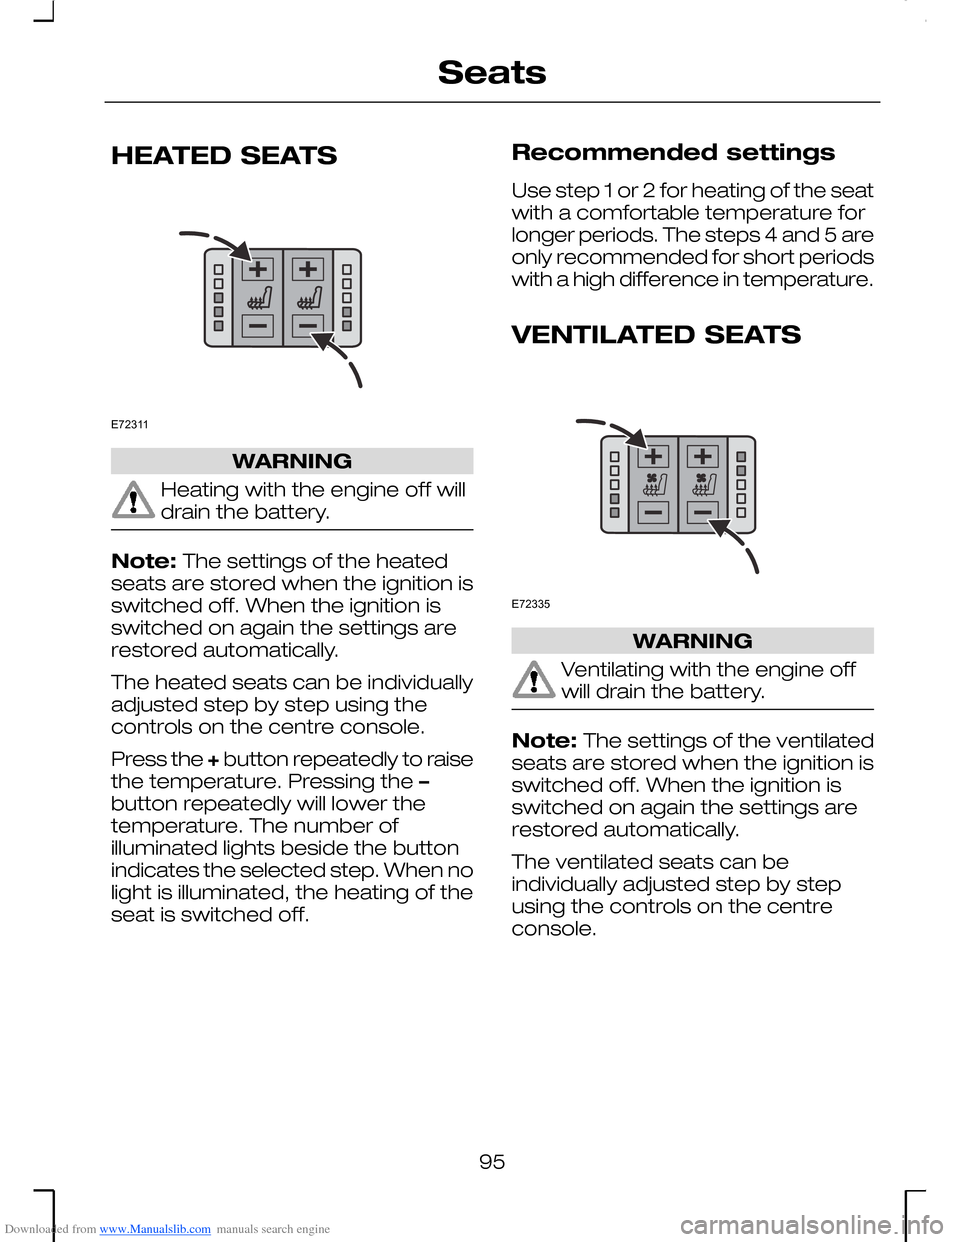
The heated seats can be individuallyadjusted step by step using thecontrols on the centre console.
Press the + button repeatedly to raisethe temperature. Pressing the –button repeatedly will lower thetemperature. The number ofilluminated lights beside the buttonindicates the selected step. When nolight is illuminated, the heating of theseat is switched off.
Recommended settings
Use step 1 or 2 for heating of the seatwith a comfortable temperature forlonger periods. The steps 4 and 5 areonly recommended for short periodswith a high difference in temperature.
VENTILATED SEATS
WARNING
Ventilating with the engine offwill drain the battery.
Note: The settings of the ventilatedseats are stored when the ignition isswitched off. When the ignition isswitched on again the settings arerestored automatically.
The ventilated seats can beindividually adjusted step by stepusing the controls on the centreconsole.
95
SeatsE72311 E72335
Page 98 of 198
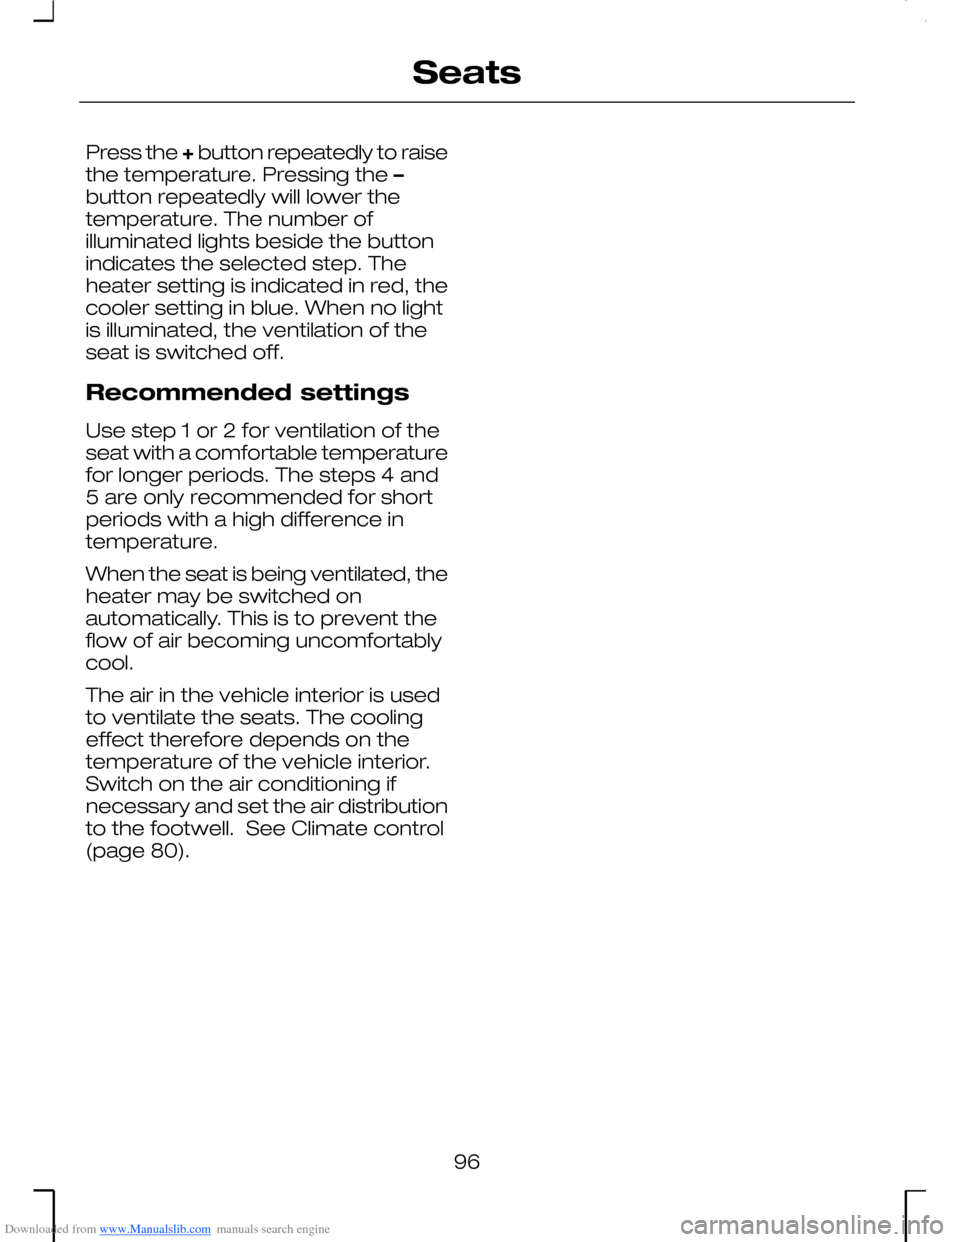
Downloaded from www.Manualslib.com manuals search engine Press the + button repeatedly to raisethe temperature. Pressing the –button repeatedly will lower thetemperature. The number ofilluminated lights beside the buttonindicates the selected step. Theheater setting is indicated in red, thecooler setting in blue. When no lightis illuminated, the ventilation of theseat is switched off.
Recommended settings
Use step 1 or 2 for ventilation of theseat with a comfortable temperaturefor longer periods. The steps 4 and5 are only recommended for shortperiods with a high difference intemperature.
When the seat is being ventilated, theheater may be switched onautomatically. This is to prevent theflow of air becoming uncomfortablycool.
The air in the vehicle interior is usedto ventilate the seats. The coolingeffect therefore depends on thetemperature of the vehicle interior.Switch on the air conditioning ifnecessary and set the air distributionto the footwell. See Climate control(page 80).
96
Seats
Page 99 of 198
Downloaded from www.Manualslib.com manuals search engine SUN VISORS
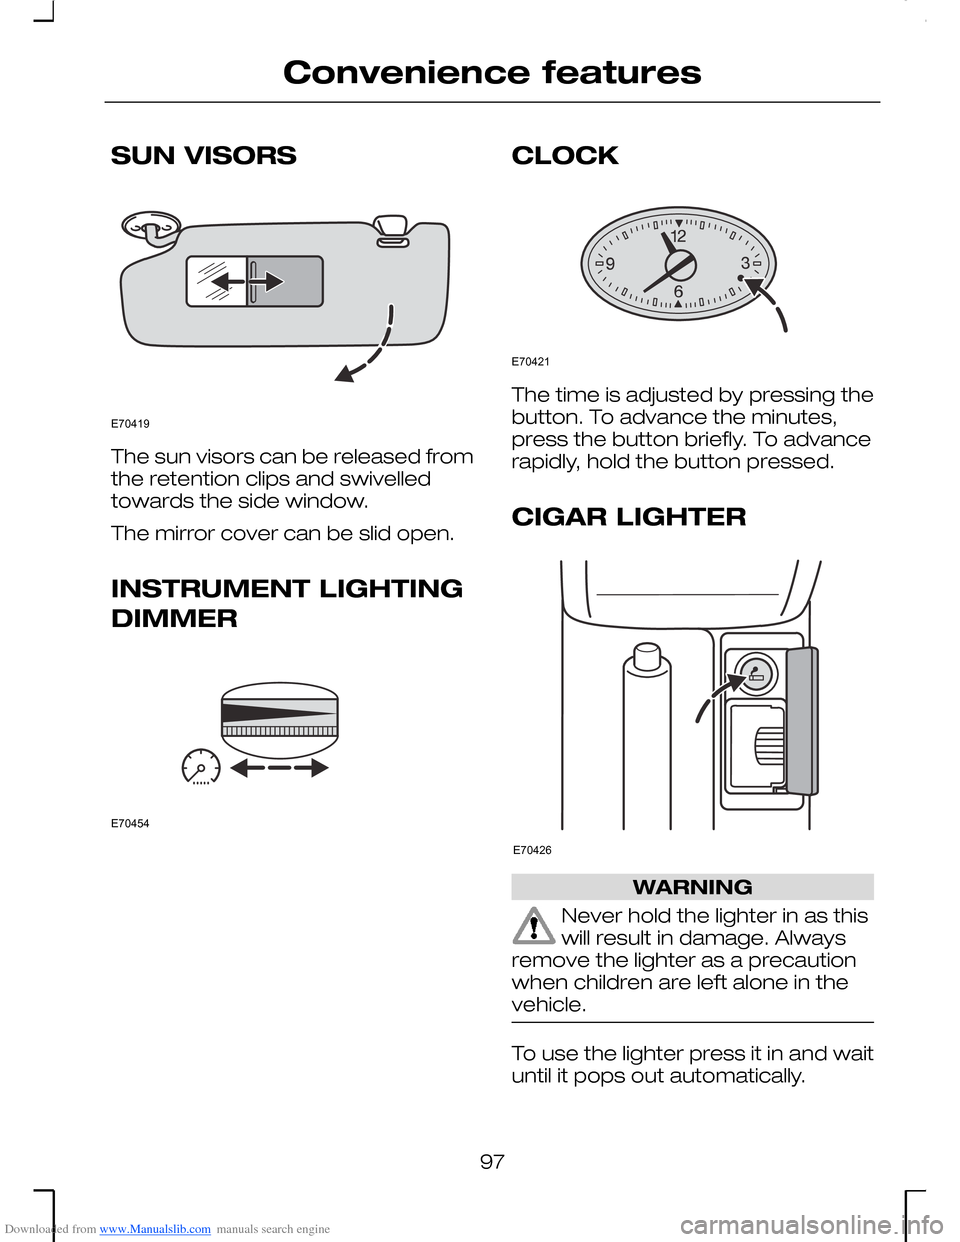
The sun visors can be released fromthe retention clips and swivelledtowards the side window.
The mirror cover can be slid open.
INSTRUMENT LIGHTING
DIMMER
CLOCK
The time is adjusted by pressing thebutton. To advance the minutes,press the button briefly. To advancerapidly, hold the button pressed.
CIGAR LIGHTER
WARNING
Never hold the lighter in as thiswill result in damage. Alwaysremove the lighter as a precautionwhen children are left alone in thevehicle.
To use the lighter press it in and waituntil it pops out automatically.
97
Convenience featuresE70419 E70454 E70421 E70426
Page 100 of 198
Downloaded from www.Manualslib.com manuals search engine The lighter socket can also be usedto power 12 volt appliances having acurrent rating of maximum 10amperes. However, if the engine isnot running, this will cause the batteryto discharge.
When connecting appliances, useonly specified connectors from theFord Accessory range or connectorsfor use with SAE standard sockets.
ASHTRAY
Front ashtray
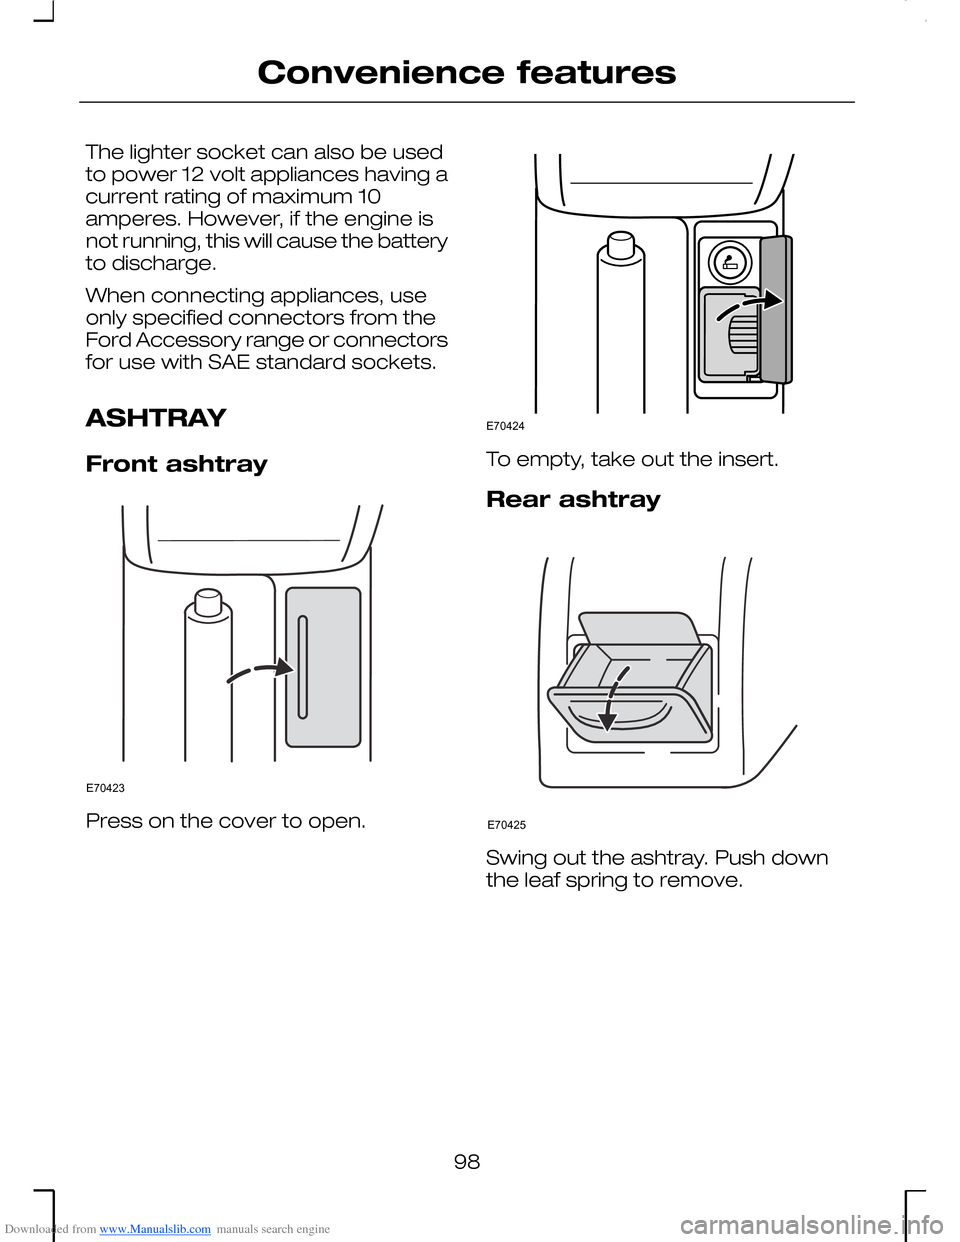
Press on the cover to open.
To empty, take out the insert.
Rear ashtray
Swing out the ashtray. Push downthe leaf spring to remove.
98
Convenience featuresE70423 E70424 E70425