FORD MONDEO 2006 2.G Workshop Manual
Manufacturer: FORD, Model Year: 2006, Model line: MONDEO, Model: FORD MONDEO 2006 2.GPages: 198, PDF Size: 4.69 MB
Page 51 of 198
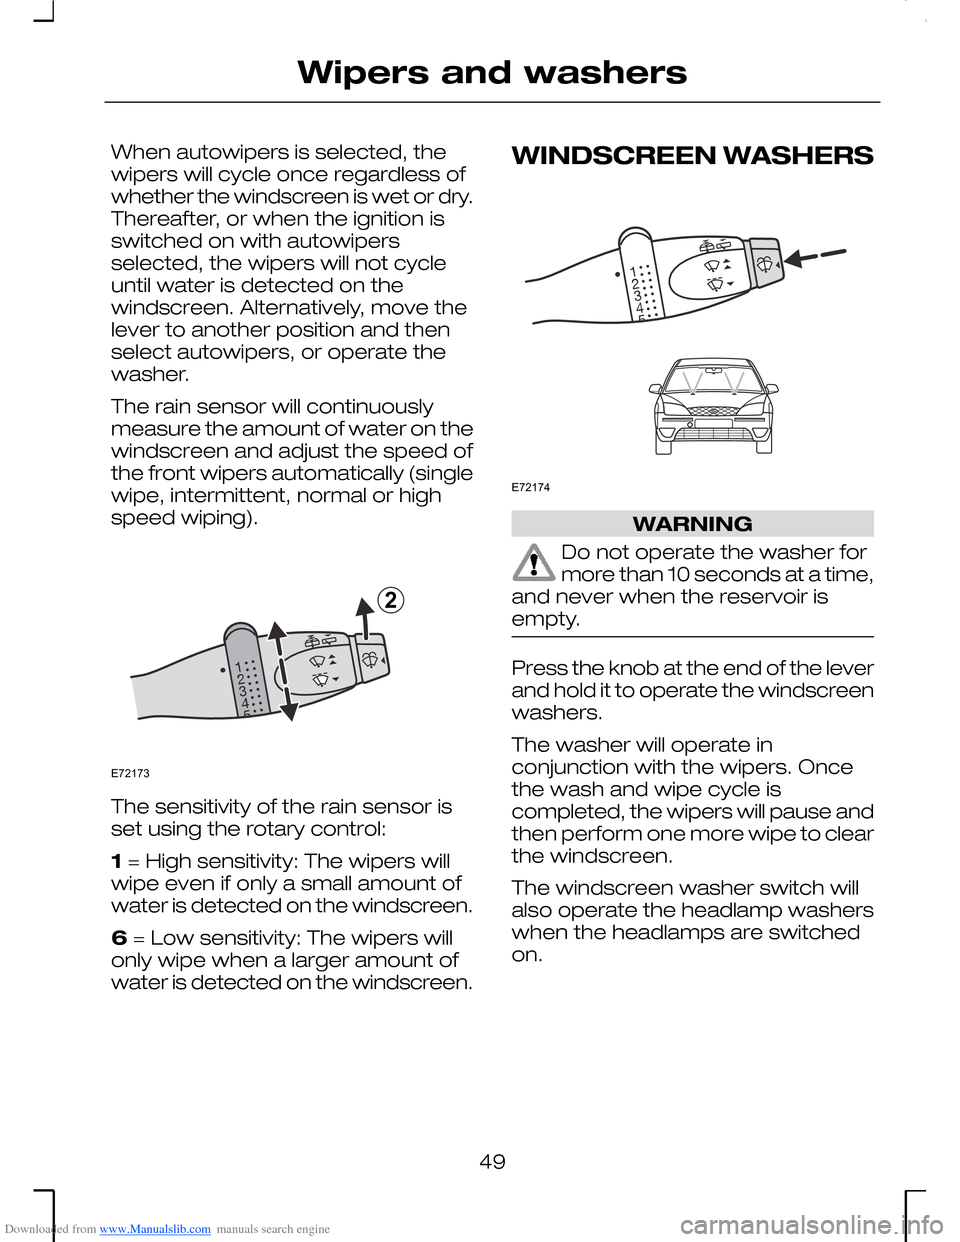
Downloaded from www.Manualslib.com manuals search engine When autowipers is selected, thewipers will cycle once regardless ofwhether the windscreen is wet or dry.Thereafter, or when the ignition isswitched on with autowipersselected, the wipers will not cycleuntil water is detected on thewindscreen. Alternatively, move thelever to another position and thenselect autowipers, or operate thewasher.
The rain sensor will continuouslymeasure the amount of water on thewindscreen and adjust the speed ofthe front wipers automatically (singlewipe, intermittent, normal or highspeed wiping).
The sensitivity of the rain sensor isset using the rotary control:
1 = High sensitivity: The wipers willwipe even if only a small amount ofwater is detected on the windscreen.
6 = Low sensitivity: The wipers willonly wipe when a larger amount ofwater is detected on the windscreen.
WINDSCREEN WASHERS
WARNING
Do not operate the washer formore than 10 seconds at a time,and never when the reservoir isempty.
Press the knob at the end of the leverand hold it to operate the windscreenwashers.
The washer will operate inconjunction with the wipers. Oncethe wash and wipe cycle iscompleted, the wipers will pause andthen perform one more wipe to clearthe windscreen.
The windscreen washer switch willalso operate the headlamp washerswhen the headlamps are switchedon.
49
Wipers and washersE721732 E72174
Page 52 of 198
Downloaded from www.Manualslib.com manuals search engine REAR WINDOW WIPER
AND WASHERS
Intermittent wiping
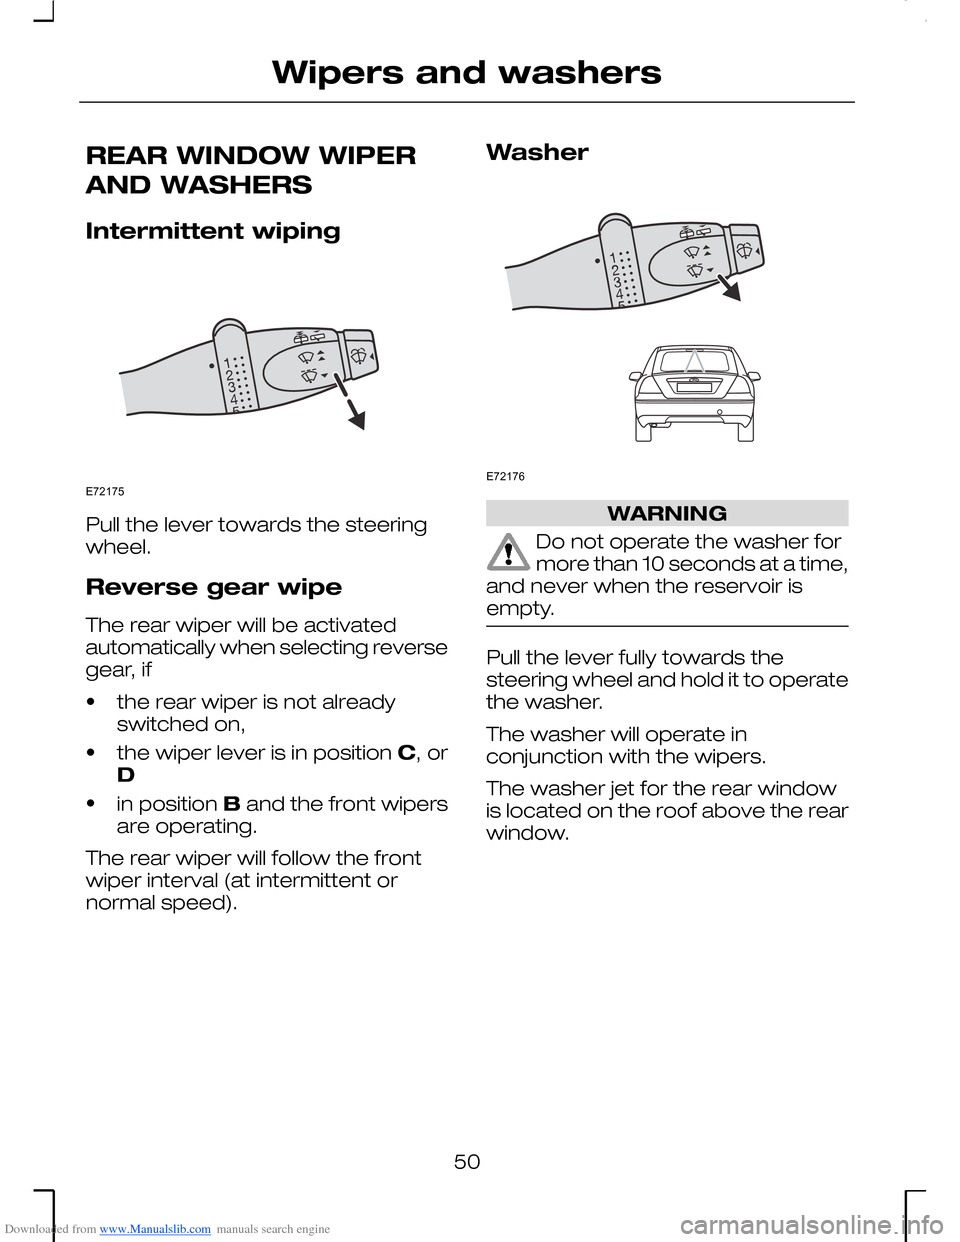
Pull the lever towards the steeringwheel.
Reverse gear wipe
The rear wiper will be activatedautomatically when selecting reversegear, if
•the rear wiper is not alreadyswitched on,
•the wiper lever is in position C, orD
•in position B and the front wipersare operating.
The rear wiper will follow the frontwiper interval (at intermittent ornormal speed).
Washer
WARNING
Do not operate the washer formore than 10 seconds at a time,and never when the reservoir isempty.
Pull the lever fully towards thesteering wheel and hold it to operatethe washer.
The washer will operate inconjunction with the wipers.
The washer jet for the rear windowis located on the roof above the rearwindow.
50
Wipers and washersE72175 E72176
Page 53 of 198
Downloaded from www.Manualslib.com manuals search engine ADJUSTING THE
WINDSCREEN WASHER
JETS
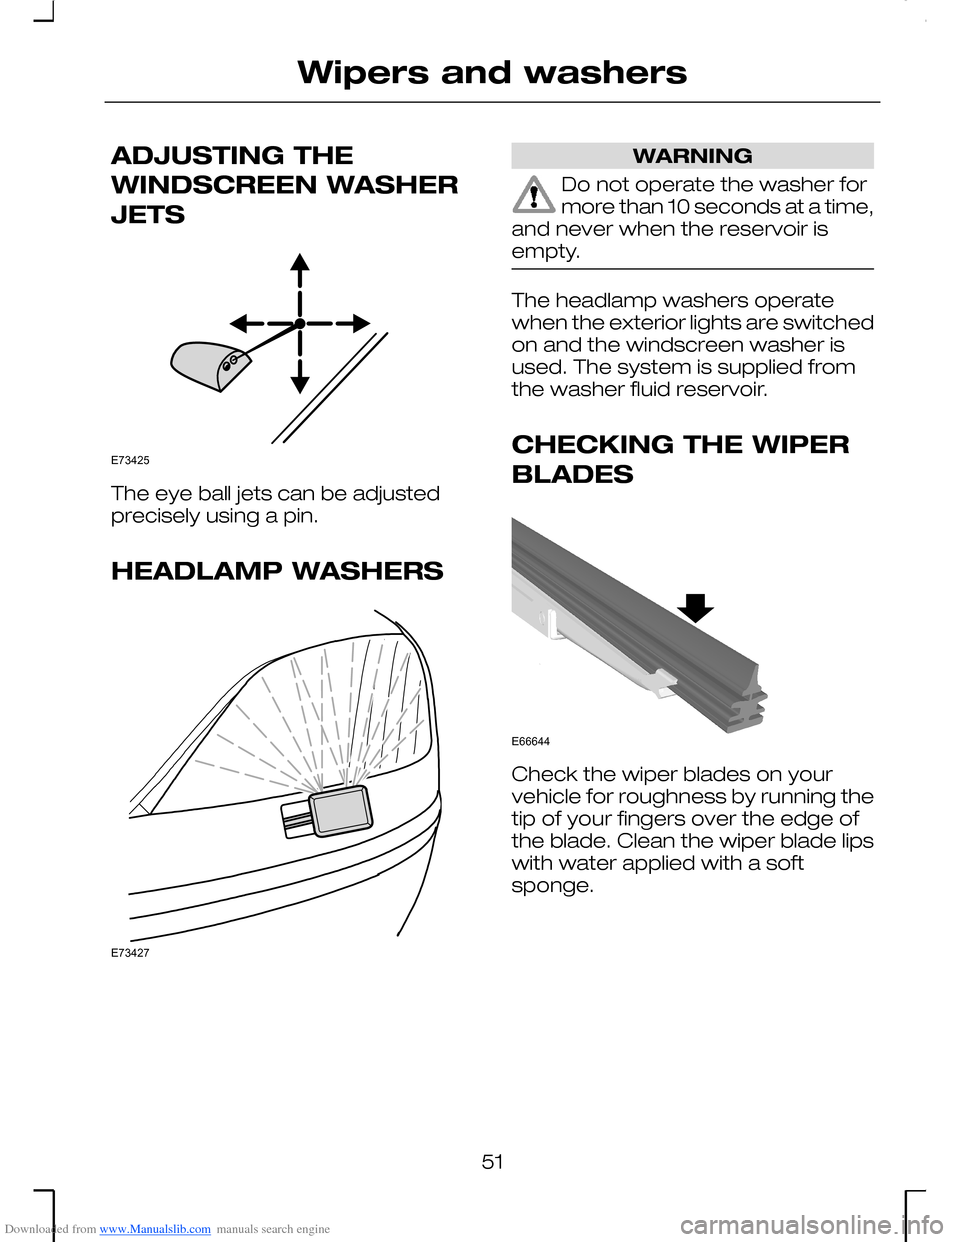
The eye ball jets can be adjustedprecisely using a pin.
HEADLAMP WASHERS
WARNING
Do not operate the washer formore than 10 seconds at a time,and never when the reservoir isempty.
The headlamp washers operatewhen the exterior lights are switchedon and the windscreen washer isused. The system is supplied fromthe washer fluid reservoir.
CHECKING THE WIPER
BLADES
Check the wiper blades on yourvehicle for roughness by running thetip of your fingers over the edge ofthe blade. Clean the wiper blade lipswith water applied with a softsponge.
51
Wipers and washersE73425 E73427 E66644
Page 54 of 198
Downloaded from www.Manualslib.com manuals search engine CHANGING THE WIPER
BLADES
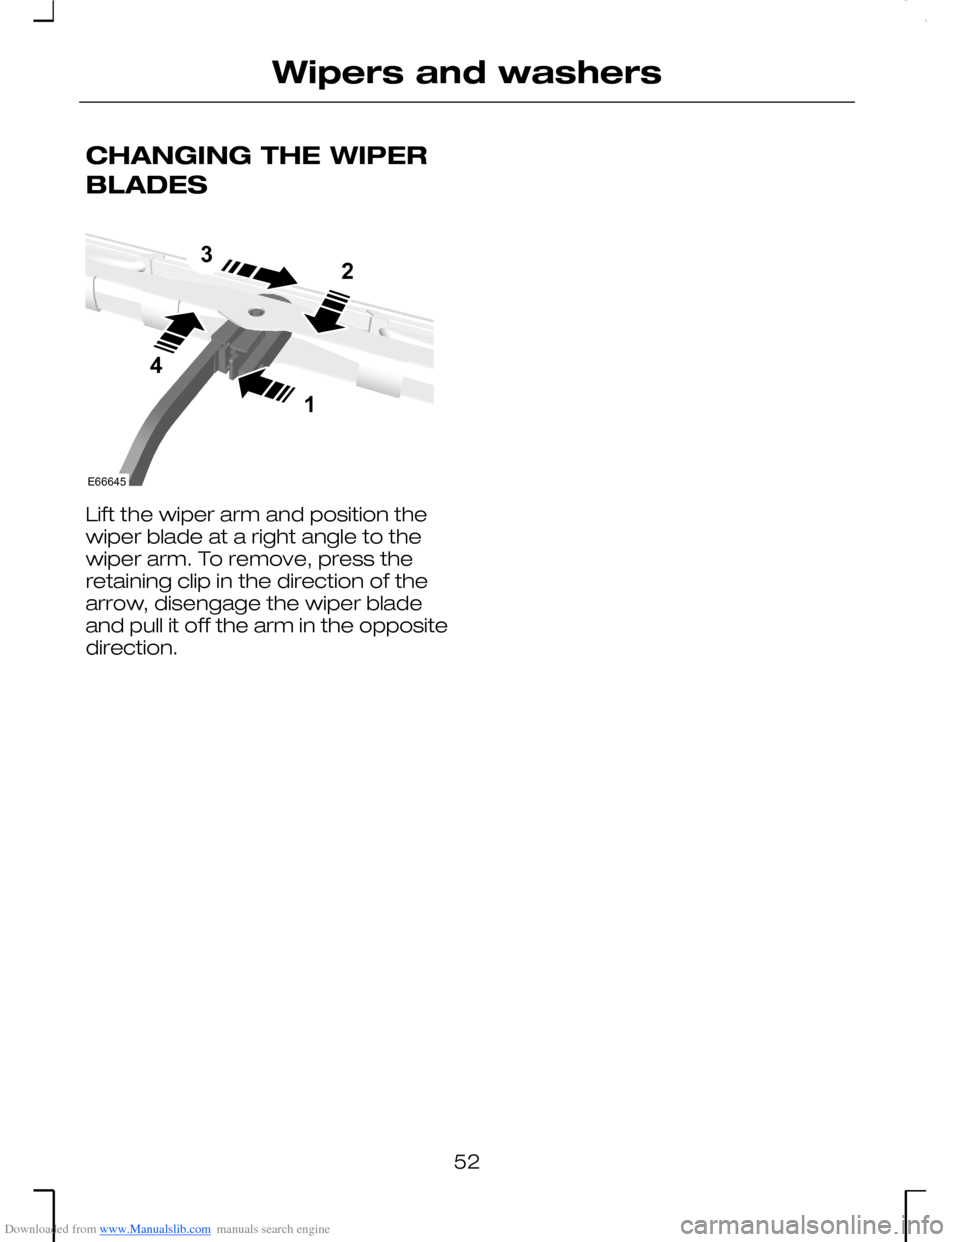
Lift the wiper arm and position thewiper blade at a right angle to thewiper arm. To remove, press theretaining clip in the direction of thearrow, disengage the wiper bladeand pull it off the arm in the oppositedirection.
52
Wipers and washersE666451234
Page 55 of 198
Downloaded from www.Manualslib.com manuals search engine LIGHTING CONTROL
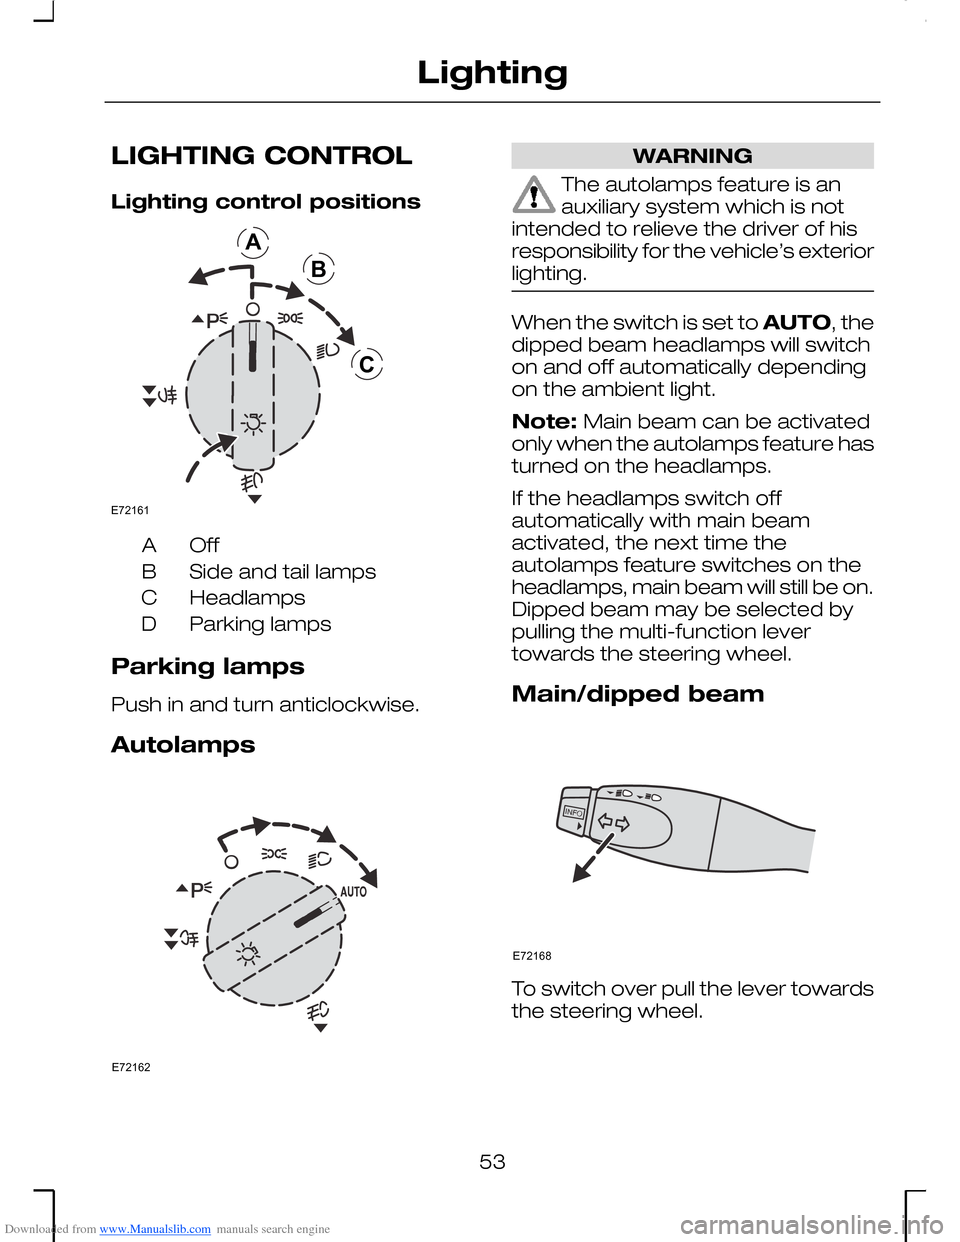
Lighting control positions
OffA
Side and tail lampsB
HeadlampsC
Parking lampsD
Parking lamps
Push in and turn anticlockwise.
Autolamps
WARNING
The autolamps feature is anauxiliary system which is notintended to relieve the driver of hisresponsibility for the vehicle’s exteriorlighting.
When the switch is set to AUTO, thedipped beam headlamps will switchon and off automatically dependingon the ambient light.
Note: Main beam can be activatedonly when the autolamps feature hasturned on the headlamps.
If the headlamps switch offautomatically with main beamactivated, the next time theautolamps feature switches on theheadlamps, main beam will still be on.Dipped beam may be selected bypulling the multi-function levertowards the steering wheel.
Main/dipped beam
To switch over pull the lever towardsthe steering wheel.
53
LightingABCE72161 E72162 E72168
Page 56 of 198
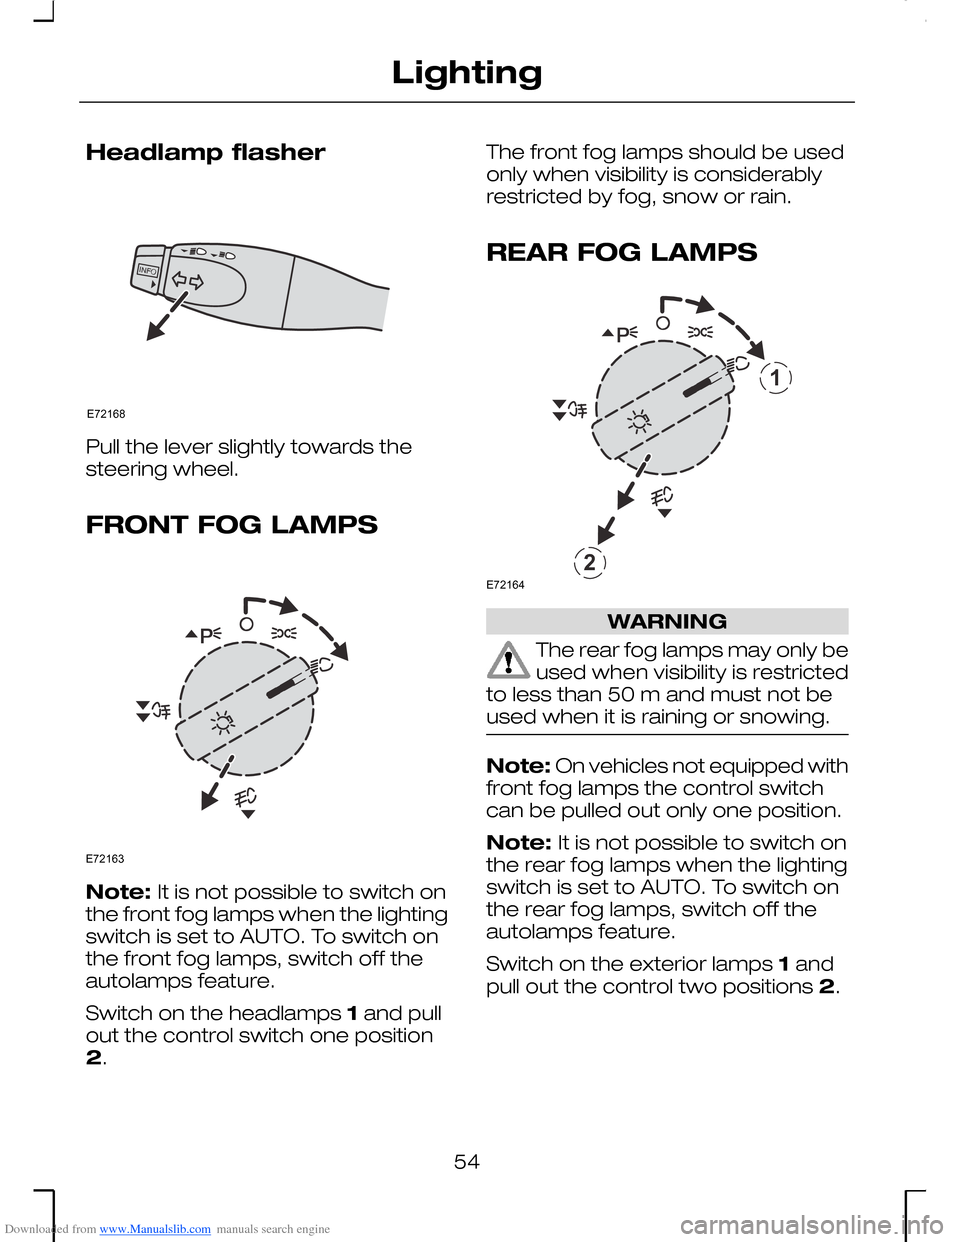
Downloaded from www.Manualslib.com manuals search engine Headlamp flasher
Pull the lever slightly towards thesteering wheel.
FRONT FOG LAMPS
Note: It is not possible to switch onthe front fog lamps when the lightingswitch is set to AUTO. To switch onthe front fog lamps, switch off theautolamps feature.
Switch on the headlamps 1 and pullout the control switch one position2.
The front fog lamps should be usedonly when visibility is considerablyrestricted by fog, snow or rain.
REAR FOG LAMPS
WARNING
The rear fog lamps may only beused when visibility is restrictedto less than 50 m and must not beused when it is raining or snowing.
Note: On vehicles not equipped withfront fog lamps the control switchcan be pulled out only one position.
Note: It is not possible to switch onthe rear fog lamps when the lightingswitch is set to AUTO. To switch onthe rear fog lamps, switch off theautolamps feature.
Switch on the exterior lamps 1 andpull out the control two positions 2.
54
LightingE72168 E72163 12E72164
Page 57 of 198
Downloaded from www.Manualslib.com manuals search engine ADJUSTING THE
HEADLAMPS
Vehicles with Xenonheadlamps
Vehicles with Xenon headlamps arefitted with automatic headlamplevelling.
The headlamps can be adjusted fordriving on the left or right hand sideof the road i.e. when travellingabroad. This adjustment should onlybe carried out by an expert.
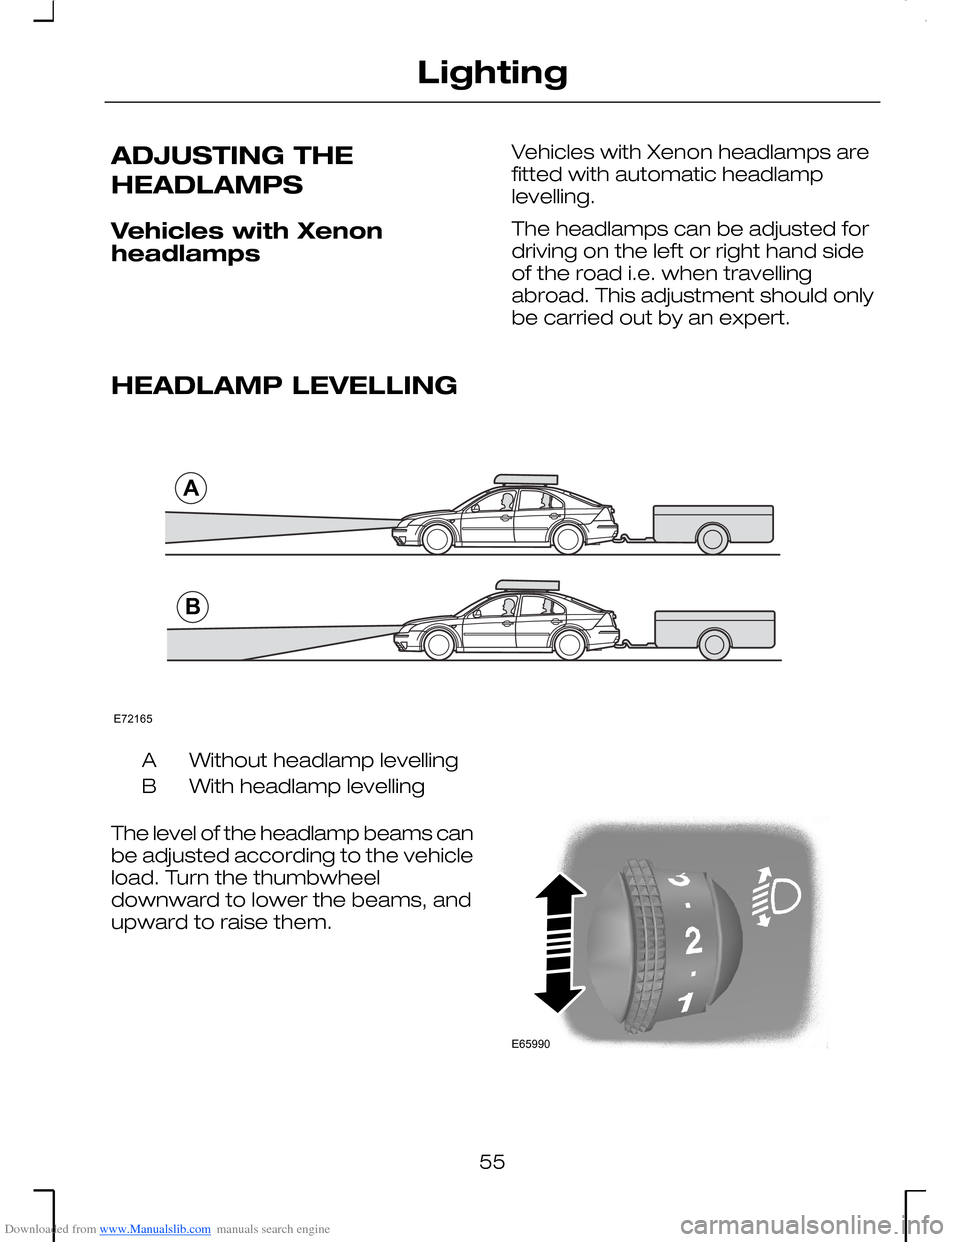
HEADLAMP LEVELLING
Without headlamp levellingA
With headlamp levellingB
The level of the headlamp beams canbe adjusted according to the vehicleload. Turn the thumbwheeldownward to lower the beams, andupward to raise them.
55
LightingABE72165 E65990
Page 58 of 198
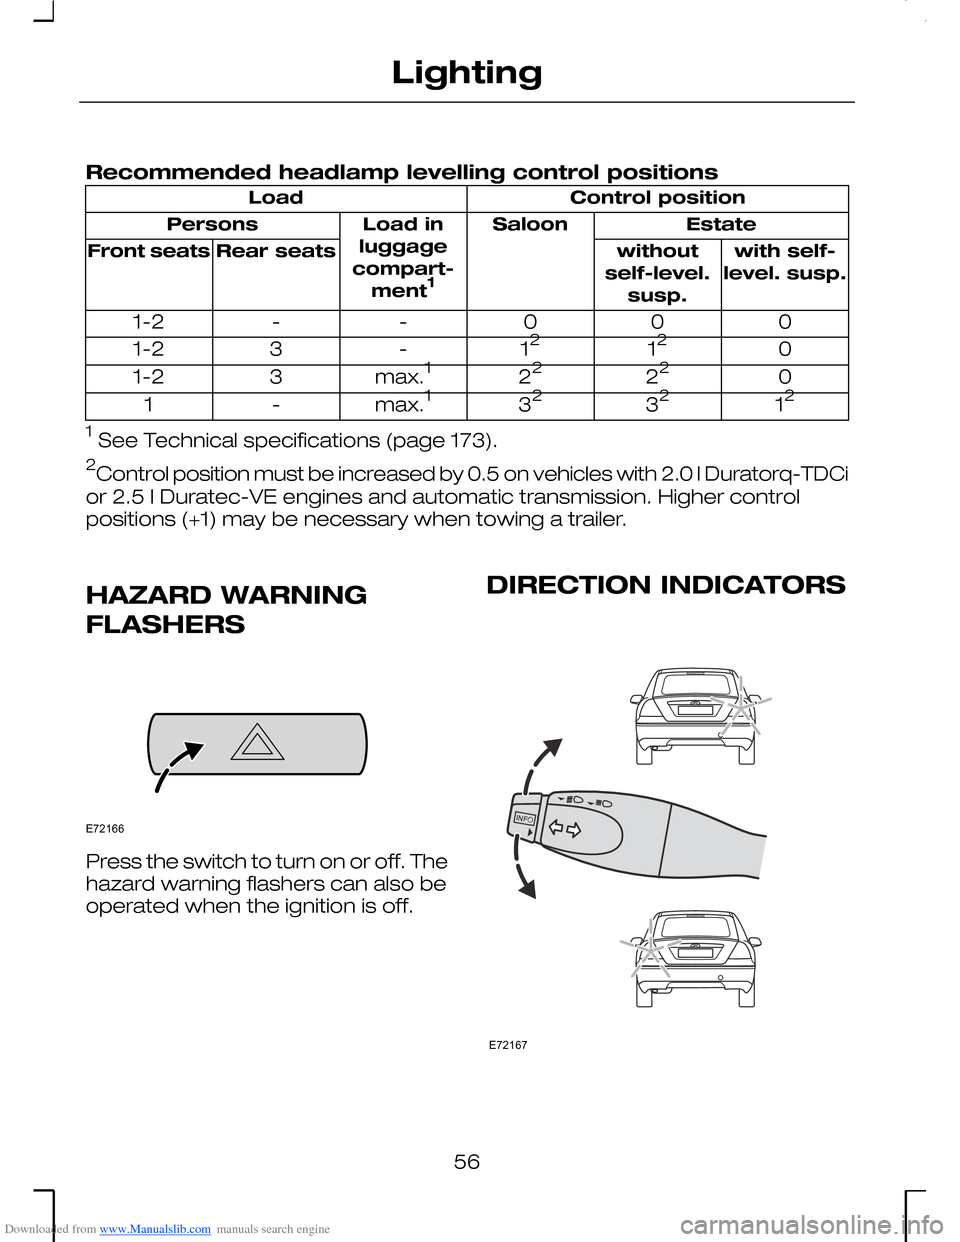
Downloaded from www.Manualslib.com manuals search engine Recommended headlamp levelling control positions
Control positionLoad
EstateSaloonLoad inluggagecompart-ment1
Persons
with self-level. susp.withoutself-level.susp.
Rear seatsFront seats
000--1-2
01212-31-2
02222max.131-2
123232max.1-1
1 See Technical specifications (page 173).
2Control position must be increased by 0.5 on vehicles with 2.0 l Duratorq-TDCi
or 2.5 l Duratec-VE engines and automatic transmission. Higher controlpositions (+1) may be necessary when towing a trailer.
HAZARD WARNING
FLASHERS
Press the switch to turn on or off. Thehazard warning flashers can also beoperated when the ignition is off.
DIRECTION INDICATORS
56
LightingE72166 E72167
Page 59 of 198
Downloaded from www.Manualslib.com manuals search engine Briefly tap the lever up or down andthe direction indicators will flash threetimes.
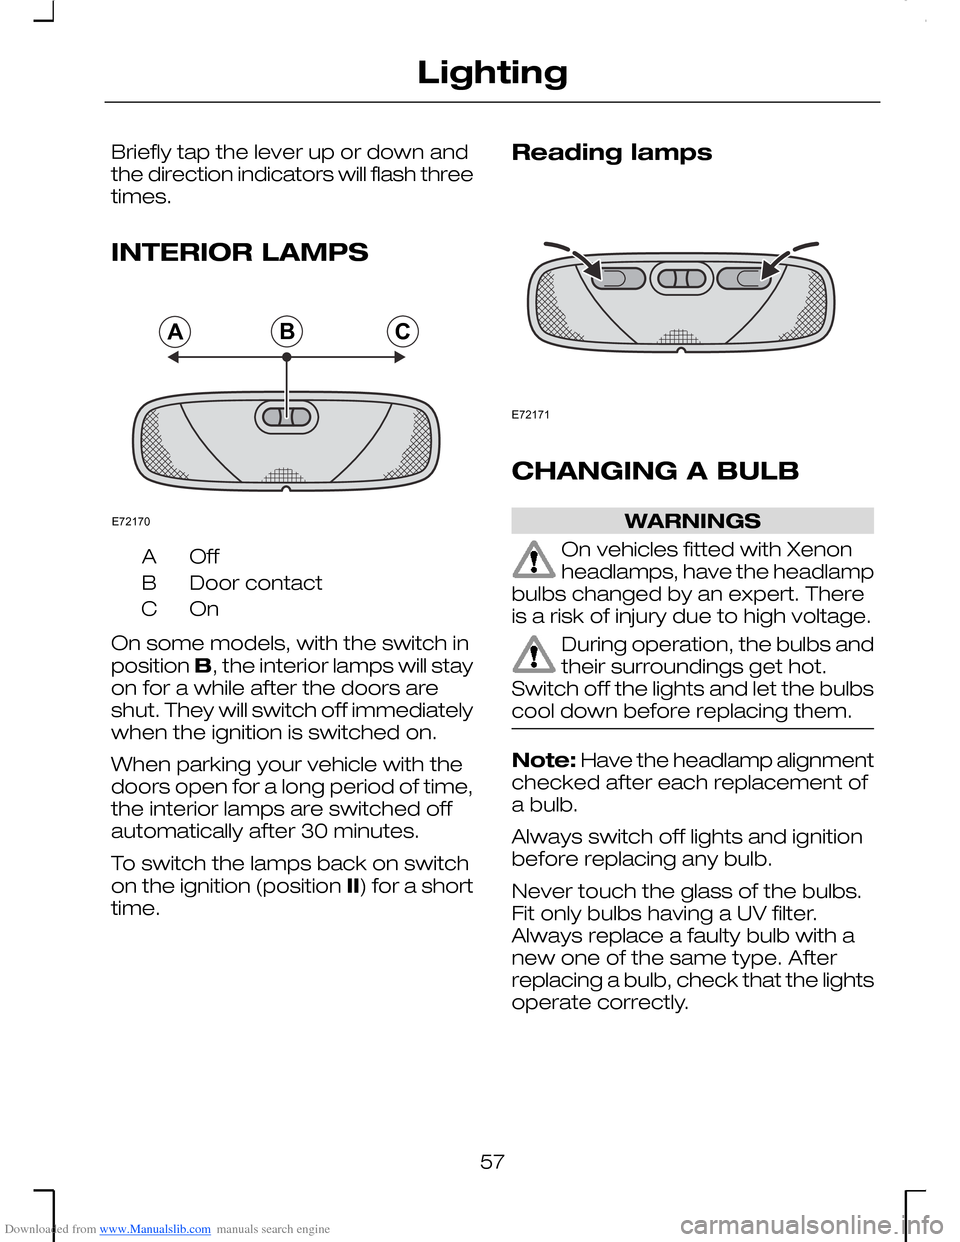
INTERIOR LAMPS
OffA
Door contactB
OnC
On some models, with the switch inposition B, the interior lamps will stayon for a while after the doors areshut. They will switch off immediatelywhen the ignition is switched on.
When parking your vehicle with thedoors open for a long period of time,the interior lamps are switched offautomatically after 30 minutes.
To switch the lamps back on switchon the ignition (position II) for a shorttime.
Reading lamps
CHANGING A BULB
WARNINGS
On vehicles fitted with Xenonheadlamps, have the headlampbulbs changed by an expert. Thereis a risk of injury due to high voltage.
During operation, the bulbs andtheir surroundings get hot.Switch off the lights and let the bulbscool down before replacing them.
Note: Have the headlamp alignmentchecked after each replacement ofa bulb.
Always switch off lights and ignitionbefore replacing any bulb.
Never touch the glass of the bulbs.Fit only bulbs having a UV filter.Always replace a faulty bulb with anew one of the same type. Afterreplacing a bulb, check that the lightsoperate correctly.
57
LightingABCE72170 E72171
Page 60 of 198
Downloaded from www.Manualslib.com manuals search engine Headlamps, side lamps,direction indicators
Note: It is necessary to remove theheadlamp assembly to remove anyof the bulbs.
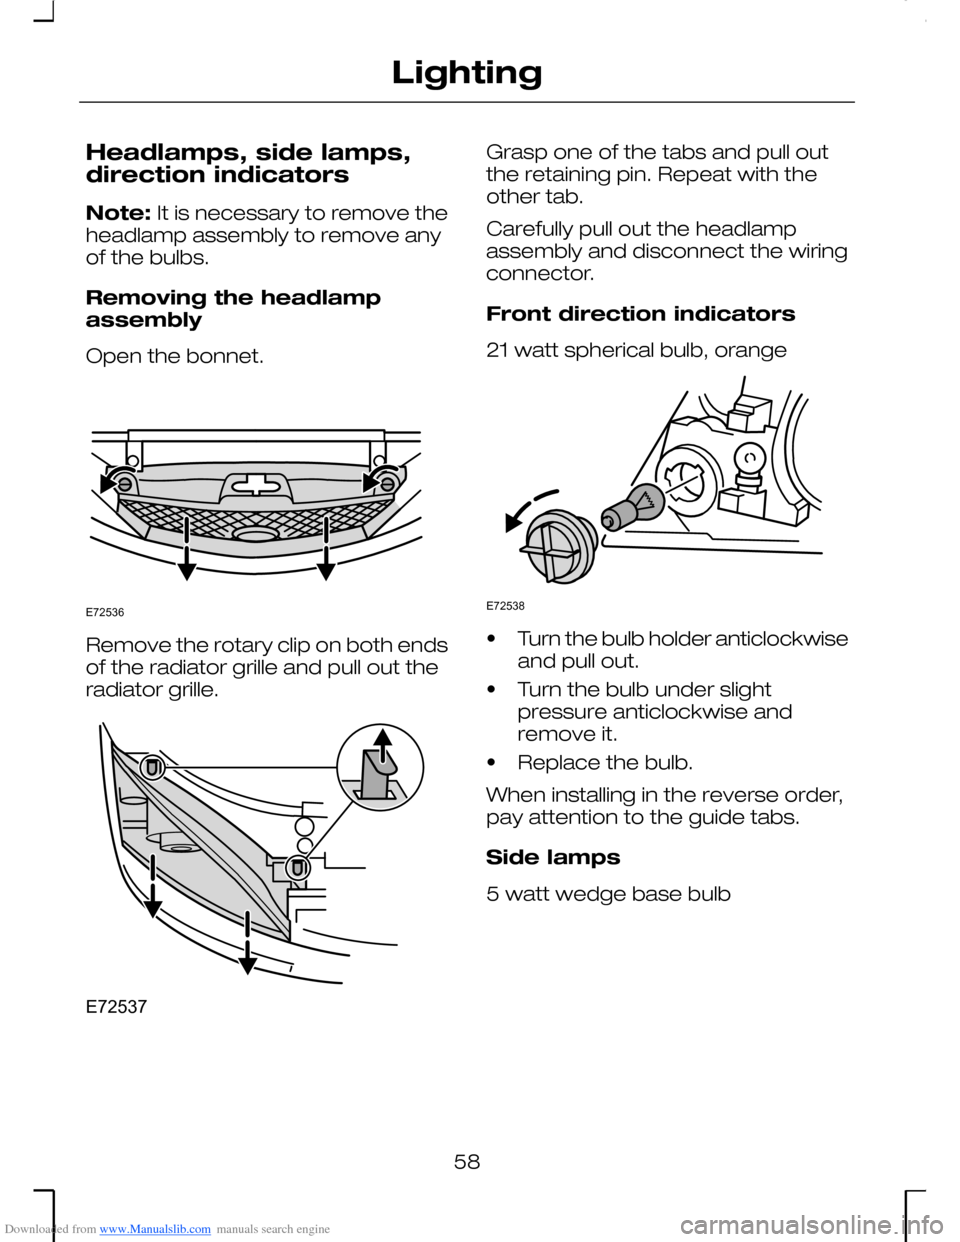
Removing the headlampassembly
Open the bonnet.
Remove the rotary clip on both endsof the radiator grille and pull out theradiator grille.
Grasp one of the tabs and pull outthe retaining pin. Repeat with theother tab.
Carefully pull out the headlampassembly and disconnect the wiringconnector.
Front direction indicators
21 watt spherical bulb, orange
•Turn the bulb holder anticlockwiseand pull out.
•Turn the bulb under slightpressure anticlockwise andremove it.
•Replace the bulb.
When installing in the reverse order,pay attention to the guide tabs.
Side lamps
5 watt wedge base bulb
58
LightingE72536 E72537 E72538