FORD MONDEO 2006 2.G Repair Manual
Manufacturer: FORD, Model Year: 2006, Model line: MONDEO, Model: FORD MONDEO 2006 2.GPages: 198, PDF Size: 4.69 MB
Page 61 of 198
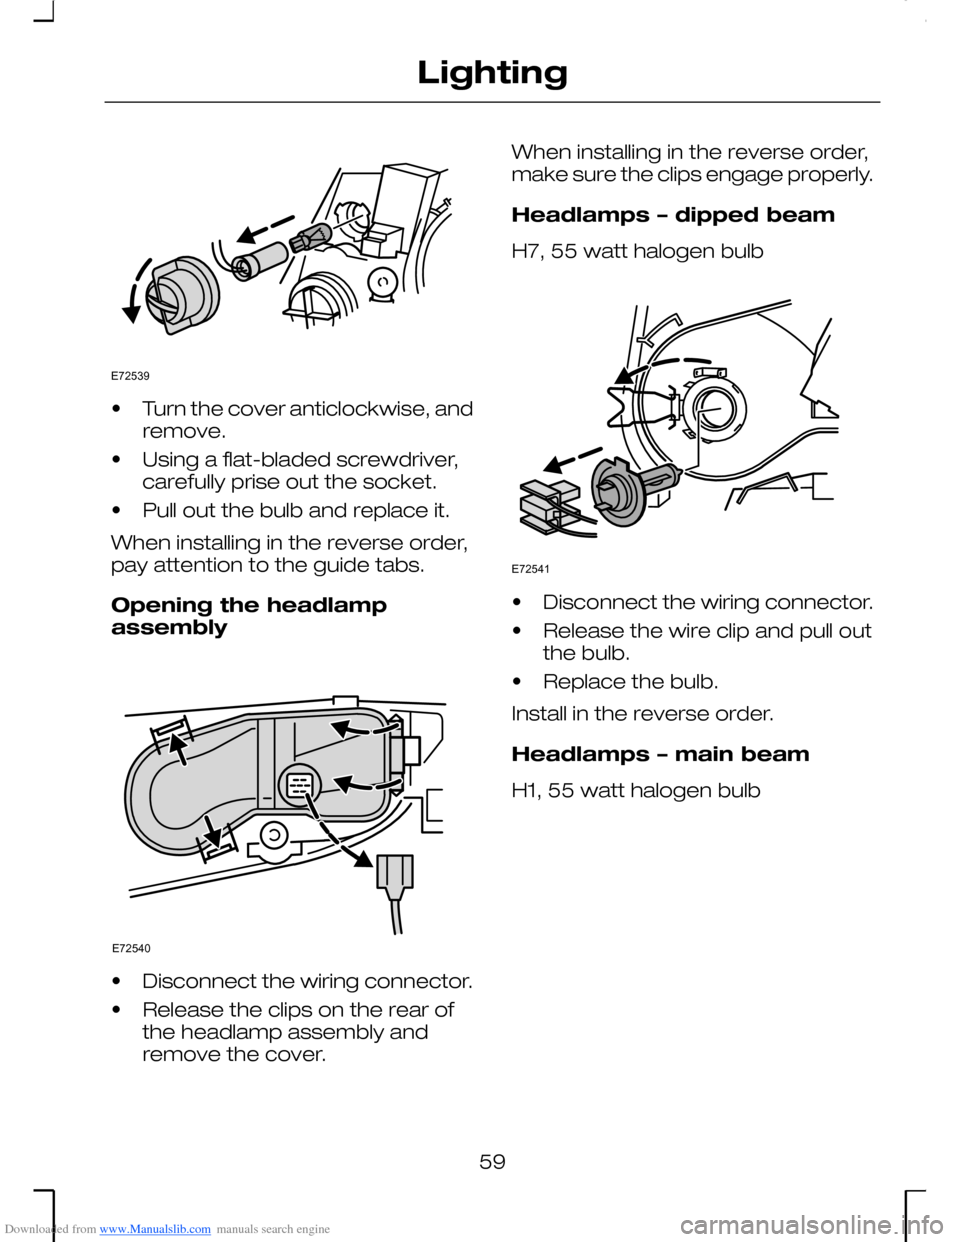
Downloaded from www.Manualslib.com manuals search engine •Turn the cover anticlockwise, andremove.
•Using a flat-bladed screwdriver,carefully prise out the socket.
•Pull out the bulb and replace it.
When installing in the reverse order,pay attention to the guide tabs.
Opening the headlampassembly
•Disconnect the wiring connector.
•Release the clips on the rear ofthe headlamp assembly andremove the cover.
When installing in the reverse order,make sure the clips engage properly.
Headlamps – dipped beam
H7, 55 watt halogen bulb
•Disconnect the wiring connector.
•Release the wire clip and pull outthe bulb.
•Replace the bulb.
Install in the reverse order.
Headlamps – main beam
H1, 55 watt halogen bulb
59
LightingE72539 E72540 E72541
Page 62 of 198
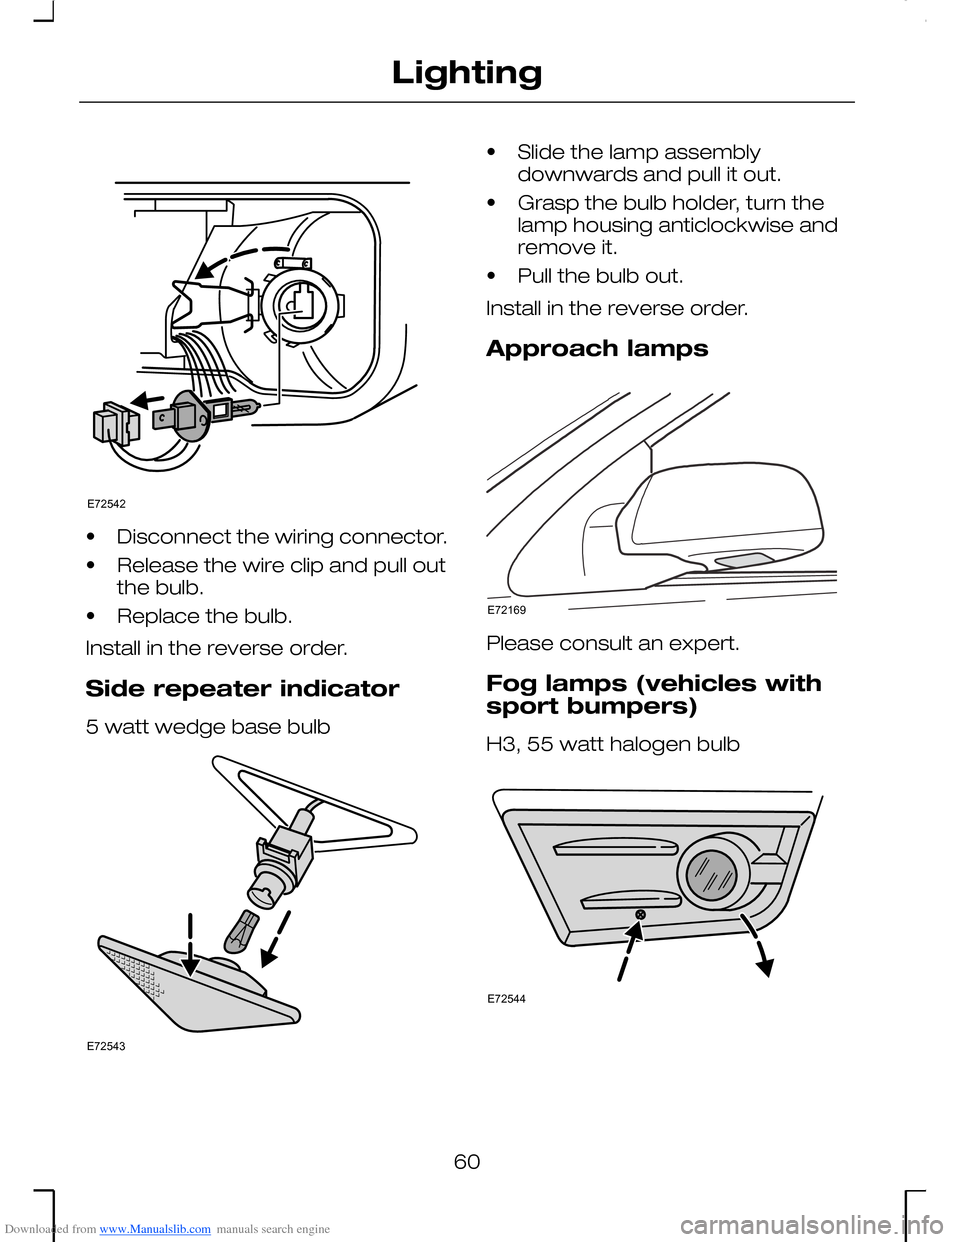
Downloaded from www.Manualslib.com manuals search engine •Disconnect the wiring connector.
•Release the wire clip and pull outthe bulb.
•Replace the bulb.
Install in the reverse order.
Side repeater indicator
5 watt wedge base bulb
•Slide the lamp assemblydownwards and pull it out.
•Grasp the bulb holder, turn thelamp housing anticlockwise andremove it.
•Pull the bulb out.
Install in the reverse order.
Approach lamps
Please consult an expert.
Fog lamps (vehicles withsport bumpers)
H3, 55 watt halogen bulb
60
LightingE72542 E72543 E72169 E72544
Page 63 of 198
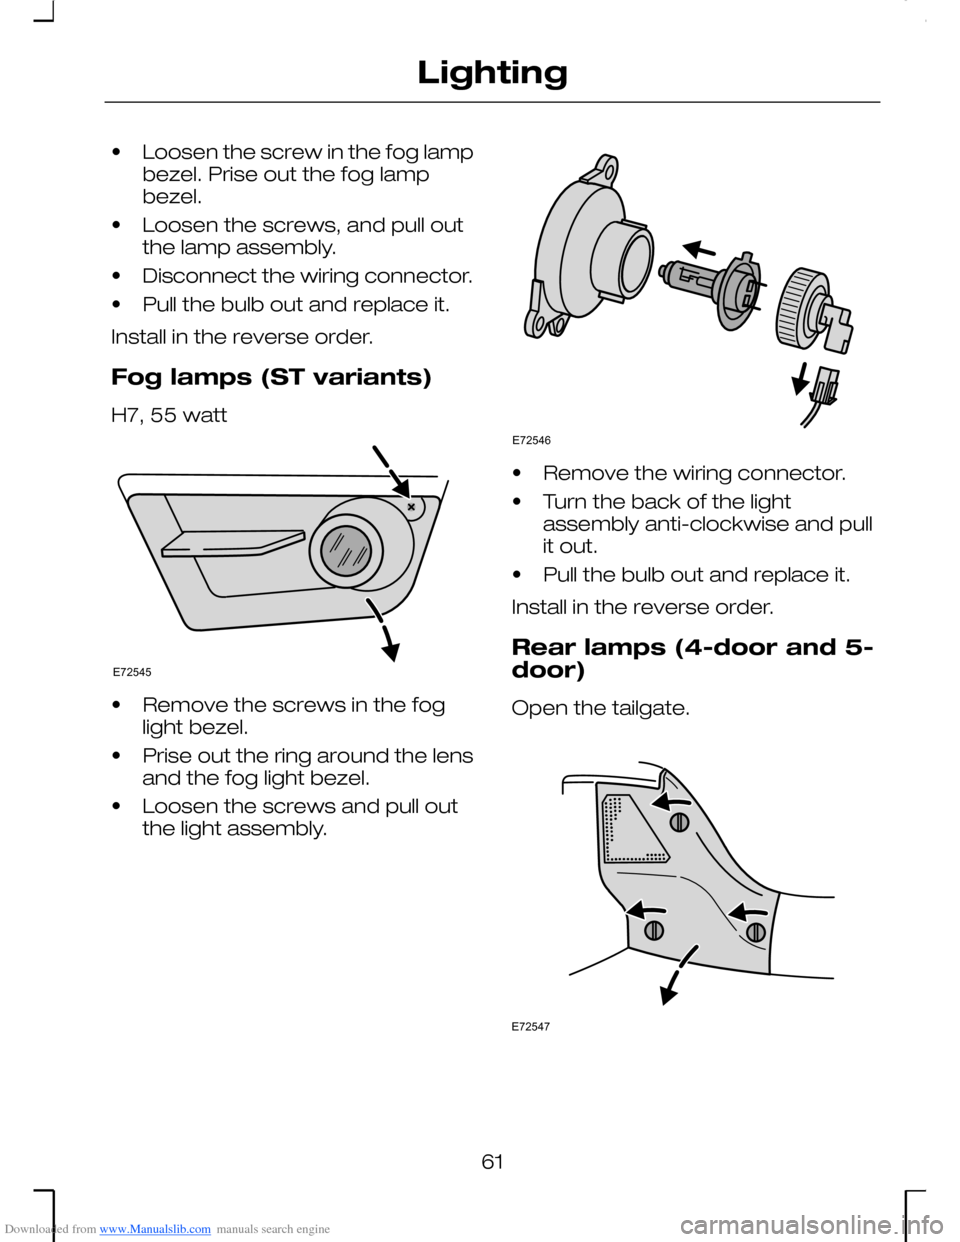
Downloaded from www.Manualslib.com manuals search engine •Loosen the screw in the fog lampbezel. Prise out the fog lampbezel.
•Loosen the screws, and pull outthe lamp assembly.
•Disconnect the wiring connector.
•Pull the bulb out and replace it.
Install in the reverse order.
Fog lamps (ST variants)
H7, 55 watt
•Remove the screws in the foglight bezel.
•Prise out the ring around the lensand the fog light bezel.
•Loosen the screws and pull outthe light assembly.
•Remove the wiring connector.
•Turn the back of the lightassembly anti-clockwise and pullit out.
•Pull the bulb out and replace it.
Install in the reverse order.
Rear lamps (4-door and 5-door)
Open the tailgate.
61
LightingE72545 E72546 E72547
Page 64 of 198
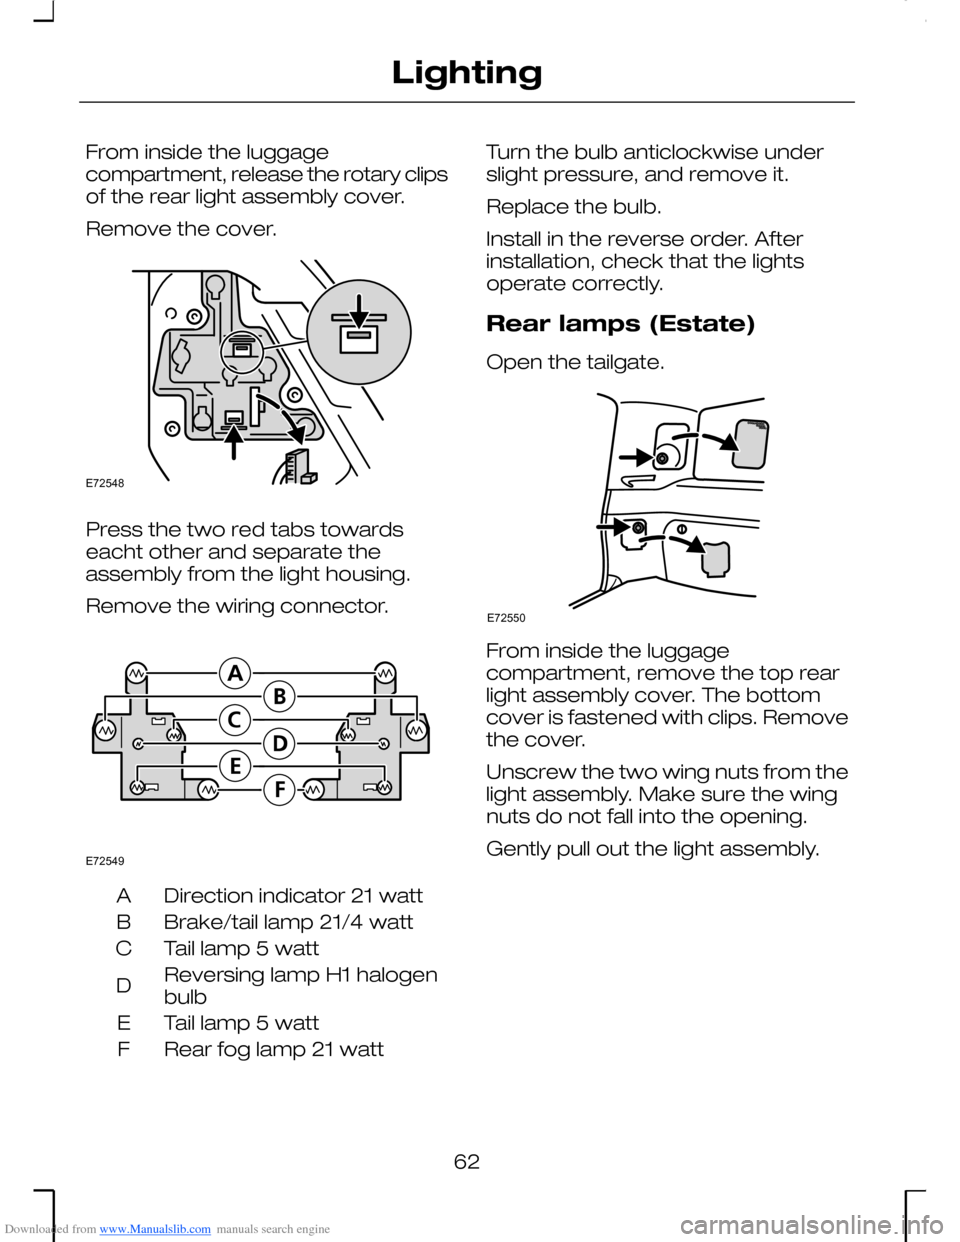
Downloaded from www.Manualslib.com manuals search engine From inside the luggagecompartment, release the rotary clipsof the rear light assembly cover.
Remove the cover.
Press the two red tabs towardseacht other and separate theassembly from the light housing.
Remove the wiring connector.
Direction indicator 21 wattA
Brake/tail lamp 21/4 wattB
Tail lamp 5 wattC
Reversing lamp H1 halogenbulbD
Tail lamp 5 wattE
Rear fog lamp 21 wattF
Turn the bulb anticlockwise underslight pressure, and remove it.
Replace the bulb.
Install in the reverse order. Afterinstallation, check that the lightsoperate correctly.
Rear lamps (Estate)
Open the tailgate.
From inside the luggagecompartment, remove the top rearlight assembly cover. The bottomcover is fastened with clips. Removethe cover.
Unscrew the two wing nuts from thelight assembly. Make sure the wingnuts do not fall into the opening.
Gently pull out the light assembly.
62
LightingE72548 E72549 E72550
Page 65 of 198
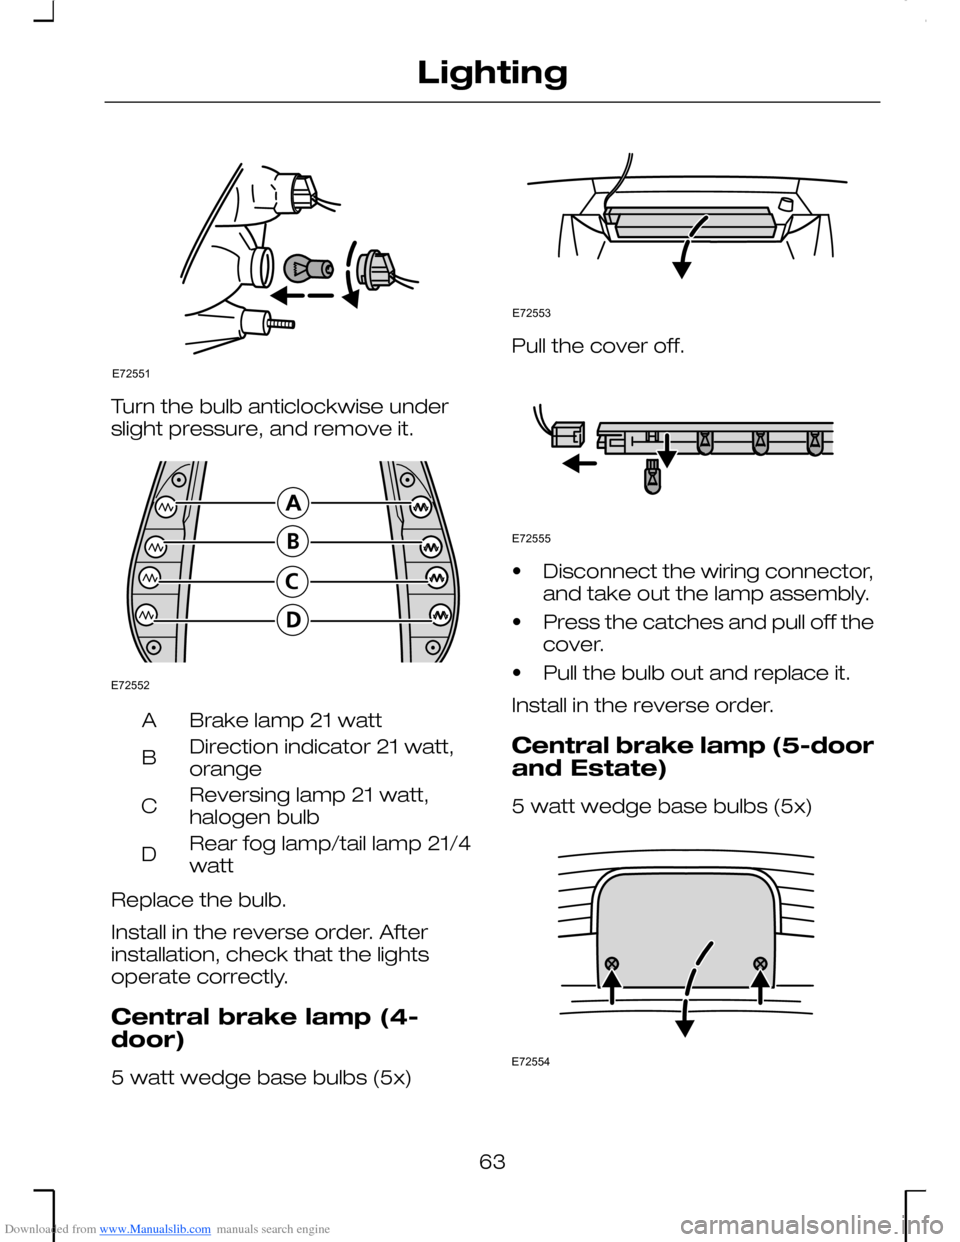
Downloaded from www.Manualslib.com manuals search engine Turn the bulb anticlockwise underslight pressure, and remove it.
Brake lamp 21 wattA
Direction indicator 21 watt,orangeB
Reversing lamp 21 watt,halogen bulbC
Rear fog lamp/tail lamp 21/4wattD
Replace the bulb.
Install in the reverse order. Afterinstallation, check that the lightsoperate correctly.
Central brake lamp (4-door)
5 watt wedge base bulbs (5x)
Pull the cover off.
•Disconnect the wiring connector,and take out the lamp assembly.
•Press the catches and pull off thecover.
•Pull the bulb out and replace it.
Install in the reverse order.
Central brake lamp (5-doorand Estate)
5 watt wedge base bulbs (5x)
63
LightingE72551 E72552 E72553 E72555 E72554
Page 66 of 198
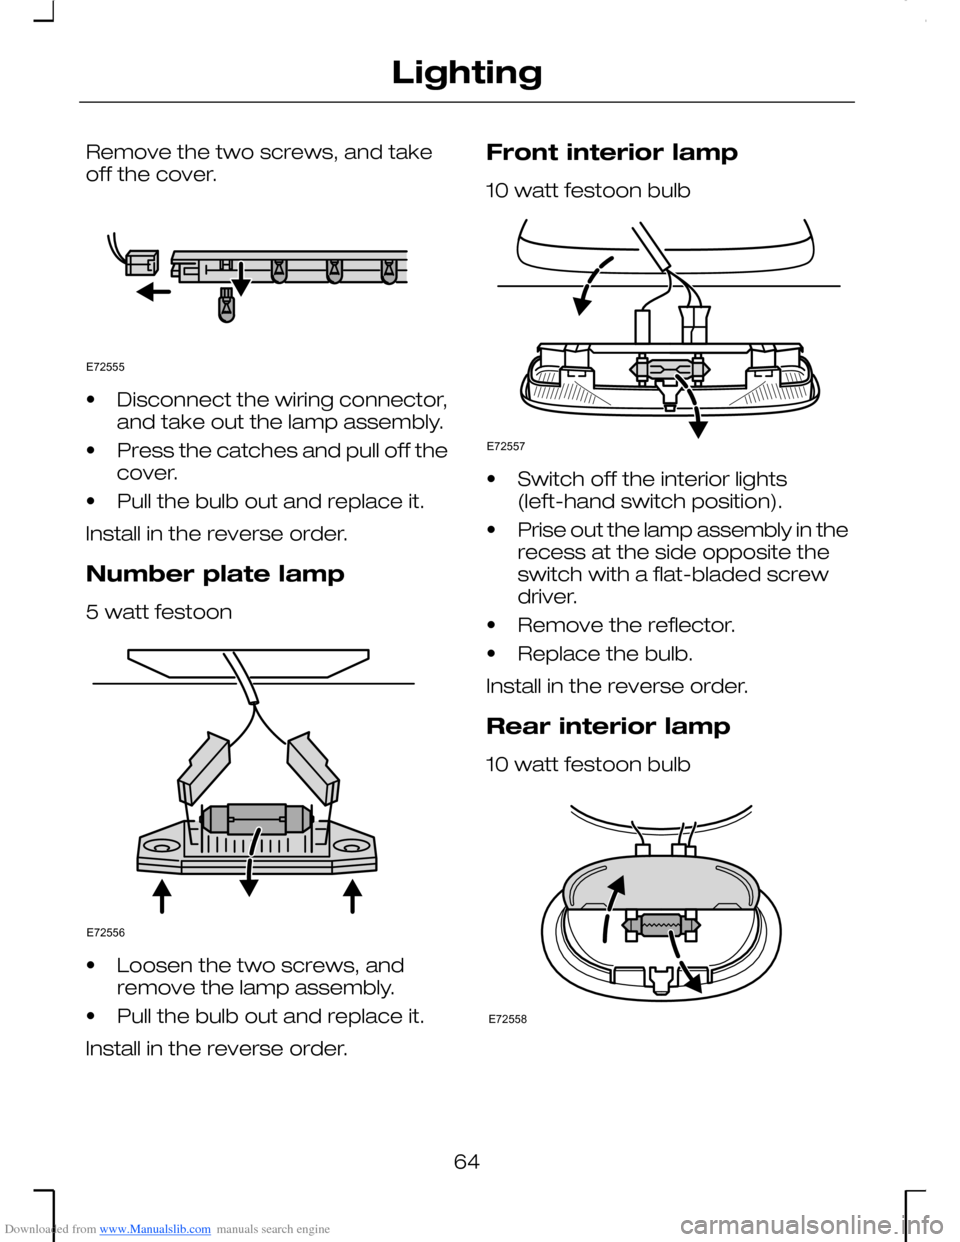
Downloaded from www.Manualslib.com manuals search engine Remove the two screws, and takeoff the cover.
•Disconnect the wiring connector,and take out the lamp assembly.
•Press the catches and pull off thecover.
•Pull the bulb out and replace it.
Install in the reverse order.
Number plate lamp
5 watt festoon
•Loosen the two screws, andremove the lamp assembly.
•Pull the bulb out and replace it.
Install in the reverse order.
Front interior lamp
10 watt festoon bulb
•Switch off the interior lights(left-hand switch position).
•Prise out the lamp assembly in therecess at the side opposite theswitch with a flat-bladed screwdriver.
•Remove the reflector.
•Replace the bulb.
Install in the reverse order.
Rear interior lamp
10 watt festoon bulb
64
LightingE72555 E72556 E72557 E72558
Page 67 of 198
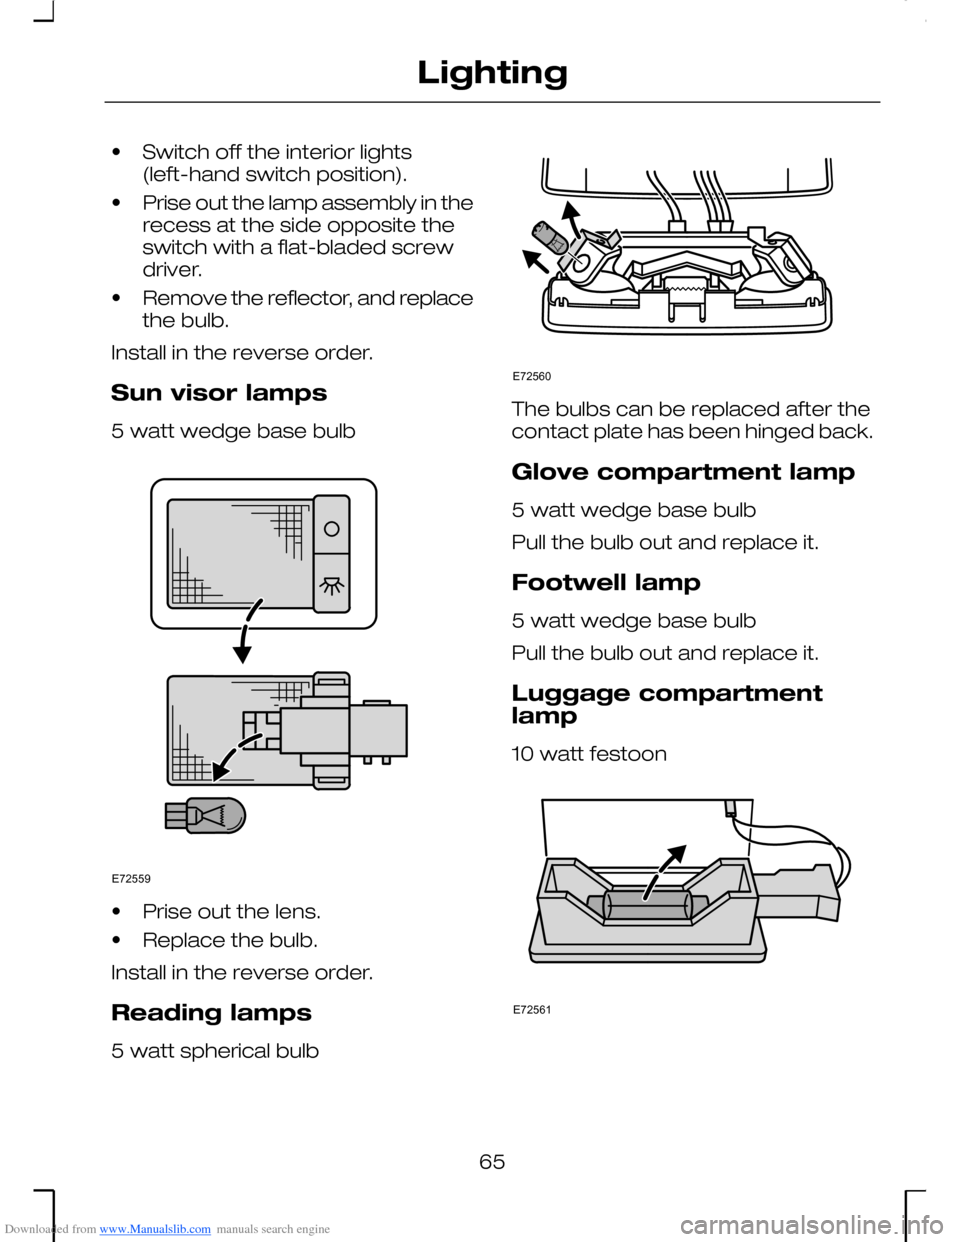
Downloaded from www.Manualslib.com manuals search engine •Switch off the interior lights(left-hand switch position).
•Prise out the lamp assembly in therecess at the side opposite theswitch with a flat-bladed screwdriver.
•Remove the reflector, and replacethe bulb.
Install in the reverse order.
Sun visor lamps
5 watt wedge base bulb
•Prise out the lens.
•Replace the bulb.
Install in the reverse order.
Reading lamps
5 watt spherical bulb
The bulbs can be replaced after thecontact plate has been hinged back.
Glove compartment lamp
5 watt wedge base bulb
Pull the bulb out and replace it.
Footwell lamp
5 watt wedge base bulb
Pull the bulb out and replace it.
Luggage compartmentlamp
10 watt festoon
65
LightingE72559 E72560 E72561
Page 68 of 198
Downloaded from www.Manualslib.com manuals search engine Carefully prise out the lamp assemblyfrom the holder with a flat-bladedscrewdriver, and remove the bulb.
Install in the reverse order.
APPROACH LAMPS
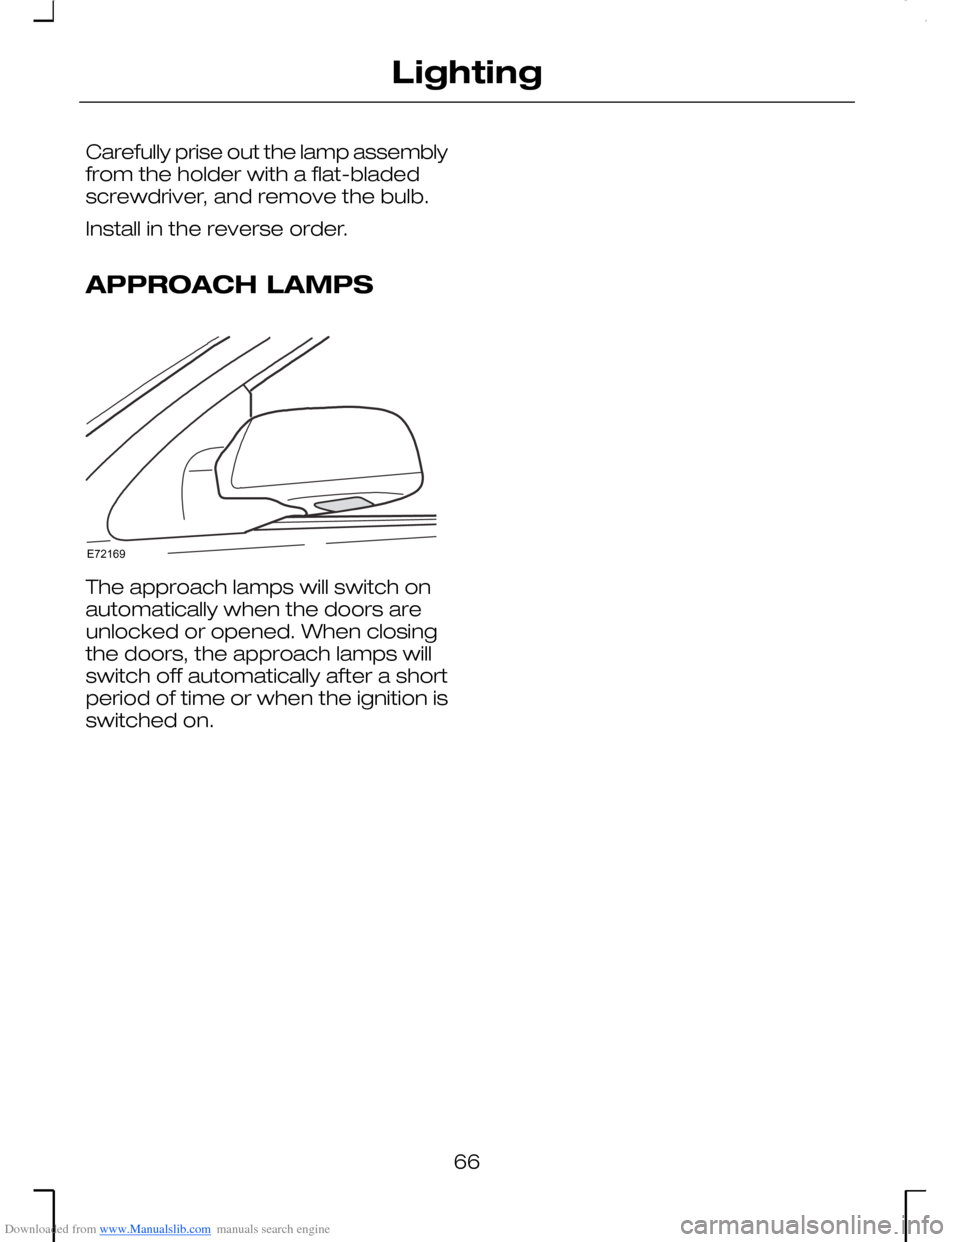
The approach lamps will switch onautomatically when the doors areunlocked or opened. When closingthe doors, the approach lamps willswitch off automatically after a shortperiod of time or when the ignition isswitched on.
66
LightingE72169
Page 69 of 198
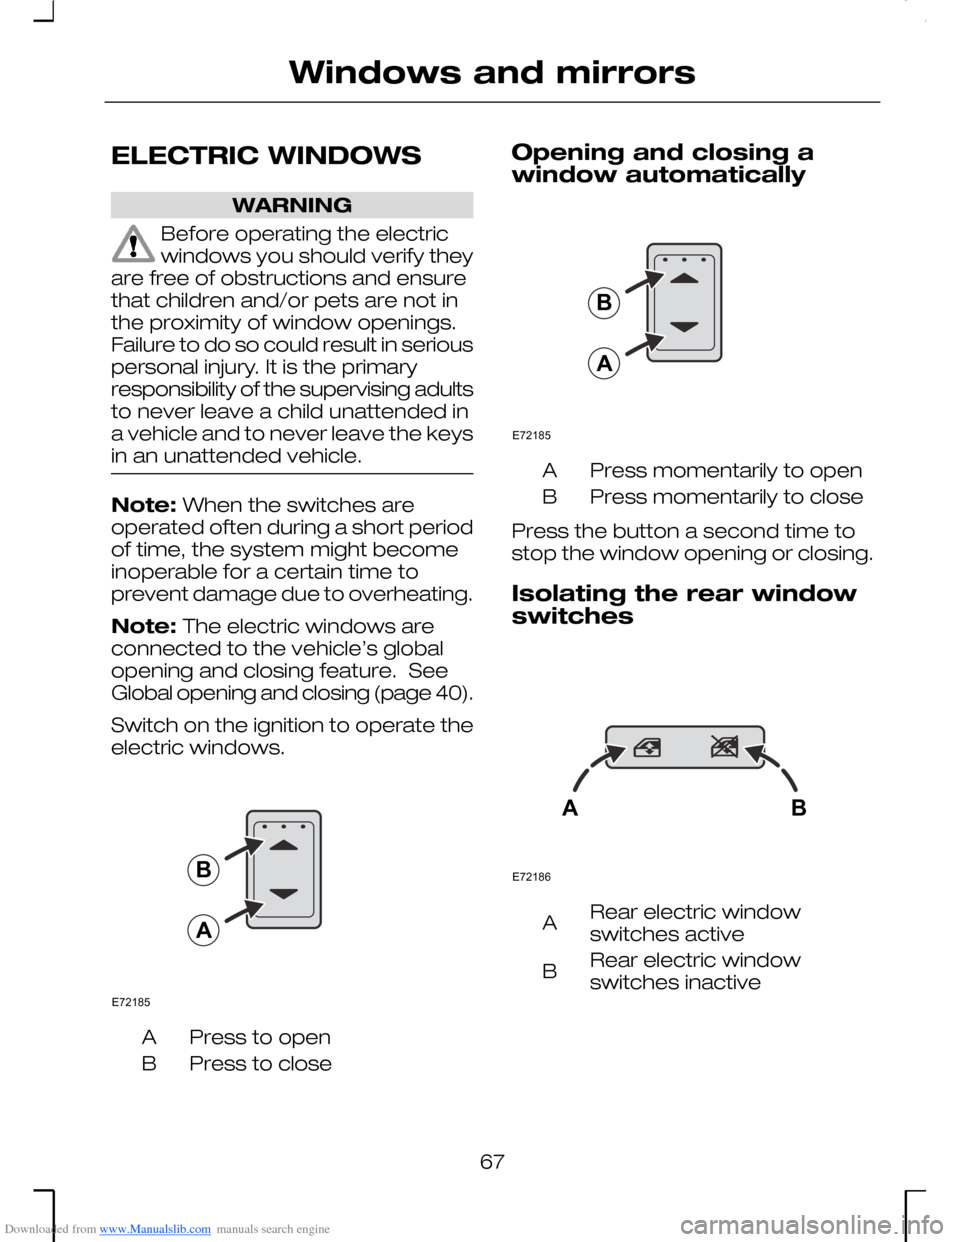
Downloaded from www.Manualslib.com manuals search engine ELECTRIC WINDOWS
WARNING
Before operating the electricwindows you should verify theyare free of obstructions and ensurethat children and/or pets are not inthe proximity of window openings.Failure to do so could result in seriouspersonal injury. It is the primaryresponsibility of the supervising adultsto never leave a child unattended ina vehicle and to never leave the keysin an unattended vehicle.
Note: When the switches areoperated often during a short periodof time, the system might becomeinoperable for a certain time toprevent damage due to overheating.
Note: The electric windows areconnected to the vehicle’s globalopening and closing feature. SeeGlobal opening and closing (page 40).
Switch on the ignition to operate theelectric windows.
Press to openA
Press to closeB
Opening and closing awindow automatically
Press momentarily to openA
Press momentarily to closeB
Press the button a second time tostop the window opening or closing.
Isolating the rear window
switches
Rear electric windowswitches activeA
Rear electric windowswitches inactiveB
67
Windows and mirrorsE72185BA E72185BA E72186AB
Page 70 of 198

Downloaded from www.Manualslib.com manuals search engine Window anti-trapprotection
WARNINGS
Anti-trap protection is not activewhile the electric windowmemory is being reset. Make surethat there are no obstacles in the wayof the closing window.
Careless closing of the electricwindows can override theanti-trap protection and causeinjuries.
All electric windows are equippedwith anti-trap protection. Thewindows will stop automatically whileclosing and reverse some distanceif there is an obstacle in the way.
To override anti-trap protection whenthere is a resistance, e. g. in thewinter, proceed as follows:
Close the window twice until itreaches the resistance and let itreverse. Close the window a thirdtime to the resistance. Briefly releasethe switch and press againimmediately. The window will overridethe resistance and can then beclosed fully.
Resetting the electricwindow memory
After the battery has beendisconnected from the vehicle it isnecessary to reset the memoryseparately for each window:
Press button B until the window isfully closed. Release the button andpress it again immediately.
The window will close automaticallyif the resetting procedure has beendone correctly. Repeat theprocedure if the window does notclose automatically.
68
Windows and mirrorsE72185BA