torque FORD MUSTANG 1969 Volume One Chassis
[x] Cancel search | Manufacturer: FORD, Model Year: 1969, Model line: MUSTANG, Model: FORD MUSTANG 1969Pages: 413, PDF Size: 75.81 MB
Page 45 of 413
02-02-26
Brake System
02-02-26
14.
Remove the clutch pedal assist
spring.
15.
On non-power brakes, remove
the retainer clip from the clutch and
brake pedal shaft, then remove the
clutch pedal and shaft assembly, the
brake pedal assembly, and the bush-
ings from the pedal support bracket.
On power brakes, remove the retainer
nut from the brake pedal shaft then
remove the pedal shaft, the brake
pedal assembly and the bushings from
the pedal support bracket.
Installation
1. Apply a coating of SAE 10 en-
gine oil to the bushings and locate all
bushings in their proper places on the
clutch and brake pedal assemblies.
2.
On non-power brakes, position
the brake pedal to the pedal support
bracket, then install the clutch pedal
and shaft assembly through the sup-
port bracket and brake pedal assem-
bly. On power brakes position the
brake pedal to the pedal support
bracket, then install the pedal shaft
and nut.
3.
Install the clutch pedal assist
spring and pivot the clutch pedal
against its bumper stop. Secure the
pedal to the stop with a small C-
clamp as shown in Figs. 28 and 31.
4.
Position the pedal support
bracket assembly to the dash panel,
and to the steering column retainer
studs.
5.
Align the pedal support bracket
holes with the holes in the dash panel
and install the two attaching sheet
metal screws. On power brakes install
the nuts on the brake booster studs.
6. Install the two cap screws at-
taching the pedal support bracket to
the upper cowl bracket.
7. Install the cap screw attaching
the pedal support bracket to the top
inner cowl bracket (Figs. 28 and 31).
8. Install the inner nylon washer,
the master cylinder push rod, and the
bushing on the brake pedal pin. Posi-
tion the stop light switch so that it
straddles the push rod with the switch
slot on the pedal pin and the switch
outer hole just clearing the pin. Slide
the switch completely onto the pin,
and install the outer nylon washer as
shown in Figs. 28 and 31. Secure
these parts to the pin with the
self-
locking retainer.
9. Connect the stop light switch
wires to the connector.
10.
Connect the clutch pedal-
to-equalizer rod to the clutch pedal
assembly with the bushing and the
spring clip retainer. Apply SAE 10
engine oil to the bushing. Remove the
C-clamp from the clutch pedal.
11.
Working from the engine side
of the dash panel, on non-power
brakes, install the two cap screws at-
taching the pedal support bracket to
the dash panel. Then install the two
screws attaching the master cylinder
to the dash panel. On power brakes
install the cap screws retaining the
brake booster to the dash panel.
12.
Install the steering column.
Refer to Part 3-4, Section 2 for pro-
cedure.
13.
Adjust the clutch pedal free
play (Group 5) to specification, if re-
quired.
14.
Check the Brake Pedal Free
Height and Travel Measurements
(Part 2-1, Section 1).
15.
Connect the ground cable to the
battery.
FAIRLANE, MONTEGO,
FALCON, MUSTANG
AND COUGAR-
AUTOMATIC TRANSMISSION
Removal
1. Disconnect the stop light switch
wires at the connector.
2.
Remove the self-locking pin and
slide the stop light switch off the
brake pedal pin just far enough for
the switch outer hole to clear the pin.
Then lower the switch away from the
pin. Slide the master cylinder or
booster push rod and the nylon wash-
ers and bushing off from the brake
pedal pin (Figs. 27, 28, 30 and 31).
3.
On all vehicles except Mustang
and Cougar with power brakes, re-
move the self-locking pin and washer
from the brake pedal shaft, then re-
move the shaft, the brake pedal as-
sembly and the bushings from the
pedal support bracket. On Mustang
and Cougar vehicles with power
brakes, remove the locknut and bolt
from the pedal. Remove the pedal as-
sembly from the support bracket (Fig.
3).
Installation
1. Apply a coating of SAE 10 en-
gine oil to the bushings and locate all
the bushings in their proper places on
the pedal assembly and pedal support
bracket (Figs. 27, 28, 30 and 31).
2.
Position the brake pedal assem-
bly to the support bracket, then install
the pedal shaft or bolt through the
support bracket and brake pedal as-
sembly. Install the retainer or locknut.
3.
Install the inner nylon washer,
the master cylinder or booster push
rod, and the bushing on the brake
pedal pin. Position the switch so that
it straddles the push rod with the
switch slot on the pedal pin, and the
switch outer hole just clearing the pin.
Slide the switch completely onto the
pin, and install the outer nylon washer
as shown in Figs. 27, 28, 30 and 31.
Secure these parts to the pin with the
self-locking pin.
4.
Connect the stop light switch
wires to the connector, and install the
wires in the retaining clip.
Check the Brake Pedal Free Height
and Travel Measurements, Part 2,
Section 1.
THUNDERBIRD
AND
CONTINENTAL MARK
III
Removal
1.
Loosen the booster mounting
nuts.
2.
Disconnect the stop light switch
wires at the connector.
3.
Remove the hairpin retainer.
Slide the stop light switch off from
the brake pedal pin just far enough
for
the
switch outer hole
to
clear
the
pin,
and then lift the switch straight
upward from the pin. Slide the master
cylinder push rod and the nylon wash-
ers and bushing off from the brake
pedal pin (Fig. 32).
4.
Remove the pivot bolt and nut
that holds the pedal to the pedal sup-
port bracket. Remove the brake pedal
assembly from the pedal support
bracket, and remove the bushings.
Installation
1. Apply a coating of SAE 10 en-
gine oil to the bushings and locate all
the bushings in their proper places on
the pedal assembly (Fig. 32).
2.
Install the brake pedal assembly
and bushings to the support bracket,
and then install the pivot bolt through
the support bracket and brake pedal
assembly. Install the pivot bolt nut
and torque to specifications.
3.
Install the inner nylon washer,
the master cylinder push rod, and the
bushing on the brake pedal pin. Posi-
tion the switch so that it straddles the
push rod with the switch slot on the
pedal pin and the switch outer hole
just clearing the pin. Slide the switch
completely onto the pin, install the
outer nylon washer as shown in Fig.
32.
Secure these parts to the pin with
the hairpin retainer.procarmanuals.com
Page 46 of 413
02-02-27
Brake System
02-02-27
4.
Connect the stop light switch
wires to the connector, and install the
wires in the retaining clip.
5.
Torque the booster mounting
nuts to specifications.
LINCOLN CONTINENTAL
Removal
1.
Disconnect the battery ground
cable from the battery.
2.
It is necessary to obtain clear-
ance to remove vacuum hoses and the
electrical connector to the temperature
heat control box. Remove the two
screws retaining the relay to the fend-
er and push the relay aside. Discon-
nect the vacuum hoses and connector
at the heat control box.
3.
Working under the instrument
panel, disconnect the vacuum hoses,
wires and retaining clip from the tem-
perature heat control box. Remove the
two screws securing the temperature
control box to the dash panel.
4.
Remove the lower control hous-
ing retaining screws (6). Disconnect
the wire harnesses at the lower control
panel and place the panel aside. Re-
move the wire harness shield. Remove
the wire harness clip. Position the
wire harness aside. Remove the tem-
perature control box and position it
aside.
5.
Remove the hair-pin type retain-
er. Slide the stop light switch off the
brake pedal pin just far enough for
the switch outer hole to clear the pin.
Lift the switch upward from the pin.
Slide the master cylinder push rod,
nylon washers and bushing off the
brake pedal pin.
6. Remove the pivot bolt and nut
that holds the pedal to the pedal sup-
port bracket. Remove the brake pedal
assembly from the support bracket
and remove the bushings.
7.
If required, remove the brake
pedal pad retaining nuts and remove
the brake pedal pad.
Installation
1.
If the brake pedal pad was re-
moved, position the pad on the pedal.
Install the pad retaining nuts and tor-
que them to specification.
2.
Apply SAE 10 engine oil to the
bushings and locate all the bushings in
their proper places on the pedal as-
sembly.
3.
Install the brake pedal assembly
and bushings to the support bracket,
and then install the pivot bolt through
the support bracket and pedal assem-
bly. Install the pivot bolt nut and tor-
que it to specification.
4.
Install the inner nylon washer,the
master cylinder push rod link, and the
bushing on the brake pedal pin. Posi-
tion the switch so that it straddles the
push rod link with the switch slot on
the pedal and the switch outer hole
just clearing the pin. Install the outer
nylon washer as shown in Fig. 33. In-
stall the hair-pin type retainer on the
brake pedal pin.
5.
Connect the stop light switch
wires to the connector, and install the
wires in the retaining clip.
6. Position the wire harness and
clip on the temperature control box
and install the retaining screw. Posi-
tion the temperature control box to
the dash panel and install the two re-
taining bolts.
7.
Connect the vacuum lines and
the electrical connector to the control
box. Position the wire harness to the
control box and install the retaining
clip.
8. Position the wire harness shield
and install two retaining bolts.
9. Connect the wire harnesses to
the lower control panel and install the
retaining screws.
10.
Working within the engine
compartment, connect the wire con-
nector to the temperature heat control
box.
11.
Position the relay to the fender
apron and install the retaining bolts.
12.
Connect the ground cable to the
battery.
13.
Check the brakes and light
switch for proper operation. Close the
hood.
PARKING BRAKE CONTROL
ASSEMBLY
FORD, MERCURY
AND METEOR
Removal
Refer to Fig. 34.
1.
Make sure the parking brake is
fully released.
2.
Remove all tension from the rear
cables by backing off the adjusting nut
from the equalizer.
3.
Remove the roll pin that secures
the release knob to the cable and re-
move the knob.
4.
Remove the nut that secures the
release cable to the instrument panel
and remove the cable from the rear of
the instrument panel.
5.
Remove the two nuts attaching
the control assembly to the dash
panel.
6. Remove the cap screw attaching
the control assembly to the cowl side
bracket.
7.
Disconnect the hose to the park-
ing brake vacuum unit, if so equipped.
8. Remove the front cable assembly
retainer clip from the cable assembly
and disconnect the cable ball from the
control clevis.
9. Remove the control assembly
from the vehicle.
Installation
1.
Position the control assembly in
the vehicle.
2.
Fit the cable assembly through
its mounting hole and install the re-
taining clip. Connect the cable ball to
the control clevis.
3.
Connect the vacuum hose to the
parking brake unit, if so equipped.
4.
Install the attaching cap screw to
the cowl side bracket. Do not tighten.
5.
Install the two control assemb-
ly-to-dash panel nuts. Tighten the nuts
and the cap screw to specifications.
6. Insert the release cable into the
instrument panel and install the re-
taining nut.
7.
Install the release knob on the
cable with the roll pin.
8. Check the operation of the park-
ing brake. Adjust the parking brake
as required.
FAIRLANE, MONTEGO
AND FALCON
Removal
Refer to Fig. 35.
1.
Make sure the parking brake is
completely released.
2.
Remove all tension from the rear
cables by backing off the jam nut and
adjusting nut from the equalizer.
3.
Working inside the vehicle, re-
move the four bolts and one nut re-
taining the left air vent and cable as-
sembly to the dash and instrument
panels. Remove the vent assembly.
4.
Remove the parking brake front
cable ball retaining clip from the clev-
is.
5.
Disconnect the cable ball from
the notch in the brake clevis.
6. Remove the three screws that at-
tach the control assembly to the left
cowl inner side panel.procarmanuals.com
Page 63 of 413
02-03-02
Specifications
02-03-02
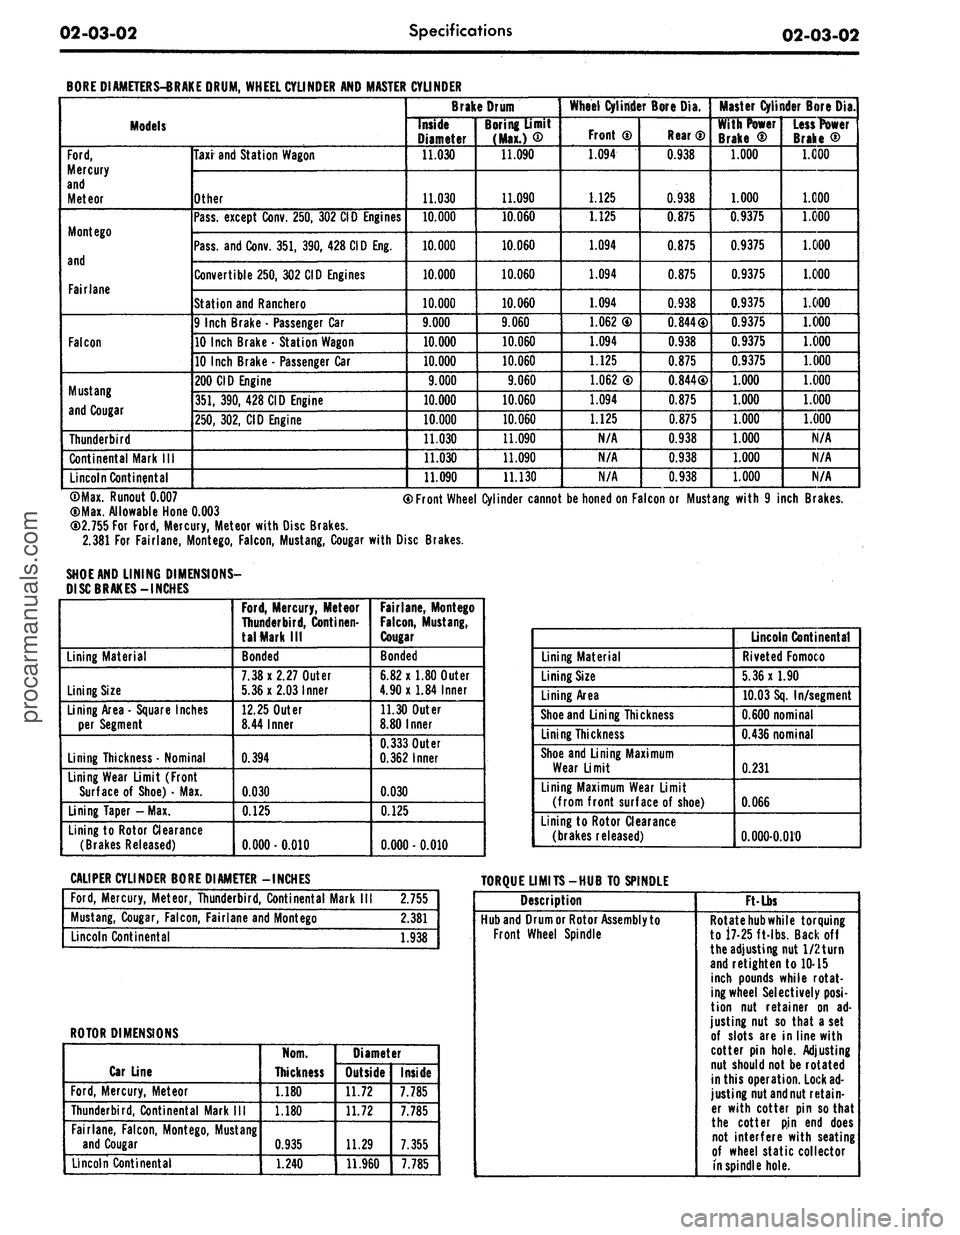
BORE DIAMETERS-BRAKE DRUM, WHEEL CYLINDER AND MASTER
Models
Ford,
Mercury
and
Meteor
Mont ego
and
Fairlane
Falcon
Mustang
and Cougar
Thunderbird
Continental Mark
III
Lincoln Continental
Taxi and Station Wagon
Other
Pass, except Conv. 250, 302 CID Engines
Pass, and Conv. 351, 390, 428 CID Eng.
Convertible 250, 302 CID Engines
Station and Ranchero
9 Inch Brake
-
Passenger Car
10 Inch Brake
•
Station Wagon
10 Inch Brake
•
Passenger Car
200 CID Engine
351,
390, 428 CID Engine
250,
302, CID Engine
CYLINDER
Brake Drum
Inside
Diameter
11.030
11.030
10.000
10.000
10.000
10.000
9.000
10.000
10.000
9.000
10.000
10.000
11.030
11.030
11.090
Boring Umit
(Max.)
®
11.090
11.090
10.060
10.060
10.060
10.060
9.060
10.060
10.060
9.060
10.060
10.060
11.090
11.090
11.130
Wheel Cylinder Bore Dia.
Front
0
1.094
L_ U25
1.125
1.094
1.094
1.094
1.062
0
1.094
1.125
1.062
®
1.094
1.125
N/A
N/A
N/A
Rear
®
0.938
0.938
0.875
0.875
0.875
0.938
0.844®
0.938
0.875
0.844®
0.875
0.875
0.938
0.938
0.938
Master Cylinder Bore Dia.
With Power
Brake
®
1.000
1.000
0.9375
0.9375
0.9375
0.9375
0.9375
0.9375
0.9375
1.000
1.000
1.000
1.000
1.000
1.000
Less Power
Brake
®
1.000
1.000
1.000
1.000
1.000
1.000
1.000
1.000
1.000
1.000
1.000
1.000
N/A
N/A
N/A
©Max. Runout
0.007
(DMax. Allowable Hone
0.003
CD2.755 For
Ford,
Mercury, Meteor with Disc Brakes.
2.381 For Fairlane, Montego, Falcon, Mustang, Cougar with Disc Brakes.
SHOE AND LINING DIMENSIONS-
DISC BRAKES-INCHES
® Front Wheel Cylinder cannot be honed on Falcon or Mustang with
9
inch Brakes.
Lining Material
Lining Size
Lining Area
-
Square Inches
per Segment
Lining Thickness • Nominal
Lining Wear Limit (Front
Surface
of
Shoe)
•
Max.
Lining Taper -Max.
Lining to Rotor Clearance
(Brakes Released)
Ford,
Mercury, Meteor
Thunderbird, Continen-
tal Mark
III
Bonded
7.38x2.27
Outer
5.36x2.03
Inner
12.25 Outer
8.44 Inner
0.394
0.030
0.125
0.000-0.010
Fairlane, Montego
Falcon,
Mustang,
Cougar
Bonded
6.82 x 1.80 Outer
4.90x1.84 Inner
11.30 Outer
8.80 Inner
0.333
Outer
0.362
Inner
0.030
0.125
0.000
• 0.010
Lining Material
Lining Size
Lining Area
Shoe and Lining Thickness
Lining Thickness
Shoe and Lining Maximum
Wear Limit
Lining Maximum Wear Limit
(from front surface
of
shoe)
Lining to Rotor Clearance
(brakes released)
Lincoln Continental
Riveted Fomoco
5.36x1.90
10.03 Sq. In/segment
0.600
nominal
0.436
nominal
0.231
0.066
0.000-0.010
CALIPER CYLINDER BORE DIAMETER -INCHES
TORQUE LIMITS-HUB TO SPINDLE
Ford,
Mercury, Meteor, Thunderbird, Continental Mark
2.755
Mustang, Cougar, Falcon, Fairlane and Montego
2.381
Lincoln Continental
1.938
ROTOR DIMENSIONS
Car Line
Ford,
Mercury, Meteor
Thunderbird, Continental Mark
III
Fairlane, Falcon, Montego, Mustang
and Cougar
Lincoln Continental
Norn.
Thickness
1.180
1.180
0.935
1.240
Diameter
Outside
11.72
11.72
11.29
11.960
Inside
7.785
7.785
7.355
7.785
Description
Hub and Drum or Rotor Assembly to
Front Wheel Spindle
Ft-Lbs
Rotate
hub
while torquing
to 17-25 ft-lbs. Backoff
the adjusting nut 1/2 turn
and retighten to 10-15
inch pounds while rotat-
ing wheel Selectively
posi-
tion
nut
retainer
on ad-
justing nut
so
that a set
of slots are in line with
cotter pin hole. Adjusting
nut should not be rotated
in this operation. Lock
ad-
justing nut and nut retain-
er with cotter pin so that
the cotter
pin end
does
not interfere with seating
of wheel static collector
in spindle hole.procarmanuals.com
Page 64 of 413
02-03-03
Specifications
02-03-03
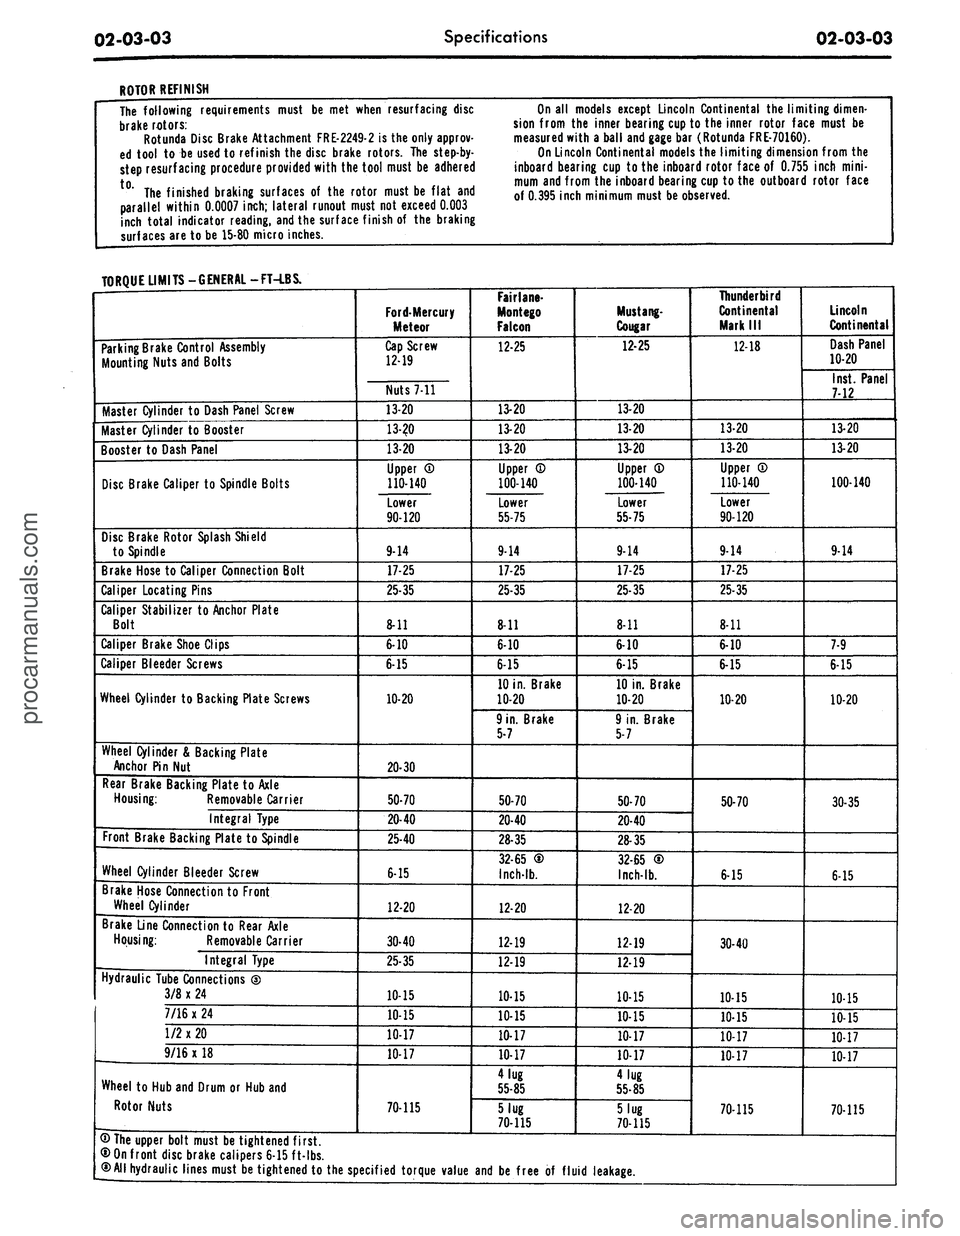
ROTOR REFINISH
The following requirements must be met when resurfacing disc
brake rotors:
Rotunda Disc Brake Attachment FRE-2249-2 is the only approv-
ed tool to be used to ref inish the disc brake rotors. The step-by-
step resurfacing procedure provided with the tool must be adhered
t0" The finished braking surfaces of the rotor must be flat and
parallel within 0.0007
inch;
lateral runout must not exceed 0.003
inch total indicator reading, and the surface finish of the braking
surfaces are to be 15-80 micro inches.
On all models except Lincoln Continental the limiting dimen-
sion from the inner bearing cup to the inner rotor face must be
measured with a ball and gage bar (Rotunda FRE-70160).
On Lincoln Continental models the limiting dimension from the
inboard bearing cup to the inboard rotor face of 0.755 inch
mini-
mum and from the inboard bearing cup to the outboard rotor face
of 0.395 inch minimum must be observed.
TORQUE LIMITS -GENERAL -FT-LBS.
Parking Brake Control Assembly
Mounting Nuts and Bolts
Master Cylinder to Dash Panel Screw
Master Cylinder to Booster
Booster to Dash Panel
Disc Brake Caliper to Spindle Bolts
Disc Brake Rotor Splash Shield
to Spindle
Brake Hose to Caliper Connection Bolt
Caliper Locating Pins
Caliper Stabilizer to Anchor Plate
Bolt
Caliper Brake Shoe Clips
Caliper Bleeder Screws
Wheel Cylinder to Backing Plate Screws
Wheel Cylinder & Backing Plate
Anchor Pin Nut
Rear Brake Backing Plate to Axle
Housing:
Removable Carrier
Integral Type
Front Brake Backing Plate to Spindle
Wheel Cylinder Bleeder Screw
Brake Hose Connection to Front
Wheel Cylinder
Brake Line Connection to Rear Axle
Housing:
Removable Carrier
Integral Type
Hydraulic Tube Connections ®
3/8 x 24
7/16 x 24
1/2 x 20
9/16 x 18
Wheel to Hub and Drum or Hub and
Rotor Nuts
Ford-Mercury
Meteor
Cap Screw
12-19
Nuts 7-11
13-20
13-?0
13-20
Upper ©
110-140
Lower
90-120
9-14
17-25
25-35
8-11
6-10
6-15
10-20
20-30
50-70
IPo
25-40
6-15
12-20
30-40
25-35
10-15
10-15
10-17
10-17
70-115
Fair
lane-
Montego
Falcon
12-25
13-20
13-20
13-20
Upper CD
100-140
Lower
55-75
9-14
17-25
25-35
8-11
6-10
6-15
10 in. Brake
10-20
9 in. Brake
5-7
50-70
20-40
28-35
32-65 ®
Inch-lb.
12-20
12-19
12-19
10-15
10-15
10-17
10-17
4 lug
55-85
5 lug
70-115
Mustang-
Cougar
12-25
13-20
13-20
13-20
Upper ©
100-140
Lower
55-75
9-14
17-25
25-35
8-11
6-10
6-15
10 in. Brake
10-20
9 in. Brake
5-7
50-70
20-40
28-35
32-65 ®
Inch-lb.
12-20
12-19
12-19
10-15
10-15
10-17
10-17
4 lug
55-85
5 lug
70-115
Thunderbird
Continental
Mark III
1218
13-20
13-20
Upper ©
110-140
Lower
90-120
9-14
17-25
25-35
8-11
6-10
6-15
10-20
50-70
6-15
30-40
10-15
10-15
10-17
10-17
70-115
Lincoln
Continental
Dash Panel
10-20
Inst. Panel
712
13-20
13-20
100-140
9-14
7-9
6-15
10-20
30-35
6-15
10-15
10-15
10-17
10-17
70-115
® The upper bolt must be tightened first.
® On front disc brake calipers 6-15 ft-lbs.
® All hydraulic lines must be tightened to the specified torque value and be free of fluid leakage.procarmanuals.com
Page 65 of 413
02-03-04
Specifications
02-03-04
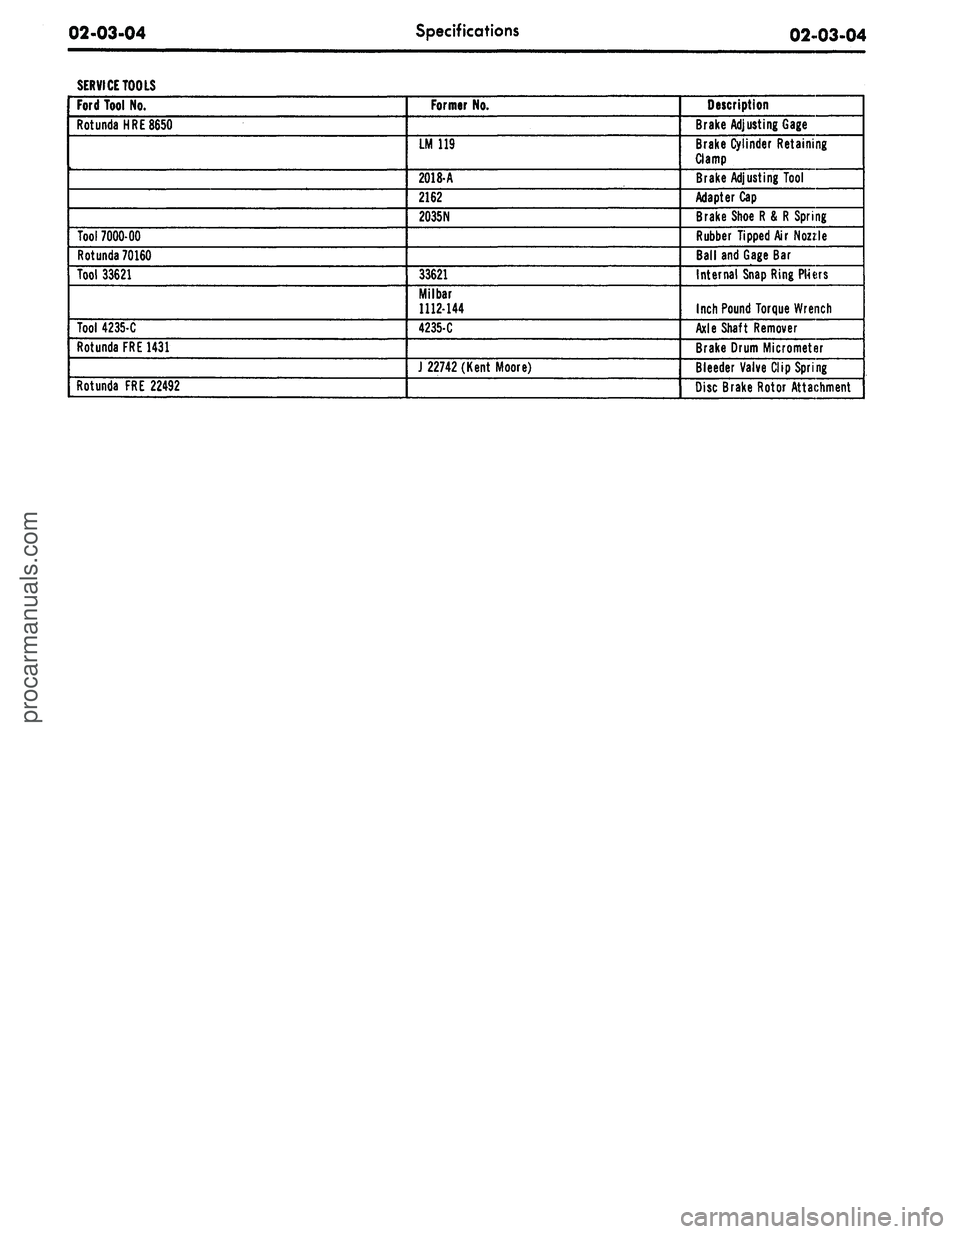
SERVICE TOOLS
Ford Tool
No.
Rotunda
HRE
8650
Tool
7000-00
Rotunda
70160
Tool 33621
Tool 4235-C
Rotunda
FRE 1431
Rotunda
FRE
22492
Former
No.
LM 119
2018-A
2162
2035N
33621
Milbar
1112-144
4235-C
J
22742 (Kent Moore)
Description
Brake
Adjusting
Gage
Brake
Cylinder
Retaining
Clamp
Brake
Adjusting
Tool
Adapter
Cap
Brake Shoe
R
&
R
Spring
Rubber
Tipped
Air
Nozzle
Ball
and
Gage
Bar
Internal
Snap Ring PMers
Inch Pound Torque
Wrench
Axle Shaft
Remover
Brake Drum
Micrometer
Bleeder
Valve Clip Spring
Disc Brake Rotor
Attachmentprocarmanuals.com
Page 71 of 413
03-01-06
Suspension — Steering, Wheels And Tires — General Service
03-01-06
SUSPENSION UPPER
ARM MOVEMENT
Front Bolt Outboard
Rear Bolt Outboard
Front Bolt Inboard
Rear Bolt Inboard
CASTER CHANGE
Tilt Backward
Increase Positive Caster
or
Decrease Negative Caster
Tilt Forward
Decrease Positive Caster
or
Increase Negative Caster
Tilt Forward
Decrease Positive Caster
or
Increase Negative Caster
Tilt Backward
Increase Positive Caster
or
Decrease Negative Caster
CAMBER CHANGE
Tilt Outward
Increase Positive Camber
or
Decrease Negative Camber
Tilt Inward
Decrease Positive Camber
or
Increase Negative Camber
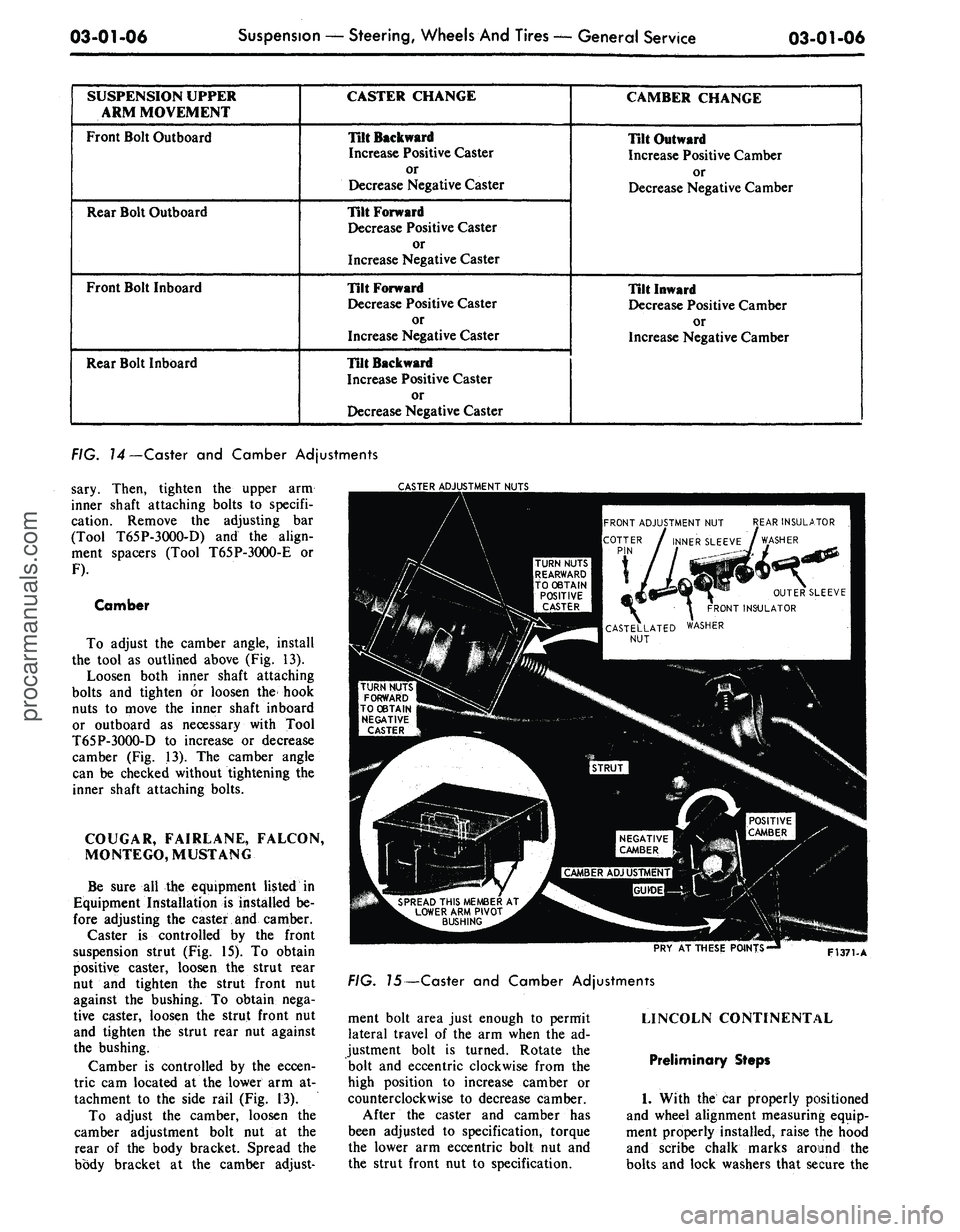
FIG. 14—Caster and Camber Adjustments
sary. Then, tighten the upper arm
inner shaft attaching bolts to specifi-
cation. Remove the adjusting bar
(Tool T65P-3OOO-D) and the align-
ment spacers (Tool T65P-3O00-E or
F).
Camber
To adjust the camber angle, install
the tool as outlined above (Fig. 13).
Loosen both inner shaft attaching
bolts and tighten or loosen the hook
nuts to move the inner shaft inboard
or outboard as necessary with Tool
T65P-3OOO-D to increase or decrease
camber (Fig. 13). The camber angle
can be checked without tightening the
inner shaft attaching bolts.
COUGAR, FAIRLANE, FALCON,
MONTEGO, MUSTANG
Be sure all the equipment listed in
Equipment Installation is installed be-
fore adjusting the caster and camber.
Caster is controlled by the front
suspension strut (Fig. 15). To obtain
positive caster, loosen the strut rear
nut and tighten the strut front nut
against the bushing. To obtain nega-
tive caster, loosen the strut front nut
and tighten the strut rear nut against
the bushing.
Camber is controlled by the eccen-
tric cam located at the lower arm at-
tachment to the side rail (Fig. 13).
To adjust the camber, loosen the
camber adjustment bolt nut at the
rear of the body bracket. Spread the
body bracket at the camber adjust-
TER ADJUSTMENT NUTS
EAR INSULATOR
WASHER
FRONT ADJUSTMENT NUT
INNER SLEEVE
TURN NUTS
REARWARD
TO OBTAIN
POSITIVE
CASTER
OUTER SLEEVE
RONT INSULATOR
WASHER
CASTELLATED
NUT
TURN NUTS
FORWARD
TO OBTAIN
NEGATIVE
CASTER
NEGATIVE
CAMBER
SPREAD THIS MEMBER AT
LOWER ARM PIVOT
BUSHING
PRY AT THESE POINTS'
F1371-A
FIG. J5—Caster and Camber Adjustments
ment bolt area just enough to permit
lateral travel of the arm when the ad-
justment bolt is turned. Rotate the
bolt and eccentric clockwise from the
high position to increase camber or
counterclockwise to decrease camber.
After the caster and camber has
been adjusted to specification, torque
the lower arm eccentric bolt nut and
the strut front nut to specification.
LINCOLN CONTINENTAL
Preliminary Steps
1.
With the car properly positioned
and wheel alignment measuring equip-
ment properly installed, raise the hood
and scribe chalk marks around the
bolts and lock washers that secure theprocarmanuals.com
Page 72 of 413
03-01-07
Suspension — Steering, Wheels And Tires — General Service
03-01-07
upper arm shaft to the frame member
(Fig. 3, Part 3-2).
2.
Loosen the arm shaft attaching
bolts,
raise the front end of the vehicle
and lower it again. This will break the
arm shaft loose from the frame mem-
ber.
3.
With a pry bar, move the arm
shaft back into alignment with the
chalk marks made in Step 1, and
tighten the shaft attaching bolts. The
bolts should be tightened just enough
to hold the shaft in position without
preventing its being moved with the
pry bar.
Caster
1.
With the aid of a pry bar, move
the shaft in or out, as required, to
meet specifications. A movement of
approximately 3 /32 inch at either the
front or rear bolt location will change
the caster 1/2 degree. Inboard move-
ment of the front bolt, or outboard
movement of the rear bolt, will change
caster in the negative direction. Out-
board movement of the front bolt, or
inboard movement of the rear bolt,
will change caster in the positive di-
rection.
2.
When the caster is correct, tor-
que the shaft attaching bolts to speci-
fication and recheck the caster and
camber to insure that the readings
have not changed.
Camber
TURN DOWNWARD TO
INCREASE ROD LENGTH
TURN UPWARD
TO DECREASE
ROD LENGTH
TURN
DOWNWARD
TO DECREASE
ROD LENGTH
TURN UPWARD TO
INCREASE ROD LENGTH
LEFT-HAND SLEEVE
RIGHT-HAND SLEEVE
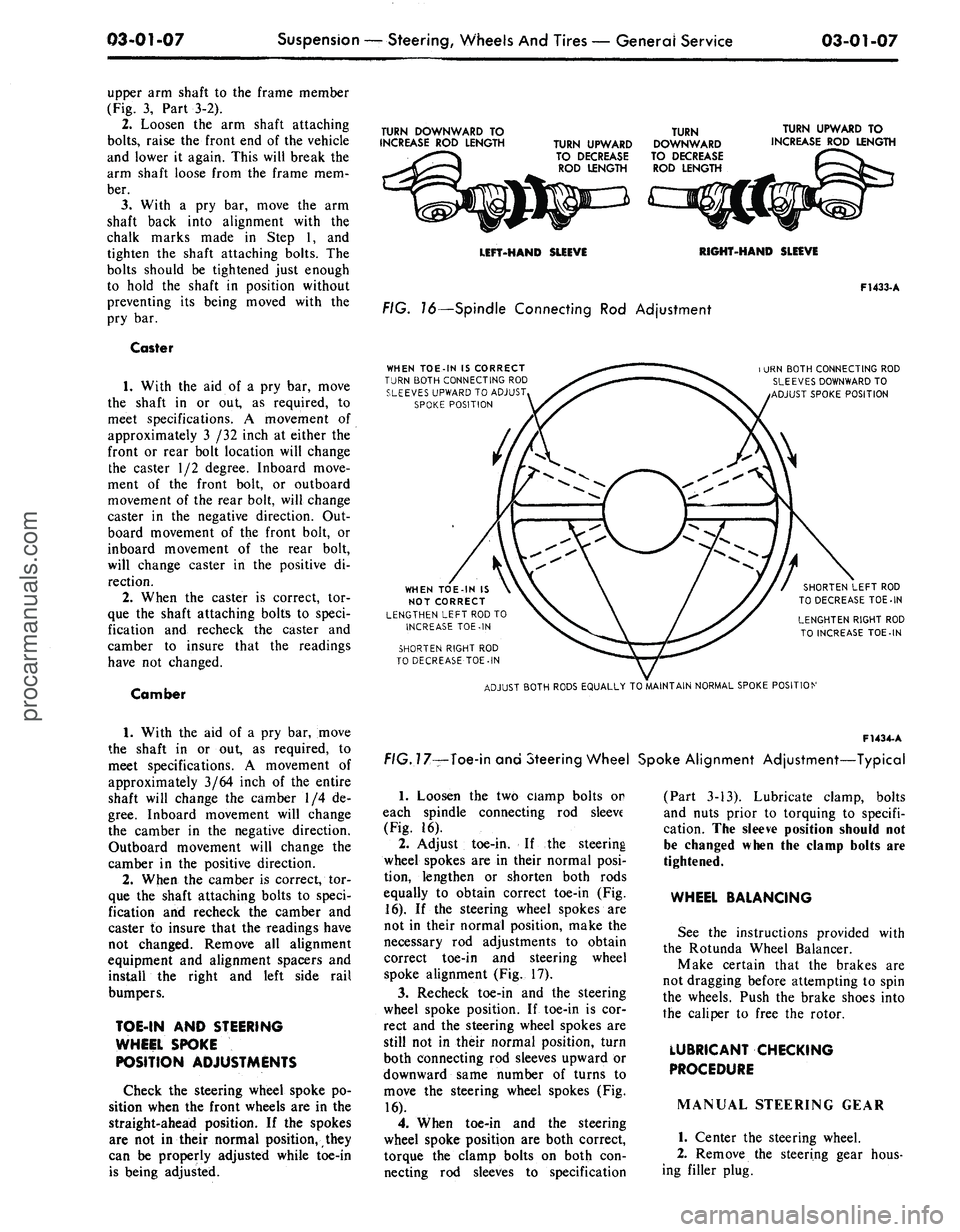
FIG. 16—Spindle Connecting Rod Adjustment
WHEN TOE-IN IS CORRECT
TURN BOTH CONNECTING ROD
SLEEVES UPWARD TO ADJUST
SPOKE POSITION
F1433-A
i URN BOTH CONNECTING ROD
SLEEVES DOWNWARD TO
ADJUST SPOKE POSITION
WHEN TOE-IN IS
NOT CORRECT
LENGTHEN LEFT ROD TO
INCREASE TOE-IN
SHORTEN RIGHT ROD
TO DECREASE TOE-IN
SHORTEN LEFT ROD
TO DECREASE TOE-IN
LENGHTEN RIGHT ROD
TO INCREASE TOE-IN
ADJUST BOTH RODS EQUALLY TO MAINTAIN NORMAL SPOKE POSITION
1.
With the aid of a pry bar, move
the shaft in or out, as required, to
meet specifications. A movement of
approximately 3/64 inch of the entire
shaft will change the camber 1/4 de-
gree.
Inboard movement will change
the camber in the negative direction.
Outboard movement will change the
camber in the positive direction.
2.
When the camber is correct, tor-
que the shaft attaching bolts to speci-
fication and recheck the camber and
caster to insure that the readings have
not changed. Remove all alignment
equipment and alignment spacers and
install the right and left side rail
bumpers.
TOE-IN AND STEERING
WHEEL SPOKE
POSITION ADJUSTMENTS
Check the steering wheel spoke po-
sition when the front wheels are in the
straight-ahead position. If the spokes
are not in their normal position, they
can be properly adjusted while toe-in
is being adjusted.
F1434-
A
f/G.77—Toe-in and Steering Wheel Spoke Alignment Adjustment—Typical
1.
Loosen the two ciamp bolts or
each spindle connecting rod sleeve
(Fig. 16).
2.
Adjust toe-in. If the steering
wheel spokes are in their normal posi-
tion, lengthen or shorten both rods
equally to obtain correct toe-in (Fig.
16).
If the steering wheel spokes are
not in their normal position, make the
necessary rod adjustments to obtain
correct toe-in and steering wheel
spoke alignment (Fig. 17).
3.
Recheck toe-in and the steering
wheel spoke position. If toe-in is cor-
rect and the steering wheel spokes are
still not in their normal position, turn
both connecting rod sleeves upward or
downward same number of turns to
move the steering wheel spokes (Fig.
16).
4.
When toe-in and the steering
wheel spoke position are both correct,
torque the clamp bolts on both con-
necting rod sleeves to specification
(Part 3-13). Lubricate clamp, bolts
and nuts prior to torquing to specifi-
cation. The sleeve position should not
be changed when the clamp bolts are
tightened.
WHEEL BALANCING
See the instructions provided with
the Rotunda Wheel Balancer.
Make certain that the brakes are
not dragging before attempting to spin
the wheels. Push the brake shoes into
the caliper to free the rotor.
LUBRICANT CHECKING
PROCEDURE
MANUAL STEERING GEAR
1.
Center the steering wheel.
2.
Remove the steering gear hous-
ing filler plug.procarmanuals.com
Page 73 of 413
03-01-08
Suspension
—
Steering,
Wheels
And
Tires
—
General Service
03-01-08
3.
Remove the lower (upper on
Mustang and Cougar) cover- to-
housing attaching bolt.
4.
With a clean punch or like in-
strument, clean out or push inward
the loose lubricant in the filler plug
hole and cover to housing attaching
bolt hole.
5.
Slowly turn the steering wheel to
the left stop, lubricant should rise
within the lower cover bolt hole; then
slowly turn the steering wheel to the
right stop, lubricant should rise within
the filler plug hole. If lubricant does
not rise in both the cover bolt hole
and the filler plug hole, add lubricant
until it comes out both holes during
this check.
6. Install the lower (upper on
Mustang and Cougar) cover- to-
housing attaching bolt and the filler
plug.
CLEANING
AND
INSPECTION
FRONT
END
GENERAL
INSPECTION
Do not check and adjust front
wheel alignment without first making
the following inspection for front-end
damage, or wear.
1.
Check for specified air pressures
in all four tires.
2.
Raise the front of the vehicle off
the floor. Shake each front wheel
grasping the upper and lower surfaces
of the tire. Check the front suspension
ball joints and mountings for loose-
ness,
wear, and damage. Check the
brake backing plate mountings. Tor-
que all loose nuts and bolts to specifi-
cation. Replace all worn parts as out-
lined in Part 3-2.
3.
Check the steering gear mount-
ings and all steering linkage connec-
tions for looseness. Torque all mount-
ings to specifications. If any of the
linkage is worn or bent, replace the
parts as outlined in Part 3-5.
4.
Check the front wheel bearings.
If any in-and-out free play is noticed,
adjust the bearings to specifications.
Replace worn or damaged bearings as
outlined in Part 3-12.
5.
Spin each front wheel with a
wheel spinner, and check and balance
each wheel as required.
6. Check the action of the shock
absorbers. If the shock absorbers are
not in good condition, the vehicle may
not settle in a normal, level position,
and front wheel alignment may be af-
fected.
WHEEL INSPECTION
Wheel hub nuts should be inspected
and tightened to specification at pre-
delivery. Loose wheel hub nuts may
cause shimmy and vibration. Elongat-
ed stud holes in the wheels may also
result from loose hub nuts.
Keep the wheels and hubs clean.
Stones wedged between the wheel and
drum and lumps of mud or grease can
unbalance a wheel and tire.
Check for damage that would affect
the runout of the wheels. Wobble or
shimmy caused by a damaged wheel
will eventually damage the wheel bear-
ings.
Inspect the wheel rims for dents
that could permit air to leak from the
tires.
UPPER BALL JOINT
INSPECTION
Ford,
Mercury,
Meteor,
Thunderbird,
Lincoln Continental
and
Continental Mark
III
1.
Raise the vehicle and place floor
jacks beneath the lower arms.
2.
Ask an assistant to grasp the
lower edge of the tire and move the
wheel in and out.
3.
As the wheel is being moved in
and out, observe the upper end of the
spindle and the upper arm.
4.
Any movement between the
upper end of the spindle and the upper
arm indicates ball joint wear and loss
of preload. If any such movement is
observed, replace the upper ball joint.
During
the
foregoing
check,
the
lower ball joint will
be
unloaded
and
may
move.
Disregard
all
such
move-
ment
of the
lower ball
joint.
Also,
do
not mistake loose wheel bearings
for a
worn ball
joint.
Cougar,
Fairlane,
Falcon,
Montego
and
Mustang
1.
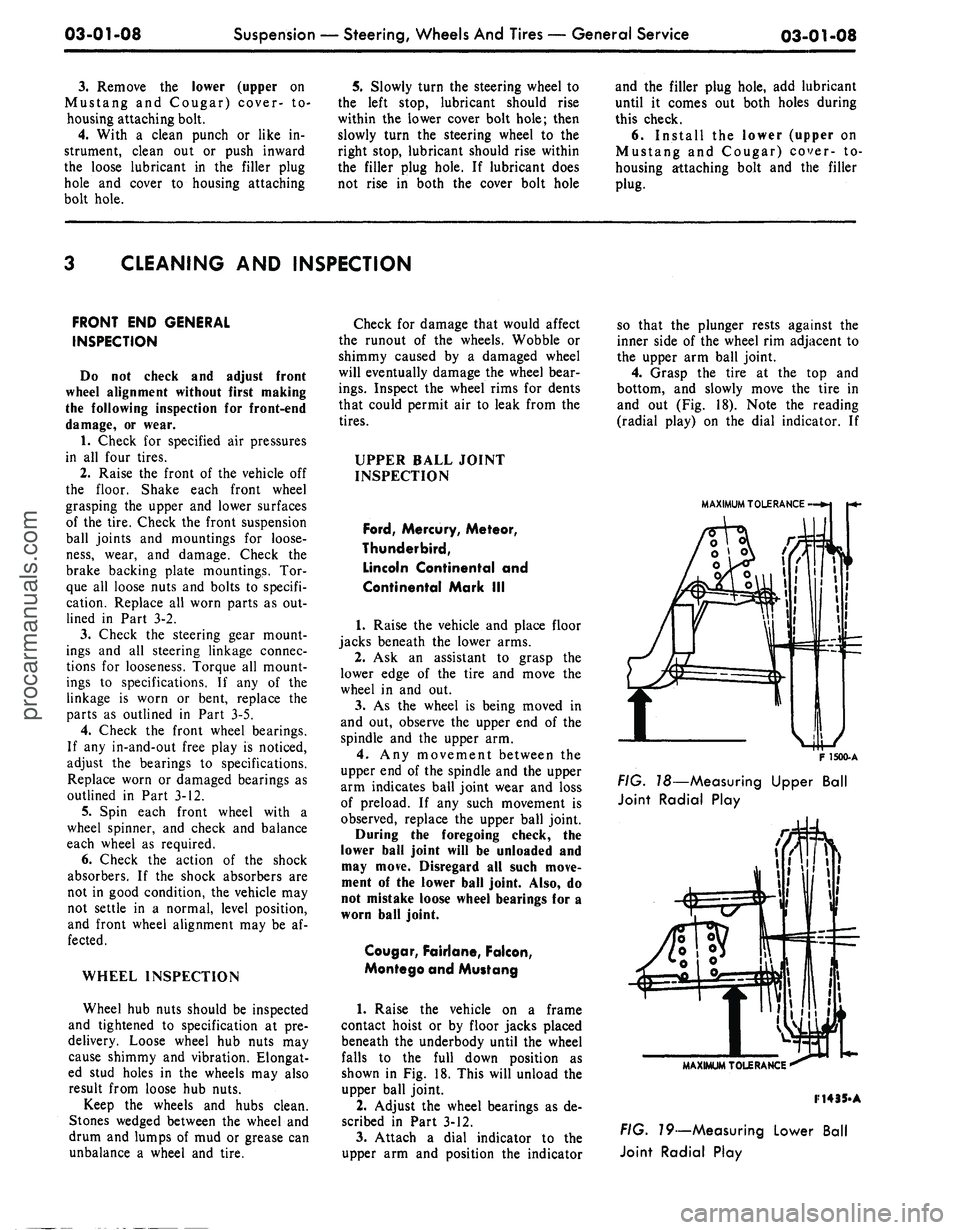
Raise the vehicle on a frame
contact hoist or by floor jacks placed
beneath the underbody until the wheel
falls to the full down position as
shown in Fig. 18. This will unload the
upper ball joint.
2.
Adjust the wheel bearings as de-
scribed in Part 3-12.
3.
Attach a dial indicator to the
upper arm and position the indicator
so that the plunger rests against the
inner side of the wheel rim adjacent to
the upper arm ball joint.
4.
Grasp the tire at the top and
bottom, and slowly move the tire in
and out (Fig. 18). Note the reading
(radial play) on the dial indicator. If
MAXIMUM TOLERANCE
F
1500-A
FIG.
T8—Measuring Upper Ball
Joint Radial Play
MAXIMUM TOLERANCE
F14
35-A
FIG.
79—Measuring Lower Ball
Joint Radial Playprocarmanuals.com
Page 76 of 413
03-01-11
Suspension — Steering, Wheels And Tires — General Service
03-01-11
3.
Inspect the rotor, rollers, cam
ring, pressure plate, cover, and bush-
ing in the pressure plate for wear or
scoring. If damaged, replacement of
the pump (less housing) is required.
4.
Make sure the inner faces of the
cover and the housing are free of
paint, nicks, or burrs. Check all fluid
passages for restrictions.
5.
Inspect the valving surfaces
(areas where the rotor and rollers con-
tact) for wear or scoring. Replace the
pressure plate or the cover if worn or
scored. Inspect the bushing in the
pressure plate for wear or scoring, and
replace the plate if necessary.
6. Inspect the control valve for
scores, nicks, or burred edges. Re-
place the valve if damaged. Do not dis-
assemble the valve. Check the valve
for free movement in the housing
bore.
7.
Inspect the tube seat in the hous-
ing. If damaged, remove it with an
E-Z-Out and install a new seat.
SHOCK ABSORBER CHECKS
All vehicles are equipped with hy-
draulic shock absorbers of the direct-
acting type and are nonadjustable and
nonrefillable. They cannot be repaired.
Before replacing a shock absorber,
check the action of the shock absor-
bers as follows:
ON VEHICLE TESTS
1.
Check the shock absorber to be
sure it is securely and properly in-
stalled. Check the shock absorber in-
sulators for damage and wear.
Replace any defective insulators and
tighten attachments to the specified
torque (on a shock absorber which in-
corporates integral insulators, replace
the shock absorbers).
2.
Inspect the shock absorber for
evidence of fluid leakage. A light film
of fluid is permissible. Be sure any
fluid observed is not from sources
other than the shock absorber.
Replace the shock absorber if leak-
age is severe.
3.
Disconnect the lower end of the
shock absorber. Extend and compress
the shock absorber as fast as possible,
using as much travel as possible.
Action should become smooth and
uniform throughout each stroke.
Higher resistance on extension than
on compression is a normal condition.
Faint swish noises are also normal.
Remove the shock absorber for a
bench test if action is erratic. If the
action is smooth, but the shock absor-
bers are suspected of being weak fol-
low step 4:
4.
Repeat step 3 on the mating
shock absorber installed on the oppo-
site side of the vehicle, and compare
results of both tests. If the action is
similar, it is unlikely that either shock
absorber is defective. Reconnect both
shock absorbers.
Replace the shock absorber having
the lower resistance. Ensure that the
part number of the replacement is the
same as that of the original shock ab-
sorber. The replacement shock absor-
ber resistance will appear to be higher
than either original due to initial fric-
tion of the rod seal.
BENCH TEST
With the shock absorber right side
up (as installed in vehicle), extend it
fully. Then turn the shock absorber
upside down and fully compress it.
Repeat this procedure at least three
times to ensure that any entrapped air
has been expelled. Now place the
shock absorber right side up in a vise,
and hand stroke the shock absorber as
described in On Vehicle Tests, step 3.
If action is not now smooth and uni-
form, install a new shock absorber.procarmanuals.com
Page 84 of 413
03-02-08
Suspension
03-02-08
IN-VEHICLE ADJUSTMENTS AND REPAIRS
HOISTING INSTRUCTIONS
Damage to steering linkage compo-
nents and front suspension struts may
occur if care is not exercised when po-
sitioning the hoist adapters of 2 post
hoists prior to lifting the vehicle.
If a 2 post hoist is used to lift the
vehicle, place the adapters under the
lower arms or the No. 1 crossmember.
Do not allow the adapters to contact
the steering linkage. If the adapters
are placed under the crossmember, a
piece of wood (2 x 4 x 16 inches)
should be placed on the hoist channel
between the adapters. This will pre-
vent the adapters from damaging the
front suspension struts.
UPPER BALL JOINT
REPLACEMENT
FORD, MERCURY,
METEOR, THUNDERBIRD,
CONTINENTAL MARK III
1.
Raise the vehicle high enough to
provide working space, and place a
support under the lower arm. If a
chain hoist or a jack that has a nar-
row contact pad is to be used on the
bumper to raise the vehicle, distribute
the load along the bumper by using a
steel plate 3 or 4 inches long as a con-
tact pad to prevent damaging the
bumper.
2.
Remove the wheel and tire.
3.
Drill a
1/8-inch
hole through
each upper ball joint retaining rivet.
Using a large chisel, cut off the rivets.
4.
Remove the upper arm suspen-
sion bumper.
5.
Remove the cotter pin and nut
from the upper ball joint stud.
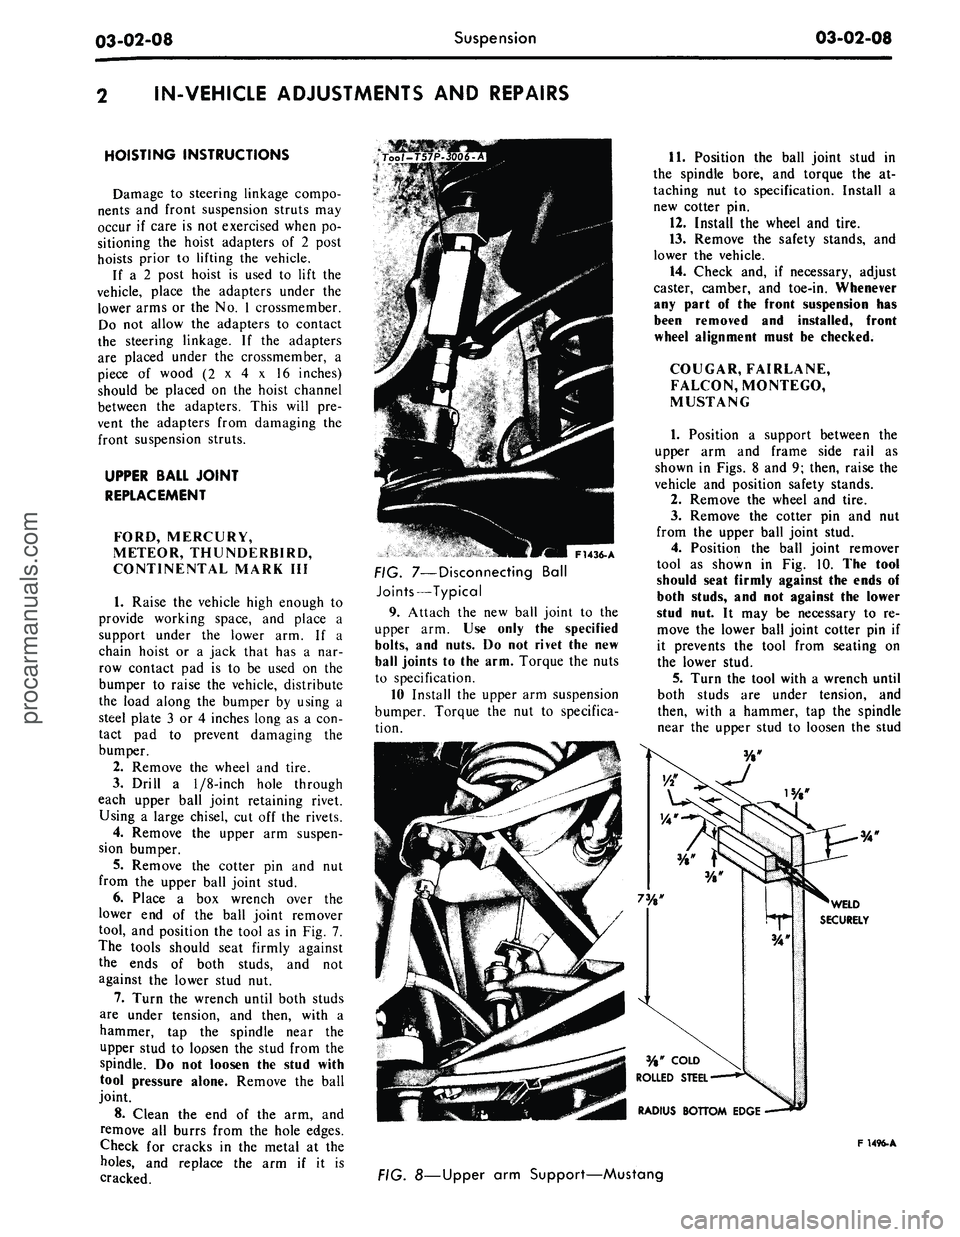
6. Place a box wrench over the
lower end of the ball joint remover
tool, and position the tool as in Fig. 7.
The tools should seat firmly against
the ends of both studs, and not
against the lower stud nut.
7.
Turn the wrench until both studs
are under tension, and then, with a
hammer, tap the spindle near the
upper stud to loosen the stud from the
spindle. Do not loosen the stud with
tool pressure alone. Remove the ball
joint.
8. Clean the end of the arm, and
remove all burrs from the hole edges.
Check for cracks in the metal at the
holes,
and replace the arm if it is
cracked.
F1436-A
FIG. 7—Disconnecting Ball
Joints—Typical
9. Attach the new ball joint to the
upper arm. Use only the specified
bolts,
and nuts. Do not rivet the new
ball joints to the arm. Torque the nuts
to specification.
10 Install the upper arm suspension
bumper. Torque the nut to specifica-
tion.
11.
Position the ball joint stud in
the spindle bore, and torque the at-
taching nut to specification. Install a
new cotter pin.
12.
Install the wheel and tire.
13.
Remove the safety stands, and
lower the vehicle.
14.
Check and, if necessary, adjust
caster, camber, and toe-in. Whenever
any part of the front suspension has
been removed and installed, front
wheel alignment must be checked.
COUGAR, FAIRLANE,
FALCON, MONTEGO,
MUSTANG
1.
Position a support between the
upper arm and frame side rail as
shown in Figs. 8 and 9; then, raise the
vehicle and position safety stands.
2.
Remove the wheel and tire.
3.
Remove the cotter pin and nut
from the upper ball joint stud.
4.
Position the ball joint remover
tool as shown in Fig. 10. The tool
should seat firmly against the ends of
both studs, and not against the lower
stud nut. It may be necessary to re-
move the lower ball joint cotter pin if
it prevents the tool from seating on
the lower stud.
5.
Turn the tool with a wrench until
both studs are under tension, and
then, with a hammer, tap the spindle
near the upper stud to loosen the stud
F 1496-A
FIG. 8—Upper arm Support—Mustangprocarmanuals.com