check engine FORD MUSTANG 1969 Volume One Chassis
[x] Cancel search | Manufacturer: FORD, Model Year: 1969, Model line: MUSTANG, Model: FORD MUSTANG 1969Pages: 413, PDF Size: 75.81 MB
Page 190 of 413
04-01-03
General Axle Service
04-01-03
Tool-759L 4204-A,
T65K 4204-
A,
T66L-4204-A,
OR
Tool-44211-A
E1897-A
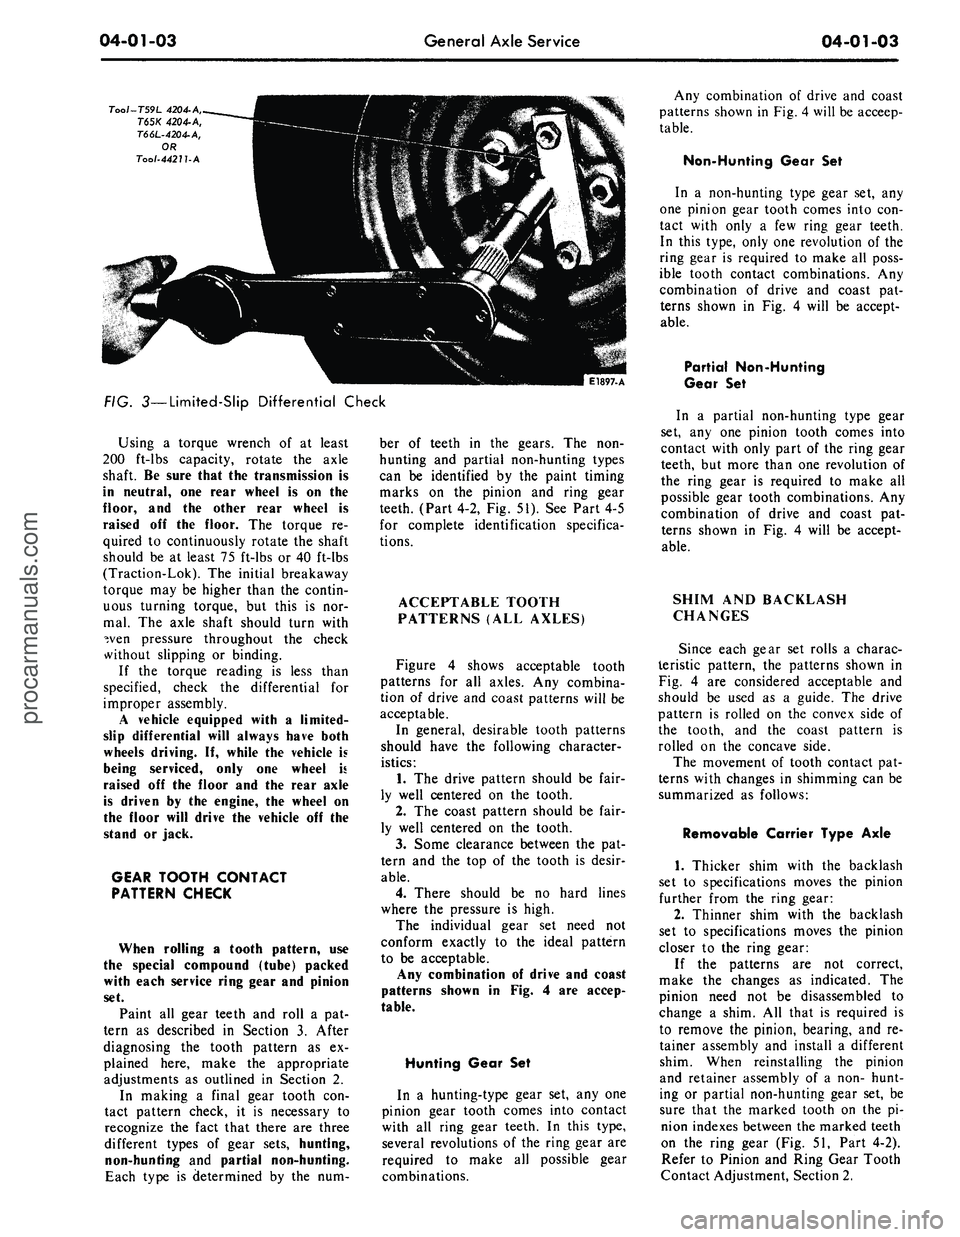
FIG. 3—Limited-Slip Differential Check
Using
a
torque wrench
of at
least
200 ft-lbs capacity, rotate
the
axle
shaft.
Be
sure that
the
transmission
is
in neutral,
one
rear wheel
is on the
floor,
and the
other rear wheel
is
raised
off the
floor.
The
torque
re-
quired
to
continuously rotate
the
shaft
should
be at
least
75
ft-lbs
or 40
ft-lbs
(Traction-Lok).
The
initial breakaway
torque
may
be
higher than
the
contin-
uous turning torque,
but
this
is nor-
mal.
The
axle shaft should turn with
^ven pressure throughout
the
check
without slipping
or
binding.
If
the
torque reading
is
less than
specified, check
the
differential
for
improper assembly.
A vehicle equipped with
a
limited-
slip differential will always have both
wheels driving.
If,
while
the
vehicle
is
being serviced, only
one
wheel
is
raised
off the
floor
and the
rear axle
is driven
by the
engine,
the
wheel
on
the floor will drive
the
vehicle
off the
stand
or
jack.
GEAR TOOTH CONTACT
PATTERN CHECK
When rolling
a
tooth pattern,
use
the special compound (tube) packed
with each service ring gear
and
pinion
set.
Paint
all
gear teeth
and
roll
a pat-
tern
as
described
in
Section
3.
After
diagnosing
the
tooth pattern
as ex-
plained here, make
the
appropriate
adjustments
as
outlined
in
Section
2.
In making
a
final gear tooth
con-
tact pattern check,
it is
necessary
to
recognize
the
fact that there
are
three
different types
of
gear sets, hunting,
non-hunting
and
partial non-hunting.
Each type
is
determined
by the num-
ber
of
teeth
in the
gears.
The non-
hunting
and
partial non-hunting types
can
be
identified
by the
paint timing
marks
on the
pinion
and
ring gear
teeth. (Part 4-2,
Fig. 51).
See
Part
4-5
for complete identification specifica-
tions.
ACCEPTABLE TOOTH
PATTERNS (ALL AXLES)
Figure
4
shows acceptable tooth
patterns
for all
axles.
Any
combina-
tion
of
drive
and
coast patterns will
be
acceptable.
In general, desirable tooth patterns
should have
the
following character-
istics:
1.
The
drive pattern should
be
fair-
ly well centered
on the
tooth.
2.
The
coast pattern should
be
fair-
ly well centered
on the
tooth.
3.
Some clearance between
the pat-
tern
and the top of the
tooth
is
desir-
able.
4.
There should
be no
hard lines
where
the
pressure
is
high.
The individual gear
set
need
not
conform exactly
to the
ideal pattern
to
be
acceptable.
Any combination
of
drive
and
coast
patterns shown
in Fig. 4 are
accep-
table.
Hunting Gear
Set
In
a
hunting-type gear
set, any one
pinion gear tooth comes into contact
with
all
ring gear teeth.
In
this type,
several revolutions
of
the
ring gear
are
required
to
make
all
possible gear
combinations.
Any combination
of
drive
and
coast
patterns shown
in
Fig.
4
will
be
acceep-
table.
Non-Hunting Gear
Set
In
a
non-hunting type gear
set, any
one pinion gear tooth comes into
con-
tact with only
a few
ring gear teeth.
In this type, only
one
revolution
of
the
ring gear
is
required
to
make
all
poss-
ible tooth contact combinations.
Any
combination
of
drive
and
coast
pat-
terns shown
in Fig. 4
will
be
accept-
able.
Partial Non-Hunting
Gear
Set
In
a
partial non-hunting type gear
set,
any one
pinion tooth comes into
contact with only part
of
the
ring gear
teeth,
but
more than
one
revolution
of
the ring gear
is
required
to
make
all
possible gear tooth combinations.
Any
combination
of
drive
and
coast
pat-
terns shown
in Fig. 4
will
be
accept-
able.
SHIM
AND
BACKLASH
CHANGES
Since each gear
set
rolls
a
charac-
teristic pattern,
the
patterns shown
in
Fig.
4 are
considered acceptable
and
should
be
used
as a
guide.
The
drive
pattern
is
rolled
on the
convex side
of
the tooth,
and the
coast pattern
is
rolled
on the
concave side.
The movement
of
tooth contact
pat-
terns with changes
in
shimming
can
be
summarized
as
follows:
Removable Carrier Type Axle
1.
Thicker shim with
the
backlash
set
to
specifications moves
the
pinion
further from
the
ring gear:
2.
Thinner shim with
the
backlash
set
to
specifications moves
the
pinion
closer
to the
ring gear:
If
the
patterns
are not
correct,
make
the
changes
as
indicated.
The
pinion need
not be
disassembled
to
change
a
shim.
All
that
is
required
is
to remove
the
pinion, bearing,
and re-
tainer assembly
and
install
a
different
shim. When reinstalling
the
pinion
and retainer assembly
of a
non-
hunt-
ing
or
partial non-hunting gear
set, be
sure that
the
marked tooth
on the pi-
nion indexes between
the
marked teeth
on
the
ring gear
(Fig.
51,
Part
4-2).
Refer
to
Pinion
and
Ring Gear Tooth
Contact Adjustment, Section
2.procarmanuals.com
Page 226 of 413
04-03-06
Rear Axles — Integral Carrier Type
04-03-06
9. Install a new integral nut and
ivasher on the pinion shaft. (Apply a
small amount of lubricant on the
washer side of the nut.)
10.
Hold the flange with the tool
shown in Fig. 9 while the nut is being
tightened.
11.
Tighten the pinion shaft nut,
rotating the pinion occasionally to in-
sure proper bearing seating, (Fig. 6)
and take frequent preload readings
until the preload is at the original rec-
orded reading established in step 3.
12.
After original preload has been
reached, tighten the pinion nut slowly,
until an additional preload of 6 to 12
in-lbs has been added.
The preload should not exceed the
amount shown above, or bearing fail-
ure may result.
Under no circumstances should the
pinion nut be backed off to lessen pre-
load. If this is done, a new pinion
bearing spacer must be installed. (In
addition, the U-joint flange must
never be hammered on, or pneumatic-
-tools used.)
13.
Remove the oil seal replacer
tool from the transmission extension
housing. Install the front end of the
drive shaft on the transmission output
shaft.
14.
Connect the rear end of the
drive shaft to the axle U-joint flange,
aligning the scribe marks made on the
drive shaft end yoke and the axle U-
joint flange (Fig. 14).
15.
Check the lubricant level. Make
sure the axle is in running position.
Add whatever amount of specified lu-
bricant is required to reach the lower
edge of the filler plug hole, located in
the carrier casting or housing cover.
REMOVAL AND INSTALLATION
REAR AXLE HOUSING
REMOVAL
1.
Raise the vehicle and support it
with safety stands under the rear
frame member.
2.
Drain the lubricant from the
axle.
3.
Make scribe marks on the drive
shaft end yoke and the axle U-joint
flange to insure proper position of the
drive shaft at assembly (Fig. 14). Dis-
connect the drive shaft at the drive
pinion flange.
4.
Disconnect the lower end of the
shock absorbers.
5.
Remove the wheels, brake drums
and both axle shafts as outlined in the
foregoing Section 2.
6. Remove vent hose front vent
tube (Corbin clamp) and remove vent
tube from brake tube junction and
axle housing.
7.
Remove the hydraulic brake T-
fitting from the axle housing. Do not
open the hydraulic brake system lines.
Remove the hydraulic brake line from
its retaining clip on the axle housing.
8. Remove both axle shaft oil seals
with the tools shown in Fig. 8.
9. Remove both brake backing
plates from the axle housing and sus-
pend them above the housing with me-
chanic's wire. The hydraulic brake
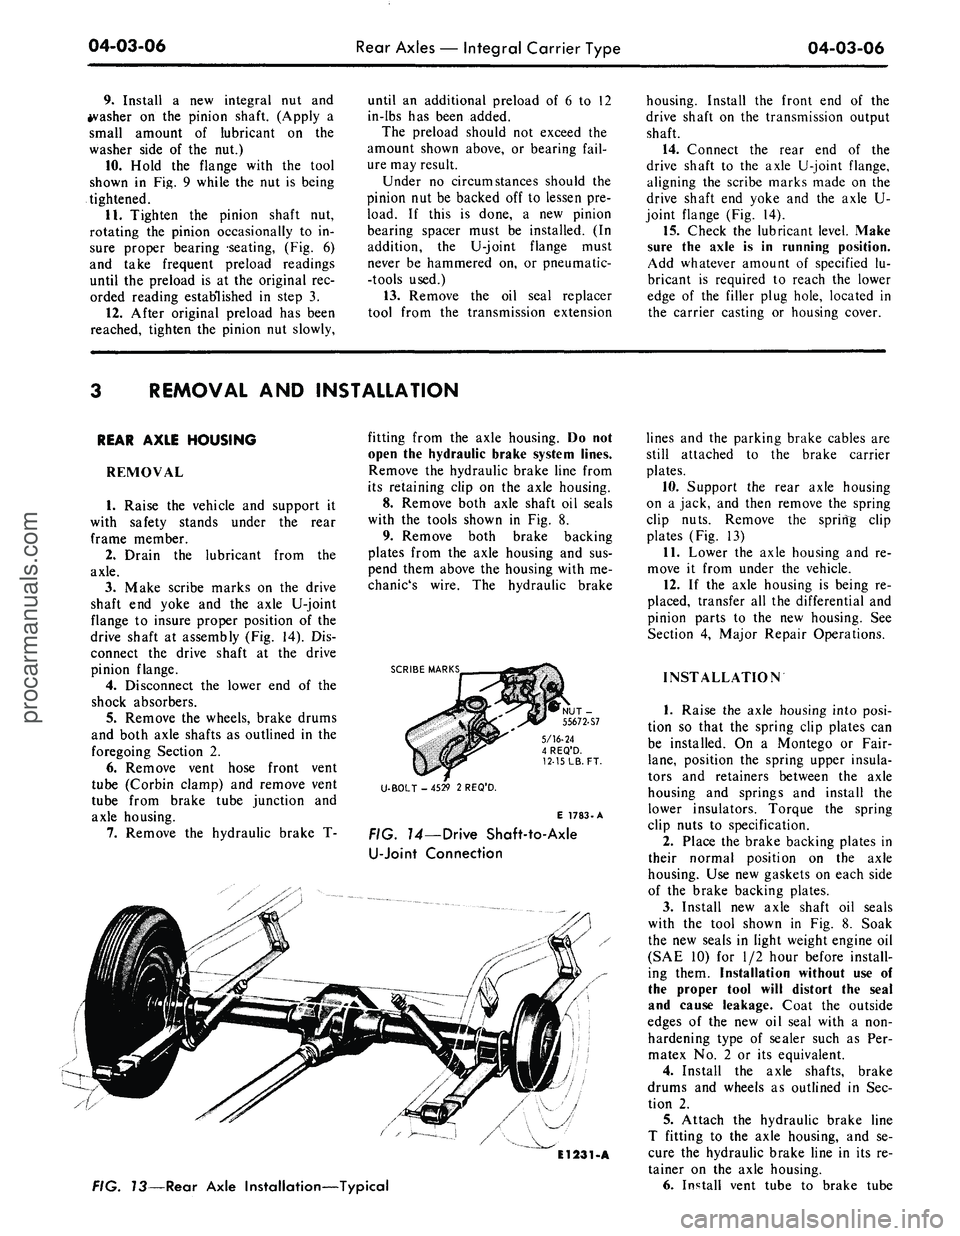
SCRIBE MARKS
5/16-24
4 REQ'D.
12-15
LB.
FT.
U-BOLT - 4529 2 REQ'D.
E 1783-A
FIG. 14—Drive Shaft-to-Axle
U-Joint
Connection
El231-A
FIG. 73—Rear Axle Installation—Typical
lines and the parking brake cables are
still attached to the brake carrier
plates.
10.
Support the rear axle housing
on a jack, and then remove the spring
clip nuts. Remove the spring clip
plates (Fig. 13)
11.
Lower the axle housing and re-
move it from under the vehicle.
12.
If the axle housing is being re-
placed, transfer all the differential and
pinion parts to the new housing. See
Section 4, Major Repair Operations.
INSTALLATION
1.
Raise the axle housing into posi-
tion so that the spring clip plates can
be installed. On a Montego or Fair-
lane,
position the spring upper insula-
tors and retainers between the axle
housing and springs and install the
lower insulators. Torque the spring
clip nuts to specification.
2.
Place the brake backing plates in
their normal position on the axle
housing. Use new gaskets on each side
of the brake backing plates.
3.
Install new axle shaft oil seals
with the tool shown in Fig. 8. Soak
the new seals in light weight engine oil
(SAE 10) for 1/2 hour before install-
ing them. Installation without use of
the proper tool will distort the seal
and cause leakage. Coat the outside
edges of the new oil seal with a non-
hardening type of sealer such as Per-
matex No. 2 or its equivalent.
4.
Install the axle shafts, brake
drums and wheels as outlined in Sec-
tion 2.
5.
Attach the hydraulic brake line
T fitting to the axle housing, and se-
cure the hydraulic brake line in its re-
tainer on the axle housing.
6. Install vent tube to brake tubeprocarmanuals.com
Page 245 of 413
04-05-04
Specifications
04-05-04
ATTACHING TORQUE SPECIFICATIONS -(By Axle Ring Gear Diameter)
Description
Differential Bearing Cap Bolt- 7 1/4"
8"
All Others
Differential Bearing Adjusting
Nut Lock Bolts
Carrier
to
Housing Stud Nuts-
8", 8 3/4", 9" 8 3/8"
Pinion Retainer
to
Carrier Bolts-
8", 8 3/4", 9" 9 3/8"
Ring Gear Attaching Bolts-
7 1/4"
All Others
Differential Pinion Shaft
Lock Pin
•
8 1/2" Only
Torque Lbs.
Ft.
40-55
55-70
70-85
12-25
25-40
30-45
40-55
65-80
15-22
Description
Rear Cover Screw and Washer
Assemblies
-8
1/4" &
8
1/2
Only
Oil Filler Plug
Rear Axle Shaft Bearing Retainer
Bolt Nuts:
Falcon,
Fairlane, Montego,
Mustang and Cougar (All)
Ford & Meteor (Exc.
8 1/2" R.G.)
Mercury,
T
Bird
Lincoln Continental (All)
Brake Backing Plate Bolt Nuts-
Ford & Meteor
8
1/2" Only
Torque Lbs.
Ft.
25-35
25-50
20-40
50-75
30-55
20-40
LUBRICANT
CAPACITIES
AND CHECKING PROCEDURES®
Vehicle
Falcon,
Mustang
Cougar, Fairlane, Falcon
Montego, Mustang
Ford,
Meteor
Ford,
Meteor
Cougar, Fairlane, Falcon, Ford,
Mercury, Meteor, Montego, Mustang
Lincoln,
Thunderbird
Engine
(C.I.D.)
170,
200
250,
302
240,
302
240,
302
351,
390,
428,
429
429,
460
Axle
Ratio
All
All
2.80:1,
3.10:1
All Except
2.80:1,
3.10:1
All
All
U.S. Measure
Capacity® (Pints)
2.5
4.0
4.0
5.0
5.0
5.0©
Imperial
Capacity
CD
(Pints)
2
31/5
3 1/5
4.0
4.0
4.0©
©All limited slip and Traction-Lok axles use ESW-M2C-104-A lubricant (C6AZ-19580-C).
All conventional axles use ESW-M2C-105-A lubricant (C6AZ-19580-B).
©Approximate refill capacity-Actual lubricant capacities are determined
by
filling
to
bottom
of
filler hole.
©To check these axles, the plug should be backed
out
slowly.
If
seepage occurs around the threads, the plug should
be
turned back
in
immediately to avoid any drainage. This indicates that the specified amount
of
lubricant
is
present
in
the axle.
SPECIAL TOOLS
FORD,
MERCURY, METEOR
Ford Tool No.
T66L-4204-L
T57L-500-A
T50T-100-A
TOOL-4235-C
T00L-4621-A
TOOL-1225-D
T00L42344
TOOL-1177
TOOL-U75-AB
T57L4220-A
T00L4221-AE
T00L-4221-AF
T66P-4220-P
TOOL-4851-K
Former No.
42211 or
42211-A
6005-M
6005-MS
B-160
4235C
—
—
4234-A
4245-B
1175-AB
—
4221-AF
T57L-4851-A
4851-K
Description
Limited-Slip Differential Check
Bench Fixture
Impact Hammer
Axle Shaft Remover
Drive Pinion Bearing and
Rear Wheel Bear Replacer
Rear Wheel Bearing Remover
Rear Wheel Bearing Installer
Rear Wheel Bearing Oil Seal Installer
Rear Wheel Bearing Oil Seal Remover
Differential Bearing Remover
Differential Bearing Remover
U-Joint
Flange Holder
Ford Tool No.
T53T4851-A
T00L4858-D
T57L4614-A
T00L4621-K
T53L-200-A
T57L-4625-A or
T00L4625-K
T57L4616-A or
T00L4615-D
T58L-101-A
T55P4616-A2
T57L4621-B or
T00L4621-L
T58L4676-A
T00L4858-E
Former No.
4851-A, D
—
4614
4621-K
—
4625-K
—
—
—
—
4676-F
4858-E
Description
U-Joint
Flange Remover
U-Joint
Flange Remover
Drive Pinion Retainer Support
Pinion Rear Bearing Cone Remover
Handle Adapter
Pinion Pilot Bearing Remover and
Installer
Pinion Front Bearing Cup Remover
and Replacer
Puller Attachment—For Bearing
Cup Removal
Pinion Rear Bearing Cup Remover
and Replacer
Pinion Rear Bearing Cone Installer
Drive Pinion Oil Seal Replacer
U-Joint
Flange and Pinion Bearing
Replacerprocarmanuals.com
Page 247 of 413
04-05-06
Specifications
04-05-06
THUNDERBIRD, CONTINENTAL MARK
III
Ford Tool No.
T50T-100-A
T50T-100-A&
TOOL-1175-AB
T00L-1225-DA
TOOL-4005
TOOL-4020-B
T57L-4067-A
TOOL-4201
TOOL-4201-C
TOOL-4205-B
TOOL-4205-C
T00L-4221-C
T00L-4222-H
T00L-4235-C
T00L-4245-B
Former No.
T50T-100-C
1175-AE
1225-DA
4005
4020-B
_
4201
4201-C
4205-B
4205-C
4221-C
4222-H
4235-C
4245-B
Description
Slide Hammer
Seal Remover
Rear Wheel Bearing Remover
Engine Repair Stand Axle Adapter-
Keyed Shaft
Pinion Depth Gauge-Complete With
Depth Micrometer and Gauge Block
Differential Bearing Adjuster Wrench
Pinion Shaft Drive
Nut
Differential Backlash
&
Runout
Gauge With Univ. Bracket, Dial
Indicator and Bracket
Differential Assembly Bench Holder
Axle Housing Dummy Bearings (1
pr.)
Differential Side Bearing Remover
Differential Bearing Cone Replacer
Axle Shaft
&
Bearing Remover
Wheel Bearing Seal Replacer
Ford Tool No.
Former No. Description
TOOL-4616
4616
Drive Pinion Bearing Cup Replacer
(Front)
T00L-4621-A 4621-A Drive Pinion Bearing and Rear Wheel
Bearing Replacer
T00L-4621-BA 4621-BA Rear Pinion Bearing Remover
TOOL-4628 4628 Pinion Rear Bearing Cup Replacer
T00L-4628-B 4628-B Pinion Bearing Front Cup Remover
T00L-4628-D 4628-D Pinion Rear Bearing Cup Remover
T64N-4676-A 4676 Pinion Shaft Oil Seal Replacer
T68P-4851-A
-
Universal Joint Flange Holder
T64N-4858-A 4858-B Companion Flange
&
Pinion Bearing
Replacer
T00L-4858-G 4858-G Pinion Flange Nut Adjusting Wrench
(Use With T64N-4858-A)
TOOL-4859 4859 Companion Flange Dust
Shield
Replacer
T00L-6565-AB
-
Dial Indicator Adapter
TOOL-6565
-
Dial Indicator
T00L-7657-J 7657-J Extension Housing Bushing
&
Seal Replacer
LINCOLN CONTINENTAL
Ford Tool
No.
T00L-4245-B
TOOL-4616
T00L-4621-A
T00L-4621-BA
TOOL-4628
T00L-4628-B
T64N-4628-B
T00L-4628-D
T64N-4676-A
T00L-4851-K
T64N-4858-A
T00L-4858-G
TOOL-4859
T00L-6565-AB
TOOL 6565
T00L-7657-J
Former
No.
4245-B
4616
4621-A
4621-BA
4628
4628-B
4628-D
4676
T57L-4851-A
4858-B
4858-G
4859
7657-J
Description
Wheel Bearing Seal Replacer
Drive Pinion bearing
Cup
Replacer (Front)
Drive Pinion Bearing
and
Rear
Wheel Bearing Replacer
Rear Pinion Bearing Remover
Pinion Rear Bearing
Cup
Replacer
Pinion Bearing Front
Cup
Remover
Pinion Rear Bearing Cup Remover
Pinion Shaft
Oil
Seal Replacer
Universal Joint Flange Holder
Companion Flange
&
Pinion Bearing
Replacer
Pinion Flange
Nut
Adjusting Wrench
(Use With T64N-4858-A)
Companion Flange Dust Shield
Replacer
Dial Indicator Adapter
Dial Indicator
Extension Housing Bushing
&
Seal Replacer
Ford Tool
No.
Former
No.
T50T-100-A
T50T-100-A&
TOOL-1175-AB
TOOL-1225-DA
TOOL-4000-C
TOOL-4005
TOOL-4020-B
TOOL-4201
TOOL-4201-C
TOOL-4204-A
TOOL-4205-B
TOOL-4205-C
T00L-4209-C
T00L-4221-C
T00L-4222-H
T00L-4235-C
Description
T50T-100-C Slide Hammer
1175-AE
1225-DA
4000-C
4005
4020-B
4201
4201-C
4205-B
4205-C
4209-C
4221-C
4222-H
4235-C
Seal Remover
Rear Wheel Bearing Remover
Differential Housing Spreader
Engine Repair Stand Axle Adapter-
Keyed Shaft
Pinion Depth Gauge-Complete With
Depth Micrometer
and
Gauge
Block
Pinion Shaft Drive
Nut
Differential Backlash
&
Runout
Gauge With Univ. Bracket, Dial
Indicator
and
Bracket
Limited Slip Differential Check
Differential Assembly Bench Holder
Axle Housing Dummy Bearings
(1
pi")
Pinion Tension Scale With
4209-C12 Socket
Differential Side Bearing Remover
Differential Bearing Cone Replacer
Axle Shaft
&
Bearing Removerprocarmanuals.com
Page 248 of 413
05-01-01
05-01-01
Clutch
GROUP
5
PART
5-1
PAGE
Drive Shaft 05-01-01
PART
5-2
General Clutch Service 05-02-01
PART
5-3
Clutch
PART
5-4
Specifications
PAGE
05-03-01
05-04-01
PART
5-1
Drive Shaft
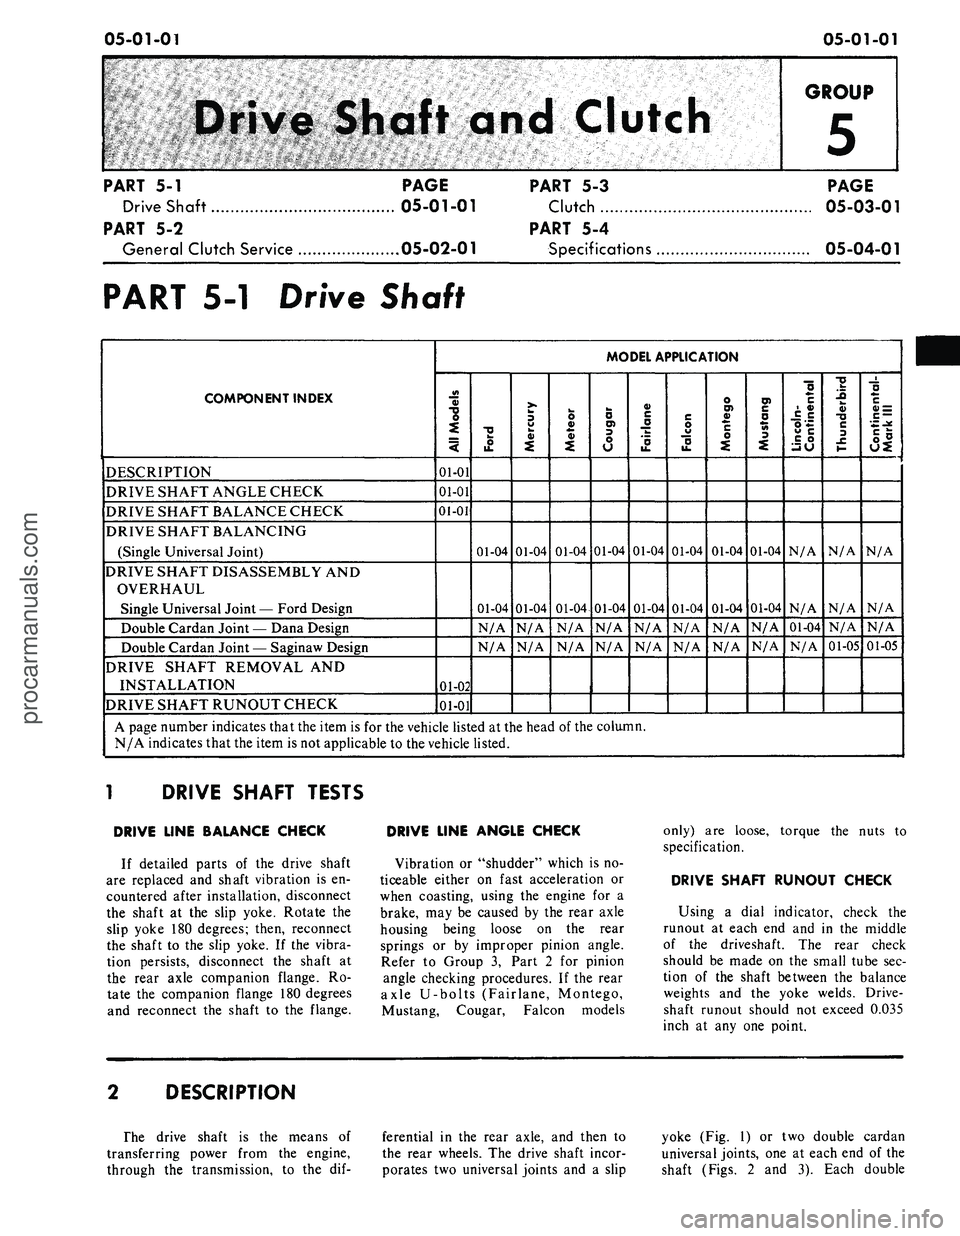
COMPONENT INDEX
DESCRIPTION
DRIVE SHAFT ANGLE CHECK
DRIVE SHAFT BALANCE CHECK
DRIVE SHAFT BALANCING
(Single Universal Joint)
DRIVE SHAFT DISASSEMBLY
AND
OVERHAUL
Single Universal Joint — Ford Design
Double Cardan Joint — Dana Design
Double Cardan Joint — Saginaw Design
DRIVE SHAFT REMOVAL
AND
INSTALLATION
DRIVE SHAFT RUNOUT CHECK
MODEL APPLICATION
All
Models
01-01
01-01
01-01
01-02
01-01
Ford
01-04
01-04
N/A
N/A
Mercury
01-04
01-04
N/A
N/A
Meteor
01-04
01-04
N/A
N/A
Cougar
01-04
01-04
N/A
N/A
Fairlane
01-04
01-04
N/A
N/A
Falcon
01-04
01-04
N/A
N/A
Montego
01-04
01-04
N/A
N/A
Mustang
01-04
01-04
N/A
N/A
Lincoln-
Continental
N/A
N/A
01-04
N/A
Thunderbird
N/A
N/A
N/A
01-05
Continental-
Mark
III
N/A
N/A
N/A
01-05
A page number indicates that the item
is for the
vehicle listed
at the
head
of
the column.
N/A indicates that
the
item
is not
applicable
to the
vehicle listed.
DRIVE SHAFT TESTS
DRIVE LINE BALANCE CHECK
If detailed parts
of the
drive shaft
are replaced
and
shaft vibration
is en-
countered after installation, disconnect
the shaft
at the
slip yoke. Rotate
the
slip yoke
180
degrees; then, reconnect
the shaft
to the
slip yoke.
If the
vibra-
tion persists, disconnect
the
shaft
at
the rear axle companion flange.
Ro-
tate
the
companion flange
180
degrees
and reconnect
the
shaft
to the
flange.
DRIVE LINE ANGLE CHECK
Vibration
or
"shudder" which
is no-
ticeable either
on
fast acceleration
or
when coasting, using
the
engine
for a
brake,
may be
caused
by the
rear axle
housing being loose
on the
rear
springs
or by
improper pinion angle.
Refer
to
Group
3,
Part
2 for
pinion
angle checking procedures.
If the
rear
axle U-bolts (Fairlane, Montego,
Mustang, Cougar, Falcon models
only)
are
loose, torque
the
nuts
to
specification.
DRIVE SHAFT RUNOUT CHECK
Using
a
dial indicator, check
the
runout
at
each
end and in the
middle
of
the
driveshaft.
The
rear check
should
be
made
on the
small tube
sec-
tion
of the
shaft between
the
balance
weights
and the
yoke welds. Drive-
shaft runout should
not
exceed 0.035
inch
at any one
point.
DESCRIPTION
The drive shaft
is the
means
of
transferring power from
the
engine,
through
the
transmission,
to the dif-
ferential
in the
rear axle,
and
then
to
the rear wheels.
The
drive shaft incor-
porates
two
universal joints
and a
slip
yoke
(Fig. 1) or two
double cardan
universal joints,
one at
each
end of the
shaft (Figs.
2 and 3).
Each double
procarmanuals.com
Page 255 of 413
05-02-01
General Clutch Service
05-02-01
PART
5-2
General Clutch Service
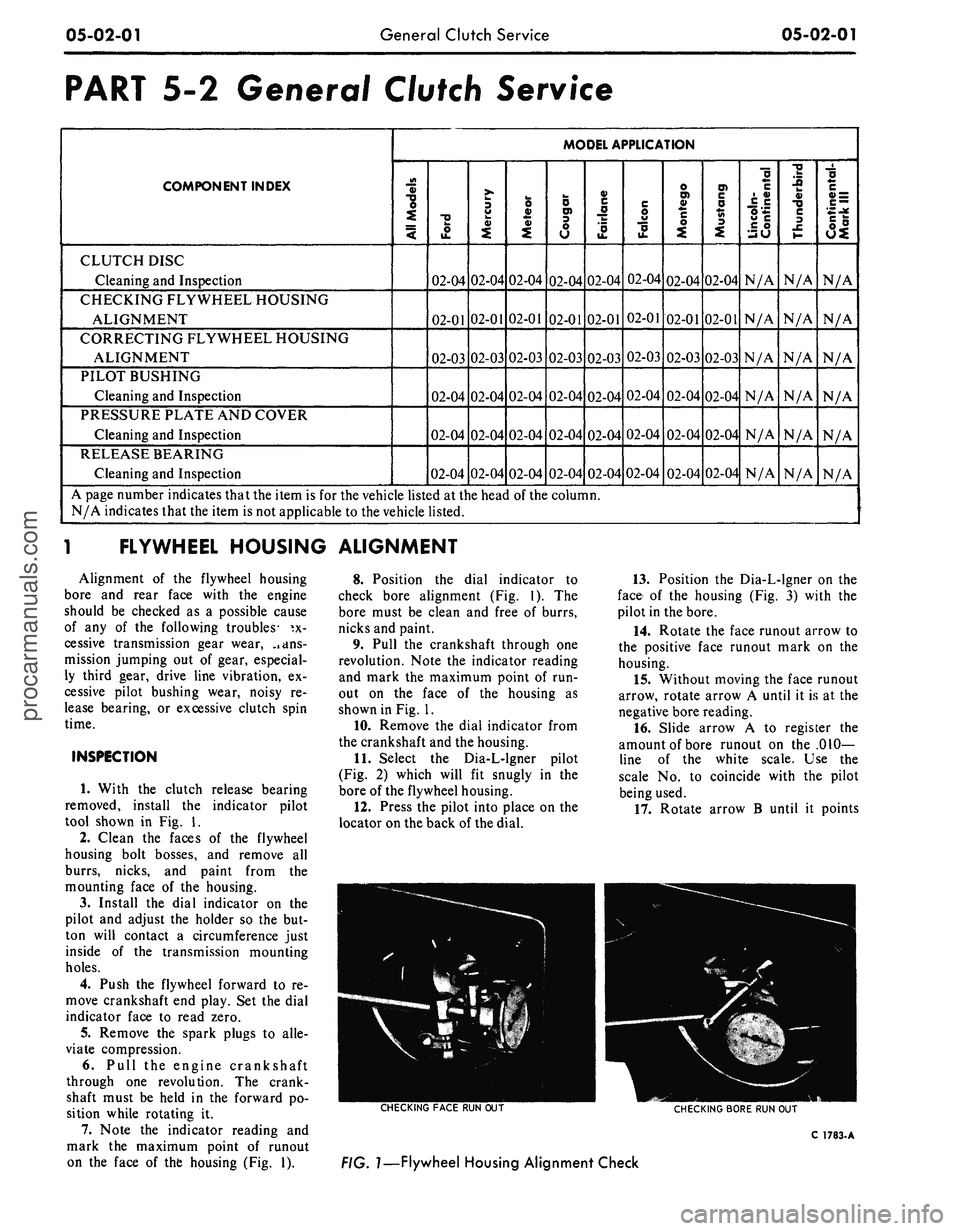
COMPONENT INDEX
MODEL APPLICATION
3
a>
1
o>
il
•U
i
!-
II
CLUTCH DISC
Cleaning and Inspection
02-04
02-04
02-04
02-04
02-04
02-04
02-04
02-04
N/A
N/A
N/A
CHECKING FLYWHEEL HOUSING
ALIGNMENT
02-01
02-01
02-01
02-01
02-01
02-01
02-01
02-01
N/A
N/A
N/A
CORRECTING FLYWHEEL HOUSING
ALIGNMENT
02-03
02-03
02-03
02-03
02-03
02-03
02-03
02-03
N/A
N/A
N/A
PILOT BUSHING
Cleaning and Inspection
02-04
02-04
02-04
02-04
02-04
02-04
02-04
02-04
N/A
N/A
N/A
PRESSURE PLATE AND COVER
Cleaning and Inspection
02-04
02-04
02-04
02-04
02-04
02-04
02-04
02-04
N/A
N/A
N/A
RELEASE BEARING
Cleaning and Inspection
02-04
02-04
02-04
02-04
02-04
02-04
02-04
02-04
N/A
N/A
N/A
A page number indicates that the item is for the vehicle listed at the head of the column.
N/A indicates that the item is not applicable to the vehicle listed.
l
FLYWHEEL HOUSING ALIGNMENT
Alignment of the flywheel housing
bore and rear face with the engine
should be checked as a possible cause
of any of the following troubles- ex-
cessive transmission gear wear, ..ans-
mission jumping out of gear, especial-
ly third gear, drive line vibration, ex-
cessive pilot bushing wear, noisy re-
lease bearing, or excessive clutch spin
time.
INSPECTION
1. With the clutch release bearing
removed, install the indicator pilot
tool shown in Fig. 1.
2.
Clean the faces of the flywheel
housing bolt bosses, and remove all
burrs, nicks, and paint from the
mounting face of the housing.
3.
Install the dial indicator on the
pilot and adjust the holder so the but-
ton will contact a circumference just
inside of the transmission mounting
holes.
4.
Push the flywheel forward to re-
move crankshaft end play. Set the dial
indicator face to read zero.
5.
Remove the spark plugs to alle-
viate compression.
6. Pull the engine crankshaft
through one revolution. The crank-
shaft must be held in the forward po-
sition while rotating it.
7. Note the indicator reading and
mark the maximum point of runout
on the face of the housing (Fig. 1).
8. Position the dial indicator to
check bore alignment (Fig. 1). The
bore must be clean and free of burrs,
nicks and paint.
9. Pull the crankshaft through one
revolution. Note the indicator reading
and mark the maximum point of run-
out on the face of the housing as
shown in Fig. 1.
10.
Remove the dial indicator from
the crankshaft and the housing.
11.
Select the Dia-L-lgner pilot
(Fig. 2) which will fit snugly in the
bore of the flywheel housing.
12.
Press the pilot into place on the
locator on the back of the dial.
13.
Position the Dia-L-lgner on the
face of the housing (Fig. 3) with the
pilot in the bore.
14.
Rotate the face runout arrow to
the positive face runout mark on the
housing.
15.
Without moving the face runout
arrow, rotate arrow A until it is at the
negative bore reading.
16.
Slide arrow A to register the
amount of bore runout on the .010-
line of the white scale. Use the
scale No. to coincide with the pilot
being used.
17.
Rotate arrow B until it points
CHECKING
FACE
RUN OUT
CHECKING
BORE
RUN OUT
C
1783-
A
FIG.
1—Flywheel
Housing Alignment Checkprocarmanuals.com
Page 257 of 413
05-02-03
General Clutch Service
05-02-03
in the direction of the face runout
arrow and its center line is parallel to
the center line of the face runout
arrow.
18.
Determine the amount of the
face runout on the B arrow scale.
19.
The value of the circular line
beneath the amount of face runout
will be the desired reading. If the
reading is in excess of 0.014 inch the
housing alignment is unacceptable.
20.
Remove the Dia-L-lgner gauge
from the flywheel housing.
21.
Install the spark plugs and con-
nect the wires.
ENGINE IN VEHICLE
Since any change in face alignment
will change bore alignment, it may be
possible to correct bore alignment by
changing face alignment. Face align-
ment can be changed by shimming be-
tween the flywheel housing and en-
gine.
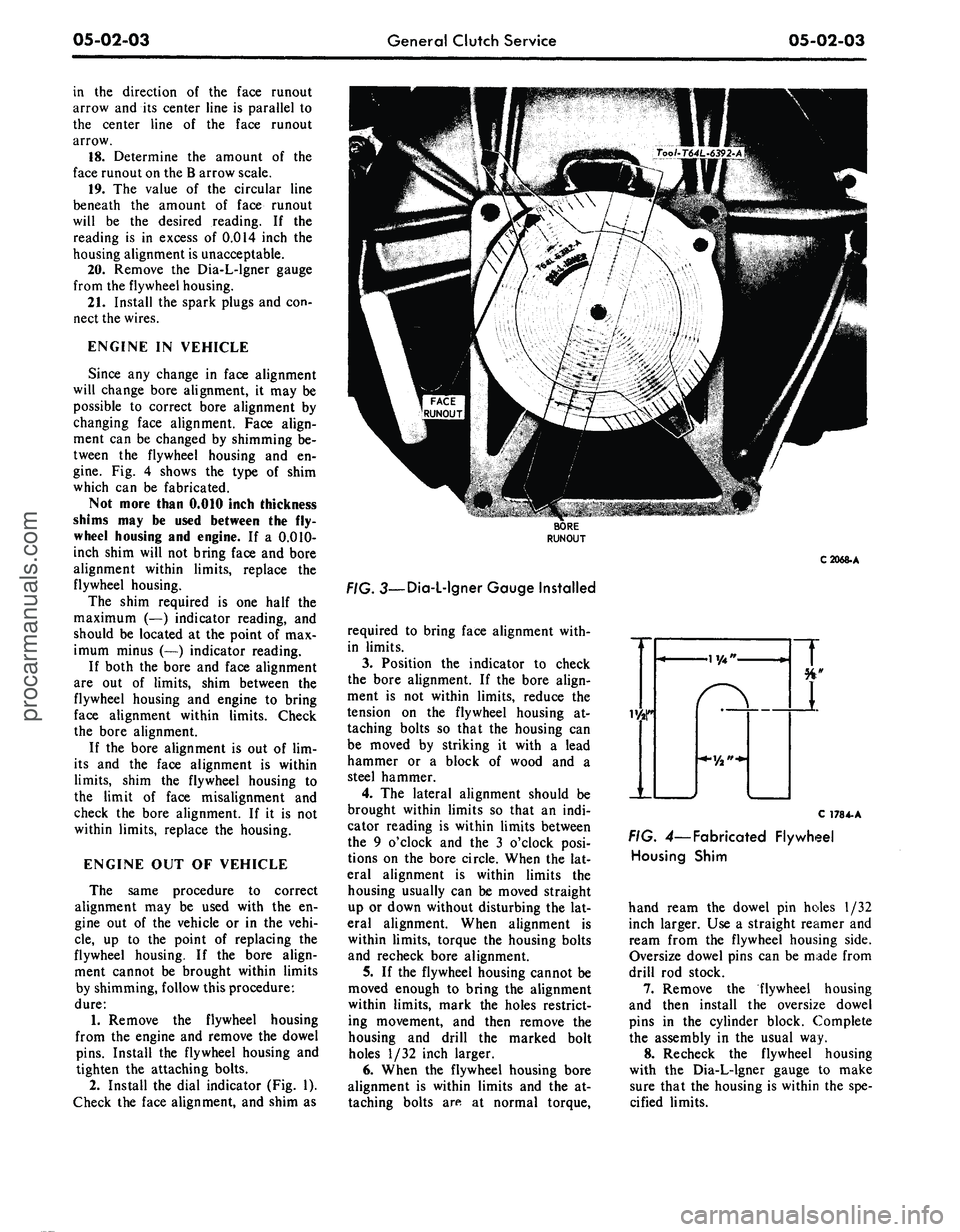
Fig. 4 shows the type of shim
which can be fabricated.
Not more than 0.010 inch thickness
shims may be used between the fly-
wheel housing and engine. If a 0.010-
inch shim will not bring face and bore
alignment within limits, replace the
flywheel housing.
The shim required is one half the
maximum (—) indicator reading, and
should be located at the point of max-
imum minus (—) indicator reading.
If both the bore and face alignment
are out of limits, shim between the
flywheel housing and engine to bring
face alignment within limits. Check
the bore alignment.
If the bore alignment is out of lim-
its and the face alignment is within
limits,
shim the flywheel housing to
the limit of face misalignment and
check the bore alignment. If it is not
within limits, replace the housing.
ENGINE OUT OF VEHICLE
The same procedure to correct
alignment may be used with the en-
gine out of the vehicle or in the vehi-
cle,
up to the point of replacing the
flywheel housing. If the bore align-
ment cannot be brought within limits
by shimming, follow this procedure:
dure:
1.
Remove the flywheel housing
from the engine and remove the dowel
pins.
Install the flywheel housing and
tighten the attaching bolts.
2.
Install the dial indicator (Fig. 1).
Check the face alignment, and shim as
C2068-A
. 3—Dia-L-lgner Gauge Installed
required to bring face alignment with-
in limits.
3.
Position the indicator to check
the bore alignment. If the bore align-
ment is not within limits, reduce the
tension on the flywheel housing at-
taching bolts so that the housing can
be moved by striking it with a lead
hammer or a block of wood and a
steel hammer.
4.
The lateral alignment should be
brought within limits so that an indi-
cator reading is within limits between
the 9 o'clock and the 3 o'clock posi-
tions on the bore circle. When the lat-
eral alignment is within limits the
housing usually can be moved straight
up or down without disturbing the lat-
eral alignment. When alignment is
within limits, torque the housing bolts
and recheck bore alignment.
5.
If the flywheel housing cannot be
moved enough to bring the alignment
within limits, mark the holes restrict-
ing movement, and then remove the
housing and drill the marked bolt
holes 1/32 inch larger.
6. When the flywheel housing bore
alignment is within limits and the at-
taching bolts are at normal torque,
C 178 4-A
FIG. 4— Fabricated Flywheel
Housing Shim
hand ream the dowel pin holes 1/32
inch larger. Use a straight reamer and
ream from the flywheel housing side.
Oversize dowel pins can be made from
drill rod stock.
7.
Remove the flywheel housing
and then install the oversize dowel
pins in the cylinder block. Complete
the assembly in the usual way.
8. Recheck the flywheel housing
with the Dia-L-lgner gauge to make
sure that the housing is within the spe-
cified limits.procarmanuals.com
Page 258 of 413
05-02-04
General Clutch Service
05-02-04
CLEANING AND INSPECTION
RELEASE BEARING
Wipe all oil and dirt off the release
bearing. The bearing is prelubricated
and should not be cleaned with sol-
vent.
Inspect the bearing retainer for
loose spring clips and rivets.
Inspect the release bearing assembly
for burrs which may cause the assem-
bly to drag on the transmission bear-
ing retainer. Any such burrs should be
cleaned up with fine crocus cloth. If
burrs are found, inspect the transmis-
sion input shaft bearing retainer for
evidence of scoring. Any scoring
should be polished out with crocus
cloth. Coat the bearing retainer with a
thin film of lithium-base grease
(C3VY-19586-A). Prior to release
bearing installation, apply a light film
of lithium base grease (C3VY-
19586-A) on both sides of the release
lever fork where it contacts the release
bearing hub and retaining springs.
Apply a light film of lithium base
grease (C3VY-19586-A) plate to the
release bearing surface that contacts
the pressure plate fingers. Carefully
fill the grease groove inside the bear-
ing hub with lithium base grease (no
polyethylene). Clean all excess grease
from the bore of the bearing hub. Ex-
cess grease will be forced onto the
spline by the transmission input shaft
bearing retainer and will contaminate
the clutch disc. Also, care must be
exercised when applying lubricants to
the release bearing, release bearing
hub and the release lever fork to avoid
excessive grease from contaminating
the clutch disc.
Hold the bearing inner race and ro-
tate the outer race while applying
pressure to it. If the bearing rotation
is rough or noisy, replace the bearing.
Most release bearing failures are
caused by improper clutch pedal ad-
justments. If the clutch linkage does
not have enough free travel, the re-
lease bearing will constantly touch the
release fingers and will spin whenever
the engine is running.
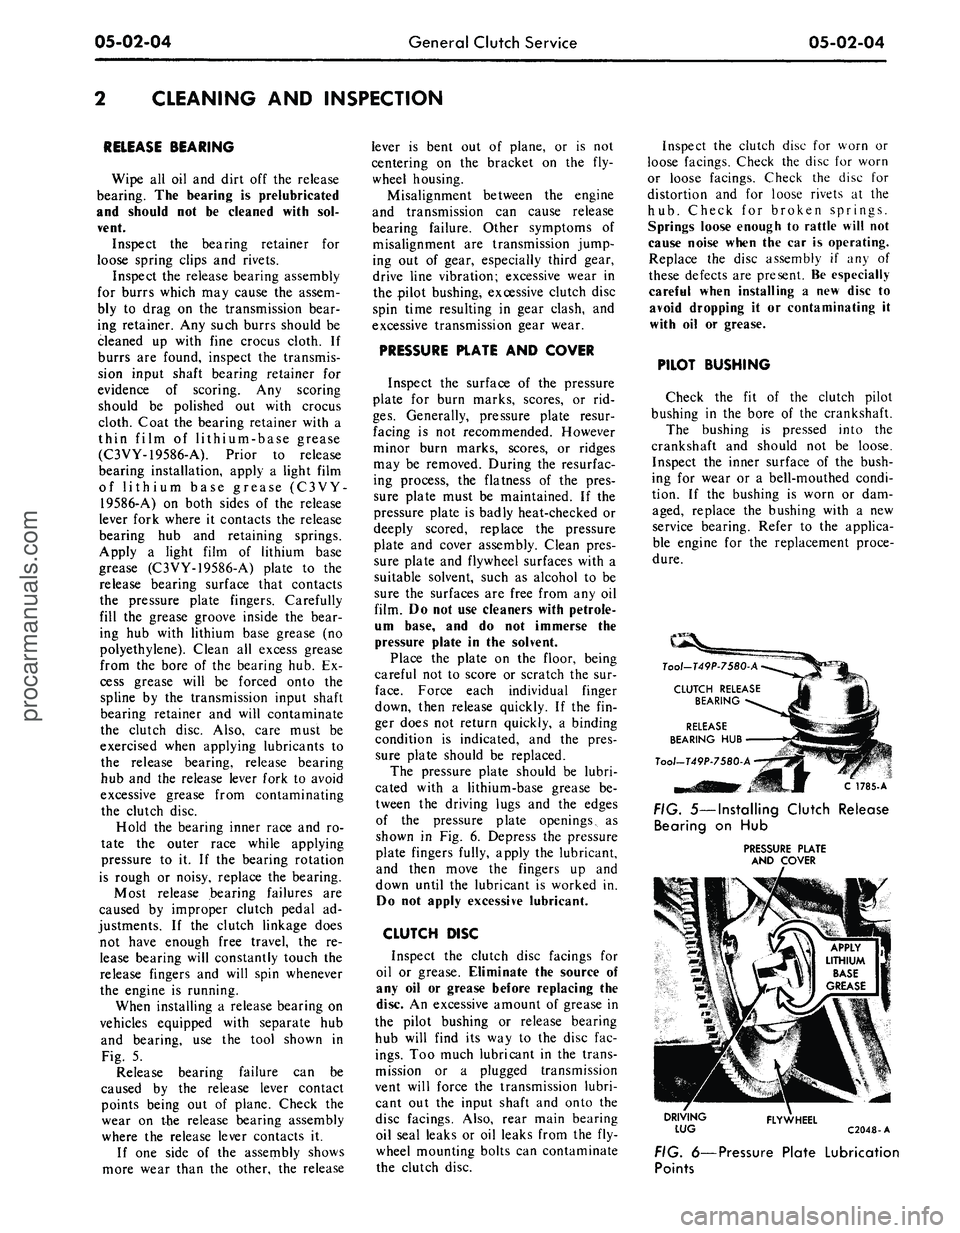
When installing a release bearing on
vehicles equipped with separate hub
and bearing, use the tool shown in
Fig. 5.
Release bearing failure can be
caused by the release lever contact
points being out of plane. Check the
wear on the release bearing assembly
where the release lever contacts it.
If one side of the assembly shows
more wear than the other, the release
lever is bent out of plane, or is not
centering on the bracket on the fly-
wheel housing.
Misalignment between the engine
and transmission can cause release
bearing failure. Other symptoms of
misalignment are transmission jump-
ing out of gear, especially third gear,
drive line vibration; excessive wear in
the pilot bushing, excessive clutch disc
spin time resulting in gear clash, and
excessive transmission gear wear.
PRESSURE PLATE AND COVER
Inspect the surface of the pressure
plate for burn marks, scores, or rid-
ges.
Generally, pressure plate resur-
facing is not recommended. However
minor burn marks, scores, or ridges
may be removed. During the resurfac-
ing process, the flatness of the pres-
sure plate must be maintained. If the
pressure plate is badly heat-checked or
deeply scored, replace the pressure
plate and cover assembly. Clean pres-
sure plate and flywheel surfaces with a
suitable solvent, such as alcohol to be
sure the surfaces are free from any oil
film. Do not use cleaners with petrole-
um base, and do not immerse the
pressure plate in the solvent.
Place the plate on the floor, being
careful not to score or scratch the sur-
face.
Force each individual finger
down, then release quickly. If the fin-
ger does not return quickly, a binding
condition is indicated, and the pres-
sure plate should be replaced.
The pressure plate should be lubri-
cated with a lithium-base grease be-
tween the driving lugs and the edges
of the pressure plate openings, as
shown in Fig. 6. Depress the pressure
plate fingers fully, apply the lubricant,
and then move the fingers up and
down until the lubricant is worked in.
Do not apply excessive lubricant.
CLUTCH DISC
Inspect the clutch disc facings for
oil or grease. Eliminate the source of
any oil or grease before replacing the
disc. An excessive amount of grease in
the pilot bushing or release bearing
hub will find its way to the disc fac-
ings.
Too much lubricant in the trans-
mission or a plugged transmission
vent will force the transmission lubri-
cant out the input shaft and onto the
disc facings. Also, rear main bearing
oil seal leaks or oil leaks from the fly-
wheel mounting bolts can contaminate
the clutch disc.
Inspect the clutch disc for worn or
loose facings. Check the disc for worn
or loose facings. Check the disc for
distortion and for loose rivets at the
hub.
Check for broken springs.
Springs loose enough to rattle will not
cause noise when the car is operating.
Replace the disc assembly if any of
these defects are present. Be especially
careful when installing a new disc to
avoid dropping it or contaminating it
with oil or grease.
PILOT BUSHING
Check the fit of the clutch pilot
bushing in the bore of the crankshaft.
The bushing is pressed into the
crankshaft and should not be loose.
Inspect the inner surface of the bush-
ing for wear or a bell-mouthed condi-
tion. If the bushing is worn or dam-
aged, replace the bushing with a new
service bearing. Refer to the applica-
ble engine for the replacement proce-
dure.
C 1785-A
FIG. 5—Installing Clutch Release
Bearing on Hub
PRESSURE PLATE
AND COVER
DRIVING
LUG
FLYWHEEL
C2048-A
FIG. 6—Pressure Plate Lubrication
Pointsprocarmanuals.com
Page 261 of 413
05-03-03
Clutch
05-03-03
CLUTCH PEDAL
ADJUSTMENTS
Adjust
the
clutch pedal free travel
whenever
the
clutch does
not
disen-
gage properly,
or
when
new
clutch
parts
are
installed. Improper adjust-
ment
of the
clutch pedal
is one of the
most frequent causes
of
clutch failure
and
can be a
contributing factor
in
some transmission failures.
FREE TRAVEL
1.
Disconnect
the
clutch return
spring from
the
release lever.
2.
Loosen
the
release lever
rod
locknut
and
adjusting
nut
(Figs.
1, 2
and
3).
3.
Move
the
clutch release lever
rearward until
the
release bearing
lightly contacts
the
clutch pressure
plate release fingers.
4.
Adjust
the rod
length until
the
rod seats
in the
release lever pocket.
5.
Insert
the
specified feeler gauge
between
the
adjusting
nut and the
swivel sleeve. Then tighten
the
adjust-
ing
nut
against
the
gauge finger tight.
6. Tighten
the
locknut against
the
adjusting
nut,
being careful
not to di-
sturb
the
adjustment. Torque
the
lock-
nut
to
specification
and
remove
the
feeler gauge.
7.
Install
the
clutch return spring.
8. Check
the
free travel
at the
pedal
for conformance
to
specification.
Re-
adjust
if
necessary.
9.
As a
final check, measure
the
pedal free travel with
the
transmission
in neutral
and the
engine running
at
about 3000
rpm. If the
pedal free
travel
at
this speed
is not a
minimum
of
1/2
inch, readjust
the
clutch pedal
free travel. Otherwise,
the
release
fin-
gers
may
contact
the
release bearing
continuously, resulting
in
premature
bearing
and
clutch failure. Free travel
must
be
exactly
to
specification.
CLUTCH ASSIST
SPRING REPLACEMENT
(FAIRLANE, FALCON,
MONTEGO)
1.
Remove
the
cotter
pin
from
the
clutch
rod at the
clutch pedal lever
as-
sembly inside
the
passenger compart-
ment.
2.
Grasp
the
clutch pedal lever
firmly
to
prevent slipping
and
remove
the clutch
rod
from
the
lever. Allow
the clutch pedal lever
to
rest
on the
floor panel.
3.
Remove
the
forward bolt secur-
ing
the
assist spring bracket
to the
brake pedal bracket
and
loosen
the
rear bolt
two or
three turns.
Do not
remove
the
rear bolt.
4.
Grasp
the
assist spring bracket
with pliers
and
rotate upward until
the
spring
can be
separated from
the
bracket.
BRAKE PEDAL
BRACKET
CLUTCH ASSIST SPRING
BRACKET
-
7535
CLUTCH PEDAL
7519
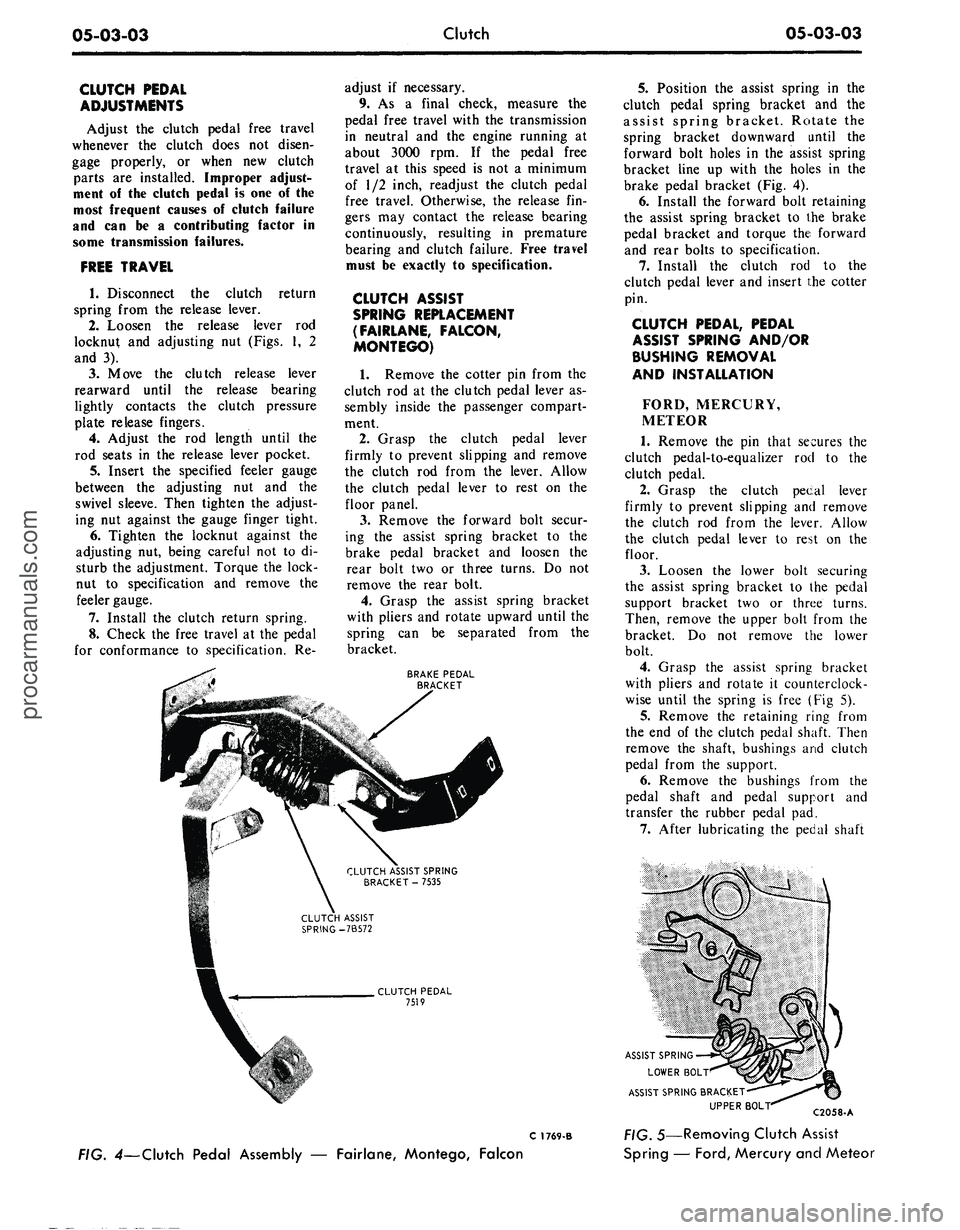
5.
Position
the
assist spring
in the
clutch pedal spring bracket
and the
assist spring bracket. Rotate
the
spring bracket downward until
the
forward bolt holes
in the
assist spring
bracket line
up
with
the
holes
in the
brake pedal bracket
(Fig. 4).
6. Install
the
forward bolt retaining
the assist spring bracket
to the
brake
pedal bracket
and
torque
the
forward
and rear bolts
to
specification.
7.
Install
the
clutch
rod to the
clutch pedal lever
and
insert
the
cotter
pin.
CLUTCH PEDAL, PEDAL
ASSIST SPRING AND/OR
BUSHING REMOVAL
AND INSTALLATION
FORD, MERCURY,
METEOR
1.
Remove
the pin
that secures
the
clutch pedal-to-equalizer
rod to the
clutch pedal.
2.
Grasp
the
clutch pecal lever
firmly
to
prevent slipping
and
remove
the clutch
rod
from
the
lever. Allow
the clutch pedal lever
to
rest
on the
floor.
3.
Loosen
the
lower bolt securing
the assist spring bracket
to the
pedal
support bracket
two or
three turns.
Then, remove
the
upper bolt from
the
bracket.
Do not
remove
the
lower
bolt.
4.
Grasp
the
assist spring bracket
with pliers
and
rotate
it
counterclock-
wise until
the
spring
is
free
(Fig 5).
5.
Remove
the
retaining ring from
the
end of the
clutch pedal shaft. Then
remove
the
shaft, bushings
and
clutch
pedal from
the
support.
6. Remove
the
bushings from
the
pedal shaft
and
pedal support
and
transfer
the
rubber pedal
pad.
7.
After lubricating
the
pedal shaft
ASSIST SPRING
LOWER BOLT
ASSIST SPRING BRACKET-
UPPER
BOL"
C 1769-B
FIG. 4—Clutch Pedal Assembly
—
Fairlane, Montego, Falcon
C2058-A
;. 5—Removing Clutch Assist
Spring
—
Ford,
Mercury and Meteorprocarmanuals.com
Page 262 of 413
05-03-04
Clutch
05-03-04
bushings, position the clutch pedal and
bushings in the pedal support.
8. Install the retaining ring on the
clutch pedal shaft.
9. Position the assist spring in the
pedal support bracket and the assist
spring bracket. Rotate the assist
spring bracket clockwise until the
upper bolt holes line up and install the
bolt. Torque both the upper and lower
bolts to specification.
10.
Check the clutch pedal free
travel and adjust as required.
MUSTANG, COUGAR
1.
Disconnect the battery ground
cable.
2.
Remove the steering column.
Refer to Group 3 of this manual for
the procedure.
3.
Remove the two capscrews re-
taining the master cylinder or booster
to the dash panel. Then remove the
two capscrews retaining the pedal sup-
port bracket to the dash panel.
4.
Working inside the vehicle, dis-
connect the clutch pedal-to-equalizer
rod at the clutch pedal by removing
the retainer and bushing.
5.
Secure the clutch pedal against
the bumper stop with a small C-clamp
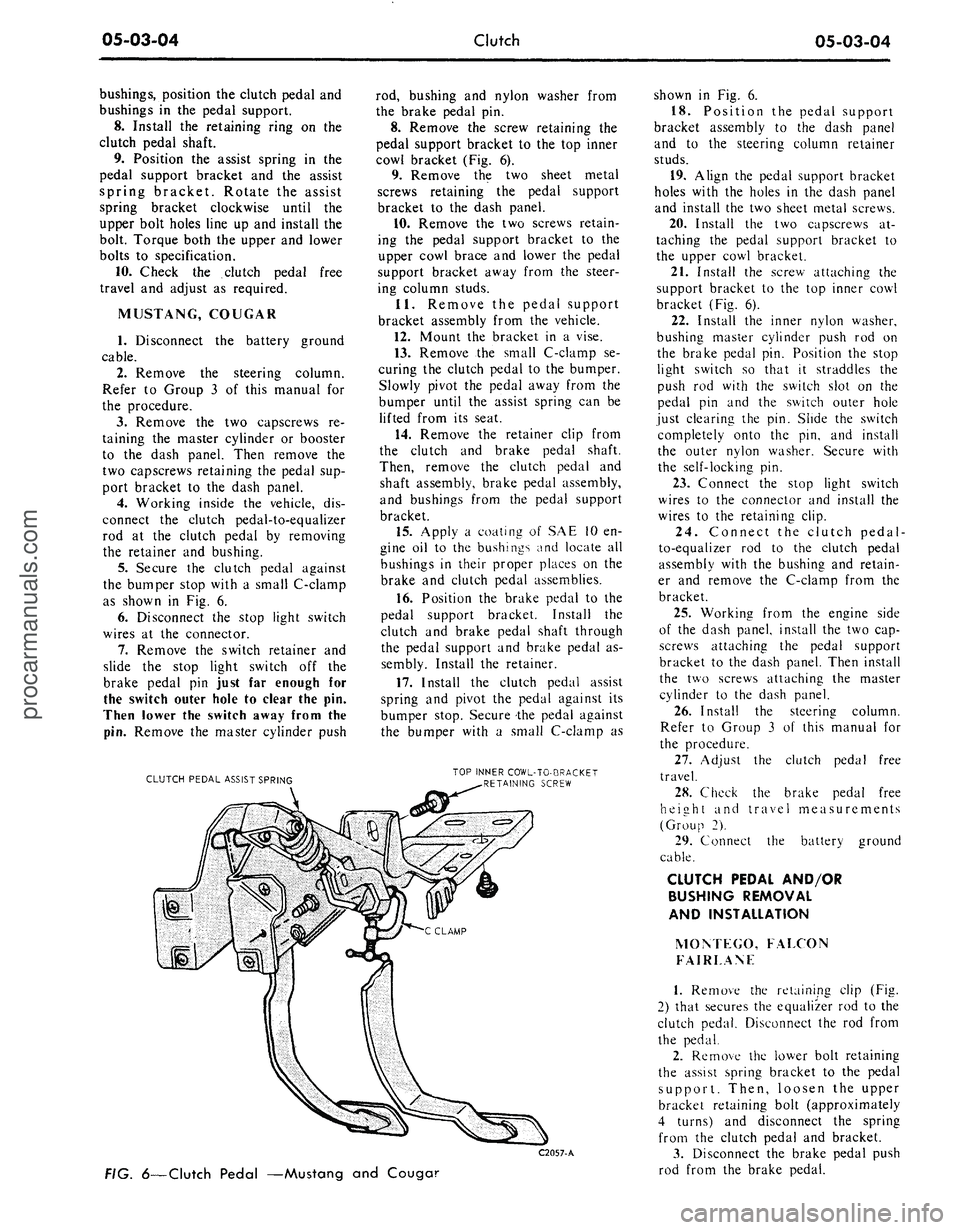
as shown in Fig. 6.
6. Disconnect the stop light switch
wires at the connector.
7.
Remove the switch retainer and
slide the stop light switch off the
brake pedal pin just far enough for
the switch outer hole to clear the pin.
Then lower the switch away from the
pin.
Remove the master cylinder push
CLUTCH PEDAL ASSIST SPRING
rod, bushing and nylon washer from
the brake pedal pin.
8. Remove the screw retaining the
pedal support bracket to the top inner
cowl bracket (Fig. 6).
9. Remove the two sheet metal
screws retaining the pedal support
bracket to the dash panel.
10.
Remove the two screws retain-
ing the pedal support bracket to the
upper cowl brace and lower the pedal
support bracket away from the steer-
ing column studs.
11.
Remove the pedal support
bracket assembly from the vehicle.
12.
Mount the bracket in a vise.
13.
Remove the small C-clamp se-
curing the clutch pedal to the bumper.
Slowly pivot the pedal away from the
bumper until the assist spring can be
lifted from its seat.
14.
Remove the retainer clip from
the clutch and brake pedal shaft.
Then, remove the clutch pedal and
shaft assembly, brake pedal assembly,
and bushings from the pedal support
bracket.
15.
Apply a coating of SAE 10 en-
gine oil to the bushings and locate all
bushings in their proper places on the
brake and clutch pedal assemblies.
16.
Position the brake pedal to the
pedal support bracket. Install the
clutch and brake pedal shaft through
the pedal support and brake pedal as-
sembly. Install the retainer.
17.
Install the clutch pedal assist
spring and pivot the pedal against its
bumper stop. Secure the pedal against
the bumper with a small C-clamp as
TOP INNER COWL-TO-BRACKET
RETAINING SCREW
C2057-A
FIG.
6—Clutch
Pedal —Mustang and Couga?
shown in Fig. 6.
18.
Position the pedal support
bracket assembly to the dash panel
and to the steering column retainer
studs.
19.
Align the pedal support bracket
holes with the holes in the dash panel
and install the two sheet metal screws.
20.
Install the two capscrews at-
taching the pedal support bracket to
the upper cowl bracket.
21.
Install the screw attaching the
support bracket to the top inner cowl
bracket (Fig. 6).
22.
Install the inner nylon washer,
bushing master cylinder push rod on
the brake pedal pin. Position the stop
light switch so that it straddles the
push rod with the switch slot on the
pedal pin and the switch outer hole
just clearing the pin. Slide the switch
completely onto the pin, and install
the outer nylon washer. Secure with
the self-locking pin.
23.
Connect the stop light switch
wires to the connector and install the
wires to the retaining clip.
24.
Connect the clutch pedal-
to-equalizer rod to the clutch pedal
assembly with the bushing and retain-
er and remove the C-clamp from the
bracket.
25.
Working from the engine side
of the dash panel, install the two cap-
screws attaching the pedal support
bracket to the dash panel. Then install
the two screws attaching the master
cylinder to the dash panel.
26.
Install the steering column.
Refer to Group 3 of this manual for
the procedure.
27.
Adjust the clutch pedal free
travel.
28.
Check the brake pedal free
height and travel measurements
(Group 2).
29.
Connect the battery ground
cable.
CLUTCH PEDAL AND/OR
BUSHING REMOVAL
AND INSTALLATION
MOM EGO, FALCON
FAIRLANF
1.
Remove the retaining clip (Fig.
2) that secures the equalizer rod to the
clutch pedal. Disconnect the rod from
the pedal.
2.
Remove the lower bolt retaining
the assist spring bracket to the pedal
support. Then, loosen the upper
bracket retaining bolt (approximately
4 turns) and disconnect the spring
from the clutch pedal and bracket.
3.
Disconnect the brake pedal push
rod from the brake pedal.procarmanuals.com