door lock FORD MUSTANG 2002 4.G Owners Manual
[x] Cancel search | Manufacturer: FORD, Model Year: 2002, Model line: MUSTANG, Model: FORD MUSTANG 2002 4.GPages: 264, PDF Size: 2.56 MB
Page 8 of 264
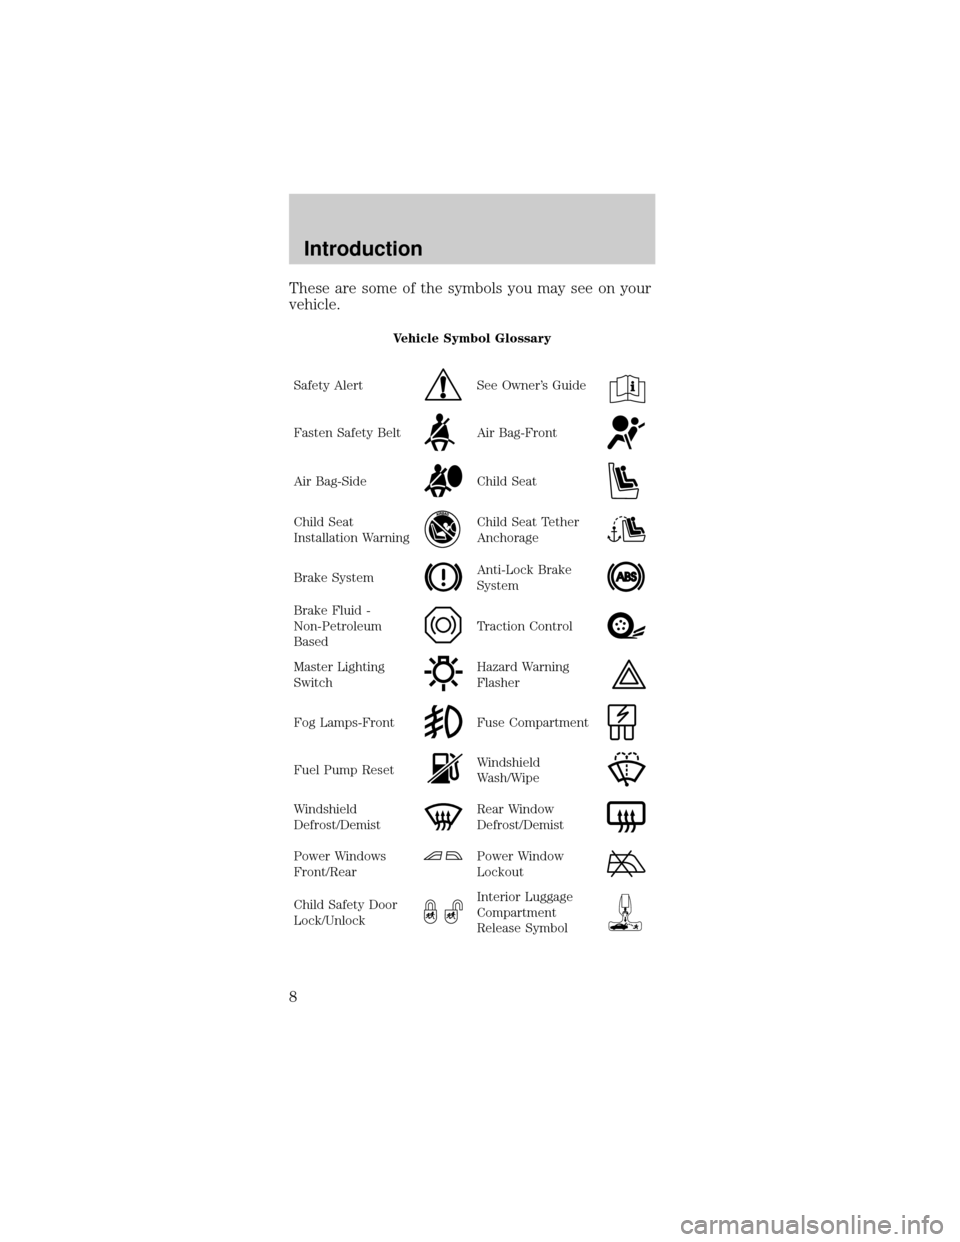
These are some of the symbols you may see on your
vehicle.
Vehicle Symbol Glossary
Safety Alert
See Owner's Guide
Fasten Safety BeltAir Bag-Front
Air Bag-SideChild Seat
Child Seat
Installation WarningChild Seat Tether
Anchorage
Brake SystemAnti-Lock Brake
System
Brake Fluid -
Non-Petroleum
BasedTraction Control
Master Lighting
SwitchHazard Warning
Flasher
Fog Lamps-FrontFuse Compartment
Fuel Pump ResetWindshield
Wash/Wipe
Windshield
Defrost/DemistRear Window
Defrost/Demist
Power Windows
Front/RearPower Window
Lockout
Child Safety Door
Lock/UnlockInterior Luggage
Compartment
Release Symbol
Introduction
8
Page 94 of 264
KEYS
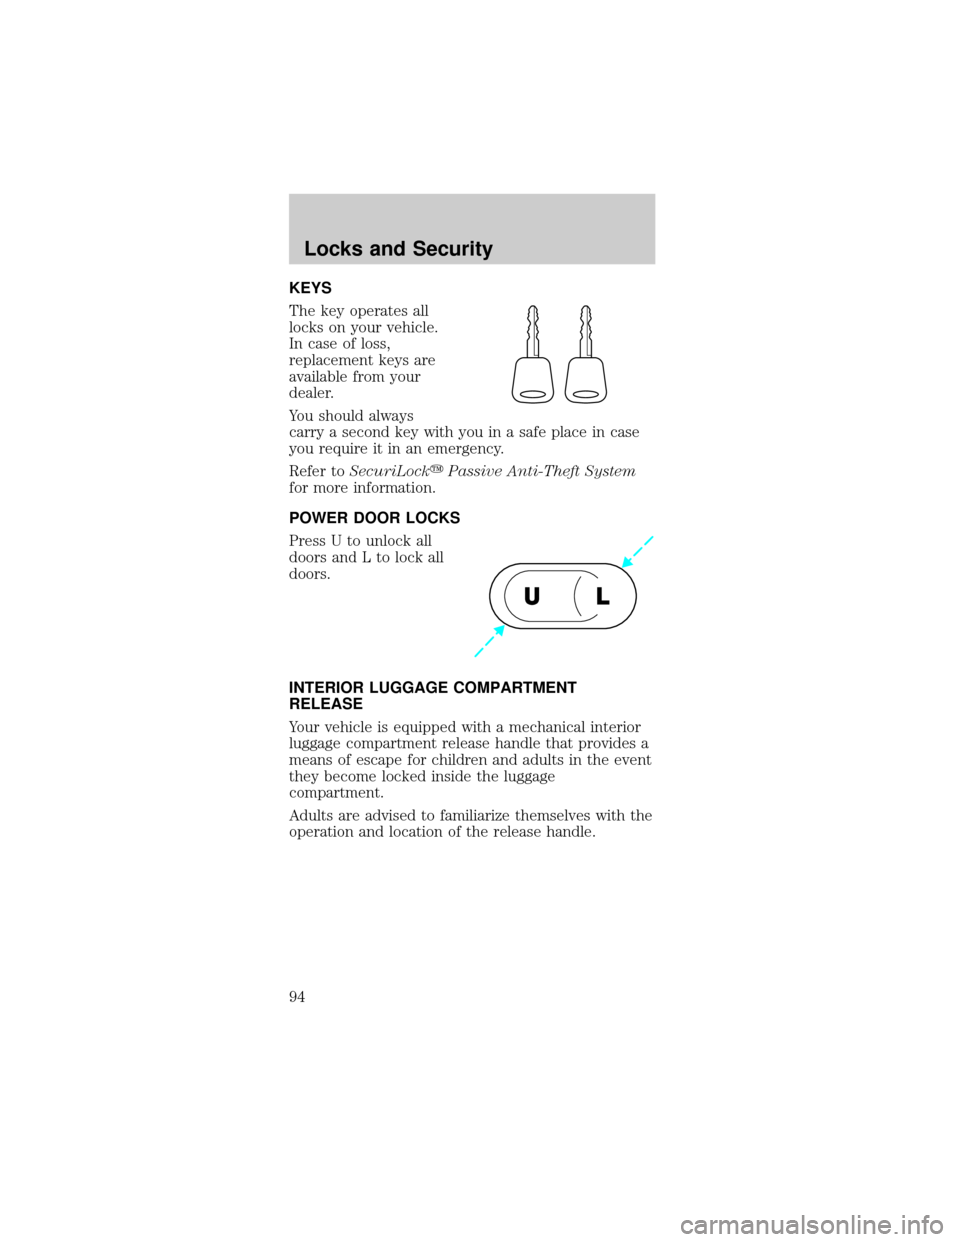
The key operates all
locks on your vehicle.
In case of loss,
replacement keys are
available from your
dealer.
You should always
carry a second key with you in a safe place in case
you require it in an emergency.
Refer toSecuriLockyPassive Anti-Theft System
for more information.
POWER DOOR LOCKS
Press U to unlock all
doors and L to lock all
doors.
INTERIOR LUGGAGE COMPARTMENT
RELEASE
Your vehicle is equipped with a mechanical interior
luggage compartment release handle that provides a
means of escape for children and adults in the event
they become locked inside the luggage
compartment.
Adults are advised to familiarize themselves with the
operation and location of the release handle.
UL
Locks and Security
94
Page 95 of 264
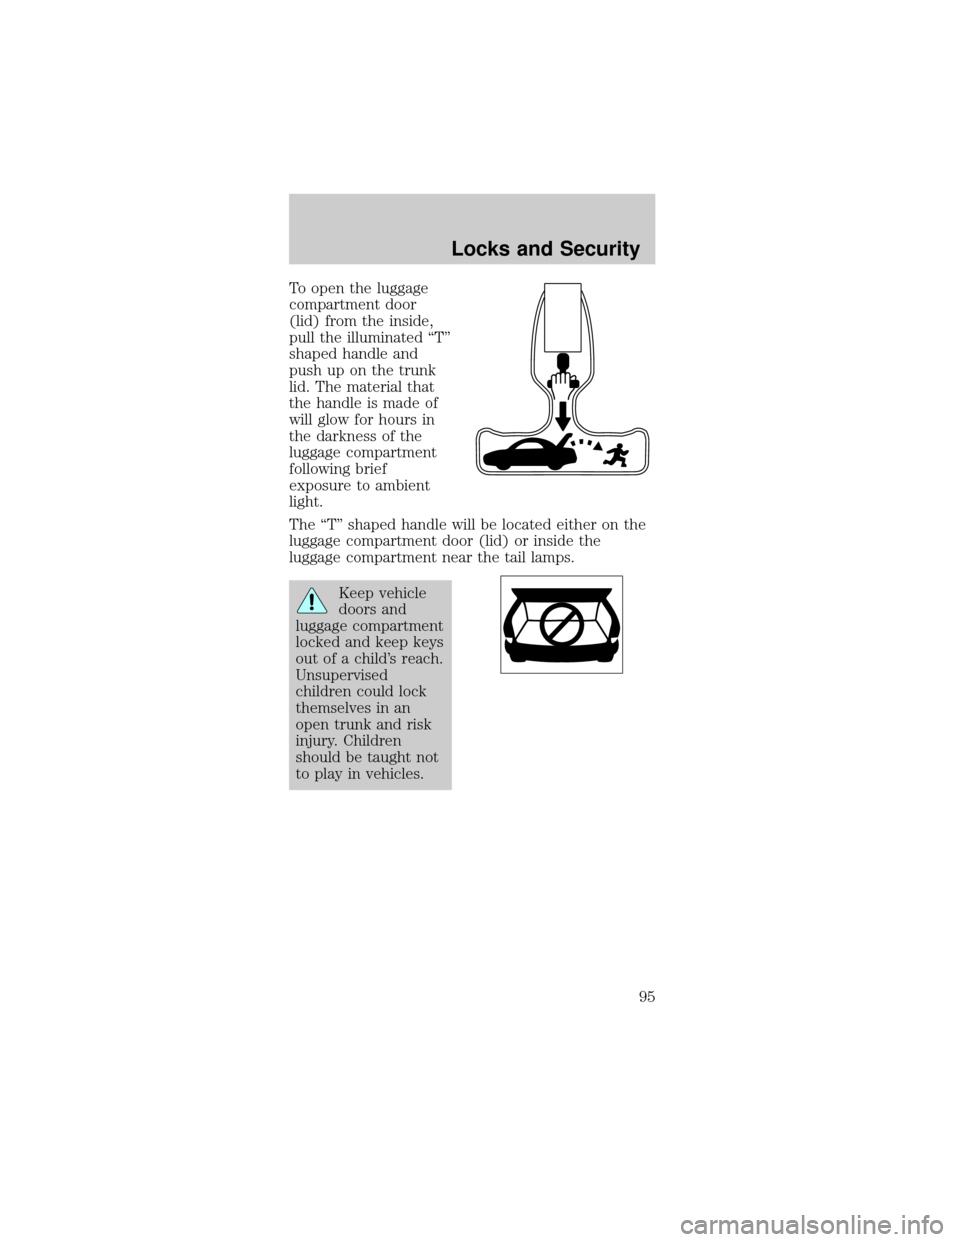
To open the luggage
compartment door
(lid) from the inside,
pull the illuminated ªTº
shaped handle and
push up on the trunk
lid. The material that
the handle is made of
will glow for hours in
the darkness of the
luggage compartment
following brief
exposure to ambient
light.
The ªTº shaped handle will be located either on the
luggage compartment door (lid) or inside the
luggage compartment near the tail lamps.
Keep vehicle
doors and
luggage compartment
locked and keep keys
out of a child's reach.
Unsupervised
children could lock
themselves in an
open trunk and risk
injury. Children
should be taught not
to play in vehicles.
Locks and Security
95
Page 96 of 264
On hot days, the temperature in the trunk
or vehicle interior can rise very quickly.
Exposure of people or animals to these high
temperatures for even a short time can cause
death or serious heat-related injuries, including
brain damage. Small children are particularly at
risk.
REMOTE ENTRY SYSTEM
This device complies with part 15 of the FCC rules
and with RS-210 of Industry Canada. Operation is
subject to the following two conditions: (1) This
device may not cause harmful interference, and (2)
This device must accept any interference received,
including interference that may cause undesired
operation.
Changes or modifications not expressly
approved by the party responsible for
compliance could void the user's authority to
operate the equipment.
The remote entry system allows you to:
²lock or unlock all vehicle doors without a key
²open the trunk
²activate the panic alarm
²confirms that the vehicle is locked with a short
ªbeepº from the horn.
The remote entry features only operate with the
ignition in the LOCK position.
If there is any potential remote keyless entry
problem with your vehicle, ensureALL key fobs
(remote entry transmitters) are brought to the
dealership, to aid in troubleshooting.
Locks and Security
96
Page 97 of 264
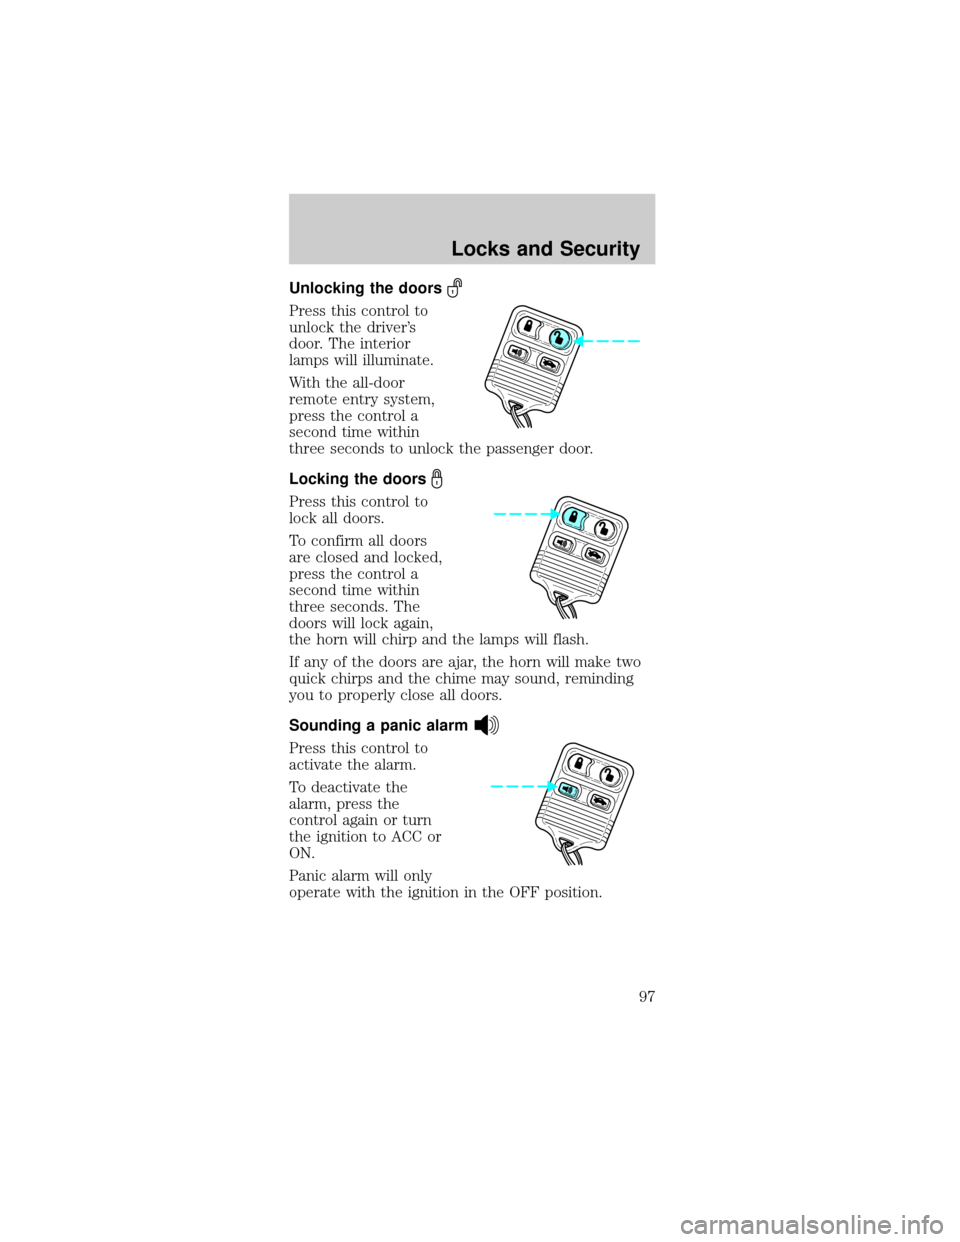
Unlocking the doors
Press this control to
unlock the driver's
door. The interior
lamps will illuminate.
With the all-door
remote entry system,
press the control a
second time within
three seconds to unlock the passenger door.
Locking the doors
Press this control to
lock all doors.
To confirm all doors
are closed and locked,
press the control a
second time within
three seconds. The
doors will lock again,
the horn will chirp and the lamps will flash.
If any of the doors are ajar, the horn will make two
quick chirps and the chime may sound, reminding
you to properly close all doors.
Sounding a panic alarm
Press this control to
activate the alarm.
To deactivate the
alarm, press the
control again or turn
the ignition to ACC or
ON.
Panic alarm will only
operate with the ignition in the OFF position.
Locks and Security
97
Page 99 of 264
Replacement of the battery willnotcause the
remote transmitter to become deprogrammed from
your vehicle. The remote transmitter should operate
normally after battery replacement.
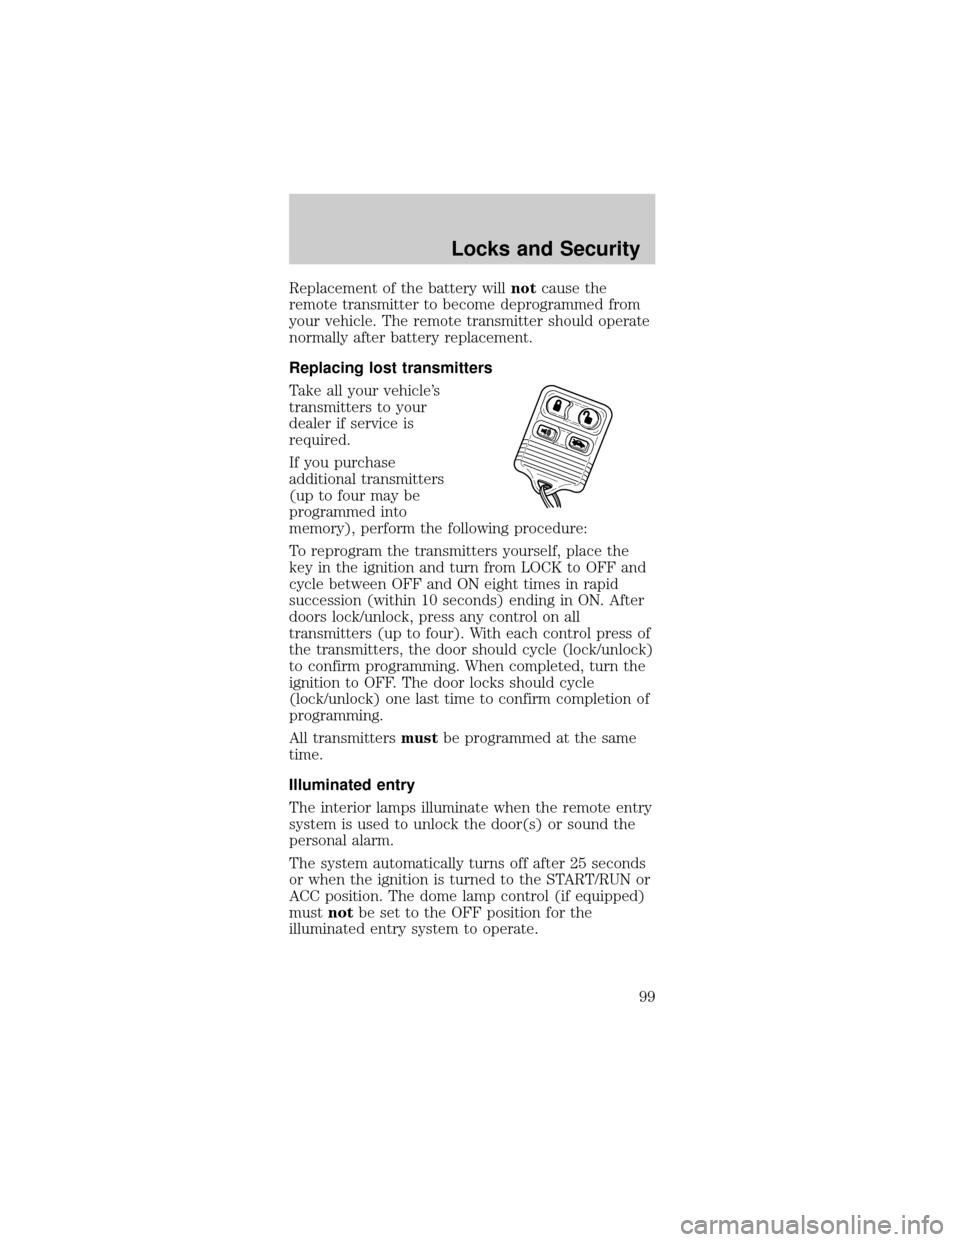
Replacing lost transmitters
Take all your vehicle's
transmitters to your
dealer if service is
required.
If you purchase
additional transmitters
(up to four may be
programmed into
memory), perform the following procedure:
To reprogram the transmitters yourself, place the
key in the ignition and turn from LOCK to OFF and
cycle between OFF and ON eight times in rapid
succession (within 10 seconds) ending in ON. After
doors lock/unlock, press any control on all
transmitters (up to four). With each control press of
the transmitters, the door should cycle (lock/unlock)
to confirm programming. When completed, turn the
ignition to OFF. The door locks should cycle
(lock/unlock) one last time to confirm completion of
programming.
All transmittersmustbe programmed at the same
time.
Illuminated entry
The interior lamps illuminate when the remote entry
system is used to unlock the door(s) or sound the
personal alarm.
The system automatically turns off after 25 seconds
or when the ignition is turned to the START/RUN or
ACC position. The dome lamp control (if equipped)
mustnotbe set to the OFF position for the
illuminated entry system to operate.
Locks and Security
99
Page 100 of 264
The inside lights will not turn off if:
²they have been turned on with the dimmer
control or
²any door is open
The battery saver will shut off the interior lamps 30
minutes after the ignition has been turned to the
OFF position, 10 minutes after if the door is left
open, and 30 minutes after if the trunk is left open
or the dome lamp switch is left on.
SECURILOCKYPASSIVE ANTI-THEFT SYSTEM
SecuriLockypassive anti-theft system is an engine
immobilization system. This system prevents the
engine from being started unless acoded key
programmed to your vehicleis used.
The SecuriLockypassive anti-theft system is not
compatible with non-Ford aftermarket remote start
systems. Use of these systems may result in vehicle
starting problems and a loss of security protection.
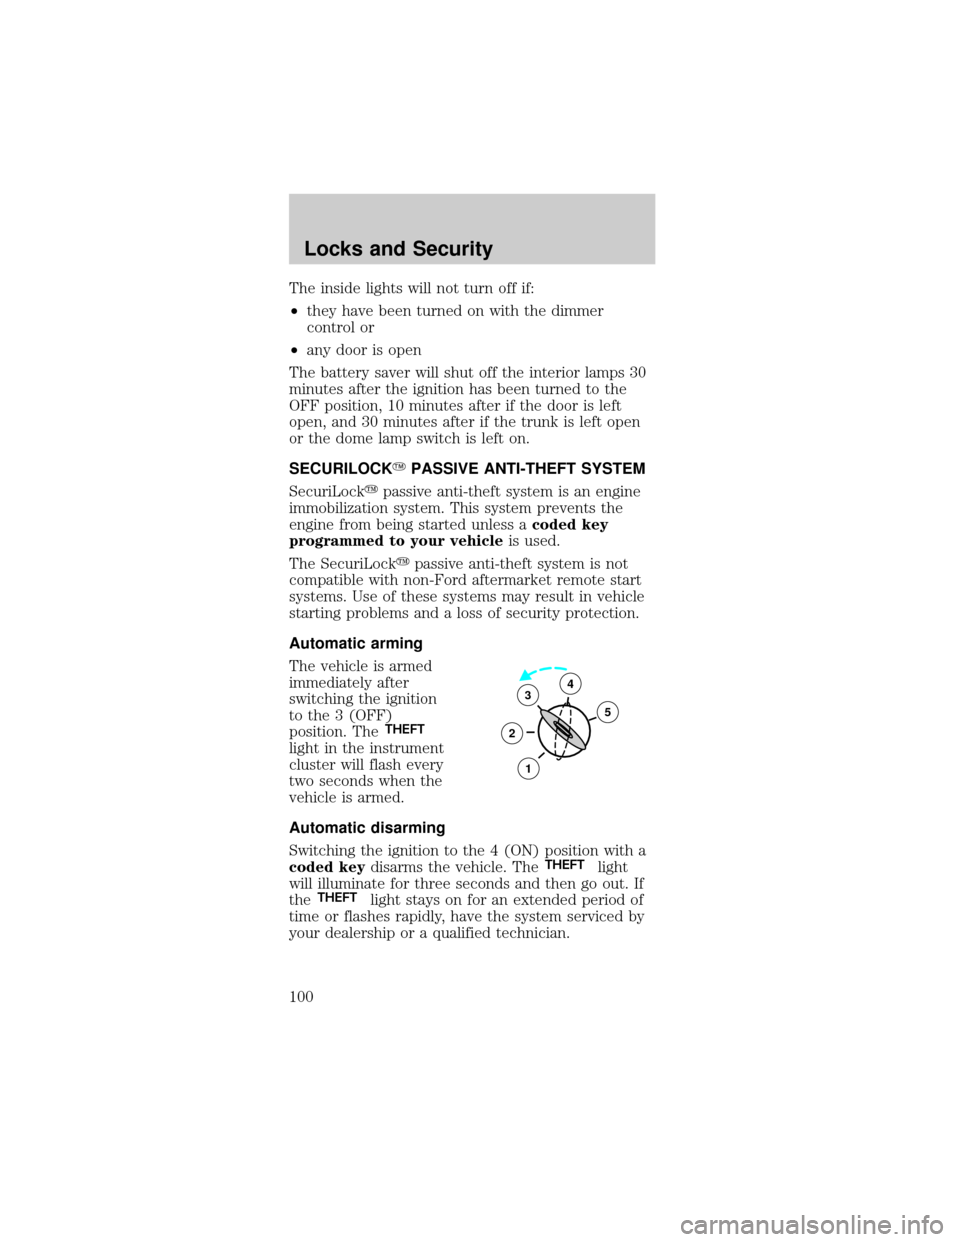
Automatic arming
The vehicle is armed
immediately after
switching the ignition
to the 3 (OFF)
position. The
THEFT
light in the instrument
cluster will flash every
two seconds when the
vehicle is armed.
Automatic disarming
Switching the ignition to the 4 (ON) position with a
coded keydisarms the vehicle. The
THEFTlight
will illuminate for three seconds and then go out. If
the
THEFTlight stays on for an extended period of
time or flashes rapidly, have the system serviced by
your dealership or a qualified technician.
3
2
1
5
4
Locks and Security
100
Page 167 of 264
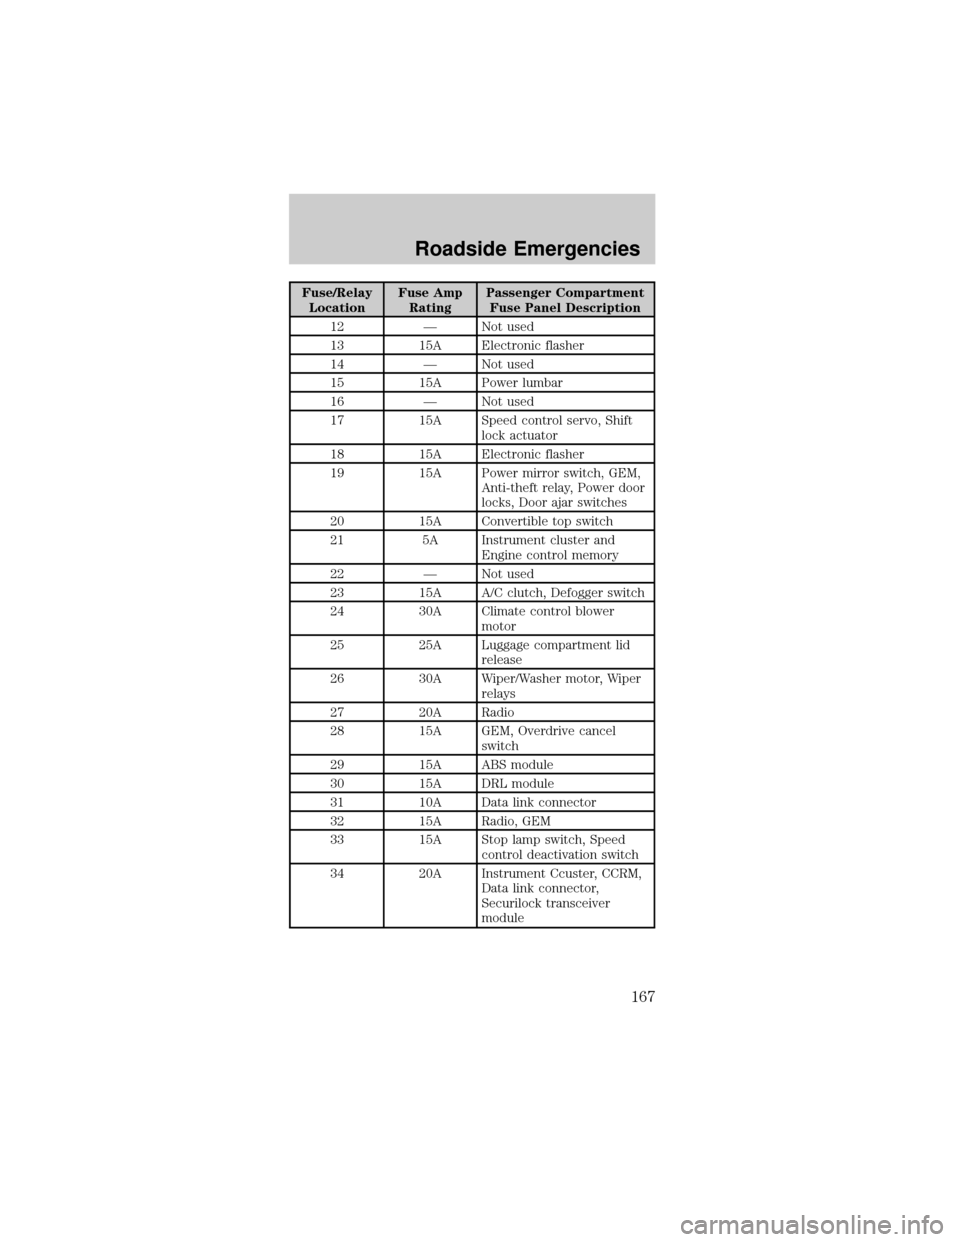
Fuse/Relay
LocationFuse Amp
RatingPassenger Compartment
Fuse Panel Description
12 Ð Not used
13 15A Electronic flasher
14 Ð Not used
15 15A Power lumbar
16 Ð Not used
17 15A Speed control servo, Shift
lock actuator
18 15A Electronic flasher
19 15A Power mirror switch, GEM,
Anti-theft relay, Power door
locks, Door ajar switches
20 15A Convertible top switch
21 5A Instrument cluster and
Engine control memory
22 Ð Not used
23 15A A/C clutch, Defogger switch
24 30A Climate control blower
motor
25 25A Luggage compartment lid
release
26 30A Wiper/Washer motor, Wiper
relays
27 20A Radio
28 15A GEM, Overdrive cancel
switch
29 15A ABS module
30 15A DRL module
31 10A Data link connector
32 15A Radio, GEM
33 15A Stop lamp switch, Speed
control deactivation switch
34 20A Instrument Ccuster, CCRM,
Data link connector,
Securilock transceiver
module
Roadside Emergencies
167
Page 171 of 264
If you use the temporary spare tire
continuously or do not follow these
precautions, the tire could fail, causing you to lose
control of the vehicle, possibly injuring yourself or
others.
When driving with the temporary spare tiredo not:
²use more than one temporary spare tire at a time
²exceed 80 km/h (50 mph) or drive further than
3 200 km (2 000 miles) total under any
circumstances
²load the vehicle beyond maximum vehicle load
rating listed on the tire pressure label on the
inside of the glove compartment door
²tow a trailer
²use tire chains
²drive through an automatic car wash, because of
the vehicle's reduced ground clearance
²try to repair the temporary spare tire or remove it
from its wheel
²use the wheel for any other type of vehicle
Use of a temporary spare tire at any one wheel
location can lead to impairment of the following:
²handling, stability and braking performance
²comfort and noise
²ground clearance and parking at curbs
²wheel driving capability
Tire change procedure
To prevent the vehicle from moving when
you change a tire, be sure the parking brake
is set, then block (in both directions) the wheel
that is diagonally opposite (other side and end of
the vehicle) to the tire being changed.
If the vehicle slips off the jack, you or
someone else could be seriously injured.
Roadside Emergencies
171
Page 253 of 264
IDENTIFYING YOUR VEHICLE
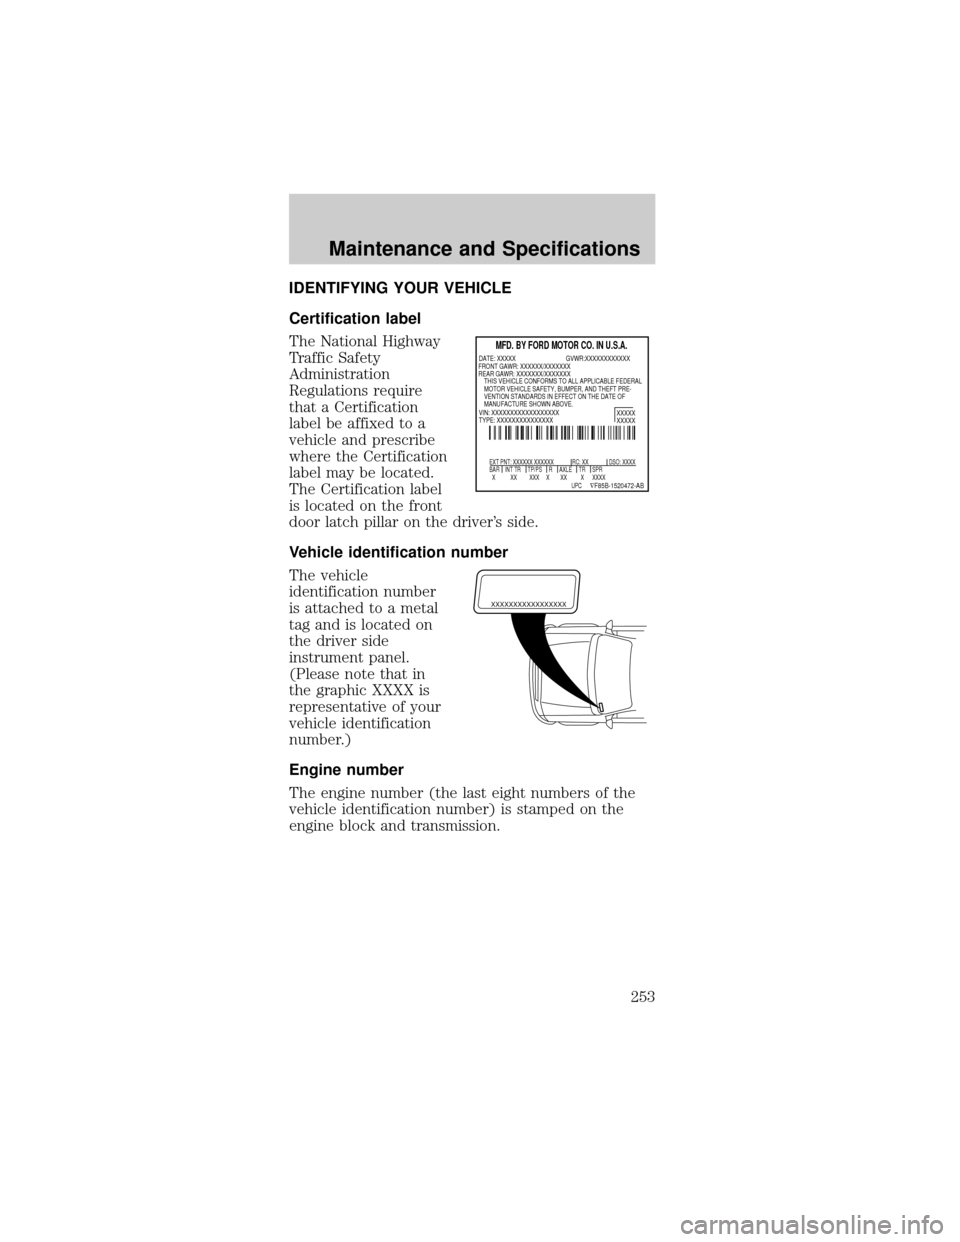
Certification label
The National Highway
Traffic Safety
Administration
Regulations require
that a Certification
label be affixed to a
vehicle and prescribe
where the Certification
label may be located.
The Certification label
is located on the front
door latch pillar on the driver's side.
Vehicle identification number
The vehicle
identification number
is attached to a metal
tag and is located on
the driver side
instrument panel.
(Please note that in
the graphic XXXX is
representative of your
vehicle identification
number.)
Engine number
The engine number (the last eight numbers of the
vehicle identification number) is stamped on the
engine block and transmission.
MFD. BY FORD MOTOR CO. IN U.S.A.
EXT PNT: XXXXXX XXXXXX RC: XX DSO: XXXX
BAR INT TR TP/PS R AXLE TR SPR
X XX XXX X XX X XXXX
XXXXX
XXXXX
UPC ÑF85B-1520472-AB
DATE: XXXXX GVWR:XXXXXXXXXXXX
VIN: XXXXXXXXXXXXXXXXXX
TYPE: XXXXXXXXXXXXXXX FRONT GAWR: XXXXXX/XXXXXXX
REAR GAWR: XXXXXXX/XXXXXXX
THIS VEHICLE CONFORMS TO ALL APPLICABLE FEDERAL
MOTOR VEHICLE SAFETY, BUMPER, AND THEFT PRE-
VENTION STANDARDS IN EFFECT ON THE DATE OF
MANUFACTURE SHOWN ABOVE.
XXXXXXXXXXXXXXXXX
Maintenance and Specifications
253