bulb FORD MUSTANG 2015 6.G Owners Manual
[x] Cancel search | Manufacturer: FORD, Model Year: 2015, Model line: MUSTANG, Model: FORD MUSTANG 2015 6.GPages: 441, PDF Size: 6.98 MB
Page 7 of 441
Maintenance
General Information....................................210
Opening and Closing the Hood
...............210
Under Hood Overview -
2.3L
EcoBoost™..................................................211
Under Hood Overview - 3.7L.....................212
Under Hood Overview -
5.0L 32V
Ti-VCT...........................................................213
Engine Oil Dipstick
.......................................214
Engine Oil Check...........................................214
Engine Coolant Check
.................................215
Manual Transmission Fluid Check.........219
Automatic Transmission Fluid Check............................................................219
Brake and Clutch Fluid Check..................219
Power Steering Fluid Check......................219
Washer Fluid Check....................................220
Fuel Filter
........................................................220
Changing the 12V Battery.........................220
Checking the Wiper Blades......................222
Changing the Wiper Blades.....................222
Adjusting the Headlamps
.........................223
Changing a Bulb...........................................224
Bulb Specification Chart...........................226
Changing the Engine Air Filter.................227
Vehicle Care
General Information...................................228
Cleaning Products.......................................228
Cleaning the Exterior..................................228
Waxing.............................................................229
Cleaning the Engine....................................229
Cleaning the Windows and Wiper Blades..........................................................230
Cleaning the Interior...................................230
Cleaning the Instrument Panel and Instrument Cluster Lens.......................230
Cleaning Leather Seats..............................231
Repairing Minor Paint Damage
...............232
Cleaning the Alloy Wheels.......................232 Vehicle Storage
.............................................232
Wheels and Tires
Temporary Mobility Kit
..............................235
Tire Care
...........................................................241
Using Summer Tires
...................................256
Using Snow Chains.....................................256
Tire Pressure Monitoring System...........257
Changing a Road Wheel...........................260
Driving at High Speed................................265
Technical Specifications..........................266
Capacities and Specific- ations
Engine Specifications.................................267
Motorcraft Parts
..........................................268
Vehicle Identification Number
...............268
Vehicle Certification Label.......................269
Transmission Code Designation............270
Capacities and Specifications -
2.3L
EcoBoost™.................................................271
Capacities and Specifications - 3.7L.....275
Capacities and Specifications -
5.0L 32V
Ti-VCT..........................................................279
Audio System
General Information
...................................283
Audio Unit - Vehicles With: AM/FM/CD/ SYNC/
Satellite Radio............................284
Audio Unit - Vehicles With: Premium AM/ FM/CD..........................................................287
Digital Radio
..................................................288
Satellite Radio
..............................................290
Audio Input Jack...........................................293
USB Port
.........................................................294
Media Hub......................................................294
SYNC™
General Information...................................295
Using Voice Recognition............................297
4
Mustang (), enUSA, First Printing Table of Contents
Page 17 of 441
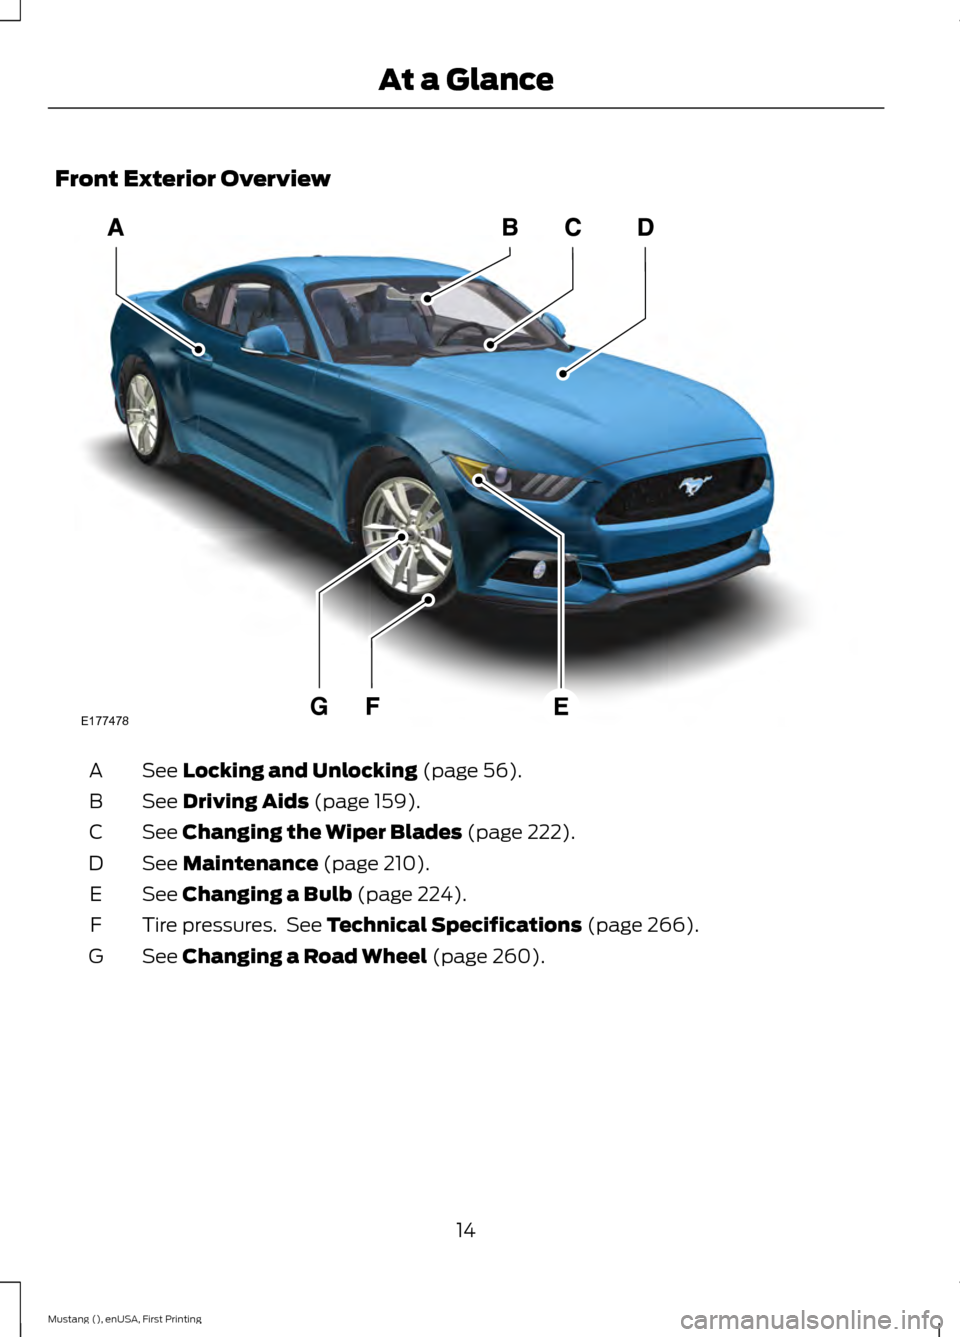
Front Exterior Overview
See Locking and Unlocking (page 56).
A
See
Driving Aids (page 159).
B
See
Changing the Wiper Blades (page 222).
C
See
Maintenance (page 210).
D
See
Changing a Bulb (page 224).
E
Tire pressures. See
Technical Specifications (page 266).
F
See
Changing a Road Wheel (page 260).
G
14
Mustang (), enUSA, First Printing At a GlanceE177478
Page 83 of 441
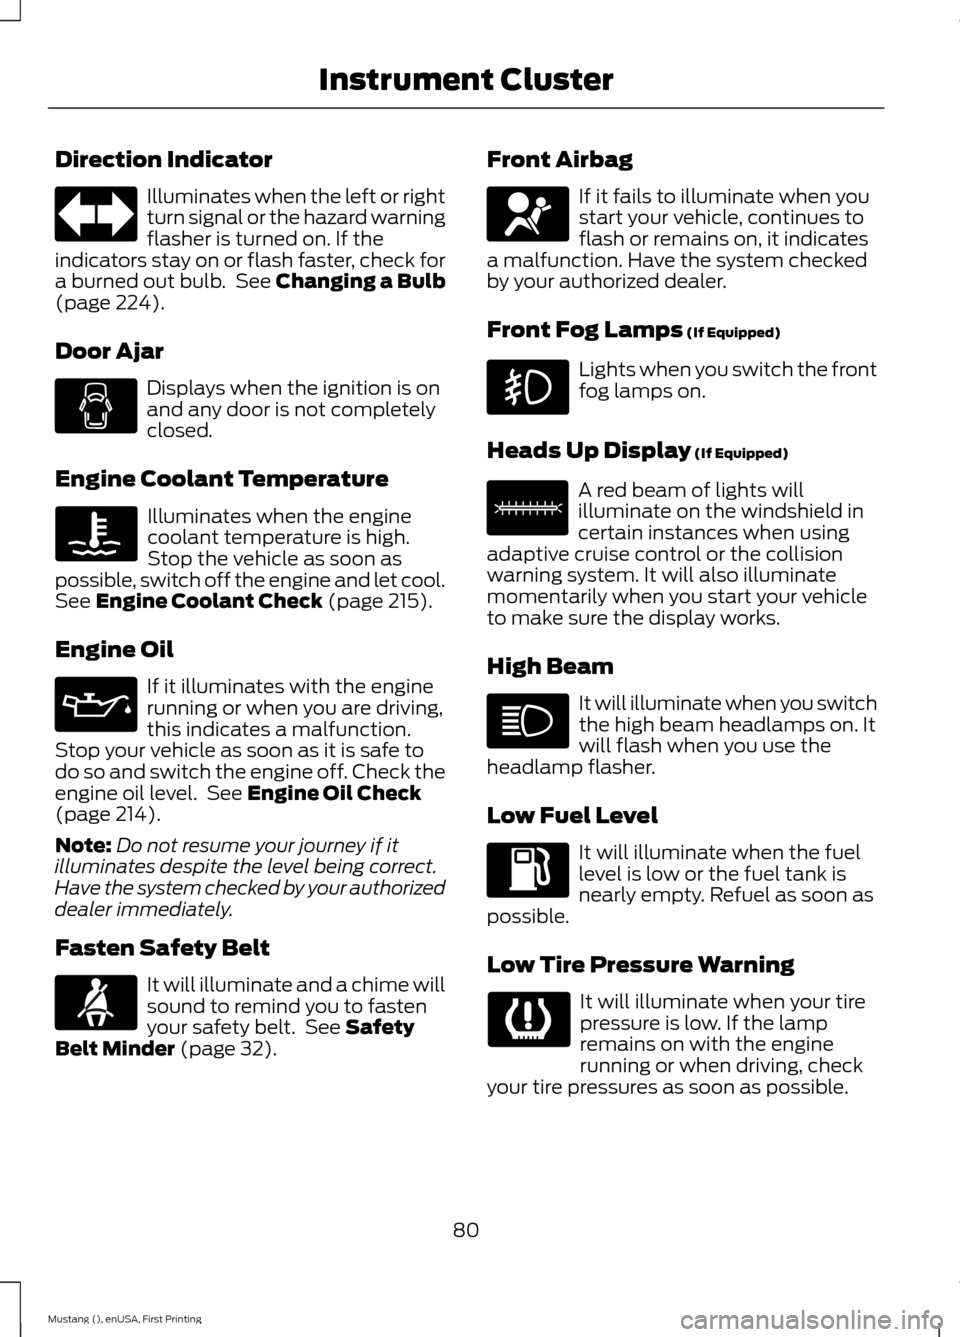
Direction Indicator
Illuminates when the left or right
turn signal or the hazard warning
flasher is turned on. If the
indicators stay on or flash faster, check for
a burned out bulb. See Changing a Bulb
(page 224).
Door Ajar Displays when the ignition is on
and any door is not completely
closed.
Engine Coolant Temperature Illuminates when the engine
coolant temperature is high.
Stop the vehicle as soon as
possible, switch off the engine and let cool.
See
Engine Coolant Check (page 215).
Engine Oil If it illuminates with the engine
running or when you are driving,
this indicates a malfunction.
Stop your vehicle as soon as it is safe to
do so and switch the engine off. Check the
engine oil level. See
Engine Oil Check
(page 214).
Note: Do not resume your journey if it
illuminates despite the level being correct.
Have the system checked by your authorized
dealer immediately.
Fasten Safety Belt It will illuminate and a chime will
sound to remind you to fasten
your safety belt. See
Safety
Belt Minder (page 32). Front Airbag If it fails to illuminate when you
start your vehicle, continues to
flash or remains on, it indicates
a malfunction. Have the system checked
by your authorized dealer.
Front Fog Lamps
(If Equipped) Lights when you switch the front
fog lamps on.
Heads Up Display
(If Equipped) A red beam of lights will
illuminate on the windshield in
certain instances when using
adaptive cruise control or the collision
warning system. It will also illuminate
momentarily when you start your vehicle
to make sure the display works.
High Beam It will illuminate when you switch
the high beam headlamps on. It
will flash when you use the
headlamp flasher.
Low Fuel Level It will illuminate when the fuel
level is low or the fuel tank is
nearly empty. Refuel as soon as
possible.
Low Tire Pressure Warning It will illuminate when your tire
pressure is low. If the lamp
remains on with the engine
running or when driving, check
your tire pressures as soon as possible.
80
Mustang (), enUSA, First Printing Instrument Cluster E156133
Page 84 of 441
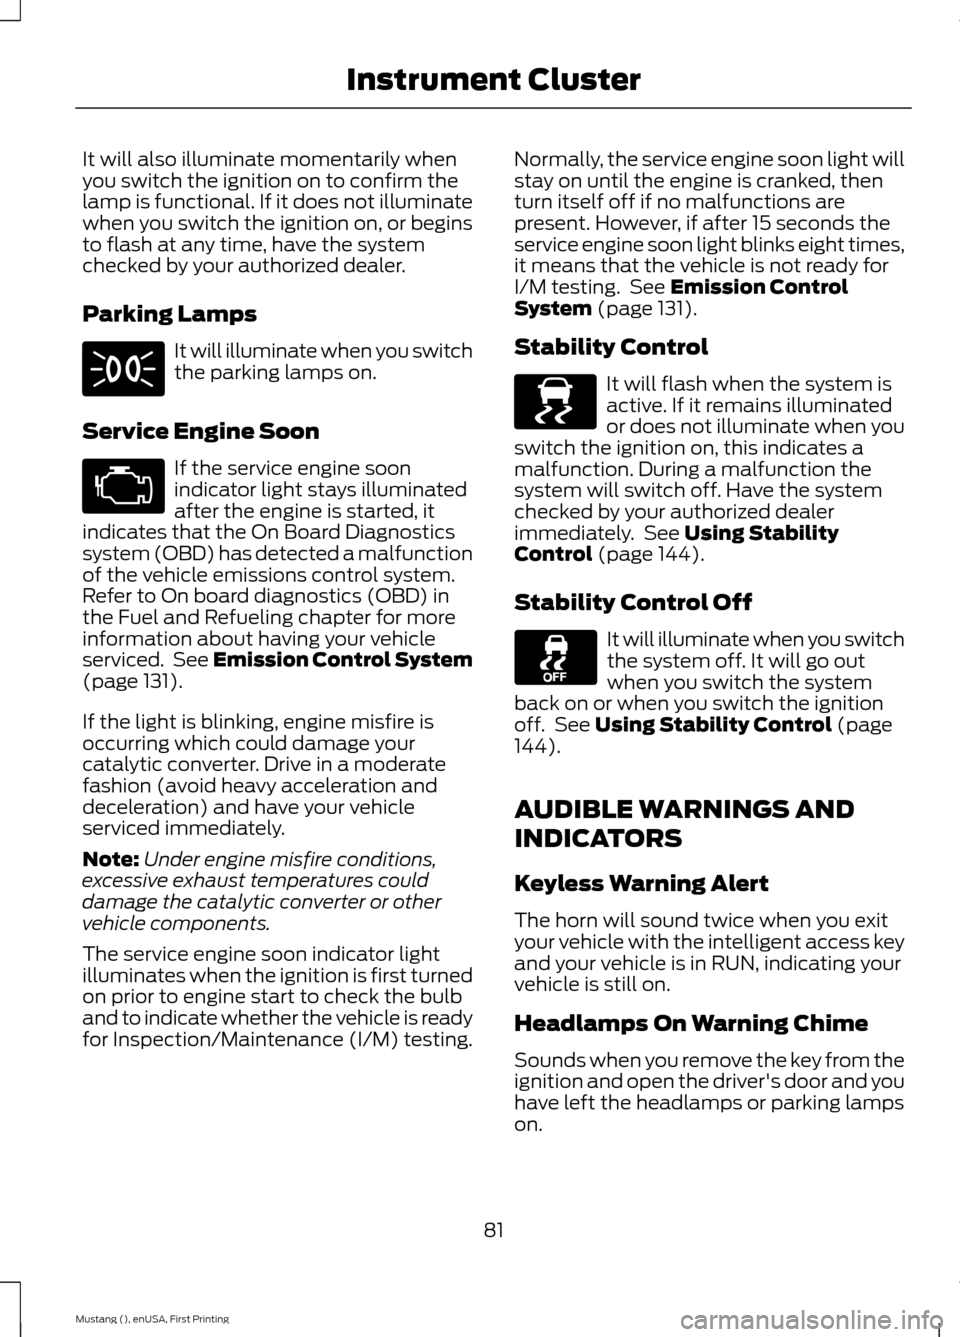
It will also illuminate momentarily when
you switch the ignition on to confirm the
lamp is functional. If it does not illuminate
when you switch the ignition on, or begins
to flash at any time, have the system
checked by your authorized dealer.
Parking Lamps
It will illuminate when you switch
the parking lamps on.
Service Engine Soon If the service engine soon
indicator light stays illuminated
after the engine is started, it
indicates that the On Board Diagnostics
system (OBD) has detected a malfunction
of the vehicle emissions control system.
Refer to On board diagnostics (OBD) in
the Fuel and Refueling chapter for more
information about having your vehicle
serviced. See Emission Control System
(page 131).
If the light is blinking, engine misfire is
occurring which could damage your
catalytic converter. Drive in a moderate
fashion (avoid heavy acceleration and
deceleration) and have your vehicle
serviced immediately.
Note: Under engine misfire conditions,
excessive exhaust temperatures could
damage the catalytic converter or other
vehicle components.
The service engine soon indicator light
illuminates when the ignition is first turned
on prior to engine start to check the bulb
and to indicate whether the vehicle is ready
for Inspection/Maintenance (I/M) testing. Normally, the service engine soon light will
stay on until the engine is cranked, then
turn itself off if no malfunctions are
present. However, if after 15 seconds the
service engine soon light blinks eight times,
it means that the vehicle is not ready for
I/M testing. See
Emission Control
System (page 131).
Stability Control It will flash when the system is
active. If it remains illuminated
or does not illuminate when you
switch the ignition on, this indicates a
malfunction. During a malfunction the
system will switch off. Have the system
checked by your authorized dealer
immediately. See
Using Stability
Control (page 144).
Stability Control Off It will illuminate when you switch
the system off. It will go out
when you switch the system
back on or when you switch the ignition
off. See
Using Stability Control (page
144).
AUDIBLE WARNINGS AND
INDICATORS
Keyless Warning Alert
The horn will sound twice when you exit
your vehicle with the intelligent access key
and your vehicle is in RUN, indicating your
vehicle is still on.
Headlamps On Warning Chime
Sounds when you remove the key from the
ignition and open the driver's door and you
have left the headlamps or parking lamps
on.
81
Mustang (), enUSA, First Printing Instrument Cluster E138639
Page 135 of 441
An improperly operating or damaged
exhaust system may allow exhaust to
enter the vehicle. Have a damaged or
improperly operating exhaust system
inspected and repaired immediately.
Do not make any unauthorized changes to
your vehicle or engine. By law, vehicle
owners and anyone who manufactures,
repairs, services, sells, leases, trades
vehicles, or supervises a fleet of vehicles
are not permitted to intentionally remove
an emission control device or prevent it
from working. Information about your
vehicle
’s emission system is on the Vehicle
Emission Control Information Decal
located on or near the engine. This decal
also lists engine displacement
Please consult your warranty information
for complete details.
On-Board Diagnostics (OBD-II)
Your vehicle is equipped with an on-board
diagnostics system (OBD-II) that monitors
the engine ’s emission control system. This
system protects the environment by
ensuring that your vehicle continues to
meet government emission standards. The
OBD-II system also assists your authorized
dealer in properly servicing your vehicle. When the service engine soon
indicator illuminates, the OBD-II
system has detected a
malfunction. Temporary malfunctions may
cause the service engine soon indicator to
illuminate.
Examples of temporary malfunctions are:
• the vehicle has run out of fuel —the
engine may misfire or run poorly
• poor fuel quality or water in the
fuel —the engine may misfire or run
poorly •
the fuel fill inlet may not have been
properly closed See Refueling (page
128).
• driving through deep water —the
electrical system may be wet.
You can correct these temporary
malfunctions by filling the fuel tank with
good quality fuel, properly closing the fuel
fill inlet or letting the electrical system dry
out. After three driving cycles without these
or any other temporary malfunctions
present, the service engine soon indicator
should stay off the next time you start the
engine. A driving cycle consists of a cold
engine startup followed by mixed
city/highway driving. No additional vehicle
service is required.
If the service engine soon indicator remains
on, have your vehicle serviced at the first
available opportunity. Although some
malfunctions detected by the OBD-II may
not have symptoms that are apparent,
continued driving with the service engine
soon indicator on can result in increased
emissions, lower fuel economy, reduced
engine and transmission smoothness, and
lead to more costly repairs.
Readiness for
Inspection/Maintenance (I/M)
Testing
Some state/provincial and local
governments may have
Inspection/Maintenance (I/M) programs
to inspect the emission control equipment
on your vehicle. Failure to pass this
inspection could prevent you from getting
a vehicle registration. If the service engine soon
indicator is on or the bulb does
not work, you may need to have
the vehicle serviced. See On-Board
Diagnostics (OBD-II).
132
Mustang (), enUSA, First Printing Fuel and Refueling
Page 136 of 441
Your vehicle may not pass the I/M test if
the service engine soon indicator is on or
not working properly (bulb is burned out),
or if the OBD-II system has determined
that some of the emission control systems
have not been properly checked. In this
case, your vehicle is not ready for I/M
testing.
If the vehicle
’s engine or transmission has
just been serviced, or the battery has
recently run down or been replaced, the
OBD-II system may indicate that the
vehicle is not ready for I/M testing. To
determine if the vehicle is ready for I/M
testing, turn the ignition key to the on
position for 15 seconds without cranking
the engine. If the service engine soon
indicator blinks eight times, it means that
the vehicle is not ready for I/M testing; if
the service engine soon indicator stays on
solid, it means that the vehicle is ready for
I/M testing.
The OBD-II system monitors the emission
control system during normal driving. A
complete check may take several days. If
the vehicle is not ready for I/M testing, you
may need to perform the following driving
cycle consisting of mixed city and highway
driving:
Drive on an expressway or highway for a
steady 15 minutes, followed by 20 minutes
of stop-and-go driving with at least four
30-second idle periods.
Allow the vehicle to sit for at least eight
hours without starting the engine. Then,
start the engine and complete the above
driving cycle. The engine must warm up to
its normal operating temperature. Once
started, do not turn off the engine until the
above driving cycle is complete. If the
vehicle is still not ready for I/M testing, you
will have to repeat the above driving cycle.
133
Mustang (), enUSA, First Printing Fuel and Refueling
Page 147 of 441
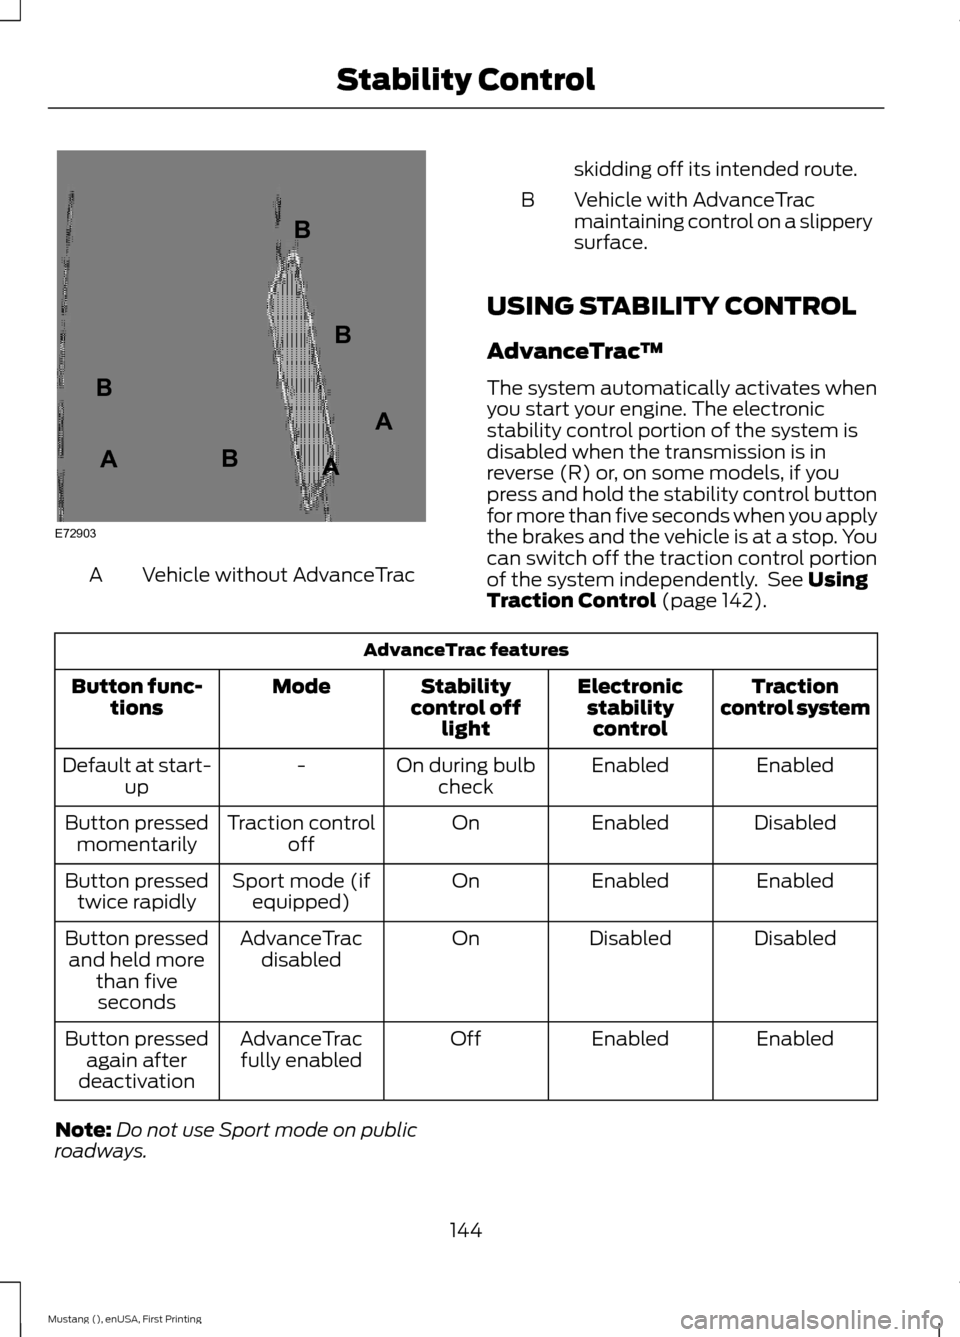
Vehicle without AdvanceTrac
A skidding off its intended route.
Vehicle with AdvanceTrac
maintaining control on a slippery
surface.
B
USING STABILITY CONTROL
AdvanceTrac ™
The system automatically activates when
you start your engine. The electronic
stability control portion of the system is
disabled when the transmission is in
reverse (R) or, on some models, if you
press and hold the stability control button
for more than five seconds when you apply
the brakes and the vehicle is at a stop. You
can switch off the traction control portion
of the system independently. See Using
Traction Control (page 142). AdvanceTrac features
Traction
control system
Electronic
stabilitycontrol
Stability
control off light
Mode
Button func-
tions
Enabled
Enabled
On during bulb
check
-
Default at start-
up
Disabled
Enabled
On
Traction control
off
Button pressed
momentarily
Enabled
Enabled
On
Sport mode (if
equipped)
Button pressed
twice rapidly
Disabled
Disabled
On
AdvanceTrac
disabled
Button pressed
and held more than fiveseconds
Enabled
Enabled
Off
AdvanceTrac
fully enabled
Button pressed
again after
deactivation
Note: Do not use Sport mode on public
roadways.
144
Mustang (), enUSA, First Printing Stability ControlE72903A
AA
B
BB
B
Page 227 of 441
5. Locate the vertical adjuster on each
headlamp. Use a Phillips #2
screwdriver to turn the adjuster either
clockwise or counterclockwise to
adjust the vertical aim of the
headlamp. The horizontal edge of the
brighter light should touch the
horizontal reference line.
6. Repeat Steps 3 through 7 to adjust the
other headlamp.
7. Close the hood and turn off the lamps.
Horizontal Aim Adjustment
Horizontal aim is not required for this
vehicle and is not adjustable.
CHANGING A BULB
Lamp Assembly Condensation
Exterior lamps have vents to
accommodate normal changes in pressure.
Condensation can be a natural occurrence
of this design. When moist air enters the
lamp assembly through the vents, there is
a possibility that condensation can occur
in cold temperatures. When normal
condensation occurs, a thin film of mist
can form on the interior of the lens. The
mist eventually clears and exits through
the vents during normal operation. Clearing
time may take as long as 48 hours under
dry weather conditions.
Examples of acceptable condensation are:
• Thin mist without streaks, drip marks
or droplets.
• Fine mist that covers less than 50% of
the lens.
Examples of unacceptable moisture are:
• Water puddle inside the lamp.
• Large water droplets, drip marks or
streaks on the interior of the lens. If any of the above conditions of
unacceptable moisture are present,
contact an authorized.
Replacing HID Headlamp Bulbs
Your vehicle has high intensity discharge
lamps. These lamps operate at a high
voltage. Contact an authorized dealer.
Accessing the Direction Indicator
and Fog Lamp Bulbs
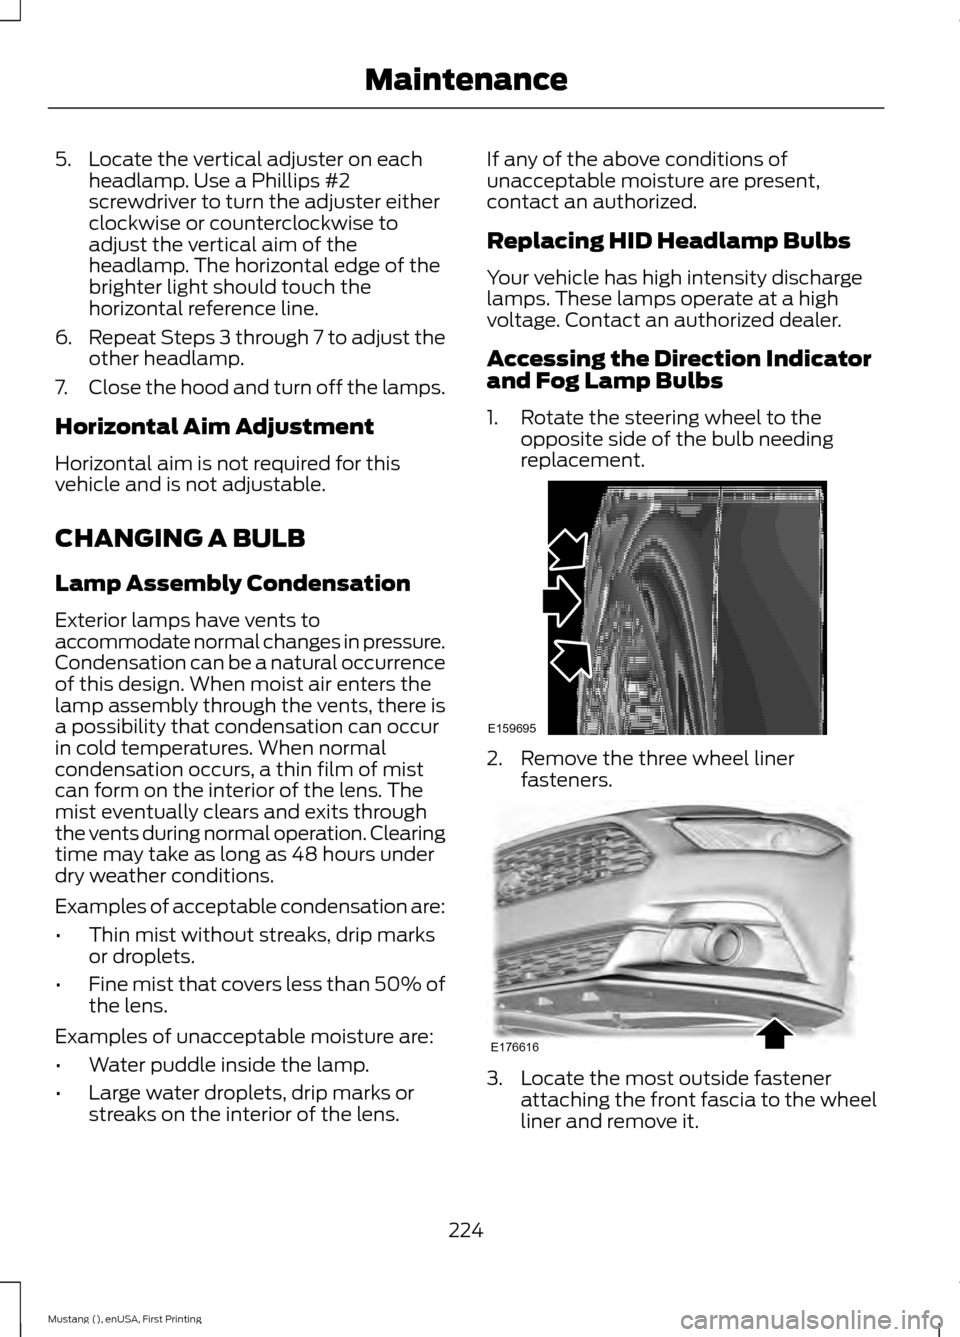
1. Rotate the steering wheel to the
opposite side of the bulb needing
replacement. 2. Remove the three wheel liner
fasteners. 3. Locate the most outside fastener
attaching the front fascia to the wheel
liner and remove it.
224
Mustang (), enUSA, First Printing MaintenanceE159695 E176616
Page 228 of 441
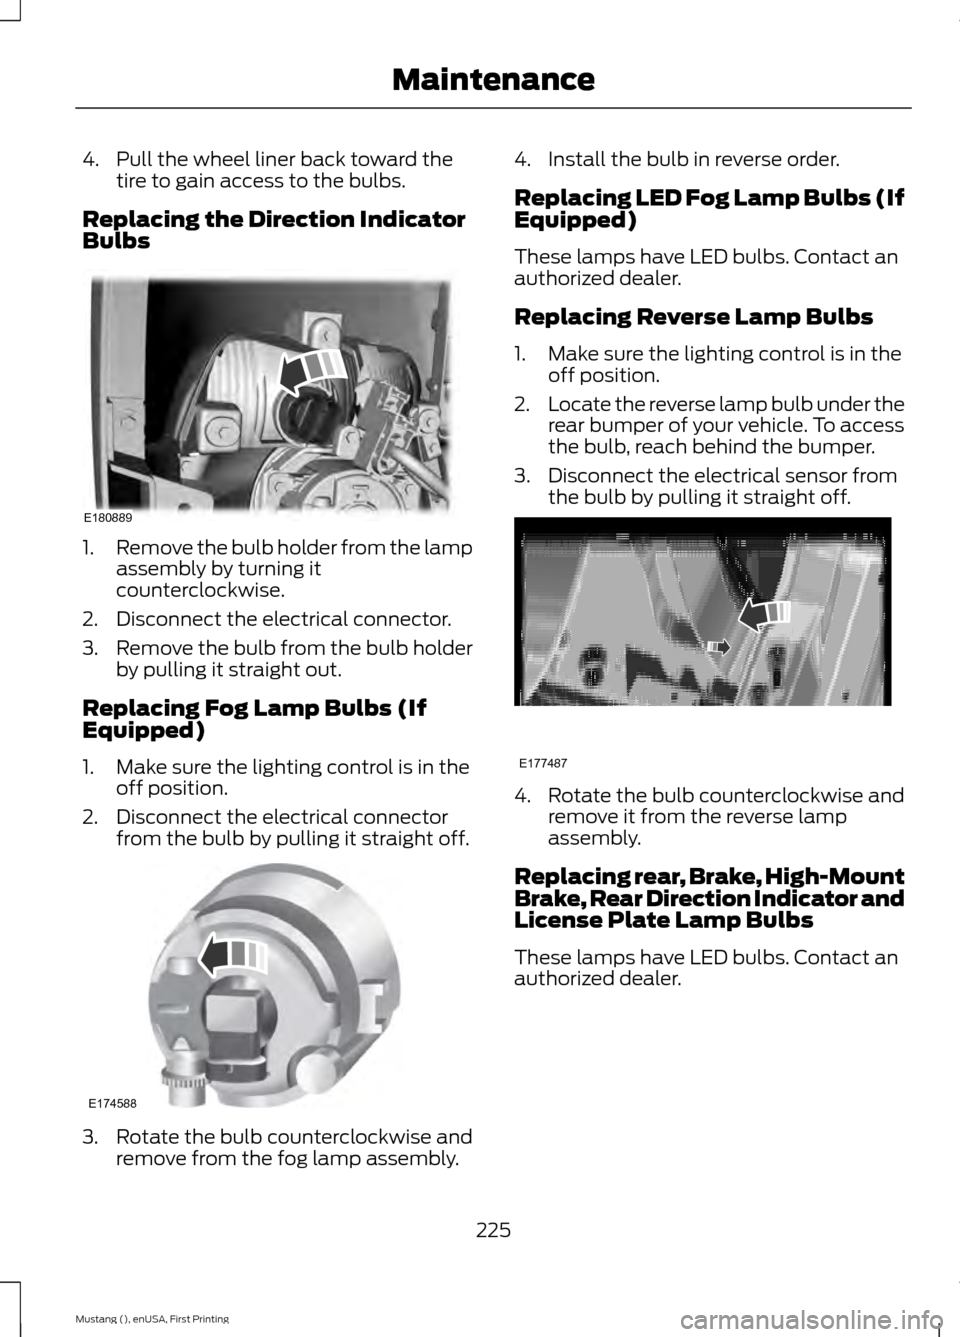
4. Pull the wheel liner back toward the
tire to gain access to the bulbs.
Replacing the Direction Indicator
Bulbs 1.
Remove the bulb holder from the lamp
assembly by turning it
counterclockwise.
2. Disconnect the electrical connector.
3. Remove the bulb from the bulb holder
by pulling it straight out.
Replacing Fog Lamp Bulbs (If
Equipped)
1. Make sure the lighting control is in the off position.
2. Disconnect the electrical connector from the bulb by pulling it straight off. 3. Rotate the bulb counterclockwise and
remove from the fog lamp assembly. 4. Install the bulb in reverse order.
Replacing LED Fog Lamp Bulbs (If
Equipped)
These lamps have LED bulbs. Contact an
authorized dealer.
Replacing Reverse Lamp Bulbs
1. Make sure the lighting control is in the
off position.
2. Locate the reverse lamp bulb under the
rear bumper of your vehicle. To access
the bulb, reach behind the bumper.
3. Disconnect the electrical sensor from the bulb by pulling it straight off. 4. Rotate the bulb counterclockwise and
remove it from the reverse lamp
assembly.
Replacing rear, Brake, High-Mount
Brake, Rear Direction Indicator and
License Plate Lamp Bulbs
These lamps have LED bulbs. Contact an
authorized dealer.
225
Mustang (), enUSA, First Printing MaintenanceE180889 E174588 E177487
Page 229 of 441
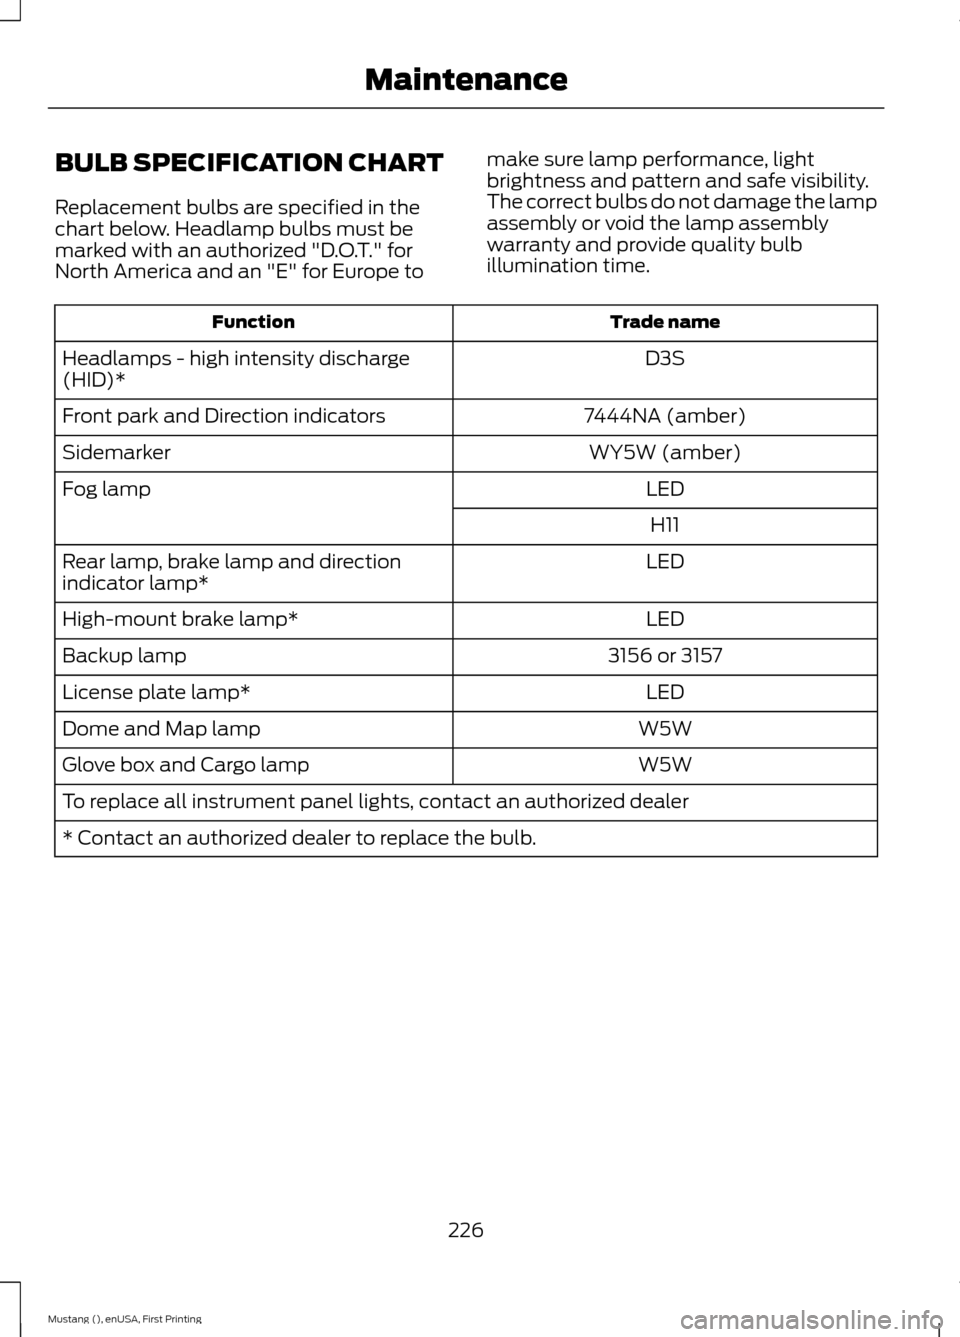
BULB SPECIFICATION CHART
Replacement bulbs are specified in the
chart below. Headlamp bulbs must be
marked with an authorized "D.O.T." for
North America and an "E" for Europe to
make sure lamp performance, light
brightness and pattern and safe visibility.
The correct bulbs do not damage the lamp
assembly or void the lamp assembly
warranty and provide quality bulb
illumination time. Trade name
Function
D3S
Headlamps - high intensity discharge
(HID)*
7444NA (amber)
Front park and Direction indicators
WY5W (amber)
Sidemarker
LED
Fog lamp
H11
LED
Rear lamp, brake lamp and direction
indicator lamp*
LED
High-mount brake lamp*
3156 or 3157
Backup lamp
LED
License plate lamp*
W5W
Dome and Map lamp
W5W
Glove box and Cargo lamp
To replace all instrument panel lights, contact an authorized dealer
* Contact an authorized dealer to replace the bulb.
226
Mustang (), enUSA, First Printing Maintenance