flat tire FORD MUSTANG 2015 6.G Owners Manual
[x] Cancel search | Manufacturer: FORD, Model Year: 2015, Model line: MUSTANG, Model: FORD MUSTANG 2015 6.GPages: 441, PDF Size: 6.98 MB
Page 141 of 441
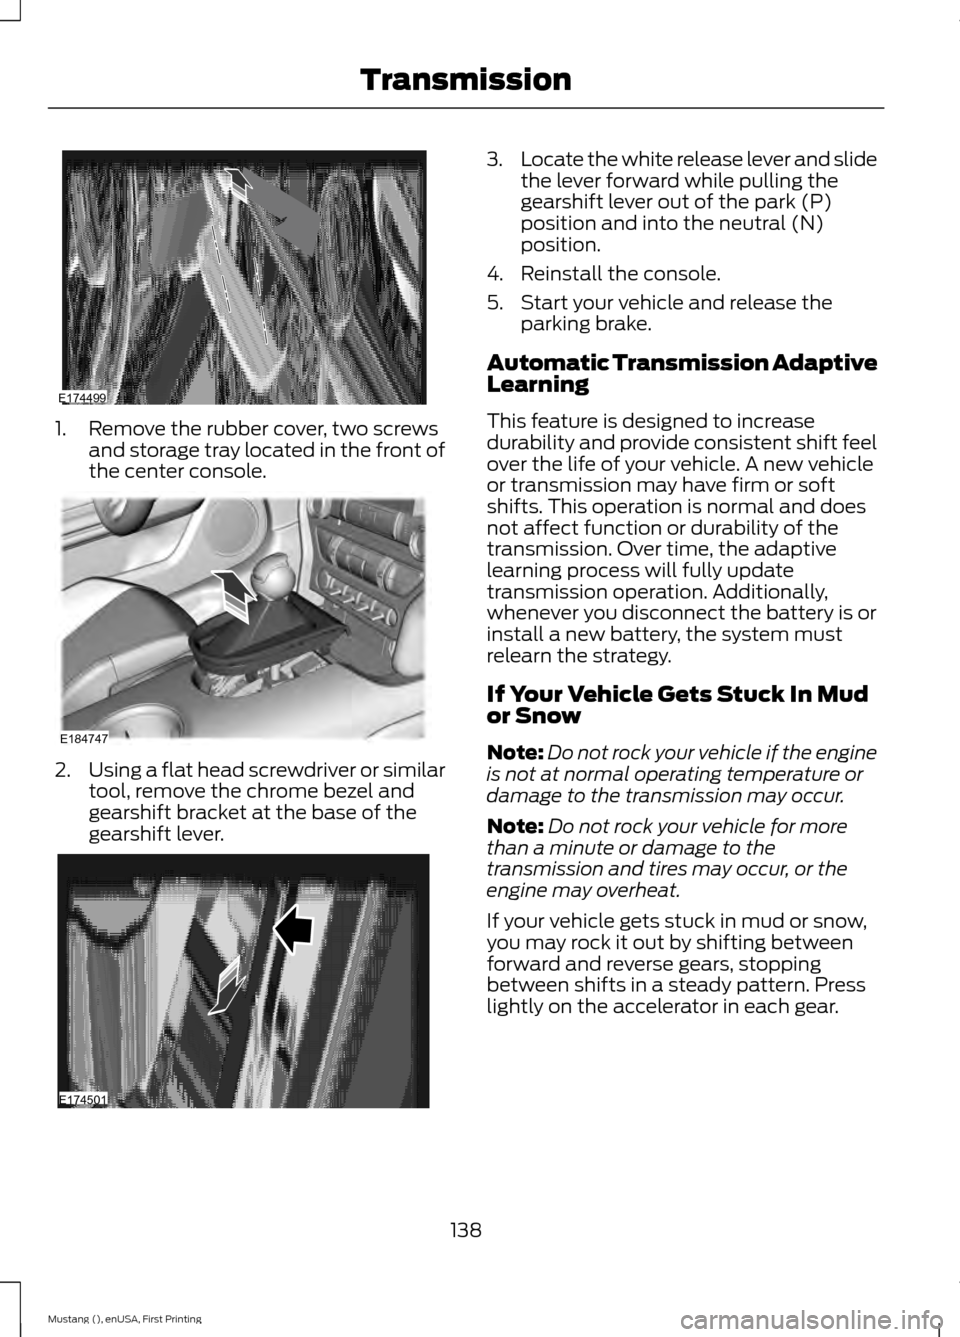
1. Remove the rubber cover, two screws
and storage tray located in the front of
the center console. 2.
Using a flat head screwdriver or similar
tool, remove the chrome bezel and
gearshift bracket at the base of the
gearshift lever. 3.
Locate the white release lever and slide
the lever forward while pulling the
gearshift lever out of the park (P)
position and into the neutral (N)
position.
4. Reinstall the console.
5. Start your vehicle and release the parking brake.
Automatic Transmission Adaptive
Learning
This feature is designed to increase
durability and provide consistent shift feel
over the life of your vehicle. A new vehicle
or transmission may have firm or soft
shifts. This operation is normal and does
not affect function or durability of the
transmission. Over time, the adaptive
learning process will fully update
transmission operation. Additionally,
whenever you disconnect the battery is or
install a new battery, the system must
relearn the strategy.
If Your Vehicle Gets Stuck In Mud
or Snow
Note: Do not rock your vehicle if the engine
is not at normal operating temperature or
damage to the transmission may occur.
Note: Do not rock your vehicle for more
than a minute or damage to the
transmission and tires may occur, or the
engine may overheat.
If your vehicle gets stuck in mud or snow,
you may rock it out by shifting between
forward and reverse gears, stopping
between shifts in a steady pattern. Press
lightly on the accelerator in each gear.
138
Mustang (), enUSA, First Printing TransmissionE174499 E184747 E174501
Page 166 of 441
All other system faults will display only
with a message in the information display.
See Information Messages (page 91).
Switching the Systems Off and On
You can temporarily switch off one or both
systems in the information display. See
General Information
(page 83). When
you switch off the Blind Spot Information
System, you will not receive alerts and the
information display will display a system
off message.
Note: The cross traffic alert system always
turns on whenever the ignition is switched
on. However, the Blind Spot Information
System will remember the last selected on
or off setting.
You cannot switch one or both systems
off when MyKey is used.
See Principle of
Operation (page 50).
You can also have one or both systems
switched off permanently at an authorized
dealer. Once switched off, only an
authorized dealer can switch the system
back on.
STEERING
Electric Power Steering WARNINGS
The electric power steering system
has diagnostic checks that
continuously monitor the system to
ensure proper operation. When a system
error is detected a steering message will
appear in the information display. The electric power steering system
has diagnostic checks that
continuously monitor the system to
ensure proper operation of the electronic
system. When an electronic error is
detected, a message will be displayed in
the information display. If this happens,
stop the vehicle in a safe place, and turn WARNINGS
off the engine. After at least 10 seconds,
reset the system by restarting the engine,
and watch the information display for a
steering message. If a steering message
returns, or returns while driving, take the
vehicle to your dealer to have it checked. Obtain immediate service if a system
error is detected. You may not notice
any difference in the feel of your
steering, but a serious condition may exist.
Failure to do so may result in loss of
steering control. Your vehicle has an electric power steering
system. There is no fluid reservoir to check
or fill.
If your vehicle loses electrical power while
you are driving (or if you switch the ignition
off), you can steer your vehicle manually,
but it takes more effort. Extreme
continuous steering may increase the effort
it takes for you to steer. This occurs to
prevent internal overheating and
permanent damage to your steering
system. If this should occur, you will neither
lose the ability to steer your vehicle
manually nor will it cause permanent
damage. Typical steering and driving
maneuvers allows the system to cool and
steering assist to return to normal.
Steering Tips
If the steering wanders or pulls, check for:
•
An improperly inflated tire.
• Uneven tire wear.
• Loose or worn suspension
components.
• Loose or worn steering components.
• Improper vehicle alignment.
A high crown in the road or high crosswinds
may also make the steering seem to
wander or pull.
163
Mustang (), enUSA, First Printing Driving Aids
Page 191 of 441
BREAKING-IN
You need to break in new tires for
approximately 300 miles (480
kilometers). During this time, your vehicle
may exhibit some unusual driving
characteristics.
Avoid driving too fast during the first 1000
miles (1600 kilometers). Vary your speed
frequently and change up through the
gears early. Do not labor the engine.
Do not tow during the first 1000 miles
(1600 kilometers).
ECONOMICAL DRIVING
Fuel economy is affected by several things
such as how you drive, the conditions you
drive under and how you maintain your
vehicle.
There are some things to keep in mind that
may improve your fuel economy:
•
Accelerate and slow down in a smooth,
moderate fashion.
• Drive at steady speeds.
• Anticipate stops; slowing down may
eliminate the need to stop.
• Combine errands and minimize
stop-and-go driving.
•When running errands, go to the
furthest destination first and then
work your way back home.
• Close the windows for high-speed
driving.
• Drive at reasonable speeds. (Traveling
at 65 mph/105 kph uses about 15%
less fuel than traveling at 75 mph/121
kph).
• Keep the tires properly inflated and use
only the recommended size. •
Use the recommended engine oil.
• Perform all regularly scheduled
maintenance.
There are also some things you may want
to avoid doing because they reduce your
fuel economy:
• Avoid sudden or hard accelerations.
• Avoid revving the engine before turning
off the car.
• Avoid long idle periods.
• Do not warm up your vehicle on cold
mornings.
• Reduce the use of air conditioning and
heat.
• Avoid using speed control in hilly
terrain.
• Do not rest your foot on the brake
pedal while driving.
• Avoid carrying unnecessary weight
(approximately 1 mpg [0.4
kilometers/liter] is lost for every 400
lbs [180 kilograms] of weight carried).
• Avoid adding particular accessories to
your vehicle (e.g. bug deflectors,
rollbars/light bars, running boards, ski
racks).
• Avoid driving with the wheels out of
alignment.
DRIVING THROUGH WATER WARNING
Do not drive through flowing or deep
water as you may lose control of your
vehicle.
Note:
Driving through standing water can
cause vehicle damage.
Note: Engine damage can occur if water
enters the air filter.
188
Mustang (), enUSA, First Printing Driving Hints
Page 194 of 441
ROADSIDE ASSISTANCE
Vehicles Sold in the United States:
Getting Roadside Assistance
To fully assist you should you have a
vehicle concern, Ford Motor Company
offers a complimentary roadside
assistance program. This program is
separate from the New Vehicle Limited
Warranty. The service is available:
•
24 hours a day, seven days a week.
• For the coverage period listed on the
Roadside Assistance Card included in
your Owner's Manual portfolio.
Roadside Assistance covers:
• A flat tire change with a good spare, if
provided with the vehicle (except
vehicles supplied with a tire inflation
kit).
• Battery jump start.
• Lock-out assistance (key replacement
cost is the customer's responsibility).
• Fuel delivery — independent service
contractors, if not prohibited by state,
local or municipal law, shall deliver up
to 2 gal (7.6 L) of gasoline or 5 gal
(18.9 L) of diesel fuel to a disabled
vehicle. Roadside Assistance limits fuel
delivery service to two no-charge
occurrences within a 12-month period.
• Winch out — available within
100 ft
(30.5 m) of a paved or county
maintained road, no recoveries.
• Towing — independent service
contractors, if not prohibited by state,
local or municipal law, shall tow Ford
eligible vehicles to an authorized dealer
within
35 mi (56 km) of the
disablement location or to the nearest authorized dealer. If a member
requests a tow to an authorized dealer
that is more than
35 mi (56 km) from
the disablement location, the member
shall be responsible for any mileage
costs in excess of
35 mi (56 km).
Roadside Assistance includes up to $200
for a towed trailer if the disabled eligible
vehicle requires service at the nearest
authorized dealer. If the towing vehicle is
operational but the trailer is not, then the
trailer does not qualify for any roadside
services.
Vehicles Sold in the United States:
Using Roadside Assistance
Complete the roadside assistance
identification card and place it in your
wallet for quick reference. This card is in
the owner's information portfolio in the
glove compartment.
United States Ford vehicle customers who
require Roadside Assistance, call
1-800-241-3673.
If you need to arrange roadside assistance
for yourself, Ford Motor Company
reimburses a reasonable amount for
towing to the nearest dealership within
35 mi (56 km)
. To obtain reimbursement
information, United States Ford vehicle
customers call 1-800-241-3673.
Customers need to submit their original
receipts.
Vehicles Sold in Canada: Getting
Roadside Assistance
Canadian customers who require roadside
assistance, call 1-800-665-2006.
Vehicles Sold in Canada: Using
Roadside Assistance
For your convenience, you may complete
the roadside assistance identification card
found in the centerfold of your warranty
guide and retain for future reference.
191
Mustang (), enUSA, First Printing Roadside Emergencies
Page 237 of 441
Brakes
•
Make sure the brakes and parking brake
release fully.
Tires
• Maintain recommended air pressure.
Miscellaneous
• Make sure all linkages, cables, levers
and pins under your vehicle are covered
with grease to prevent rust.
• Move vehicles at least 25 ft (7.5 m)
every 15 days to lubricate working parts
and prevent corrosion.
Removing Vehicle From Storage
When your vehicle is ready to come out of
storage, do the following:
• Wash your vehicle to remove any dirt
or grease film build-up on window
surfaces.
• Check windshield wipers for any
deterioration.
• Check under the hood for any foreign
material that may have collected
during storage such as mice or squirrel
nests.
• Check the exhaust for any foreign
material that may have collected
during storage.
• Check tire pressures and set tire
inflation per the Tire Label.
• Check brake pedal operation. Drive
your vehicle
15 ft (4.5 m) back and
forth to remove rust build-up.
• Check fluid levels (including coolant,
oil and gas) to make sure there are no
leaks, and fluids are at recommended
levels.
• If you remove the battery, clean the
battery cable ends and inspect. Contact an authorized dealer if you have
any concerns or issues.
234
Mustang (), enUSA, First Printing Vehicle Care
Page 238 of 441
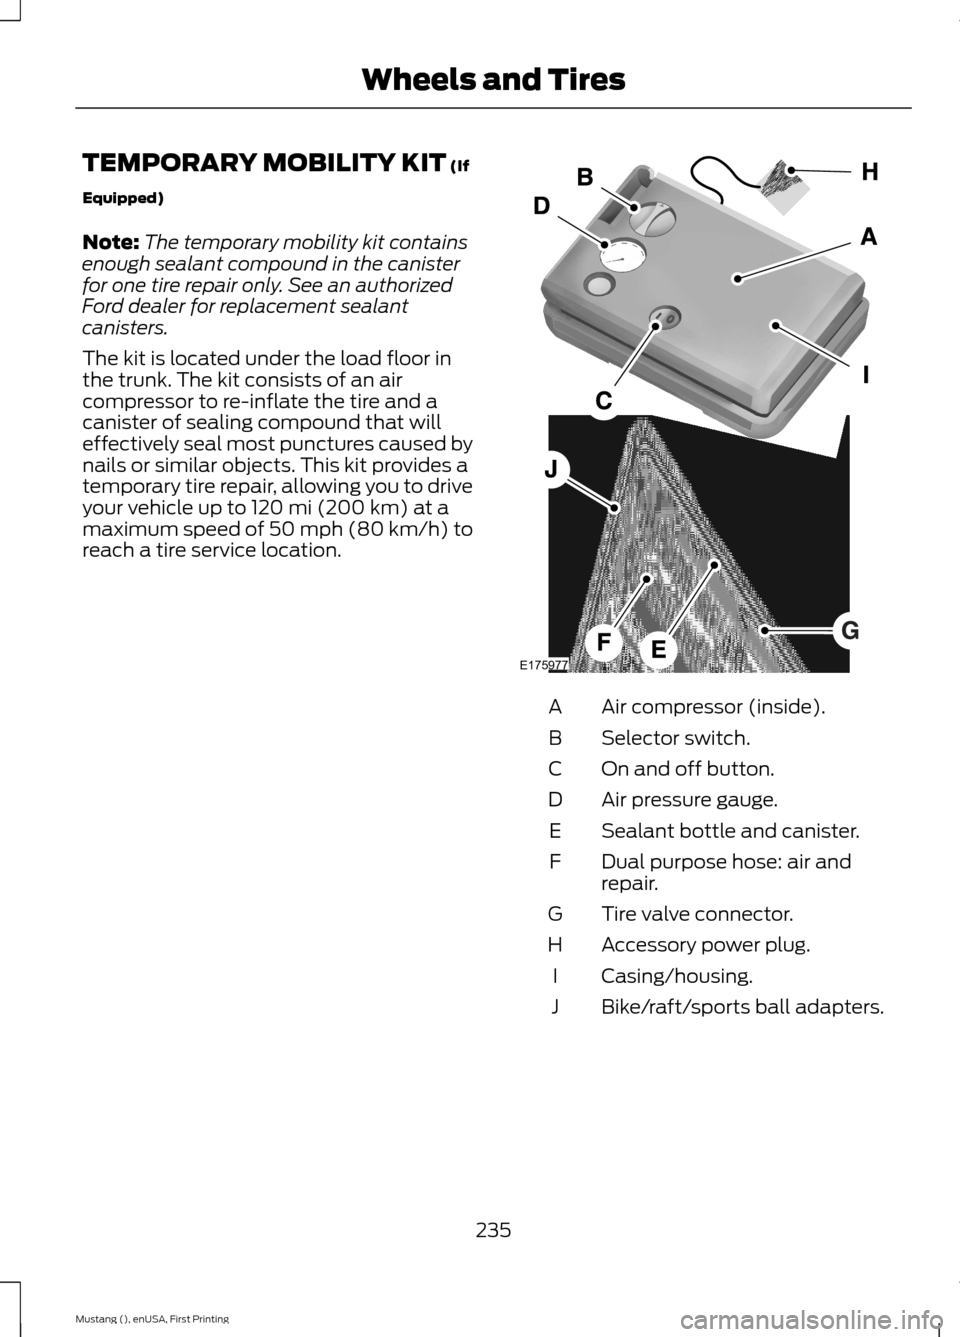
TEMPORARY MOBILITY KIT (If
Equipped)
Note: The temporary mobility kit contains
enough sealant compound in the canister
for one tire repair only. See an authorized
Ford dealer for replacement sealant
canisters.
The kit is located under the load floor in
the trunk. The kit consists of an air
compressor to re-inflate the tire and a
canister of sealing compound that will
effectively seal most punctures caused by
nails or similar objects. This kit provides a
temporary tire repair, allowing you to drive
your vehicle up to
120 mi (200 km) at a
maximum speed of 50 mph (80 km/h) to
reach a tire service location. Air compressor (inside).
A
Selector switch.
B
On and off button.
C
Air pressure gauge.
D
Sealant bottle and canister.
E
Dual purpose hose: air and
repair.
F
Tire valve connector.
G
Accessory power plug.
H
Casing/housing.
I
Bike/raft/sports ball adapters.
J
235
Mustang (), enUSA, First Printing Wheels and TiresE175977
Page 239 of 441
General Information
WARNING
Failure to follow these guidelines
could result in an increased risk of
loss of vehicle control, injury or death.
Note:
Do not use the kit if you have severely
damaged a tire. Only seal punctures located
within the tire tread with the kit.
Do not attempt to repair punctures larger
than ¼ inch (6 millimeters) or damage to
the tire's sidewall. The tire may not
completely seal.
Loss of air pressure may adversely affect
tire performance. For this reason:
Note: Do not drive the vehicle above
50 mph (80 km/h).
Note: Do not drive further than
120 mi
(200 km). Drive only to the closest
authorized Ford dealer or tire repair shop to
have your tire inspected.
• Drive carefully and avoid abrupt
steering maneuvers.
• Periodically monitor tire inflation
pressure in the affected tire; if the tire
is losing pressure, have the vehicle
towed.
• Read the information in the Tips for
Use of the Kit section to make sure safe
operation of the kit and your vehicle.
Tips for Use of the Kit
To ensure safe operation of the kit:
• Read all instructions and cautions fully.
• Before operating the kit, make sure
your vehicle is safely off the road and
away from moving traffic. Switch on
the hazard lights.
• Always set the parking brake to ensure
the vehicle does not move
unexpectedly. •
Do not remove any foreign objects,
such as nails or screws, from the tire.
• When using the kit, leave the engine
running (only if the vehicle is outdoors
or in a well-ventilated area) so the
compressor does not drain the
vehicle's battery.
• Do not allow the compressor to
operate continuously for more than 15
minutes. This will help prevent the
compressor from overheating.
• Never leave the kit unattended during
operation.
• Sealant compound contains latex.
Those with latex sensitivities should
use appropriate precautions to avoid
an allergic reaction.
• Keep the kit away from children.
• Only use the kit when the ambient
temperature is between -22°F (-30°C)
and 158°F (70°C).
• Only use the sealing compound before
the use-by date. The use-by date is on
a label on the sealant canister, which
you can see through the rectangular
viewing window on the bottom of the
compressor. Check the use-by date
regularly and replace the canister after
four years of non-use.
• Do not store the kit unsecured inside
the passenger compartment of the
vehicle as it may cause injury during a
sudden stop or crash. Always store the
kit in its original location.
• After sealant use, an authorized Ford
dealer must replace the tire pressure
monitoring system sensor and valve
stem on the wheel.
• Operating the kit could cause an
electrical disturbance in radio, CD and
DVD player operation.
236
Mustang (), enUSA, First Printing Wheels and Tires
Page 240 of 441
* When inflation only is required
for a tire or other objects, the
selector must be in the Air
position.
What to do When a Tire Is
Punctured
You can repair a tire puncture within the
tire's tread area in two stages with the kit.
• In the first stage, inflate the tire with a
sealing compound and air. After you
inflate the tire, you will need to drive
the vehicle a short distance (about 4
miles [6 kilometers]) to distribute the
sealant in the tire.
• In the second stage, check the tire
pressure and adjust, if necessary, to the
vehicle's specified tire inflation
pressure.
First Stage: Inflating the Tire with
Sealing Compound and Air WARNINGS
Do not stand directly over the kit
while inflating the tire. If you notice
any unusual bulges or deformations
in the tire's sidewall during inflation, stop
and call roadside assistance. If the tire does not inflate to the
recommended tire pressure within
15 minutes, stop and call roadside
assistance. Do not run the engine during kit
operation unless the vehicle is
outdoors or in a well-ventilated area.
Preparation: Park the vehicle in a safe, level
and secure area, away from moving traffic.
Switch the hazard lights on. Apply the
parking brake and switch the engine off.
Inspect the flat tire for visible damage. Sealant compound contains latex. Use
appropriate precautions to avoid any
allergic reactions.
Do not remove any foreign object that has
pierced the tire. If a puncture is located in
the tire sidewall, stop and call roadside
assistance.
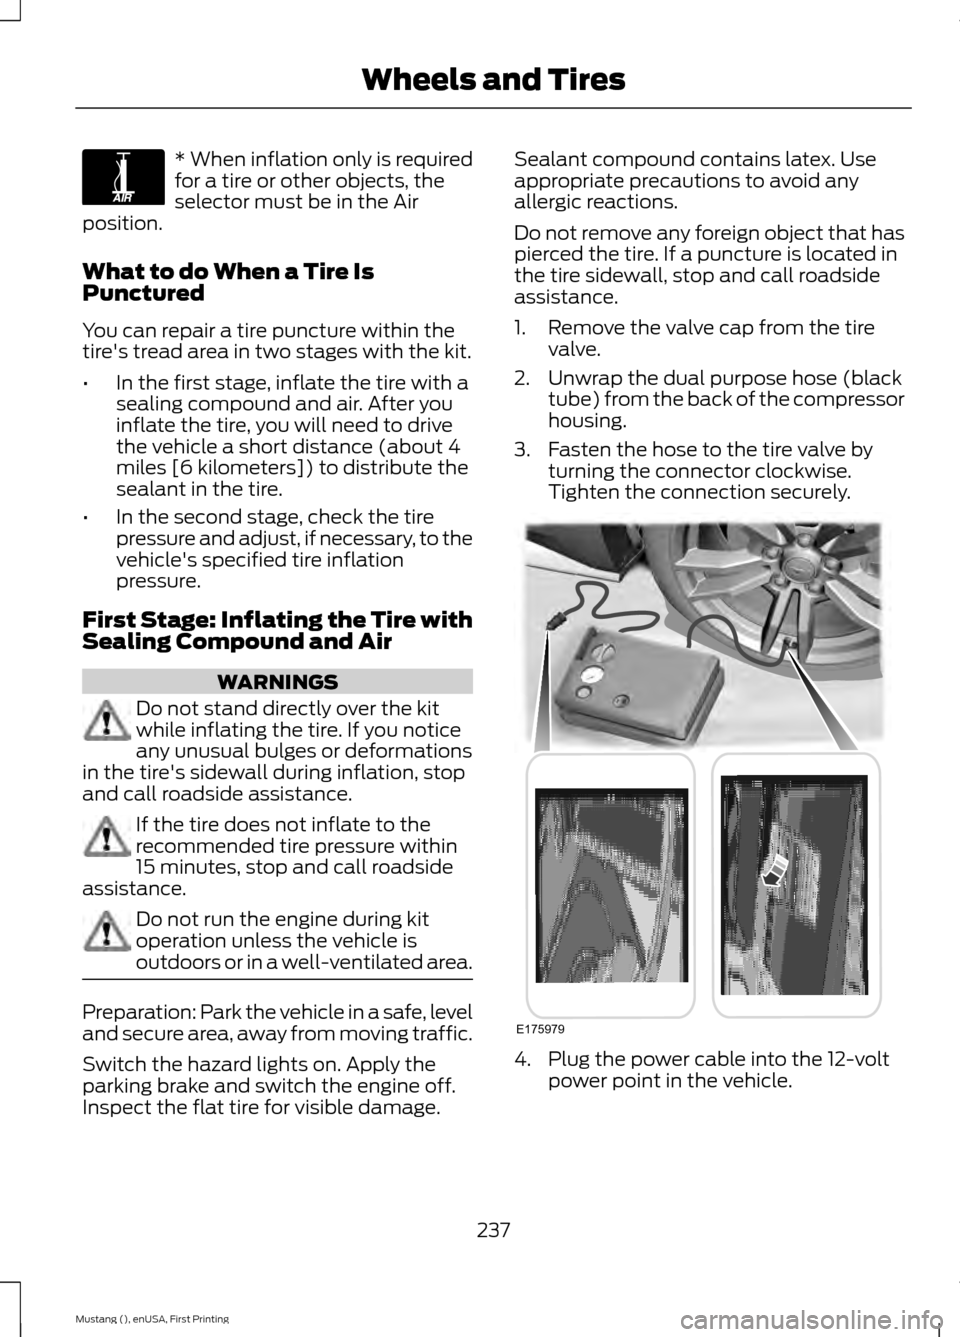
1. Remove the valve cap from the tire
valve.
2. Unwrap the dual purpose hose (black tube) from the back of the compressor
housing.
3. Fasten the hose to the tire valve by turning the connector clockwise.
Tighten the connection securely. 4. Plug the power cable into the 12-volt
power point in the vehicle.
237
Mustang (), enUSA, First Printing Wheels and TiresE175978 E175979
Page 241 of 441
5. Remove the warning sticker found on
the casing/housing and place it on the
top of the instrument panel or the
center of the dash.
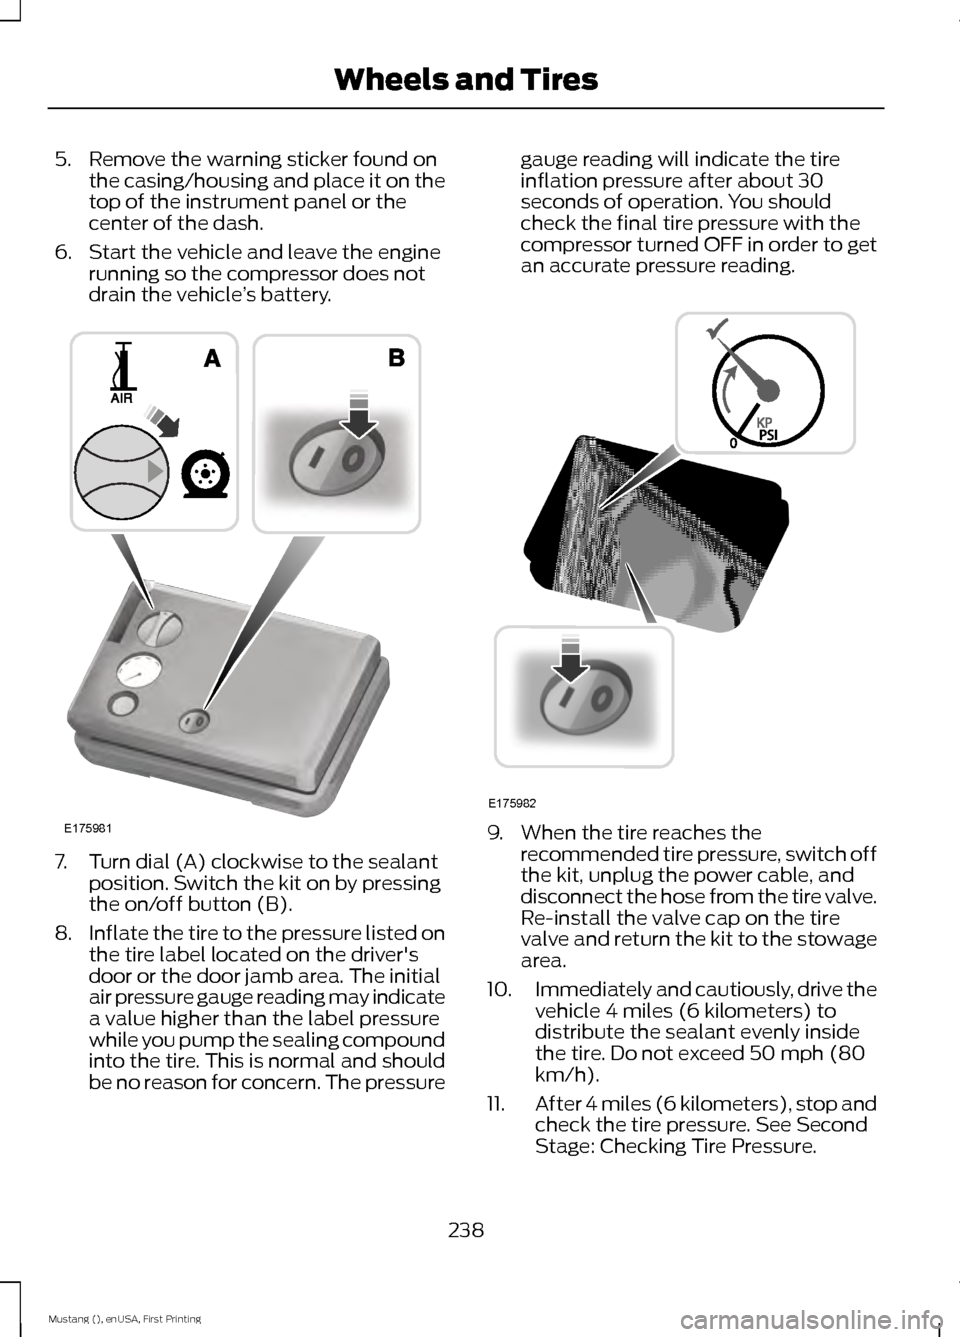
6. Start the vehicle and leave the engine running so the compressor does not
drain the vehicle ’s battery. 7. Turn dial (A) clockwise to the sealant
position. Switch the kit on by pressing
the on/off button (B).
8. Inflate the tire to the pressure listed on
the tire label located on the driver's
door or the door jamb area. The initial
air pressure gauge reading may indicate
a value higher than the label pressure
while you pump the sealing compound
into the tire. This is normal and should
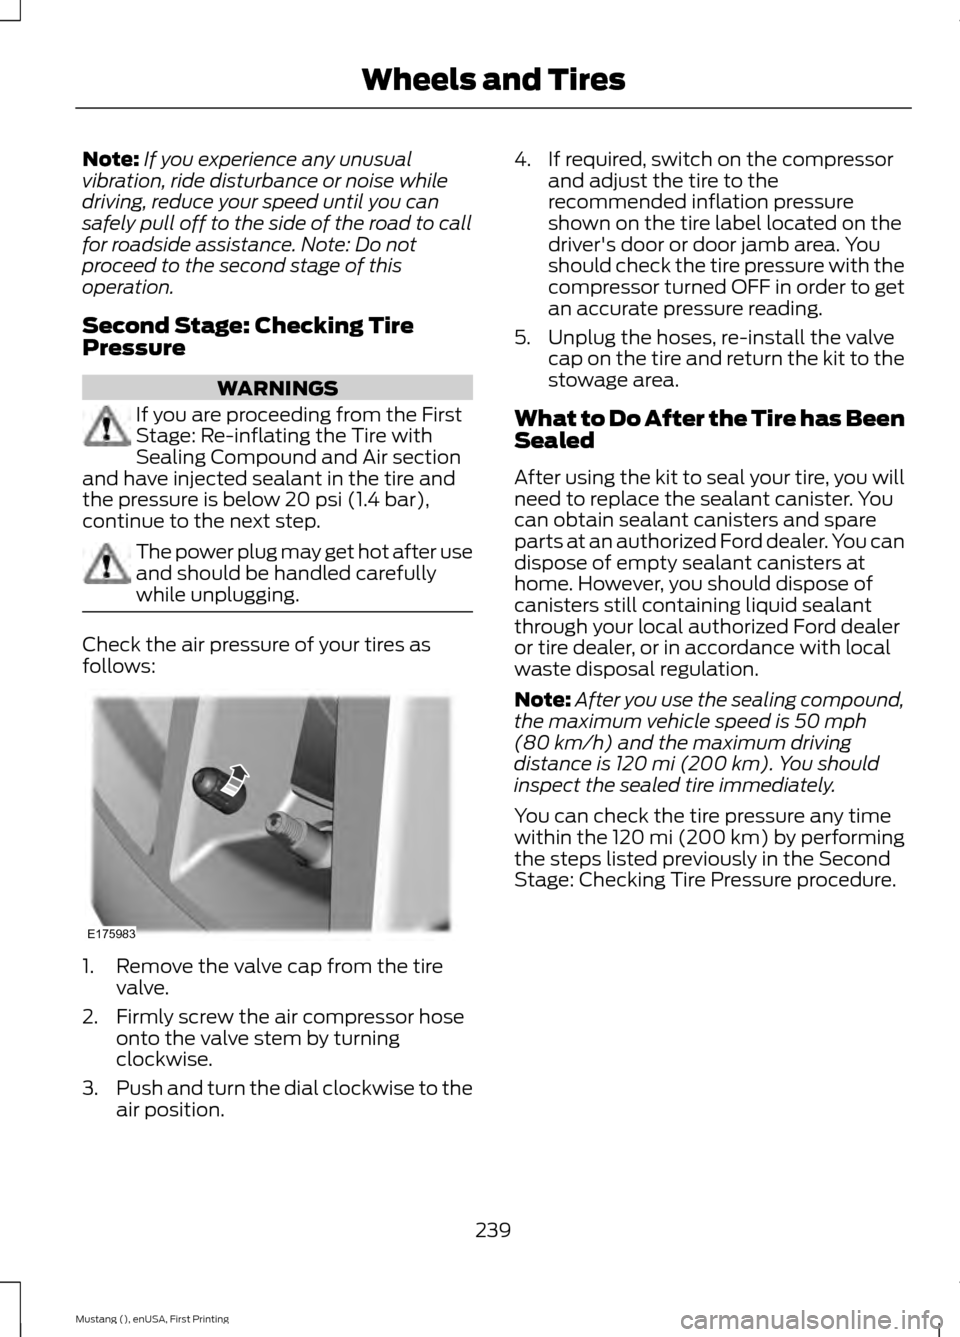
be no reason for concern. The pressure gauge reading will indicate the tire
inflation pressure after about 30
seconds of operation. You should
check the final tire pressure with the
compressor turned OFF in order to get
an accurate pressure reading.
9. When the tire reaches the
recommended tire pressure, switch off
the kit, unplug the power cable, and
disconnect the hose from the tire valve.
Re-install the valve cap on the tire
valve and return the kit to the stowage
area.
10. Immediately and cautiously, drive the
vehicle 4 miles (6 kilometers) to
distribute the sealant evenly inside
the tire. Do not exceed 50 mph (80
km/h).
11. After 4 miles (6 kilometers), stop and
check the tire pressure. See Second
Stage: Checking Tire Pressure.
238
Mustang (), enUSA, First Printing Wheels and TiresE175981 E175982
Page 242 of 441
Note:
If you experience any unusual
vibration, ride disturbance or noise while
driving, reduce your speed until you can
safely pull off to the side of the road to call
for roadside assistance. Note: Do not
proceed to the second stage of this
operation.
Second Stage: Checking Tire
Pressure WARNINGS
If you are proceeding from the First
Stage: Re-inflating the Tire with
Sealing Compound and Air section
and have injected sealant in the tire and
the pressure is below 20 psi (1.4 bar),
continue to the next step. The power plug may get hot after use
and should be handled carefully
while unplugging.
Check the air pressure of your tires as
follows:
1. Remove the valve cap from the tire
valve.
2. Firmly screw the air compressor hose onto the valve stem by turning
clockwise.
3. Push and turn the dial clockwise to the
air position. 4. If required, switch on the compressor
and adjust the tire to the
recommended inflation pressure
shown on the tire label located on the
driver's door or door jamb area. You
should check the tire pressure with the
compressor turned OFF in order to get
an accurate pressure reading.
5. Unplug the hoses, re-install the valve cap on the tire and return the kit to the
stowage area.
What to Do After the Tire has Been
Sealed
After using the kit to seal your tire, you will
need to replace the sealant canister. You
can obtain sealant canisters and spare
parts at an authorized Ford dealer. You can
dispose of empty sealant canisters at
home. However, you should dispose of
canisters still containing liquid sealant
through your local authorized Ford dealer
or tire dealer, or in accordance with local
waste disposal regulation.
Note: After you use the sealing compound,
the maximum vehicle speed is
50 mph
(80 km/h) and the maximum driving
distance is 120 mi (200 km). You should
inspect the sealed tire immediately.
You can check the tire pressure any time
within the 120 mi (200 km) by performing
the steps listed previously in the Second
Stage: Checking Tire Pressure procedure.
239
Mustang (), enUSA, First Printing Wheels and TiresE175983