lock FORD MUSTANG MACH-E 2021 Owners Manual
[x] Cancel search | Manufacturer: FORD, Model Year: 2021, Model line: MUSTANG MACH-E, Model: FORD MUSTANG MACH-E 2021Pages: 460, PDF Size: 7.29 MB
Page 288 of 460
ROADSIDE ASSISTANCE
Vehicles Sold in the United States:
Getting Roadside Assistance
To fully assist you should you have a
vehicle concern, Ford Motor Company
offers a complimentary roadside
assistance program. This program is
separate from the New Vehicle Limited
Warranty.
The service is available:
•
24 hours a day, seven days a week.
• For the coverage period supplied with
your vehicle.
Roadside Assistance covers:
• 12 V battery jump start.
• Lock-out assistance (key replacement
cost is the customer's responsibility).
• In the event your vehicle's high-voltage
battery does not have enough power
to move, as a Mach-E roadside
customer, you can choose where you
would like your vehicle towed (within
a 35 mi (56 km) radius):
• Nearest public charger.
• EV Certified Ford or Lincoln Dealer.
• Your home residence.
Vehicles Sold in the United States:
Using Roadside Assistance
Complete the roadside assistance
identification card and place it in your
wallet for quick reference. This card is in
the Owner's Manual kit.
United States vehicle customers who
require Roadside Assistance, call
1-800-241-3673. If you need to arrange roadside assistance
for yourself, Ford Motor Company
reimburses a reasonable amount for
towing to the nearest dealership within
35 mi (56 km)
. To obtain reimbursement
information, United States vehicle
customers call 1-800-241-3673.
Customers need to submit their original
receipts.
Vehicles Sold in Canada: Getting
Roadside Assistance
To fully assist you should you have a
vehicle concern, Ford Motor Company of
Canada, Limited offers a complimentary
roadside assistance program. This
program is eligible within Canada or the
continental United States.
The service is available 24 hours a day,
seven days a week.
This program is separate from the New
Vehicle Limited Warranty, but the coverage
is concurrent with the powertrain coverage
period of your vehicle. Canadian roadside
coverage and benefits may differ from the
U.S. coverage.
If you require more information, please call
us in Canada at 1-800-665-2006, or visit
our website at
www .f or d . c a .
SWITCHING THE HAZARD
FLASHERS ON AND OFF
The hazard flashers operate with the
power on or off. The battery loses charge
and may have insufficient power to restart
your vehicle. The hazard flasher button is on
the center console. Press the
button to turn on the hazard
flashers if your vehicle is creating a safety
hazard for other road users.
When you switch the hazard flashers on,
all front and rear direction indicators flash.
284
2021 Mustang Mach-E (CGW) Canada/United States of America, Vehicles Built From: 07-06-2021, enUSA, Edition date: 202104, First-Printing Crash and Breakdown Information
Page 289 of 460
Press the button again to switch them off.
JUMP STARTING THE VEHICLE
JUMP STARTING PRECAUTIONS
WARNING: Connect batteries with
only the same nominal voltage. WARNING: Use only adequately
sized cables with insulated clamps.
Note: This procedure is only for the 12 volt
under hood battery.
Note: Your vehicle has a 12 volt battery that
is easily accessible under the hood. The 12
volt battery controls the switches and
contacts that engage the high voltage
battery. Do not jump start the high voltage
battery using a standard 12 volt battery. Tow
your vehicle to an authorized dealer if the
high voltage battery does not accept a
regular charge.
Note: Do not attempt to push start your
vehicle. You could cause transmission
damage.
Note: Do not disconnect the 12 volt battery
from your vehicle electrical system. PREPARING THE VEHICLE
Opening the Front Luggage
Compartment With No Vehicle
Power
If the doors are unlocked when your vehicle
loses power, you can still open the door by
pressing the touchpad on the door window
trim twice within three seconds. See
Opening and Closing the Doors
(page
77). With the door open, use the release
handle to open the front luggage
compartment. See Opening and Closing
the Front Luggage Compartment (page
275
).
Note: You can open an unlocked door a
limited number of times for approximately
72 hours after the 12 volt battery power
depletes.
If the doors are locked when your vehicle
loses power, follow the steps below:
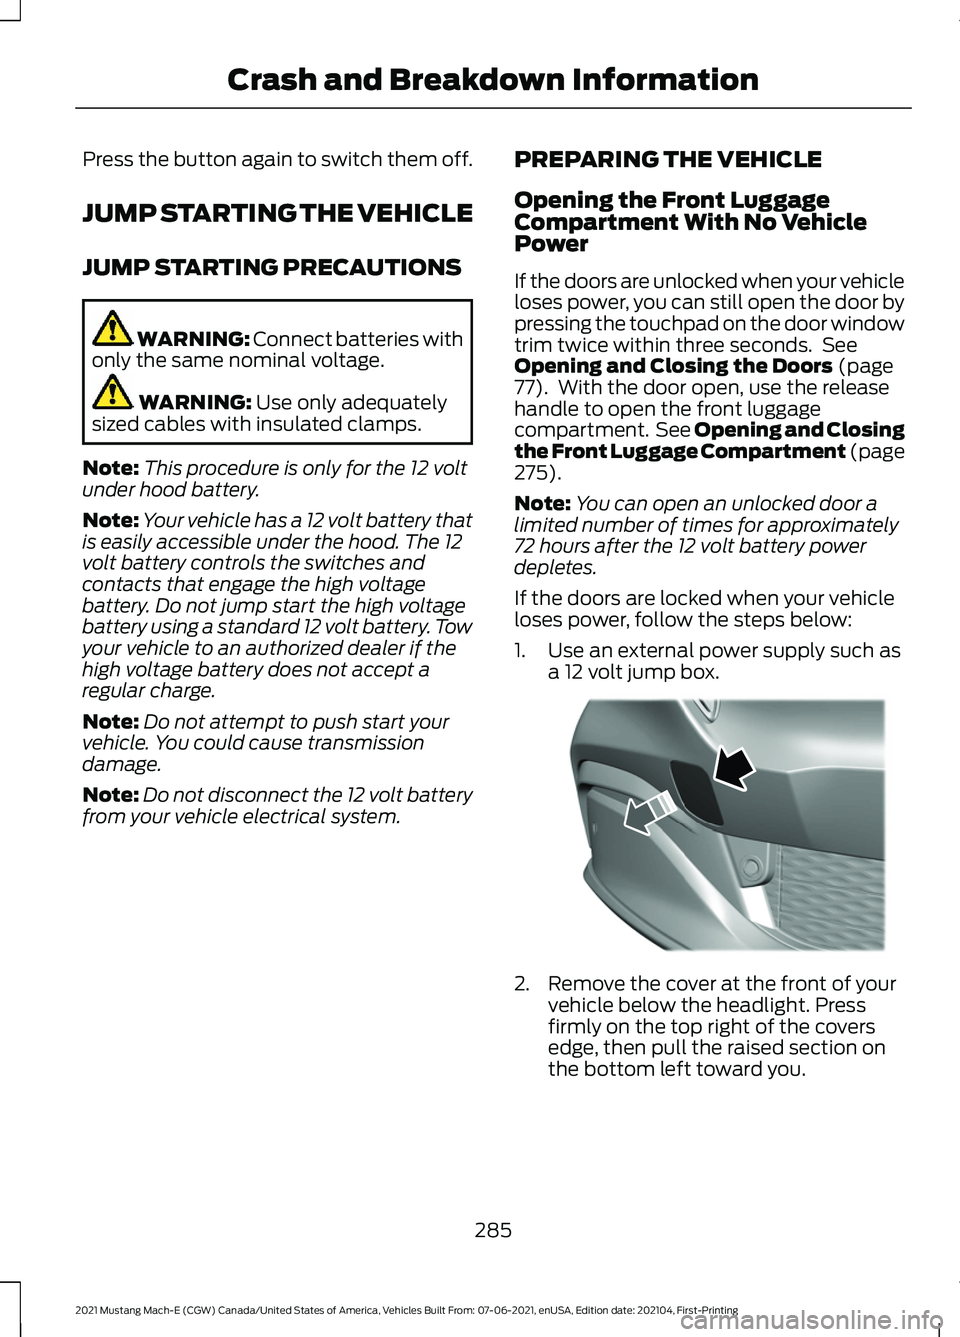
1. Use an external power supply such as a 12 volt jump box. 2. Remove the cover at the front of your
vehicle below the headlight. Press
firmly on the top right of the covers
edge, then pull the raised section on
the bottom left toward you.
285
2021 Mustang Mach-E (CGW) Canada/United States of America, Vehicles Built From: 07-06-2021, enUSA, Edition date: 202104, First-Printing Crash and Breakdown InformationE323341
Page 291 of 460
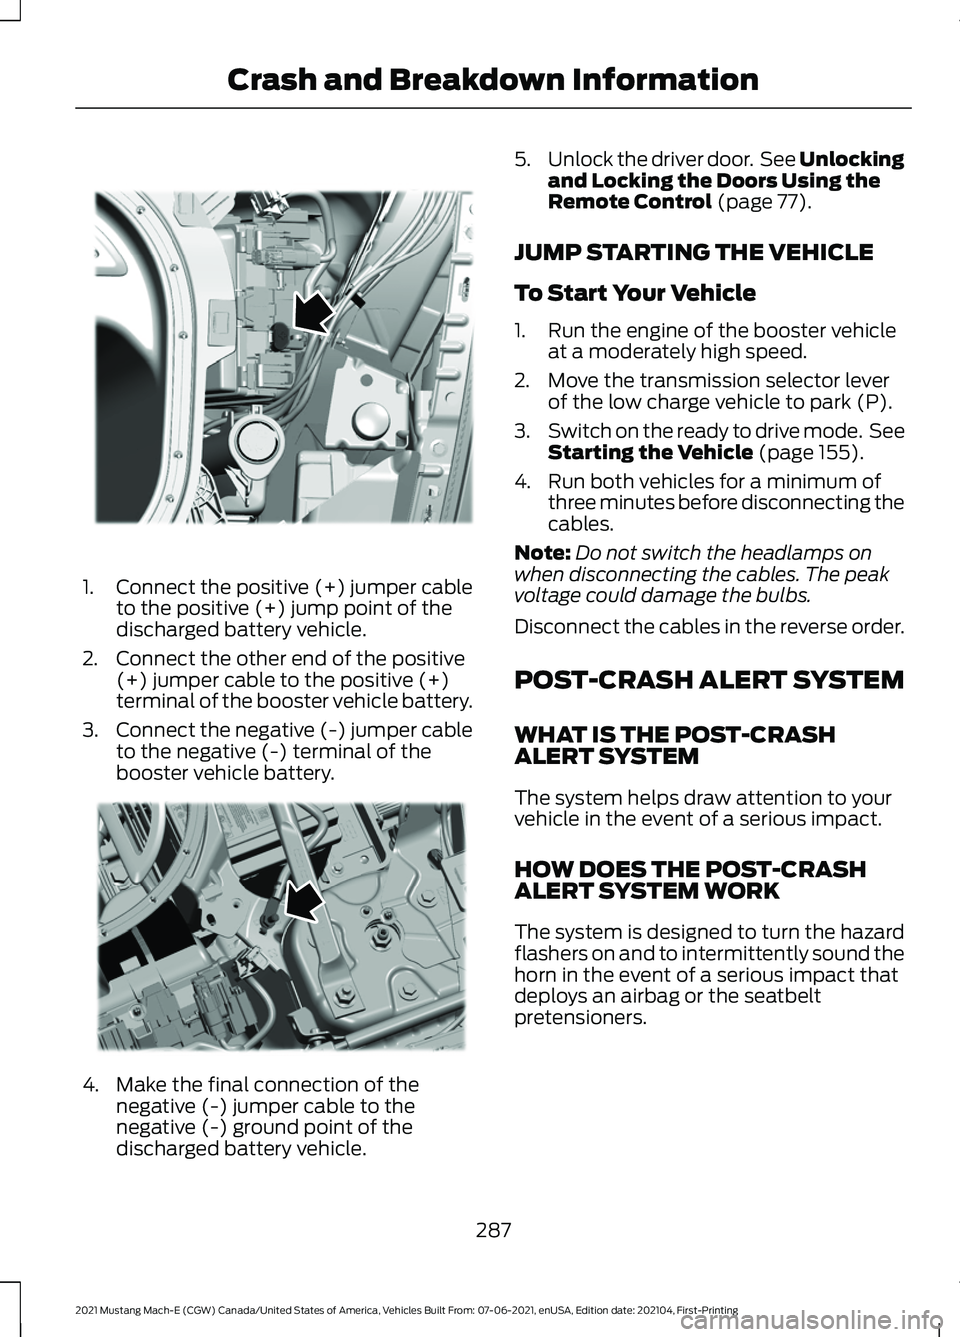
1.
Connect the positive (+) jumper cable
to the positive (+) jump point of the
discharged battery vehicle.
2. Connect the other end of the positive (+) jumper cable to the positive (+)
terminal of the booster vehicle battery.
3. Connect the negative (-) jumper cable
to the negative (-) terminal of the
booster vehicle battery. 4. Make the final connection of the
negative (-) jumper cable to the
negative (-) ground point of the
discharged battery vehicle. 5.
Unlock the driver door. See Unlocking
and Locking the Doors Using the
Remote Control (page 77).
JUMP STARTING THE VEHICLE
To Start Your Vehicle
1. Run the engine of the booster vehicle at a moderately high speed.
2. Move the transmission selector lever of the low charge vehicle to park (P).
3. Switch on the ready to drive mode. See
Starting the Vehicle
(page 155).
4. Run both vehicles for a minimum of three minutes before disconnecting the
cables.
Note: Do not switch the headlamps on
when disconnecting the cables. The peak
voltage could damage the bulbs.
Disconnect the cables in the reverse order.
POST-CRASH ALERT SYSTEM
WHAT IS THE POST-CRASH
ALERT SYSTEM
The system helps draw attention to your
vehicle in the event of a serious impact.
HOW DOES THE POST-CRASH
ALERT SYSTEM WORK
The system is designed to turn the hazard
flashers on and to intermittently sound the
horn in the event of a serious impact that
deploys an airbag or the seatbelt
pretensioners.
287
2021 Mustang Mach-E (CGW) Canada/United States of America, Vehicles Built From: 07-06-2021, enUSA, Edition date: 202104, First-Printing Crash and Breakdown InformationE338767 E338540
Page 292 of 460
POST-CRASH ALERT SYSTEM
LIMITATIONS
Depending on applicable laws in the
country your vehicle was built for, the horn
does not sound in the event of a serious
impact.
SWITCHING THE POST-CRASH
ALERT SYSTEM OFF
Press the hazard flasher switch or the
unlock button on the remote control to
switch the system off.
Note:
The alert turns off when the vehicle
battery runs out of charge.
POST IMPACT BRAKING
HOW DOES POST IMPACT
BRAKING WORK
In the event of a moderate to severe crash,
the braking system reduces the vehicle ’s
speed in order to prevent or reduce the
impact of a potential secondary crash.
POST IMPACT BRAKING
LIMITATIONS
Post impact braking does not activate if
any of the following occur:
• The anti-lock braking system is
damaged during the collision.
• Electronic stability control is disabled.
OVERRIDING POST IMPACT
BRAKING
You can override post impact braking by
pressing the brake or accelerator pedal. POST IMPACT BRAKING
INDICATORS It flashes when a post impact
braking event is occurring.
AUTOMATIC CRASH SHUTOFF
WHAT IS AUTOMATIC CRASH
SHUTOFF
The system deactivates the high voltage
system if it is a battery or hybrid-electric
vehicle, in the event of a moderate or
severe crash.
RE-ENABLING YOUR VEHICLE
1. Switch your vehicle off.
2. Attempt to start your vehicle.
3. Switch your vehicle off.
4. Attempt to start your vehicle.
Note: If your vehicle does not start after the
third attempt, have your vehicle checked as
soon as possible.
288
2021 Mustang Mach-E (CGW) Canada/United States of America, Vehicles Built From: 07-06-2021, enUSA, Edition date: 202104, First-Printing Crash and Breakdown InformationE138639
Page 299 of 460
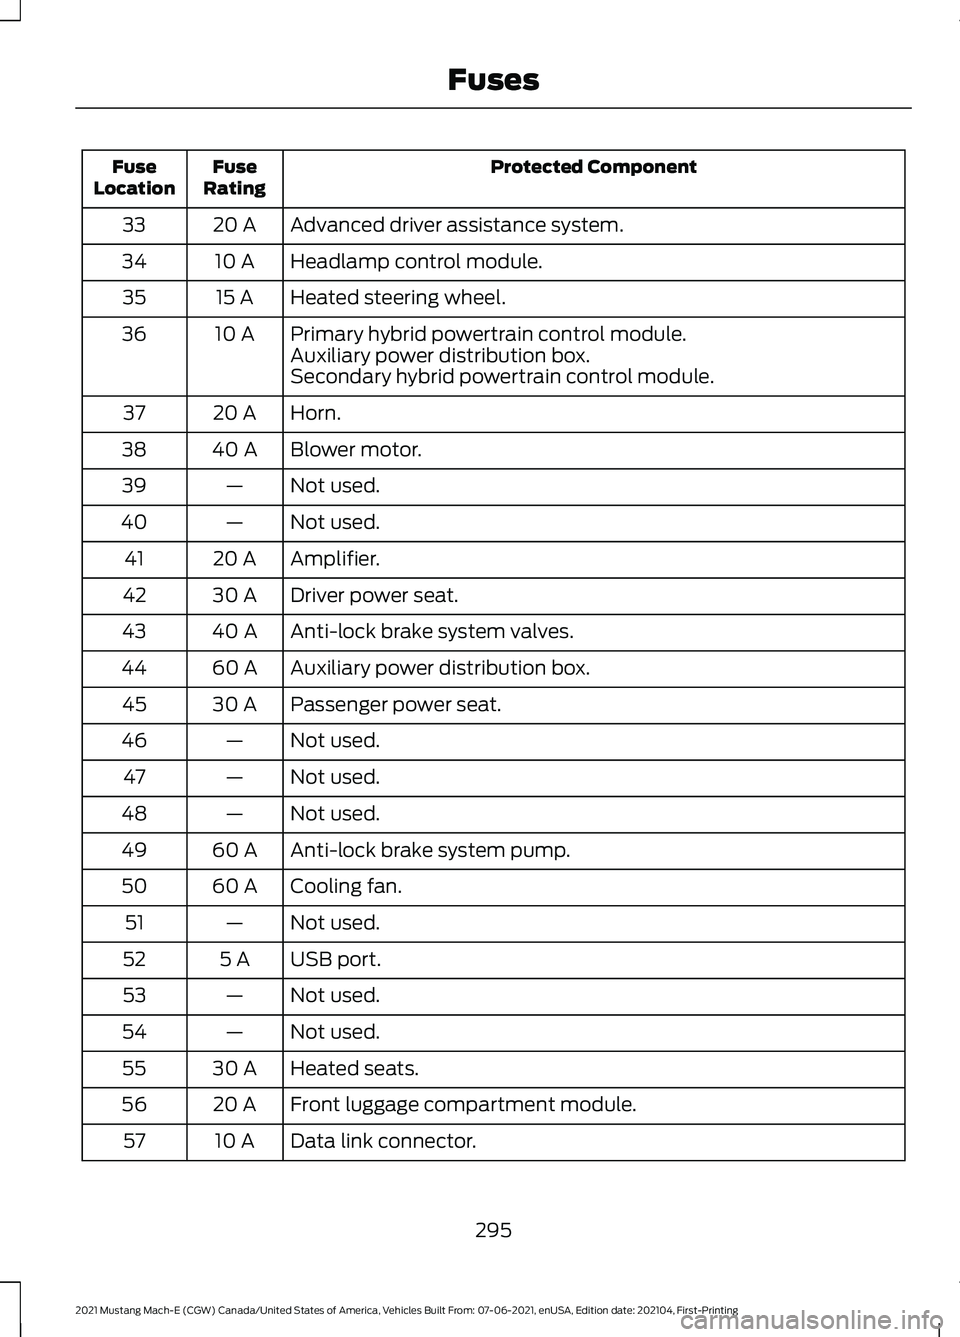
Protected Component
Fuse
Rating
Fuse
Location
Advanced driver assistance system.
20 A
33
Headlamp control module.
10 A
34
Heated steering wheel.
15 A
35
Primary hybrid powertrain control module.
10 A
36
Auxiliary power distribution box.
Secondary hybrid powertrain control module.
Horn.
20 A
37
Blower motor.
40 A
38
Not used.
—
39
Not used.
—
40
Amplifier.
20 A
41
Driver power seat.
30 A
42
Anti-lock brake system valves.
40 A
43
Auxiliary power distribution box.
60 A
44
Passenger power seat.
30 A
45
Not used.
—
46
Not used.
—
47
Not used.
—
48
Anti-lock brake system pump.
60 A
49
Cooling fan.
60 A
50
Not used.
—
51
USB port.
5 A
52
Not used.
—
53
Not used.
—
54
Heated seats.
30 A
55
Front luggage compartment module.
20 A
56
Data link connector.
10 A
57
295
2021 Mustang Mach-E (CGW) Canada/United States of America, Vehicles Built From: 07-06-2021, enUSA, Edition date: 202104, First-Printing Fuses
Page 309 of 460
Note:
If prediluted coolant is not available,
use the approved concentrated coolant
diluting it to 50/50 with distilled water. See
Cooling System Capacity and
Specification (page 344). Using water that
has not been deionized could contribute to
deposit formation, corrosion and plugging
of the small cooling system passageways.
Note: Coolants marketed for all makes and
models might not meet our specifications
and could cause damage to the cooling
system. Resulting component damage
could void the vehicle warranty.
If the coolant level is at or below the
minimum mark, add prediluted coolant
immediately.
To top up the coolant level do the
following:
1. Unscrew the cap slowly. Any pressure escapes as you unscrew the cap.
2. Add prediluted coolant approved to the correct specification. See Cooling
System Capacity and Specification
(page 344).
3. Add enough prediluted coolant to reach the correct level.
4. Replace the coolant reservoir cap. Turn
the cap clockwise until it contacts the
hard stop.
5. Check the coolant level in the coolant reservoir the next few times you drive
your vehicle. If necessary, add enough
prediluted coolant to bring the coolant
level to the correct level.
If you have to add more than
1.1 qt (1 L) of
coolant per month, have your vehicle
checked as soon as possible. Operating
your vehicle with a low level of coolant can
result in overheating and possible electric
motor damage. In case of emergency, you can add a large
amount of water without coolant in order
to reach a vehicle service location. In this
instance, have qualified personnel do the
following as soon as possible:
1. Drain the cooling system.
2. Chemically clean the coolant system.
3. Refill with coolant.
Water alone, without coolant, can cause
damage from corrosion, overheating or
freezing.
Do not use the following as a coolant
substitute:
•
Alcohol.
• Methanol.
• Brine.
• Any coolant mixed with alcohol or
methanol antifreeze.
Alcohol and other liquids can cause
damage from overheating or freezing.
Do not add extra inhibitors or additives to
the coolant. These can be harmful and
compromise the corrosion protection of
the coolant.
Recycled Coolant
We do not recommend the use of recycled
coolant, as an approved recycling process
is not yet available.
Dispose of used coolant in an appropriate
manner. Follow your community's
regulations and standards for recycling and
disposing of automotive fluids.
305
2021 Mustang Mach-E (CGW) Canada/United States of America, Vehicles Built From: 07-06-2021, enUSA, Edition date: 202104, First-Printing Maintenance
Page 312 of 460
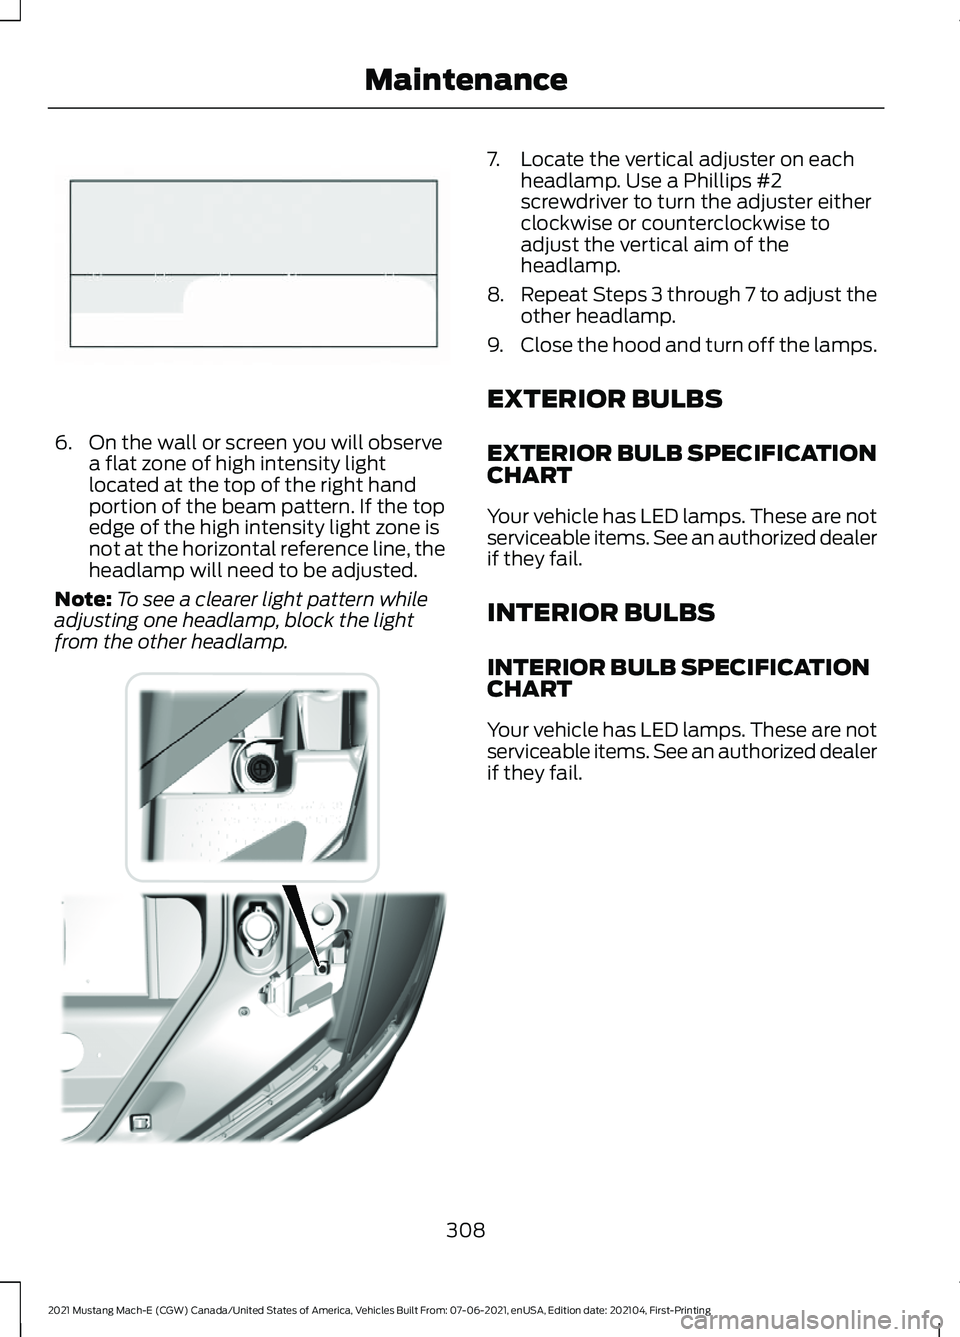
6. On the wall or screen you will observe
a flat zone of high intensity light
located at the top of the right hand
portion of the beam pattern. If the top
edge of the high intensity light zone is
not at the horizontal reference line, the
headlamp will need to be adjusted.
Note: To see a clearer light pattern while
adjusting one headlamp, block the light
from the other headlamp. 7. Locate the vertical adjuster on each
headlamp. Use a Phillips #2
screwdriver to turn the adjuster either
clockwise or counterclockwise to
adjust the vertical aim of the
headlamp.
8. Repeat Steps 3 through 7 to adjust the
other headlamp.
9. Close the hood and turn off the lamps.
EXTERIOR BULBS
EXTERIOR BULB SPECIFICATION
CHART
Your vehicle has LED lamps. These are not
serviceable items. See an authorized dealer
if they fail.
INTERIOR BULBS
INTERIOR BULB SPECIFICATION
CHART
Your vehicle has LED lamps. These are not
serviceable items. See an authorized dealer
if they fail.
308
2021 Mustang Mach-E (CGW) Canada/United States of America, Vehicles Built From: 07-06-2021, enUSA, Edition date: 202104, First-Printing MaintenanceE142465 E335000
Page 338 of 460
Accessory power plug
H
Casing/housing
I
Bike/raft/sports ball adapters
J
USING THE TIRE SEALANT
AND INFLATOR KIT
Tips for use of the kit
To ensure safe operation of the kit:
• Before operating the kit, make sure
your vehicle is safely off the road and
away from moving traffic.
• Do not remove any foreign objects,
such as nails or screws, from the tire.
• Do not allow the compressor to
operate continuously for more than 15
minutes. This will help prevent the
compressor from overheating.
• Only use the kit when the ambient
temperature is between -22°F (-30°C)
and 158°F (70°C).
• Only use the sealing compound before
the use-by date. The use-by date is on
a label on the sealant canister and can
be seen through the rectangular
viewing window on the bottom of the
compressor. Check the use-by date
regularly and replace the canister when
the sealant expires.
Note: Sealant compound contains latex.
Use appropriate precautions to avoid any
allergic reactions. When inflation only is required
for a tire or other objects, the
selector must be in the Air
position.
What to do when a tire is punctured
A tire puncture within the tire's tread area
can be repaired in two stages with the kit. •
In the first stage, the tire will be
reinflated with a sealing compound
and air. After the tire has been inflated,
you will need to drive the vehicle a
short distance approximately
4 mi
(6 km) to distribute the sealant in the
tire.
• In the second stage, you will need to
check the tire pressure and adjust, if
necessary, to the vehicle's specified
tire inflation pressure.
First Stage: Reinflating the Tire
with sealing compound and air WARNING:
Do not stand directly
over the kit while inflating the tire. If you
notice any unusual bulges or
deformations in the tire's sidewall during
inflation, stop and call roadside
assistance. WARNING:
If the tire does not
inflate to the recommended tire pressure
within 15 minutes, stop and call roadside
assistance.
Park the vehicle in a safe, level and secure
area, away from moving traffic.
Turn the hazard lights on. Apply the parking
brake and power off the vehicle. Inspect
the flat tire for visible damage.
If a puncture is located in the tire sidewall,
stop and call roadside assistance.
1. Remove the valve cap from the tire valve.
2. Unwrap the dual purpose hose (black tube) from the back of the compressor
housing.
3. Fasten the hose to the tire valve by turning the connector clockwise.
Tighten the connection securely.
334
2021 Mustang Mach-E (CGW) Canada/United States of America, Vehicles Built From: 07-06-2021, enUSA, Edition date: 202104, First-Printing Tire Sealant and Inflator KitE175978
Page 339 of 460
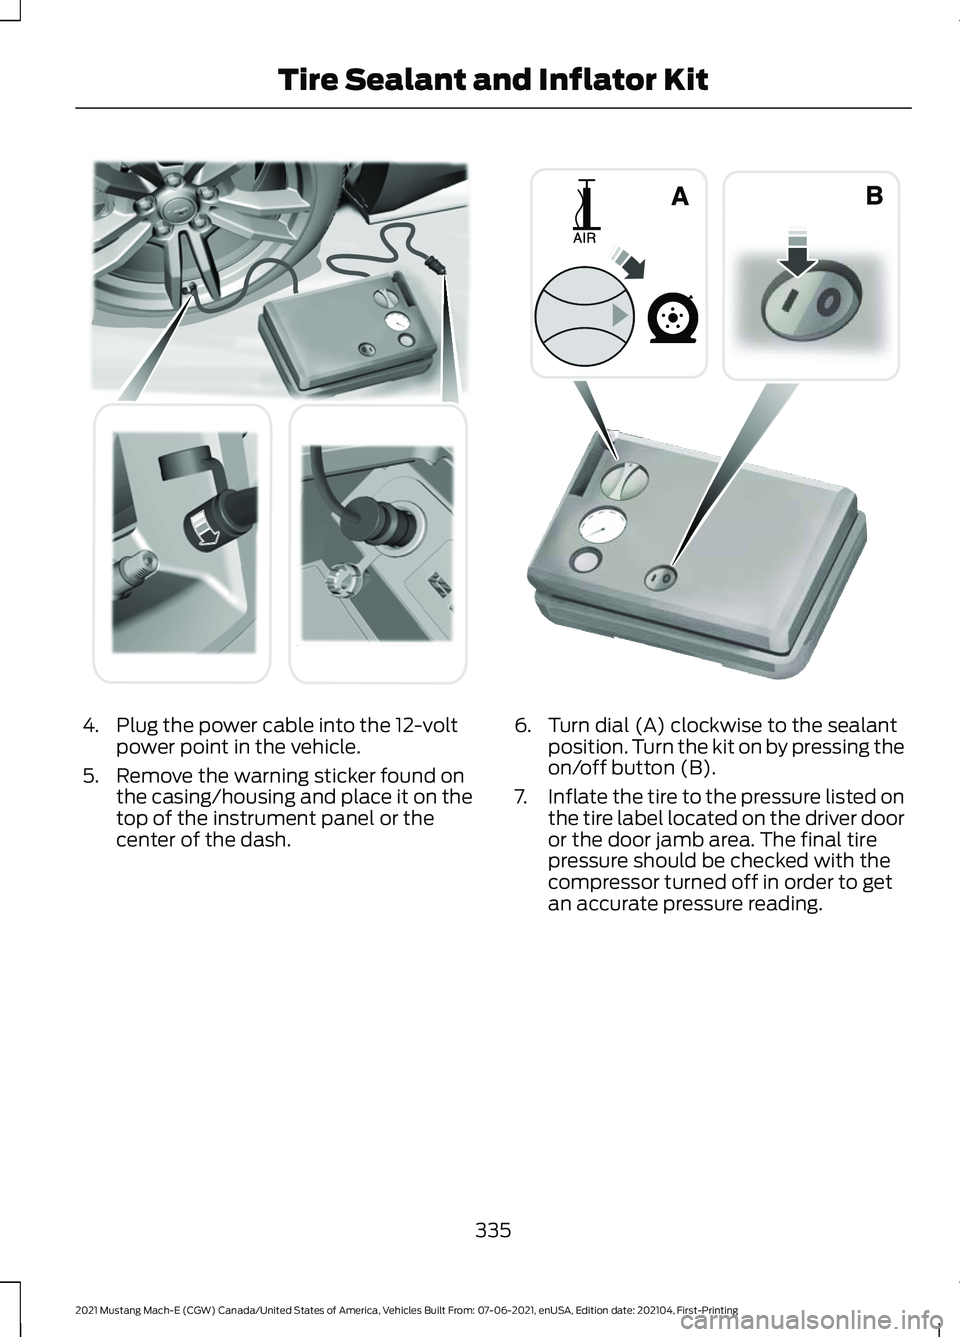
4. Plug the power cable into the 12-volt
power point in the vehicle.
5. Remove the warning sticker found on the casing/housing and place it on the
top of the instrument panel or the
center of the dash. 6. Turn dial (A) clockwise to the sealant
position. Turn the kit on by pressing the
on/off button (B).
7. Inflate the tire to the pressure listed on
the tire label located on the driver door
or the door jamb area. The final tire
pressure should be checked with the
compressor turned off in order to get
an accurate pressure reading.
335
2021 Mustang Mach-E (CGW) Canada/United States of America, Vehicles Built From: 07-06-2021, enUSA, Edition date: 202104, First-Printing Tire Sealant and Inflator Kit E175979 E175981
Page 340 of 460
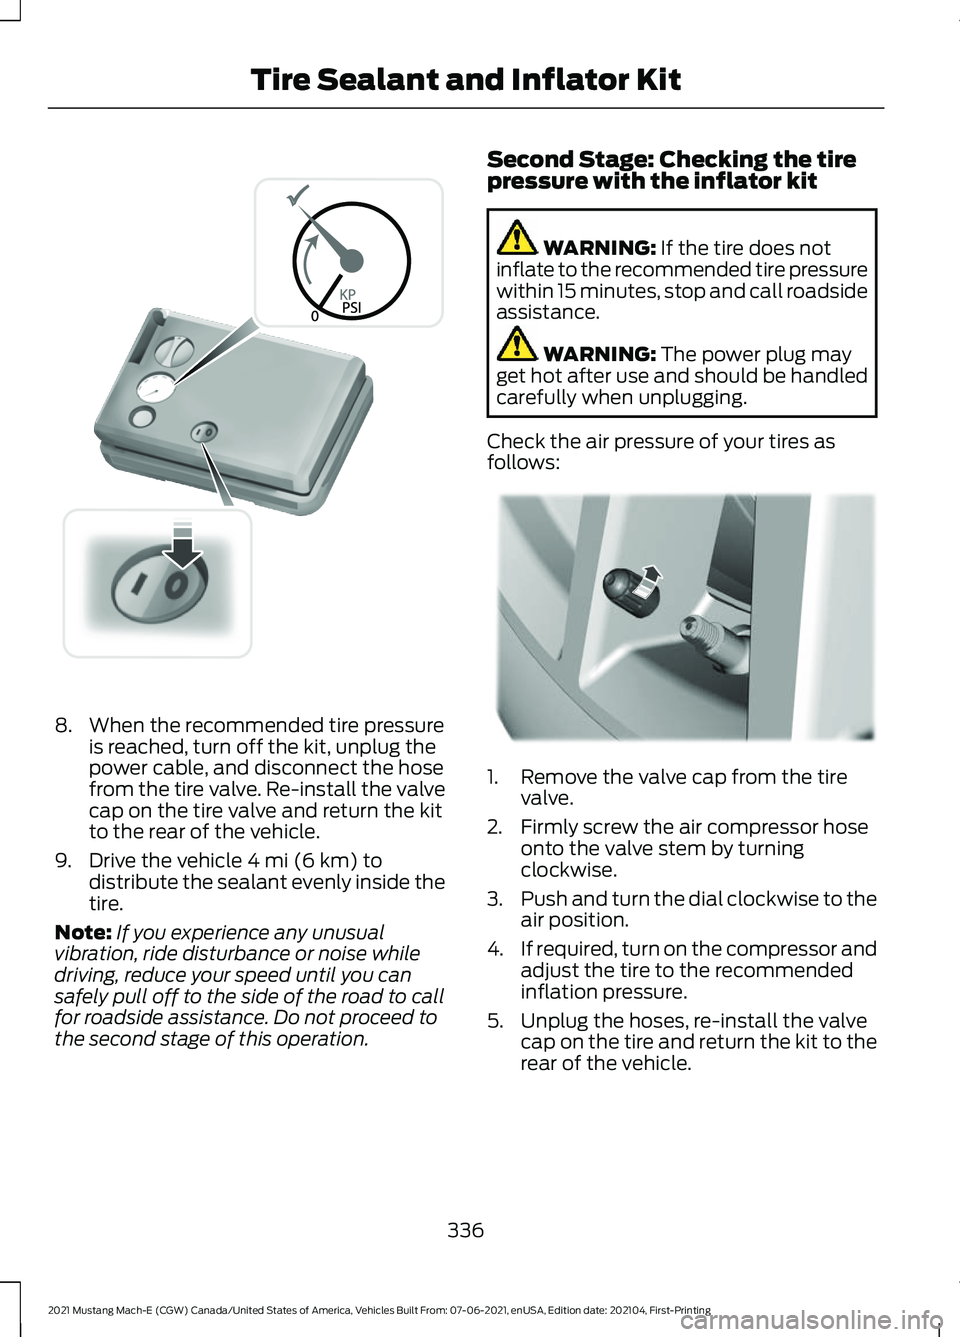
8. When the recommended tire pressure
is reached, turn off the kit, unplug the
power cable, and disconnect the hose
from the tire valve. Re-install the valve
cap on the tire valve and return the kit
to the rear of the vehicle.
9. Drive the vehicle 4 mi (6 km) to
distribute the sealant evenly inside the
tire.
Note: If you experience any unusual
vibration, ride disturbance or noise while
driving, reduce your speed until you can
safely pull off to the side of the road to call
for roadside assistance. Do not proceed to
the second stage of this operation. Second Stage: Checking the tire
pressure with the inflator kit WARNING:
If the tire does not
inflate to the recommended tire pressure
within 15 minutes, stop and call roadside
assistance. WARNING:
The power plug may
get hot after use and should be handled
carefully when unplugging.
Check the air pressure of your tires as
follows: 1. Remove the valve cap from the tire
valve.
2. Firmly screw the air compressor hose onto the valve stem by turning
clockwise.
3. Push and turn the dial clockwise to the
air position.
4. If required, turn on the compressor and
adjust the tire to the recommended
inflation pressure.
5. Unplug the hoses, re-install the valve cap on the tire and return the kit to the
rear of the vehicle.
336
2021 Mustang Mach-E (CGW) Canada/United States of America, Vehicles Built From: 07-06-2021, enUSA, Edition date: 202104, First-Printing Tire Sealant and Inflator KitE175982 E175983