FORD SIERRA 1993 2.G Bodywork And Fittings User Guide
Manufacturer: FORD, Model Year: 1993, Model line: SIERRA, Model: FORD SIERRA 1993 2.GPages: 22, PDF Size: 1.2 MB
Page 11 of 22
8Position the crane with the lifting arm
diagonally over the centre of the cargo area,
and attach the cradle. Carefully lift the cargo
area from the chassis. Note that the lip of the
cargo area rear panel fits over the rear chassis
crossmember, therefore the cargo area must
be pulled rearwards as it is removed to
disengage it from the crossmember.
Refitting
9Refitting is a reversal of removal, but ensure
that the insulators are in place between the
cargo area and the chassis. Before finally
tightening the securing bolts, adjust the
position of the cargo area to give an equal
clearance on both sides of the vehicle
between the cab rear panel and the cargo
area front panel.
Removal
1Lower the tailboard to the open position.
2Detach the rear lamp wiring cover on one
side of the vehicle by removing the two
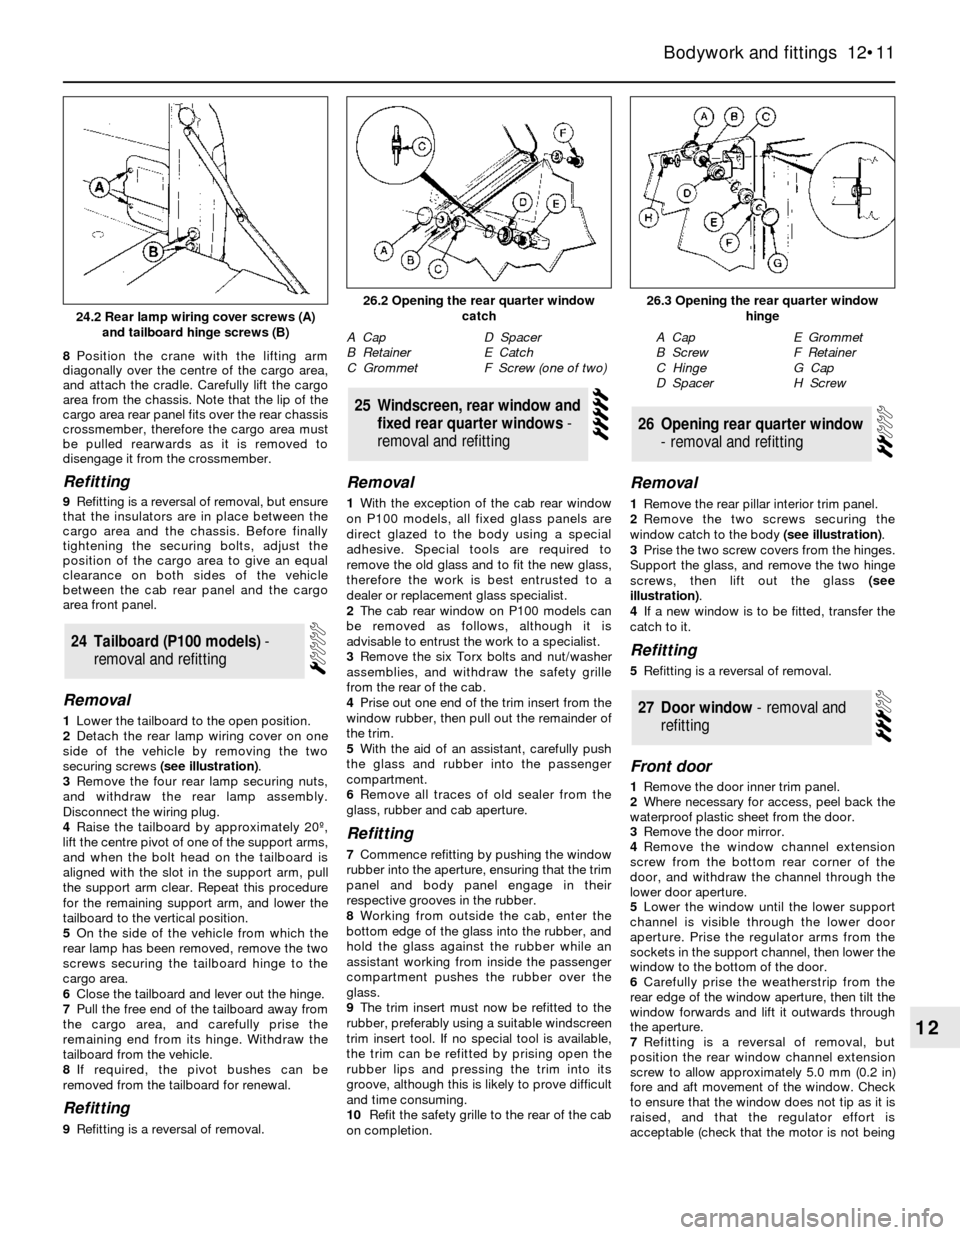
securing screws (see illustration).
3Remove the four rear lamp securing nuts,
and withdraw the rear lamp assembly.
Disconnect the wiring plug.
4Raise the tailboard by approximately 20º,
lift the centre pivot of one of the support arms,
and when the bolt head on the tailboard is
aligned with the slot in the support arm, pull
the support arm clear. Repeat this procedure
for the remaining support arm, and lower the
tailboard to the vertical position.
5On the side of the vehicle from which the
rear lamp has been removed, remove the two
screws securing the tailboard hinge to the
cargo area.
6Close the tailboard and lever out the hinge.
7Pull the free end of the tailboard away from
the cargo area, and carefully prise the
remaining end from its hinge. Withdraw the
tailboard from the vehicle.
8If required, the pivot bushes can be
removed from the tailboard for renewal.
Refitting
9Refitting is a reversal of removal.
Removal
1With the exception of the cab rear window
on P100 models, all fixed glass panels are
direct glazed to the body using a special
adhesive. Special tools are required to
remove the old glass and to fit the new glass,
therefore the work is best entrusted to a
dealer or replacement glass specialist.
2The cab rear window on P100 models can
be removed as follows, although it is
advisable to entrust the work to a specialist.
3Remove the six Torx bolts and nut/washer
assemblies, and withdraw the safety grille
from the rear of the cab.
4Prise out one end of the trim insert from the
window rubber, then pull out the remainder of
the trim.
5With the aid of an assistant, carefully push
the glass and rubber into the passenger
compartment.
6Remove all traces of old sealer from the
glass, rubber and cab aperture.
Refitting
7Commence refitting by pushing the window
rubber into the aperture, ensuring that the trim
panel and body panel engage in their
respective grooves in the rubber.
8Working from outside the cab, enter the
bottom edge of the glass into the rubber, and
hold the glass against the rubber while an
assistant working from inside the passenger
compartment pushes the rubber over the
glass.
9The trim insert must now be refitted to the
rubber, preferably using a suitable windscreen
trim insert tool. If no special tool is available,
the trim can be refitted by prising open the
rubber lips and pressing the trim into its
groove, although this is likely to prove difficult
and time consuming.
10Refit the safety grille to the rear of the cab
on completion.
Removal
1Remove the rear pillar interior trim panel.
2Remove the two screws securing the
window catch to the body (see illustration).
3Prise the two screw covers from the hinges.
Support the glass, and remove the two hinge
screws, then lift out the glass (see
illustration).
4If a new window is to be fitted, transfer the
catch to it.
Refitting
5Refitting is a reversal of removal.
Front door
1Remove the door inner trim panel.
2Where necessary for access, peel back the
waterproof plastic sheet from the door.
3Remove the door mirror.
4Remove the window channel extension
screw from the bottom rear corner of the
door, and withdraw the channel through the
lower door aperture.
5Lower the window until the lower support
channel is visible through the lower door
aperture. Prise the regulator arms from the
sockets in the support channel, then lower the
window to the bottom of the door.
6Carefully prise the weatherstrip from the
rear edge of the window aperture, then tilt the
window forwards and lift it outwards through
the aperture.
7Refitting is a reversal of removal, but
position the rear window channel extension
screw to allow approximately 5.0 mm (0.2 in)
fore and aft movement of the window. Check
to ensure that the window does not tip as it is
raised, and that the regulator effort is
acceptable (check that the motor is not being
27Door window - removal and
refitting
26Opening rear quarter window
- removal and refitting
25Windscreen, rear window and
fixed rear quarter windows -
removal and refitting
24Tailboard (P100 models) -
removal and refitting
Bodywork and fittings 12•11
12
26.3 Opening the rear quarter window
hinge
A Cap
B Screw
C Hinge
D SpacerE Grommet
F Retainer
G Cap
H Screw
26.2 Opening the rear quarter window
catch
A Cap
B Retainer
C GrommetD Spacer
E Catch
F Screw (one of two)
24.2 Rear lamp wiring cover screws (A)
and tailboard hinge screws (B)
Page 12 of 22
overloaded on models with electric windows).
Adjust the channel extension screw if
necessary.
Rear door
8Proceed as shown in paragraphs 1 and 2.
9On Saloon and Hatchback models, prise
the interior quarter trim panel from the rear of
the door, then remove the now exposed
screw and withdraw the exterior trim panel.
10Remove the three window channel
extension screws from the rear of the door,
and withdraw the channel through the lower
door aperture.
11Lower the window until the lower support
channel is visible through the lower door
aperture. Prise the regulator arms from the
sockets in the support channel, then lower the
window to the bottom of the door.
12Carefully prise the weatherstrip from the
front edge of the window aperture, then tilt the
window rearwards and lift it outwards through
the aperture.
13Refitting is as described in paragraph 7.
Removal
1Remove the door inner trim panel.
2Where necessary for improved access, peel
back the waterproof plastic sheet from the
door.
3Lower the window until the lower support
channel is visible through the lower door
aperture. Prise the regulator arms from the
sockets in the support channel, then lower the
window to the bottom of the door (see
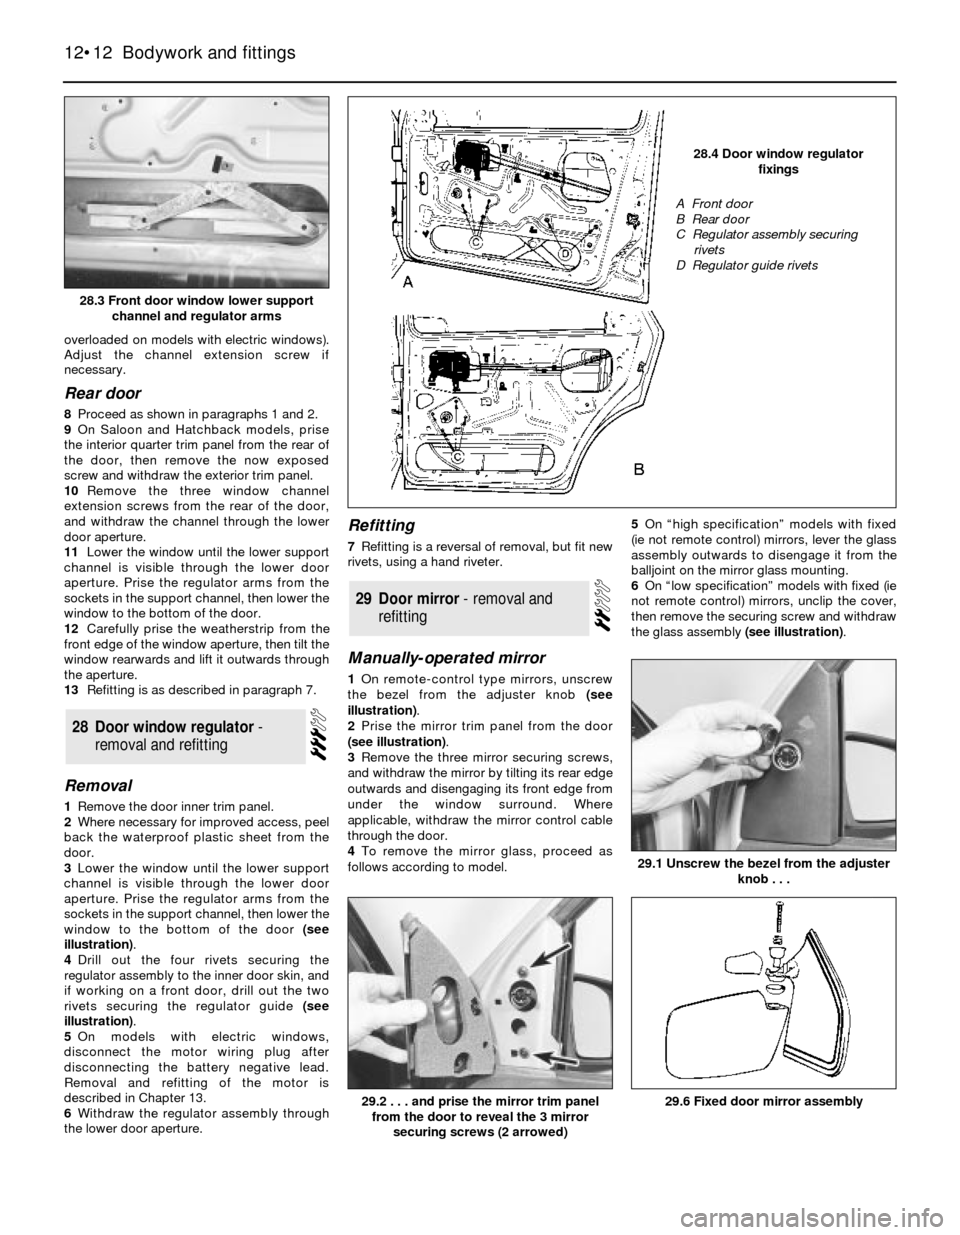
illustration).
4Drill out the four rivets securing the
regulator assembly to the inner door skin, and
if working on a front door, drill out the two
rivets securing the regulator guide (see
illustration).
5On models with electric windows,
disconnect the motor wiring plug after
disconnecting the battery negative lead.
Removal and refitting of the motor is
described in Chapter 13.
6Withdraw the regulator assembly through
the lower door aperture.
Refitting
7Refitting is a reversal of removal, but fit new
rivets, using a hand riveter.
Manually-operated mirror
1On remote-control type mirrors, unscrew
the bezel from the adjuster knob (see
illustration).
2Prise the mirror trim panel from the door
(see illustration).
3Remove the three mirror securing screws,
and withdraw the mirror by tilting its rear edge
outwards and disengaging its front edge from
under the window surround. Where
applicable, withdraw the mirror control cable
through the door.
4To remove the mirror glass, proceed as
follows according to model. 5On “high specification” models with fixed
(ie not remote control) mirrors, lever the glass
assembly outwards to disengage it from the
balljoint on the mirror glass mounting.
6On “low specification” models with fixed (ie
not remote control) mirrors, unclip the cover,
then remove the securing screw and withdraw
the glass assembly (see illustration).
29Door mirror - removal and
refitting
28Door window regulator -
removal and refitting
12•12Bodywork and fittings
29.2 . . . and prise the mirror trim panel
from the door to reveal the 3 mirror
securing screws (2 arrowed)29.6 Fixed door mirror assembly
29.1 Unscrew the bezel from the adjuster
knob . . .
28.4 Door window regulator
fixings
A Front door
B Rear door
C Regulator assembly securing
rivets
D Regulator guide rivets
28.3 Front door window lower support
channel and regulator arms
Page 13 of 22
7On models with remote control mirrors,
insert a thin screwdriver through the hole in
the bottom of the mirror assembly, and whilst
supporting the glass, release the locking ring
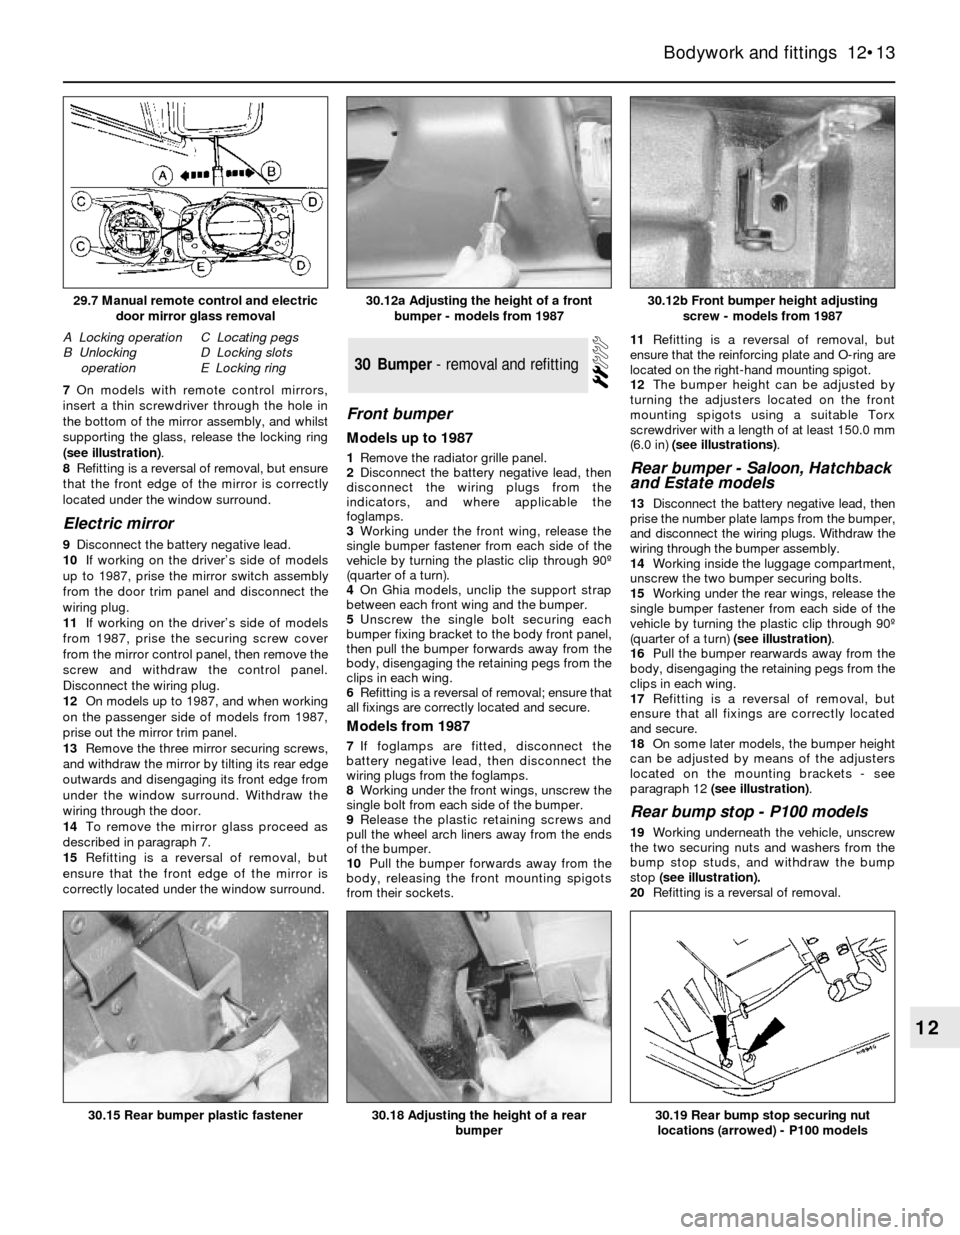
(see illustration).
8Refitting is a reversal of removal, but ensure
that the front edge of the mirror is correctly
located under the window surround.
Electric mirror
9Disconnect the battery negative lead.
10If working on the driver’s side of models
up to 1987, prise the mirror switch assembly
from the door trim panel and disconnect the
wiring plug.
11If working on the driver’s side of models
from 1987, prise the securing screw cover
from the mirror control panel, then remove the
screw and withdraw the control panel.
Disconnect the wiring plug.
12On models up to 1987, and when working
on the passenger side of models from 1987,
prise out the mirror trim panel.
13Remove the three mirror securing screws,
and withdraw the mirror by tilting its rear edge
outwards and disengaging its front edge from
under the window surround. Withdraw the
wiring through the door.
14To remove the mirror glass proceed as
described in paragraph 7.
15Refitting is a reversal of removal, but
ensure that the front edge of the mirror is
correctly located under the window surround.
Front bumper
Models up to 1987
1Remove the radiator grille panel.
2Disconnect the battery negative lead, then
disconnect the wiring plugs from the
indicators, and where applicable the
foglamps.
3Working under the front wing, release the
single bumper fastener from each side of the
vehicle by turning the plastic clip through 90º
(quarter of a turn).
4On Ghia models, unclip the support strap
between each front wing and the bumper.
5Unscrew the single bolt securing each
bumper fixing bracket to the body front panel,
then pull the bumper forwards away from the
body, disengaging the retaining pegs from the
clips in each wing.
6Refitting is a reversal of removal; ensure that
all fixings are correctly located and secure.
Models from 1987
7If foglamps are fitted, disconnect the
battery negative lead, then disconnect the
wiring plugs from the foglamps.
8Working under the front wings, unscrew the
single bolt from each side of the bumper.
9Release the plastic retaining screws and
pull the wheel arch liners away from the ends
of the bumper.
10Pull the bumper forwards away from the
body, releasing the front mounting spigots
from their sockets.11Refitting is a reversal of removal, but
ensure that the reinforcing plate and O-ring are
located on the right-hand mounting spigot.
12The bumper height can be adjusted by
turning the adjusters located on the front
mounting spigots using a suitable Torx
screwdriver with a length of at least 150.0 mm
(6.0 in) (see illustrations).
Rear bumper - Saloon, Hatchback
and Estate models
13Disconnect the battery negative lead, then
prise the number plate lamps from the bumper,
and disconnect the wiring plugs. Withdraw the
wiring through the bumper assembly.
14Working inside the luggage compartment,
unscrew the two bumper securing bolts.
15Working under the rear wings, release the
single bumper fastener from each side of the
vehicle by turning the plastic clip through 90º
(quarter of a turn) (see illustration).
16Pull the bumper rearwards away from the
body, disengaging the retaining pegs from the
clips in each wing.
17Refitting is a reversal of removal, but
ensure that all fixings are correctly located
and secure.
18On some later models, the bumper height
can be adjusted by means of the adjusters
located on the mounting brackets - see
paragraph 12 (see illustration).
Rear bump stop - P100 models
19Working underneath the vehicle, unscrew
the two securing nuts and washers from the
bump stop studs, and withdraw the bump
stop (see illustration).
20Refitting is a reversal of removal.
30Bumper - removal and refitting
Bodywork and fittings 12•13
12
30.15 Rear bumper plastic fastener30.19 Rear bump stop securing nut
locations (arrowed) - P100 models30.18 Adjusting the height of a rear
bumper
30.12b Front bumper height adjusting
screw - models from 198730.12a Adjusting the height of a front
bumper - models from 198729.7 Manual remote control and electric
door mirror glass removal
A Locking operation
B Unlocking
operationC Locating pegs
D Locking slots
E Locking ring
Page 14 of 22
New bumpers are supplied without the trim
moulding fitted. Special primer and adhesive
tape are specified by the manufacturer to
retain the moulding: it is suggested that a
Ford dealer is consulted for further details.
A damaged moulding can be removed by
prising it from the bumper using a screwdriver.
Models up to 1987
1With the bonnet raised, remove the four
grille panel securing screws from the top of
the front panel.
2Lift the grille panel from its lower mounting
bushes, and withdraw it from the vehicle.
3Refitting is a reversal of removal, but ensure
that the lower mounting lugs are correctly
located in their bushes.
Models from 1987
4With the bonnet raised, remove the two
grille panel securing screws from the front
face of the panel.
5Release the upper and lower grille retaining
clips, and withdraw the grille panel from the
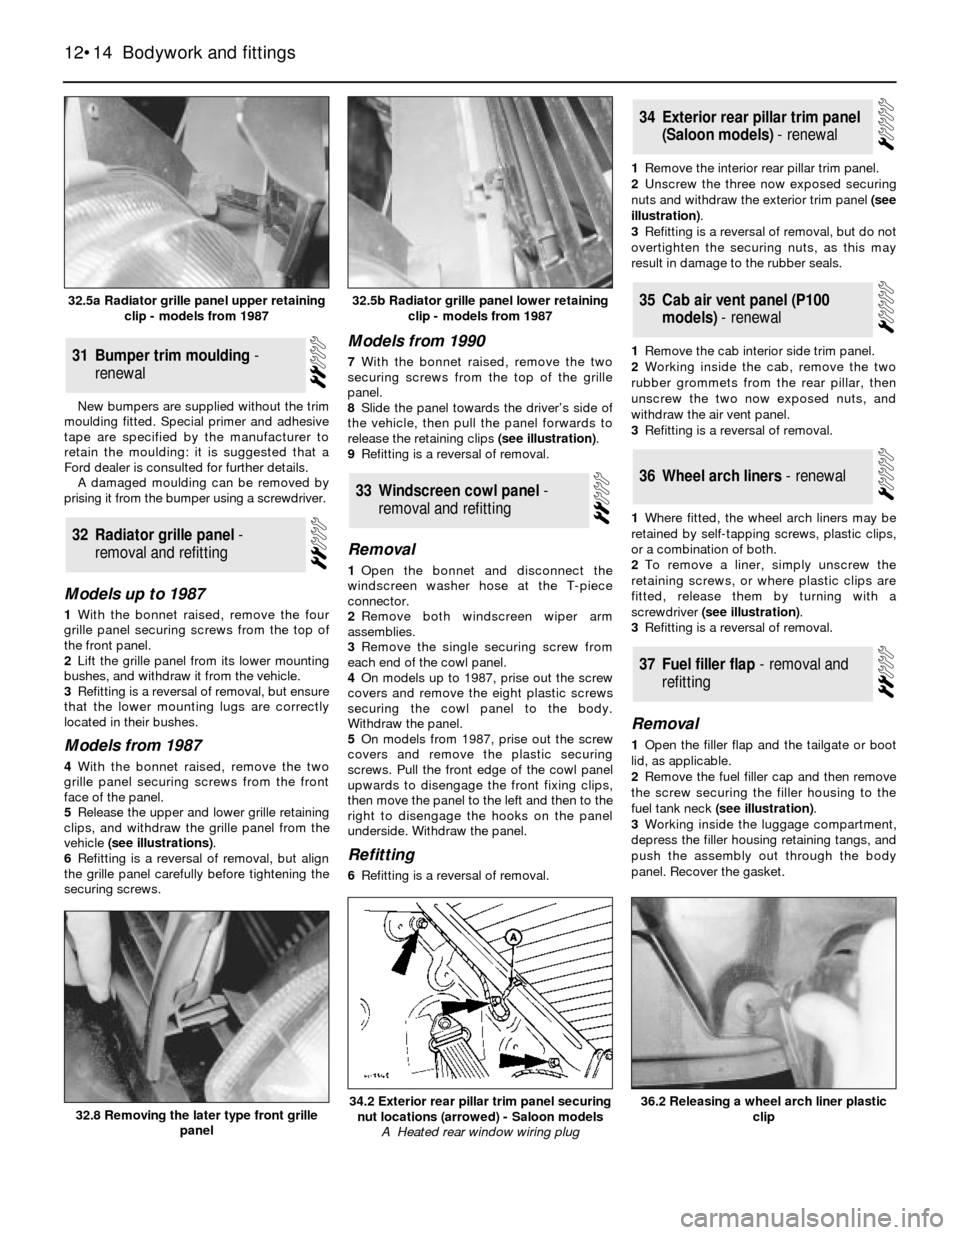
vehicle (see illustrations).
6Refitting is a reversal of removal, but align
the grille panel carefully before tightening the
securing screws.
Models from 1990
7With the bonnet raised, remove the two
securing screws from the top of the grille
panel.
8Slide the panel towards the driver’s side of
the vehicle, then pull the panel forwards to
release the retaining clips (see illustration).
9Refitting is a reversal of removal.
Removal
1Open the bonnet and disconnect the
windscreen washer hose at the T-piece
connector.
2Remove both windscreen wiper arm
assemblies.
3Remove the single securing screw from
each end of the cowl panel.
4On models up to 1987, prise out the screw
covers and remove the eight plastic screws
securing the cowl panel to the body.
Withdraw the panel.
5On models from 1987, prise out the screw
covers and remove the plastic securing
screws. Pull the front edge of the cowl panel
upwards to disengage the front fixing clips,
then move the panel to the left and then to the
right to disengage the hooks on the panel
underside. Withdraw the panel.
Refitting
6Refitting is a reversal of removal.1Remove the interior rear pillar trim panel.
2Unscrew the three now exposed securing
nuts and withdraw the exterior trim panel (see
illustration).
3Refitting is a reversal of removal, but do not
overtighten the securing nuts, as this may
result in damage to the rubber seals.
1Remove the cab interior side trim panel.
2Working inside the cab, remove the two
rubber grommets from the rear pillar, then
unscrew the two now exposed nuts, and
withdraw the air vent panel.
3Refitting is a reversal of removal.
1Where fitted, the wheel arch liners may be
retained by self-tapping screws, plastic clips,
or a combination of both.
2To remove a liner, simply unscrew the
retaining screws, or where plastic clips are
fitted, release them by turning with a
screwdriver (see illustration).
3Refitting is a reversal of removal.
Removal
1Open the filler flap and the tailgate or boot
lid, as applicable.
2Remove the fuel filler cap and then remove
the screw securing the filler housing to the
fuel tank neck (see illustration).
3Working inside the luggage compartment,
depress the filler housing retaining tangs, and
push the assembly out through the body
panel. Recover the gasket.
37Fuel filler flap - removal and
refitting
36Wheel arch liners - renewal
35Cab air vent panel (P100
models) - renewal
34Exterior rear pillar trim panel
(Saloon models) - renewal
33Windscreen cowl panel -
removal and refitting
32Radiator grille panel -
removal and refitting
31Bumper trim moulding -
renewal
12•14Bodywork and fittings
32.8 Removing the later type front grille
panel36.2 Releasing a wheel arch liner plastic
clip34.2 Exterior rear pillar trim panel securing
nut locations (arrowed) - Saloon models
A Heated rear window wiring plug
32.5b Radiator grille panel lower retaining
clip - models from 198732.5a Radiator grille panel upper retaining
clip - models from 1987
Page 15 of 22
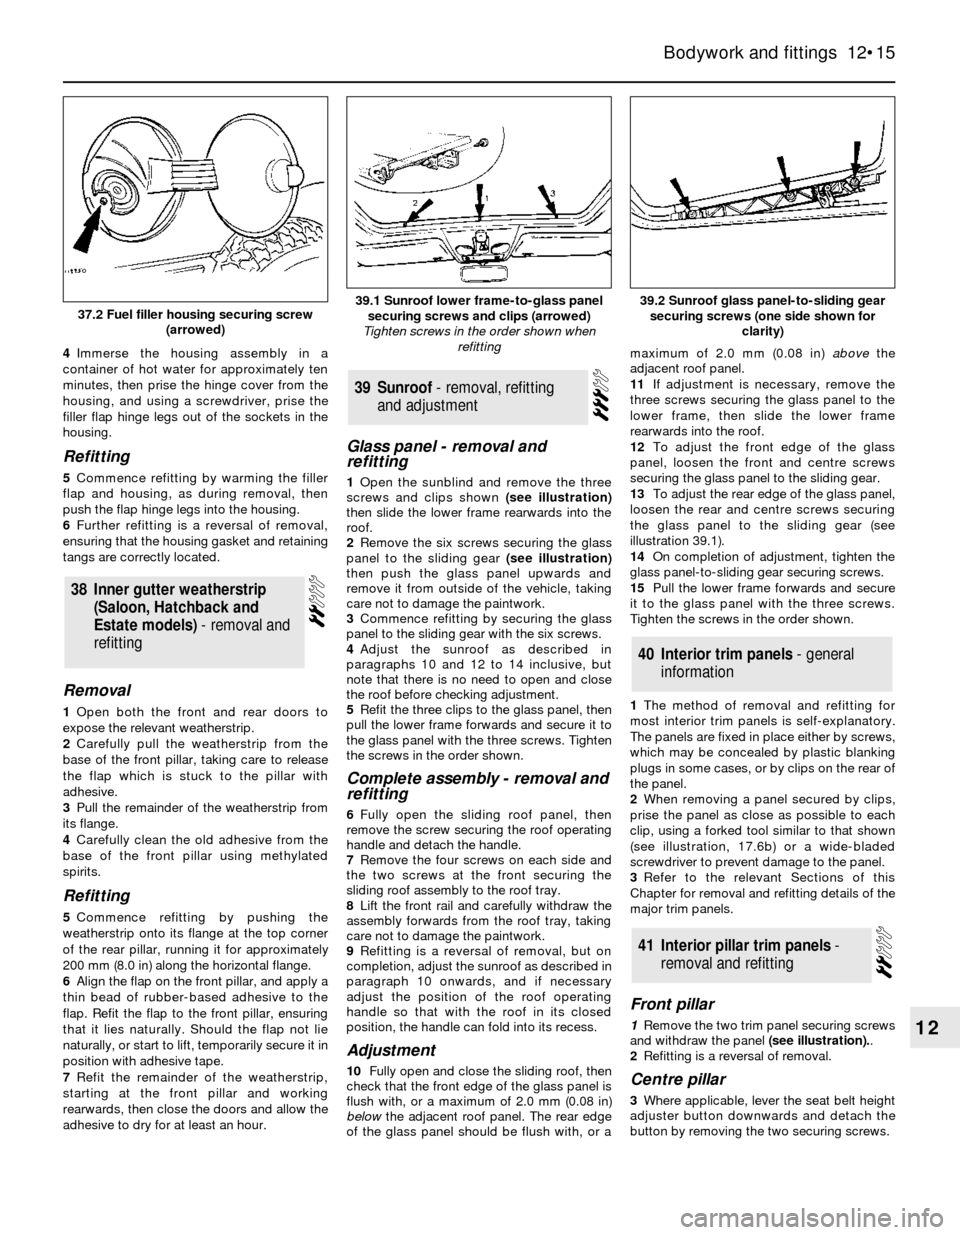
4Immerse the housing assembly in a
container of hot water for approximately ten
minutes, then prise the hinge cover from the
housing, and using a screwdriver, prise the
filler flap hinge legs out of the sockets in the
housing.
Refitting
5Commence refitting by warming the filler
flap and housing, as during removal, then
push the flap hinge legs into the housing.
6Further refitting is a reversal of removal,
ensuring that the housing gasket and retaining
tangs are correctly located.
Removal
1Open both the front and rear doors to
expose the relevant weatherstrip.
2Carefully pull the weatherstrip from the
base of the front pillar, taking care to release
the flap which is stuck to the pillar with
adhesive.
3Pull the remainder of the weatherstrip from
its flange.
4Carefully clean the old adhesive from the
base of the front pillar using methylated
spirits.
Refitting
5Commence refitting by pushing the
weatherstrip onto its flange at the top corner
of the rear pillar, running it for approximately
200 mm (8.0 in) along the horizontal flange.
6Align the flap on the front pillar, and apply a
thin bead of rubber-based adhesive to the
flap. Refit the flap to the front pillar, ensuring
that it lies naturally. Should the flap not lie
naturally, or start to lift, temporarily secure it in
position with adhesive tape.
7Refit the remainder of the weatherstrip,
starting at the front pillar and working
rearwards, then close the doors and allow the
adhesive to dry for at least an hour.
Glass panel - removal and
refitting
1Open the sunblind and remove the three
screws and clips shown (see illustration)
then slide the lower frame rearwards into the
roof.
2Remove the six screws securing the glass
panel to the sliding gear (see illustration)
then push the glass panel upwards and
remove it from outside of the vehicle, taking
care not to damage the paintwork.
3Commence refitting by securing the glass
panel to the sliding gear with the six screws.
4Adjust the sunroof as described in
paragraphs 10 and 12 to 14 inclusive, but
note that there is no need to open and close
the roof before checking adjustment.
5Refit the three clips to the glass panel, then
pull the lower frame forwards and secure it to
the glass panel with the three screws. Tighten
the screws in the order shown.
Complete assembly - removal and
refitting
6Fully open the sliding roof panel, then
remove the screw securing the roof operating
handle and detach the handle.
7Remove the four screws on each side and
the two screws at the front securing the
sliding roof assembly to the roof tray.
8Lift the front rail and carefully withdraw the
assembly forwards from the roof tray, taking
care not to damage the paintwork.
9Refitting is a reversal of removal, but on
completion, adjust the sunroof as described in
paragraph 10 onwards, and if necessary
adjust the position of the roof operating
handle so that with the roof in its closed
position, the handle can fold into its recess.
Adjustment
10Fully open and close the sliding roof, then
check that the front edge of the glass panel is
flush with, or a maximum of 2.0 mm (0.08 in)
below the adjacent roof panel. The rear edge
of the glass panel should be flush with, or amaximum of 2.0 mm (0.08 in) above the
adjacent roof panel.
11If adjustment is necessary, remove the
three screws securing the glass panel to the
lower frame, then slide the lower frame
rearwards into the roof.
12To adjust the front edge of the glass
panel, loosen the front and centre screws
securing the glass panel to the sliding gear.
13To adjust the rear edge of the glass panel,
loosen the rear and centre screws securing
the glass panel to the sliding gear (see
illustration 39.1).
14On completion of adjustment, tighten the
glass panel-to-sliding gear securing screws.
15Pull the lower frame forwards and secure
it to the glass panel with the three screws.
Tighten the screws in the order shown.
1The method of removal and refitting for
most interior trim panels is self-explanatory.
The panels are fixed in place either by screws,
which may be concealed by plastic blanking
plugs in some cases, or by clips on the rear of
the panel.
2When removing a panel secured by clips,
prise the panel as close as possible to each
clip, using a forked tool similar to that shown
(see illustration, 17.6b) or a wide-bladed
screwdriver to prevent damage to the panel.
3Refer to the relevant Sections of this
Chapter for removal and refitting details of the
major trim panels.
Front pillar
1Remove the two trim panel securing screws
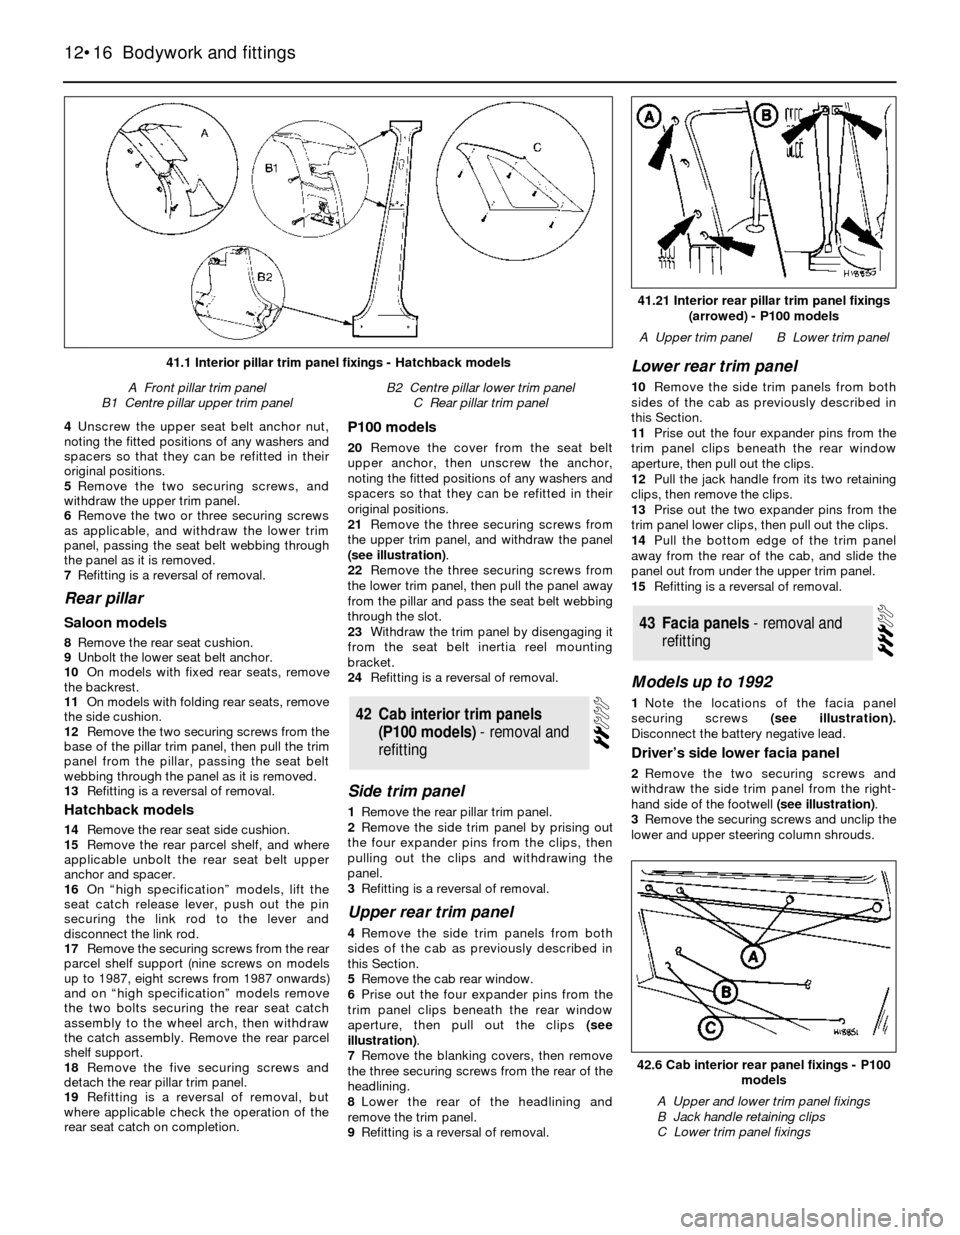
and withdraw the panel(see illustration)..
2Refitting is a reversal of removal.
Centre pillar
3Where applicable, lever the seat belt height
adjuster button downwards and detach the
button by removing the two securing screws.
41Interior pillar trim panels -
removal and refitting
40Interior trim panels - general
information
39Sunroof - removal, refitting
and adjustment
38Inner gutter weatherstrip
(Saloon, Hatchback and
Estate models) - removal and
refitting
Bodywork and fittings 12•15
12
39.2 Sunroof glass panel-to-sliding gear
securing screws (one side shown for
clarity)39.1 Sunroof lower frame-to-glass panel
securing screws and clips (arrowed)
Tighten screws in the order shown when
refitting37.2 Fuel filler housing securing screw
(arrowed)
Page 16 of 22
4Unscrew the upper seat belt anchor nut,
noting the fitted positions of any washers and
spacers so that they can be refitted in their
original positions.
5Remove the two securing screws, and
withdraw the upper trim panel.
6Remove the two or three securing screws
as applicable, and withdraw the lower trim
panel, passing the seat belt webbing through
the panel as it is removed.
7Refitting is a reversal of removal.
Rear pillar
Saloon models
8Remove the rear seat cushion.
9Unbolt the lower seat belt anchor.
10On models with fixed rear seats, remove
the backrest.
11On models with folding rear seats, remove
the side cushion.
12Remove the two securing screws from the
base of the pillar trim panel, then pull the trim
panel from the pillar, passing the seat belt
webbing through the panel as it is removed.
13Refitting is a reversal of removal.
Hatchback models
14Remove the rear seat side cushion.
15Remove the rear parcel shelf, and where
applicable unbolt the rear seat belt upper
anchor and spacer.
16On “high specification” models, lift the
seat catch release lever, push out the pin
securing the link rod to the lever and
disconnect the link rod.
17Remove the securing screws from the rear
parcel shelf support (nine screws on models
up to 1987, eight screws from 1987 onwards)
and on “high specification” models remove
the two bolts securing the rear seat catch
assembly to the wheel arch, then withdraw
the catch assembly. Remove the rear parcel
shelf support.
18Remove the five securing screws and
detach the rear pillar trim panel.
19Refitting is a reversal of removal, but
where applicable check the operation of the
rear seat catch on completion.
P100 models
20Remove the cover from the seat belt
upper anchor, then unscrew the anchor,
noting the fitted positions of any washers and
spacers so that they can be refitted in their
original positions.
21Remove the three securing screws from
the upper trim panel, and withdraw the panel
(see illustration).
22Remove the three securing screws from
the lower trim panel, then pull the panel away
from the pillar and pass the seat belt webbing
through the slot.
23Withdraw the trim panel by disengaging it
from the seat belt inertia reel mounting
bracket.
24Refitting is a reversal of removal.
Side trim panel
1Remove the rear pillar trim panel.
2Remove the side trim panel by prising out
the four expander pins from the clips, then
pulling out the clips and withdrawing the
panel.
3Refitting is a reversal of removal.
Upper rear trim panel
4Remove the side trim panels from both
sides of the cab as previously described in
this Section.
5Remove the cab rear window.
6Prise out the four expander pins from the
trim panel clips beneath the rear window
aperture, then pull out the clips (see
illustration).
7Remove the blanking covers, then remove
the three securing screws from the rear of the
headlining.
8Lower the rear of the headlining and
remove the trim panel.
9Refitting is a reversal of removal.
Lower rear trim panel
10Remove the side trim panels from both
sides of the cab as previously described in
this Section.
11Prise out the four expander pins from the
trim panel clips beneath the rear window
aperture, then pull out the clips.
12Pull the jack handle from its two retaining
clips, then remove the clips.
13Prise out the two expander pins from the
trim panel lower clips, then pull out the clips.
14Pull the bottom edge of the trim panel
away from the rear of the cab, and slide the
panel out from under the upper trim panel.
15Refitting is a reversal of removal.
Models up to 1992
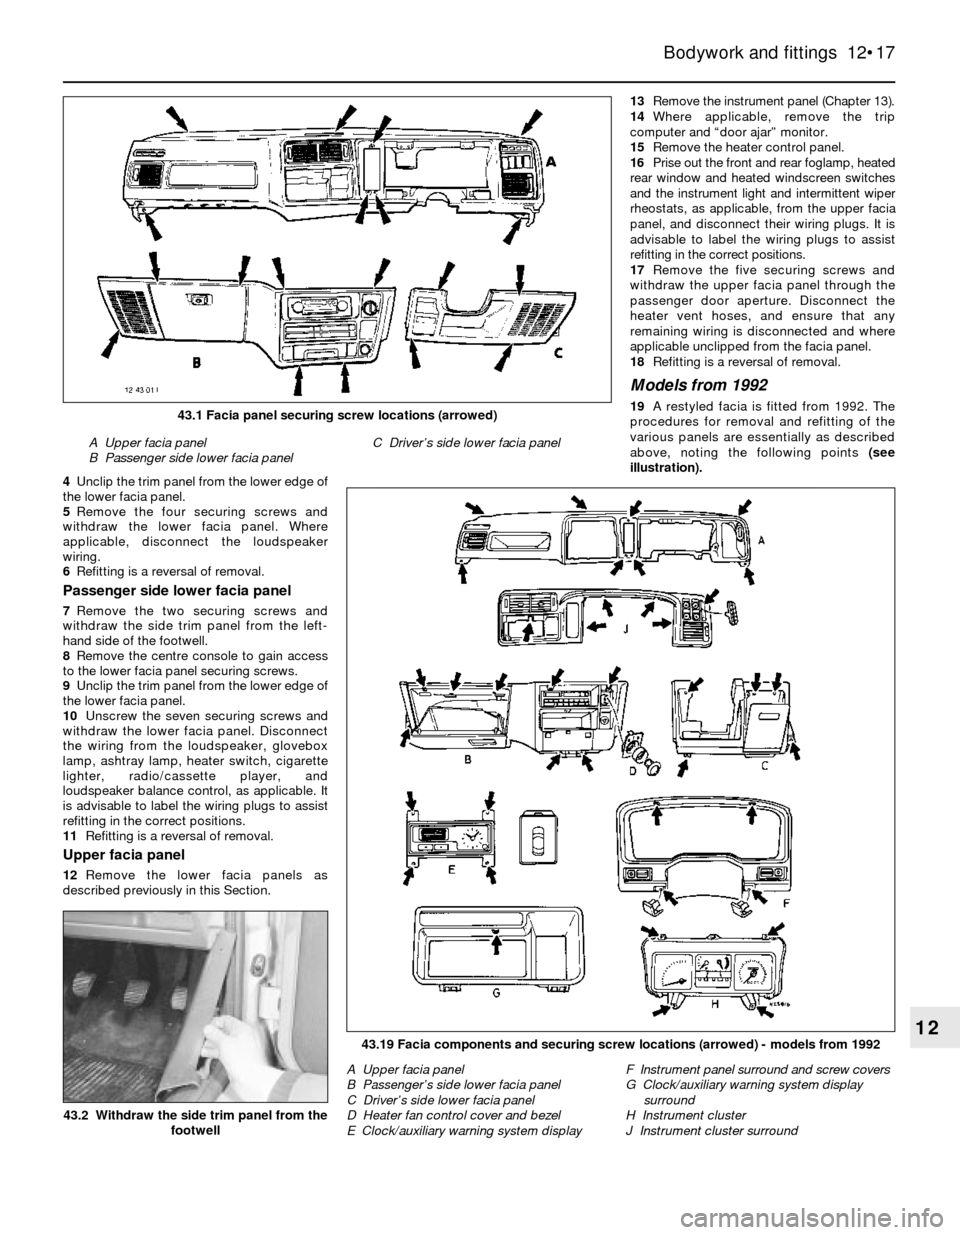
1Note the locations of the facia panel
securing screws (see illustration).
Disconnect the battery negative lead.
Driver’s side lower facia panel
2Remove the two securing screws and
withdraw the side trim panel from the right-
hand side of the footwell (see illustration).
3Remove the securing screws and unclip the
lower and upper steering column shrouds.
43Facia panels - removal and
refitting
42Cab interior trim panels
(P100 models) - removal and
refitting
12•16Bodywork and fittings
42.6 Cab interior rear panel fixings - P100
models
A Upper and lower trim panel fixings
B Jack handle retaining clips
C Lower trim panel fixings
41.21 Interior rear pillar trim panel fixings
(arrowed) - P100 models
A Upper trim panelB Lower trim panel
41.1 Interior pillar trim panel fixings - Hatchback models
A Front pillar trim panel
B1 Centre pillar upper trim panelB2 Centre pillar lower trim panel
C Rear pillar trim panel
Page 17 of 22
4Unclip the trim panel from the lower edge of
the lower facia panel.
5Remove the four securing screws and
withdraw the lower facia panel. Where
applicable, disconnect the loudspeaker
wiring.
6Refitting is a reversal of removal.
Passenger side lower facia panel
7Remove the two securing screws and
withdraw the side trim panel from the left-
hand side of the footwell.
8Remove the centre console to gain access
to the lower facia panel securing screws.
9Unclip the trim panel from the lower edge of
the lower facia panel.
10Unscrew the seven securing screws and
withdraw the lower facia panel. Disconnect
the wiring from the loudspeaker, glovebox
lamp, ashtray lamp, heater switch, cigarette
lighter, radio/cassette player, and
loudspeaker balance control, as applicable. It
is advisable to label the wiring plugs to assist
refitting in the correct positions.
11Refitting is a reversal of removal.
Upper facia panel
12Remove the lower facia panels as
described previously in this Section.13Remove the instrument panel (Chapter 13).
14Where applicable, remove the trip
computer and “door ajar” monitor.
15Remove the heater control panel.
16Prise out the front and rear foglamp, heated
rear window and heated windscreen switches
and the instrument light and intermittent wiper
rheostats, as applicable, from the upper facia
panel, and disconnect their wiring plugs. It is
advisable to label the wiring plugs to assist
refitting in the correct positions.
17Remove the five securing screws and
withdraw the upper facia panel through the
passenger door aperture. Disconnect the
heater vent hoses, and ensure that any
remaining wiring is disconnected and where
applicable unclipped from the facia panel.
18Refitting is a reversal of removal.
Models from 1992
19A restyled facia is fitted from 1992. The
procedures for removal and refitting of the
various panels are essentially as described
above, noting the following points(see
illustration).
Bodywork and fittings 12•17
1243.19 Facia components and securing screw locations (arrowed) - models from 1992
A Upper facia panel
B Passenger’s side lower facia panel
C Driver’s side lower facia panel
D Heater fan control cover and bezel
E Clock/auxiliary warning system displayF Instrument panel surround and screw covers
G Clock/auxiliary warning system display
surround
H Instrument cluster
J Instrument cluster surround
A Upper facia panel
B Passenger side lower facia panelC Driver’s side lower facia panel
43.1 Facia panel securing screw locations (arrowed)
43.2 Withdraw the side trim panel from the
footwell
Page 18 of 22
20On models with an adjustable steering
column, fully extend and lower the steering
column before attempting to remove any of
the panels on the driver’s side.
21The steering column shrouds are secured
by six screws - five through the lower shroud,
and one through the upper shroud.
22If necessary, remove the centre console.
23The driver’s side lower facia panel is
secured by five screws.
24The passenger’s side lower facia panel is
secured by eight screws.
25On models with an alarm, the alarm warning
light must be disconnected and removed before
removing the upper facia panel.
Models up to 1990
Full length console
1Where applicable, prise the electric window
switches from the front upper console panel
and disconnect the wiring.
2Remove the three securing screws from the
front upper console panel, then withdraw the
panel over the gear selector lever, at the same
time releasing the rubber gaiter where
applicable.
3On “high specification” models, where
applicable prise the electric window switches
from the rear upper console panel and
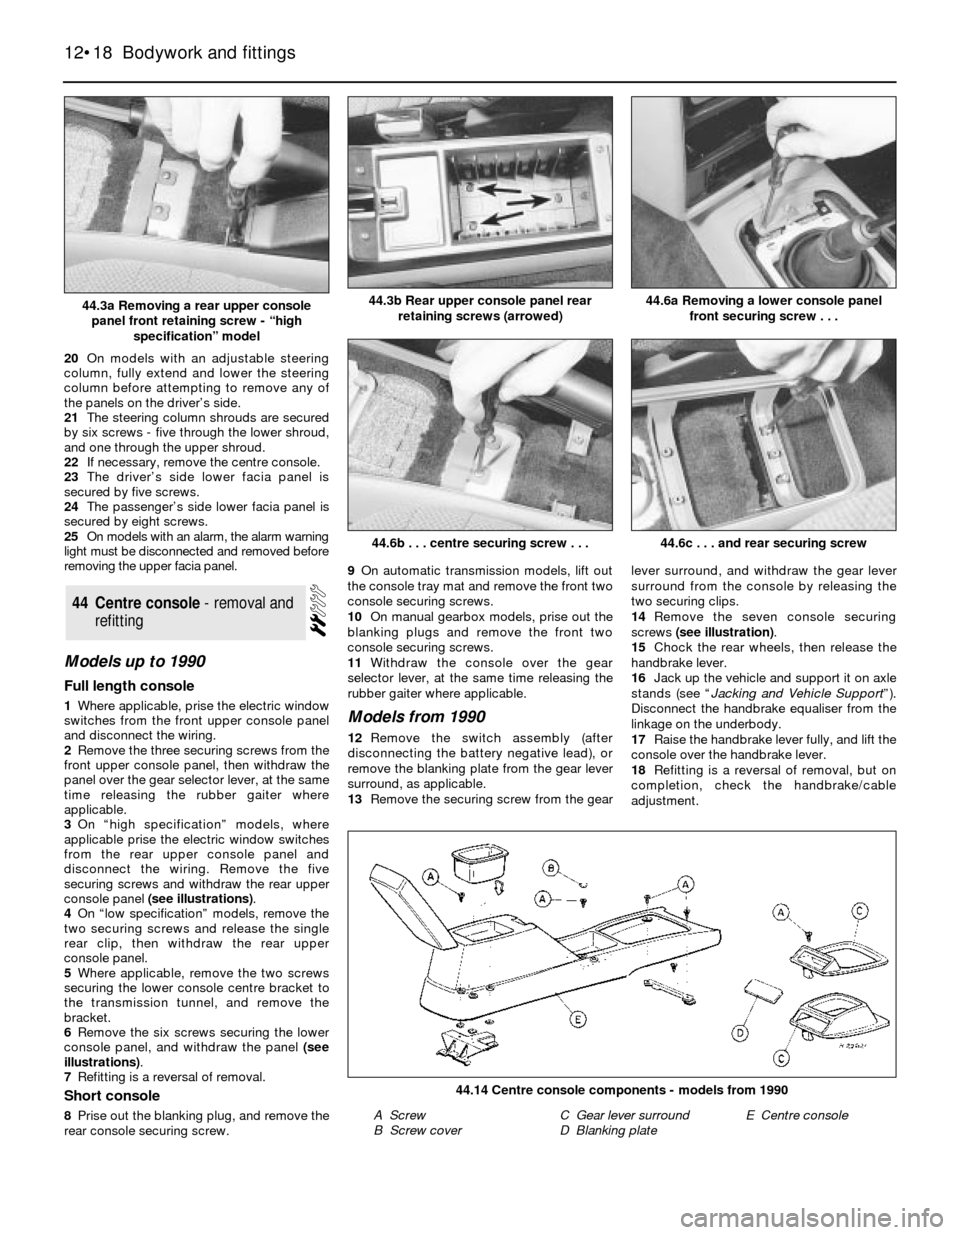
disconnect the wiring. Remove the five
securing screws and withdraw the rear upper
console panel (see illustrations).
4On “low specification” models, remove the
two securing screws and release the single
rear clip, then withdraw the rear upper
console panel.
5Where applicable, remove the two screws
securing the lower console centre bracket to
the transmission tunnel, and remove the
bracket.
6Remove the six screws securing the lower
console panel, and withdraw the panel (see
illustrations).
7Refitting is a reversal of removal.
Short console
8Prise out the blanking plug, and remove the
rear console securing screw.9On automatic transmission models, lift out
the console tray mat and remove the front two
console securing screws.
10On manual gearbox models, prise out the
blanking plugs and remove the front two
console securing screws.
11Withdraw the console over the gear
selector lever, at the same time releasing the
rubber gaiter where applicable.
Models from 1990
12Remove the switch assembly (after
disconnecting the battery negative lead), or
remove the blanking plate from the gear lever
surround, as applicable.
13Remove the securing screw from the gearlever surround, and withdraw the gear lever
surround from the console by releasing the
two securing clips.
14Remove the seven console securing
screws (see illustration).
15Chock the rear wheels, then release the
handbrake lever.
16Jack up the vehicle and support it on axle
stands (see “Jacking and Vehicle Support”).
Disconnect the handbrake equaliser from the
linkage on the underbody.
17Raise the handbrake lever fully, and lift the
console over the handbrake lever.
18Refitting is a reversal of removal, but on
completion, check the handbrake/cable
adjustment.
44Centre console - removal and
refitting
12•18Bodywork and fittings
44.3b Rear upper console panel rear
retaining screws (arrowed)
44.6b . . . centre securing screw . . .
44.14 Centre console components - models from 1990
A Screw
B Screw coverC Gear lever surround
D Blanking plateE Centre console
44.6c . . . and rear securing screw
44.6a Removing a lower console panel
front securing screw . . .44.3a Removing a rear upper console
panel front retaining screw - “high
specification” model
Page 19 of 22
Removal
1Disconnect the battery negative lead.
2Open the sunroof.
3On models with a manually-operated
sunroof, remove the sunroof handle securing
screw, then withdraw the handle and trim plate.
4On models with an electric sunroof, remove
the operating switch.
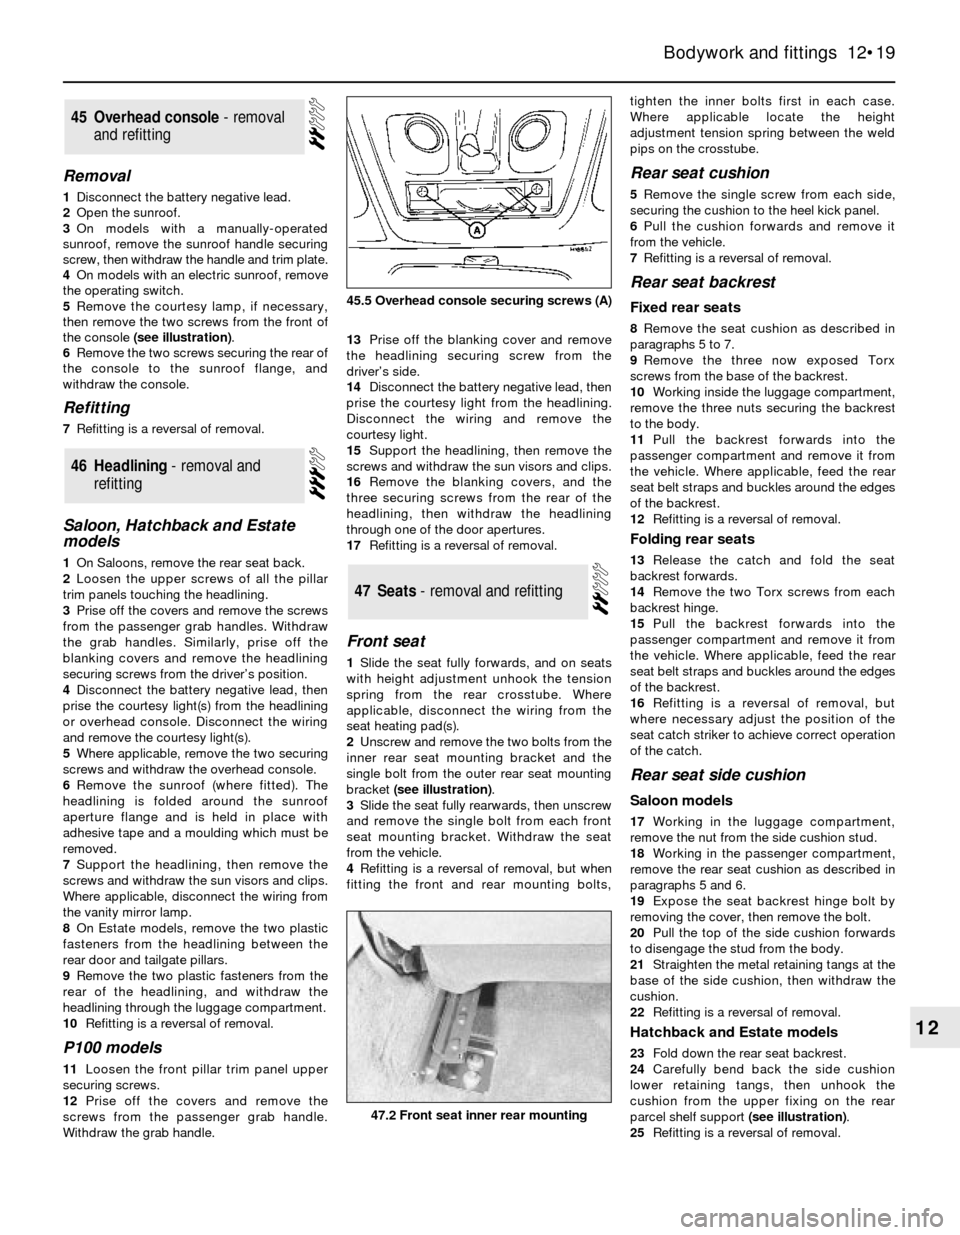
5Remove the courtesy lamp, if necessary,
then remove the two screws from the front of
the console (see illustration).
6Remove the two screws securing the rear of
the console to the sunroof flange, and
withdraw the console.
Refitting
7Refitting is a reversal of removal.
Saloon, Hatchback and Estate
models
1On Saloons, remove the rear seat back.
2Loosen the upper screws of all the pillar
trim panels touching the headlining.
3Prise off the covers and remove the screws
from the passenger grab handles. Withdraw
the grab handles. Similarly, prise off the
blanking covers and remove the headlining
securing screws from the driver’s position.
4Disconnect the battery negative lead, then
prise the courtesy light(s) from the headlining
or overhead console. Disconnect the wiring
and remove the courtesy light(s).
5Where applicable, remove the two securing
screws and withdraw the overhead console.
6Remove the sunroof (where fitted). The
headlining is folded around the sunroof
aperture flange and is held in place with
adhesive tape and a moulding which must be
removed.
7Support the headlining, then remove the
screws and withdraw the sun visors and clips.
Where applicable, disconnect the wiring from
the vanity mirror lamp.
8On Estate models, remove the two plastic
fasteners from the headlining between the
rear door and tailgate pillars.
9Remove the two plastic fasteners from the
rear of the headlining, and withdraw the
headlining through the luggage compartment.
10Refitting is a reversal of removal.
P100 models
11Loosen the front pillar trim panel upper
securing screws.
12Prise off the covers and remove the
screws from the passenger grab handle.
Withdraw the grab handle.13Prise off the blanking cover and remove
the headlining securing screw from the
driver’s side.
14Disconnect the battery negative lead, then
prise the courtesy light from the headlining.
Disconnect the wiring and remove the
courtesy light.
15Support the headlining, then remove the
screws and withdraw the sun visors and clips.
16Remove the blanking covers, and the
three securing screws from the rear of the
headlining, then withdraw the headlining
through one of the door apertures.
17Refitting is a reversal of removal.
Front seat
1Slide the seat fully forwards, and on seats
with height adjustment unhook the tension
spring from the rear crosstube. Where
applicable, disconnect the wiring from the
seat heating pad(s).
2Unscrew and remove the two bolts from the
inner rear seat mounting bracket and the
single bolt from the outer rear seat mounting
bracket (see illustration).
3Slide the seat fully rearwards, then unscrew
and remove the single bolt from each front
seat mounting bracket. Withdraw the seat
from the vehicle.
4Refitting is a reversal of removal, but when
fitting the front and rear mounting bolts,tighten the inner bolts first in each case.
Where applicable locate the height
adjustment tension spring between the weld
pips on the crosstube.
Rear seat cushion
5Remove the single screw from each side,
securing the cushion to the heel kick panel.
6Pull the cushion forwards and remove it
from the vehicle.
7Refitting is a reversal of removal.
Rear seat backrest
Fixed rear seats
8Remove the seat cushion as described in
paragraphs 5 to 7.
9Remove the three now exposed Torx
screws from the base of the backrest.
10Working inside the luggage compartment,
remove the three nuts securing the backrest
to the body.
11Pull the backrest forwards into the
passenger compartment and remove it from
the vehicle. Where applicable, feed the rear
seat belt straps and buckles around the edges
of the backrest.
12Refitting is a reversal of removal.
Folding rear seats
13Release the catch and fold the seat
backrest forwards.
14Remove the two Torx screws from each
backrest hinge.
15Pull the backrest forwards into the
passenger compartment and remove it from
the vehicle. Where applicable, feed the rear
seat belt straps and buckles around the edges
of the backrest.
16Refitting is a reversal of removal, but
where necessary adjust the position of the
seat catch striker to achieve correct operation
of the catch.
Rear seat side cushion
Saloon models
17Working in the luggage compartment,
remove the nut from the side cushion stud.
18Working in the passenger compartment,
remove the rear seat cushion as described in
paragraphs 5 and 6.
19Expose the seat backrest hinge bolt by
removing the cover, then remove the bolt.
20Pull the top of the side cushion forwards
to disengage the stud from the body.
21Straighten the metal retaining tangs at the
base of the side cushion, then withdraw the
cushion.
22Refitting is a reversal of removal.
Hatchback and Estate models
23Fold down the rear seat backrest.
24Carefully bend back the side cushion
lower retaining tangs, then unhook the
cushion from the upper fixing on the rear
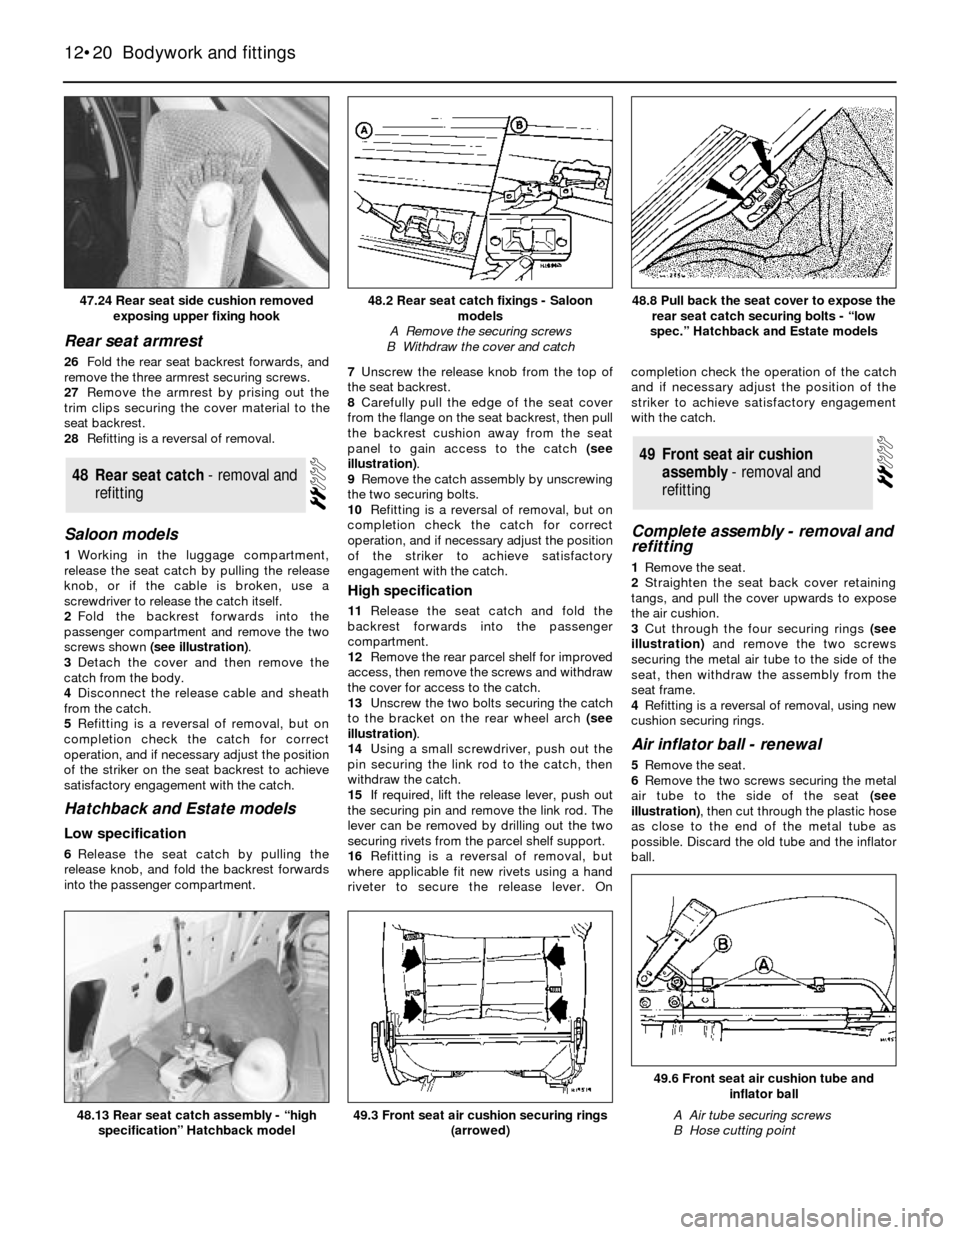
parcel shelf support (see illustration).
25Refitting is a reversal of removal.
47Seats - removal and refitting
46Headlining - removal and
refitting
45Overhead console - removal
and refitting
Bodywork and fittings 12•19
12
47.2 Front seat inner rear mounting
45.5 Overhead console securing screws (A)
Page 20 of 22
Rear seat armrest
26Fold the rear seat backrest forwards, and
remove the three armrest securing screws.
27Remove the armrest by prising out the
trim clips securing the cover material to the
seat backrest.
28Refitting is a reversal of removal.
Saloon models
1Working in the luggage compartment,
release the seat catch by pulling the release
knob, or if the cable is broken, use a
screwdriver to release the catch itself.
2Fold the backrest forwards into the
passenger compartment and remove the two
screws shown (see illustration).
3Detach the cover and then remove the
catch from the body.
4Disconnect the release cable and sheath
from the catch.
5Refitting is a reversal of removal, but on
completion check the catch for correct
operation, and if necessary adjust the position
of the striker on the seat backrest to achieve
satisfactory engagement with the catch.
Hatchback and Estate models
Low specification
6Release the seat catch by pulling the
release knob, and fold the backrest forwards
into the passenger compartment.7Unscrew the release knob from the top of
the seat backrest.
8Carefully pull the edge of the seat cover
from the flange on the seat backrest, then pull
the backrest cushion away from the seat
panel to gain access to the catch (see
illustration).
9Remove the catch assembly by unscrewing
the two securing bolts.
10Refitting is a reversal of removal, but on
completion check the catch for correct
operation, and if necessary adjust the position
of the striker to achieve satisfactory
engagement with the catch.
High specification
11Release the seat catch and fold the
backrest forwards into the passenger
compartment.
12Remove the rear parcel shelf for improved
access, then remove the screws and withdraw
the cover for access to the catch.
13Unscrew the two bolts securing the catch
to the bracket on the rear wheel arch (see
illustration).
14Using a small screwdriver, push out the
pin securing the link rod to the catch, then
withdraw the catch.
15If required, lift the release lever, push out
the securing pin and remove the link rod. The
lever can be removed by drilling out the two
securing rivets from the parcel shelf support.
16Refitting is a reversal of removal, but
where applicable fit new rivets using a hand
riveter to secure the release lever. Oncompletion check the operation of the catch
and if necessary adjust the position of the
striker to achieve satisfactory engagement
with the catch.
Complete assembly - removal and
refitting
1Remove the seat.
2Straighten the seat back cover retaining
tangs, and pull the cover upwards to expose
the air cushion.
3Cut through the four securing rings (see
illustration)and remove the two screws
securing the metal air tube to the side of the
seat, then withdraw the assembly from the
seat frame.
4Refitting is a reversal of removal, using new
cushion securing rings.
Air inflator ball - renewal
5Remove the seat.
6Remove the two screws securing the metal
air tube to the side of the seat (see
illustration), then cut through the plastic hose
as close to the end of the metal tube as
possible. Discard the old tube and the inflator
ball.
49Front seat air cushion
assembly - removal and
refitting
48Rear seat catch - removal and
refitting
12•20Bodywork and fittings
48.8 Pull back the seat cover to expose the
rear seat catch securing bolts - “low
spec.” Hatchback and Estate models
49.3 Front seat air cushion securing rings
(arrowed)
49.6 Front seat air cushion tube and
inflator ball
A Air tube securing screws
B Hose cutting point48.13 Rear seat catch assembly - “high
specification” Hatchback model
48.2 Rear seat catch fixings - Saloon
models
A Remove the securing screws
B Withdraw the cover and catch47.24 Rear seat side cushion removed
exposing upper fixing hook