FORD TAURUS 2017 Owners Manual
Manufacturer: FORD, Model Year: 2017, Model line: TAURUS, Model: FORD TAURUS 2017Pages: 504, PDF Size: 5.84 MB
Page 261 of 504
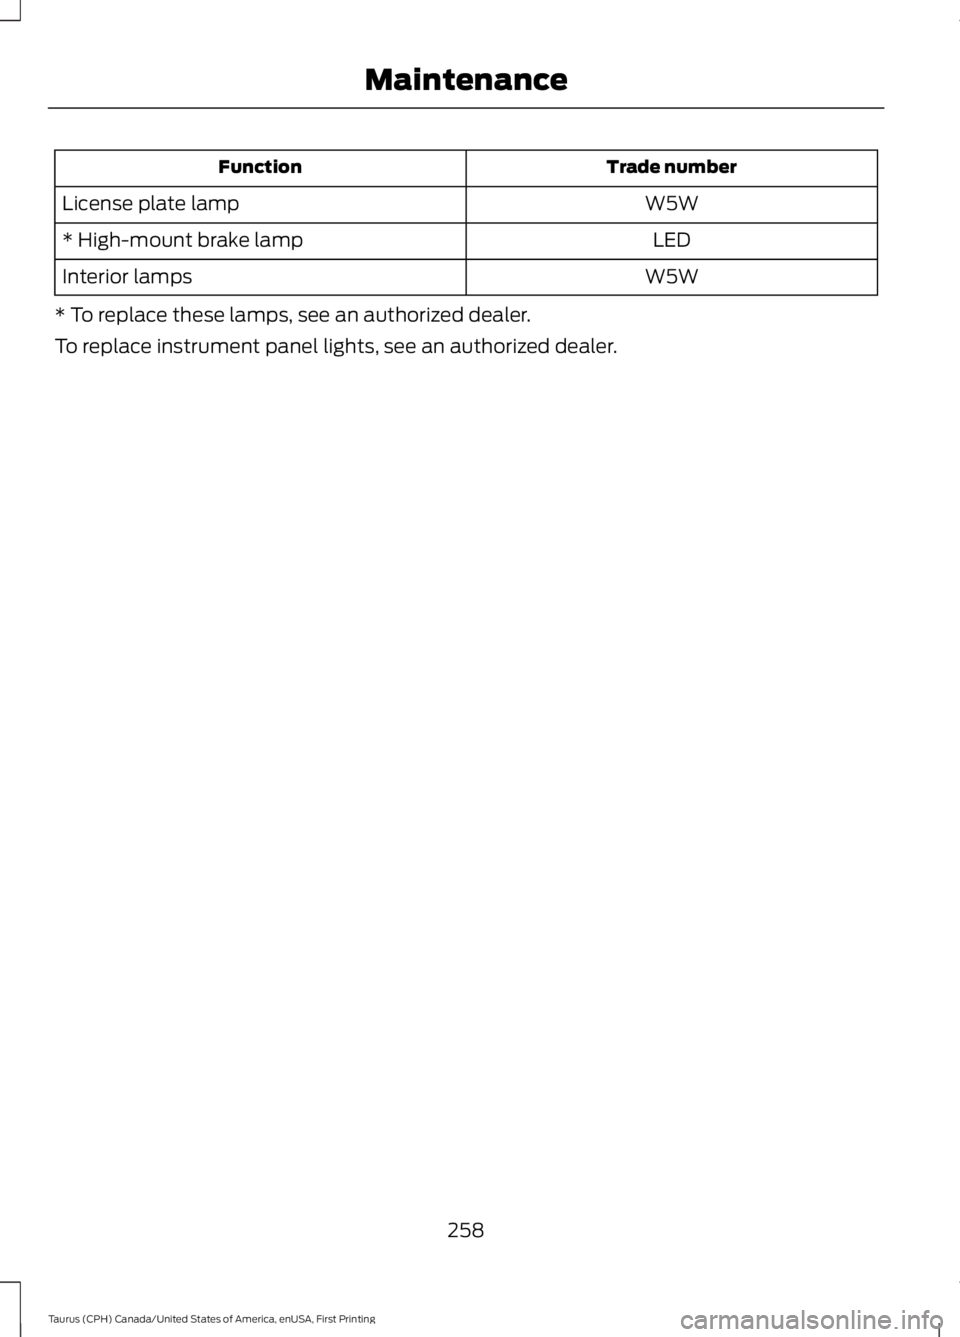
Trade numberFunction
W5WLicense plate lamp
LED* High-mount brake lamp
W5WInterior lamps
* To replace these lamps, see an authorized dealer.
To replace instrument panel lights, see an authorized dealer.
258
Taurus (CPH) Canada/United States of America, enUSA, First Printing
Maintenance
Page 262 of 504
CHANGING THE ENGINE AIR
FILTER
WARNING
Do not start the engine with the aircleaner removed. This can causedamage not covered by the vehicleWarranty and can result in serious injury.
When changing the air filter element, useonly the air filter element listed. SeeCapacities and Specifications (page297).
For vehicles with EcoBoost engines, whenservicing the air cleaner, it is important thatno foreign material enters the air inductionsystem. The engine and turbocharger aresusceptible to damage from even smallparticles.
Change the air filter element at the correctinterval. See Scheduled Maintenance(page 447).
Note: Failure to use the correct air filterelement may result in severe enginedamage. Resulting component damagemay not be covered by the vehicle Warranty.
To replace the air filter element do thefollowing:
1. Switch the ignition off.
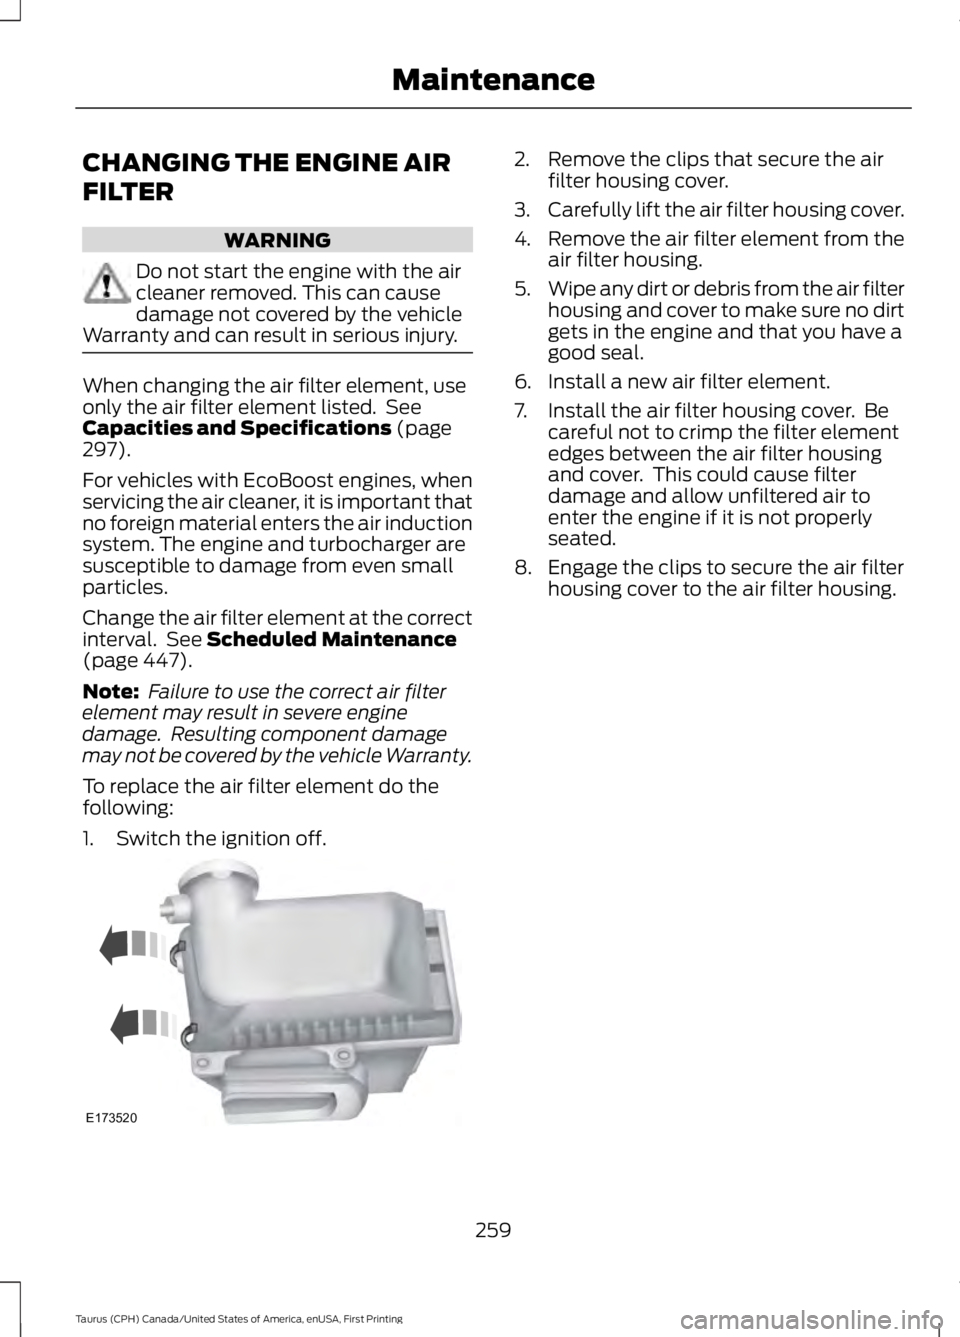
2. Remove the clips that secure the airfilter housing cover.
3.Carefully lift the air filter housing cover.
4.Remove the air filter element from theair filter housing.
5.Wipe any dirt or debris from the air filterhousing and cover to make sure no dirtgets in the engine and that you have agood seal.
6. Install a new air filter element.
7. Install the air filter housing cover. Becareful not to crimp the filter elementedges between the air filter housingand cover. This could cause filterdamage and allow unfiltered air toenter the engine if it is not properlyseated.
8. Engage the clips to secure the air filterhousing cover to the air filter housing.
259
Taurus (CPH) Canada/United States of America, enUSA, First Printing
MaintenanceE173520
Page 263 of 504
GENERAL INFORMATION
Your dealer has many quality productsavailable to clean your vehicle and protectits finishes.
CLEANING PRODUCTS
Materials
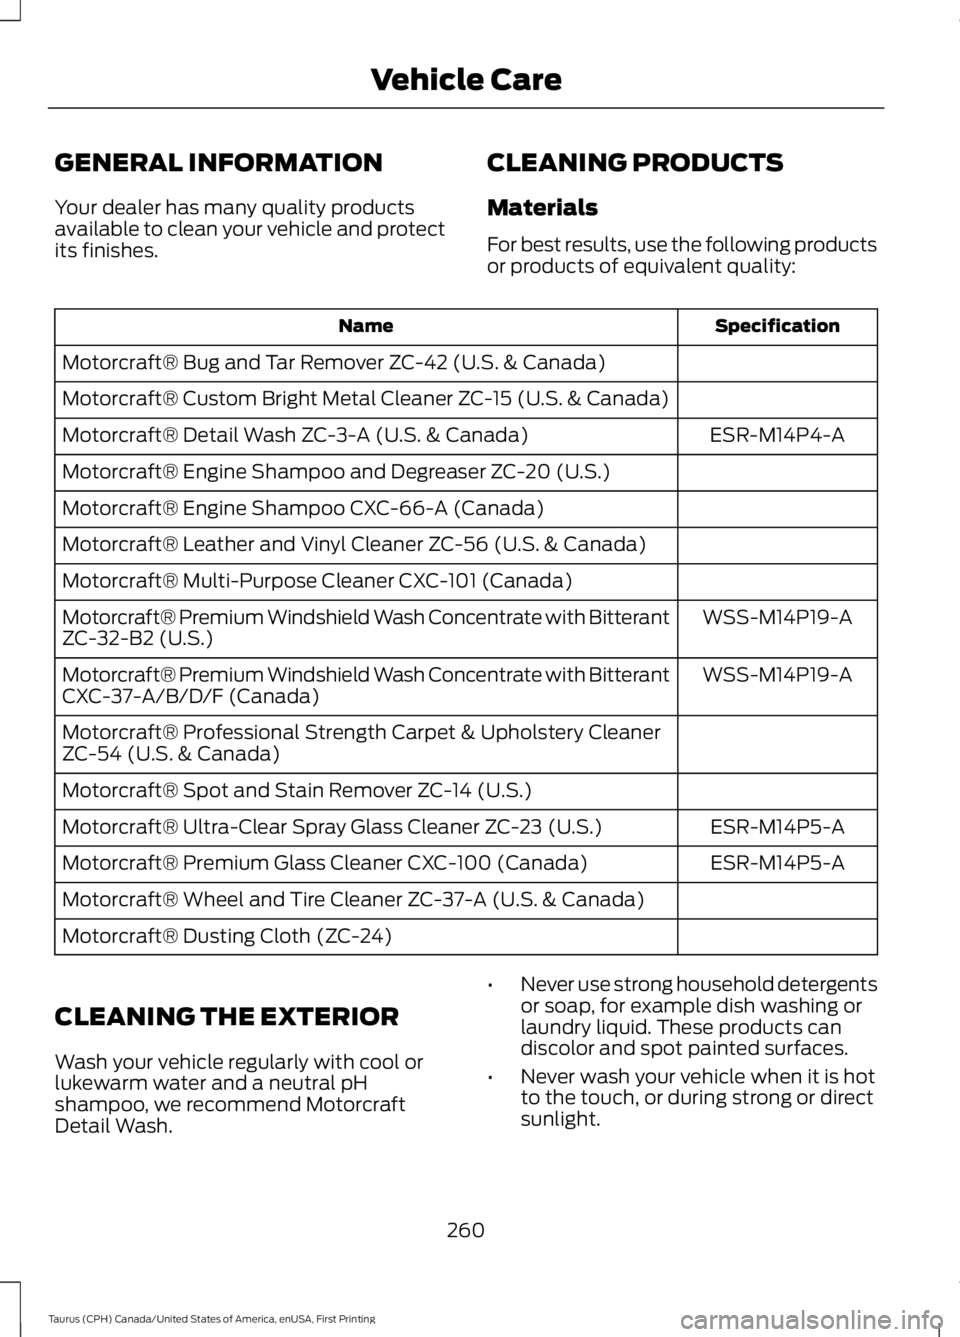
For best results, use the following productsor products of equivalent quality:
SpecificationName
Motorcraft® Bug and Tar Remover ZC-42 (U.S. & Canada)
Motorcraft® Custom Bright Metal Cleaner ZC-15 (U.S. & Canada)
ESR-M14P4-AMotorcraft® Detail Wash ZC-3-A (U.S. & Canada)
Motorcraft® Engine Shampoo and Degreaser ZC-20 (U.S.)
Motorcraft® Engine Shampoo CXC-66-A (Canada)
Motorcraft® Leather and Vinyl Cleaner ZC-56 (U.S. & Canada)
Motorcraft® Multi-Purpose Cleaner CXC-101 (Canada)
WSS-M14P19-AMotorcraft® Premium Windshield Wash Concentrate with BitterantZC-32-B2 (U.S.)
WSS-M14P19-AMotorcraft® Premium Windshield Wash Concentrate with BitterantCXC-37-A/B/D/F (Canada)
Motorcraft® Professional Strength Carpet & Upholstery CleanerZC-54 (U.S. & Canada)
Motorcraft® Spot and Stain Remover ZC-14 (U.S.)
ESR-M14P5-AMotorcraft® Ultra-Clear Spray Glass Cleaner ZC-23 (U.S.)
ESR-M14P5-AMotorcraft® Premium Glass Cleaner CXC-100 (Canada)
Motorcraft® Wheel and Tire Cleaner ZC-37-A (U.S. & Canada)
Motorcraft® Dusting Cloth (ZC-24)
CLEANING THE EXTERIOR
Wash your vehicle regularly with cool orlukewarm water and a neutral pHshampoo, we recommend MotorcraftDetail Wash.
•Never use strong household detergentsor soap, for example dish washing orlaundry liquid. These products candiscolor and spot painted surfaces.
•Never wash your vehicle when it is hotto the touch, or during strong or directsunlight.
260
Taurus (CPH) Canada/United States of America, enUSA, First Printing
Vehicle Care
Page 264 of 504
•Dry your vehicle with a chamois or softterry cloth towel to eliminate waterspotting.
•Immediately remove fuel spillages, birddroppings, insect deposits and road tar.These may cause damage to yourvehicle’s paintwork or trim over time.We recommend Motorcraft Bug andTar Remover.
•Remove any exterior accessories, forexample antennas, before entering acar wash.
Note:Suntan lotions and insect repellentscan damage painted surfaces. If thesesubstances come in contact with yourvehicle, wash the affected area as soon aspossible.
Exterior Chrome Parts
•Apply a high quality-cleaning productto bumpers and other chrome parts.Follow the manufacturer’s instructions.We recommend Motorcraft CustomBright Metal Cleaner.
•Do not apply the cleaning product tohot surfaces. Do not leave the cleaningproduct on chrome surfaces longerthan the time recommended.
•Using other non-recommendedcleaners can result in severe andpermanent cosmetic damage.
Note:Never use abrasive materials, forexample steel wool or plastic pads as theycan scratch the chrome surface.
Note:Do not use chrome cleaner, metalcleaner or polish on wheels or wheel covers.
Exterior Plastic Parts
For routine cleaning we recommendMotorcraft Detail Wash. If tar or greasespots are present, we recommendMotorcraft Bug and Tar Remover.
Stripes or Graphics (If Equipped)
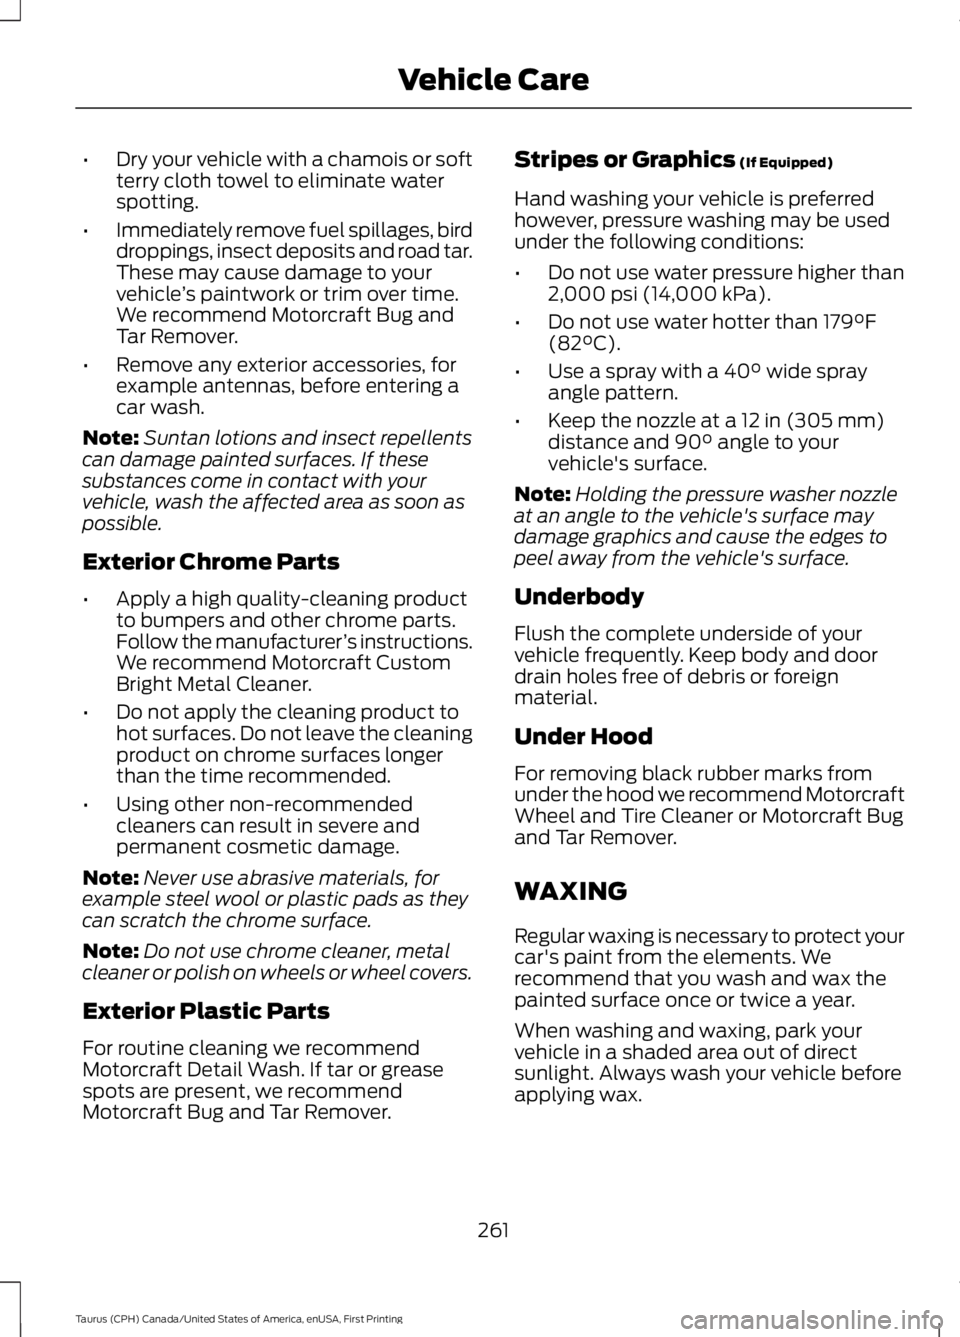
Hand washing your vehicle is preferredhowever, pressure washing may be usedunder the following conditions:
•Do not use water pressure higher than2,000 psi (14,000 kPa).
•Do not use water hotter than 179°F(82°C).
•Use a spray with a 40° wide sprayangle pattern.
•Keep the nozzle at a 12 in (305 mm)distance and 90° angle to yourvehicle's surface.
Note:Holding the pressure washer nozzleat an angle to the vehicle's surface maydamage graphics and cause the edges topeel away from the vehicle's surface.
Underbody
Flush the complete underside of yourvehicle frequently. Keep body and doordrain holes free of debris or foreignmaterial.
Under Hood
For removing black rubber marks fromunder the hood we recommend MotorcraftWheel and Tire Cleaner or Motorcraft Bugand Tar Remover.
WAXING
Regular waxing is necessary to protect yourcar's paint from the elements. Werecommend that you wash and wax thepainted surface once or twice a year.
When washing and waxing, park yourvehicle in a shaded area out of directsunlight. Always wash your vehicle beforeapplying wax.
261
Taurus (CPH) Canada/United States of America, enUSA, First Printing
Vehicle Care
Page 265 of 504
•Use a quality wax that does not containabrasives.
•Follow the manufacturer’s instructionsto apply and remove the wax.
•Apply a small amount of wax in aback-and-forth motion, not in circles.
•Do not allow wax to come in contactwith any non-body (low-gloss black)colored trim. The wax will discolor orstain the parts over time.
•Roof racks.
•Bumpers.
•Grained door handles.
•Side moldings.
•Mirror housings.
•Windshield cowl area.
•Do not apply wax to glass areas.
•After waxing, your car's paint shouldfeel smooth, and be free of streaks andsmudges.
CLEANING THE ENGINE
Engines are more efficient when they areclean because grease and dirt buildup keepthe engine warmer than normal.
When washing:
•Take care when using a power washerto clean the engine. The high-pressurefluid could penetrate the sealed partsand cause damage.
•Do not spray a hot engine with coldwater to avoid cracking the engineblock or other engine components.
•Spray Motorcraft Engine Shampoo andDegreaser on all parts that requirecleaning and pressure rinse clean. InCanada, use Motorcraft EngineShampoo.
•Never wash or rinse the engine while itis hot or running; water in the runningengine may cause internal damage.
•Never wash or rinse any ignition coil,spark plug wire or spark plug well, orthe area in and around these locations.
•Cover the battery, power distributionbox, and air filter assembly to preventwater damage when cleaning theengine.
CLEANING THE WINDOWS AND
WIPER BLADES
Car wash chemicals and environmentalfallout can result in windshield and wiperblade contamination. Dirty windshield andwipers will result in poor windshield wiperoperation. Keep the windshield and wiperblades clean to maintain windshield wiperperformance.
To clean the windshield and wiper blades:
•Clean the windshield with anon-abrasive glass cleaner. Whencleaning the interior of the windshield,avoid getting any glass cleaner on theinstrument panel or door panels. Wipeany glass cleaner off these surfacesimmediately.
•For windshields contaminated withtree sap, chemicals, wax or bugs, cleanthe entire windshield using steel wool(no greater than 0000 grade) in acircular motion and rinse with water.
•Clean the wiper blades with isopropylrubbing alcohol or windshield washerconcentrate.
Note: Do not use razor blades or othersharp objects to clean or remove decalsfrom the inside of the heated rear window.The vehicle warranty does not coverdamage caused to the heated rear windowgrid lines.
262
Taurus (CPH) Canada/United States of America, enUSA, First Printing
Vehicle Care
Page 266 of 504
CLEANING THE INTERIOR
WARNINGS
Do not use cleaning solvents, bleachor dye on the vehicle’s safety belts,as these actions may weaken thebelt webbing.
On vehicles equipped withseat-mounted airbags, do not usechemical solvents or strongdetergents. Such products couldcontaminate the side airbag system andaffect performance of the side airbag in acollision.
For fabric, carpets, cloth seats, safety beltsand seats equipped with side airbags:
•Remove dust and loose dirt with avacuum cleaner.
•Remove light stains and soil withMotorcraft Professional StrengthCarpet & Upholstery Cleaner.
•If grease or tar is present on thematerial, spot-clean the area first withMotorcraft Spot and Stain Remover. InCanada, use Motorcraft Multi-PurposeCleaner.
•If a ring forms on the fabric after spotcleaning, clean the entire areaimmediately (but do not oversaturate)or the ring will set.
•Do not use household cleaningproducts or glass cleaners, which canstain and discolor the fabric and affectthe flame retardant abilities of the seatmaterials.
CLEANING THE INSTRUMENT
PANEL AND INSTRUMENT
CLUSTER LENS
WARNING
Do not use chemical solvents orstrong detergents when cleaning thesteering wheel or instrument panelto avoid contamination of the airbagsystem.
Note:Follow the same procedure ascleaning leather seats for cleaning leatherinstrument panels and leather interior trimsurfaces. See Cleaning Leather Seats(page 264).
Clean the instrument panel and clusterlens with a clean, damp and soft cloth,then use a clean, dry and soft cloth to drythese areas.
•Avoid cleaners or polishes that increasethe gloss of the upper portion of theinstrument panel. The dull finish in thisarea helps protect you fromundesirable windshield reflection.
•Do not use any household cleaningproducts or glass cleaners as thesemay damage the finish of theinstrument panel, interior trim andcluster lens.
•Wash or wipe your hands clean if youhave been in contact with certainproducts such as insect repellent andsuntan lotion to avoid possible damageto the interior painted surfaces.
•Do not allow air fresheners and handsanitizers to spill onto interior surfaces.If a spill occurs, wipe off immediately.Your warranty may not cover thesedamages.
If a staining liquid like coffee or juice hasbeen spilled on the instrument panel or oninterior trim surfaces:
263
Taurus (CPH) Canada/United States of America, enUSA, First Printing
Vehicle Care
Page 267 of 504
1. Wipe up spilled liquid using a clean,soft cloth as quickly as possible.
2. Use Motorcraft Premium Leather andVinyl Cleaner or a commerciallyavailable leather cleaning product forautomotive interiors. Test any cleaneror stain remover on an inconspicuousarea.
3. Alternatively, wipe the surface with aclean, soft cloth and a mild soap andwater solution. Dry the area with aclean, soft cloth.
4. If necessary, apply more soap andwater solution or cleaning product toa clean, soft cloth and press it onto thesoiled area. Allow this to set at roomtemperature for 30 minutes.
5. Remove the soaked cloth, then with aclean, damp cloth, use a rubbingmotion for 60 seconds on the soiledarea.
6. Dry the area with a clean, soft cloth.
CLEANING LEATHER SEATS (If
Equipped)
Note:Follow the same procedure ascleaning leather seats for cleaning leatherinstrument panels and leather interior trimsurfaces.
For routine cleaning, wipe the surface witha soft, damp cloth and a mild soap andwater solution. Dry the area with a clean,soft cloth.
For cleaning and removing stains such asdye transfer, use Motorcraft PremiumLeather and Vinyl Cleaner or acommercially available leather cleaningproduct for automotive interiors.
Note:Test any cleaner or stain remover onan inconspicuous area.
You should:
•Remove dust and loose dirt with avacuum cleaner.
•Clean and treat spills and stains assoon as possible.
Do not use the following products as thesemay damage the leather:
•Oil and petroleum or silicone-basedleather conditioners.
•Household cleaners.
•Alcohol solutions.
•Solvents or cleaners intendedspecifically for rubber, vinyl andplastics.
REPAIRING MINOR PAINT
DAMAGE
Authorized dealers have touch-up paint tomatch your vehicle’s color. Your vehiclecolor code is printed on a sticker on thefront, left-hand side door jamb. Take yourcolor code to your authorized dealer tomake sure you get the correct color.
Before repairing minor paint damage, usea cleaner such as Motorcraft Bug and TarRemover to remove particles such as birddroppings, tree sap, insect deposits, tarspots, road salt and industrial fallout.
Always read the instructions before usingcleaning products.
CLEANING THE WHEELS
Note:Do not apply a cleaning chemical towarm or hot wheel rims and covers.
Note:Some automatic car washes maycause damage to the finish on your wheelrims and covers.
264
Taurus (CPH) Canada/United States of America, enUSA, First Printing
Vehicle Care
Page 268 of 504
Note:Industrial-strength or heavy-dutycleaners in combination with brush agitationto remove brake dust and dirt, could wearaway the clear coat finish over a period time.
Note:Do not use hydrofluoric acid-basedor high caustic-based wheel cleaners, steelwool, fuels or strong household detergents.
Note:If you intend parking your vehicle foran extended period after cleaning thewheels with a wheel cleaner, drive yourvehicle for a few minutes before doing so.This will reduce the risk of increasedcorrosion of the brake discs.
Alloy wheels and wheel covers are coatedwith a clear coat paint finish. To maintaintheir condition we recommend that you:
•Clean the wheels weekly usingMotorcraft Wheel and Tire Cleaner.Apply using manufacturer'sinstructions.
•Use a sponge to remove heavydeposits of dirt and brake dustaccumulation.
•Rinse thoroughly with a strong streamof water when you have completed thecleaning process.
•To remove tar and grease, useMotorcraft Bug and Tar Remover.
VEHICLE STORAGE
If you plan on storing your vehicle for 30days or more, read the followingmaintenance recommendations to makesure your vehicle stays in good operatingcondition.
We engineer and test all motor vehiclesand their components for reliable, regulardriving. Under various conditions,long-term storage may lead to degradedengine performance or failure unless youuse specific precautions to preserve enginecomponents.
General
•Store all vehicles in a dry, ventilatedplace.
•Protect from sunlight, if possible.
•If vehicles are stored outside, theyrequire regular maintenance to protectagainst rust and damage.
Body
•Wash your vehicle thoroughly toremove dirt, grease, oil, tar or mud fromexterior surfaces, rear-wheel housingand the underside of front fenders.
•Periodically wash your vehicle if it isstored in exposed locations.
•Touch-up exposed or primed metal toprevent rust.
•Cover chrome and stainless steel partswith a thick coat of auto wax to preventdiscoloration. Re-wax as necessarywhen you wash your vehicle.
•Lubricate all hood, door and luggagecompartment hinges and latches witha light grade oil.
•Cover interior trim to prevent fading.
•Keep all rubber parts free from oil andsolvents.
Engine
•Change the engine oil and filter prior tostorage because used engine oilcontains contaminates which maycause engine damage.
•Start the engine every 15 days for aminimum of 15 minutes. Run at fast idlewith the climate controls set to defrostuntil the engine reaches normaloperating temperature.
265
Taurus (CPH) Canada/United States of America, enUSA, First Printing
Vehicle Care
Page 269 of 504
•With your foot on the brake, shiftthrough all the gears while the engineis running.
•We recommend that you change theengine oil before you use your vehicleagain.
Fuel system
•Fill the fuel tank with high-quality fueluntil the first automatic shutoff of thefuel pump nozzle.
Cooling system
•Protect against freezing temperatures.
•When removing your vehicle fromstorage, check coolant fluid level.Confirm that there are no coolingsystem leaks and that fluid is at therecommended level.
Battery
•Check and recharge as necessary. Keepconnections clean.
•If storing your vehicle for more than 30days without recharging the battery,we recommend that you disconnectthe battery cables to maintain batterycharge for quick starting.
Note:It is necessary to reset memoryfeatures if battery cables are disconnected.
Brakes
•Make sure the brakes and parking brakerelease fully.
Tires
•Maintain recommended air pressure.
Miscellaneous
•Make sure all linkages, cables, leversand pins under your vehicle are coveredwith grease to prevent rust.
•Move vehicles at least 25 ft (7.5 m)every 15 days to lubricate working partsand prevent corrosion.
Removing Vehicle From Storage
When your vehicle is ready to come out ofstorage, do the following:
•Wash your vehicle to remove any dirtor grease film build-up on windowsurfaces.
•Check windshield wipers for anydeterioration.
•Check under the hood for any foreignmaterial that may have collectedduring storage such as mice or squirrelnests.
•Check the exhaust for any foreignmaterial that may have collectedduring storage.
•Check tire pressures and set tireinflation per the Tire Label.
•Check brake pedal operation. Driveyour vehicle 15 ft (4.5 m) back andforth to remove rust build-up.
•Check fluid levels (including coolant,oil and gas) to make sure there are noleaks, and fluids are at recommendedlevels.
•If you remove the battery, clean thebattery cable ends and check fordamage.
Contact an authorized dealer if you haveany concerns or issues.
266
Taurus (CPH) Canada/United States of America, enUSA, First Printing
Vehicle Care
Page 270 of 504
GENERAL INFORMATION
A decal with tire pressure data is locatedin the driver’s door opening.
Check and set the tire pressure at theambient temperature in which you areintending to drive your vehicle and whenthe tires are cold.
Note:Check your tire pressures regularly tooptimize fuel economy.
Note:Use only approved wheel and tiresizes. Using other sizes could damage yourvehicle and will make the National TypeApproval invalid.
Note:If you change the diameter of the tiresfrom that fitted at the factory, thespeedometer may not display the correctspeed. Take your vehicle to an authorizeddealer to have the engine managementsystem reprogrammed.
TIRE SEALANT AND INFLATOR
KIT (If Equipped)
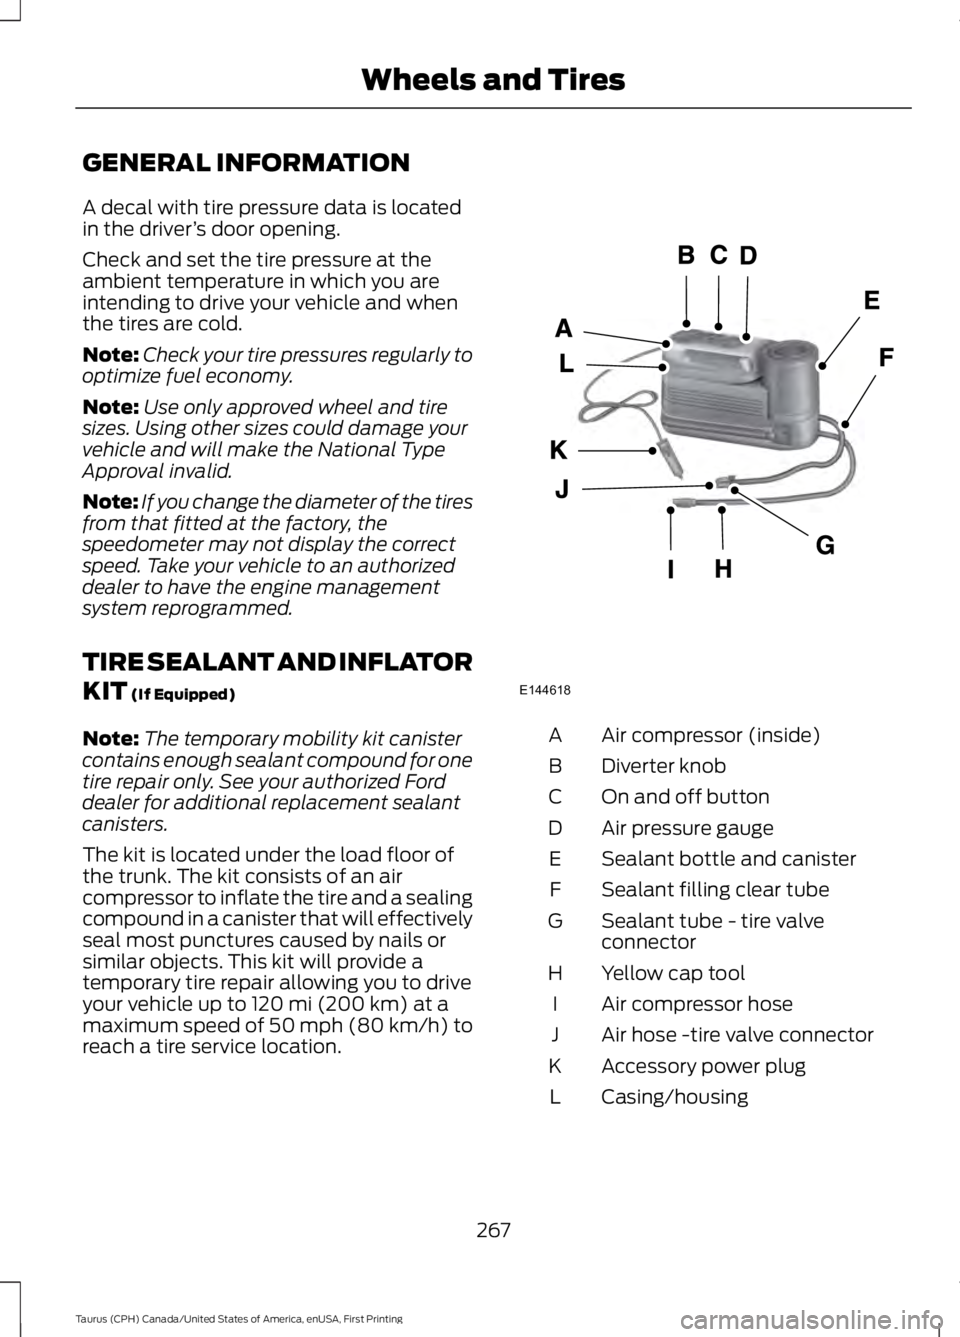
Note:The temporary mobility kit canistercontains enough sealant compound for onetire repair only. See your authorized Forddealer for additional replacement sealantcanisters.
The kit is located under the load floor ofthe trunk. The kit consists of an aircompressor to inflate the tire and a sealingcompound in a canister that will effectivelyseal most punctures caused by nails orsimilar objects. This kit will provide atemporary tire repair allowing you to driveyour vehicle up to 120 mi (200 km) at amaximum speed of 50 mph (80 km/h) toreach a tire service location.
Air compressor (inside)A
Diverter knobB
On and off buttonC
Air pressure gaugeD
Sealant bottle and canisterE
Sealant filling clear tubeF
Sealant tube - tire valveconnectorG
Yellow cap toolH
Air compressor hoseI
Air hose -tire valve connectorJ
Accessory power plugK
Casing/housingL
267
Taurus (CPH) Canada/United States of America, enUSA, First Printing
Wheels and TiresE144618