CODE FORD TRANSIT 2015 5.G Owners Manual
[x] Cancel search | Manufacturer: FORD, Model Year: 2015, Model line: TRANSIT, Model: FORD TRANSIT 2015 5.GPages: 461, PDF Size: 5.82 MB
Page 7 of 461
Engine Oil Dipstick - 3.5L.........................204
Engine Oil Dipstick - 3.7L..........................204
Engine Oil Dipstick - 3.2L Power Stroke
Diesel...........................................................204
Engine Oil Check..........................................204
Changing the Engine Oil and Oil Filter.............................................................205
Engine Coolant Check
...............................206
Automatic Transmission Fluid Check...........................................................209
Brake Fluid Check.........................................210
P
ower Steering Fluid Check.....................210
Washer Fluid Check.....................................210
Draining the Fuel Filter Water Trap........210
Fuel Filter - Gasoline....................................212
Changing the 12V Ba
ttery
..........................213
Checking the Wiper Blades.......................215
Changing the Wiper Blades......................
215
Adjusting the Headlamps
..........................215
Removing a Headlamp...............................216
Changing a Bulb
............................................217
Bulb Specification Chart............................221
Changing the Engine Air Filter - 3.5L.....223
Changing the Engine Air Filter - 3.7L......224
Changing the Engine Air Filter - 3.2L Power Stroke Diesel................................225
Vehicle Care
Cleaning Products........................................227
Cleaning the Exterior...................................227
W
axing.............................................................228
Cleaning the Engine....................................228
Cleaning the Windows and Wiper Blades..........................................................229
Cleaning the Interior...................................229
Cleaning the Instrument Panel and Instrument Cluster Lens.......................229
R
epairing Minor Paint Damage..............230
Cleaning the Alloy Wheels.......................230
Vehicle Storage..............................................231 Wheels and Tires
General Information...................................
233
Tire Care..........................................................234
Using W
inter Tires.......................................250
Using S
now Chains......................................251
Tire Pressure Monitoring System............251
Changing a Road Wheel...........................256
T
echnical Specifications
...........................264
Capacities and Specific- ations
Engine Specifications - 3.5L....................265
Engine Specifications - 3.7L....................265
Engine Specifications - 3.2L Power Stroke Diesel.............................................
266
Motorcraft Parts - 3.5L..............................267
Motorcraft Parts - 3.7L..............................268
Mot
orcraft Parts -
3.2L Power Stroke
Diesel...........................................................269
Vehicle Identification Number
................270
Vehicle Certification Label
.......................270
Transmission Code Designation
..............271
Capacities and Specifications - 3.5L......271
Capacities and Specifications - 3.7L.....274
Capacities and Specifications - 3.2L Power Stroke Diesel................................278
A
udio System
General Information...................................282
Audio Unit - Vehicles With: AM/FM......283
Audio Unit - Vehicles With: Premium AM/ FM/CD.........................................................286
A
udio Unit - Vehicles With: AM/FM/CD/ S
YNC............................................................288
Audio Unit -
Vehicles With: AM/FM/CD/
SYNC/Satellite Radio............................290
Digital Radio..................................................292
S
atellite Radio..............................................294
Audio Input Jack...........................................297
USB Port..........................................................297
Media Hub......................................................298
4 Transit (TTH) Canada/United States of America, enUSA, Edition date: 03/2014 Table of Contents
Page 62 of 461
PASSIVE ANTI-THEFT
SYSTEM
Note:
The system is not compatible with
non-Ford aftermarket remote start systems.
Use of these systems may result in vehicle
starting problems and a loss of security
protection.
Note: Metallic objects, electronic devices
or a second coded key on the same key
chain may cause vehicle starting problems
if they are too close to the key when starting
the engine. Prevent these objects from
touching the coded key while starting the
engine. Switch the ignition off, move all
objects on the key chain away from the
coded key and restart the engine if a
problem occurs.
Note: Do not leave a duplicate coded key
in the vehicle. Always take your keys and
lock all doors when leaving the vehicle.
SecuriLock®
The system is an engine immobilization
system. It is designed to help prevent the
engine from being started unless a
correctly coded key for your vehicle is used.
Using an incorrectly coded key may
prevent the engine from starting. A
message may appear in the information
display.
If you are unable to start the engine with a
correctly coded key, a malfunction has
happened and a message may appear in
the information display.
Automatic Arming
The engine immobilization system arms
immediately after you switch the ignition
off. Automatic Disarming
Switching the ignition on with a correctly
coded key disarms the engine
immobilization system.
Replacement Keys
The integrated keyhead transmitter
functions as a programmed ignition key
that operates all the locks and starts your
vehicle, as well as a remote control.
If your keys are lost or stolen and you do
not have a spare correctly coded key, you
will need to have your vehicle towed to an
authorized dealer. You need to erase the
coded keys from your vehicle and program
new coded keys.
Store an extra correctly coded key away
from the vehicle in a safe place to help
prevent any inconveniences. See an
authorized dealer to purchase additional
spare or replacement keys.
Programming a Spare Integrated
Keyhead Transmitter
You can program your own integrated
keyhead transmitter or standard
SecuriLock coded keys to your vehicle. This
procedure will program both the engine
immobilizer keycode and the remote entry
portion of the remote control to your
vehicle
Only use integrated keyhead transmitters
or standard SecuriLock keys.
You must have two previously
programmed correctly coded keys and the
new unprogrammed key readily accessible.
See an authorized dealer to have the spare
key programmed if two previously
programmed correctly coded keys are not
available.
Read and understand the entire procedure
before you begin.
1.
Insert the first previously programmed
correctly coded key into the ignition.
59 Transit (TTH) Canada/United States of America, enUSA, Edition date: 03/2014 Security
Page 63 of 461
2.
Switch the ignition from off to on. Keep
the ignition on for at least three
seconds, but no more than 10 seconds.
3. Switch the ignition off and remove the
first correctly coded key from the
ignition.
4. After three seconds but within 10 seconds of switching the ignition off,
insert the second previously correctly
coded key into the ignition.
5. Switch the ignition from off to on. Keep
the ignition on for at least three
seconds, but no more than 10 seconds.
6. Switch the ignition off and remove the
second previously programmed
correctly coded key from the ignition.
7. After three seconds but within 10 seconds of switching the ignition off
and removing the previously
programmed correctly coded key,
insert the new unprogrammed key into
the ignition.
8. Switch the ignition from off to on. Keep
the ignition on for at least six seconds.
9. Remove the newly programmed correctly coded key from the ignition.
If the key has been successfully
programmed it will start the engine and
operate the remote entry system (if the
new key is an integrated keyhead
transmitter).
If the key was not successfully
programmed, wait 10 seconds and repeat
Steps 1 through 8. If you are still
unsuccessful, take your vehicle to an
authorized dealer.
Note: You can program a maximum of eight
coded keys to your vehicle. All eight can be
integrated keyhead transmitters. ANTI-THEFT ALARM (If Equipped)
Alarm System
The perimeter alarm is a deterrent against
unauthorized access to your vehicle
through the doors, luggage compartment
and the hood. It also protects the audio
unit.
Triggering the Alarm
Once armed, the alarm is triggered in any
of the following ways:
• If someone opens a door, cargo area
or the hood without a valid key or
remote control.
• If someone removes the audio or
navigation system.
• If you switch the ignition on without a
valid key.
If the alarm is triggered, the horn will sound
for 30 seconds and the hazard warning
flasher will flash for five minutes.
Any further attempts to perform one of the
above will trigger the alarm again.
Arming the Alarm
To arm the alarm, lock your vehicle. See
Locks
(page 54).
Disarming the Alarm
Disarm and silence the alarm by unlocking
the doors with the key and switching the
ignition on with a correctly coded key
within 12 seconds, or by unlocking the
doors or the cargo area with the remote
control.
60 Transit (TTH) Canada/United States of America, enUSA, Edition date: 03/2014 Security
Page 149 of 461
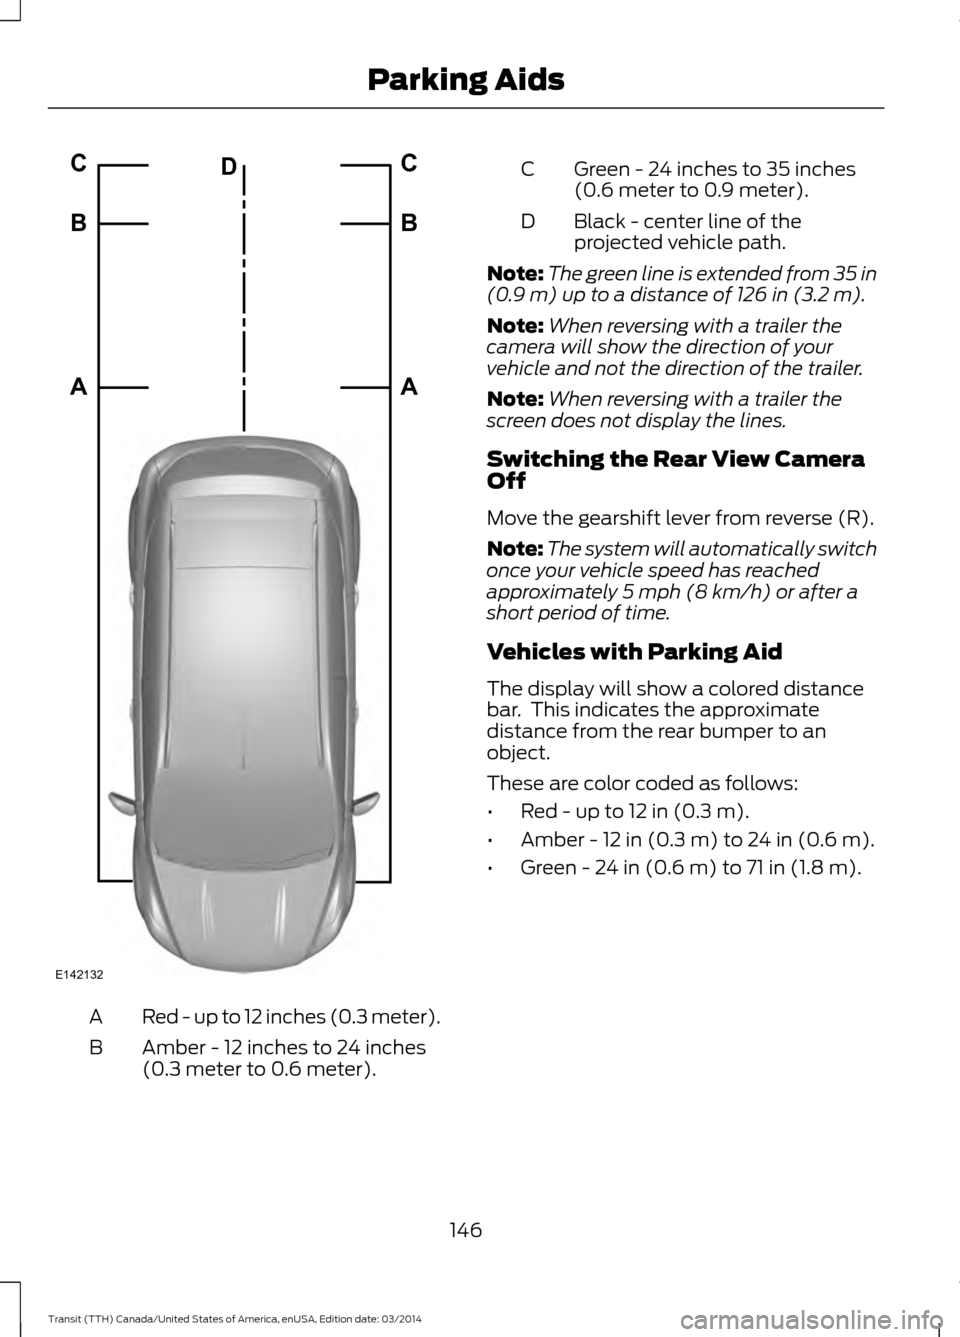
Red - up to 12 inches (0.3 meter).
A
Amber - 12 inches to 24 inches
(0.3 meter to 0.6 meter).
B Green - 24 inches to 35 inches
(0.6 meter to 0.9 meter).
C
Black - center line of the
projected vehicle path.
D
Note: The green line is extended from 35 in
(0.9 m) up to a distance of 126 in (3.2 m).
Note: When reversing with a trailer the
camera will show the direction of your
vehicle and not the direction of the trailer.
Note: When reversing with a trailer the
screen does not display the lines.
Switching the Rear View Camera
Off
Move the gearshift lever from reverse (R).
Note: The system will automatically switch
once your vehicle speed has reached
approximately
5 mph (8 km/h) or after a
short period of time.
Vehicles with Parking Aid
The display will show a colored distance
bar. This indicates the approximate
distance from the rear bumper to an
object.
These are color coded as follows:
• Red - up to 12 in (0.3 m).
• Amber - 12 in (0.3 m) to
24 in (0.6 m).
• Green -
24 in (0.6 m) to 71 in (1.8 m).
146 Transit (TTH) Canada/United States of America, enUSA, Edition date: 03/2014 Parking AidsE142132A B C
A B C
D
Page 155 of 461
Setting the System Sensitivity
You can adjust how quickly the system
warns you of a dangerous situation. The
system has two sensitivity levels which you
can set using the information display. See
(page 79).
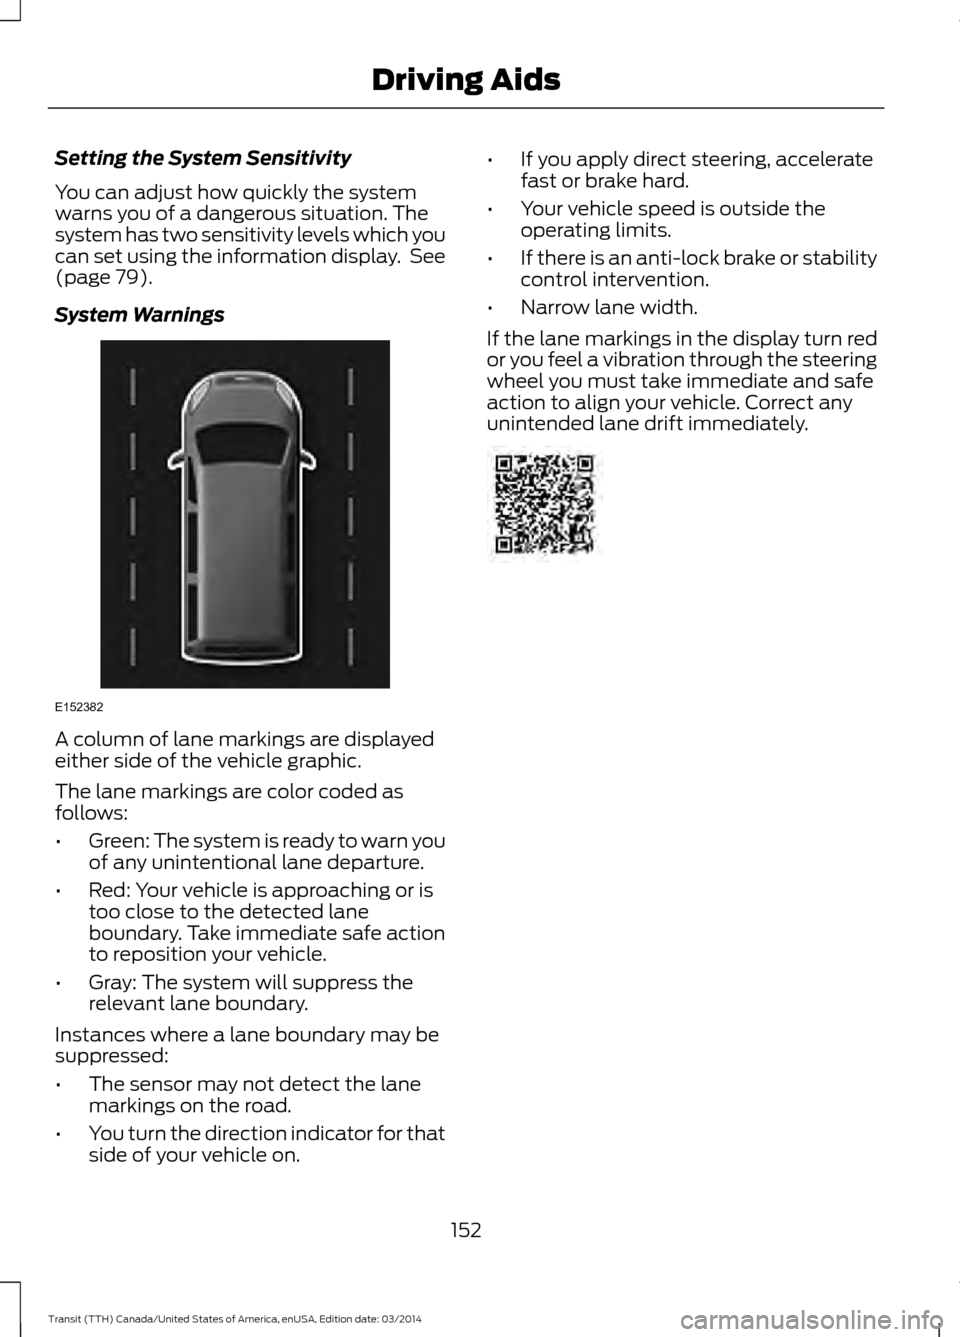
System Warnings A column of lane markings are displayed
either side of the vehicle graphic.
The lane markings are color coded as
follows:
•
Green: The system is ready to warn you
of any unintentional lane departure.
• Red: Your vehicle is approaching or is
too close to the detected lane
boundary. Take immediate safe action
to reposition your vehicle.
• Gray: The system will suppress the
relevant lane boundary.
Instances where a lane boundary may be
suppressed:
• The sensor may not detect the lane
markings on the road.
• You turn the direction indicator for that
side of your vehicle on. •
If you apply direct steering, accelerate
fast or brake hard.
• Your vehicle speed is outside the
operating limits.
• If there is an anti-lock brake or stability
control intervention.
• Narrow lane width.
If the lane markings in the display turn red
or you feel a vibration through the steering
wheel you must take immediate and safe
action to align your vehicle. Correct any
unintended lane drift immediately. 152
Transit (TTH) Canada/United States of America, enUSA, Edition date: 03/2014 Driving AidsE152382
Page 184 of 461
GETTING THE SERVICES YOU
NEED
Warranty repairs to your vehicle must be
performed by an authorized dealer. While
any authorized dealer handling your vehicle
line will provide warranty service, we
recommend you return to your selling
authorized dealer who wants to ensure
your continued satisfaction.
Please note that certain warranty repairs
require special training and equipment, so
not all authorized dealers are authorized
to perform all warranty repairs. This means
that, depending on the warranty repair
needed, you may have to take your vehicle
to another authorized dealer.
A reasonable time must be allowed to
perform a repair after taking your vehicle
to the authorized dealer. Repairs will be
made using Ford or Motorcraft® parts, or
remanufactured or other parts that are
authorized by Ford.
Away From Home
If you are away from home when your
vehicle needs service, contact the Ford
Customer Relationship Center or use the
online resources listed below to find the
nearest authorized dealer.
In the United States:
Mailing address
Ford Motor Company
Customer Relationship Center
P.O. Box 6248
Dearborn, MI 48121
Telephone
1-800-392-3673 (FORD)
(TDD for the hearing impaired:
1-800-232-5952)
Online
Additional information and resources are
available online at www.fordowner.com
These are some of the items that can be
found online:
•
U.S. dealer locator by Dealer Name,
City/State or Zip Code.
• Owner Manuals.
• Maintenance Schedules.
• Recalls.
• Ford Extended Service Plans.
• Ford Genuine Accessories.
• Service specials and promotions.
In Canada:
Mailing address
Customer Relationship Centre
Ford Motor Company of Canada, Limited
P.O. Box 2000
Oakville, Ontario L6K 0C8
Telephone
1-800-565-3673 (FORD)
Online
www.ford.ca
Twitter
@FordServiceCA (English Canada)
@FordServiceQC (Quebec)
Additional Assistance
If you have questions or concerns, or are
unsatisfied with the service you are
receiving, follow these steps:
1. Contact your Sales Representative or Service Advisor at your selling/servicing
authorized dealer.
2. If your inquiry or concern remains unresolved, contact the Sales Manager,
Service Manager or Customer Relations
Manager.
3. If you require assistance or clarification
on Ford Motor Company policies,
please contact the Ford Customer
Relationship Center.
181 Transit (TTH) Canada/United States of America, enUSA, Edition date: 03/2014 Customer Assistance
Page 185 of 461
In order to help us serve you better, please
have the following information available
when contacting a Customer Relationship
Center:
•
Vehicle Identification Number.
• Your telephone number (home and
business).
• The name of the authorized dealer and
city where located.
• The vehicle ’s current odometer reading.
In some states, you must directly notify
Ford in writing before pursuing remedies
under your state ’s warranty laws. Ford is
also allowed a final repair attempt in some
states.
In the United States, a warranty dispute
must be submitted to the BBB AUTO LINE
before taking action under the
Magnuson-Moss Warranty Act, or to the
extent allowed by state law, before
pursuing replacement or repurchase
remedies provided by certain state laws.
This dispute handling procedure is not
required prior to enforcing state created
rights or other rights which are independent
of the Magnuson-Moss Warranty Act or
state replacement or repurchase laws.
IN CALIFORNIA (U.S. ONLY)
California Civil Code Section 1793.2(d)
requires that, if a manufacturer or its
representative is unable to repair a motor
vehicle to conform to the vehicle ’s
applicable express warranty after a
reasonable number of attempts, the
manufacturer shall be required to either
replace the vehicle with one substantially
identical or repurchase the vehicle and
reimburse the buyer in an amount equal to
the actual price paid or payable by the
consumer (less a reasonable allowance
for consumer use). The consumer has the
right to choose whether to receive a refund
or replacement vehicle. California Civil Code Section 1793.22(b)
presumes that the manufacturer has had
a reasonable number of attempts to
conform the vehicle to its applicable
express warranties if, within the first 18
months of ownership of a new vehicle or
the first 18000 miles (29 000 km),
whichever occurs first:
1.
Two or more repair attempts are made
on the same non-conformity likely to
cause death or serious bodily injury OR
2. Four or more repair attempts are made
on the same nonconformity (a defect
or condition that substantially impairs
the use, value or safety of the vehicle)
OR
3. The vehicle is out of service for repair of nonconformities for a total of more
than 30 calendar days (not necessarily
all at one time).
In the case of 1 or 2 above, the consumer
must also notify the manufacturer of the
need for the repair of the nonconformity
at the following address:
Ford Motor Company
16800 Executive Plaza Drive
Mail Drop 3NE-B
Dearborn, MI 48126
You are required to submit your warranty
dispute to BBB AUTO LINE before asserting
in court any rights or remedies conferred
by California Civil Code Section 1793.22(b).
You are also required to use BBB AUTO
LINE before exercising rights or seeking
remedies created by the Federal
Magnuson-Moss Warranty Act, 15 U.S.C.
sec. 2301 et seq. If you choose to seek
redress by pursuing rights and remedies
not created by California Civil Code Section
1793.22(b) or the Magnuson-Moss
Warranty Act, resort to BBB AUTO LINE is
not required by those statutes.
182 Transit (TTH) Canada/United States of America, enUSA, Edition date: 03/2014 Customer Assistance
Page 216 of 461
CHANGING THE 12V BATTERY
Removing the Battery
WARNINGS
You must replace your vehicle
battery with one of exactly the same
specification.
Make sure the battery box is correctly
sealed.
Your vehicle battery is heavy; take
care when lifting and removing.
Note:
If you have power seats and the
battery has no charge, jump-start your
vehicle to move the seat. See Jump
Starting the Vehicle (page 178).
Note: Where applicable you must
reprogram the audio system using the
keycode.
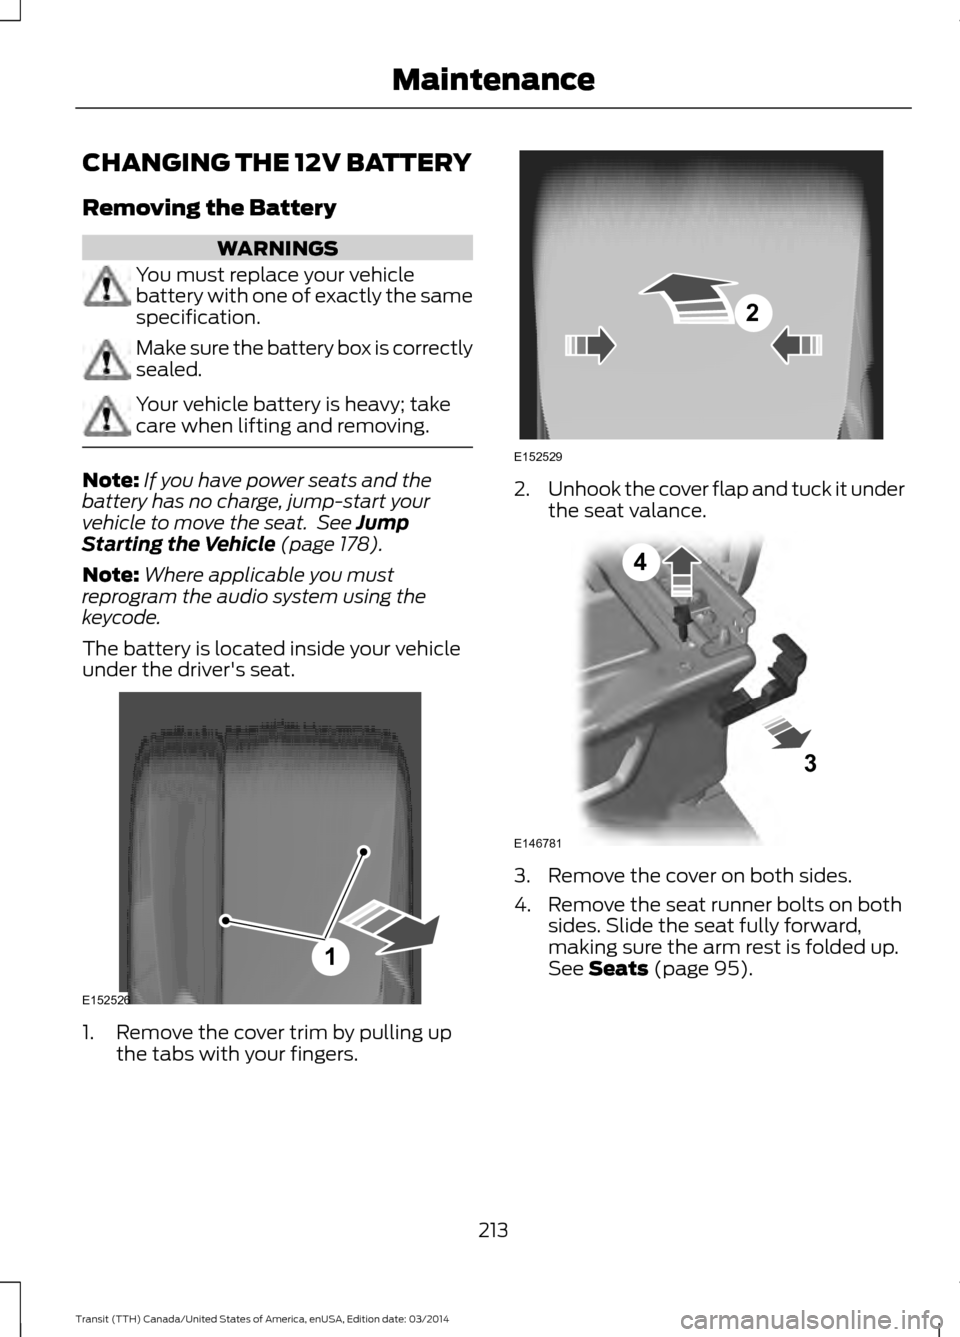
The battery is located inside your vehicle
under the driver's seat. 1. Remove the cover trim by pulling up
the tabs with your fingers. 2.
Unhook the cover flap and tuck it under
the seat valance. 3. Remove the cover on both sides.
4. Remove the seat runner bolts on both
sides. Slide the seat fully forward,
making sure the arm rest is folded up.
See Seats (page 95).
213 Transit (TTH) Canada/United States of America, enUSA, Edition date: 03/2014 MaintenanceE152526
1 2
E152529 E146781
3
4
Page 237 of 461
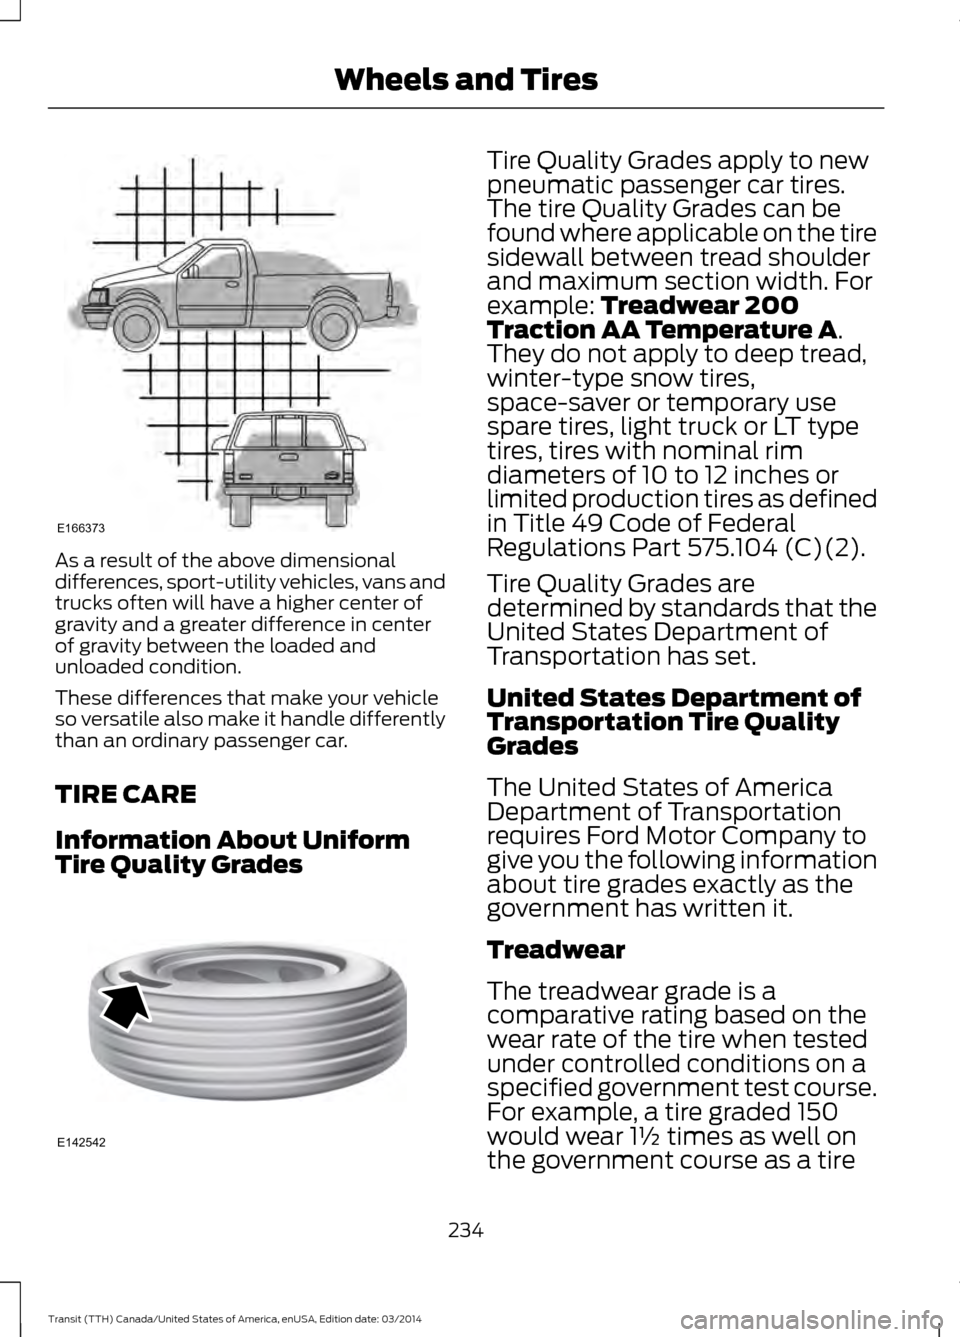
As a result of the above dimensional
differences, sport-utility vehicles, vans and
trucks often will have a higher center of
gravity and a greater difference in center
of gravity between the loaded and
unloaded condition.
These differences that make your vehicle
so versatile also make it handle differently
than an ordinary passenger car.
TIRE CARE
Information About Uniform
Tire Quality Grades Tire Quality Grades apply to new
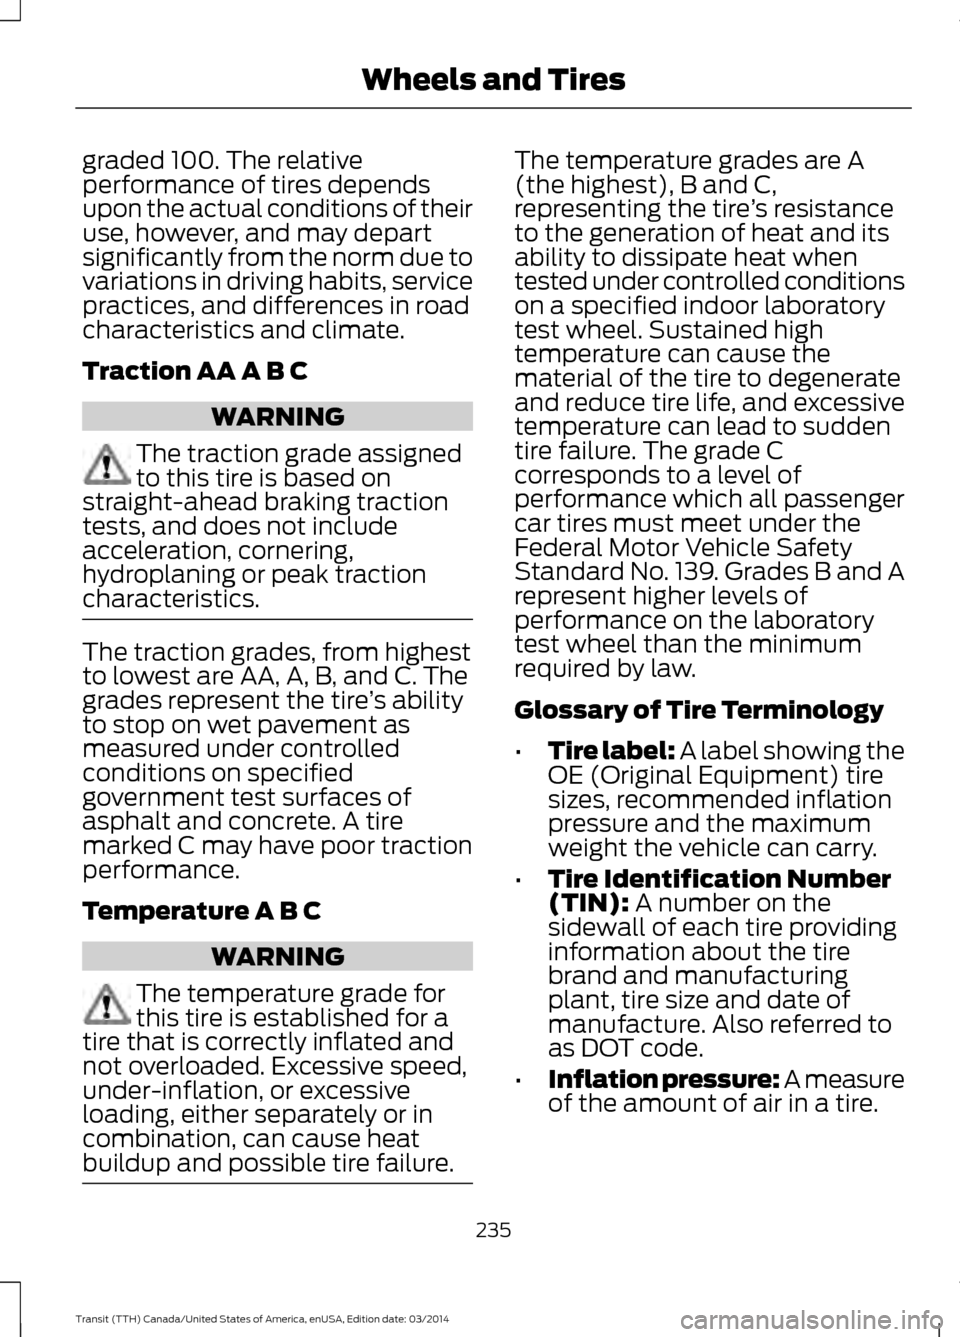
pneumatic passenger car tires.
The tire Quality Grades can be
found where applicable on the tire
sidewall between tread shoulder
and maximum section width. For
example: Treadwear 200
Traction AA Temperature A.
They do not apply to deep tread,
winter-type snow tires,
space-saver or temporary use
spare tires, light truck or LT type
tires, tires with nominal rim
diameters of 10 to 12 inches or
limited production tires as defined
in Title 49 Code of Federal
Regulations Part 575.104 (C)(2).
Tire Quality Grades are
determined by standards that the
United States Department of
Transportation has set.
United States Department of
Transportation Tire Quality
Grades
The United States of America
Department of Transportation
requires Ford Motor Company to
give you the following information
about tire grades exactly as the
government has written it.
Treadwear
The treadwear grade is a
comparative rating based on the
wear rate of the tire when tested
under controlled conditions on a
specified government test course.
For example, a tire graded 150
would wear 1½ times as well on
the government course as a tire
234 Transit (TTH) Canada/United States of America, enUSA, Edition date: 03/2014 Wheels and TiresE166373 E142542
Page 238 of 461
graded 100. The relative
performance of tires depends
upon the actual conditions of their
use, however, and may depart
significantly from the norm due to
variations in driving habits, service
practices, and differences in road
characteristics and climate.
Traction AA A B C
WARNING
The traction grade assigned
to this tire is based on
straight-ahead braking traction
tests, and does not include
acceleration, cornering,
hydroplaning or peak traction
characteristics. The traction grades, from highest
to lowest are AA, A, B, and C. The
grades represent the tire
’s ability
to stop on wet pavement as
measured under controlled
conditions on specified
government test surfaces of
asphalt and concrete. A tire
marked C may have poor traction
performance.
Temperature A B C WARNING
The temperature grade for
this tire is established for a
tire that is correctly inflated and
not overloaded. Excessive speed,
under-inflation, or excessive
loading, either separately or in
combination, can cause heat
buildup and possible tire failure. The temperature grades are A
(the highest), B and C,
representing the tire
’s resistance
to the generation of heat and its
ability to dissipate heat when
tested under controlled conditions
on a specified indoor laboratory
test wheel. Sustained high
temperature can cause the
material of the tire to degenerate
and reduce tire life, and excessive
temperature can lead to sudden
tire failure. The grade C
corresponds to a level of
performance which all passenger
car tires must meet under the
Federal Motor Vehicle Safety
Standard No. 139. Grades B and A
represent higher levels of
performance on the laboratory
test wheel than the minimum
required by law.
Glossary of Tire Terminology
• Tire label: A label showing the
OE (Original Equipment) tire
sizes, recommended inflation
pressure and the maximum
weight the vehicle can carry.
• Tire Identification Number
(TIN): A number on the
sidewall of each tire providing
information about the tire
brand and manufacturing
plant, tire size and date of
manufacture. Also referred to
as DOT code.
• Inflation pressure: A measure
of the amount of air in a tir
e.
235 Transit (TTH) Canada/United States of America, enUSA, Edition date: 03/2014 Wheels and Tires