FORD WINDSTAR 1997 1.G Owners Manual
WINDSTAR 1997 1.G
FORD
FORD
https://www.carmanualsonline.info/img/11/5412/w960_5412-0.png
FORD WINDSTAR 1997 1.G Owners Manual
Trending: warning lights, oil temperature, climate control, snow chains, trip computer, maintenance reset, seat adjustment
Page 211 of 385
210
[SS31200(ALL)12/95]8.
Double check the retractor is in the automatic locking mode.
Try to pull more belt out of the retractor. If you cannot, the
belt is in the automatic locking mode. See Figure 8.
[SS31300(ALL)12/95]
17-1/2 pica
art:0050283-A
Checking the retractor
[SS31400(ALL)12/95]9.
Check to make sure that the seat is properly secured prior to
each use. If the retractor is not locked, repeat steps 6
through 8.
[SS31500(ALL)12/95]
NOTE: To remove retractor from the automatic lock mode,
allow seat belt to retract fully to its stowed position
and the retractor will automatically switch back to the
vehicle sensitive locking mode for normal adult usage.
File:06wnsss.ex
Update:Thu Jul 18 11:00:49 1996
Page 212 of 385
![FORD WINDSTAR 1997 1.G Owners Manual Seating and Safety Restraints
211
*
[SS31600(ALL)05/96]
Installing a Child Safety Seat at the Center Seating
Position with Locking Adjustable Lap Belt
*
[SS31700(ALL)01/96]1.
Lengthen the lap belt. To FORD WINDSTAR 1997 1.G Owners Manual Seating and Safety Restraints
211
*
[SS31600(ALL)05/96]
Installing a Child Safety Seat at the Center Seating
Position with Locking Adjustable Lap Belt
*
[SS31700(ALL)01/96]1.
Lengthen the lap belt. To](/img/11/5412/w960_5412-211.png)
Seating and Safety Restraints
211
*
[SS31600(ALL)05/96]
Installing a Child Safety Seat at the Center Seating
Position with Locking Adjustable Lap Belt
*
[SS31700(ALL)01/96]1.
Lengthen the lap belt. To lengthen the belt, hold the tongue
so that its bottom is perpendicular to the direction of
webbing while sliding the tongue up the webbing.
*
[SS31800(ALL)01/96]2.
Place the child safety seat in the center seating position.
*
[SS31900(ALL)01/96]3.
Route the tongue and webbing through the child seat
according to the child seat manufacturer's instructions.
*
[SS32000(ALL)01/96]4.
Insert the belt tongue into the proper buckle for the center
seating position until you hear a snap and feel it latch. Make
sure the tongue is securely fastened to the buckle by pulling
on tongue.
*
[SS32100(ALL)01/96]5.
Push down on the child seat while pulling on the loose end
of the lap belt webbing to tighten the belt.
[SS32200(ALL)12/95]6.
Before placing the child into the child seat, forcibly tilt the
child seat from side to side and in forward directions to
ensure that the seat is held securely in place. If the child seat
moves excessively, repeat steps 5 through 6 or properly
install the child seat in a different seating position.
%*
[SS32300(ALL)04/96]
Attaching Safety Seats With Tether Straps
*
[SS32400(ALL)04/96]
Some manufacturers make safety seats that include a tether
strap that goes over the back of the vehicle seat and attaches to
an anchoring point. Other manufacturers offer the tether strap
as an accessory. Contact the manufacturer of your child safety
seat for information about ordering a tether strap.
[SS32500(ALL)12/95]
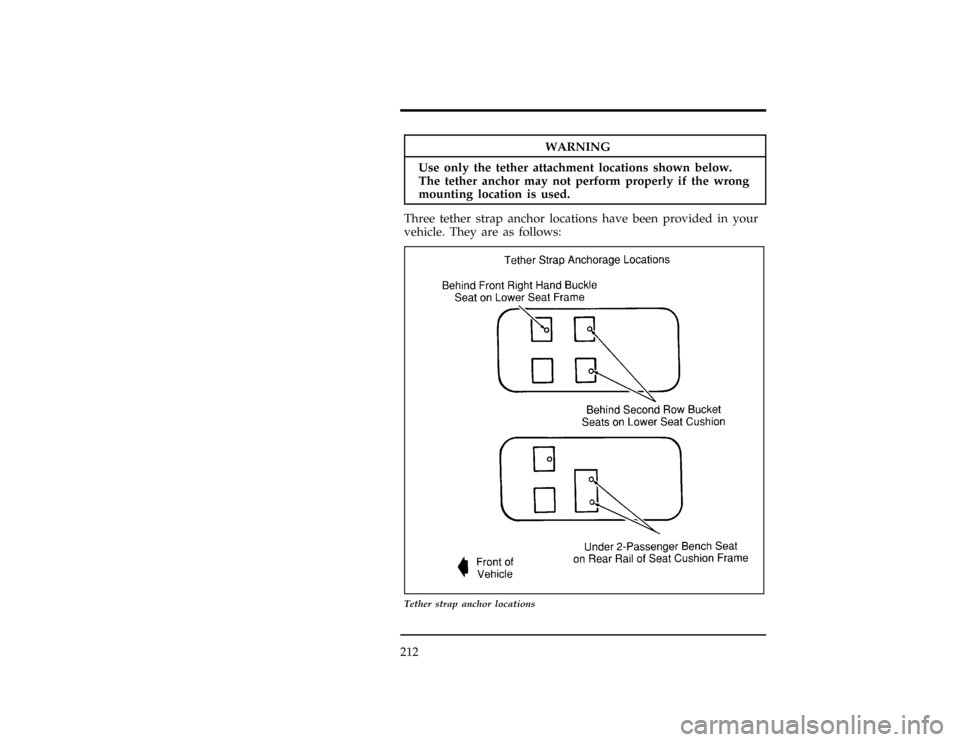
You can attach a tether strap to the front passenger or second
row seats by using the built-in tether anchors provided on the
back of the seats as described below.
[SS32600(ALL)12/95]
Follow the child seat manufacturer's instructions to attach the
tether strap to the tether anchor.
File:06wnsss.ex
Update:Thu Jul 18 11:00:49 1996
Page 213 of 385
212
WARNING
Useonl ythetethe rattachmen tlocation sshow nbelow.
File:06wnsss.ex
Page 214 of 385
Seating and Safety Restraints
213
[SS33000(ALL)12/95]
n
FRONT PASSENGER SEATING POSITION Ð You must use
the tether strap anchor location provided on the back of the
seat cushion frame. (Refer to Figure 1.)
[SS33100(ALL)12/95]
10-1/2 pica
art:0050180-A
Figure 1: Tether anchor location Ð Front passenger seat
[SS33200(ALL)12/95]
n
SECOND ROW BENCH (if equipped) SEATING POSITION
Ð You must use one of the two tether strap anchor locations
(one each side) provided on the back of the seat cushion.
(Refer to Figures 2 and 3.)
File:06wnsss.ex
Update:Thu Jul 18 11:00:49 1996
Page 215 of 385
214
[SS33300(ALL)12/95]
13-1/2 pica
art:0050181-A
Figure 2: Tether anchor location Ð second row bench seat (with built-in child
safety seat)
File:06wnsss.ex
Update:Thu Jul 18 11:00:49 1996
Page 216 of 385
Seating and Safety Restraints
215
[SS33400(ALL)12/95]
17-1/2 pica
art:0050184-A
Figure 3: Tether anchor location Ð second row bench seat (without built-in
child safety seat)
File:06wnsss.ex
Update:Thu Jul 18 11:00:49 1996
Page 217 of 385
216
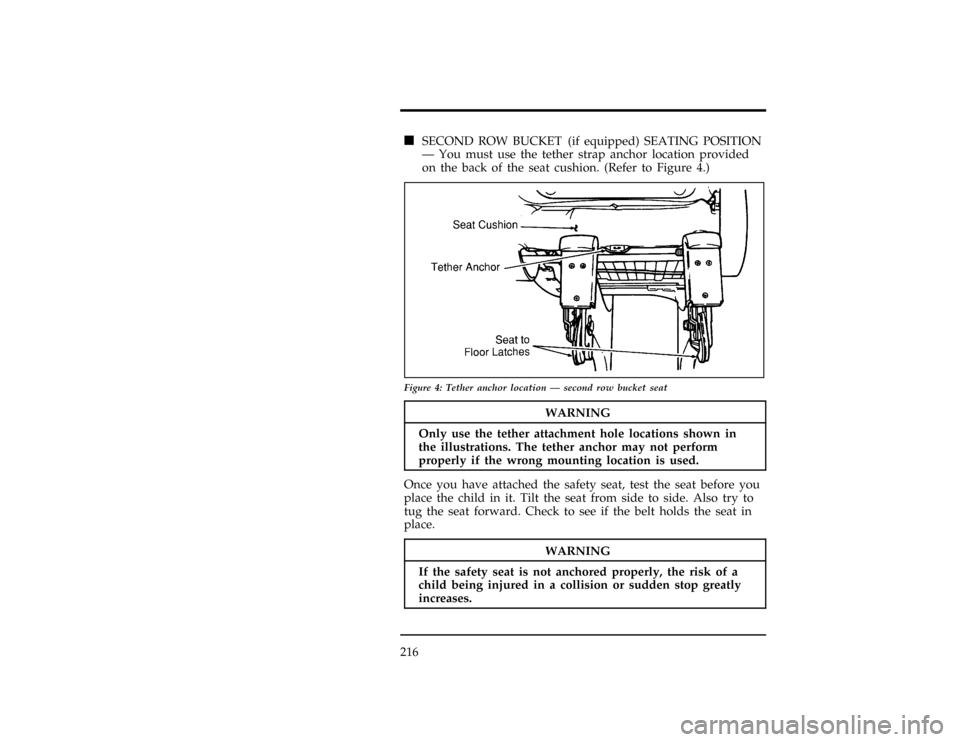
*WARNING
Onlyus eth etethe rattachmen thol elocation sshow nin
WARNING
If th esafet ysea tis no tanchore dproperly ,th eris kof a
Page 218 of 385
217
%
WARNING
Do no tstar tyou rvehicl ein aclose dgarag eor in other
Page 219 of 385
![FORD WINDSTAR 1997 1.G Owners Manual 218
*
[TO01500(ALL)12/95]3.
DO NOT depress the accelerator pedal when starting your
engine. DO NOT use the accelerator until after the engine is
running and you are ready to drive away.
[TO01600(ALL)1 FORD WINDSTAR 1997 1.G Owners Manual 218
*
[TO01500(ALL)12/95]3.
DO NOT depress the accelerator pedal when starting your
engine. DO NOT use the accelerator until after the engine is
running and you are ready to drive away.
[TO01600(ALL)1](/img/11/5412/w960_5412-218.png)
218
*
[TO01500(ALL)12/95]3.
DO NOT depress the accelerator pedal when starting your
engine. DO NOT use the accelerator until after the engine is
running and you are ready to drive away.
[TO01600(ALL)12/95]4.
Turn the key to the START position until the engine starts.
(Release the key after the engine has started and it will
return to the ON position.)
[TO01700(ALL)12/95]
If you have difficulty in turning the key, rotate the steering
wheel slightly to relieve any binding.
%*
[TO01800(ALL)01/96]
For a cold engine:
*
[TO01900(ALL)01/96]
n
At temperatures10ÊF (-12ÊC) andbelow:If the engine does
not start infifteen (15) secondson the first try, turn the key
to OFF, wait approximately ten (10) seconds so you do not
flood the engine, then try again.
*
[TO02000(ALL)01/96]
n
At temperaturesabove10ÊF(-12ÊC):If the engine does not
start infive (5) secondson the first try, turn the key to OFF,
wait approximately ten (10) seconds so you do not flood the
engine, then try again.
*
[TO02100(ALL)01/96]
For a warm engine:
*
[TO02200(ALL)01/96]
n
Do not hold the key in the START position for more than
five (5) secondsat a time. If the engine does not start within
five (5) seconds on the first try, turn the key to the OFF
position. Wait a few seconds after the starter stops, then try
again.
*
[TO02300(ALL)01/96]
Whenever you start your vehicle, release the key as soon as the
engine starts. Excessive cranking could damage the starter.
*
[TO02400(ALL)01/96]
After you start the engine, let it idle for a few seconds.Keep
your foot on the brake pedaland release the parking brake.
Put the gearshift lever in gear, slowly release the brake pedal
and drive away in the normal manner.
File:08wntos.ex
Update:Thu Jul 18 11:01:04 1996
Page 220 of 385
Starting
219
WARNING
Do no tpark ,idle ,or driv eyou rvehicl ein dr ygras sor
Trending: keyless entry, lumbar support, snow chains, fuel filter, low beam, maintenance, coolant
![FORD WINDSTAR 1997 1.G Owners Manual 210
[SS31200(ALL)12/95]8.
Double check the retractor is in the automatic locking mode.
Try to pull more belt out of the retractor. If you cannot, the
belt is in the automatic locking mode. See Figure FORD WINDSTAR 1997 1.G Owners Manual 210
[SS31200(ALL)12/95]8.
Double check the retractor is in the automatic locking mode.
Try to pull more belt out of the retractor. If you cannot, the
belt is in the automatic locking mode. See Figure](/img/11/5412/w960_5412-210.png)
![FORD WINDSTAR 1997 1.G Owners Manual Seating and Safety Restraints
211
*
[SS31600(ALL)05/96]
Installing a Child Safety Seat at the Center Seating
Position with Locking Adjustable Lap Belt
*
[SS31700(ALL)01/96]1.
Lengthen the lap belt. To FORD WINDSTAR 1997 1.G Owners Manual Seating and Safety Restraints
211
*
[SS31600(ALL)05/96]
Installing a Child Safety Seat at the Center Seating
Position with Locking Adjustable Lap Belt
*
[SS31700(ALL)01/96]1.
Lengthen the lap belt. To](/img/11/5412/w960_5412-211.png)

![FORD WINDSTAR 1997 1.G Owners Manual Seating and Safety Restraints
213
[SS33000(ALL)12/95]
n
FRONT PASSENGER SEATING POSITION Ð You must use
the tether strap anchor location provided on the back of the
seat cushion frame. (Refer to Figu FORD WINDSTAR 1997 1.G Owners Manual Seating and Safety Restraints
213
[SS33000(ALL)12/95]
n
FRONT PASSENGER SEATING POSITION Ð You must use
the tether strap anchor location provided on the back of the
seat cushion frame. (Refer to Figu](/img/11/5412/w960_5412-213.png)
![FORD WINDSTAR 1997 1.G Owners Manual 214
[SS33300(ALL)12/95]
13-1/2 pica
art:0050181-A
Figure 2: Tether anchor location Ð second row bench seat (with built-in child
safety seat)
File:06wnsss.ex
Update:Thu Jul 18 11:00:49 1996 FORD WINDSTAR 1997 1.G Owners Manual 214
[SS33300(ALL)12/95]
13-1/2 pica
art:0050181-A
Figure 2: Tether anchor location Ð second row bench seat (with built-in child
safety seat)
File:06wnsss.ex
Update:Thu Jul 18 11:00:49 1996](/img/11/5412/w960_5412-214.png)
![FORD WINDSTAR 1997 1.G Owners Manual Seating and Safety Restraints
215
[SS33400(ALL)12/95]
17-1/2 pica
art:0050184-A
Figure 3: Tether anchor location Ð second row bench seat (without built-in
child safety seat)
File:06wnsss.ex
Update:Th FORD WINDSTAR 1997 1.G Owners Manual Seating and Safety Restraints
215
[SS33400(ALL)12/95]
17-1/2 pica
art:0050184-A
Figure 3: Tether anchor location Ð second row bench seat (without built-in
child safety seat)
File:06wnsss.ex
Update:Th](/img/11/5412/w960_5412-215.png)


![FORD WINDSTAR 1997 1.G Owners Manual 218
*
[TO01500(ALL)12/95]3.
DO NOT depress the accelerator pedal when starting your
engine. DO NOT use the accelerator until after the engine is
running and you are ready to drive away.
[TO01600(ALL)1 FORD WINDSTAR 1997 1.G Owners Manual 218
*
[TO01500(ALL)12/95]3.
DO NOT depress the accelerator pedal when starting your
engine. DO NOT use the accelerator until after the engine is
running and you are ready to drive away.
[TO01600(ALL)1](/img/11/5412/w960_5412-218.png)
