clutch GEELY CK 2008 Workshop Manual
[x] Cancel search | Manufacturer: GEELY, Model Year: 2008, Model line: CK, Model: GEELY CK 2008Pages: 392, PDF Size: 38.86 MB
Page 3 of 392
Chapter 6 Cooling System Inspection
(MR7131A, MR7151A, MR7161A).................................................................52Section 1 System Check
Section 2 Water Pump, Thermostat and Radiator Replacement.................................... 54Chapter 7 Clutch (MR7131A, MR7151A, MR7161A)....................................56Section 1 Clutch Replacement...................................................................................57Chapter 8 Maunal Transaxle Assembly
(MR7131A, MR7151A, MR7161A)................................................................59Section 1 Manual Transaxle Replacement..................................................................60
Section 2 Vehicle Speed Sensor Replacement
Section 3 Transmission Case Oil Seal..........................................................................62
Section 4 Transaxle Case Oil Seal Replacement........................................................63Chapter 9 General Engine Troubles and Their Troubleshooting....................64Section 1 Overview........................................................................................................64
Section 2 General Engine Fault and Troubleshooting.......................................................64
Section 3 Engine Noise Diagnosis and Troubleshooting................................................77Chapter 10 Engine Management Unit..............................................................81Section 1 System Description.........................................................................................81
Section 2 System Component and Working Principle......................................................82Part II Chassis............................................................................85Chapter 1 Transmission Control Device.........................................................85Section 1 Transmission Control Device.........................................................................85
Section 2 Lever Type Transmission Control Device......................................................85
Section 3 Cable Type Transmission Control Module......................................................87Chapter 2 Accelerator Pedal............................................................................90Section 1 Accelerator Pedal..........................................................................................90Chapter 3 Clutch Control System....................................................................91Section 1 Clutch Control System....................................................................................91
Section 2 Clutch Cable Control Mechanism.....................................................................91
Section 3 Clutch hydraulic Control Device.......................................................................94Chapter 4 Propeller Shaft...............................................................................97...............................................................................................52
..............................................................61
Page 17 of 392

10Chapter 2 Engine Components Replacement
(MR479Q, MR479QA, MR481QA)Section 1 Engine ComponentsComponent 1Air Filter Assembly W/ Hose
Accelerator Control
Cable Assembly
Heater Inlet Hose
Heater Outlet Hose
Fuel Sub-Assembly
Efi Fuel Pipe Clamp
MT:
Transmission
Control Cable
Assembly
AT :
Transmission Control Cable Assembly MT:
Clutch Release
Cylinder Assembly
Radiator Outlet Pipe Radiator Inlet Pipe
Starter AssemblyAT: Oil Cooler Outlet Pipe
AT: Oil Cooler Inlet Pipe
Radiator Assembly
BatteryFront Exhaust
Pipe Assy.3-way catalytic
converterMufflerTail PipeFigure 20
Page 19 of 392

12Component 3Figure 22Flywheel
Clutch Disc
Clutch Cover
Clutch Release Bearing
Clutch Release Fork
Release Fork Support
Release Fork Boot
Page 20 of 392

13Section 2 Engine Components Replacement1. Avoid gasoline ejection when work.
2. Drain the coolant to empty.
3. Remove air filter assembly with hose. See (Figure 23)
4. Remove battery
5. Remove fuel delivery pipe sub-assembly
6. Disconnect water hoses, disconnect heater outlet hose
from A/C hose.
7. Loose nut, remove accelerator control cable
8. Remove throttle body assembly
9. Remove power steering pump reservoir assembly
10. Remove front exhaust pipe assembly
11. Remove steering gear boot
12. Seperate steering column assembly. See (Figure 24)
13. Remove front wheel hub nut
14. Disconnect front wheel vehicle speed sensor (with ABS)
15. Detach steering tie rod ball stud pin assembly
16. Detach front lower swing arm sub-assembly
17. Detach front propeller assembly. See (Figure 25)
Detach front propeller from the shaft hub with plastic hammer.
18. Disconnect transmission shift cable or gear shift level assembly
19. Disconnect clutch cylinder assembly or disconnect clutch cable
20. Detach engine assembly and transaxle
(a) Hoisting engine ;
(b) Remove 3 bolts. Detach the right engine mounting bracket. See (Figure 26) ;
(c) Remove 1 bolt. Detach the left engine mounting bracket;
(d) Remove 1 bolt. Detach the rear engine mounting bracket;
(e) Remove engine and transaxle and put them on the pallet;
(f) Jack up the boday.Figure 23
Figure 24
Figure 25 Figure 26
Page 21 of 392
1421. Remove radiator assembly
22. Remove engine V-belt
23. Remove No. 1 V- belt (A/C compressor to crankshaft pulley)
24. Remove generator assembly
25. Remove A/C compressor
26. Remove compressor installing No. 1 bracket. Remove 4 bolts and compressor installing No.
1 bracket.
27. Remove starter assembly
28. Remove power steering pump V- belt
29. Detach power steering pump assembly
30. Remove power steering pump, adjust the bracket
31. Detach manual transaxle assembly (Separate automatic transaxle assembly)
32. Detach clutch cover panel assembly.
33. Detach clutch pressure plate assembly.
34. Detach flywheel sub-assembly.
35. Remove engine rear end cover.
36. Remove injector assembly and remove intake manifold.
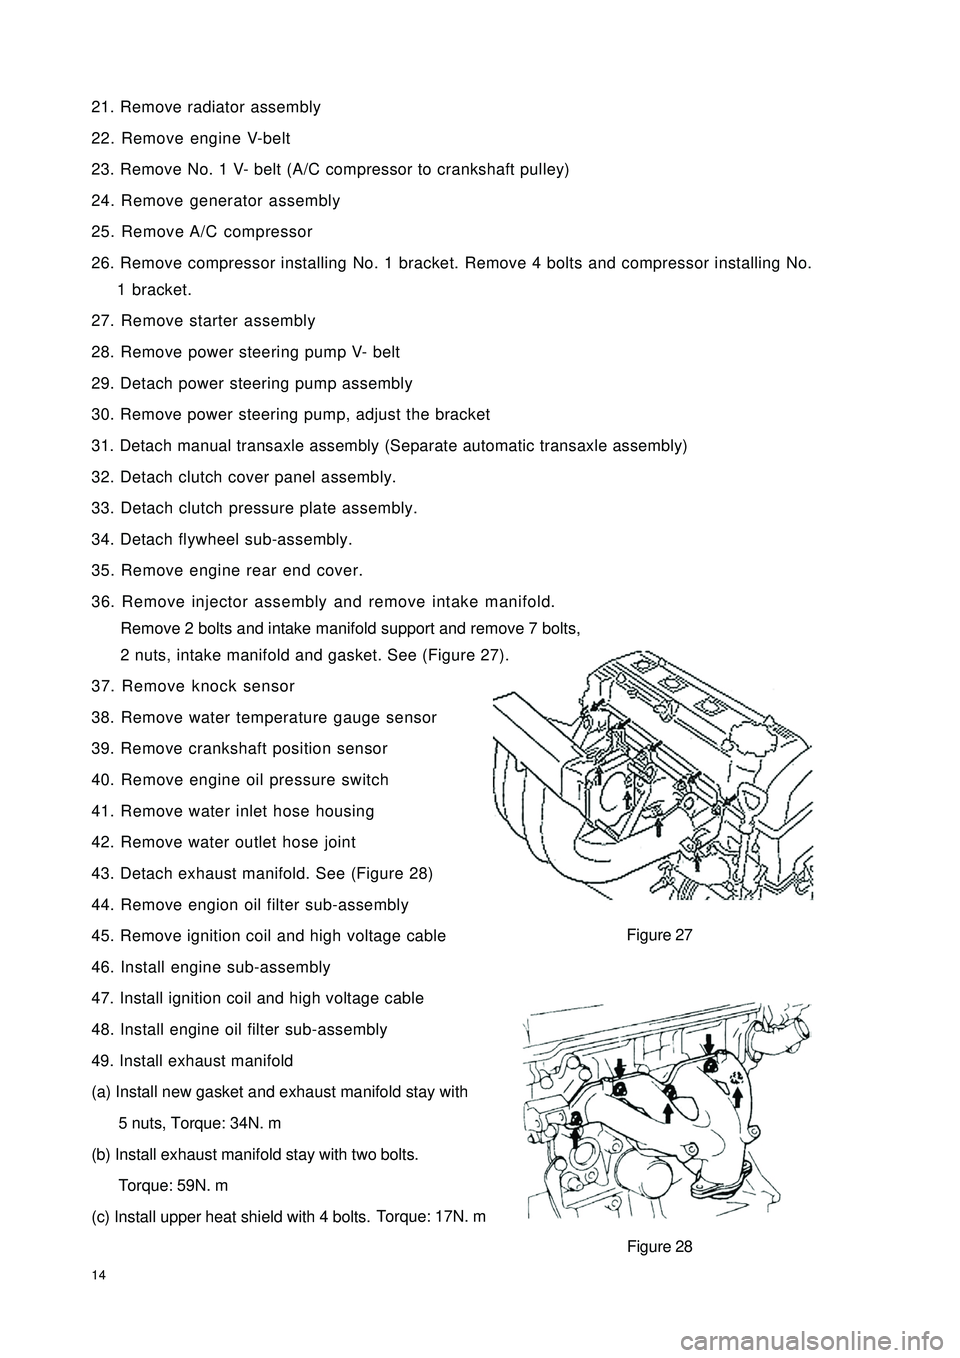
Remove 2 bolts and intake manifold support and remove 7 bolts,
2 nuts, intake manifold and gasket. See (Figure 27).
37. Remove knock sensor
38. Remove water temperature gauge sensor
39. Remove crankshaft position sensor
40. Remove engine oil pressure switch
41. Remove water inlet hose housing
42. Remove water outlet hose joint
43. Detach exhaust manifold. See (Figure 28)
44. Remove engion oil filter sub-assembly
45. Remove ignition coil and high voltage cable
46. Install engine sub-assembly
47. Install ignition coil and high voltage cable
48. Install engine oil filter sub-assembly
49. Install exhaust manifold
(a) Install new gasket and exhaust manifold stay with
5 nuts, Torque: 34N. m
(b) Install exhaust manifold stay with two bolts.
Torque: 59N. m
(c) Install upper heat shield with 4 bolts.Torque: 17N. mFigure 27
Figure 28
Page 22 of 392
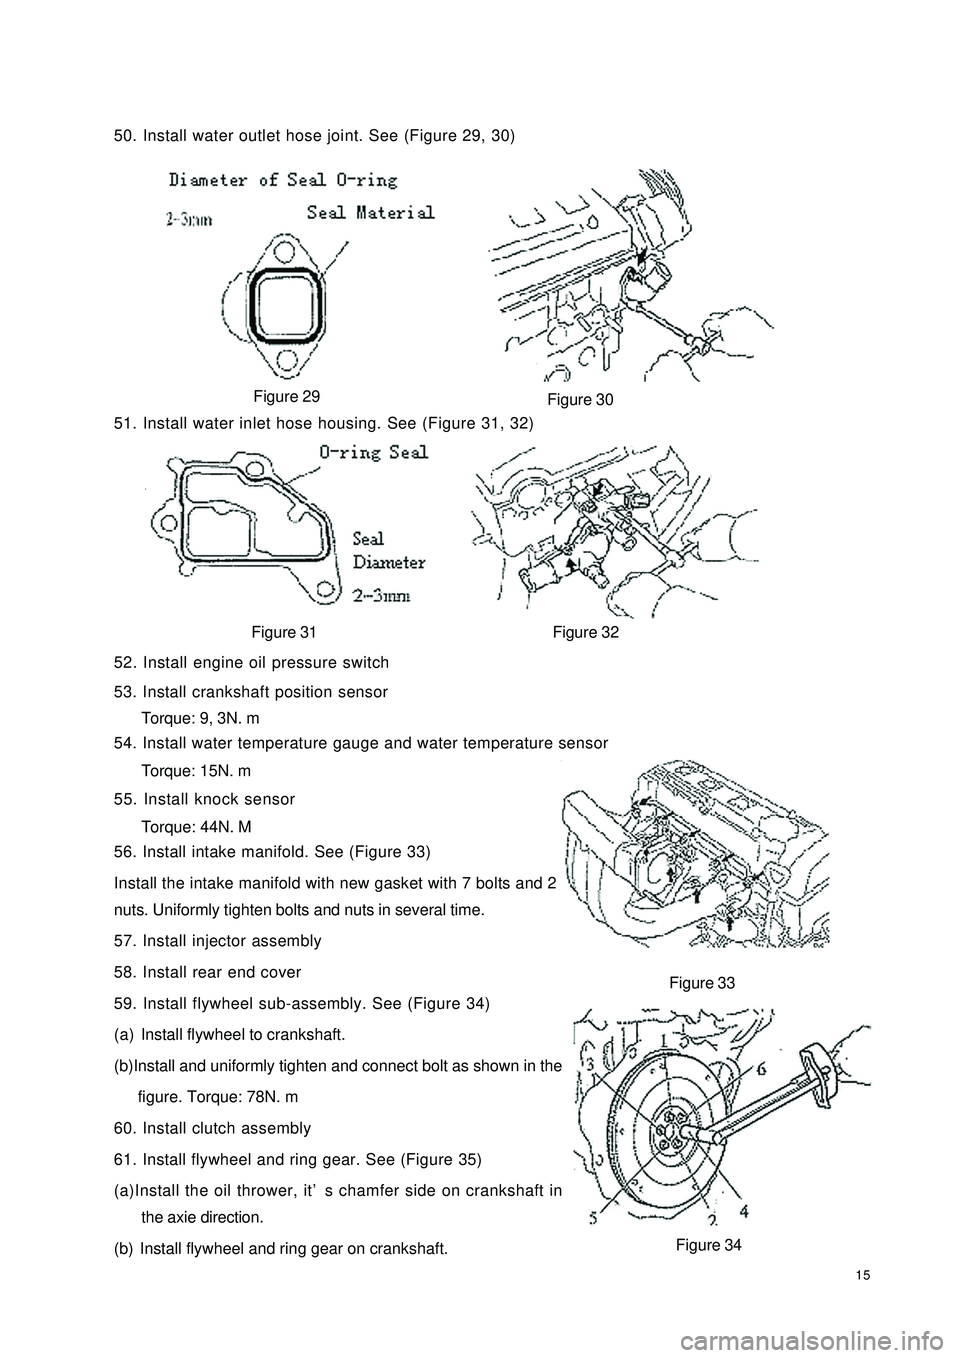
1550. Install water outlet hose joint. See (Figure 29, 30)
Figure 29
51. Install water inlet hose housing. See (Figure 31, 32)
Figure 31 Figure 32
52. Install engine oil pressure switch
53. Install crankshaft position sensor
Torque: 9, 3N. m
54. Install water temperature gauge and water temperature sensor
Torque: 15N. m
55. Install knock sensor
Torque: 44N. M
56. Install intake manifold. See (Figure 33)
Install the intake manifold with new gasket with 7 bolts and 2
nuts. Uniformly tighten bolts and nuts in several time.
57. Install injector assembly
58. Install rear end cover
59. Install flywheel sub-assembly. See (Figure 34)
(a) Install flywheel to crankshaft.
(b)Install and uniformly tighten and connect bolt as shown in the
figure. Torque: 78N. m
60. Install clutch assembly
61. Install flywheel and ring gear. See (Figure 35)
(a)Install the oil thrower, it’s chamfer side on crankshaft in
the axie direction.
(b) Install flywheel and ring gear on crankshaft.Figure 33
Figure 34 Figure 30
Page 41 of 392
34Section 7 Engine Rear Oil Seal Replacement1. Detach engine and manuel transaxle assembly on "Provision 20, Section 2, Chapter 2"
2. Detach clutch case assembly
3. Remove clutch plate assembly
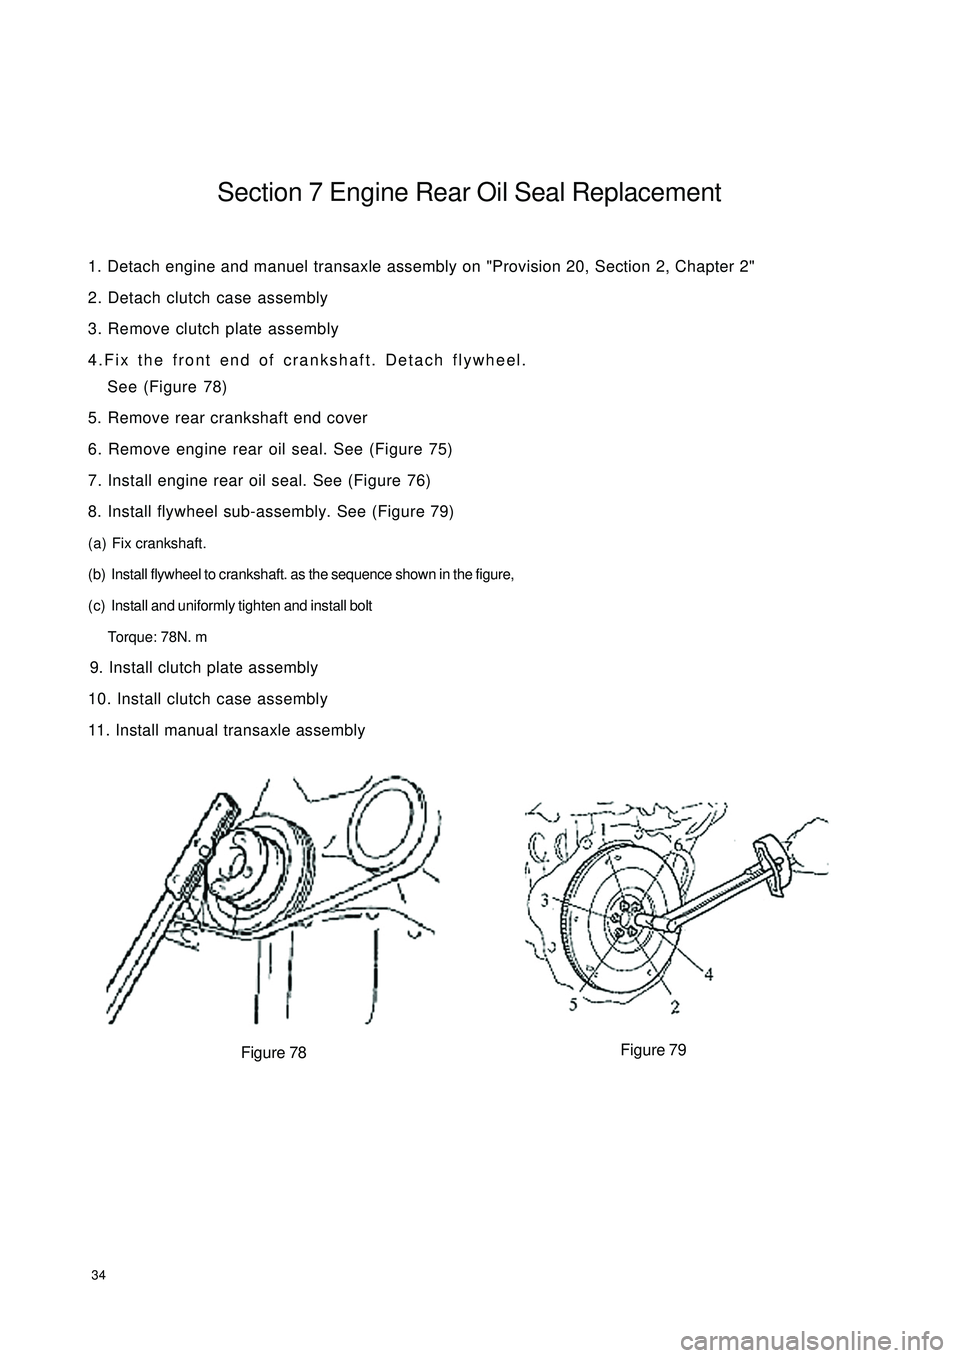
4.Fix the front end of crankshaft. Detach flywheel.
See (Figure 78)
5. Remove rear crankshaft end cover
6. Remove engine rear oil seal. See (Figure 75)
7. Install engine rear oil seal. See (Figure 76)
8. Install flywheel sub-assembly. See (Figure 79)
(a) Fix crankshaft.
(b) Install flywheel to crankshaft. as the sequence shown in the figure,
(c) Install and uniformly tighten and install bolt
Torque: 78N. m
9. Install clutch plate assembly
10. Install clutch case assembly
11. Install manual transaxle assembly
Figure 78Figure 79
Page 63 of 392

56Chapter 7 Clutch
(MR7131A, MR7151A, MR7161A)Component 1 (Hydraulic Manipulation)Figure 131
Page 64 of 392

57Section 1 Clutch ReplacementHoist the engine from the compartment. See "Provison 20, Section 2, Chapter 2".
1. Remove manual transaxle assembly
2. Remove the clutch release fork. See (Figure 132)
3. Detach clutch release fork boot.
4. Detach clutch release bearing
5. Detach clutch release bearing fixed clamp
6. Remove clutch fork pivot pin
7. Align the clutch cover to the mark on the flywheel. Detach clutch cover. See (Figure 133)
8. Remove clutch plate
9. Check and remove clutch plate assembly. See (Figure 134)
10. Check clutch cover. See (Figure 135)
Depth wear: A: 0.6mm
Width wear: B: 5mm
Figure 132 Figure 133
Figure 134 Figure 135
Page 65 of 392
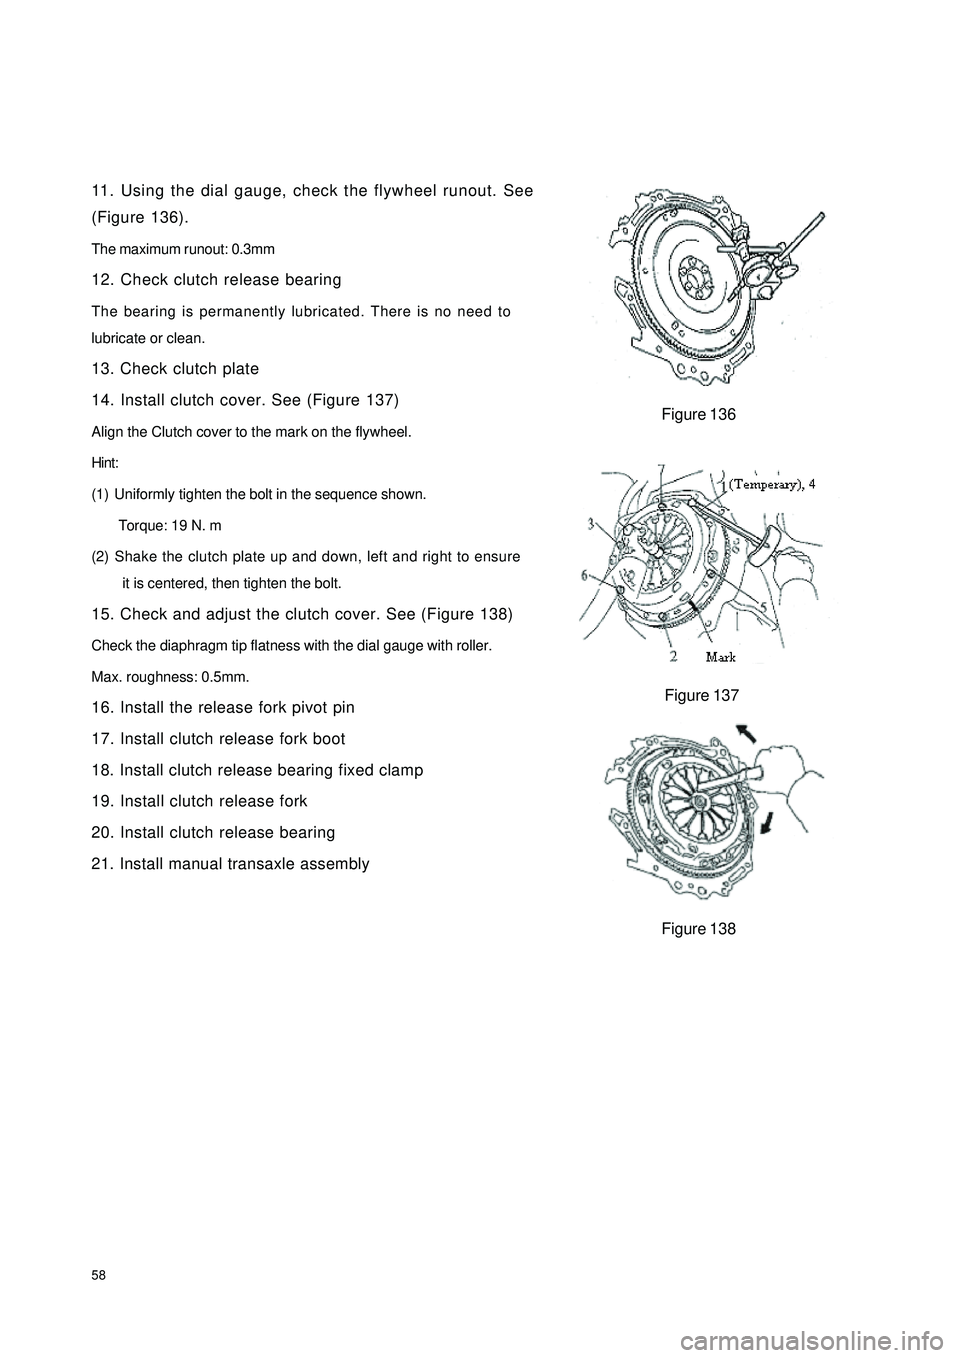
5811. Using the dial gauge, check the flywheel runout. See
(Figure 136).
The maximum runout: 0.3mm
12. Check clutch release bearing
The bearing is permanently lubricated. There is no need to
lubricate or clean.
13. Check clutch plate
14. Install clutch cover. See (Figure 137)
Align the Clutch cover to the mark on the flywheel.
Hint:
(1) Uniformly tighten the bolt in the sequence shown.
Torque: 19 N. m
(2) Shake the clutch plate up and down, left and right to ensure
it is centered, then tighten the bolt.
15. Check and adjust the clutch cover. See (Figure 138)
Check the diaphragm tip flatness with the dial gauge with roller.
Max. roughness: 0.5mm.
16. Install the release fork pivot pin
17. Install clutch release fork boot
18. Install clutch release bearing fixed clamp
19. Install clutch release fork
20. Install clutch release bearing
21. Install manual transaxle assemblyFigure 136
Figure 137
Figure 138