clutch GEELY CK 2008 User Guide
[x] Cancel search | Manufacturer: GEELY, Model Year: 2008, Model line: CK, Model: GEELY CK 2008Pages: 392, PDF Size: 38.86 MB
Page 67 of 392

60Section 1 Manual Transaxle Replacement1. Open the engine hood
2. Remove the battery
3. Remove clutch cylinder sub-assembly. See (Figure 140)
4. Detach transmission shift cable assembly. See (Figure 141)
5. Remove the connector and turn on the back-up lamp switch connector.
6. Disconnect vehicle speed sensor
Disconnect vehicle speed sensor connector.
7. Detach the front exhaust pipe
8. Drain transmission oil
9. Detach left & right front wheel hub nut
10. Detach left & right front wheel speed sensor (ABS)
11. Detach front balance rod
12. Detach left & right tie-rod with ball stud pin
13. Detach front balance rod
14. Detach left & right lower swing arm
15. Detach left & right front propeller assembly
16. Hoist the engine from compartment. See "Provision 20, Section 2, Chapter 2"
17. Detach starter assembly
18. Detach engine mounting bracket
19. Detach manual transaxle assembly
20. Install engine mounting bracket
21. Install manual transaxle assembly
22. Connect engine vibration insulating cushions
23. Install starter assembly
24. Install left & right front propeller assembly
25. Connect left & right lower swing arm
26. Connect left & right tie-rod with ball stud pin
27. Connect front balance rod
28. Connect left & right front speed sensor (ABS)
29. Installleft & right front shaft nut
30. Install front exhaust pipe
31. Connect speedometer sensor connector.
32. Connect back-up lamp switch connector.
33. Connect transmission shift cable assembly. See (Figure 141)
34. Install clutch sub-pump assembly. See (Figure 140)Figure 140
Figure 141
Page 98 of 392

91Chapter 3 Clutch Control SystemSection 1 Clutch Control SystemClutch operating system descriptionThis model is equipped with hydraulic and cable clutch control system, respectively used for 1.3L engine
1.5L engine.PROBLEM SYMPTOMS TABLEUse the table below to help you find the cause of the problem. The numbers indicate the priority of the likely
cause of the problem. Check each part in order. If necessary, replace these parts.Section 2 Clutch Cable Control MechanismComponentsSympto m Sus pe cte d Are a
1. Clutc h pe da l position (Too low)
2. Control mec ha nism (Stagna tion)
3. Clutc h pe da l fre e stroke (too la rge)
C lut c h doe s not r e le a s e 1. H ydr a ulic pipe line ( A ir in line )
1. Control system (Incorrect assembly & adjustment)
2. Clutc h asse mbly (Fa ulty) Clutch noisyC lut c h s lipsConnect The
Clutch Fork Clutch Cable
Assmbly
Adjusting NutCowl Baffle
Clutch and Brake
Pedal Assembly
Page 99 of 392
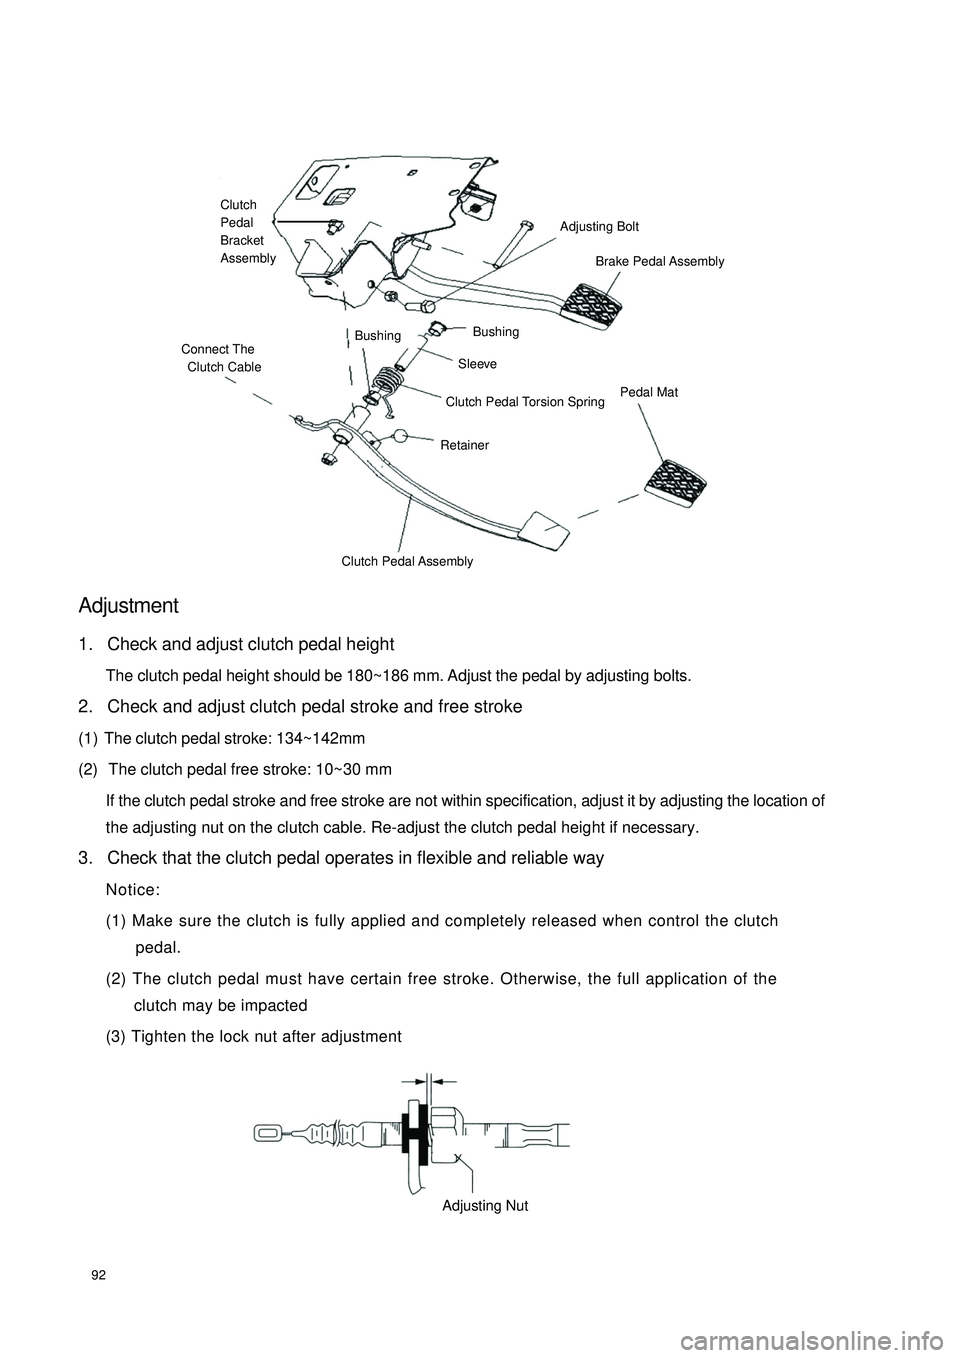
92Adjustment1. Check and adjust clutch pedal height
The clutch pedal height should be 180~186 mm. Adjust the pedal by adjusting bolts.
2. Check and adjust clutch pedal stroke and free stroke
(1) The clutch pedal stroke: 134~142mm
(2) The clutch pedal free stroke: 10~30 mm
If the clutch pedal stroke and free stroke are not within specification, adjust it by adjusting the location of
the adjusting nut on the clutch cable. Re-adjust the clutch pedal height if necessary.
3. Check that the clutch pedal operates in flexible and reliable way
Notice:
(1) Make sure the clutch is fully applied and completely released when control the clutch
pedal.
(2) The clutch pedal must have certain free stroke. Otherwise, the full application of the
clutch may be impacted
(3) Tighten the lock nut after adjustmentConnect The
Clutch CableBushingBushingAdjusting BoltBrake Pedal Assembly Sleeve Clutch Pedal Torsion Spring Retainer Pedal MatClutch Pedal AssemblyClutch
Pedal
Bracket
AssemblyAdjusting Nut
Page 100 of 392

93Replacement1. Remove the clutch cable
(1) Loosen the clutch adjusting nut. Separate the clutch cable from the accelerator rocker arm
(2) Remove the 2 set bolts from the clutch cable on the cowl panel
(3) Separate the clutch cable from the clutch pedal
2. Install the clutch cable assembly in the reverse order of the above procedure.
Notice:
(1) The clutch cable assembly on the cowl panel set bolt torque : 20~25N.m
(2) Check and adjust the pedal according to the above-mentioned requirement in
"Adjustment".Adjusting BoltStrokeFree
StrokeMinimum Distance from the Cowl Panel Adjusting Bolt
NutInstall HeightAdjusting Nut
Page 101 of 392
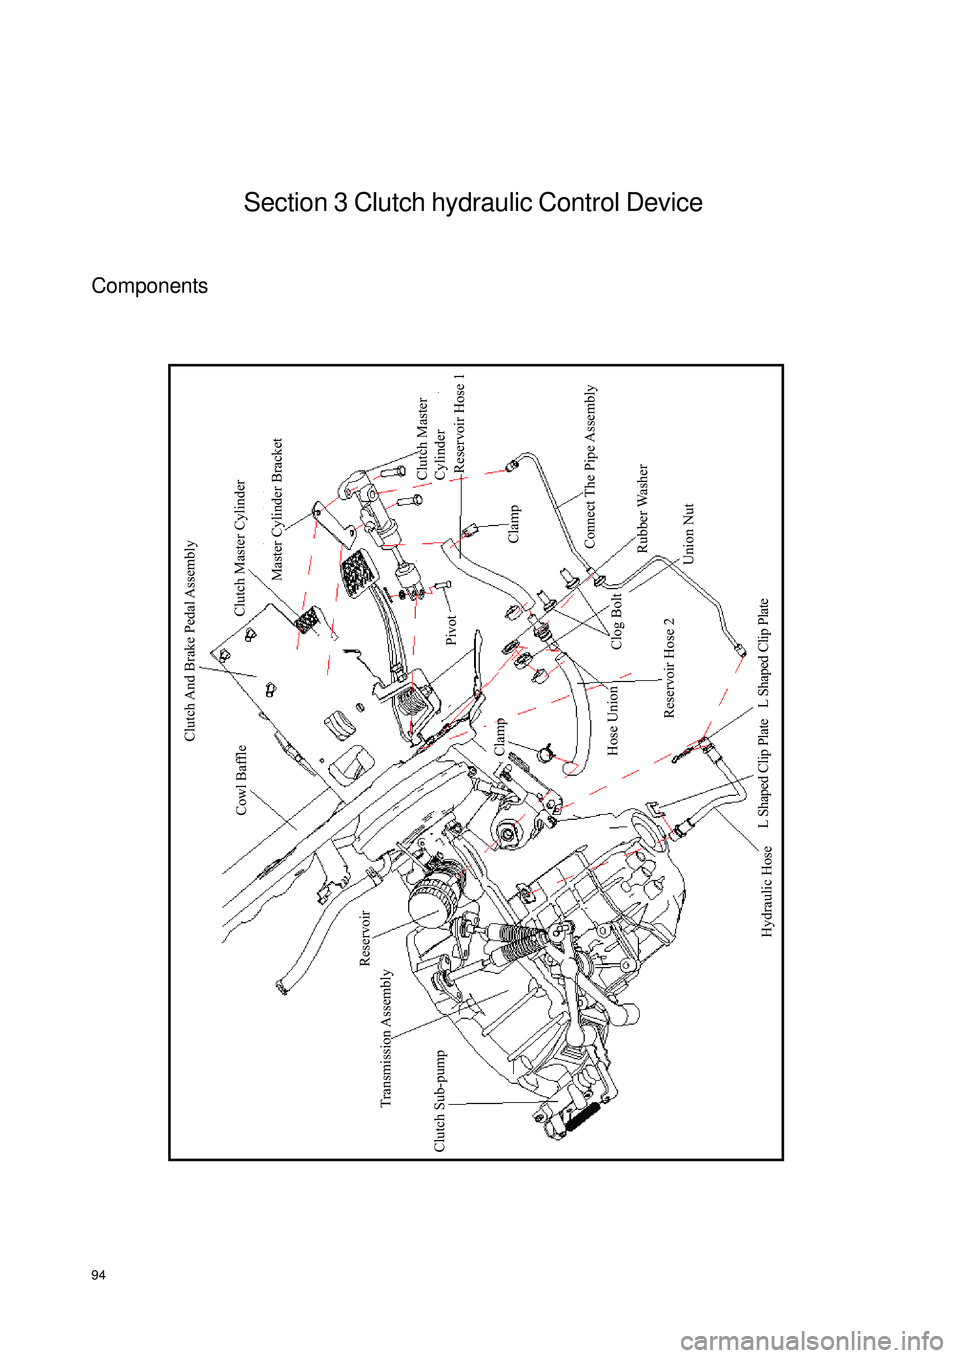
94Section 3 Clutch hydraulic Control DeviceComponents
Clutch Sub-pump
Transmission Assembly
Reservoir
Cowl Baffle
Clutch And Brake Pedal Assembly
Clutch Master Cylinder
Clutch Master
Cylinder
Master Cylinder Bracket
Clamp Clamp
Connect The Pipe Assembly
Hose Union
Reservoir Hose 2Reservoir Hose 1
Clog Bolt
Rubber Washer
Union Nut
Hydraulic Hose
L Shaped Clip Plate L Shaped Clip Plate
Pivot
Page 102 of 392
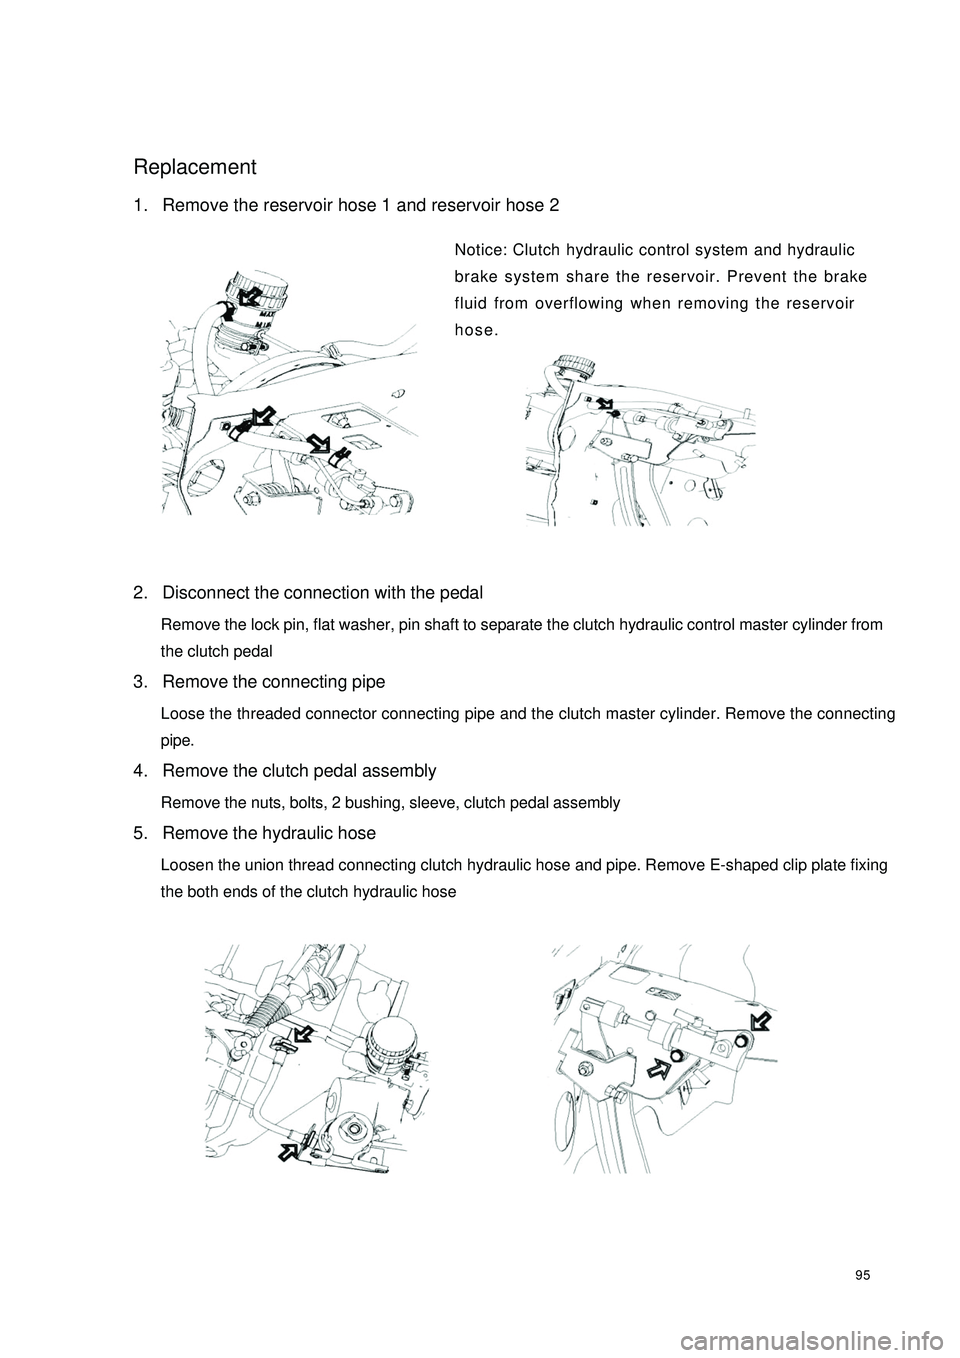
95Replacement1. Remove the reservoir hose 1 and reservoir hose 2
Notice: Clutch hydraulic control system and hydraulic
brake system share the reservoir. Prevent the brake
fluid from overflowing when removing the reservoir
hose.
2. Disconnect the connection with the pedal
Remove the lock pin, flat washer, pin shaft to separate the clutch hydraulic control master cylinder from
the clutch pedal
3. Remove the connecting pipe
Loose the threaded connector connecting pipe and the clutch master cylinder. Remove the connecting
pipe.
4. Remove the clutch pedal assembly
Remove the nuts, bolts, 2 bushing, sleeve, clutch pedal assembly
5. Remove the hydraulic hose
Loosen the union thread connecting clutch hydraulic hose and pipe. Remove E-shaped clip plate fixing
the both ends of the clutch hydraulic hose
Page 103 of 392
966. Remove clutch hydraulic control master cylinder
Remove the 2 fixing bolts between the clutch hydraulic control master cylinder and the pedal bracket
7. Install and replace the parts in the reverse order of the above procedure
Notice:
(1) Be careful not to leak brake fluid onto other objects or paint surface. Clean it immedi-
ately to avoid damage.
(2) Do not damage the seal rubber when installing and removing the pipe and make sure the
installation is correct
(3) Clutch pedal set thread torque : 20~25N.m
(4) Clutch hydraulic control master cylinder set bolt torque : 20~25N.m
(5) Torque of the union thread connecting the pipe and clutch master cylinder:
12~16N.m
(6) Torque of the threaded connector connecting the clutch hydraulic hose and pipe:
12~16N.m
(7) Bleed the air in the clutch hydraulic control system
(8) Check the clutch hydraulic control system for leakage
(9) Check the clutch hydraulic control system for reliable working
(10)Check the brake fluid level. Fill the brake fluid of the same brand if necessary.
(11) Check the clutch pedal installation height stroke and free stroke
a . The clutch pedal installation height: 180~186 mm
b . The clutch pedal stroke: 134~142mm
c . The clutch pedal free stroke: 10~20 mm
Page 148 of 392
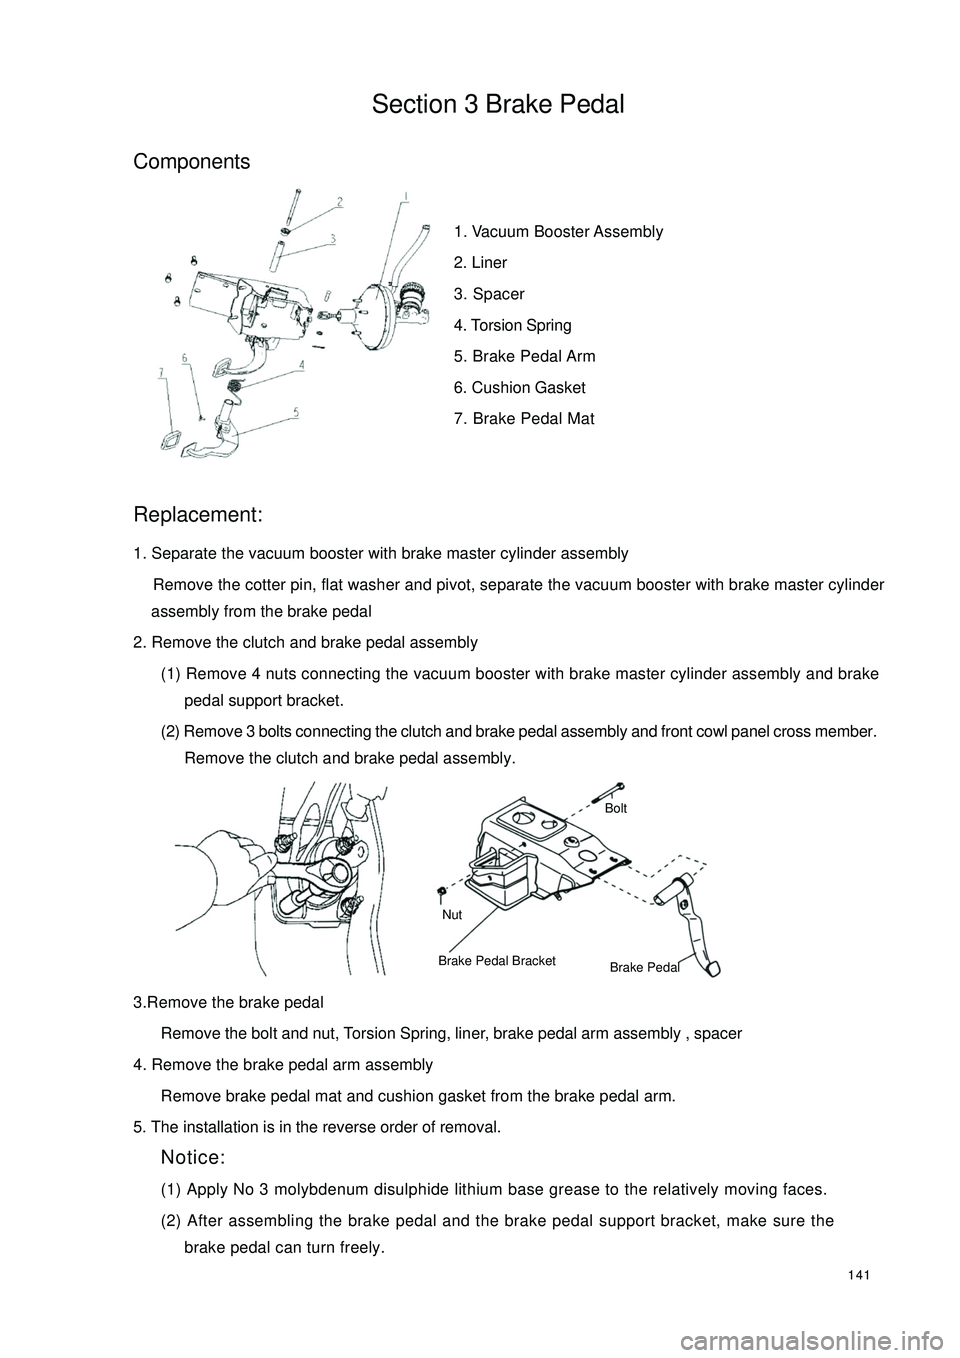
141Section 3 Brake PedalComponents1. Vacuum Booster Assembly
2. Liner
3. Spacer
4. Torsion Spring
5. Brake Pedal Arm
6. Cushion Gasket
7. Brake Pedal MatReplacement:1. Separate the vacuum booster with brake master cylinder assembly
Remove the cotter pin, flat washer and pivot, separate the vacuum booster with brake master cylinder
assembly from the brake pedal
2. Remove the clutch and brake pedal assembly
(1) Remove 4 nuts connecting the vacuum booster with brake master cylinder assembly and brake
pedal support bracket.
(2) Remove 3 bolts connecting the clutch and brake pedal assembly and front cowl panel cross member.
Remove the clutch and brake pedal assembly.
3.Remove the brake pedal
Remove the bolt and nut, Torsion Spring, liner, brake pedal arm assembly , spacer
4. Remove the brake pedal arm assembly
Remove brake pedal mat and cushion gasket from the brake pedal arm.
5. The installation is in the reverse order of removal.
Notice:
(1) Apply No 3 molybdenum disulphide lithium base grease to the relatively moving faces.
(2) After assembling the brake pedal and the brake pedal support bracket, make sure the
brake pedal can turn freely.NutBoltBrake Pedal BracketBrake Pedal
Page 168 of 392
161Chapter 2 Starting and Charging SystemSection 1 Starting System
(MR479Q MR479QA MR481QA)I. STARTER INSPECTIONNOTICE:
These tests must be done within 5 seconds to avoid burning out the coil.
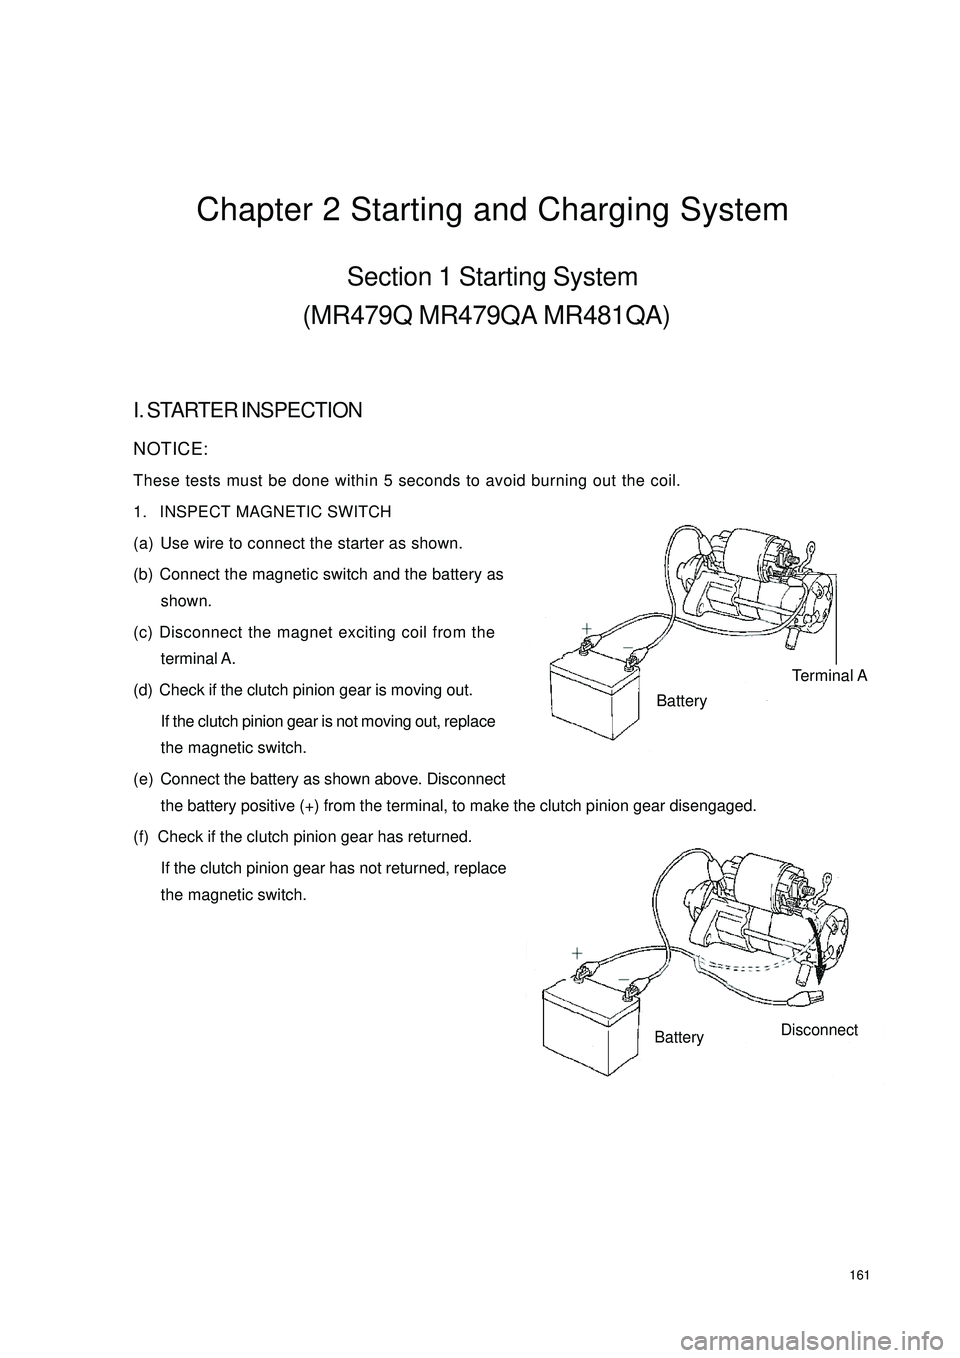
1. INSPECT MAGNETIC SWITCH
(a) Use wire to connect the starter as shown.
(b) Connect the magnetic switch and the battery as
shown.
(c) Disconnect the magnet exciting coil from the
terminal A.
(d) Check if the clutch pinion gear is moving out.
If the clutch pinion gear is not moving out, replace
the magnetic switch.
(e) Connect the battery as shown above. Disconnect
the battery positive (+) from the terminal, to make the clutch pinion gear disengaged.
(f) Check if the clutch pinion gear has returned.
If the clutch pinion gear has not returned, replace
the magnetic switch.Terminal ABatteryBatteryDisconnect
Page 169 of 392
1622. INSPECT STARTER NO-LOAD
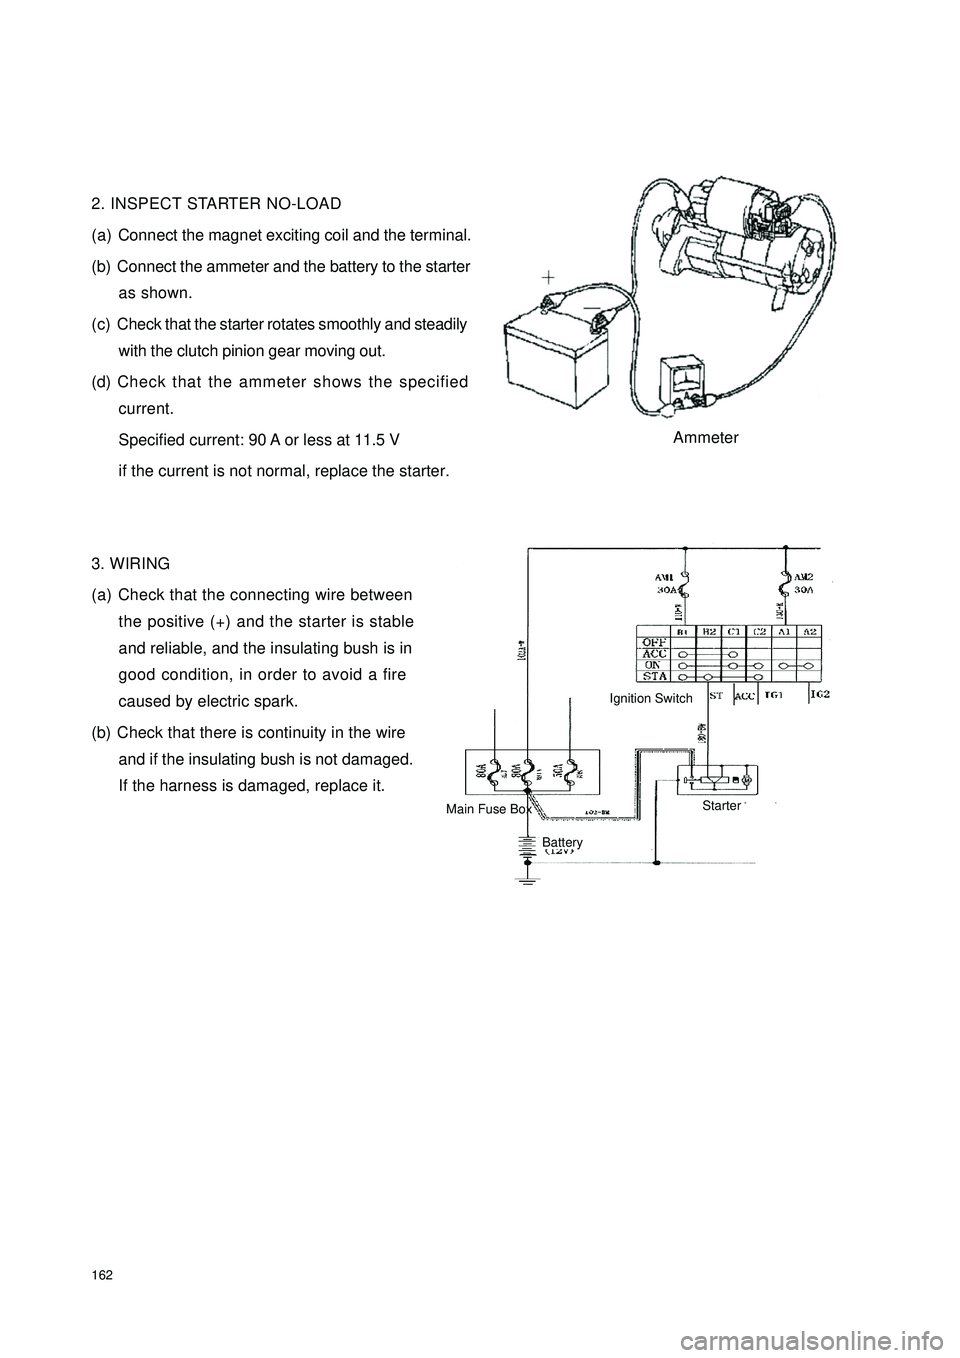
(a) Connect the magnet exciting coil and the terminal.
(b) Connect the ammeter and the battery to the starter
as shown.
(c) Check that the starter rotates smoothly and steadily
with the clutch pinion gear moving out.
(d) Check that the ammeter shows the specified
current.
Specified current: 90 A or less at 11.5 V
if the current is not normal, replace the starter.
3. WIRING
(a) Check that the connecting wire between
the positive (+) and the starter is stable
and reliable, and the insulating bush is in
good condition, in order to avoid a fire
caused by electric spark.
(b) Check that there is continuity in the wire
and if the insulating bush is not damaged.
If the harness is damaged, replace it.AmmeterIgnition SwitchBattery Main Fuse BoxStarter