GENESIS G80 SPORT 2019 Quick Reference Guide
Manufacturer: GENESIS, Model Year: 2019, Model line: G80 SPORT, Model: GENESIS G80 SPORT 2019Pages: 88, PDF Size: 6.71 MB
Page 11 of 88
11
Name of Each Component
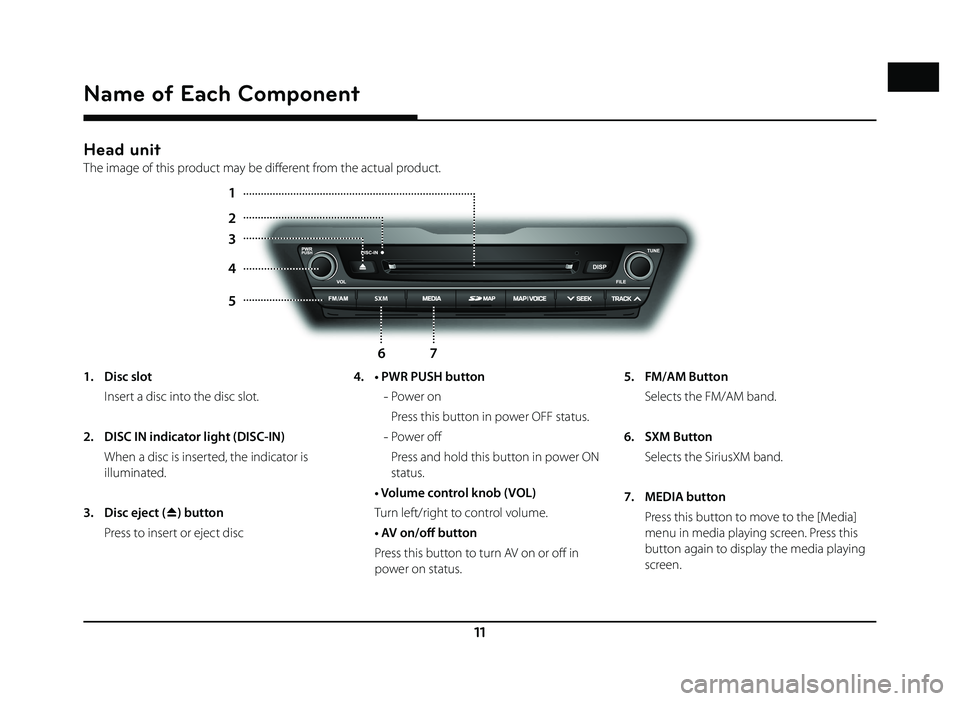
Head unit
The image of this product may be diff erent from the actual product.
/SXM
1
4
6
2
5
7
3
1. Disc slot
Insert a disc into the disc slot.
2. DISC IN indicator light (DISC-IN)
When a disc is inserted, the indicator is illuminated.
3. Disc eject (
B) button
Press to insert or eject disc 4. • PWR PUSH button
-
Power on
Press this button in power OFF status.
-
Power off
Press and hold this button in power ON status.
• Volume control knob (VOL)
Turn left/right to control volume.
• AV on/off button
Press this button to turn AV on or off in
power on status. 5. FM/AM Button
Selects the FM/AM band.
6. SXM Button
Selects the SiriusXM band.
7. MEDIA button
Press this button to move to the [Media]
menu in media playing screen. Press this
button again to display the media playing
screen.
Name of Each Component
Page 12 of 88
12
/SXM
10 11 13
128
9
Name of Each Component
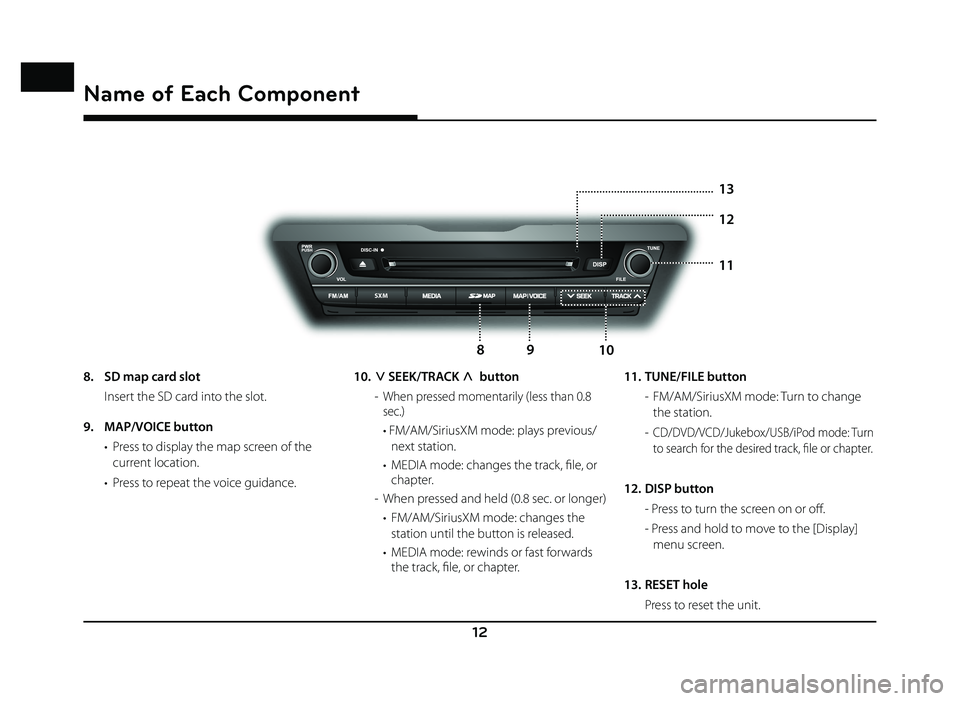
8. SD map card slot
Insert the SD card into the slot.
9. MAP/VOICE button
• Press to display the map screen of the current location.
• Press to repeat the voice guidance. 10. S SEEK/TRACK W
button
-
When pressed momentarily (less than 0.8
sec.)
• FM/AM/SiriusXM mode: plays previous/ next station.
• MEDIA mode: changes the track, fi le, or chapter.
- When pressed and held (0.8 sec. or longer) • FM/AM/SiriusXM mode: changes the station until the button is released.
• MEDIA mode: rewinds or fast forwards the track, fi le, or chapter. 11. TUNE/FILE button
- FM/AM/SiriusXM mode: Turn to change the station.
- CD/DVD/VCD/Jukebox/USB/iPod mode: Turn
to search for the desired track, fi le or chapter.
12. DISP button - Press to turn the screen on or off .
- Press and hold to move to the [Display] menu screen.
13. RESET hole
Press to reset the unit.
Page 13 of 88
13
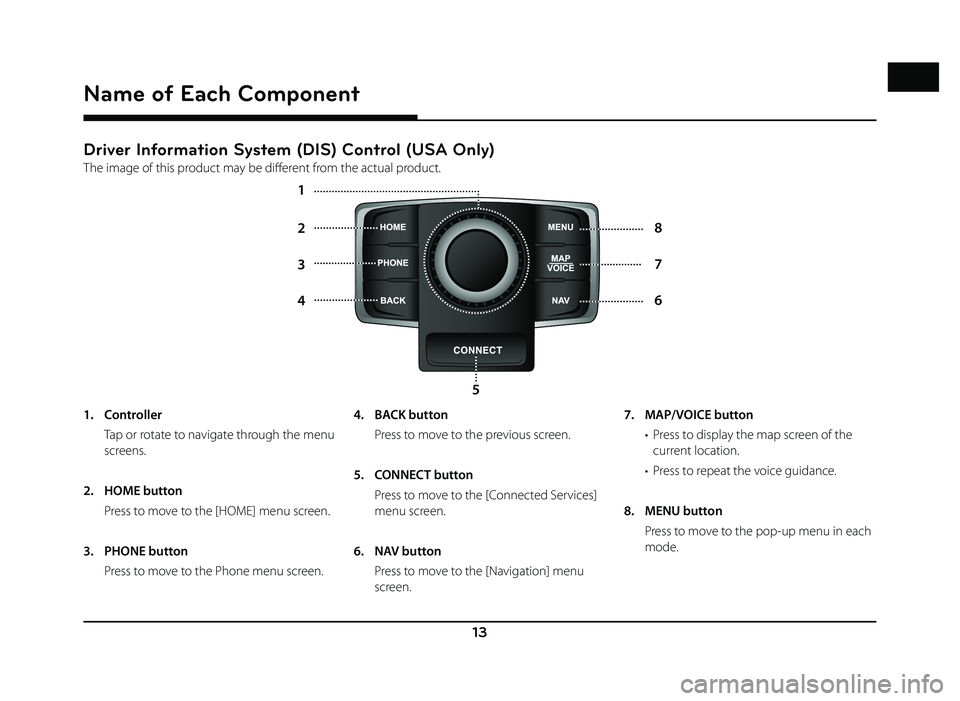
Driver Information System (DIS) Control (USA Only)
The image of this product may be diff erent from the actual product.
4 6
2
8
5
3
7
1
Name of Each Component
1. Controller
Tap or rotate to navigate through the menu
screens.
2. HOME button
Press to move to the [HOME] menu screen.
3. PHONE button
Press to move to the Phone menu screen. 4. BACK button
Press to move to the previous screen.
5. CONNECT button
Press to move to the [Connected Services]
menu screen.
6. NAV button
Press to move to the [Navigation] menu screen. 7. MAP/VOICE button
• Press to display the map screen of the current location.
• Press to repeat the voice guidance.
8. MENU button
Press to move to the pop-up menu in each mode.
Page 14 of 88
14
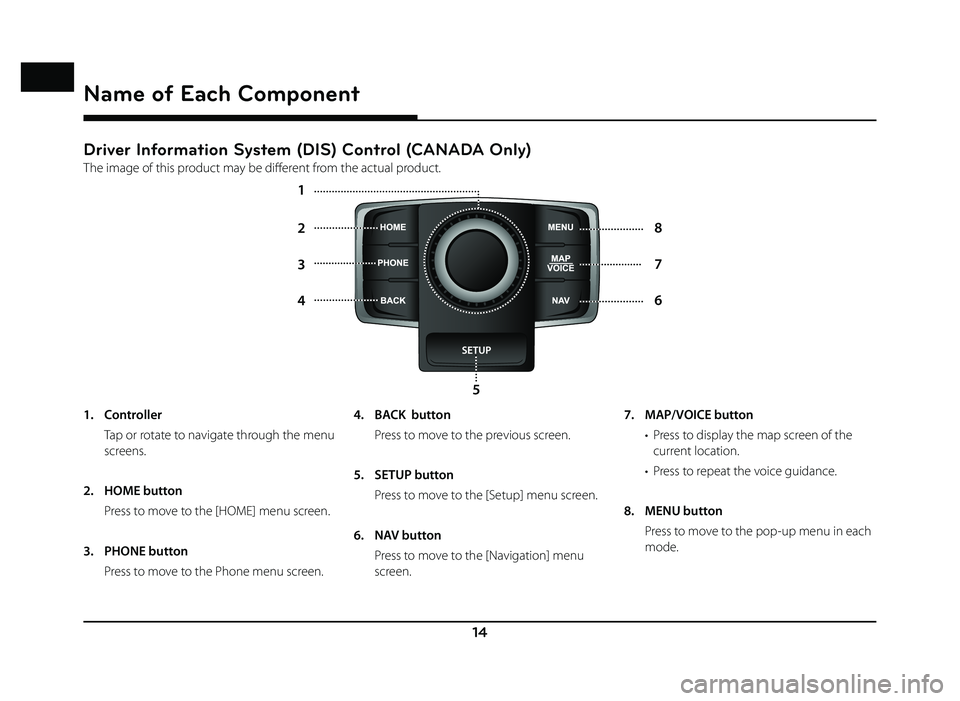
Driver Information System (DIS) Control (CANADA Only)
The image of this product may be diff erent from the actual product.
4 6
2
8
5
3
7
1
Name of Each Component
1. Controller
Tap or rotate to navigate through the menu
screens.
2. HOME button
Press to move to the [HOME] menu screen.
3. PHONE button
Press to move to the Phone menu screen. 4. BACK button
Press to move to the previous screen.
5. SETUP button
Press to move to the [Setup] menu screen.
6. NAV button
Press to move to the [Navigation] menu
screen. 7. MAP/VOICE button
• Press to display the map screen of the current location.
• Press to repeat the voice guidance.
8. MENU button
Press to move to the pop-up menu in each mode.
Page 15 of 88
15
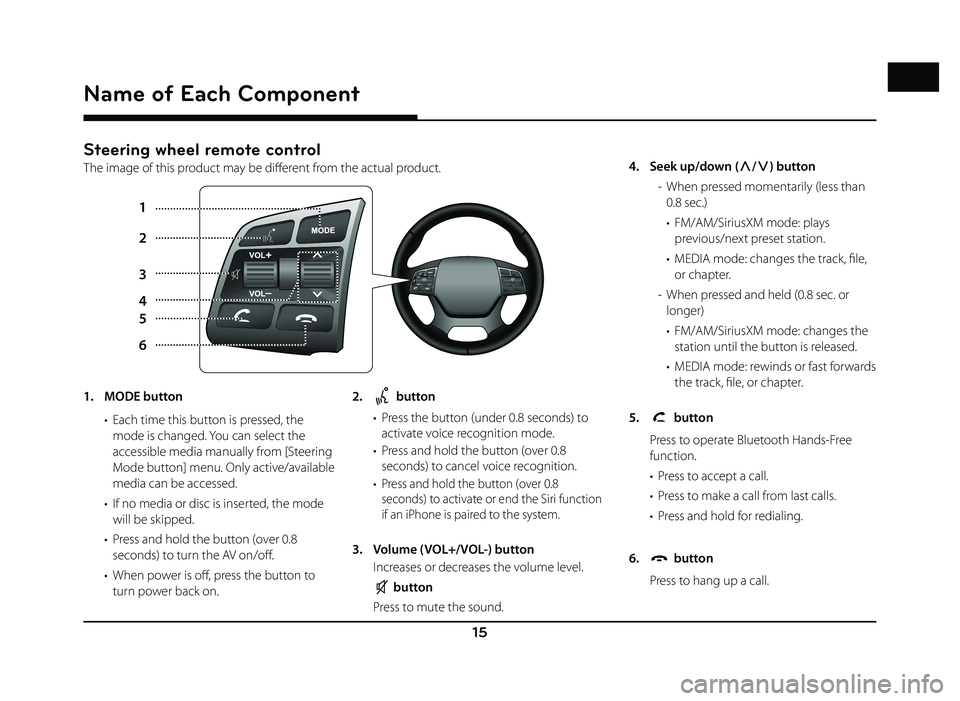
Steering wheel remote control
The image of this product may be diff erent from the actual product.
1
5
6 2
3
4
Name of Each Component
1. MODE button • Each time this button is pressed, the mode is changed. You can select the
accessible media manually from [Steering
Mode button] menu. Only active/available
media can be accessed.
• If no media or disc is inserted, the mode will be skipped.
• Press and hold the button (over 0.8 seconds) to turn the AV on/off .
• When power is off , press the button to turn power back on. 2. button
• Press the button (under 0.8 seconds) to activate voice recognition mode.
• Press and hold the button (over 0.8 seconds) to cancel voice recognition.
•
Press and hold the button (over 0.8
seconds) to activate or end the Siri function
if an iPhone is paired to the system.
3. Volume (VOL+/VOL-) button
Increases or decreases the volume level.
button
Press to mute the sound. 4. Seek up/down (
W/
S ) button
- When pressed momentarily (less than 0.8 sec.)
• FM/AM/SiriusXM mode: plays previous/next preset station.
• MEDIA mode: changes the track, fi le, or chapter.
- When pressed and held (0.8 sec. or longer)
• FM/AM/SiriusXM mode: changes the station until the button is released.
• MEDIA mode: rewinds or fast forwards the track, fi le, or chapter.
5.
button
Press to operate Bluetooth Hands-Free function.
• Press to accept a call.
• Press to make a call from last calls.
• Press and hold for redialing.
6.
button
Press to hang up a call.
Page 16 of 88
![GENESIS G80 SPORT 2019 Quick Reference Guide 16
Radio Operation (FM/AM)
Listening to FM/AM radio
1. Press [FM/AM] on the head unit. Or press [HOME] > [FM/AM].
2. Press [FM] or [AM] on the screen.
The FM/AM screen of the most recent listen GENESIS G80 SPORT 2019 Quick Reference Guide 16
Radio Operation (FM/AM)
Listening to FM/AM radio
1. Press [FM/AM] on the head unit. Or press [HOME] > [FM/AM].
2. Press [FM] or [AM] on the screen.
The FM/AM screen of the most recent listen](/img/46/35634/w960_35634-15.png)
16
Radio Operation (FM/AM)
Listening to FM/AM radio
1. Press [FM/AM] on the head unit. Or press [HOME] > [FM/AM].
2. Press [FM] or [AM] on the screen.
The FM/AM screen of the most recent listened station is displayed.
3. Auto tuning:
Press [
S SEEK/TRACK W] on the head unit.
-
When a station is received, searching stops.
Manual tuning:
Turn [ TUNE/FILE] on the head unit in clockwise or counter-clockwise direction.
-
The stations move up and down step by
step.
Preset tuning:
From the 12 presets, select the station you want to listen to.Listening to HD Radio™
Stations (USA Only)
The HD Radio function is not supported for
vehicles purchased in Canada.
You can turn HD Radio reception on from the
menu and listen to HD Radio Broadcasts.
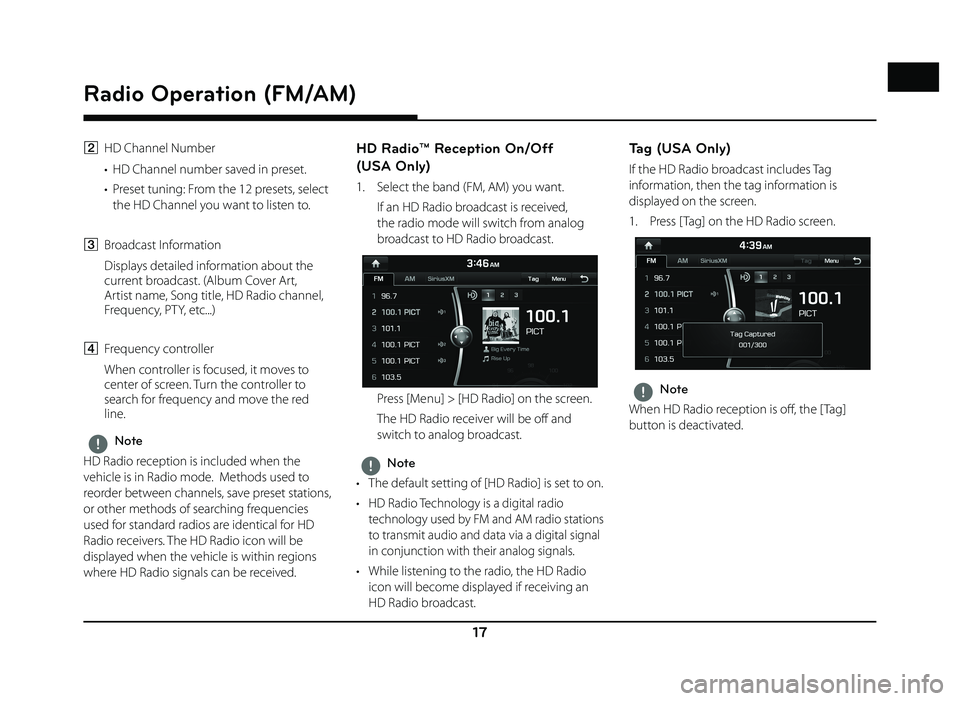
The HD Radio screen is displayed only when a
HD Radio broadcast is being received.
HD Radio screen
D
A
CB
A HD Radio Reception & Channel buttons
Displays main HD Radio channels and used to directly select the currently available
local channels.
Radio Operation (FM/AM)
Page 17 of 88
17
Radio Operation (FM/AM)
B HD Channel Number
• HD Channel number saved in preset.
• Preset tuning: From the 12 presets, select the HD Channel you want to listen to.
C Broadcast Information
Displays detailed information about the current broadcast. (Album Cover Art,
Artist name, Song title, HD Radio channel,
Frequency, PTY, etc...)
D Frequency controller
When controller is focused, it moves to center of screen. Turn the controller to
search for frequency and move the red
line.
,Note
HD Radio reception is included when the
vehicle is in Radio mode. Methods used to
reorder between channels, save preset stations,
or other methods of searching frequencies
used for standard radios are identical for HD
Radio receivers. The HD Radio icon will be
displayed when the vehicle is within regions
where HD Radio signals can be received.
HD Radio™ Reception On/Off
(USA Only)
1. Select the band (FM, AM) you want.
If an HD Radio broadcast is received, the radio mode will switch from analog
broadcast to HD Radio broadcast.
Press [Menu] > [HD Radio] on the screen.
The HD Radio receiver will be off and switch to analog broadcast.
,Note
• The default setting of [HD Radio] is set to on.
• HD Radio Technology is a digital radio technology used by FM and AM radio stations
to transmit audio and data via a digital signal
in conjunction with their analog signals.
• While listening to the radio, the HD Radio icon will become displayed if receiving an
HD Radio broadcast.
Tag (USA Only)
If the HD Radio broadcast includes Tag
information, then the tag information is
displayed on the screen.
1. Press [ Tag] on the HD Radio screen.
,Note
When HD Radio reception is off , the [ Tag]
button is deactivated.
Page 18 of 88
18
Radio Operation (SiriusXM™)
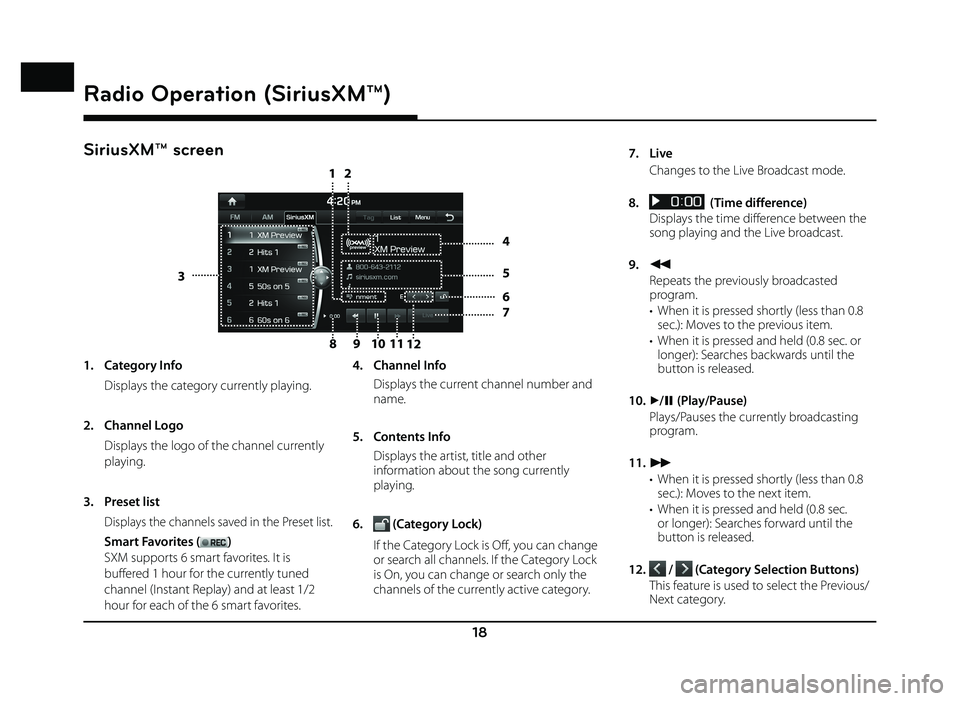
SiriusXM™ screen
810
12
9
11
3
4
5
6
7
21
Radio Operation (SiriusXM™)
1. Category Info
Displays the category currently playing.
2. Channel Logo
Displays the logo of the channel currently
playing.
3. Preset list
Displays the channels saved in the Preset list.
Smart Favorites ()
SXM supports 6 smart favorites. It is
buffered 1 hour for the currently tuned
channel (Instant Replay) and at least 1/2
hour for each of the 6 smart favorites. 4. Channel Info
Displays the current channel number and
name.
5. Contents Info
Displays the artist, title and other information about the song currently
playing.
6.
(Category Lock)
If the Category Lock is Off, you can change or search all channels. If the Category Lock
is On, you can change or search only the
channels of the currently active category. 7. Live
Changes to the Live Broadcast mode.
8.
(Time difference)
Displays the time difference between the song playing and the Live broadcast.
9.
c
Repeats the previously broadcasted program.
• When it is pressed shortly (less than 0.8 sec.): Moves to the previous item.
• When it is pressed and held (0.8 sec. or longer): Searches backwards until the
button is released.
10.
d/ M (Play/Pause)
Plays/Pauses the currently broadcasting program.
11.
v
• When it is pressed shortly (less than 0.8 sec.): Moves to the next item.
• When it is pressed and held (0.8 sec. or longer): Searches forward until the
button is released.
12.
/ (Category Selection Buttons)
This feature is used to select the Previous/ Next category.
Page 19 of 88
![GENESIS G80 SPORT 2019 Quick Reference Guide 19
Radio Operation (SiriusXM™)
Listening to SiriusXM™ radio
1. Press [SXM] on the head unit. Or press [HOME] > [SiriusXM].
The SiriusXM radio screen of the most recent listened channel will b GENESIS G80 SPORT 2019 Quick Reference Guide 19
Radio Operation (SiriusXM™)
Listening to SiriusXM™ radio
1. Press [SXM] on the head unit. Or press [HOME] > [SiriusXM].
The SiriusXM radio screen of the most recent listened channel will b](/img/46/35634/w960_35634-18.png)
19
Radio Operation (SiriusXM™)
Listening to SiriusXM™ radio
1. Press [SXM] on the head unit. Or press [HOME] > [SiriusXM].
The SiriusXM radio screen of the most recent listened channel will be displayed.
2. Select the desired broadcast channel.
For more details, Refer to "Selecting SiriusXM broadcast channel".
Selecting SiriusXM™ broadcast
channel
Selecting a channel through manual
search
Turn [ TUNE/FILE] on the head unit clockwise
or counter-clockwise to display the previous or
next channel information.
Selecting with channel up/down
Press [S SEEK/TRACK W] on the head unit.
- The previous or next channel will be selected.
Selecting a channel through preset
Press the preset button of the desired channel.
Selecting channel through
channel/category list
1. Press [List] on the screen.
Or press [Menu] > [Channel List].
2. Select the desired category and channel.
Press [Menu] > [Now Listening] to return to the current playing channel.
Press [Menu] > [Featured Favorites] to move to the [Featured Favorites] menu.
If you want to skip a channel, press [Menu] > [Skip]. After press the channel to skip,
press [ g] to confirm your selection.
,Note
The channel list may be diff erent according to
the region.
Page 20 of 88
20
Audio CD/MP3 CD Operation
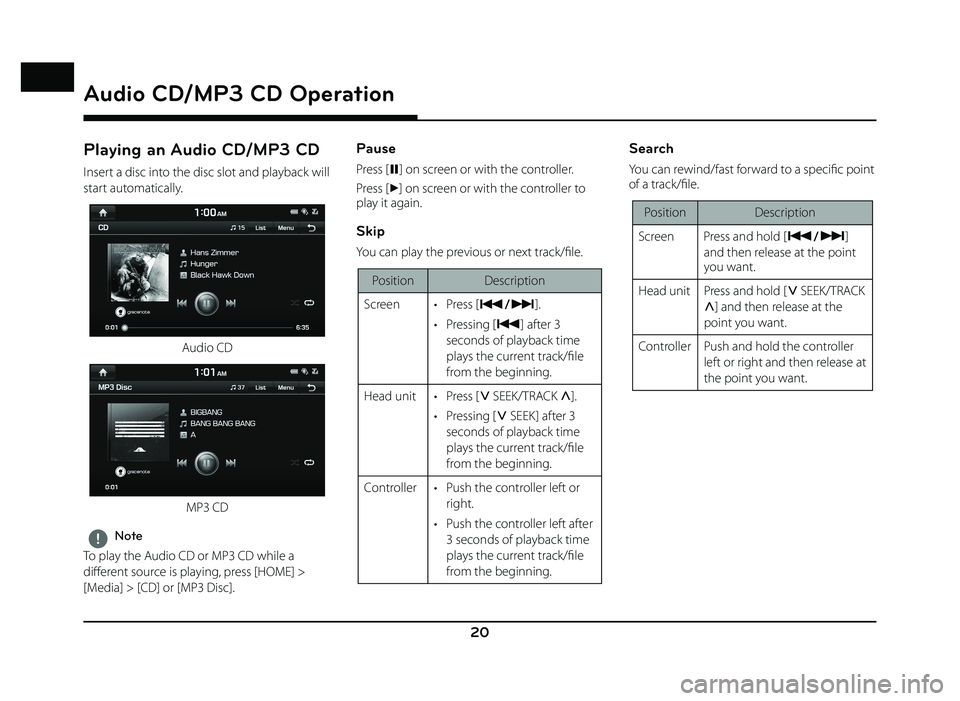
Playing an Audio CD/MP3 CD
Insert a disc into the disc slot and playback will
start automatically.
Audio CD
MP3 CD
,Note
To play the Audio CD or MP3 CD while a
diff erent source is playing, press [HOME] >
[Media] > [CD] or [MP3 Disc].
Pause
Press [ M] on screen or with the controller.
Press [
d] on screen or with the controller to
play it again.
Skip
You can play the previous or next track/fi le.
Position Description
Screen • Press [
C/V].
• Pressing [
C] after 3
seconds of playback time
plays the current track/fi le
from the beginning.
Head unit • Press [
S SEEK/TRACK W].
• Pressing [
S SEEK] after 3
seconds of playback time
plays the current track/fi le
from the beginning.
Controller • Push the controller left or right.
• Push the controller left after 3 seconds of playback time
plays the current track/fi le
from the beginning.
Search
You can rewind/fast forward to a specifi c point
of a track/fi le.
Position Description
Screen Press and hold [ C
/V]
and then release at the point
you want.
Head unit Press and hold [
S SEEK/TRACK
W] and then release at the
point you want.
Controller Push and hold the controller left or right and then release at
the point you want.
Audio CD/MP3 CD Operation