instrument cluster GMC SIERRA 2021 Get To Know Guide
[x] Cancel search | Manufacturer: GMC, Model Year: 2021, Model line: SIERRA, Model: GMC SIERRA 2021Pages: 20, PDF Size: 2.48 MB
Page 3 of 20
3
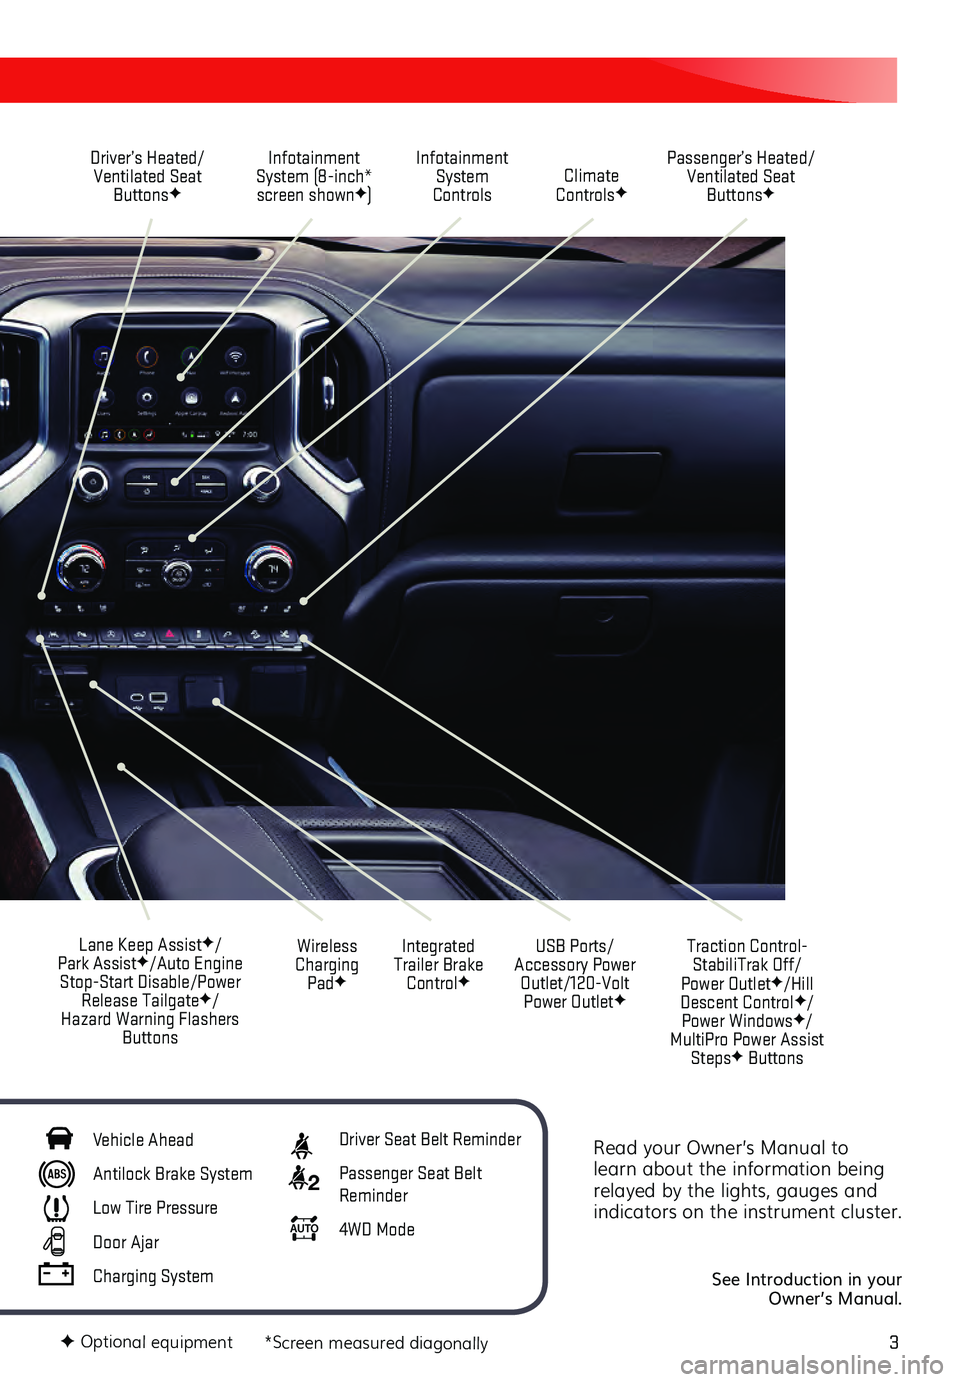
Read your Owner’s Manual to
learn about the information being
relayed by the lights, gauges and
indicators on the instrument cluster.
See Introduction in your
Owner’s Manual.
Driver’s Heated/ Ventilated Seat Buttons
F
Infotainment
System (8-inch* screen shown
F) Passenger’s Heated/
Ventilated Seat ButtonsF
Infotainment System
Controls Climate
Controls
F
USB Ports/
Accessory Power Outlet/120-Volt Power Outlet
F
Integrated
Trailer Brake Control
F
Wireless
Charging Pad
F
Lane Keep AssistF/
Park AssistF/Auto Engine
Stop-Start Disable/Power Release Tailgate
F/
Hazard Warning Flashers Buttons
F Optional equipment *Screen measured diagonally
Traction Control-StabiliTrak Off/
Power Outlet
F/Hill
Descent ControlF/
Power WindowsF/
MultiPro Power Assist Steps
F Buttons
Vehicle Ahead
Antilock Brake System
Low Tire Pressure
Door Ajar
Charging System
Driver Seat Belt Reminder
2 Passenger Seat Belt
Reminder
AU TO 4WD Mode
Page 7 of 20
7F Optional equipment
DRIVER INFORMATION CENTER
MULTICOLOR HEAD-UP DISPLAYF
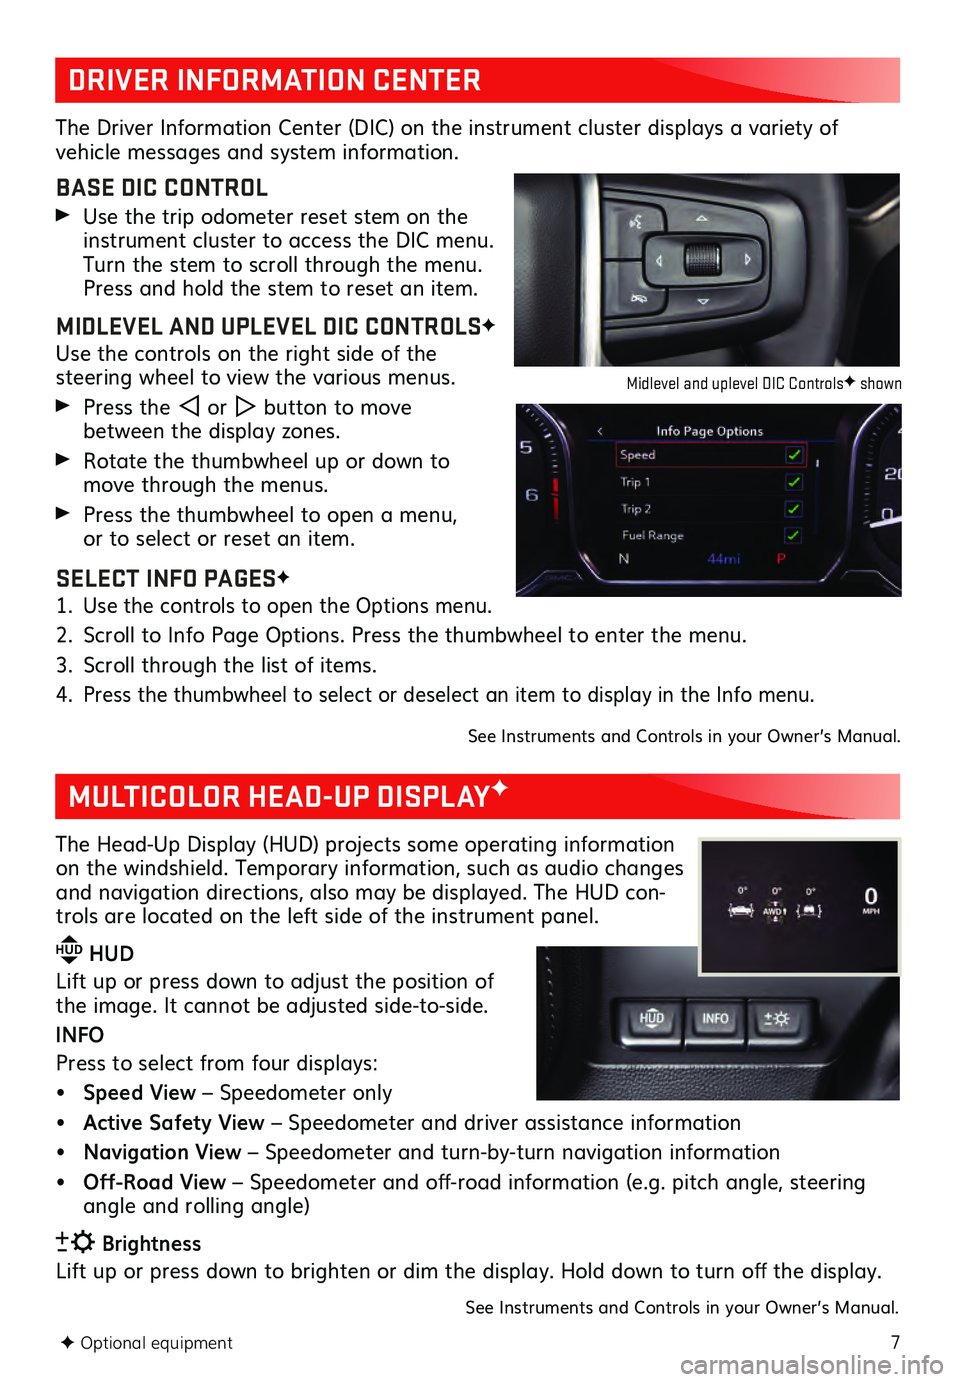
The Driver Information Center (DIC) on the instrument cluster displays a variety of vehicle messages and system information.
BASE DIC CONTROL
Use the trip odometer reset stem on the instrument cluster to access the DIC menu.
Turn the stem to scroll through the menu.
Press and hold the stem to reset an item.
MIDLEVEL AND UPLEVEL DIC CONTROLSF
Use the controls on the right side of the steering wheel to view the various menus.
Press the or button to move
between the display zones.
Rotate the thumbwheel up or down to move through the menus.
Press the thumbwheel to open a menu, or to select or reset an item.
SELECT INFO PAGESF
1. Use the controls to open the Options menu.
2. Scroll to Info Page Options. Press the thumbwheel to enter the menu.
3. Scroll through the list of items.
4. Press the thumbwheel to select or deselect an item to display in the Info menu.
See Instruments and Controls in your Owner’s Manual.
The Head-Up Display (HUD) projects some operating information
on the windshield. Temporary information, such as audio changes
and navigation directions, also may be displayed. The HUD con-
trols are located on the left side of the instrument panel.
HUD HUD
Lift up or press down to adjust the position of
the image. It ca nnot be adjusted side-to-side.
INFO
Press to select from four displays:
• Speed View – Speedometer only
• Active Safety View – Speedometer and driver assistance information
• Navigation View – Speedometer and turn-by-turn navigation information
• Off-Road View – Speedometer and off-road information (e.g. pitch angle, steering
angle and rolling angle)
Brightness
Lift up or press down to brighten or dim the display. Hold down to turn off the display.
See Instruments and Controls in your Owner’s Manual.
Midlevel and uplevel DIC ControlsF shown
Page 12 of 20
12F Optional equipment
LIGHTING
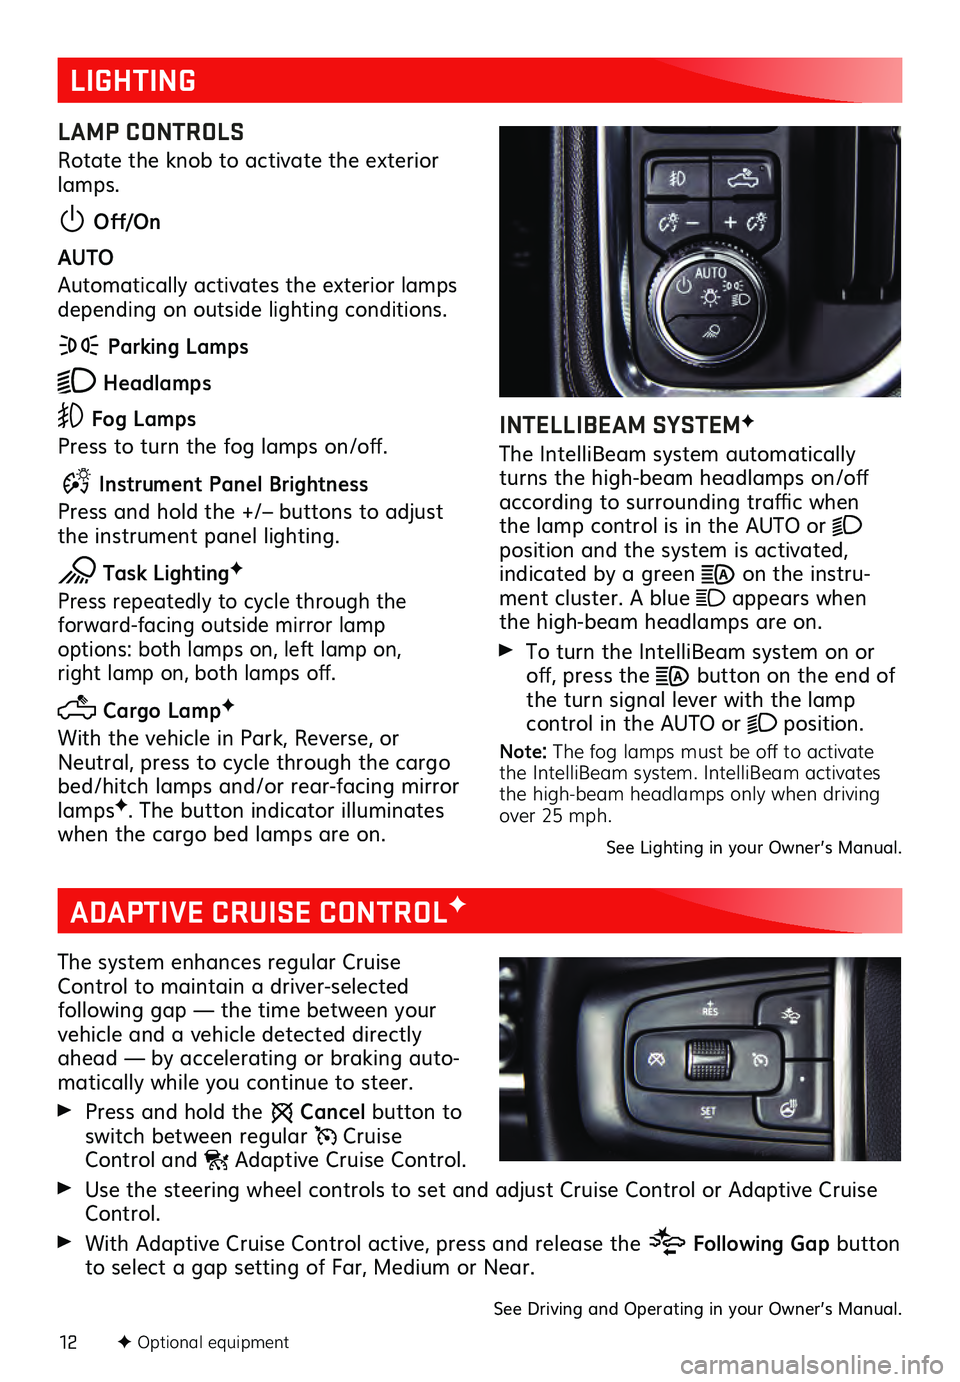
LAMP CONTROLS
Rotate the knob to activate the exterior
lamps.
Off/On
AUTO
Automatically activates the exterior lamps
depending on outside lighting conditions.
Parking Lamps
Headlamps
Fog Lamps
Press to turn the fog lamps on/off.
Instrument Panel Brightness
Press and hold the +/– buttons to adjust
the instrument panel lighting.
Task LightingF
Press repeatedly to cycle through the forward-facing outside mirror lamp options: both lamps on, left lamp on, right lamp on, both lamps off.
Cargo LampF
With the vehicle in Park, Reverse, or
Neutral, press to cycle through the cargo
bed/hitch lamps and/or rear-facing mirror
lamps
F. The button indicator illuminates
when the cargo bed lamps are on.
INTELLIBEAM SYSTEMF
The IntelliBeam system automatically
turns the high-beam headlamps on/off
according to surrounding traffic when
the lamp control is in the AUTO or
position and the system is activated, indicated by a green on the instru -
ment cluster. A blue appears when
the high-beam headlamps are on.
To turn the IntelliBeam s ystem on or off, press the button on the end of
the turn signal lever with the lamp
control in the AUTO or
position.
Note: The fog lamps must be off to activate
the IntelliBeam system. IntelliBeam activates
the high-beam headlamps only when driving
over 25 mph.
See Lighting in your Owner’s Manual.
ADAPTIVE CRUISE CONTROLF
The system enhances regular Cruise
Control to maintain a driver-selected
following gap — the time between your vehicle and a vehicle detected directly
ahead — by accelerating or braking auto -
matically while you continue to steer.
Press and hold the Cancel button to
switch between regular Cruise Control and Adaptive Cruise Control.
Use the steering wheel controls to set and adjust Cruise Control or Adaptive Cruise Control.
With Adaptive Cruise Control active, press and release the Following Gap button
to select a gap setting of Far, Medium or Near.
See Driving and Operating in your Owner’s Manual.
Page 17 of 20
17F Optional equipment
POWER MIRRORSF/TRAILERING MIRRORSF
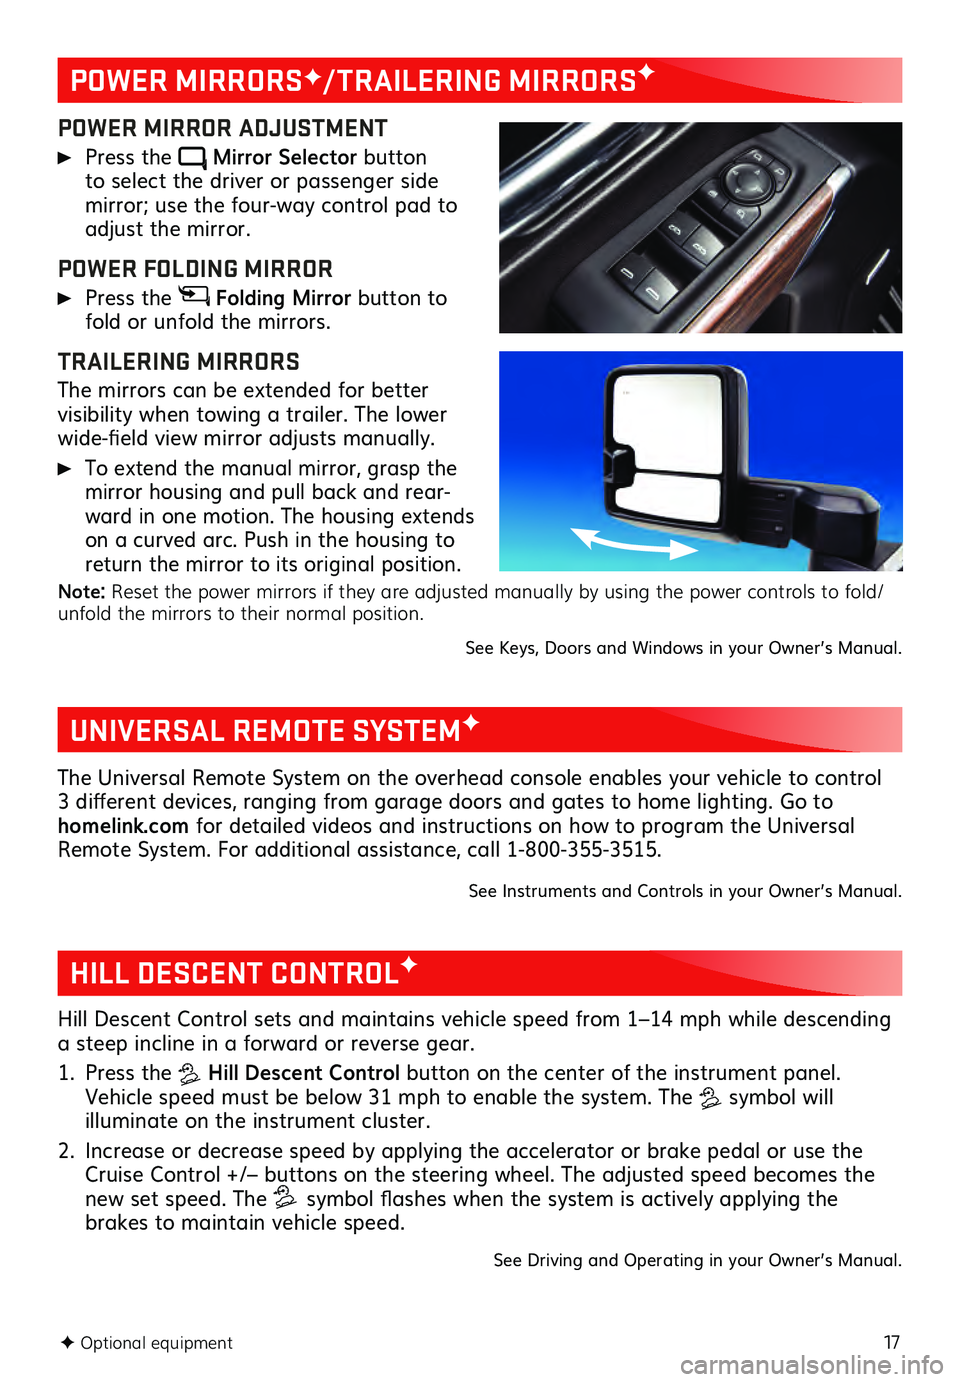
POWER MIRROR ADJUSTMENT
Press the Mirror Selector button to select the driver or passenger side mirror; use the four-way control pad to adjust the mirror.
POWER FOLDING MIRROR
Press the Folding Mirror button to
fold or unfold the mirrors.
TRAILERING MIRRORS
The mirrors can be extended for better visibility when towing a trailer. The lower
wide-field view mirror adjusts manually.
To extend the manual mirror, grasp the
mirror housing and pull back and rear -
ward in one motion. The housing extends
on a curved arc. Push in the housing to
return the mirror to its original position.
Note: Reset the power mirrors if they are adjusted manually by using the power controls to fold/
unfold the mirrors to their normal position.
See Keys, Doors and Windows in your Owner’s Manual.
UNIVERSAL REMOTE SYSTEMF
The Universal Remote System on the overhead console enables your vehicle to control
3 different devices, ranging from garage doors and gates to home lighting. Go to
homelink.com for detailed videos and instructions on how to program the Universal
Remote System. For additional assistance, call 1-800-355-3515.
See Instruments and Controls in your Owner’s Manual.
HILL DESCENT CONTROLF
Hill Descent Control sets and maintains vehicle speed from 1–14 mph while descending
a steep incline in a forward or reverse gear.
1. Press the Hill Descent Control button on the center of the instrument panel.
Vehicle speed must be below 31 mph to enable the system. The
symbol will illuminate on the instrument cluster.
2. Increase or decrease speed by applying the accelerator or brake pedal or use the Cruise Control +/– buttons on the steering wheel. The adjusted speed becomes the
new set speed. The symbol flashes when the system is actively applying the
brakes to maintain vehicle speed.
See Driving and Operating in your Owner’s Manual.
Page 18 of 20
18F Optional equipment
TRAILERINGF
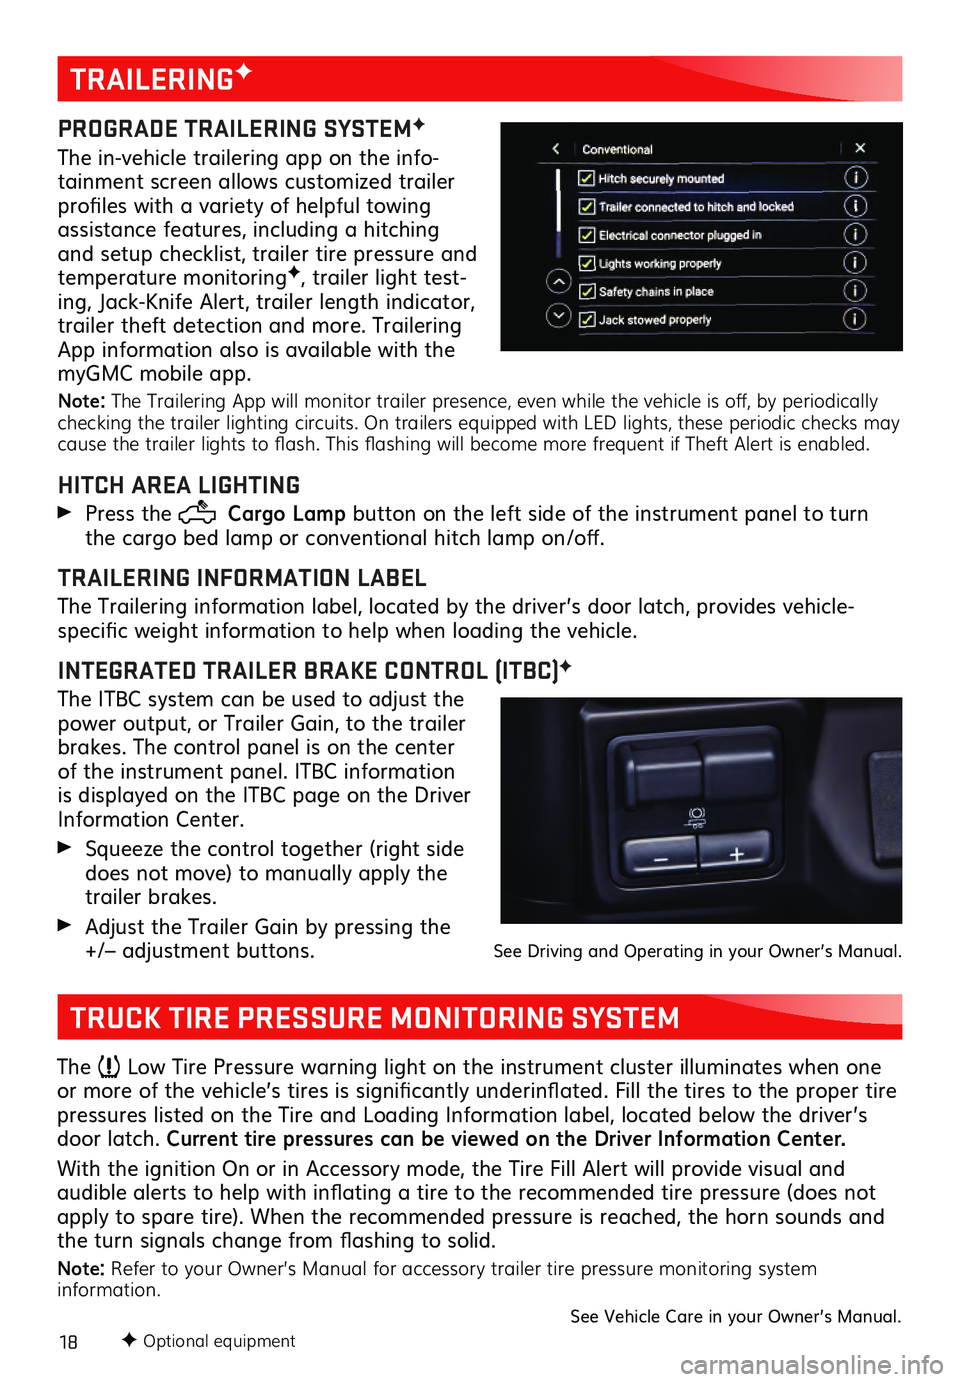
PROGRADE TRAILERING SYSTEMF
The in-vehicle trailering app on the info-
tainment screen allows customized trailer
profiles with a variety of helpful towing
assistance features, including a hitching
and setup checklist, trailer tire pressure and
temperature monitoring
F, trailer light test-
ing, Jack-Knife Alert, trailer length indicator,
trailer theft detection and more. Trailering
App information also is available with the
myGMC mobile app.
Note: The Trailering App will monitor trailer presence, even while the vehicle is off, by periodically
checking the trailer lighting circuits. On trailers equipped with LED lights, these periodic checks may
cause the trailer lights to flash. This flashing will become more frequent if Theft Alert is enabled.
HITCH AREA LIGHTING
Press the Cargo Lamp button on the left side of the instrument panel to turn
the cargo bed lamp or conventional hitch lamp on/off.
TRAILERING INFORMATION LABEL
The Trailering information label, located by the driver’s door latch, provides vehicle-
specific weight information to help when loading the vehicle.
INTEGRATED TRAILER BRAKE CONTROL (ITBC)F
The ITBC system can be used to adjust the
power output, or Trailer Gain, to the trailer
brakes. The control panel is on the center
of the instrument panel. ITBC information
is displayed on the ITBC page on the Driver
Information Center.
Squeeze the control together (right s ide does not move) to manually apply the
trailer brakes.
Adjust the Trailer Gain by pressing the +/– adjustment buttons. See Driving and Operating in your Owner’s Manual.
TRUCK TIRE PRESSURE MONITORING SYSTEM
The Low Tire Pressure warning light on the instrument cluster illuminates when one
or more of the vehicle’s tires is significantly underinflated. Fill the tires to the proper tire
pressures listed on the Tire and Loading Information label, located below the driver’s
door latch. Current tire pressures can be viewed on the Driver Information Center.
With the ignition On or in Accessory mode, the Tire Fill Alert will provide visual and
audible alerts to help with inflating a tire to the recommended tire pressure (does not apply to spare tire). When the recommended pressure is reached, the horn sounds and
the turn signals change from flashing to solid.
Note: Refer to your Owner’s Manual for accessory trailer tire pressure monitoring system
information.
See Vehicle Care in your Owner’s Manual.