engine GMC YUKON DENALI 2010 User Guide
[x] Cancel search | Manufacturer: GMC, Model Year: 2010, Model line: YUKON DENALI, Model: GMC YUKON DENALI 2010Pages: 560, PDF Size: 4.32 MB
Page 134 of 560
3. If it is the first remote start since the vehicle hasbeen driven, repeat these steps, while the engine
is still running, to extend the engine running time
by 10 minutes. Remote start can be extended
one time.
After entering the vehicle during a remote start, insert
and turn the key to RUN to drive the vehicle.
To manually shut off a remote start, do any of the
following:
.Aim the RKE transmitter at the vehicle and press
the remote start button until the parking lamps
turn off.
.Turn on the hazard warning flashers.
.Turn the ignition switch on and then off.
The vehicle can be remote started two separate times
between driving sequences. The engine will run for
10 minutes after each remote start.
Or, you can extend the engine run time by another
10 minutes within the first 10 minute remote start time
frame, and before the engine stops.
For example, if the lock button and then the remote start
buttons are pressed again after the vehicle has been
running for five minutes, 10 minutes are added, allowing
the engine to run for 15 minutes.
The additional ten minutes are considered a second
remote vehicle start. Once two remote starts, or a single remote start with
one time extension has been done, the vehicle must be
started with the key. After the key is removed from the
ignition, the vehicle can be remote started again.
The vehicle cannot be remote started if the key is in the
ignition, the hood is not closed, or if there is an
emission control system malfunction and the check
engine light comes on.
Also, the engine will turn off during a remote vehicle
start if the coolant temperature gets too high or if the oil
pressure gets low.
Vehicles that have the remote vehicle start feature are
shipped from the factory with the remote vehicle start
system enabled. The system may be enabled or
disabled through the DIC. See
“REMOTE START”
under DIC Vehicle Customization (With DIC Buttons)
on
page 4‑66for additional information. If your vehicle
does not have DIC buttons, see your dealer/retailer to
enable or disable the remote vehicle start system.
Remote Start Ready
If your vehicle does not have the remote vehicle start
feature, it may have the remote start ready feature.
This feature allows your dealer/retailer to add the
manufacturer's remote vehicle start feature.
See your dealer/retailer if you would like to add the
manufacturer's remote vehicle start feature to your
vehicle.
3-8
Page 138 of 560
Liftgate/Liftglass
{WARNING:
It can be dangerous to drive with the liftglass or
liftgate open because carbon monoxide (CO) gas
can come into your vehicle. You cannot see or
smell CO. It can cause unconsciousness and
even death.
If you must drive with the liftglass or liftgate open,
or if electrical wiring or other cable connections
must pass through the seal between the body and
the liftglass or liftgate:
.Make sure all other windows are shut.
.Turn the fan on your heating or cooling
system to its highest speed with the
recirculation mode off. That will force outside
air into your vehicle. SeeDual Automatic
Climate Control System on page 4‑18.
(Continued)
WARNING: (Continued)
.If you have air outlets on or under the
instrument panel, open them all the way.
.If your vehicle is equipped with a power
liftgate, disable the power liftgate function.
See Engine Exhaust on page 3‑40.
See Power Liftgate
on page 3‑14for more information
on how to use the power liftgate.
To unlock the liftgate, use the power door lock switch or
press the door unlock button on the Remote Keyless
Entry (RKE) transmitter twice. See Remote Keyless
Entry (RKE) System Operation
on page 3‑4.
3-12
Page 140 of 560
Power Liftgate
Power Liftgate Operation
{WARNING:
Exhaust gases can enter the vehicle if it is driven
with the liftgate, trunk/hatch open, or with any
objects that pass through the seal between the
body and the trunk/hatch or liftgate. Engine
exhaust contains Carbon Monoxide (CO) which
cannot be seen or smelled. It can cause
unconsciousness and even death.
If the vehicle must be driven with the liftgate,
or trunk/hatch open:
.Close all of the windows.
.Fully open the air outlets on or under the
instrument panel.(Continued)
WARNING: (Continued)
.Adjust the Climate Control system to a setting
that brings in only outside air and set the fan
speed to the highest setting. See Climate
Control System in the Index.
.If the vehicle is equipped with a power liftgate,
disable the power liftgate function.
For more information about carbon monoxide,
see Engine Exhaust on page 3‑40.
On vehicles with a power liftgate the button is located
on the overhead console.
The vehicle must be in P (Park) to use the power
liftgate feature.
&: Press the top of the button to open or close the
power liftgate.
OFF : Press the bottom of the button for manual
operation of the power liftgate.
3-14
Page 149 of 560
When the PASS-Key®III+ system senses that someone
is using the wrong key, it prevents the vehicle from
starting. Anyone using a trial-and-error method to start
the vehicle will be discouraged because of the high
number of electrical key codes.
If the engine does not start and the security light on
the instrument panel cluster comes on when trying
to start the vehicle, there may be a problem with
your theft-deterrent system. Turn the ignition off and
try again.
If the engine still does not start, and the key appears to
be undamaged, try another ignition key. At this time,
you may also want to check the fuse, see Fuses and
Circuit Breakers
on page 6‑107. If the engine still does
not start with the other key, your vehicle needs service.
If your vehicle does start, the first key may be faulty.
See your dealer/retailer who can service the
PASS-Key
®III+ to have a new key made. In an
emergency, contact Roadside Assistance.
It is possible for the PASS-Key
®III+ decoder to learn
the transponder value of a new or replacement key.
Up to 10 keys may be programmed for the vehicle.
The following procedure is for programming additional
keys only. If all the currently programmed keys are lost
or do not operate, you must see your dealer/retailer or a
locksmith who can service PASS-Key
®III+ to have keys
made and programmed to the system. See your dealer/retailer or a locksmith who can service
PASS-Key
®III+ to get a new key blank that is cut
exactly as the ignition key that operates the system.
To program the new additional key:
1. Verify that the new key has a
1stamped on it.
2. Insert the original, already programmed, key in the ignition and start the engine. If the engine will not
start, see your dealer/retailer for service.
3. After the engine has started, turn the key to LOCK/OFF, and remove the key.
4. Insert the new key to be programmed and turn it to the ON/RUN position within five seconds of turning
the ignition to the LOCK/OFF position in Step 3.
The security light will turn off once the key has
been programmed.
5. Repeat Steps 1 through 4 if additional keys are to be programmed.
If you lose or damage your PASS-Key
®III+ key, see
your dealer/retailer or a locksmith who can service
PASS-Key
®III+ to have a new key made.
Do not leave the key or device that disarms or
deactivates the theft deterrent system in the vehicle.
3-23
Page 150 of 560
Starting and Operating Your
Vehicle
New Vehicle Break-In
Notice:The vehicle does not need an elaborate
break-in. But it will perform better in the long run if
you follow these guidelines:
.Keep your speed at 55 mph (88 km/h) or less
for the first 500 miles (805 km).
.Do not drive at any one constant speed,
fast or slow, for the first 500 miles
(805 km). Do not make full-throttle starts.
Avoid downshifting to brake or slow the
vehicle.
.Avoid making hard stops for the first
200 miles (322 km) or so. During this time
the new brake linings are not yet broken in.
Hard stops with new linings can mean
premature wear and earlier replacement.
Follow this breaking-in guideline every time
you get new brake linings.
.Do not tow a trailer during break-in.
See Towing a Trailer
on page 5‑42for the
trailer towing capabilities of the vehicle and
more information.
Following break‐in, engine speed and load can be
gradually increased.
3-24
Page 151 of 560
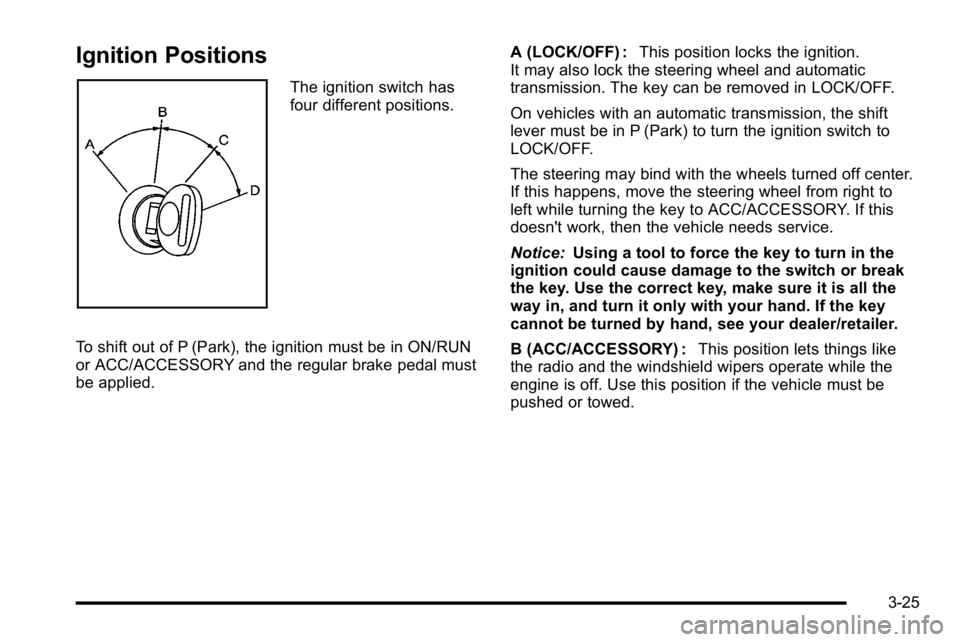
Ignition Positions
The ignition switch has
four different positions.
To shift out of P (Park), the ignition must be in ON/RUN
or ACC/ACCESSORY and the regular brake pedal must
be applied. A (LOCK/OFF) :
This position locks the ignition.
It may also lock the steering wheel and automatic
transmission. The key can be removed in LOCK/OFF.
On vehicles with an automatic transmission, the shift
lever must be in P (Park) to turn the ignition switch to
LOCK/OFF.
The steering may bind with the wheels turned off center.
If this happens, move the steering wheel from right to
left while turning the key to ACC/ACCESSORY. If this
doesn't work, then the vehicle needs service.
Notice: Using a tool to force the key to turn in the
ignition could cause damage to the switch or break
the key. Use the correct key, make sure it is all the
way in, and turn it only with your hand. If the key
cannot be turned by hand, see your dealer/retailer.
B (ACC/ACCESSORY) : This position lets things like
the radio and the windshield wipers operate while the
engine is off. Use this position if the vehicle must be
pushed or towed.
3-25
Page 152 of 560
C (ON/RUN) :This position can be used to operate the
electrical accessories and to display some instrument
panel cluster warning and indicator lights. The switch
stays in this position when the engine is running.
The transmission is also unlocked in this position on
automatic transmission vehicles.
If you leave the key in the ACC/ACCESSORY or
ON/RUN position with the engine off, the battery could
be drained. You may not be able to start the vehicle if
the battery is allowed to drain for an extended period
of time.
D (START) : This is the position that starts the engine.
When the engine starts, release the key. The ignition
switch returns to ON/RUN for driving.
A warning tone will sound when the driver door is
opened, the ignition is in ACC/ACCESSORY or
LOCK/OFF and the key is in the ignition.Retained Accessory Power (RAP)
The following vehicle accessories can be used for up to
10 minutes after the engine is turned off:
.Audio System
.Power Windows
.OnStar®System (if equipped)
.Sunroof (if equipped)
These features work when the key is in ON/RUN or
ACC/ACCESSORY. Once the key is turned from
ON/RUN to LOCK/OFF, the windows and sunroof
continue to work up to 10 minutes until any door is
opened. The radio continues to work for up to
10 minutes or until the driver door is opened.
Starting the Engine
Move the shift lever to P (Park) or N (Neutral).
The engine will not start in any other position.
To restart the engine when the vehicle is already
moving, use N (Neutral) only.
Notice: Do not try to shift to P (Park) if the vehicle
is moving. If you do, you could damage the
transmission. Shift to P (Park) only when the
vehicle is stopped.
3-26
Page 153 of 560
Starting Procedure
1. With your foot off the accelerator pedal, turn theignition to START. When the engine starts,
let go of the key. The idle speed will slow down
as the engine warms. Do not race the engine
immediately after starting it. Operate the engine
and transmission gently to allow the oil to warm up
and lubricate all moving parts.
The vehicle has a Computer-Controlled Cranking
System. This feature assists in starting the engine
and protects components. If the ignition key is
turned to the START position, and then released
when the engine begins cranking, the engine will
continue cranking for a few seconds or until the
vehicle starts. If the engine does not start and the
key is held in START, cranking will be stopped
after 15 seconds to prevent cranking motor
damage. To prevent gear damage, this system also
prevents cranking if the engine is already running.
Engine cranking can be stopped by turning the
ignition switch to the ACC/ACCESSORY or
LOCK/OFF position.
Notice: Cranking the engine for long periods of
time, by returning the key to the START position
immediately after cranking has ended, can overheat
and damage the cranking motor, and drain the
battery. Wait at least 15 seconds between each try,
to let the cranking motor cool down. 2. If the engine does not start after 5‐10 seconds,
especially in very cold weather (below 0°F or
−18°C), it could be flooded with too much gasoline.
Try pushing the accelerator pedal all the way to the
floor and holding it there as you hold the key in
START for up to a maximum of 15 seconds. Wait at
least 15 seconds between each try, to allow the
cranking motor to cool down. When the engine
starts, let go of the key and accelerator. If the
vehicle starts briefly but then stops again, repeat
these steps. This clears the extra gasoline from the
engine. Do not race the engine immediately after
starting it. Operate the engine and transmission
gently until the oil warms up and lubricates all
moving parts.
Notice: The engine is designed to work with the
electronics in the vehicle. If you add electrical
parts or accessories, you could change the way
the engine operates. Before adding electrical
equipment, check with your dealer/retailer. If you
do not, the engine might not perform properly.
Any resulting damage would not be covered by the
vehicle warranty.
3-27
Page 154 of 560
Adjustable Throttle and Brake Pedal
On vehicles with this feature, you can change the
position of the throttle and brake pedals.
No adjustment to the pedals can be made when the
vehicle is in R (Reverse) or while using the cruise
control.
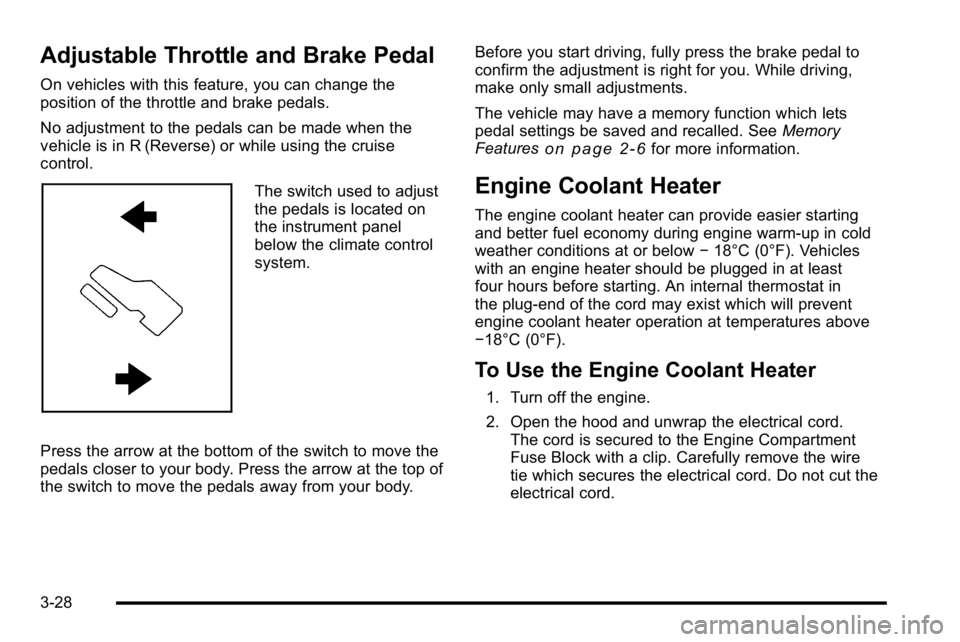
The switch used to adjust
the pedals is located on
the instrument panel
below the climate control
system.
Press the arrow at the bottom of the switch to move the
pedals closer to your body. Press the arrow at the top of
the switch to move the pedals away from your body. Before you start driving, fully press the brake pedal to
confirm the adjustment is right for you. While driving,
make only small adjustments.
The vehicle may have a memory function which lets
pedal settings be saved and recalled. See
Memory
Features
on page 2‑6for more information.
Engine Coolant Heater
The engine coolant heater can provide easier starting
and better fuel economy during engine warm-up in cold
weather conditions at or below −18°C (0°F). Vehicles
with an engine heater should be plugged in at least
four hours before starting. An internal thermostat in
the plug-end of the cord may exist which will prevent
engine coolant heater operation at temperatures above
−18°C (0°F).
To Use the Engine Coolant Heater
1. Turn off the engine.
2. Open the hood and unwrap the electrical cord. The cord is secured to the Engine Compartment
Fuse Block with a clip. Carefully remove the wire
tie which secures the electrical cord. Do not cut the
electrical cord.
3-28
Page 155 of 560
3. Plug the cord into a normal, grounded 110-voltAC outlet.
{WARNING:
Plugging the cord into an ungrounded outlet could
cause an electrical shock. Also, the wrong kind of
extension cord could overheat and cause a fire.
You could be seriously injured. Plug the cord into
a properly grounded three-prong 110-volt AC
outlet. If the cord will not reach, use a heavy-duty
three-prong extension cord rated for at least
15 amps.
4. Before starting the engine, be sure to unplug and store the cord as it was before to keep it away from
moving engine parts. If you do not, it could be
damaged.
The length of time the heater should remain plugged in
depends on several factors. Ask a dealer/retailer in the
area where you will be parking the vehicle for the best
advice on this.
Active Fuel Management™
Vehicles with V8 engines may have Active Fuel
Management™. This system allows the engine to
operate on either all or half of its cylinders, depending
on the driving conditions.
When less power is required, such as cruising at a
constant vehicle speed, the system will operate in the
half cylinder mode, allowing the vehicle to achieve
better fuel economy. When greater power demands are
required, such as accelerating from a stop, passing,
or merging onto a freeway, the system will maintain
full-cylinder operation.
If the vehicle has an Active Fuel Management™
indicator, see DIC Operation and Displays (Using DIC
Buttons)
on page 4‑43or DIC Operation and Displays
(Using Trip Odometer Reset Stem)on page 4‑50for
more information on using this display .
3-29