tires HONDA ACCORD 2013 9.G Owner's Manual
[x] Cancel search | Manufacturer: HONDA, Model Year: 2013, Model line: ACCORD, Model: HONDA ACCORD 2013 9.GPages: 595, PDF Size: 20.67 MB
Page 529 of 595

52 8
uu Checking and Maintaining Tires uDOT Tire Quality Grading (U.S. Vehicles)
Maintenance
DOT Tire Quality Grading (U.S. Vehicles)The tires on your vehicle meet all U.S. Federal Safety
Requirements. All tires are also graded for treadwear, traction,
and temperature performance according to Department of
Transportation (DOT) standard s. The following explains these
gradings.
Quality grades can be found where applicable on the tire sidewall
between tread shoulder and maximu m section width.
The treadwear grade is a compara tive rating based on the wear
rate of the tire when tested under co ntrolled conditions on a
specified government test course. For exampl e, a tire graded 150
would wear one and one-half (1 1/2) times as well on the
government course as a tire graded 100. The relative performance
of tires depends upon the actual conditions of their use, however,
and may depart significantly from the norm due to variations in
driving habits, service practices and differences in road
characteristics and climate.■Uniform Tire Quality Grading■Treadwear
1 Uniform Tire Quality GradingFor example:
Treadwear 200
Traction AA
Temperature A
All passenger car tires must conform
to Federal Safety Requirements in
addition to these grades.
Page 530 of 595

52 9
uu Checking and Maintaining Tires uDOT Tire Quality Grading (U.S. Vehicles)
Maintenance
The traction grades, from highest to lowest, are AA, A, B, and C.
Those grades represent the tire's ability to stop on wet pavement
as measured under controlled condi tions on specified
government test surfaces of asphalt and concrete. A tire marked
C may have poor traction performance.
The temperature grades are A (the highest), B, and C,
representing the tire's resistance to the generation of heat and its
ability to dissipate heat when tested under controlled conditions
on a specified indoor laboratory test wheel. Sustained high
temperature can cause the material of the tire to degenerate and
reduce tire life, and excessive temperature can lead to sudden tire
failure. The grade C corresponds to a level of performance which
all passenger car tires must meet under the Federal Motor Vehicle
Safety Standard No. 109. Grades B and A represent higher levels
of performance on the laboratory test wheel than the minimum
required by law.■Traction■Temperature
1 TractionWarning: The traction grade
assigned to this tire is based on
straight-ahead braking traction tests,
and does not incl ude acceleration,
cornering, hydroplaning, or peak
traction characteristics.1 TemperatureWarning: The temperature grade for
this tire is established for a tire that is
properly inflated and not
overloaded. Excessive speed,
underinflation, or excessive loading,
either separately or in combination,
can cause heat build up and possible
tire failure.
Page 531 of 595

53 0
uu Checking and Maintaining Tires uWear Indicators
Maintenance
Wear Indicators
The groove where the wear indicator is
located is 1/16 inch (1.6 mm) shallower than
elsewhere on the tire. If the tread has worn so
that the indicator is exposed, replace the tire.
Worn out tires have poor traction on wet
roads.
Tire Service LifeThe life of your tires is dependent on many factors, including driving habits, road
conditions, vehicle loading, inflation pressure, maintenance history, speed, and
environmental conditions (even when the tires are not in use).
In addition to regular inspections and inflation pressure maintenance, it is
recommended that you have annual inspections performed once the tires reach five
years old. All tires, including the spare, should be removed from service after 10
years from the date of manufacture, regardless of their condition or state of wear.
1Checking Tires
High speed driving
We recommend that you do not drive faster than the
posted speed limits and conditions allow. If you drive
at sustained high speeds (over 99 mph or 160 km/h),
adjust the cold tire pressures as shown below to
avoid excessive heat build up and sudden tire failure.*1: Canadian V6 Touring modelsTire Size
215/55R17 94V
235/45R18 94V
*1
Pressure 35 psi (240 kPa, 2.4 kgf/cm
2)
6-cylinder models
Example of a Wear
Indicator mark
Page 532 of 595

531
uu Checking and Maintaining Tires uTire and Wheel Replacement
Maintenance
Tire and Wheel ReplacementReplace your tires with radials of the same size, load range, speed rating, and
maximum cold tire pressure rating (as shown on the tire’s sidewall). Using tires of a
different size or construction can cause the ABS and VSA ® (vehicle stability assist)
system to work incorrectly.
It is best to replace all four tires at the same time. If that isn’t possible, replace the
front or rear tires in pairs.
Make sure that the wheel’s specifications match those of the original wheels.
1 Tire and Wheel Replacement
3
WARNING
Installing improper tires on your vehicle can
affect handling and stability. This can cause
a crash in which you can be seriously hurt or
killed.
Always use the size and type of tires
recommended in this owner’s manual.
Page 533 of 595
532
uu Checking and Maintaining Tires uTire Rotation
Maintenance
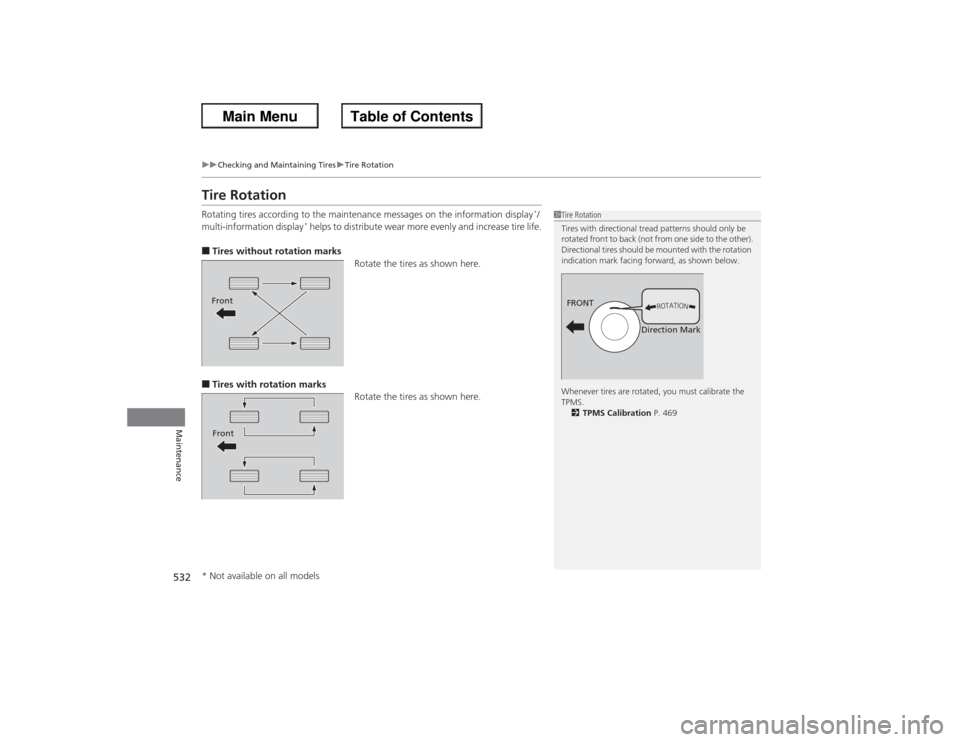
Tire RotationRotating tires according to the maintenance messages on the information display
*/
multi-information display
* helps to distribute wear more evenly and increase tire life.
■Tires without rotation marks Rotate the tires as shown here.■Tires with rotation marksRotate the tires as shown here.
1Tire Rotation
Tires with directional tread patterns should only be
rotated front to back (not from one side to the other).
Directional tires should be mounted with the rotation
indication mark facing forward, as shown below.
Whenever tires are rotated, you must calibrate the
TPMS.
2 TPMS Calibration P. 469
FRONT
Direction Mark
FrontFront* Not available on all models
Page 534 of 595

533
uu Checking and Maintaining Tires uWinter Tires
Maintenance
Winter TiresIf driving on snowy or frozen roads, mount all season marked M+S tires, snow tires, or tire
chains; reduce speed; and maintain sufficient distance between vehicles when driving.
Be particularly careful when operating the steering wheel or brakes to prevent
skidding.
Use tire chains, snow tires, or all season tires when necessary or according to the law.
When mounting, refer to the following points.
For winter tires:
• Select the size and load ranges that are the same as the original tires.
• Mount the tires to all four wheels.
For tire chains:
• Install them on the front tires only.
• Because your vehicle has limited tire clearance, we strongly recommend using the
chains listed below:
• Follow the chain manufacturer's instruction when installing. Mount them as
tightly as you can.
• Check that the chains do not touch the brake lines or suspension.
• Drive slowly.Cable-type: SCC Radial Chain SC1034Cable-type: SCC Radial Chain SC1036Cable-type: SCC Radial Chain SC1040
1Winter TiresNOTICETraction devices that are the wrong size or improperly
installed can damage your vehicle's brake lines,
suspension, body, and wheels. Stop driving if they are
hitting any part of the vehicle.
When tire chains are mounted, follow the chain
manufacturer's instructions regarding vehicle
operational limits.
If your vehicle is equipped with summer tires, be
aware that these tires are not designed for winter
driving conditions. For more information, contact a
dealer.
3
WARNING
Using the wrong chains, or not properly
installing chains, can damage the brake
lines and cause a crash in which you can be
seriously injured or killed.
Follow all instruction s in this owner's
manual regarding the selection and use of
tire chains.
Models with 205/65R1 6 tiresModels with 215/55R17 tiresModels with 235/45R18 tires
Page 546 of 595
545
Continued
Handling the Unexpected
If a Tire Goes FlatChanging a Flat TireIf a tire goes flat while driving, grasp the steering wheel firmly, and brake gradually
to reduce speed. Then, stop in a safe place. Replace the flat tire with a compact
spare tire. Go to a dealer as soon as possible to have the full-size tire repaired or
replaced.
1.Park the vehicle on firm, level, and non-slippery surface and apply the parking
brake.
2. Move the shift lever to
(P.
2. Move the shift lever to (R.
3. Turn on the hazard warning lights and turn the ignition switch to LOCK
(0*1.
*1: Models with the smart entry system have an ENGINE START/STOP button instead of an
ignition switch.
1 Changing a Flat Tire
Periodically check the tire pressure of the compact
spare. It should be set to the specified pressure.
Specified Pressure: 60 psi (420 kPa, 4.2 kgf/cm
2)
When driving with the compact spare tire, keep the
vehicle speed under 50 mp h (80 km/h). Replace with
a full-size tire as soon as possible.
The compact spare tire and wheel in your vehicle are
specifically for this model.
Do not use them with another vehicle.
Do not use another type of compact spare tire or
wheel with your vehicle.
Do not mount tire chains on a compact spare tire.
If a chain-mounted front tire goes flat, remove one of
the full-size rear tires and replace it with the compact
spare tire. Remove the flat front tire and replace it
with the full size tire that was removed from the rear.
Mount the tire chains on the front tire.
Automatic transmission/CVT modelsManual transmission modelsAll models
Page 564 of 595

563
uu Indicator, Coming On/Blinking uIf the Low Tire Pressure/TPMS Indicator Comes On or Blinks
Handling the Unexpected
If the Low Tire Pressure/TPMS Indicator Comes On or Blinks
■Reasons for the indicator to come on or blink
A tire pressure is significantly low, or the TPMS has not been calibrated.
If there is a problem with the TPMS or the compact spare tire is installed,
the indicator blinks for about one minute, and then stays on.■What to do when th e indicator comes on
Drive carefully and avoid abrupt cornering and hard braking.
Stop your vehicle in a safe place. Check the tire pressure and adjust the
pressure to the specified level. The specified tire pressure is on a label on
the driver side doorjamb. uCalibrate the TPMS after the tire pressure is adjusted.■What to do when the indicator blinks, then remains on
Have the tire inspected by a dealer as soon as possible. If the compact
spare tire causes the indicator to blink, change the tire to a full-size tire.
The indicator goes off after driving for a few miles (kilometers). uCalibrate the TPMS after a full-size tire is reinstalled.
1If the Low Tire Pressure/TPMS Indicator Comes On or BlinksNOTICEDriving on an extremely underinflated tire can cause
it to overheat. An overheated tire can fail. Always
inflate your tires to the prescribed level.
Page 568 of 595
567Handling the Unexpected
Emergency TowingCall a professional towing service if you need to tow your vehicle.■Flat bed equipment
The operator loads your vehicle on the back of a truck.
This is the best way to transport your vehicle.■Wheel lift equipment
The tow truck uses two pivoting arms that go under the front tires and lift them off
the ground. The rear tires remain on the ground. This is an acceptable way to
tow your vehicle.
1 Emergency TowingNOTICETrying to lift or tow your vehicle by the bumpers will
cause serious damage. The bumpers are not designed
to support the vehicle's weight.NOTICEImproper towing such as towing behind a
motorhome or other motor vehicle can damage the
transmission.
Never tow your vehicle with just a rope or chain.
It is very dangerous, since ropes or chains may shift
from side to side or break.
Page 581 of 595
580
uuWarranty Coverages u
Information
Replacement Battery Limited Warranty – provides prorated coverage for a
replacement battery purchased from a dealer.
Replacement Muffler Lifetime Limited Warranty – provides coverage for as
long as the purchaser of the muffler owns the vehicle.
Restrictions and exclusions apply to all these warranties. Please read the 2013 Honda
warranty information booklet that came with your vehicle for precise information on
warranty coverages. Your vehicle’s original tires are covered by their manufacturer.
Tire warranty information is in a separate booklet.■Canadian Owners
Please refer to the 2013 warranty manual that came with your vehicle.