VIN HONDA ACCORD 2015 9.G Manual PDF
[x] Cancel search | Manufacturer: HONDA, Model Year: 2015, Model line: ACCORD, Model: HONDA ACCORD 2015 9.GPages: 593
Page 135 of 593
uuOperating the Switches Around the Steering Wheel uENGINE START/STOP Button
*
134Controls
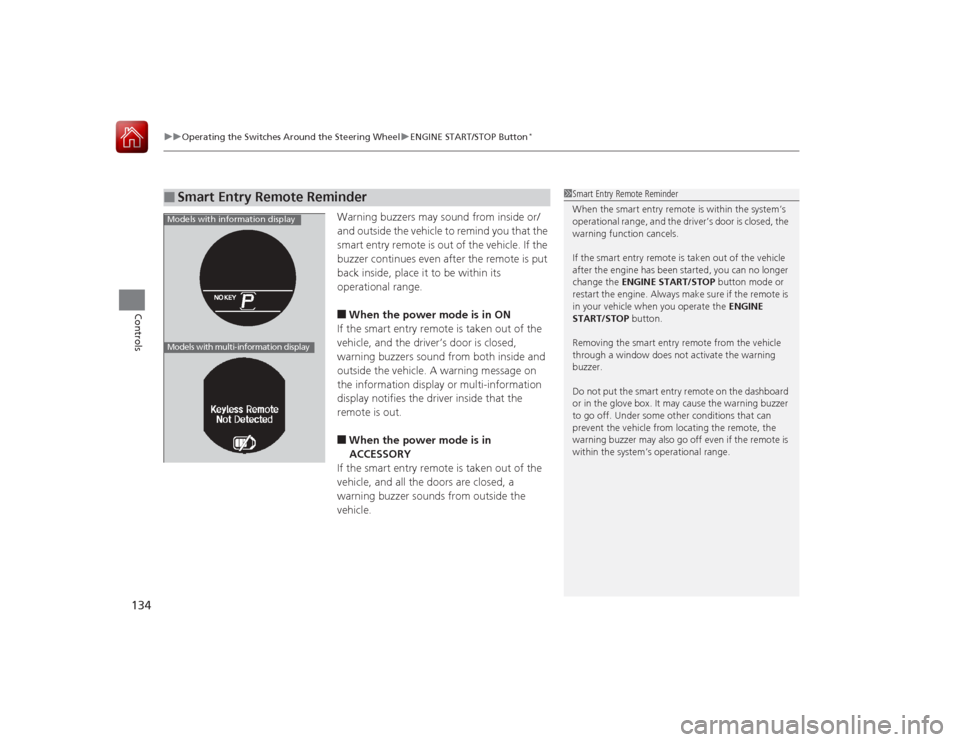
Warning buzzers may sound from inside or/
and outside the vehicle to remind you that the
smart entry remote is out of the vehicle. If the
buzzer continues even after the remote is put
back inside, place it to be within its
operational range.■When the power mode is in ON
If the smart entry remote is taken out of the
vehicle, and the driver’s door is closed,
warning buzzers sound from both inside and
outside the vehicle. A warning message on
the information display or multi-information
display notifies the driver inside that the
remote is out.■When the power mode is in
ACCESSORY
If the smart entry remote is taken out of the
vehicle, and all the doors are closed, a
warning buzzer sounds from outside the
vehicle.
■
Smart Entry Remote Reminder
1 Smart Entry Remote Reminder
When the smart entry remote is within the system’s
operational range, and the driver’s door is closed, the
warning function cancels.
If the smart entry remote is taken out of the vehicle
after the engine has been started, you can no longer
change the ENGINE START/STOP button mode or
restart the engine. Al ways make sure if the remote is
in your vehicle when you operate the ENGINE
START/STOP button.
Removing the smart entry re mote from the vehicle
through a window does not activate the warning
buzzer.
Do not put the smart entry remote on the dashboard
or in the glove box. It may cause the warning buzzer
to go off. Under some other conditions that can
prevent the vehicle from locating the remote, the
warning buzzer may also go off even if the remote is
within the system’s operational range.
Models with information displayModels with multi-information display
Page 136 of 593
135
uuOperating the Switches Around the Steering Wheel uIgnition Switch and Power Mode Comparison
Controls
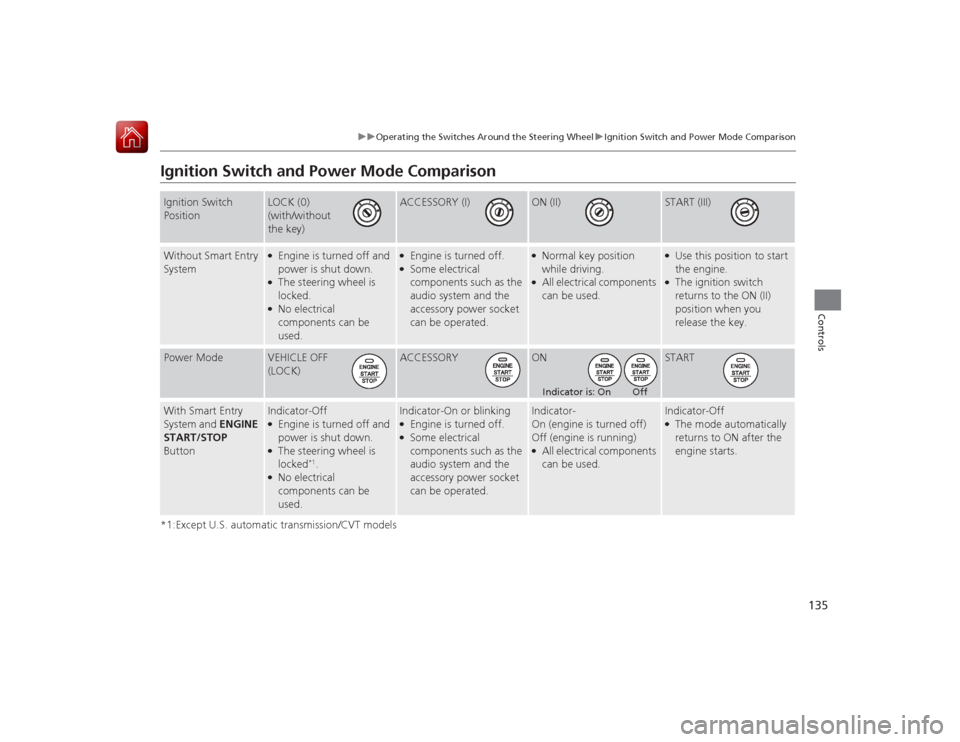
Ignition Switch and Power Mode Comparison*1:Except U.S. automatic transmission/CVT modelsIgnition Switch
Position
LOCK (0)
(with/without
the key)
ACCESSORY (I)
ON (II)
START (III)
Without Smart Entry
System
●Engine is turned off and
power is shut down.●The steering wheel is
locked.●No electrical
components can be
used.
●Engine is turned off.●Some electrical
components such as the
audio system and the
accessory power socket
can be operated.
●Normal key position
while driving.●All electrical components
can be used.
●Use this position to start
the engine.●The ignition switch
returns to the ON (II)
position when you
release the key.
Power Mode
VEHICLE OFF
(LOCK)
ACCESSORY
ON
START
With Smart Entry
System and ENGINE
START/STOP
Button
Indicator-Off●Engine is turned off and
power is shut down.●The steering wheel is
locked
*1.
●No electrical
components can be
used.
Indicator-On or blinking●Engine is turned off.●Some electrical
components such as the
audio system and the
accessory power socket
can be operated.
Indicator-
On (engine is turned off)
Off (engine is running)●All electrical components
can be used.
Indicator-Off●The mode automatically
returns to ON after the
engine starts.
Indicator is: On Off
Page 138 of 593
Continued
137
uuOperating the Switches Around the Steering Wheel uLight Switches
Controls
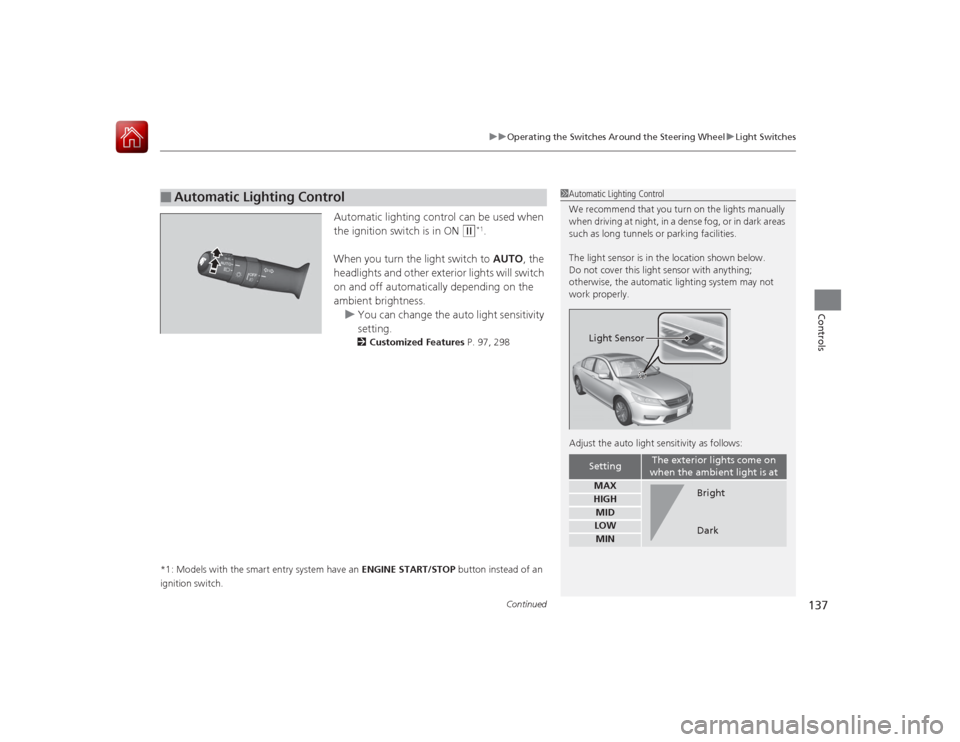
Automatic lighting control can be used when
the ignition switch is in ON
(w
*1.
When you turn the light switch to AUTO, the
headlights and other exterior lights will switch
on and off automatically depending on the
ambient brightness. u You can change the auto light sensitivity
setting.
2 Customized Features P. 97, 298
*1: Models with the smart entry system have an ENGINE START/STOP button instead of an
ignition switch.
■
Automatic Lighting Control
1 Automatic Lighting Control
We recommend that you turn on the lights manually
when driving at night, in a dense fog, or in dark areas
such as long tunnels or parking facilities.
The light sensor is in the location shown below.
Do not cover this light sensor with anything;
otherwise, the automatic lighting system may not
work properly.
Adjust the auto light sensitivity as follows:
Setting
The exterior lights come on
when the ambient light is at
MAXHIGHMIDLOWMINLight Sensor
Bright
Dark
Page 141 of 593
140
uuOperating the Switches Around the Steering Wheel uWipers and Washers
Controls
Wipers and Washers
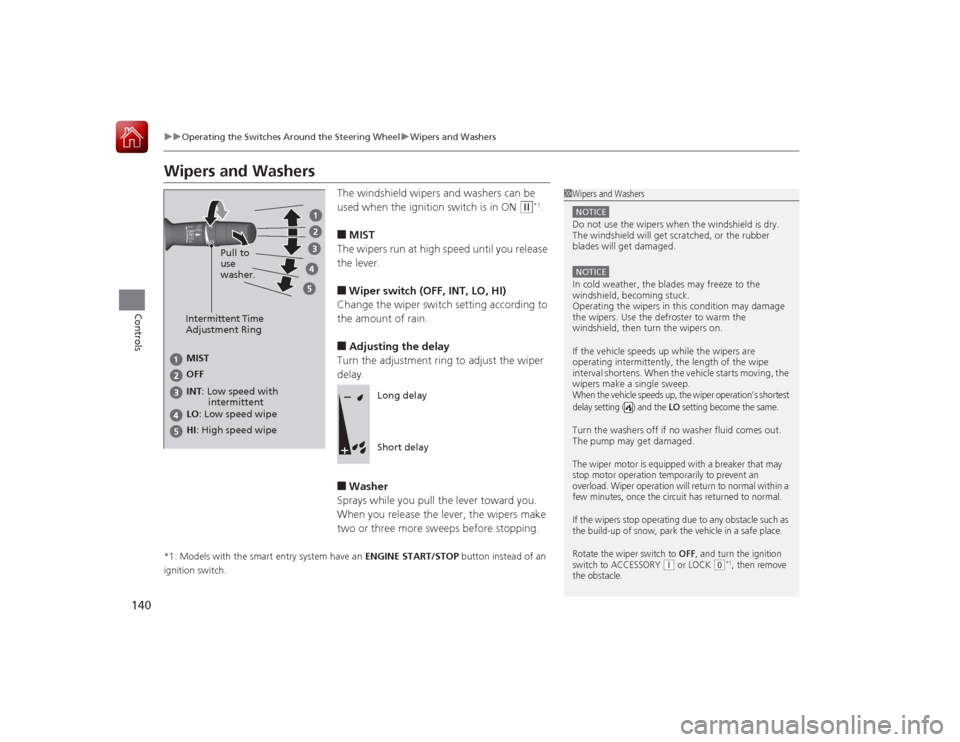
The windshield wipers and washers can be
used when the ignition switch is in ON
(w
*1.
■MIST
The wipers run at high speed until you release
the lever.■Wiper switch (OFF, INT, LO, HI)
Change the wiper switch setting according to
the amount of rain.■Adjusting the delay
Turn the adjustment ring to adjust the wiper
delay.■Washer
Sprays while you pull the lever toward you.
When you release the lever, the wipers make
two or three more sweeps before stopping.
*1: Models with the smart entry system have an ENGINE START/STOP button instead of an
ignition switch.
1 Wipers and WashersNOTICEDo not use the wipers when the windshield is dry.
The windshield will get scratched, or the rubber
blades will get damaged.NOTICEIn cold weather, the blades may freeze to the
windshield, becoming stuck.
Operating the wipers in this condition may damage
the wipers. Use the defroster to warm the
windshield, then turn the wipers on.
If the vehicle speeds up while the wipers are
operating intermitte ntly, the length of the wipe
interval shortens. When the vehicle starts moving, the
wipers make a single sweep.When the vehicle speeds up, the wiper operation’s shortest
delay setting ( ) and the
LO setting become the same.
Turn the washers off if no washer fluid comes out.
The pump may get damaged.The wiper motor is equipped with a breaker that may
stop motor operation temporarily to prevent an
overload. Wiper operation will return to normal within a
few minutes, once the circuit has returned to normal.
If the wipers stop operating due to any obstacle such as
the build-up of snow, park the vehicle in a safe place.
Rotate the wiper switch to
OFF
, and turn the ignition
switch to ACCESSORY
( q or LOCK
(0*1, then remove
the obstacle.
Intermittent Time
Adjustment Ring
MIST
INT: Low speed with
intermittent OFF
LO : Low speed wipe
HI: High speed wipe Pull to
use
washer.
Long delay
Short delay
Page 144 of 593
143
uuOperating the Switches Around the Steering Wheel uDriving Position Memory System
*
Continued
Controls
Driving Position Memory System
*
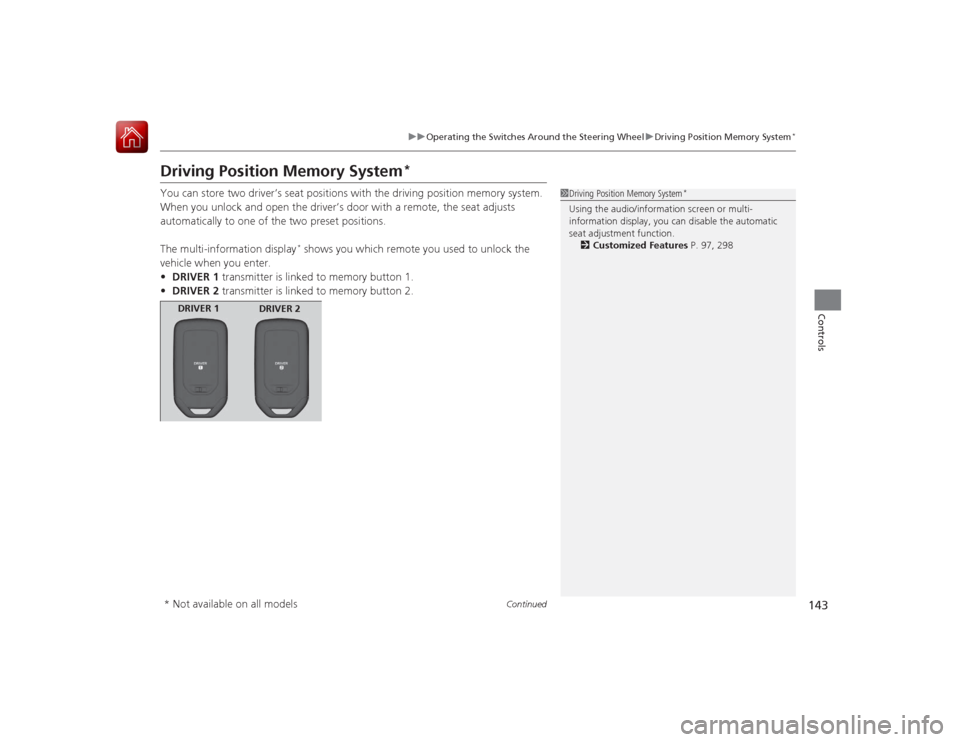
You can store two driver’s seat positions with the driving position memory system.
When you unlock and open the driver’s door with a remote, the seat adjusts
automatically to one of the two preset positions.
The multi-information display
* shows you which remote you used to unlock the
vehicle when you enter.
• DRIVER 1 transmitter is linked to memory button 1.
• DRIVER 2 transmitter is linked to memory button 2.
1Driving Position Memory System
*
Using the audio/information screen or multi-
information display, you can disable the automatic
seat adjustment function.
2 Customized Features P. 97, 298
DRIVER 1
DRIVER 2
* Not available on all models
Page 145 of 593
uuOperating the Switches Around the Steering Wheel uDriving Position Memory System
*
144Controls
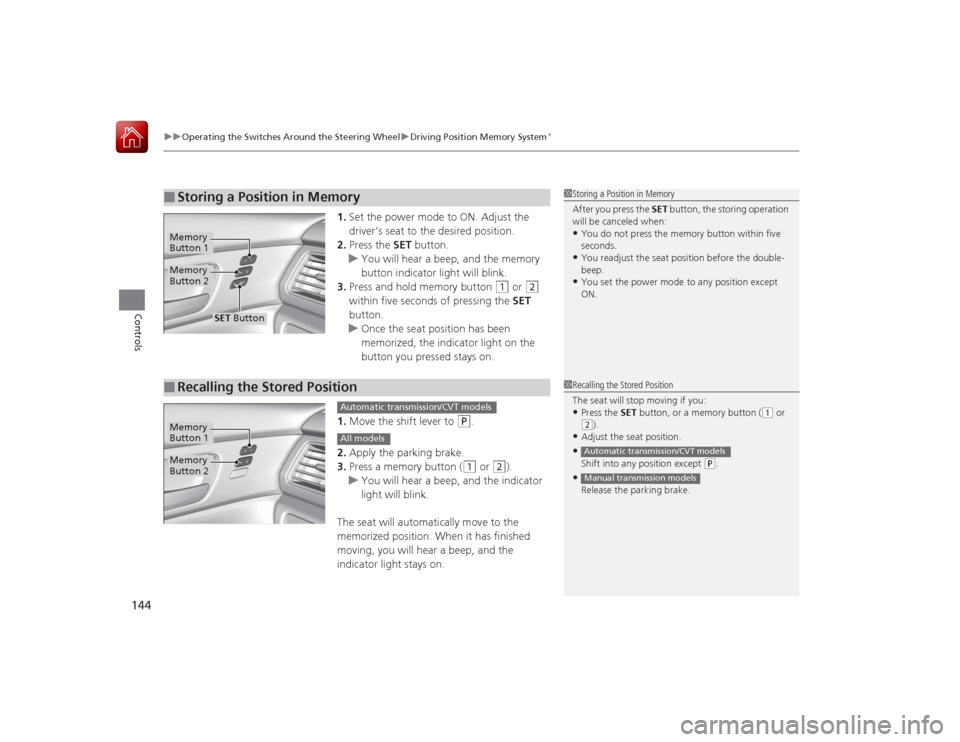
1. Set the power mode to ON. Adjust the
driver’s seat to the desired position.
2. Press the SET button.
u You will hear a beep, and the memory
button indicator light will blink.
3. Press and hold memory button
(1
or
(2
within five seconds of pressing the SET
button.
u Once the seat position has been
memorized, the indicator light on the
button you pressed stays on.
1. Move the shift lever to
(P
.
2. Apply the parking brake.
3. Press a memory button ((1
or
(2
).
u You will hear a beep, and the indicator
light will blink.
The seat will automatically move to the
memorized position. When it has finished
moving, you will hear a beep, and the
indicator light stays on.
■
Storing a Position in Memory
1 Storing a Position in Memory
After you press the SET button, the storing operation
will be canceled when: •You do not press the memory button within five
seconds.•You readjust the seat position before the double-
beep.•You set the power mode to any position except
ON.
Memory
Button 1Memory
Button 2
SET Button
■
Recalling the Stored Position
1 Recalling the Stored Position
The seat will stop moving if you: •Press the SET button, or a memory button (
(1 or
(2).
•Adjust the seat position.•Shift into any position except
( P.
•Release the parking brake.Automatic transmission/CVT modelsManual transmission models
Memory
Button 1Memory
Button 2
Automatic transmission/CVT modelsAll models
Page 146 of 593
145
uuOperating the Switches Around the Steering Wheel uAdjusting the Steering Wheel
Controls
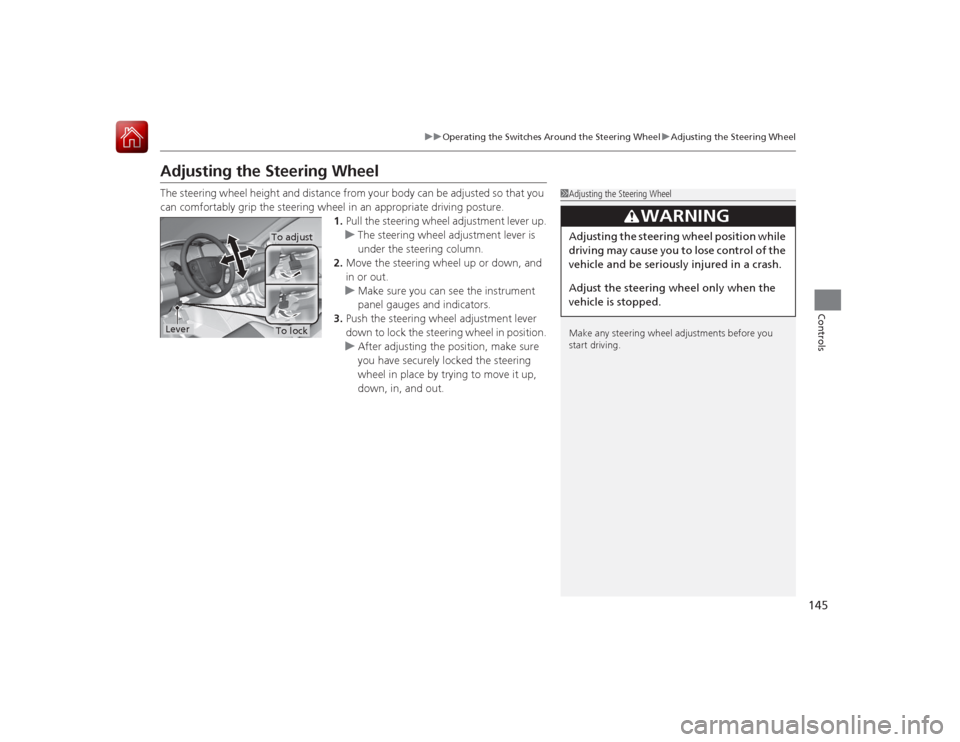
Adjusting the Steering WheelThe steering wheel height and distance from your body can be adjusted so that you
can comfortably grip the steering wheel in an appropriate driving posture.
1.Pull the steering wheel adjustment lever up.
u The steering wheel adjustment lever is
under the steering column.
2. Move the steering wheel up or down, and
in or out.
u Make sure you can see the instrument
panel gauges and indicators.
3. Push the steering wheel adjustment lever
down to lock the steering wheel in position.
u After adjusting the position, make sure
you have securely locked the steering
wheel in place by trying to move it up,
down, in, and out.
1Adjusting the Steering Wheel
Make any steering wheel adjustments before you
start driving.
3
WARNING
Adjusting the steering wheel po sition while
driving may cause you to lose control of the
vehicle and be seriously injured in a crash.
Adjust the steering wheel only when the
vehicle is stopped.
To adjustTo lock
Lever
Page 147 of 593
146Controls
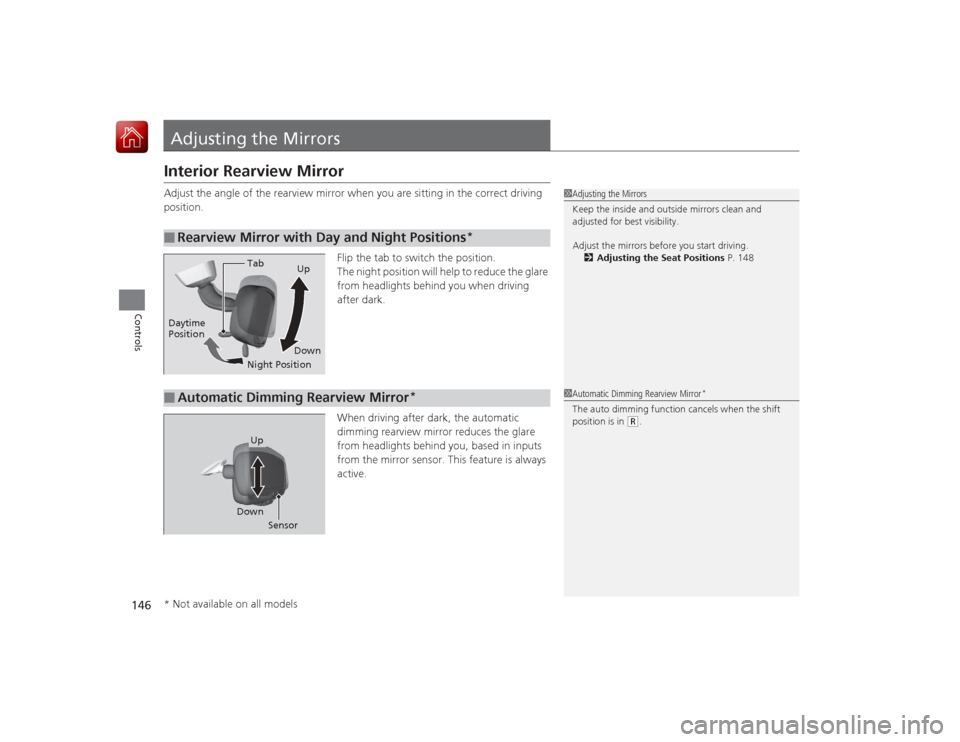
Adjusting the MirrorsInterior Rearview MirrorAdjust the angle of the rearview mirror when you are sitting in the correct driving
position.Flip the tab to switch the position.
The night position will help to reduce the glare
from headlights behind you when driving
after dark.
When driving after dark, the automatic
dimming rearview mirror reduces the glare
from headlights behind you, based in inputs
from the mirror sensor. This feature is always
active.■
Rearview Mirror with Day and Night Positions
*
1Adjusting the Mirrors
Keep the inside and outside mirrors clean and
adjusted for best visibility.
Adjust the mirrors before you start driving.
2 Adjusting the Seat Positions P. 148
Tab
Daytime
Position
Night PositionUp
Down■
Automatic Dimming Rearview Mirror
*
1 Automatic Dimming Rearview Mirror
*
The auto dimming function cancels when the shift
position is in
(R.
Sensor
Down
Up
* Not available on all models
Page 149 of 593
148Controls
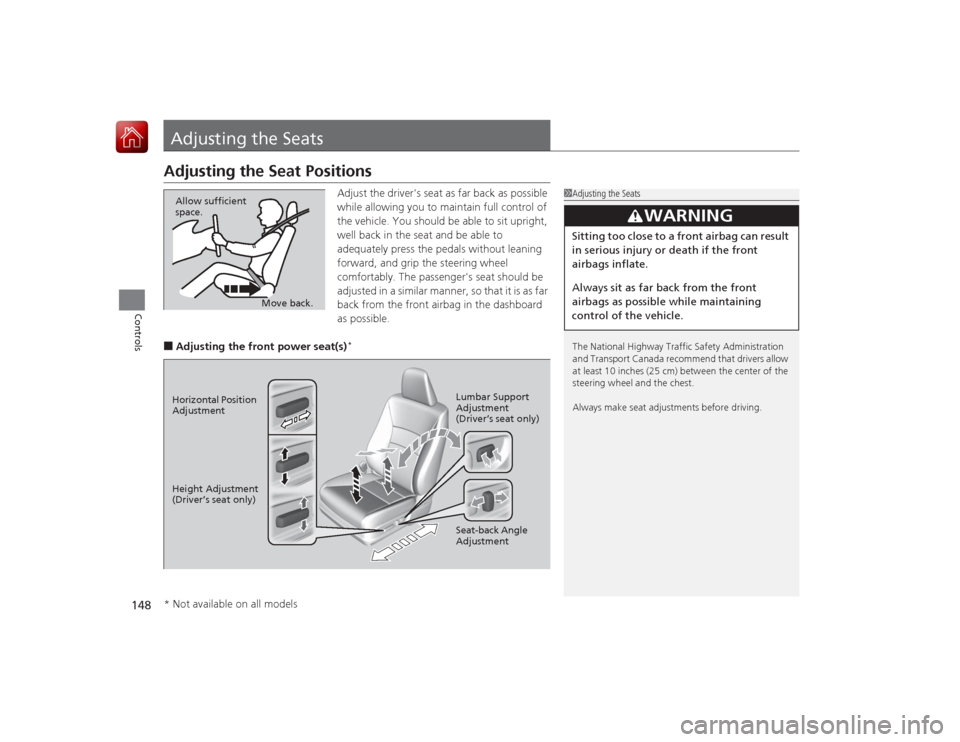
Adjusting the SeatsAdjusting the Seat Positions
Adjust the driver's seat as far back as possible
while allowing you to maintain full control of
the vehicle. You should be able to sit upright,
well back in the seat and be able to
adequately press the pedals without leaning
forward, and grip the steering wheel
comfortably. The passenger's seat should be
adjusted in a similar manner, so that it is as far
back from the front airbag in the dashboard
as possible.
■Adjusting the front power seat(s)
*
1 Adjusting the Seats
The National Highway Traffic Safety Administration
and Transport Canada recommend that drivers allow
at least 10 inches (25 cm) between the center of the
steering wheel and the chest.
Always make seat adjustments before driving.
3
WARNING
Sitting too close to a front airbag can result
in serious injury or death if the front
airbags inflate.
Always sit as far back from the front
airbags as possible while maintaining
control of the vehicle.
Move back.
Allow sufficient
space.
Horizontal Position
Adjustment
Height Adjustment
(Driver’s seat only)
Seat-back Angle
Adjustment Lumbar Support
Adjustment
(Driver’s seat only)* Not available on all models
Page 151 of 593
uuAdjusting the Seats uAdjusting the Seat Positions
150Controls
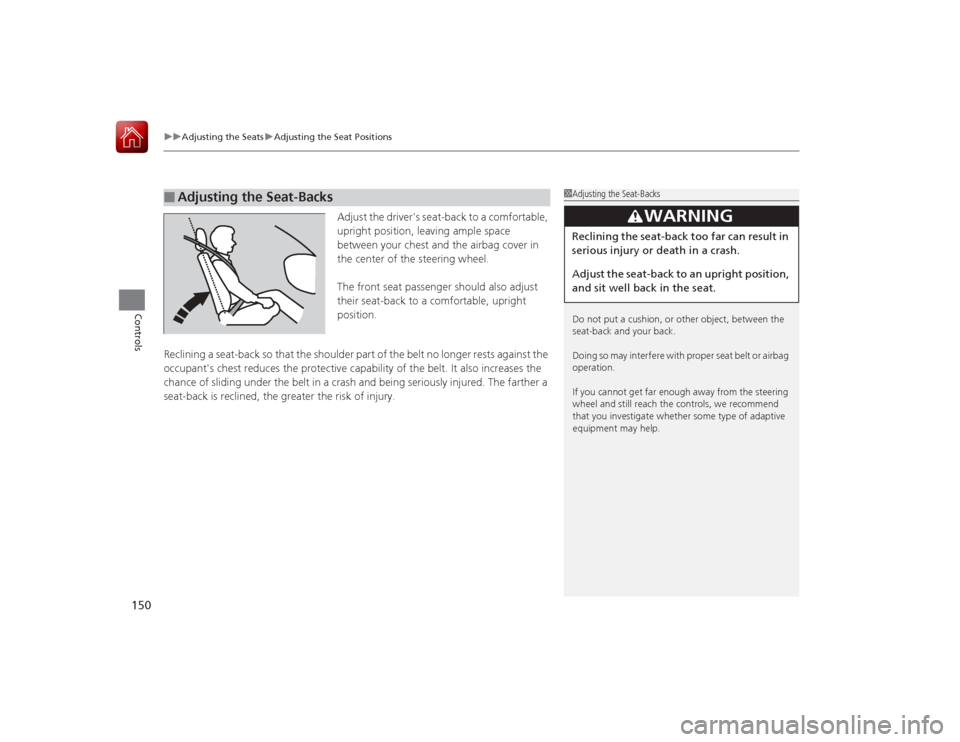
Adjust the driver's seat-back to a comfortable,
upright position, leaving ample space
between your chest and the airbag cover in
the center of the steering wheel.
The front seat passenger should also adjust
their seat-back to a comfortable, upright
position.
Reclining a seat-back so that the shoulder part of the belt no longer rests against the
occupant's chest reduces the protective capability of the belt. It also increases the
chance of sliding under the belt in a crash and being seriously injured. The farther a
seat-back is reclined, the greater the risk of injury.
■
Adjusting the Seat-Backs
1 Adjusting the Seat-Backs
Do not put a cushion, or other object, between the
seat-back and your back.
Doing so may interfe re with proper seat belt or airbag
operation.
If you cannot get far enough away from the steering
wheel and still reach the controls, we recommend
that you investigate whether some type of adaptive
equipment may help.
3
WARNING
Reclining the seat-back too far can result in
serious injury or death in a crash.
Adjust the seat-back to an upright po sition,
and sit well back in the seat.