HONDA ACCORD SEDAN 2001 Owner's Manual (in English)
Manufacturer: HONDA, Model Year: 2001, Model line: ACCORD SEDAN, Model: HONDA ACCORD SEDAN 2001Pages: 372, PDF Size: 6.1 MB
Page 171 of 372
Audio System
Operation
Select the CD changer by pressing
the CD button. You will see "Cd" in the display. The system will begin
playing the last selected disc in theCD changer. You will see the disc
and track numbers displayed.
When that disc ends, the next disc in the CD changer is loaded and played.
After the last disc finishes, the system returns to disc 1.
To select a different disc, press the appropriate Preset button (1 — 6). If
you select an empty position in the CD changer, the system will go into
the loading sequence (see page 165 ).
You can use the SKIP buttons while a disc is playing to select passages
and change tracks. To move rapidly within a track, press
and hold the appropriate SKIP
button. You will hear a beep and the system will continue to move. Press
the button to move forward, or the button to move backward.
Release the button when the system
reaches the point you want. Each time you press the button
and release it, the system skips
forward to the beginning of the next track. Press and release the
button to skip backward to the
beginning of the current track. Press
and release it again to skip to the
beginning of the previous track.
REPEAT — To activate the Repeat
feature, press and release the RPT
button. You will see RPT in the
display as a reminder. The system
continuously replays the current
track. Press the RPT button again to turn it off. Pressing either of the
SKIP buttons also turns off the
repeat feature.
RANDOM PLAY — This feature,
when activated, plays the tracks
within a CD in random order, rather than in the order they are recordedon the CD. To activate Random Play,
press the RDM button. You will see RDM in the display. The system will
then select and play tracks randomly.
This continues until you deactivate Random Play by pressing the RDM
button again, or you select a different CD with a preset button.
Comfort and Convenience Features
Page 172 of 372
Audio System
To take the system out of CD mode, press the AM or FM button, or insert
a cassette in the player. If a tape is
already in the cassette player, press
the TAPE button. When you return
to CD mode by pressing the CD
button, play will continue at the same
point that it left off.
If you turn the system off while a CD
is playing, either with the PWR/VOL
knob or the ignition switch, play will continue at the same point when you
turn it back on.
CONTINUED
Comfort and Convenience Features
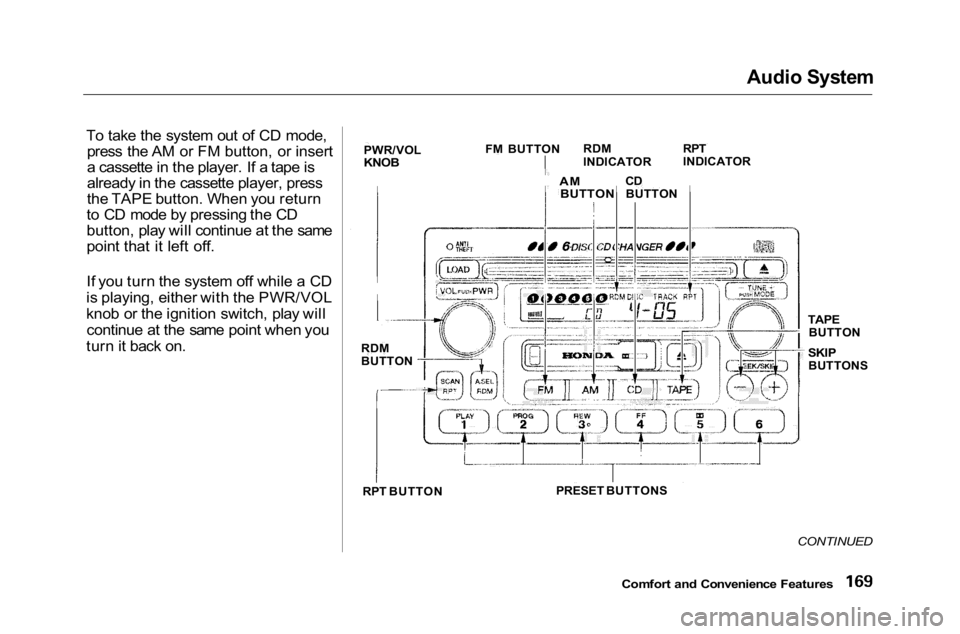
PWR/VOL
KNOB
FM BUTTON
RDM
INDICATOR
RPT
INDICATOR
CD BUTTONAM BUTTON
RDM
BUTTON
RPT BUTTON
TAPE
BUTTON
SKIP
BUTTONS
PRESET BUTTONS
Page 173 of 372
Audio System
Removing CDs from the Changer
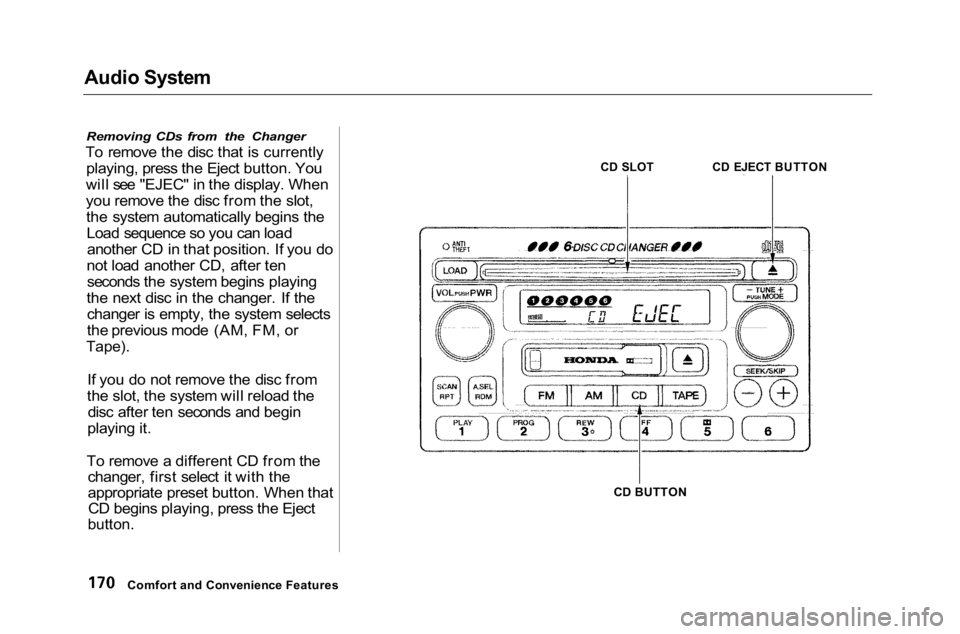
To remove the disc that is currently playing, press the Eject button. You
will see "EJEC" in the display. When
you remove the disc from the slot, the system automatically begins theLoad sequence so you can loadanother CD in that position. If you do
not load another CD, after ten seconds the system begins playing
the next disc in the changer. If the changer is empty, the system selects
the previous mode (AM, FM, or
Tape).
If you do not remove the disc from
the slot, the system will reload the disc after ten seconds and begin
playing it.
To remove a different CD from the changer, first select it with the
appropriate preset button. When thatCD begins playing, press the Eject
button.
Comfort and Convenience Features
CD SLOT
CD EJECT BUTTON
CD BUTTON
Page 174 of 372
Audio System
Protecting Compact Discs
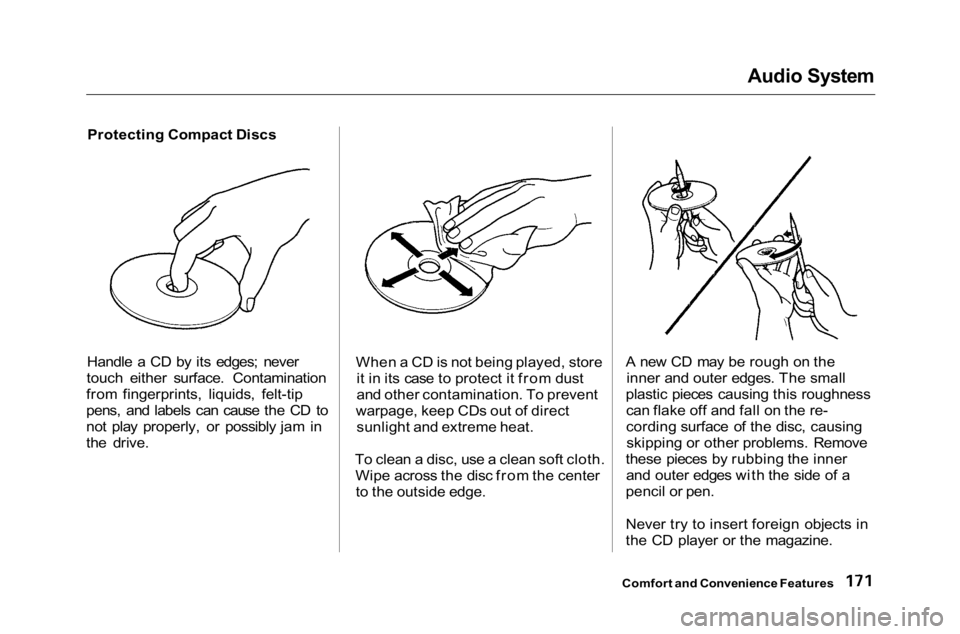
Handle a CD by its edges; never
touch either surface. Contamination
from fingerprints, liquids, felt-tip
pens, and labels can cause the CD to
not play properly, or possibly jam in
the drive. When a CD is not being played, store
it in its case to protect it from dust
and other contamination. To prevent
warpage, keep CDs out of direct sunlight and extreme heat.
To clean a disc, use a clean soft cloth. Wipe across the disc from the centerto the outside edge. A new CD may be rough on the
inner and outer edges. The small
plastic pieces causing this roughness can flake off and fall on the re-
cording surface of the disc, causingskipping or other problems. Remove
these pieces by rubbing the inner and outer edges with the side of a
pencil or pen.
Never try to insert foreign objects in
the CD player or the magazine.
Comfort and Convenience Features
Page 175 of 372
Audio System
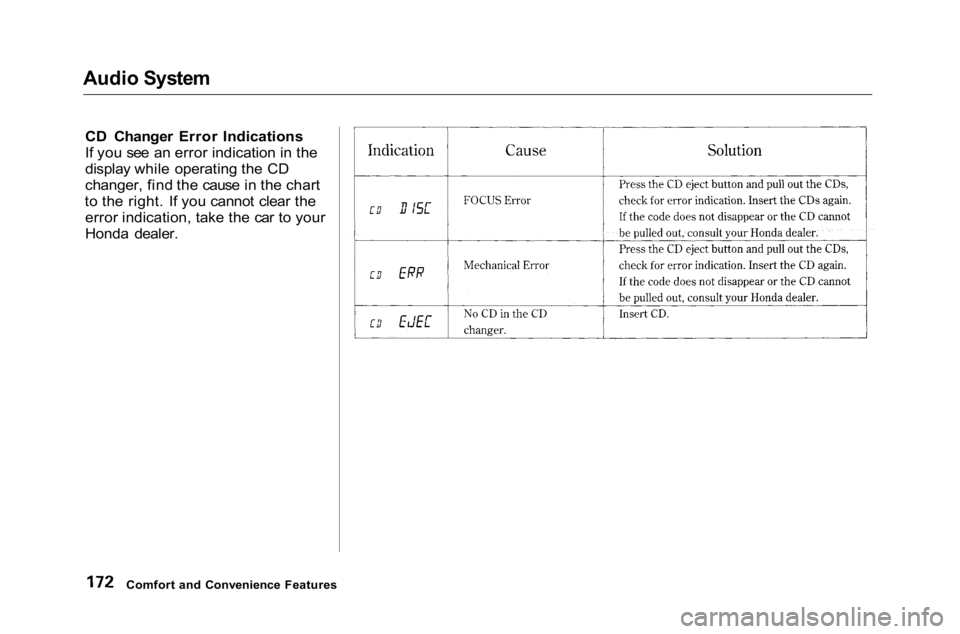
CD Changer Error Indications
If you see an error indication in the
display while operating the CD
changer, find the cause in the chart
to the right. If you cannot clear the error indication, take the car to your
Honda dealer.
Comfort and Convenience Features
Page 176 of 372
Audio System
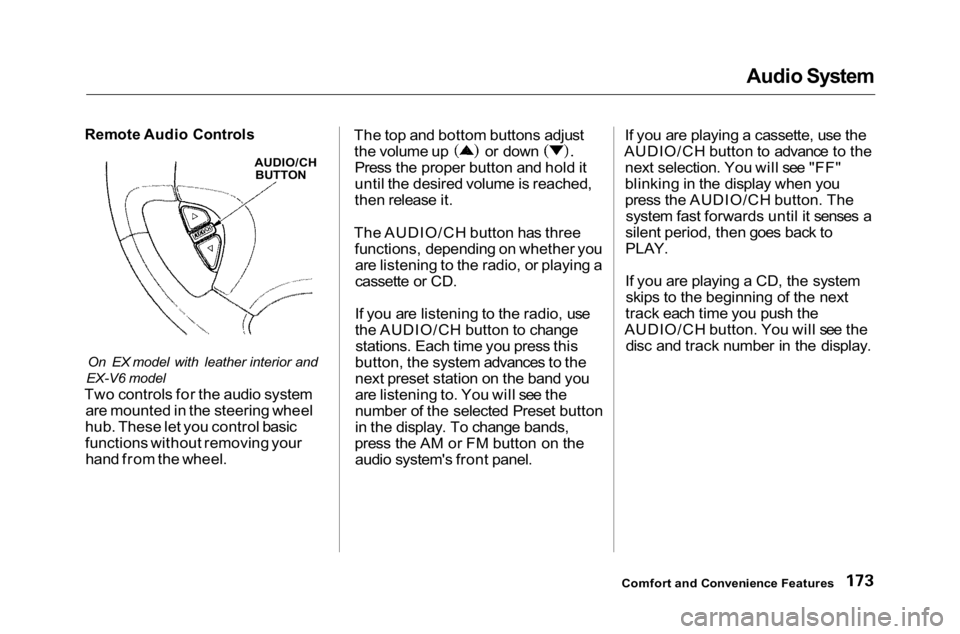
Remote Audio Controls
On EX model with leather interior and
EX-V6 model
Two controls for the audio system are mounted in the steering wheel
hub. These let you control basic
functions without removing your hand from the wheel. The top and bottom buttons adjust the volume up or down
Press the proper button and hold it
until the desired volume is reached,
then release it.
The AUDIO/CH button has three functions, depending on whether youare listening to the radio, or playing a
cassette or CD.
If you are listening to the radio, use
the AUDIO/CH button to changestations. Each time you press this
button, the system advances to the
next preset station on the band you
are listening to. You will see the
number of the selected Preset button
in the display. To change bands,
press the AM or FM button on the audio system's front panel. If you are playing a cassette, use the
AUDIO/CH button to advance to the next selection. You will see "FF"
blinking in the display when you
press the AUDIO/CH button. Thesystem fast forwards until it senses a
silent period, then goes back to
PLAY.
If you are playing a CD, the system skips to the beginning of the next
track each time you push the
AUDIO/CH button. You will see the disc and track number in the display.
Comfort and Convenience Features
AUDIO/CH
BUTTON
Page 177 of 372
Audio System
Theft Protection
On EX, EX-V6 models
Your car's audio system will disable itself if it is disconnected from
electrical power for any reason. Tomake it work again, the user must
enter a specific five-digit code in the
Preset buttons. Because there are
hundreds of number combinations possible from five digits, making thesystem work without knowing the
exact code is nearly impossible.
You should have received a card that lists your audio system's codenumber and serial number. It is best
to store this card in a safe place at
home. In addition, you should writethe audio system's serial number in
this Owner's Manual. If you should
happen to lose the card, you mustobtain the code number from your
Honda dealer. To do this, you will
need the system's serial number. If your car's battery is disconnected
or goes dead, or the radio fuse is
removed, the audio system willdisable itself. If this happens, you
will see "Code" in the frequency display the next time you turn on the
system. Use the Preset buttons to
enter the five-digit code. If it is
entered correctly, the radio will start
playing.
If you make a mistake entering the
code, do not start over or try tocorrect your mistake. Complete the
five-digit sequence, then enter the correct code. You have ten tries toenter the correct code. If you are
unsuccessful in ten attempts, you must then leave the system on forone hour before trying again. You will have to store your favorite
stations in the Preset buttons after
the system begins working. Your original settings were lost when
power was disconnected.
Comfort and Convenience Features
Page 178 of 372
Security System
On EX and EX-V6 models
The security system helps to protect your car and valuables from theft.
The horn sounds and a combination of headlights, parking lights, side
marker lights and taillights flashes if
someone attempts to break into your
car or remove the radio. This alarm
continues for two minutes, then the system resets. To reset an alarming
system before the two minutes have
elapsed, unlock either front door
with the key or the remote transmitter.
The security system sets auto- matically fifteen seconds after you
lock the doors, hood, and trunk. For
the system to activate, you must lock
the doors from the outside with the
key, lock tab, door lock switch, or
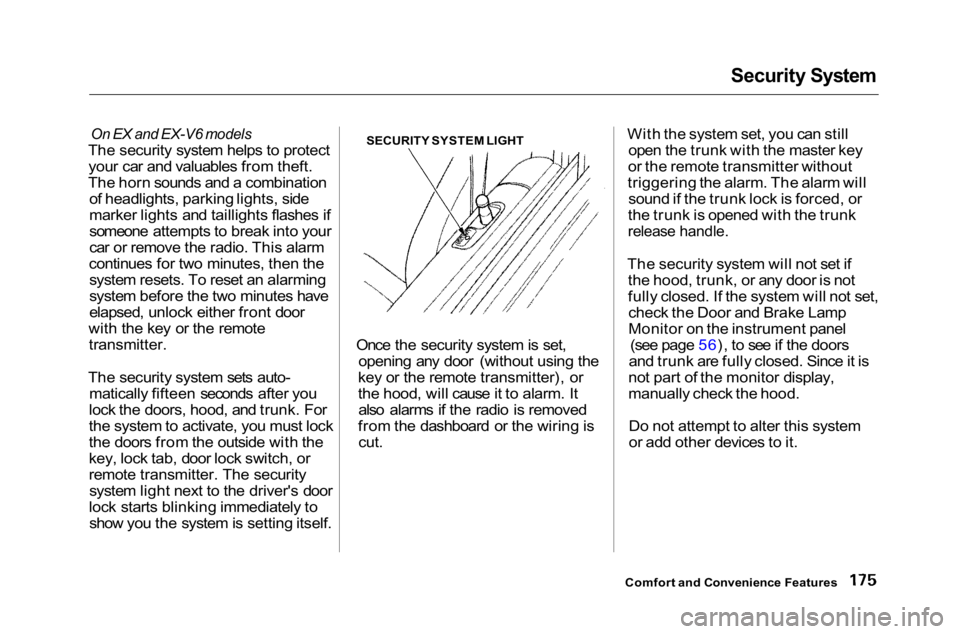
remote transmitter. The security system light next to the driver's door
lock starts blinking immediately to show you the system is setting itself. SECURITY SYSTEM LIGHT
Once the security system is set, opening any door (without using the
key or the remote transmitter), or
the hood, will cause it to alarm. It also alarms if the radio is removed
from the dashboard or the wiring is cut. With the system set, you can still
open the trunk with the master key
or the remote transmitter without
triggering the alarm. The alarm will sound if the trunk lock is forced, or
the trunk is opened with the trunk
release handle.
The security system will not set if the hood, trunk, or any door is not
fully closed. If the system will not set,check the Door and Brake Lamp
Monitor on the instrument panel (see page 56), to see if the doors
and trunk are fully closed. Since it is
not part of the monitor display,
manually check the hood.
Do not attempt to alter this system
or add other devices to it.
Comfort and Convenience Features
Page 179 of 372

176
Page 180 of 372
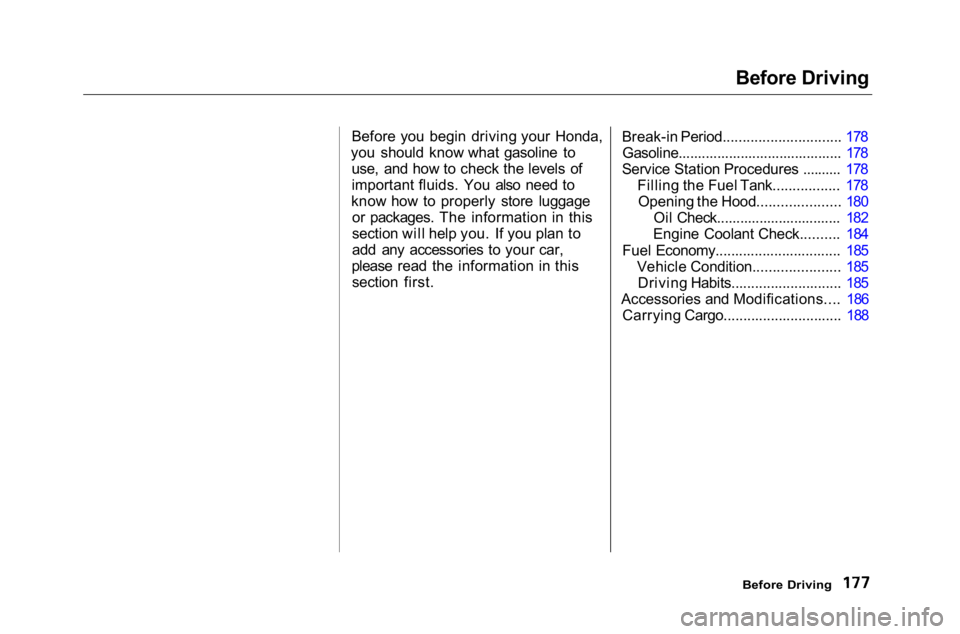
Before Driving
Before you begin driving your Honda,
you should know what gasoline to use, and how to check the levels of
important fluids. You also need to
know how to properly store luggage or packages. The information in this
section will help you. If you plan to
add any accessories to your car,
please read the information in this section first. Break-in Period.............................. 178
Gasoline.......................................... 178
Service Station Procedures .......... 178 Filling the Fuel Tank................. 178Opening the Hood..................... 180 Oil Check................................ 182
Engine Coolant Check.......... 184
Fuel Economy................................ 185 Vehicle Condition...................... 185Driving Habits............................ 185
Accessories and Modifications.... 186 Carrying Cargo.............................. 188
Before Driving