HONDA CIVIC 2002 7.G Workshop Manual
Manufacturer: HONDA, Model Year: 2002, Model line: CIVIC, Model: HONDA CIVIC 2002 7.GPages: 1139, PDF Size: 28.19 MB
Page 1011 of 1139
Seat Belts
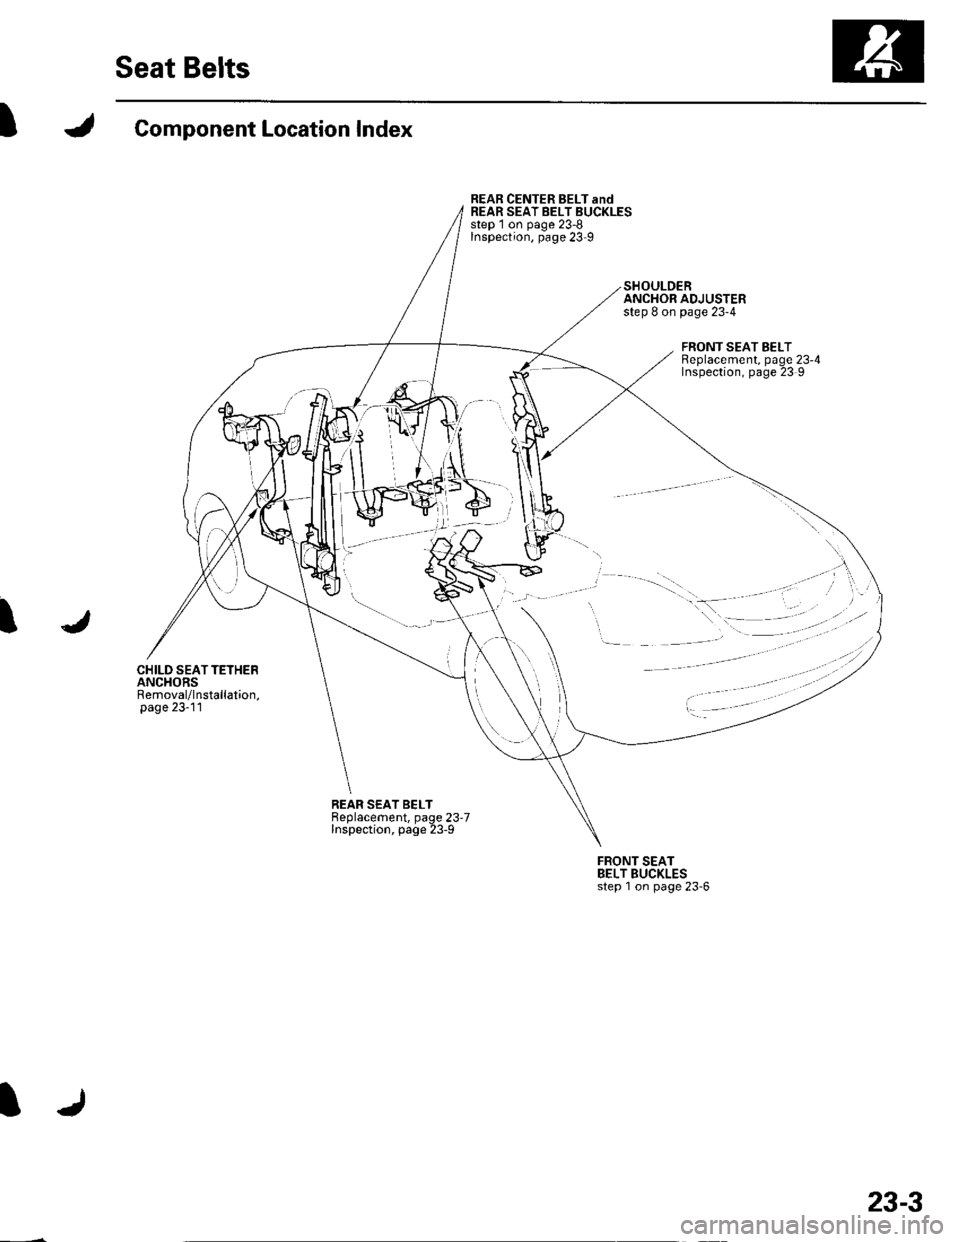
IComponent Location Index
CHILD SEATTETHERANCHORSRemoval/lnstallation,page 23-11
REAR CENTER BELT andREAR SEAT BELT BUCKLESstep 1 on page 23-8Inspection, page 23 9
SHOULDERANCHOR ADJUSTERstep 8 on page 23-4
FRONT SEAT BELTReplacement, page 23-4Inspection, page 23 9
I
REAR SEAT BELTBeplacement, page 23.7Inspection, page 23-9
FRONT SEATBELT BUCKLESstep 1 on page 23'6
23-3
Page 1012 of 1139
Seat Belts
Front Seat Belt Replacement
SRS comDonents are located in this area. Review the
SRS component locations (see page 23-13) and the
precautions and procedures (see page 23-14) in the SRS
section before performing repairs or service,
NOTE: Check the front seat belts for damage, and
replace them if necessary. Be careful not to damage
them during removal and installation.
Front Seat Belt
Make sure you have the anti-theft code for the radio,
then write down the frequencies for the preset
buttons.
Disconnect the negative cable from the battery, and
wait at least 3 minutes before beginning work.
Slide the front seat forward fully.
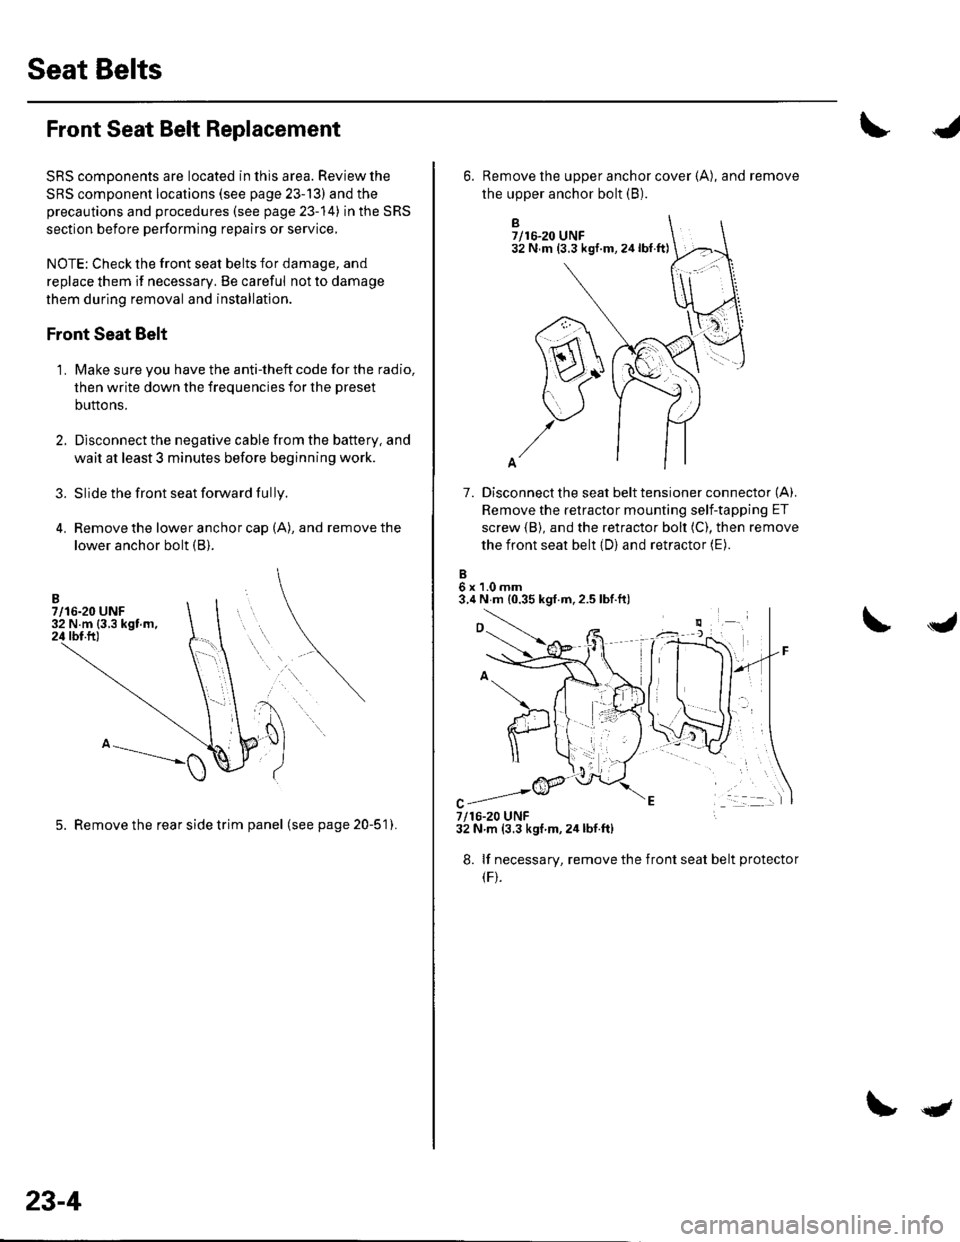
Remove the lower anchor cap (A), and remove the
lower anchor bolt (B).
3.
1.
5. Remove the rear side trim panel (seepage20-51).
23-4
qt
B7/16-20 UNF32 N m (3.3 kgf.m,24lbt.ft)
7. Disconnect the seat belt tensioner connector (A).
Remove the retractor mounting self-tapping ET
screw {B), and the retractor bolt (C), then remove
the front seat belt (D) and retractor (E).
6x1.0mm3.4 N m {0.35 kgf.m,2.5 lbf.ft)
6. Remove the upper anchor cover {A), and remove
the upper anchor bolt (B).
7/16-20 UNF32 N.m (3.3 kgf m,2ir lbf.ft)
8. lf necessary, remove the
(F).
front seat belt protecto
Page 1013 of 1139
9.
10.
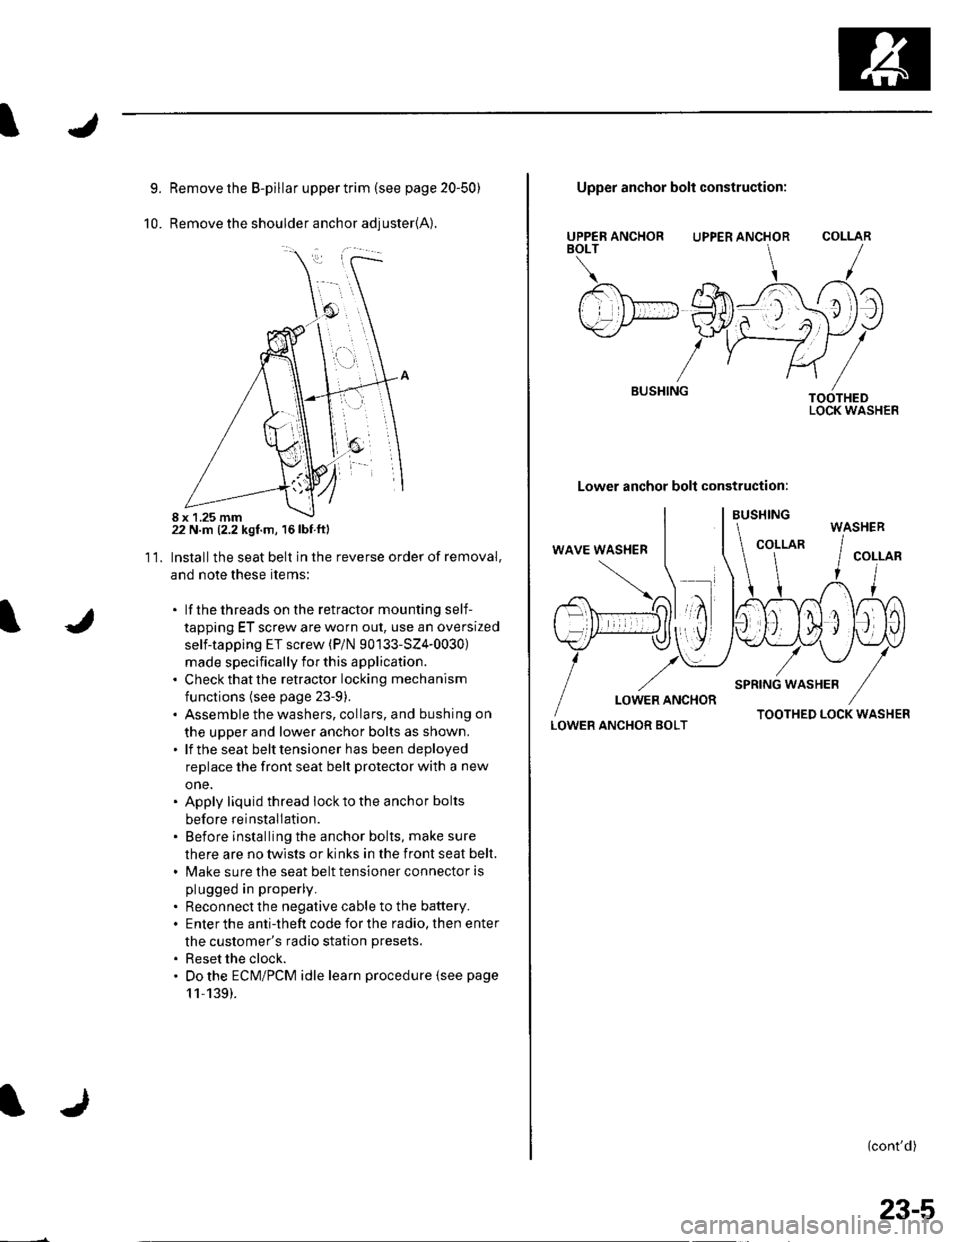
Remove the B-pillar upper trim {see page 20-50)
Remove the shoulder anchor adjuster{A).
22 N.m (2.2 kgf.m, 16lbf.ftl
Installthe seat belt in the reverse order of removal,
and note these items:
. lf thethreads on the retractor mounting self-
tapping ET screw are worn out, use an oversized
self-tapping ET screw (P/N 90133-SZ4-0030)
made specifically for this application.. Check that the retractor locking mechanism
functions (see page 23-9).. Assemble the washers, collars, and bushing on
the upper and lower anchor bolts as shown.. lf the seat belt tensioner has been deployed
replace the front seat belt protector with a new
one.. Apply liquid thread lock to the anchor bolts
before reinstallation.. Before installing the anchor bolts, make sure
there are no twists or kinks in the front seat belt.. Make sure the seat belt tensioner connector is
plugged in properly.
. Reconnect the negative cable to the battery.. Enter the anti-theft code for the radio, then enter
the customer's radio station presets.
. Reset the clock.. Do the ECM/PCM idle learn procedure {see page
11,139).
11.
8 x 1.25 mm
UPPER ANCHORBOLT
BUSHING
Upper anchor bolt construction:
UPPER ANCHOR
Lower anchor bolt construction:
COLLAR
TOOTHEDLOCK WASHER
LOWER ANCHOR BOLTTOOTHED LOCK WASHER
{cont'd)
WASHER
23-5
Page 1014 of 1139
Seat Belts
Front Seat Belt Replacement (cont'd)
Seat Belt Buckle
1. Make sure you have the anti-theft code for the radio,
then write down the frequencies for the preset
buttons.
2. Disconnect the negative cable from the battery ,and wait at least 3 minutes before beginning work.
3. Remove the front seat (see page 20-7'1).
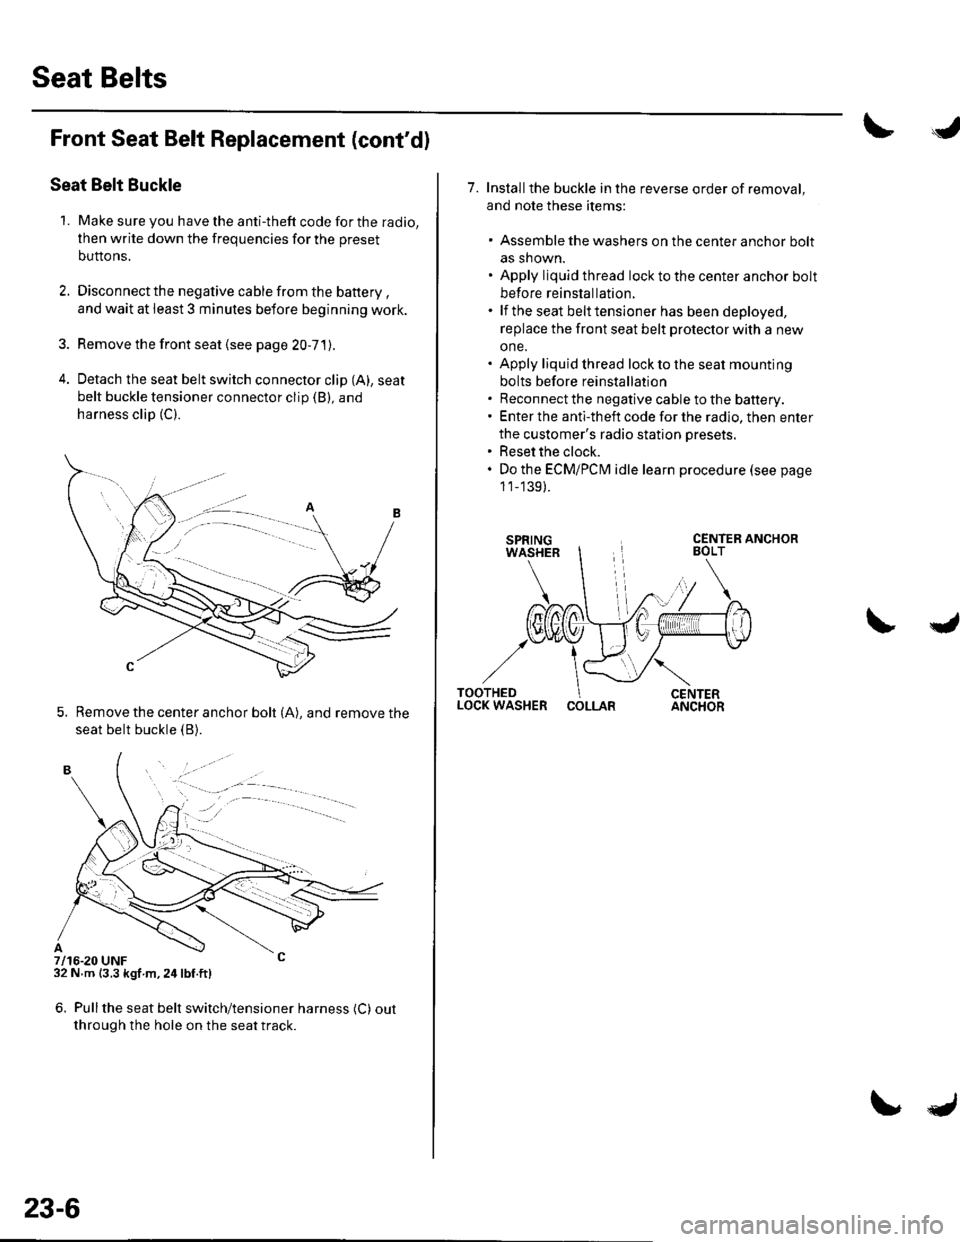
4. Detach the seat belt switch connector clip (A), seat
belt buckle tensioner connector clip (B), and
harness clip (C).
5. Remove the center anchor bolt (A), and remove the
seat belt buckle {B).
7/16-20 UNF32 N m {3.3 kgf m,24lbf.ft)
6. Pullthe seat belt switch/tensioner harness (C) out
through the hole on the seat track.
. -.. :.a--
23-6
7. Installthe buckle in the reverse order of removal,
and note these items:
. Assemble the washers on the center anchor bolt
as shown.. Apply liquid thread lock to the center anchor bolt
before reinstallation.. lf the seat belt tensioner has been deployed,
replace the front seat belt protector with a new
one.. Apply liquid thread lock to the seat mounting
bolts before reinstallation. Reconnect the negative cable to the battery.. Enter the anti-theft code for the radio, then enter
the customer's radio station presets.. Reset the clock.. Do the ECMiPCM idle learn procedure (see page
1 1_139).
COLLAR
Page 1015 of 1139
I
I
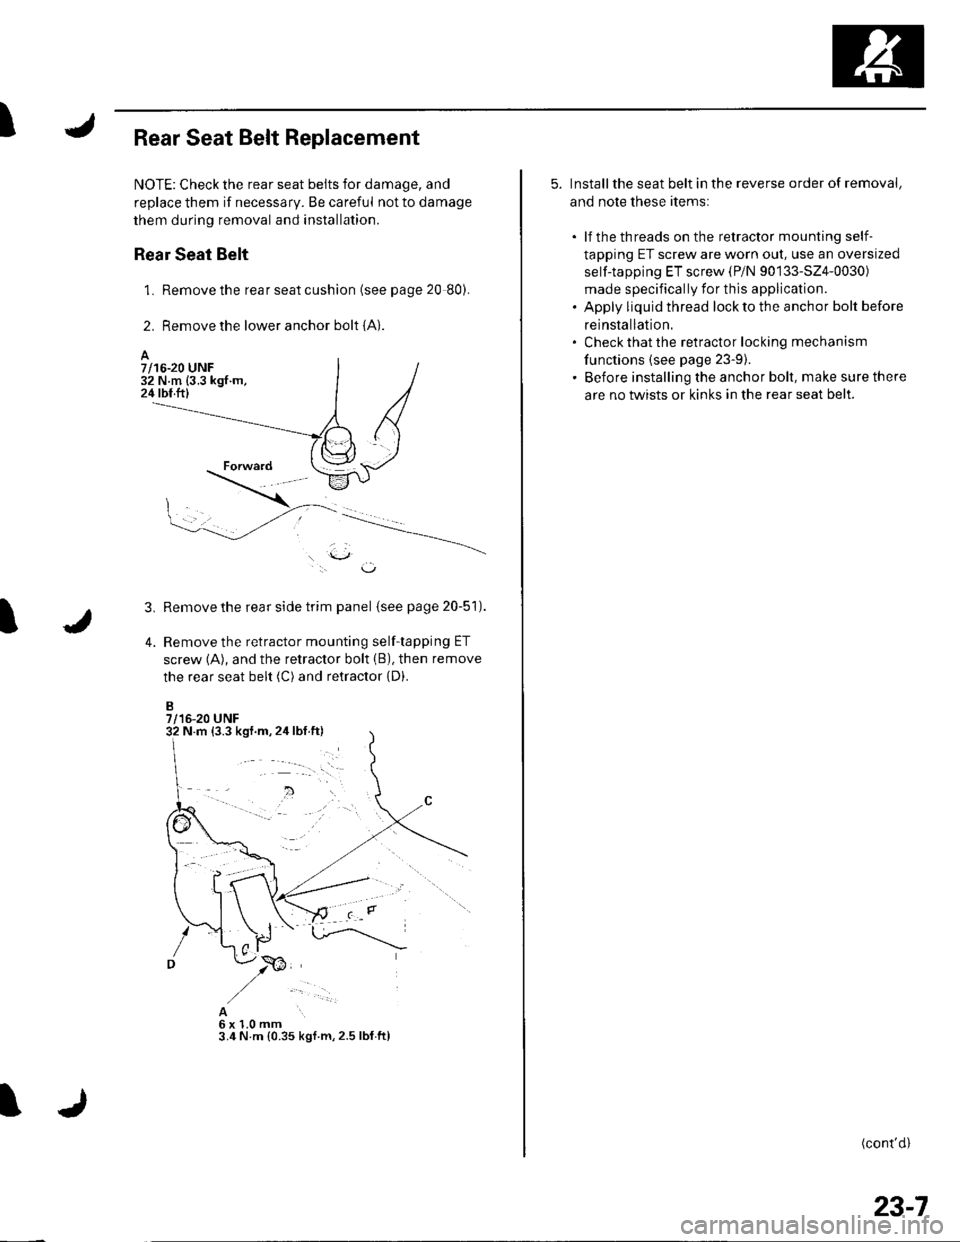
Rear Seat Belt Replacement
NOTE: Check the rear seat belts for damage, and
replace them if necessary. Be careful not to damage
them during removal and installation.
Rear Seat Belt
1. Remove the rear seat cushion (see page 20 80).
2. Remove the lower anchor bolt {A}.
l.\J,
Remove the rear side trim panel (see page 20-51).
Remove the retractor mounting self-tapping ET
screw (A), and the retractor bolt (B), then remove
the rear seat belt (C) and retractor {D).
B7/16-20 UNF
3,
4.
A6x1.0mm3.4 N.m {0.35 kgl m,2.5 lbf.ftl
A7/16-20 UNF32 N.m (3.3 kgf.m,24 tbf.ftl
N m {3.3 kgf.m,2ir lbf.ft)
5. Installthe seat belt in the reverse order of removal,
and note these items:
. lf the threads on the retractor mounting self-
tapping ET screw are worn out, use an oversized
self-tapping ET screw (P/N 90133-524-0030)
made specifically for this application.. Apply liquid thread lock to the anchor bolt before
reinstallation.' Check that the retractor locking mechanism
functions {see page 23-9).. Before installing the anchor bolt, make sure there
are no twists or kinks in the rear seat belt.
(cont'd)
23-7
Page 1016 of 1139
Seat Belts
Rear Seat Belt Replacement {cont'd)
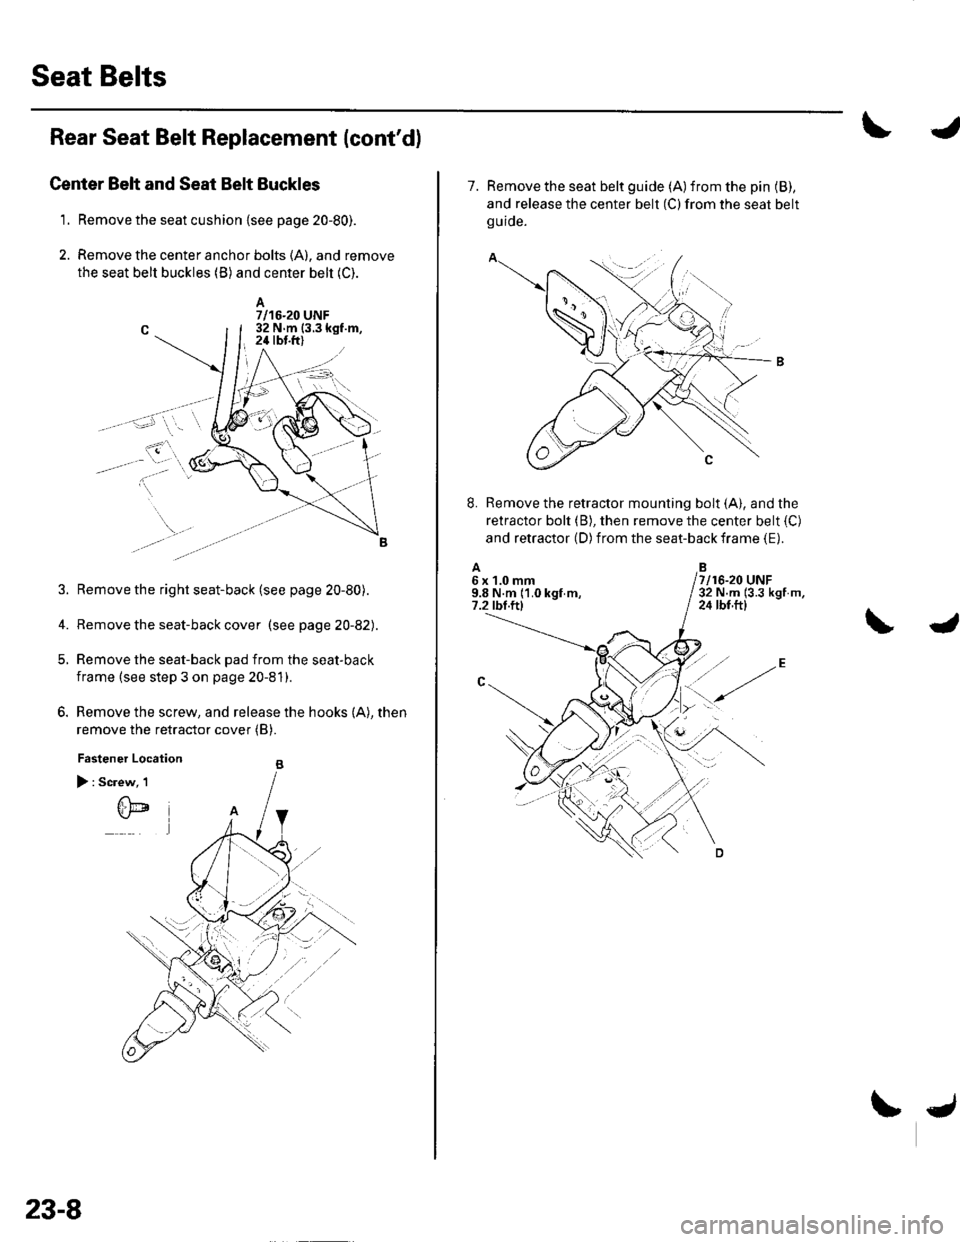
Center Belt and Seat Belt Buckles
1. Remove the seat cushion {see page 20-80).
2. Remove the center anchor bolts (A), and remove
the seat belt buckles (B) and center beh (C).
A7/16-20 UNF32 N.m 13.3 kgf.m,24 tbt.ft)
'.;r- 1-..i, ,
3. Remove the right seat-back (see page 20-80).
4. Remove the seat-back cover (seepage20-82).
5, Remove the seat-back pad from the seat-back
frame (see step 3 on page 20-81).
6. Remove the screw, and release the hooks (A), then
remove the retractor cover (B).
Fastener Location B
23-8
t.)
7. Remove the seat belt guide (A) from the pin (B),
and release the center belt (C) from the seat beltg u ide.
Remove the retractor mounting bolt (A), and the
retractor bolt (B), then remove the center belt (C)
and retractor (D) from the seat-back frame (E).
A6x1.0mm9.8 N.m (1.0 kgf m,7.2 tbl.ttl
7/16-20 UNF32 N.m (3.3 kgf m,24 tbf.ftl
.:.',
Page 1017 of 1139
I
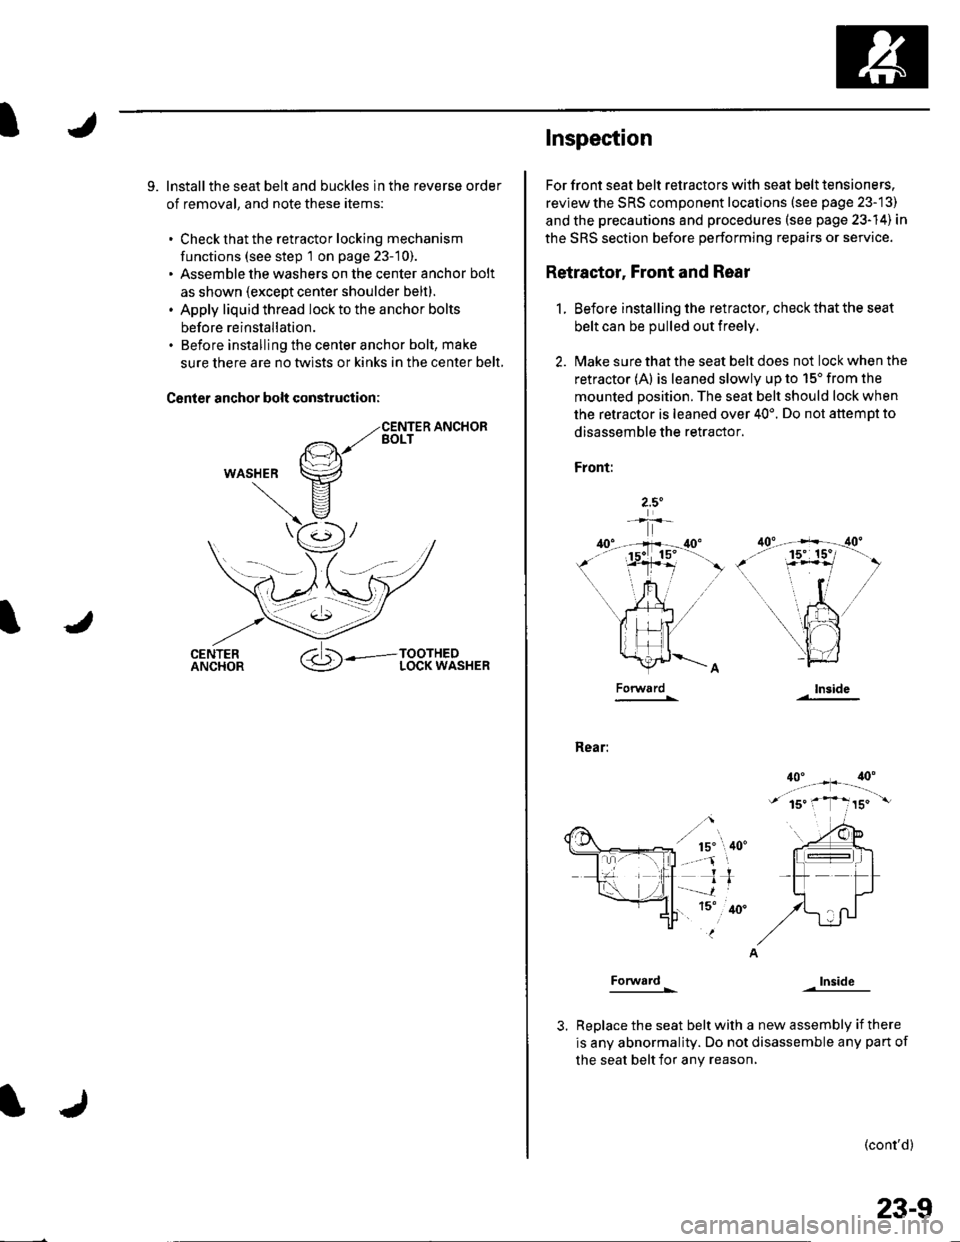
9. lnstallthe seat belt and buckles in the reverse order
of removal, and note these items:
. Check that the retractor locking mechanism
functions (see step 1 on page 23-10).. Assemble the washers on the center anchor bolt
as shown (except center shoulder belt).. Apply liquid thread lock to the anchor bolts
before reinstallation.. Before installing the center anchor bolt, make
sure there are no twlsts or kinks in the center belt,
Canler anchor bolt construction:
WASHER
Inspec'tion
For front seat belt retractors with seat belt tensioners.
reviewthe SRS component locations (see page 23-13)
and the precautions and procedures (see psge 23-14) in
the SRS section before performing repairs or service.
Retractor, Front and Rear
1. Before installing the retractor, check that the seat
belt can be pulled out freely.
2. l\4ake sure that the seat belt does not lock when the
retractor (A) is leaned slowly up to 15'from the
mounted position. The seat belt should lock when
the retractor is leaned over 40'. Do not attemDt to
disassemble the retractor.
Front:
Rear:
Forward
Forward
lnside
Inside
Replace the seat belt with a new assembly if there
is any abnormality. Do not disassemble any pan of
the seat belt for any reason,
(cont'd)
23-9
Page 1018 of 1139
Seat Belts
Inspection (cont'd)
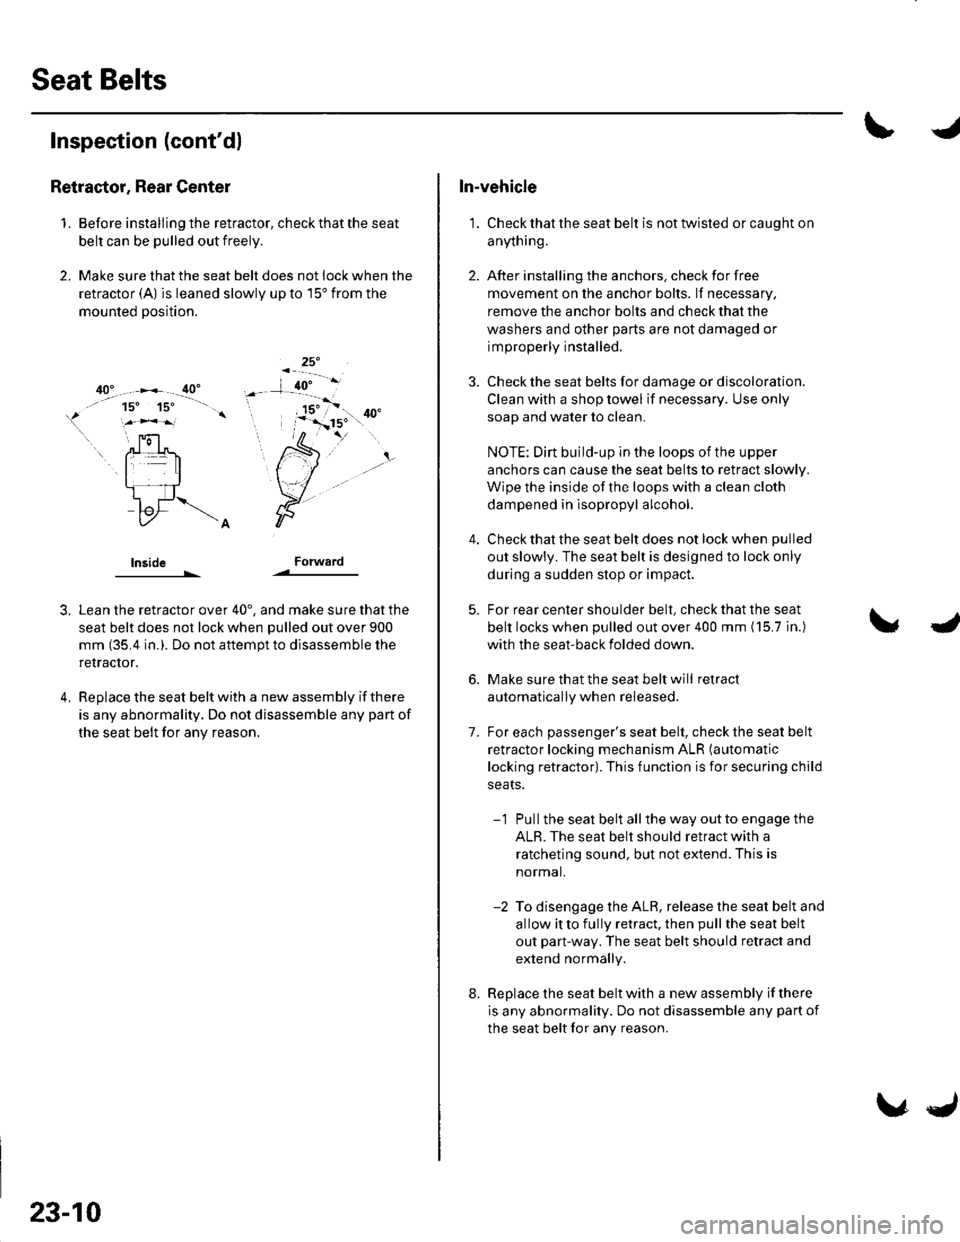
RetraEtor, Rear Center
1. Before installing the retractor, check that the seat
belt can be pulled out freely.
2, Make sure that the seat belt does not lock when the
retractor (A) is leaned slowly up to 15' from the
mounted position.
lnsideForward
3,
4.
Lean the retractor over 40', and make sure that the
seat belt does not lock when pulled out over 900
mm (35.4 in.). Do not aftempt to disassemble the
retractor.
Replace the seat belt with a new assembly if there
is any abnormality. Do not disassemble any part of
the seat belt for any reason.
23-10
\,J
In-vehicle
1. Check that the seat belt is not twisted or caught on
anything.
2. After installing the anchors. check for free
movement on the anchor bolts. lf necessary,
remove the anchor bolts and check that the
washers and other parts are not damaged or
improperly installed.
3. Check the seat belts for damage or discoloration.
Clean with a shop towel if necessary. Use only
soap and water to clean.
NOTE: Dirt build-up in the loops of the upper
anchors can cause the seat belts to retract slowly.
Wipe the inside of the loops with a clean cloth
dampened in lsopropyl alcohol.
Check that the seat belt does not lock when pulled
out slowly. The seat belt is designed to lock only
during a sudden stop or impact.
For rear center shoulder belt, check that the seat
belt locks when pulled out over 400 mm (15.7 in.)
with the seat-back folded down.
Make sure that the seat belt will retract
automatically when released.
For each passenger's seat belt, check the seat belt
retractor locking mechanism ALR (automatic
locking retractor). This function is for securing child
seats.
-1 Pullthe seat belt allthe way outto engage the
ALR. The seat belt should retract with a
ratcheting sound, but not extend. This is
normal.
-2 To disengage the ALR, release the seat belt and
allow itto fully retract, then pullthe seat belt
out part-way. The seat belt should retract and
extend normally.
Replace the seat belt with a new assembly if there
is any abnormality. Do not disassemble any part of
the seat belt for any reason.
7.
8.
Page 1019 of 1139
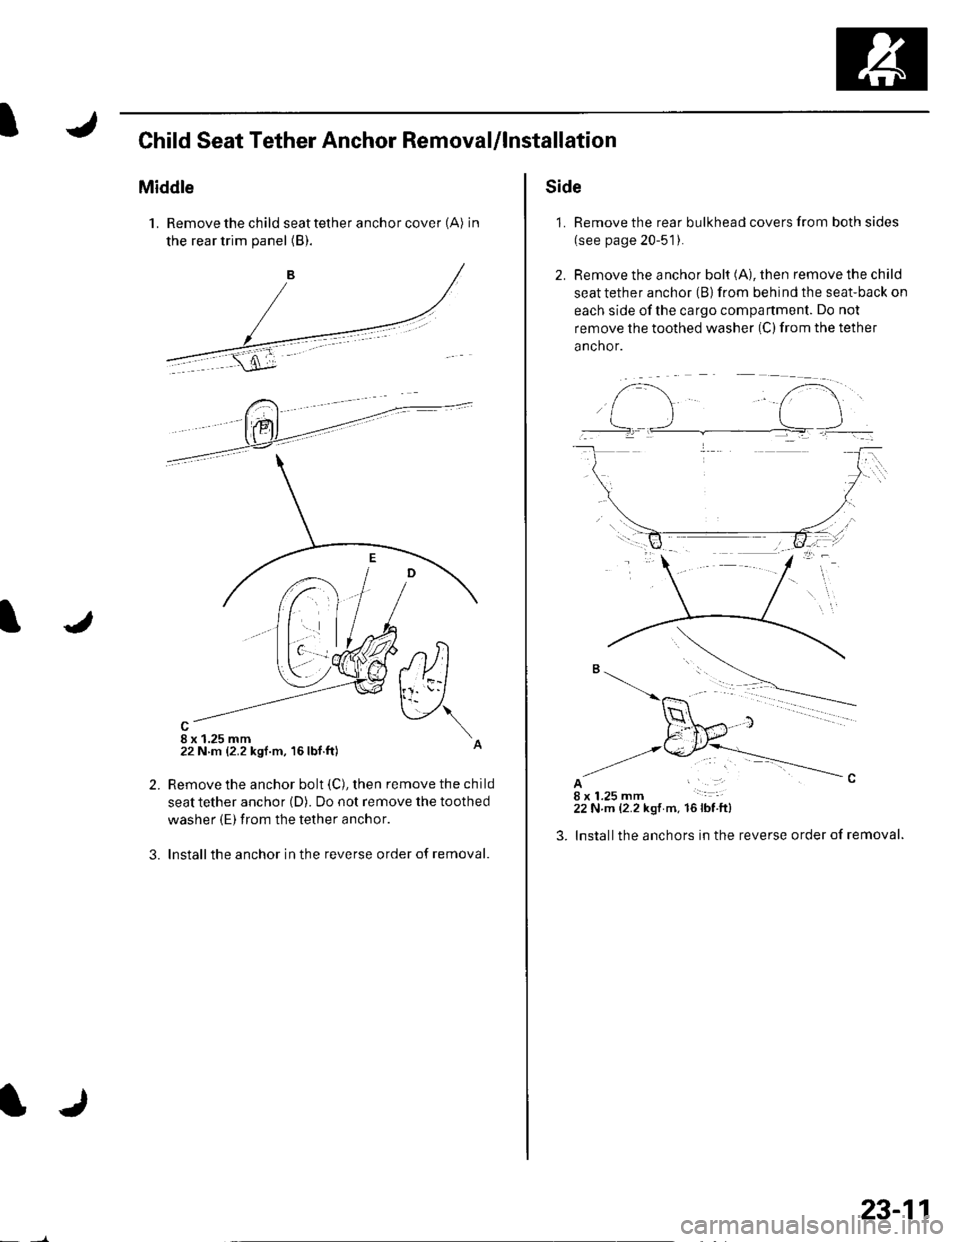
IChild Seat Tether Anchor RemovaUlnstallation
Middle
1. Remove the child seat tether anchor cover (A) in
the rear trim panel (B).
8 x 1.25 mm22 N m {2.2 ksf.m, 16lbf.ft)
,tltl
v\
2.
3.
Remove the anchor bolt (C), then remove the child
seat tether anchor (D). Do not remove the toothed
washer (E) from the tether anchor.
Installthe anchor in the reverse order of removal.
IJ
23-11
Side
1. Remove the rear bulkhead covers from both sides
(see page 20-51).
2. Remove the anchor bolt (A), then remove the child
seat tether anchor (B) from behind the seat-back on
each side ofthe cargo compartment. Do not
remove the toothed washer (C) from the tether
anchor.
AI18 x 1.25 mm22 N.m {2.2 kgt m. 16lbfft)
lnstallthe anchors in the reverse order of removal.
f-..- t".i..].-
Page 1020 of 1139
sRs
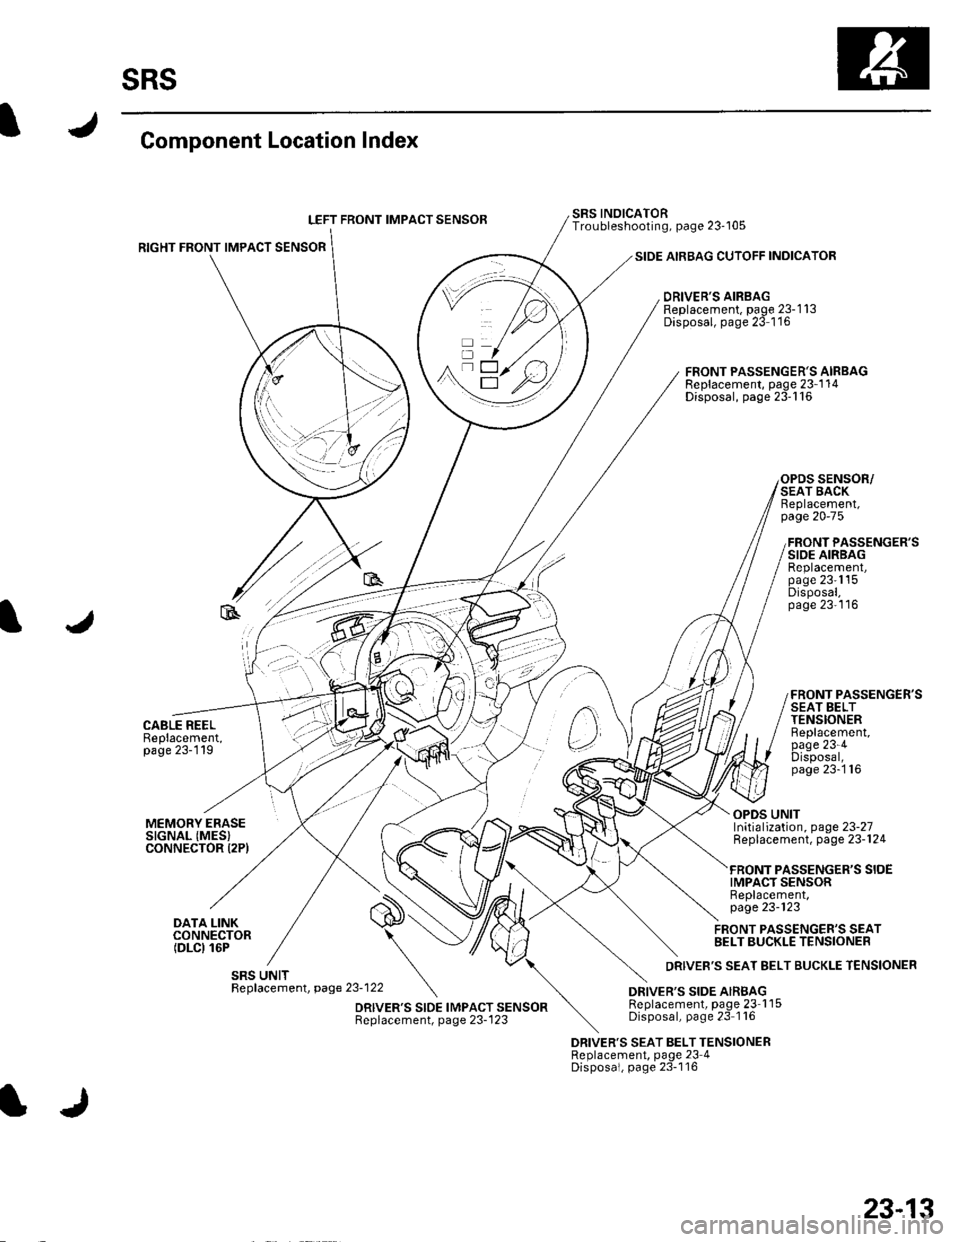
Component Location Index
LEFT FRONT IMPACT SENSOB
RIGHT FRONT IMPACT SENSOR
CABLE REELBeplacement,page 23-119
SIDE AIRBAG CUTOFF INDICATOR
DRIVER'S AIRBAGReplacement, page 23-1 13Disposal, page 23 1'16
SRS INOICATORTroubleshooting, page 23-105
FRONT PASSENGER'S AIRBAGReplacement, page 23-1 14Disposal, page 23'116
SENSOR/SEAT BACKReplacement,page 20-75
FRONT PASSENGER'SSIDE AIRBAGReplacement,page 23'1'15Disposal,page 23'116
FRONT PASSENGER'SSEAT BELTTENSIONERBeplacement,page 23-4Disposal,page 23-'116
MEMORY ERASESIGNAL (MES}CONNECTOR I2PI
DATA LINKCONNECTOR(DLCI 16P
OPDS UNITInitialization, page 23-27Replacement, page 23-124
PASSENGER'S SIOEIMPACT SENSORReplacement,page 23-123
FRONT PASSENGER'S SEATBELT BUCKLE TENSIONER
DRIVER'S SEAT BELT TENSIONERReplacement, page 23 4Disposal, page 23-116
23-13