service HONDA CIVIC 2002 7.G Owner's Guide
[x] Cancel search | Manufacturer: HONDA, Model Year: 2002, Model line: CIVIC, Model: HONDA CIVIC 2002 7.GPages: 1139, PDF Size: 28.19 MB
Page 143 of 1139
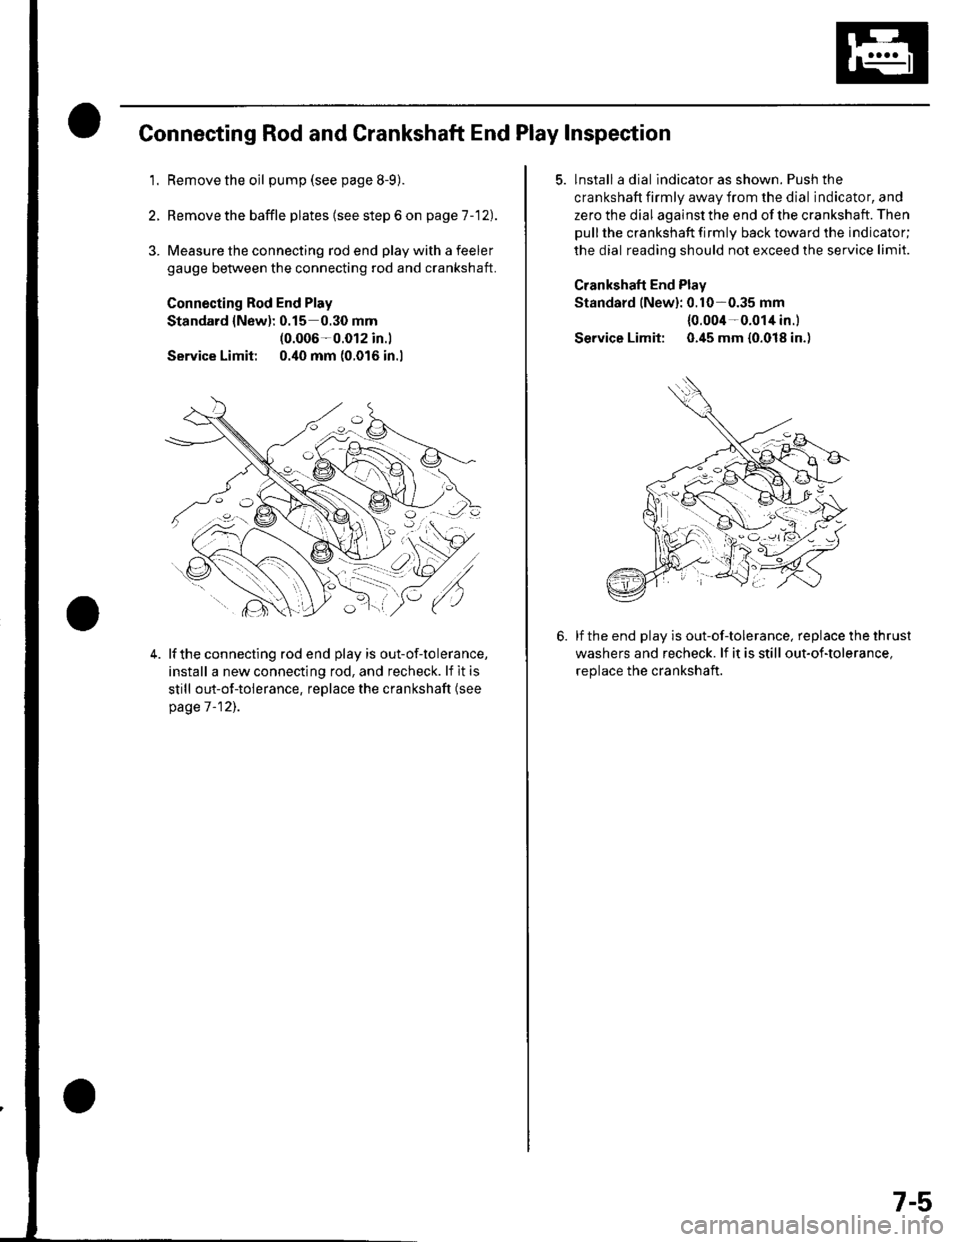
Connecting Rod and Crankshaft End Play Inspection
1.Remove the oil pump (see page 8-9).
Remove the baffle plates (see step 6 on page 1 -12).
3. Measure the connecting rod end play with a feeler
gauge between the connecting rod and crankshaft.
Connecting Rod End Play
Standard {New): 0.15 0.30 mm(0.006-0.012 in.l
Service Limit 0.40 mm (0.016 in.l
4.lf the connecting rod end play is out-of-tolerance,
install a new connecting rod, and recheck. lf it is
still out-of-tolerance, replace the crankshaft (see
page 7 -12],.
5. lnstall a dial indicator as shown. Push the
crankshaft firmly away from the dial indicator, and
zero the dial against the end of the crankshaft. Then
pull the crankshaft firmly back toward the indicator;
the dial reading should not exceed the service limit.
Crankshaft End Plav
Standard lNew): 0.10-0.35 mm
{0.004-0.014 in.l
Service Limit: 0.45 mm {0.018 in.)
lf the end play is out-of-tolerance, replace the thrust
washers and recheck. lf it is still out-of-tolerance,
replace the crankshaft.
7-5
Page 144 of 1139
Engine Block
Crankshaft Main Bearing Replacement
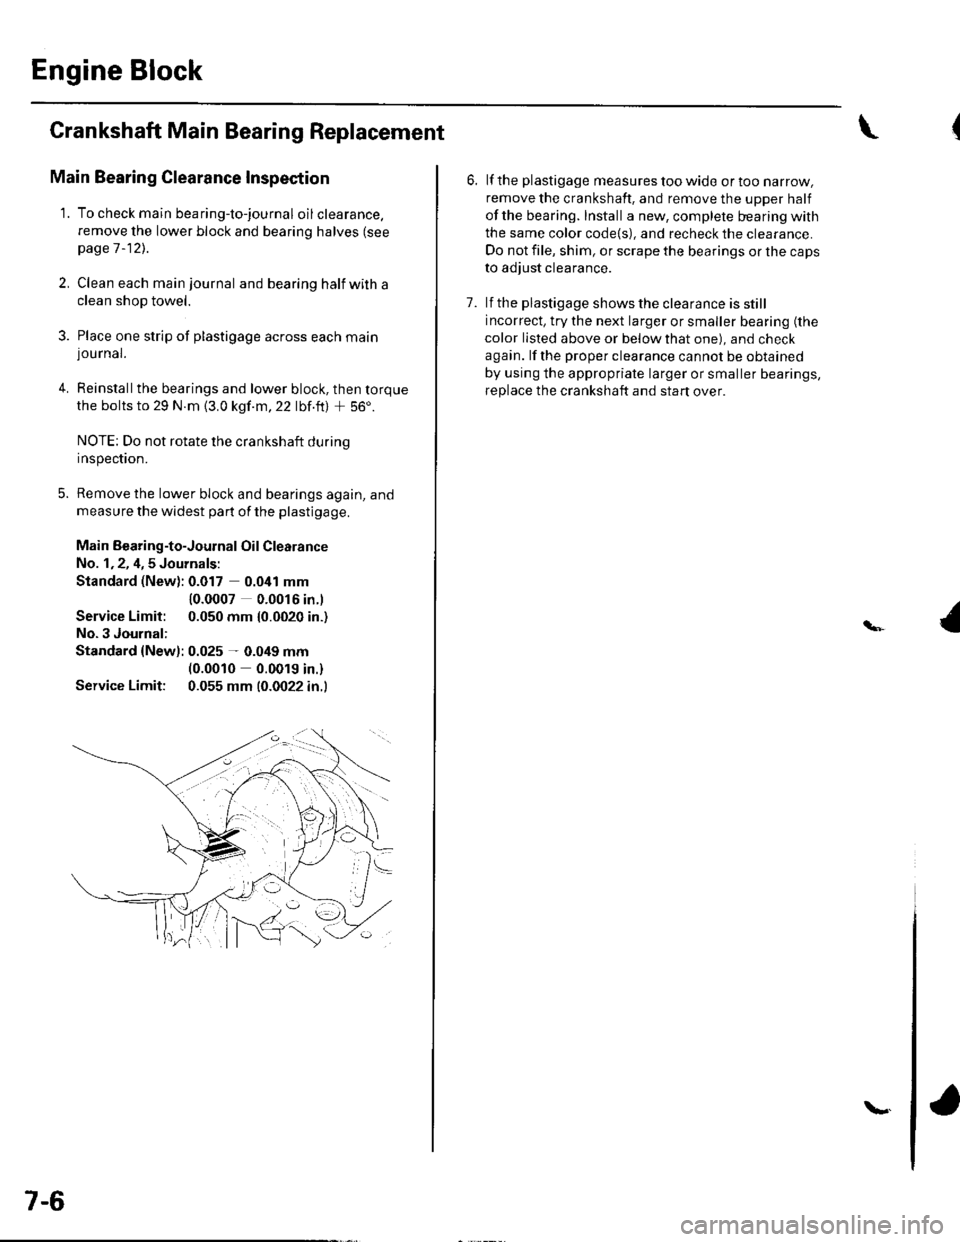
Main Bearing Clearance Inspection
1. To check main bea ring-to-jou rna I oil clearance.
remove the lower block and bearing halves (see
page 1 -12)..
2, Clean each main journal and bearing half witha
clean shop towel.
3. Place one strip of plastigage across each main
lou rnal.
4. Reinstallthe bearings and lower block, then torque
the bolts to 29 N.m {3.0 kgf.m,22 lbf.ft) + 56'.
NOTE: Do not rotate the crankshaft during
Inspeclton.
5. Remove the lower block and bearings again, and
measure the widest part of the plastigage.
Main Bearing-to-Journal Oil Clearance
No. 1,2, 4,5 Journals:
Standard (New): 0.017 0.041 mm
Service Limit:
No.3 Journal:
10.0007 0.0016 in.l
0.050 mm {0.0020 in.)
Standard {Newl: 0.025 - 0.049 mm(0.0010 0.0019 in.)
Service Limit: 0.055 mm (0.0022 in.l
7-6
\.
6. lf the plastigage measures too wide or too narrow,
remove the crankshaft. and remove the upper half
ofthe bearing. Install a new, complete bearing with
the same color code{s), and recheck the clearance.
Do not file, shim, or scrape the bearings or the caps
to adjust clearance.
7. lf the plastigage shows the clearance is still
incorrect, try the next larger or smaller bearing (the
color listed above or below that one), and check
again. lf the proper clearance cannot be obtained
by using the appropriate larger or smaller bearings,
replace the crankshaft and start over.
Page 146 of 1139
Engine Block
Crankshaft Main Bearing
Replacement (cont'd)
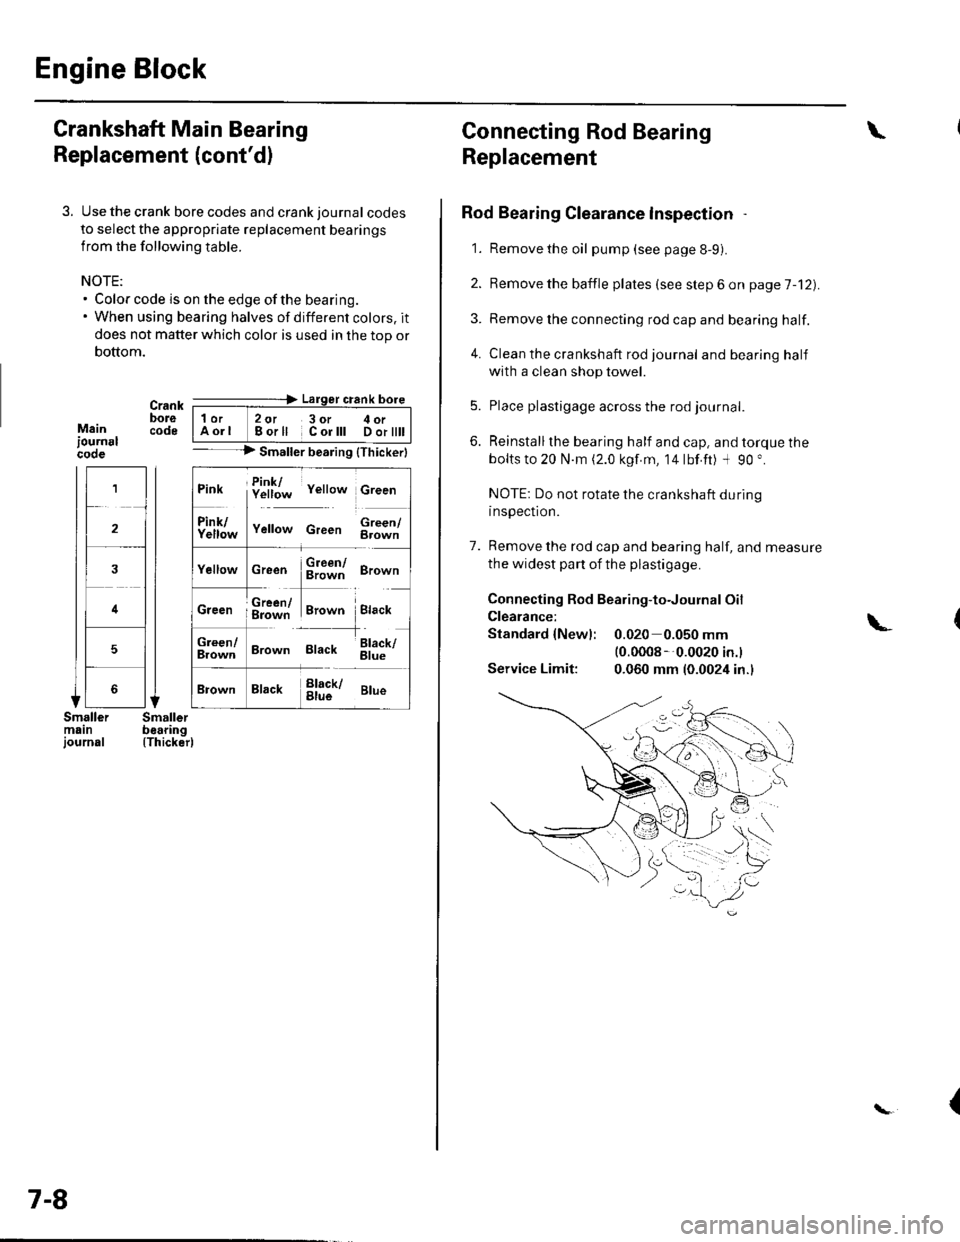
3. Use the crank bore codes and crank journal codes
to select the appropriate replacement bearings
from the following table.
NOTE:. Color code is on the edge of the bearing.. When using bearing halves of different colors. it
does not matter which color is used in the top or
bottom.
Mainiournslcooe
Crank ---=-> Lalger crank bore
bore | 1or 2ot 3or c oi__-lcode IAorl Borll Corlll Dortttt I-- --> Smaller bearing {Thickerl
(Thicker)
1
2
4
5
Pink f!1f;* v"rro* c,""n
ll
f111f;,," v"no* c,""" $;;fl
cr""n $ffi ero-n
ffi#Tr,.*" i.,""*Creen ; g=jiff;i Brown Black
;;lT]*
'---l-'o"*,
Brown Black 6il;
Brack !l;kr ar*
7-8
Connecting Rod Bearing
Replacement
Rod Bearing Clearance lnspection
1. Remove the oil pump (see page 8-9).
2. Bemove the baffle plates (see step 6 on page 7-12).
3. Remove the connecting rod cap and bearing half.
4. Clean the crankshaft rod journal andbearinghalf
with a clean shop towel.
5. Place plastigage across the rod journal.
6. Reinstallthe bearing half and cap, and torque the
bolts to 20 N.m (2.0 kgf.m, 14lbf.ft) -l 90 ".
NOTE: Do not rotate the crankshaft during
inspection.
7. Remove the rod cap and bearing half, and measure
the widest part of the plastigage.
Connecting Rod Bearing-to-Journal Oil
Clearance:
Standard {Newl: 0.020 0.050 mm(0.0008 --0.0020 in.l
Service Limit: 0.060 mm (0.0024 in.)
\
\-
{
Page 152 of 1139
Engine Block
Crankshaft lnspection
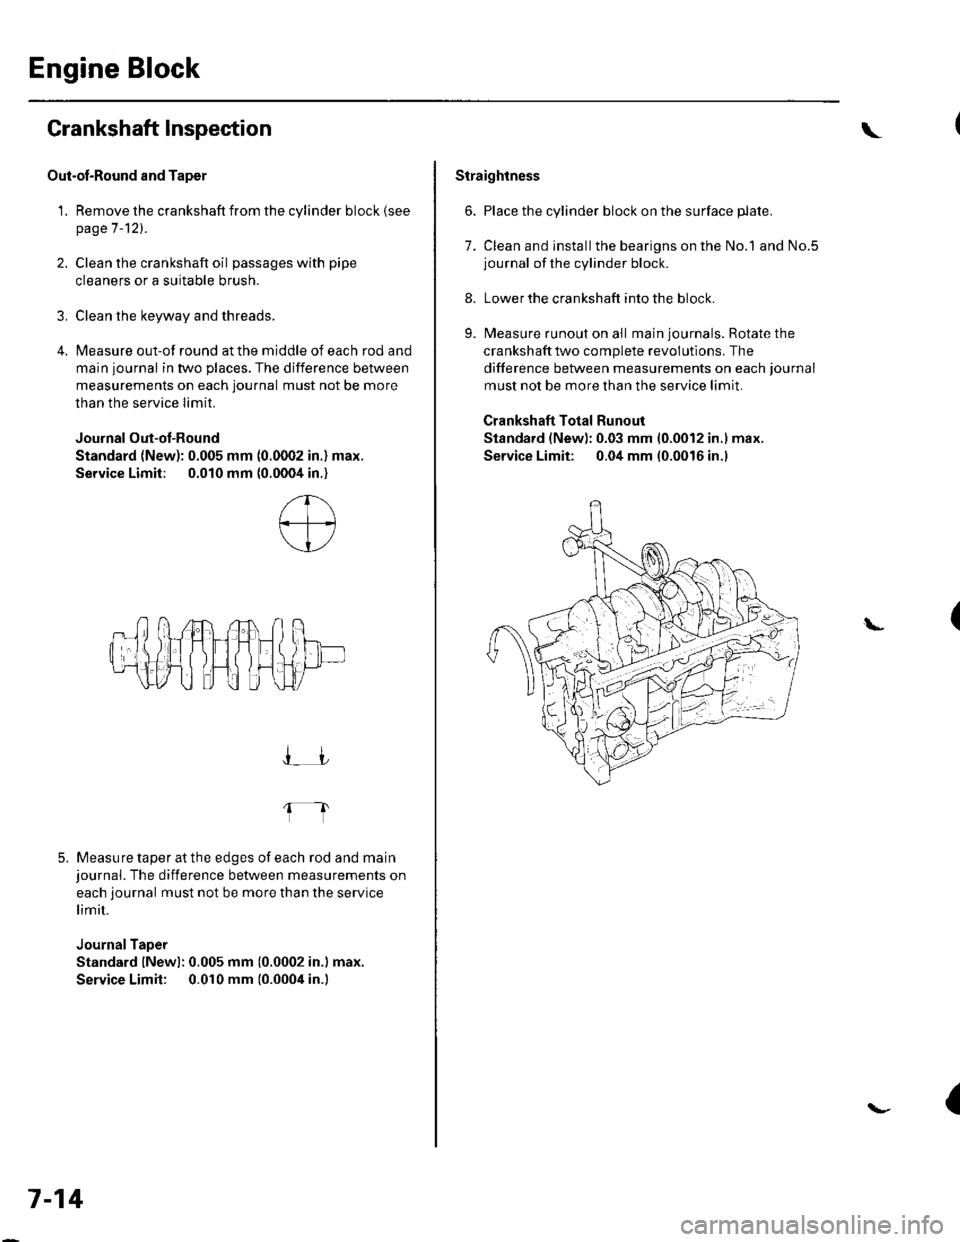
Out-ol-Round and Taper
1. Remove the crankshaft from the cylinder block (see
page 7-121.
2. Clean the crankshaft oil passages with pipe
cleaners or a suitable brush.
3. Clean the keyway and threads.
4. Measure out-of round at the middle of each rod and
main journal in two places. The difference between
measurements on each journal must not be more
than the service Iimit.
Journal Out-ot-Round
Standard (New): 0.005 mm (0.0002 in.) max.
Service Limit; 0.010 mm (0.0004 in.)
5. Measure taper at the edges of each rod and mainjournal. The difference between measurements on
each journal must not be more than the service
limit.
JournalTaper
Standard lNewl: 0.005 mm (0.0002 in.) max.
Service Limit: 0.010 mm {0.0004 in.)
I_JJ
fl
7-14
\
Straightness
6. Place the cylinder block on the surface plate.
7. Clean and installthe bearigns on the No.1 and No.5journal of the cylinder block.
8. Lower the crankshaft into the block.
9. Measure runout on all main journals. Rotate the
crankshaft two complete revolutlons. The
difference between measurements on each journal
must not be more than the service limit.
Crankshaft Total Runout
Standard (New): 0.03 mm 10.0012 in.l max.
Service Limit: 0.04 mm (0.0016 in.l
(L
{
Page 153 of 1139
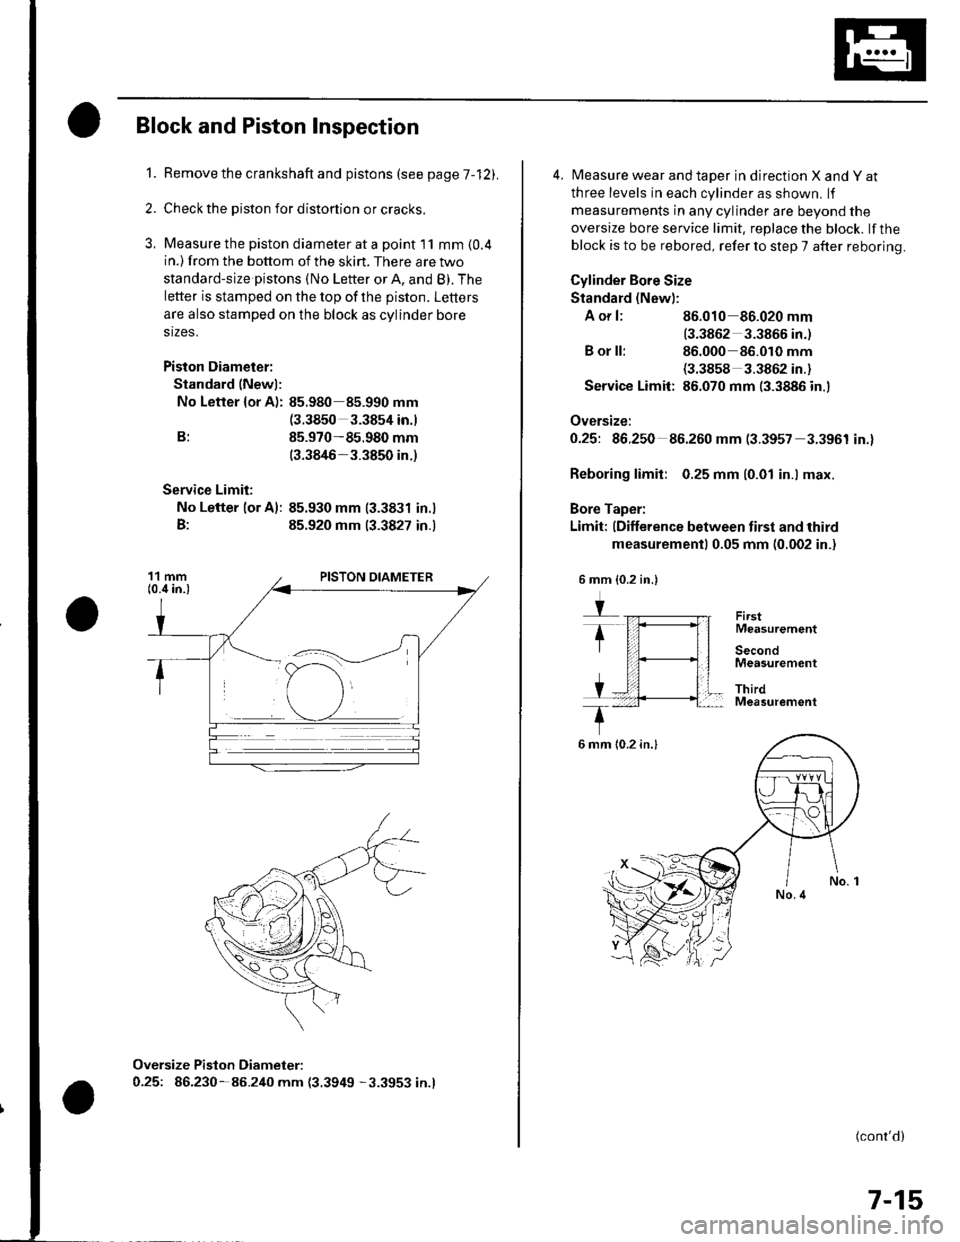
1.
Block and Piston Inspection
Remove the crankshaft and pistons (se e pageT -121.
Check the piston for distortion or cracks,
Measure the piston diameter at a point I1 mm {0.4in.) from the bottom of the skirt. There are two
standard-size pistons (No Letter or A, and B). The
letter is stamped on the top of the piston. Letters
are also stamped on the block as cylinder bore
stzes.
Piston Diameter:
Standard (Newl:
No Letter {or A): 85.980 85.990 mm(3.3850 3.3854 in.)
B: 85.970-85.980 mm(3.3846-3.3850 in.)
Service Limit:
No Lefter lor A): 85.930 mm (3.3831 in.)
B: 85.920 mm 13.3827 in.)
Oversize Piston Diameter:
0.25: 86.230-85.240 mm (3.3949 -3.3953 in.l
4. Measure wear and taper in direction X and Y at
three levels in each cylinder as shown. lf
measurements in any cylinder are beyond the
oversize bore service limit. replace the block. lf the
block is to be rebored, refer to step 7 after reboring.
Cylinder Bore Size
Standard (New):
A or l: 86.010 86.020 mm
13.3862 3.3866 in.)
B or ll: 86.000 86.010 mm(3.3858 3.3862 in.)
Service Limit: 86.070 mm (3.3886 in.)
Oversize:
O.25t 96.250 86.260 mm (3.3957 3.3961 in.)
Reboring limit: 0.25 mm (0.01 in.l max.
Bore Taper:
Limit: (Difference between first and third
measurement) 0.05 mm (0.002 in.)
FirstMeasurement
SecondMeasutement
ThirdMeasurement
(cont'd)
7-15
6 mm {0.2 in.}
6 mm {0.2 in.}
Page 154 of 1139
Engine Block
Block and Piston Inspection (cont'd)
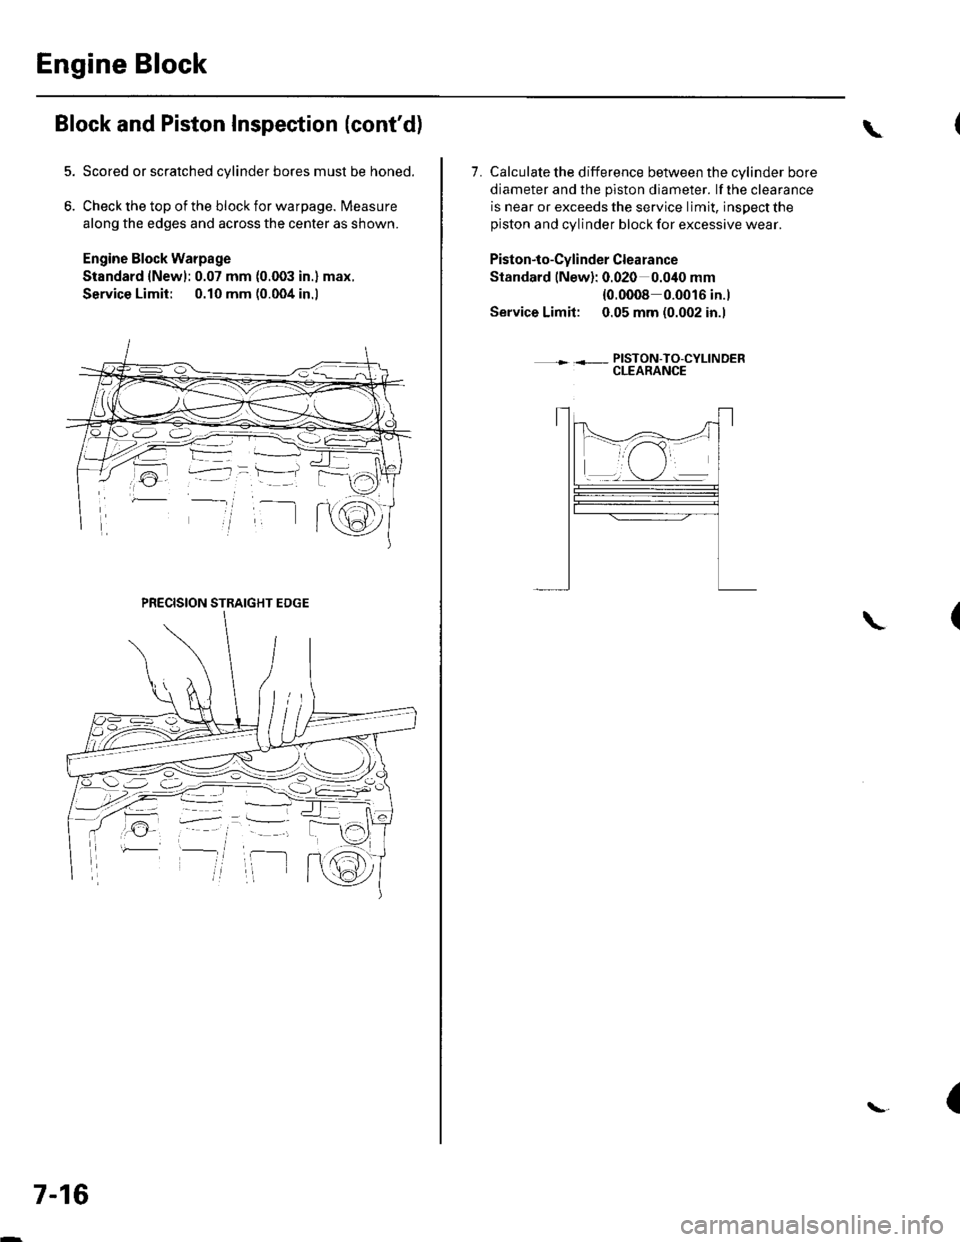
Scored or scratched cylinder bores must be honed.
Check the top of the block for warpage. Measure
along the edges and across the center as shown.
Engine Block Warpage
Standard lNew): 0.07 mm (0.003 in.) max.
Service Limit: 0.10 mm (0.004 in.l
PRECISION STRAIGHT EDGE
7-16
\
7. Calculate the difference between the cylinder bore
diameter and the plston diameter. lf the clearance
is near or exceeds the service limit, inspect thepiston and cvlinder block for excessive wear.
Piston-to-Cylinder Clearance
Standard lNew): 0.020 0.040 mm
{0.0008 0.0016 in.)
Service Limit: 0.05 mm (0.002 in.l
++ PISTON-TO-CYLINDERCLEARANCE
\
(
Page 155 of 1139
Cylinder Honing
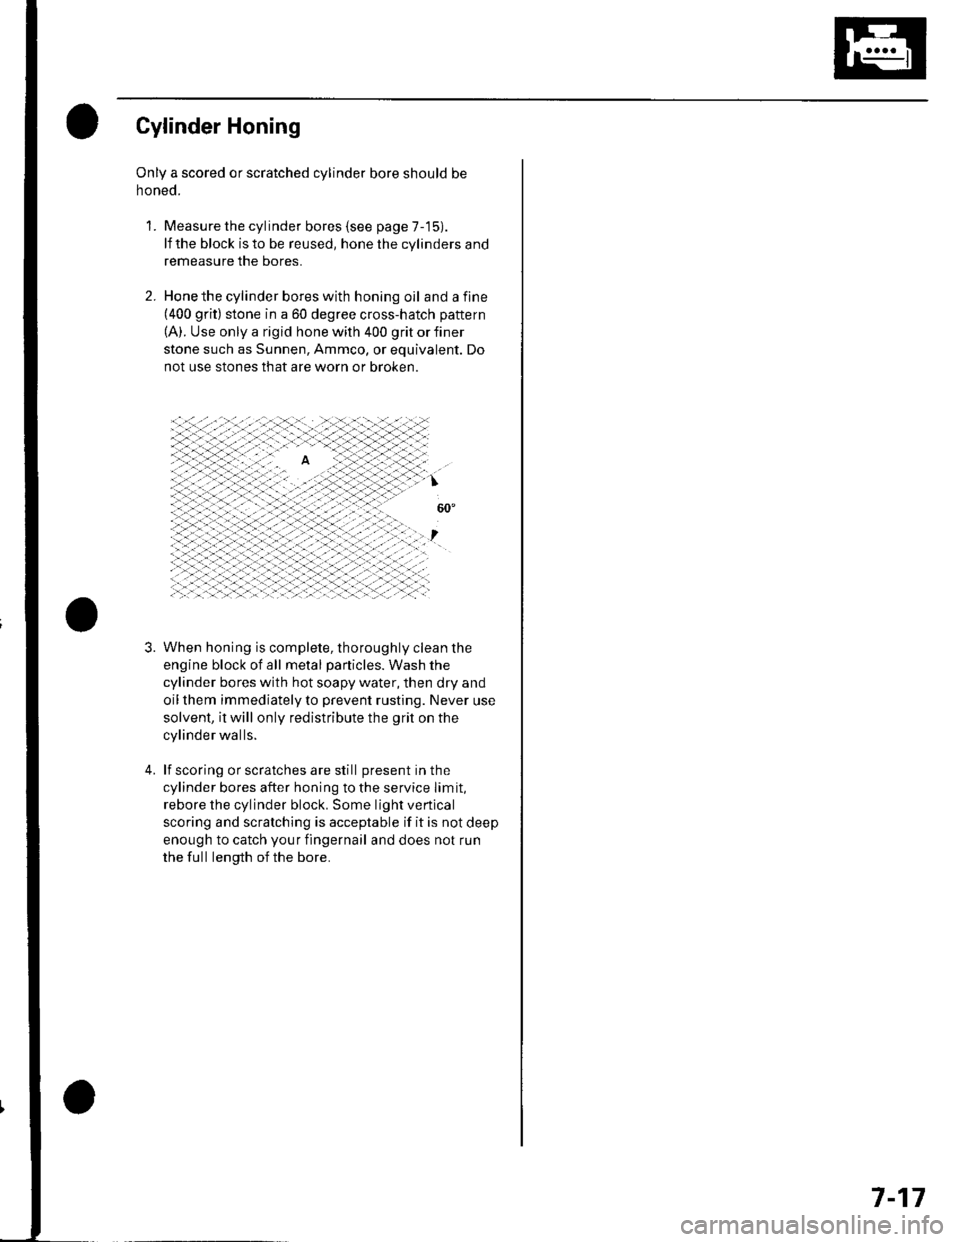
Only a scored or scratched cylinder bore should be
noneo.
Measure the cylinder bores {see page 7-15).
lf the block is to be reused, hone the cylinders and
remeasure the bores.
Hone the cylinder bores with honing oil and a fine(400 grit) stone in a 60 degree cross-hatch pattern
(A). Use only a rigid hone with 400 grit or finer
stone such as Sunnen, Ammco, or equivalent. Do
not use stones that are worn or broken.
When honing is complete, thoroughly clean the
engine block of all metal particles. Wash the
cylinder bores with hot soapy water, then dry and
oil them immediately to prevent rusting. Never use
solvent, it will only redistribute the grit on the
cylinder walls.
lf scoring or scratches are still present in the
cylinder bores after honing to the service limit,
rebore the cylinder block. Some light vertical
scoring and scratching is acceptable if it is not deep
enough to catch your fingernail and does not run
the full length of the bore.
'L
3.
7-17
Page 157 of 1139
v
Inspection
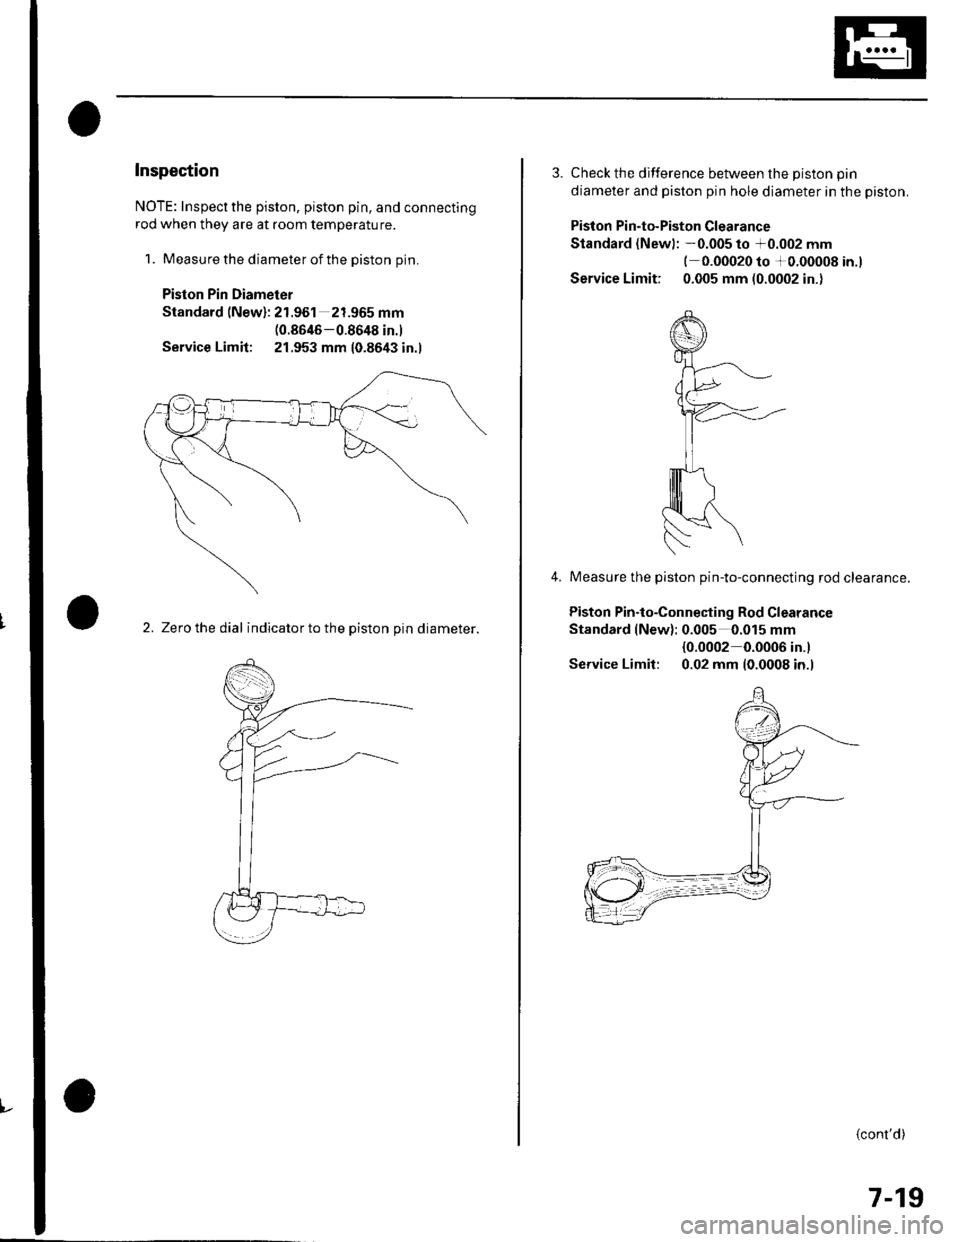
NOTE: Inspect the piston, piston pin, and connecting
rod when they are at room temperature.
1. Measure the diameter of the piston pin.
Piston Pin Diameter
Standard (New): 21.961 21.965 mm(0.8646-0.8648 in.)
Service Limit: 21.953 mm 10.8643 in.l
2. Zerc the dial indicator to the piston pin diameter.
3. Check the difference between the Diston Din
diameter and piston pin hole diameter in the piston.
Piston Pin-to-Piston Clearance
Standard (Newl: -0.005 to +0.002 mm(-0.00020 to +0.00008 in.)
Service Limit: 0.005 mm (0.0002 in.)
Measure the piston pin-to-connecting rod clearance.
Piston Pin.to-Connecting Rod Clearance
Standard (New): 0.005 0.015 mm
{0.0002 0.0006 in.}
Service Limil: 0.02 mm (0.0008 in.l
4.
(cont'd)
7-19
Page 159 of 1139
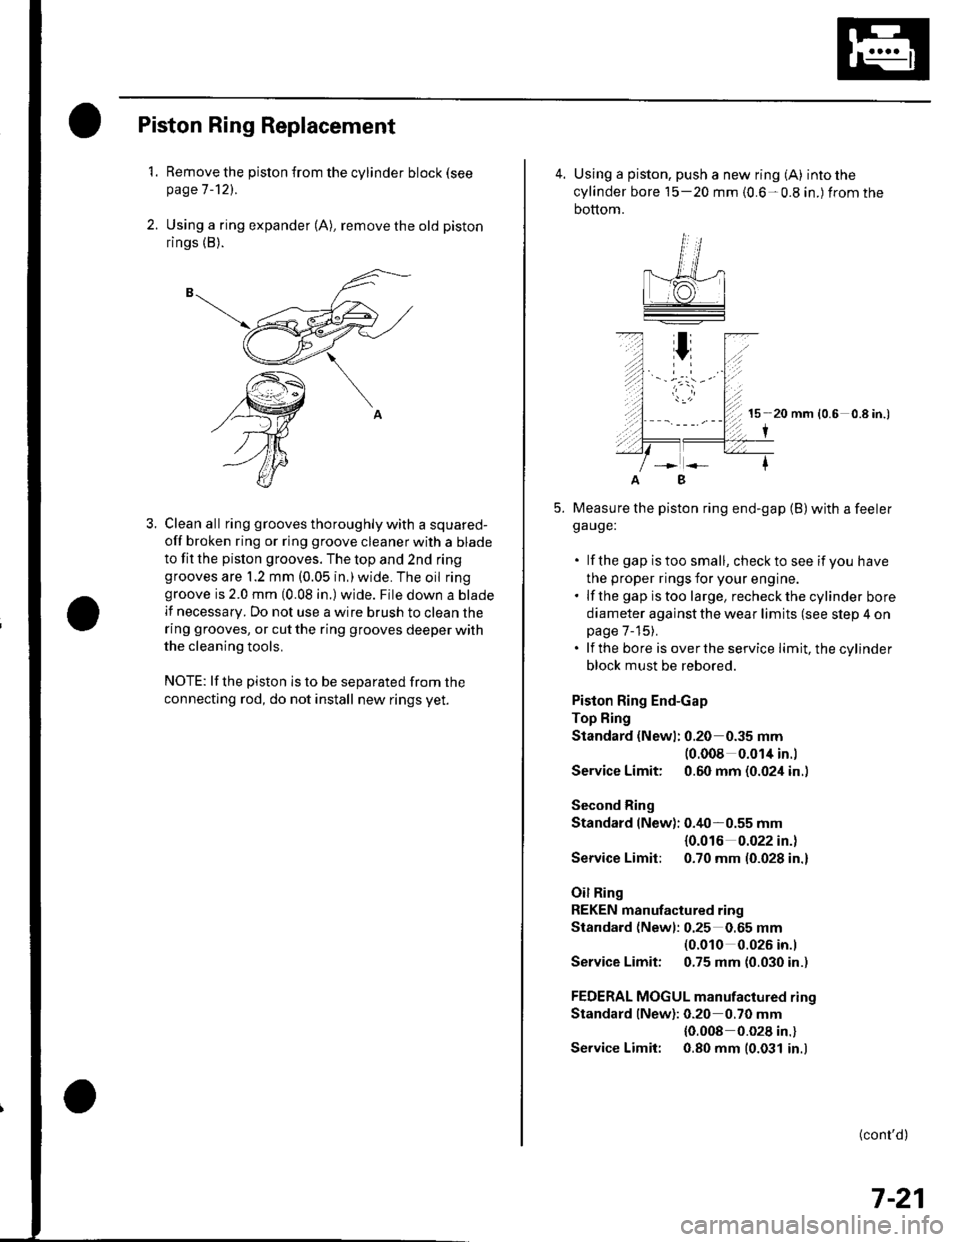
Piston Ring Replacement
1. Remove the piston {rom the cylinder block (see
page 7 -121.
2. Using a ring expander (A), remove the old piston
rings (B).
3. Clean all ring grooves thoroughly with a squared-
off broken ring or ring groove cleaner with a blade
to fit the pislon grooves. The top and 2nd ringgrooves are 1.2 mm (0.05 in,)wide. The oil ringgroove is 2.0 mm (0.08 in.) wide. File down a blade
lf necessary. Do not use a wire brush to clean the
ring grooves, or cut the ring grooves deeper with
the cleaning tools.
NOTE: lf the piston is to be separated from the
connecting rod, do not install new rings yet.
4. Using a piston, push a new ring (A) into the
cylinder bore 15-20 mm {0.6-0.8 in.) from the
bottom.
15 20 mm (0.6 0.8 in.)
I
Measure the piston ring end-gap (B) with a feelerga uge:
. lf the gap istoo small, checkto see if you have
the proper rings for your engine.. lf the gap istoo large, recheckthecylinder bore
diameter against the wear limits (see slep 4 onpage 7-15).. lf the bore is overthe service limit, the cylinder
block must be rebored.
Piston Ring End-Gap
Top Fing
Standard (Newl: 0.20 0.35 mm(0.008 0.014 in.l
Service Limit: 0.60 mm (0.024 in..
Second Ring
Standard (New): 0.40-0.55 mm
{0.016 0.022 in.)
Service Limit: 0.70 mm (0.028 in.)
Oil Ring
REKEN manufactured ring
Standard (Newl: 0.25 0.65 mm(0.010 0.026 in.l
Service Limit: 0.75 mm (0.030 in.)
FEDERAL MOGUL manufactured rino
Standard lNew): 0.20 0.70 mm
{0.008 0.028 in.}
Service Limit: 0.80 mm (0.031 in.)
B
(cont'd)
7-21
Page 160 of 1139
Engine Block
Piston Ring Replacement (cont'd)
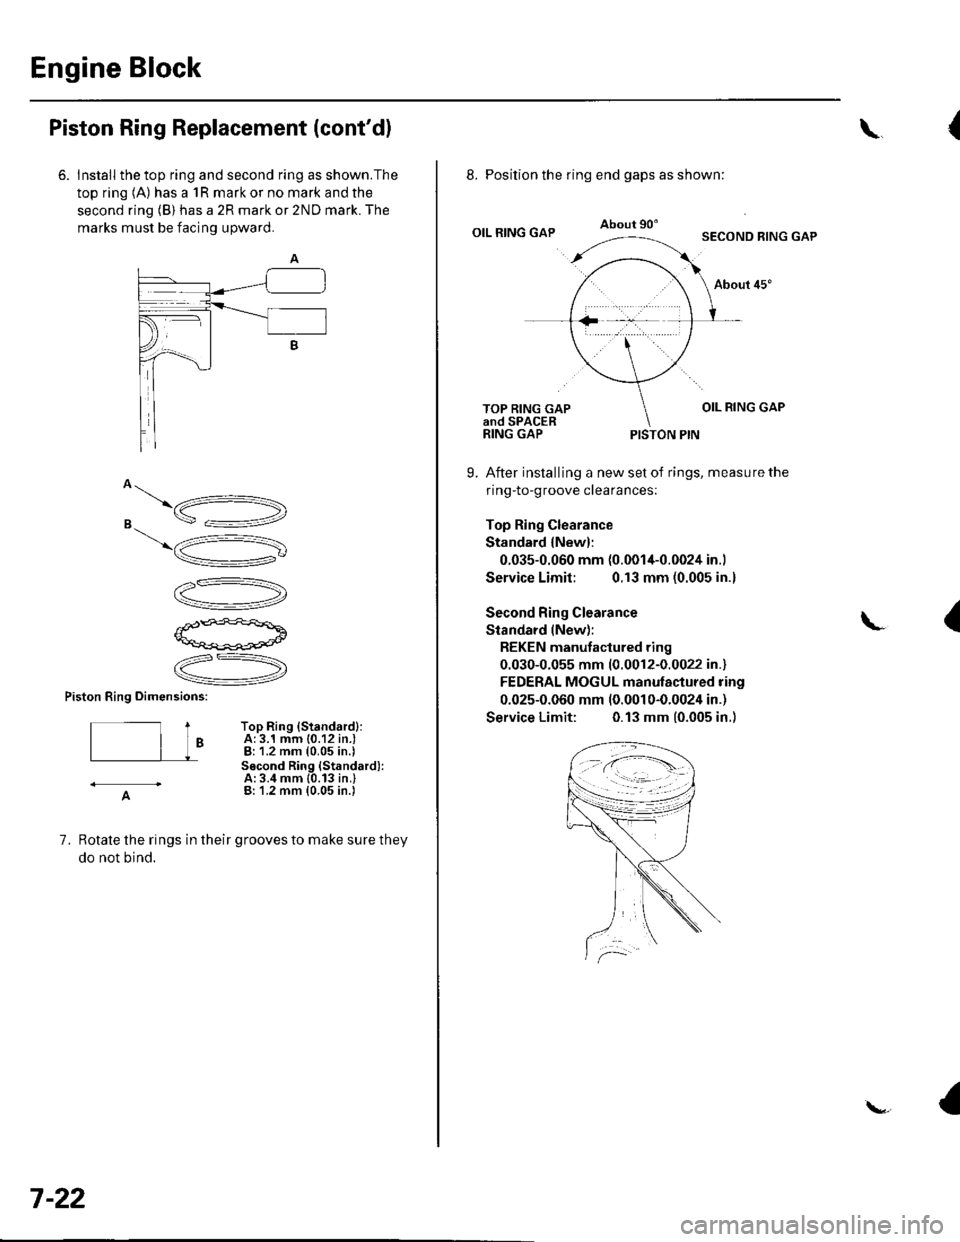
6. Install the top ring and second ring as shown.The
top ring (A) has a 1R mark or no mark and the
second ring (B) has a 2R mark or 2ND mark. The
marks must be facing upward.
o\,"16.
s =:-=2
\5
V"
12-)V
P'ffi+a\aq*-pogd
.ZR,
V
Piston Ring oimensions:
t ToP Ring {Standardl:| | o A: 3.1 mm {0.12 in.l
| | J - B:1.2 mm {0.05 in.)Socond Ring {Standard):A:3.4 mm {0.13 in.}- A- B:'1.2 mm (0.05 in.i
7, Rotate the rings in their grooves to make sure they
do not bind.
7-22
\{
8. Position the ring end gaps as shown:
OIL RING GAPAbout 90'SECOND RING GAP
About 45"
OIL RING GAPTOP RING GAPand SPACERRING GAPPISTON PIN
9. After installing a new set of rings, measure the
ring-to-groove clearances:
Top Ring Clearance
Standard {New}:
0.035-0.060 mm {0.0014-0.0024 in.)
Service Limit: 0.13 mm (0.005 in.)
Second Ring Clearance
Standard lNew):
REKEN manutactured ring
0.030-0.055 mm (0.0012-0.0022 in.)
FEDERAL MOGUL manulactured ring
0.025-0.060 mm (0.001 0-0.0024 in.)
Service Limit: 0.13 mm (0.005 in.)
{